ECVrr Manuale del Software di Configurazione - Configuration Software Manual - Fantini Cosmi
←
→
Trascrizione del contenuto della pagina
Se il tuo browser non visualizza correttamente la pagina, ti preghiamo di leggere il contenuto della pagina quaggiù
ECVRR

Manuale del software
di configurazione
Configuration Software Manual
Indice
Table of Contents

Introduzione .......................................................................................... pag. 3      Introduction ................................................................................................ page 3

1. Installazione del software ................................................................. pag. 4              1. Installation of the software .................................................................. page 4

2. Configurazione ................................................................................... pag. 9        2. Configuration ......................................................................................... page 9

3. Moduli ............................................................................................... pag. 14   3. Signature editors ................................................................................ page 14

                                                                                                                                                                                                                                           2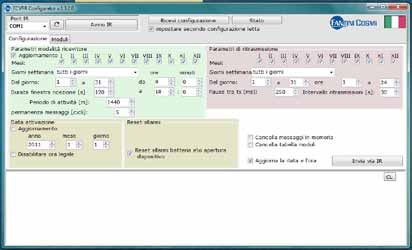
Introduzione

                                                                                                                                                      E C V RR
Introduction

Introduzione                                                                                Introduction

Il software descritto nel presente manuale consente di configurare i parametri di           The software described in this manual is designed to configure the working parameters
funzionamento dei ripetitori ECVRR prodotti da Fantini Cosmi.                               of the ECVRR relays produced by Fantini Cosmi.
All’interno del manuale i nomi dei pulsanti o voci del programma sono sempre riportati in   If in the manual is talk about a button or indicator in the program, always their name is
grassetto, per esempio: Pulsante.                                                           written using bold font, for example: Button.

Requisiti di sistema per l’utilizzo del programma                                           System requirements
•   Sistema Operativo                                                                       •   Operating System
    Windows 7, Windows Server 2003 SP2, Windows Server 2008, Windows Server 2008                Windows 7, Windows Server 2003 SP2, Windows Server 2008, Windows Server 2008
    R2, Windows Vista SP1, Windows XP SP3.                                                      R2, Windows Vista SP1, Windows XP SP3.
•   Requisiti Hardware                                                                      •   Hardware requirements
    CPU: x86\x64 bit 1,5 GHz (consigliato>1, 6GHz)                                              CPU:x86\x64 bit 1,1 GHz (>1,6 GHz recommended)
    RAM 1GB (consigliato 2GB)                                                                   RAM 1GB (recommended 2GB)
    850 MB di spazio libero sul disco libero(consigliato 2GB).                                  850 MB HD free space (recommended 2GB)
•   Requisiti Software                                                                      •   Software Requirements
    Microsoft .NET Framework4.0 (se non installato è necessario disporre di una                 Microsoft .NET Framework4.0 (if not installed on the system, it’s requested a working
    connessione ad internet attiva durante l’installazione).                                    internet connection).

                                                                                                                                                                                        3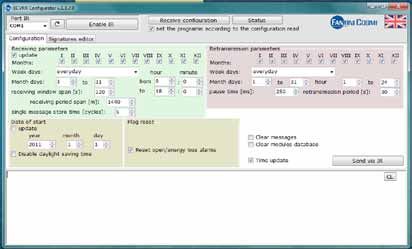
1. Installazione del software
1. Software Installation

1. installazione del software                                                                 1. SOFTWARE INSTALLATION

Inizio dell’installazione                                                                     Begin of installation
Per procedere con l’installazione del software ECVRR Configurator nel vostro computer,        To start with installation of the ECVRR Configurator on you system, copy the content of
estrarre il contenuto della cartella compressa ECVRR Configurator[version_number]             the compressed folder ECVRR Configurator[version_number] setup.zip into a local fonder
setup.zip in una cartella locale del computer in uso (per esempio il desktop di windows).     of the computer you would use (for example the Windows desktop). Then launch the
Successivamente avviare l’installazione facendo doppio click sull’icona dell’installer        installation process double-clicking the installer icon ECVRR Configurator.msi
ECVRR Configurator.msi

Se compare la finestra mostrata di seguito, accettare scegliendo Accept, verrà scaricato il   If it will compares the windows showed above, accept choosing Accept, it will be downloaded
componente Microsoft .NET Framework 4 (x86 o x64) necessario per il funzionamento del         the .NET Framework 4 (x86 or x64) component, needed to the correct working of the
software (accertarsi che il PC abbia a disposizione una connessione internet funzionante).    software (check if there is an internet connection available for the PC). If the component is
Se il componente è già presente nel vostro computer non comparirà alcuna finestra di          already installed on your system it will not appears any windows.
questo tipo.

                                                                                                                                                                                         4
1. Installazione del software

                                                                                                                                                   E C V RR
1. Software Installation

Una volta che l’installazione del componente .NET Framework sarà terminata avrà inizio il   Once installation of .NET Framework will finished the installation process of the ECVRR
processo d’installazione del software ECVRR Configurator.                                   Configurator software will begin.

Scegliere Next e proseguire.                                                                Tap Next and proceed.

                                                                                                                                                                                 5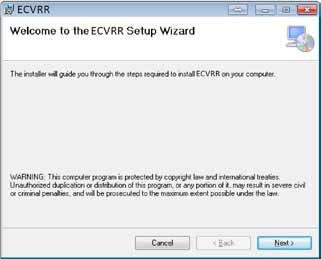
1. Installazione del software
1. Software Installation

Tap Next and proceed.           Tap Next and proceed.

                                                        6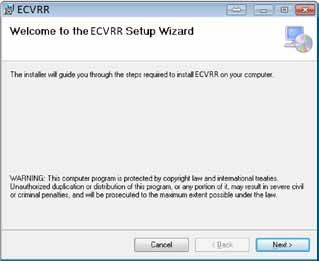
1. Installazione del software

                                                                                                                                  E C V RR
1. Software Installation

Scegliere la directory di installazione, premere Next e procedere.   Chose the folder for the installation, push Next and proceed.

Scegliere Next ed avrà inizio la copia dei file dell’applicazione.   Chose Next and it will start the copy of the application file.

                                                                                                                                         7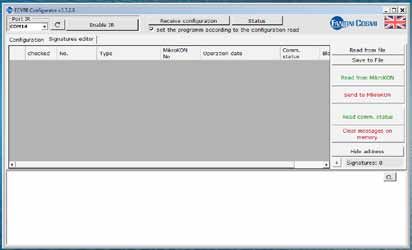
1. Installazione del software
1. Software Installation

L’installazione terminerà con la visualizzazione della finestra sopra riportata, scegliere   The installation ends with the window showed above, tap Close.
Close.
Saranno state create rispettivamente:                                                        It will be created respectively:

•   un’icona del programma sul Desktop                                                       •   One desktop shortcut icon

•   Un nuovo gruppo di programmi nominato Fantini Cosmi all’interno del quale ritroviamo     •   A new program group named Fantini Cosmi containing another group called ECVRR
    il gruppo ECVRR Configurator con il relativo collegamento all’avvio del programma.           Configurator with relative icon for launching the application.

                                                                                                                                                                            8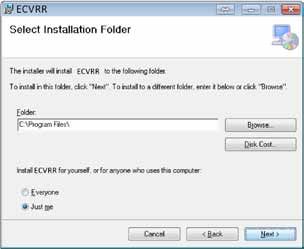
2. CONFIGURAZIONE
E C V RR
2. CONFIGURATION
2. Configurazione 2. Configuration
Il processo di configurazione è effettuato tramite operazioni di lettura e scrittura. Configuration process is performed by reading and writing operation.
Per effettuare le operazioni di comunicazione (lettura o scrittura) verso l’ECVRR, è richiesto To perform communication (reading or writing) to the ECVRR, it is required to connect the
di connettere l’interfaccia ottica (cod. Fantini Cosmi ECVUSBO) al PC (è necessario optical interface (cod. Fantini Cosmi ECVUSBO) to the PC (a driver installation is required,
installare un driver, far riferimento al manuale del prodotto ECVUSBO) refer to the ECVUSBO product manual)
L’interfaccia ottica necessita di essere messa a contatto con la porta ottica del Ripetitore The optical interface need to be contacted with the optical port of the Repeater as showed
come mostrato in figura. in the below picture.
Una volta che l’ECVUSBO è stato messo in contatto con la porta ottica dell’ECVRR è Once the ECVUSBO is in contact with the ECVRR optical port it is possible to perform
possibile comunicare con il PC verso e dal Repitore. communication operation between PC and the Repeater.
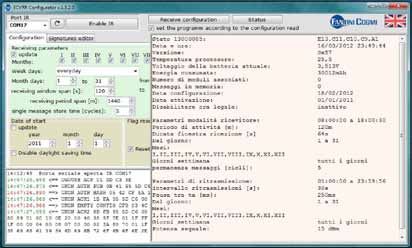
Scheda di configurazione
La finestra è utilizzata per determinare i parametri di funzionamento del ripetitore. Configuration Tab
In questa schermata vengono impostati i parametri operativi del ripetitore. The window is used to determine the modules functioning parameters. In this screen you
set the operating parameters of the repeater.
9
2. CONFIGURAZIONE
2. CONFIGURATION
Descrizione dei pulsanti/caselle disponibili: Available buttons and features:
• Porta IR - elenco delle porte seriali del computer - permette di scegliere la porta a • Port IR – List of the computer serial ports - allows the selection of the COM port to
cui è connessa l’interfaccia ottica. Quando la comunicazione sarà avviata, il numero which the Optical Head has been connected. When commu-nication is activated the
della porta sarà memorizzato nel programma e in un futuro riavvio del computer sarà port number gets memorized and at the following start up will be selected from the
selezionato di default dall’elenco. list by default.
• Avvio IR - attiva il servizio di comunicazione dati sulla porta selezionata. L’invio \ rice- • Enable IR – enables the communicating data service on the selected port. The data
zione dei dati deve essere portato a termine mantenendo a contatto la Optical Head con communication must be performmed keeping the Optical Head in contact with the op-
la porta ottica del ripetitore. tical interface on the repeater (front side).
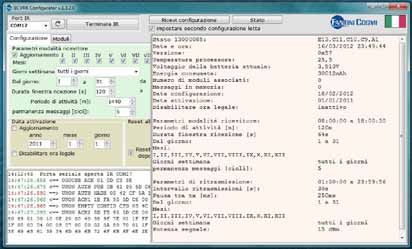
• Ricevi configurazione – una volta avviata la comunicazione IR il software riceve la con- • Receive configuration – Once IR Communication was enabled, pushing that button the
figurazione dal ripetitore premendo questo pulsante. software receives the configuration from the repeater.
• Impostare secondo configurazione letta – selezionando la casella, il software si confi- • Set the program according to the configuration read – tick the checkbox to auto-con-
gurerà automaticamente secondo i parametri acquisiti dal ripetitore. figure the software according to the parameters of the repeater.
• Status – effettua un’operazione di lettura della memoria del ripetitore e mostra lo stato • Status – it performs a reading operation of the repeater’s memory and shows the repe-
del dispositivo. I parametri letti sono mostrati all’interno di un rettangolo bianco nella ater’s general status. The parameters red are showed into a white square on the right
destra della finestra. side of the window.
102. CONFIGURAZIONE
E C V RR
2. CONFIGURATION
• Cancella messaggi in memoria – selezionando la casella verranno eliminati i messag- • Clear messages – tick the checkbox to delete the stored messages into the repeater’s
gi di memorizzati nella memoria del ripetitore. memory.
• Cancella tabella moduli – selezionare la casella per eliminare il database dei moduli • Clear module database – tick the checkbox to delete the modules database actually
salvato all’interno della memoria del ripetitore. saved into the repeater’s memory.
• Aggiorna la data e l’ora – permette di aggiornare data e ora basandosi sull’ora del PC • Time update – it allows to update time and date according to the PC’s clock.
con cui si sta configurando il ripetitore.
• Send via IR - allows the transmission of the set parameters to the ECVRR.
• Invia via IR - permette la trasmissione dei parametri configurati all’ECVRR.
Parametri modalità ricevitore Receiving parameters
Il ripetitore è progettato per effettuare una lettura al giorno, è possibile configurarlo per The repeater is designed to perform one reading per day, more than one reading per day is
effettuare più di una lettura al giorno, ma è sconsigliato a causa dell’aumento dei consumi possible but it’s not recommended due to the bigger battery consumption.
di batteria.
• Update - when the checkbox is tick, it allows to update the data below
• Aggiornamento – quando la casella è selezionata, permette di aggiornare i parametri
del ripetitore con quelli sottostanti. • Months – By tick the checkboxes (I→XII) you can determine in which months the
repeater will receive the information broadcasted by modules.
• Mesi – Selezionando le caselle (I→XII)si può determinare durante quali mesi il ripeti-
tore riceverà le informazioni trasmesse dai moduli. • Week days – by selecting the available options you can choose in which days of the
week receive the information.
112. CONFIGURAZIONE
2. CONFIGURATION
• Giorni settimana – selezionando le opzioni disponibili dal menu a tendina si può • Month days – it allows to select the month period in which the repeater receives the
determinare durante quali giorni della settimana ricevere le informazioni. data.
• Dal/al giorno – permette di selezionare il periodo del mese in cui ricevere i dati. • From/to – it allows to select the time in which the repeater receives the data.
• Da/a – permette di selezionare la fascia oraria in cui ricevere i dati. • Receiving window span – (default 120 seconds) it is the period in which the repeater
acquires the data from the modules. If module are programmed to send a telegramm
• Durata finestra ricezione – (default 120 secondi) è il periodo di tempo nel quale il
every 30 seconds, the default settings determine the possibility to have 4 transmission
ripetitore acquisirà i dati dai vari moduli. Se i moduli sono programmati per trasmettere
during the reception window.
un telegramma ogni 30 secondi, l’impostazione di default permette di avere la
possibilità di ricevere 4 trasmissioni durante questa finestra di ricezione. • Interval between listening session – (default 1440 minutes), this is the period between
two listening window. As default it is set to 24h. It means that every 24h as default
• Periodo di attività – (default 1440 minuti) è il periodo tra due sessioni di ricezione.
settings the repeater listens the broadcsted signal for 120 seconds.
Nell’impostazione di default è 24h. Ciò prevede che ogni 24h il ripetitore ascolti i
segnali trasmessi dai moduli per 120 secondi. • Single message store time [cycles] – (default 5) if by a period of activity to another
the repeater is not receiving data from a transmitting module, the previous message
• Permanenza messaggi [cicli] – (default 5) se da un periodo di attività all’altro il
recepted and stored is transmitted by the repeater, up to a maximum of 5 cycles (in the
ripetitore non riceve dati da un modulo trasmettitore, il messaggio precedentemente
case of default), after which the stored message will delete and the signal related to
acquisito e memorizzato viene trasmesso dal ripetitore per un massimo di 5 cicli
that module is no more sent till the reception of a new transmission coming from the
(nell’impostazione di default), dopodiché il messaggio viene cancellato e il segnale
module.
relativo a quel modulo non viene più trasmesso fino alla ricezione di una nuova
trasmissione proveniente dal modulo.
Retransmission parameters
Parametri di trasmissione • Months - By tick the checkboxes (I→XII) you can determine in which months the
repeater will transmit the stored messages.
• Mesi - Selezionando le caselle (I→XII) si può determinare durante quali mesi il
ripetitore trasmetterà i messaggi memorizzati. • Week days – by selecting the available options you can choose in which days of the
week the repeater transmits the stored messages.
• Giorni settimana - selezionando le opzioni disponibili dal menu a tendina si può
determinare durante quali giorni della settimana trasmettere i messaggi memorizzati. • Month days – it allows to select the month period in which the repeater transmits the
data.
• Dal/al giorno - permette di selezionare il periodo del mese in cui trasmettere i dati.
• From/to – it allows to select the dayly time range in which the repeater transmits the
• Da/a – permette di selezionare la fascia oraria in cui trasmettere i dati.
data.
• Pausa tra TX – (default 250ms) è l’intervallo selezionabile di trasmissione dei dati tra il
• Pause time – (default 250ms) it is the selectable range of data transmission between a
messaggio relativo ad un modulo e l’altro.
module message and the next.
• Intervallo ritrasmissioni – (default 30 sec.) è il periodo tra due sessioni di trasmissione.
• Retransmission period – (default 30s) it is the period between two transmission
sessions.
122. CONFIGURAZIONE
E C V RR
2. CONFIGURATION
Data attivazione Date of start
• Aggiornamento – quando la casella è selezionata, permette di salvare i dati sottostanti. • Update - when the checkbox is tick, it allows to update the data below.
• Disabilitare ora legale – se la casella non è selezionata, il software aggiorna in • Disable daylight saving time – if the checkbox isn’t tick, the software au-tomatically
automatico l’ora legale/solare. Selezionare la casella per disabilitare questa funzione. updates the daylight saving time. Tick the box to disable this feature.
Reset allarmi Flag reset
• Reset allarmi batteria e/o apertura dispositivo – selezionando la casella verranno • Reset open/energy loss alarms - by checking the box alarm notifications will be
eliminate le notifiche di allarme. deleted.
133. MODULI
3. Signature editors
La schermata consente la gestione degli elenchi/liste dei moduli raggruppati per tipo, The screen lets you manage lists / lists of modules grouped by type, serial number, blocks,
numero seriale, isolati, vie etc. In questa schermata avviene la creazione/modifica dei dati streets, etc.. In this screen you can create / edit data of the regarding modules and those
riguardanti i moduli e di quelli relativi alla loro ubicazione. related to their location.
Descrizione dei pulsanti/caselle disponibili: Available buttons and features:
• Leggi da file - permette il caricamento di una lista di moduli precedentemente creata e • Read from file - allows you to upload a list of modules previously created and saved.
salvata. I formati supportati sono .15t (provenienti dal software ECSW) e csv. Supported file format are .15t (coming from ECVSW software) and csv.
• Salva su file - permette la memorizzazione della lista in un file csv in una nuova • Save to file - allows the storage of the list into csv file inside a new directory.
directory
• Read from repeater - allows you to read the actual modules database from the repeater.
• Leggi dal ripetitore – permette di acquisire il database dei moduli associati dal
• Send to repeater - allows you to send new modules database to the repeater.
ripetitore.
• Read comm. Status – by pressing the button, it will read from the repeater the number
• Invia a ripetitore – permette di inviare il database dei moduli associati al ripetitore.
of cycles in which the related module’s messages is already transmitted (this match
• Leggi stato comm. – premendo il pulsante verranno letti dal ripetitore il numero di with the Single message store time [cycles] setting). An indication like 5/5 on the
cicli per i quali è stato utilizzato lo stesso messaggio nelle sessioni di trasmissione Comm. Status column means that the same message was sent 5 times and that means
(riguarda l’impostazione Permanenza messaggi [cicli]). Un’indicazione del tipo 5/5 it will be no more transmitted because it’s too old.
nella colonna Stato comm. Segnala che il messaggio è stato ritrasmessi 5 volte e non
• Clear message in memory – it allows to delete the messages stored into the memory.
sarà più trasmesso perchè troppo vecchio.
• Hide address – by pressing the button information about the address (street, city, ...) of
• Cancella messaggi in memoria – permette di cancellare i messaggi di in memoria.
143. MODULI
E C V RR
3. Signature editors
• Nascondi indirizzo – premendo il pulsante vengono nascoste le informazioni riguardanti the modules will be hidden .
la localizzazione (via, città, ...) dei moduli. • + - it allows to add new modules one by one.
• + - permette di aggiungere nuovi moduli, uno ad uno. • Signatures – modules counter.
• Moduli – contatore dei moduli. • CL – press this button to clear the notification screen.
• CL – premere il pulsante per eliminare i messaggi dalla finestra delle notifiche.
155679654
FANTINI COSMI S.p.A.
Via dell’Osio, 6
20090 Caleppio di Settala, Milano
Tel. +39 02 956821 | Fax +39 02 95307006
info@fantinicosmi.it
supportotecnico@fantinicosmi.it
www.fantinicosmi.it
16Puoi anche leggere