Config RFM-RPT3 Software Manual - Manuale del software Config RFM-RPT3 - BMeters
←
→
Trascrizione del contenuto della pagina
Se il tuo browser non visualizza correttamente la pagina, ti preghiamo di leggere il contenuto della pagina quaggiù

Config RFM-RPT3 Software Manual
Manuale del software Config RFM-RPT3

Config RFM-RPT-3 Software Manual – Manuale del software                                                                                                                                                                             v 1.1

Table of contents – Indice

Introduction - Introduzione ............................................................................................................................................................................................................. 3
1. Software Installation – Installazione del software ........................................................................................................................................................................ 4
2. Software windows description – Descrizione delle finestre del software ....................................................................................................................................... 5
     2.1 New Connection - Connessione ............................................................................................................................................................................................ 5
     2.2 Configuration Menu – Menu di configurazione ..................................................................................................................................................................... 6
     2.3 Debug Mode – Modalità Debug ......................................................................................................................................................................................... 15
3. Configuration Procedure – Procedura configurazione ................................................................................................................................................................. 18

                                                                                                                                                                                                                                pag. 2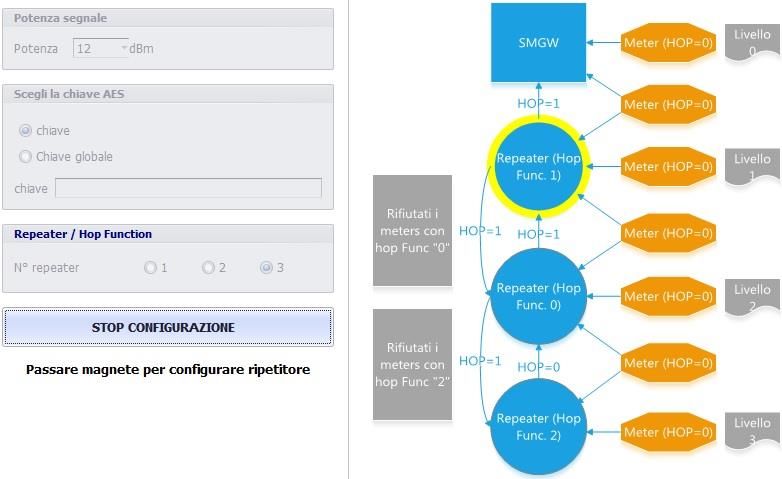
Config RFM-RPT-3 Software Manual – Manuale del software v 1.1
Introduction - Introduzione
The software described in this manual is needed for the configuration and commis- Il software descritto nel presente manuale serve per la configurazione e la messa in
sioning of the signal repeater mod.RFM-RPT-3. opera del ripetitore di segnale mod.RFM-RPT-3.
The configuration of the repeater is a necessary procedure that must be carried La configurazione del ripetitore è un procedimento necessario e va svolto prima
out before the installation, because in this phase all functioning parameters are dell’installazione, in quanto in questa fase vengono impostati tutti i parametri di
set. funzionamento.
A “Debug mode” is also available and it allows to check in real time what is received E’ anche disponibile una “modalità di debug”, che permette di visualizzare in tempo
by the repeater. All B Meters radio modules received by the repeater, along with reale quanto ricevuto dal ripetitore. Vengono infatti mostrati tutti i moduli B Meters
the related information, are shown during debug mode. It is then an operational ricevuti dal ripetitore con le informazioni ad esso associate. E’ quindi una modalità
mode that should be used during the commissioning process in order to verify the operativa usata in fase di messa in servizio per verificare la corretta ricezione di tutti
correct data reception from the modules and every time you need to check i moduli e ogni qualvolta si ha necessita di controllare il funzionamento del disposi-
whether the device is working correctly. tivo.
The software does require an installation procedure (completely guided by instal- Il programma richiede una operazione di installazione (completamente guidata da
lation Wizard). See chapter 1 of this manual Wizard di installazione). Vedere capitolo 1 di questo manuale.
System requirements Requisiti di sistema
Operating System Sistema Operativo
Windows 10, Windows 8.1, Windows 8, Windows 7, Windows Server 2003 SP2, Windows 10, Windows 8.1, Windows 8, Windows 7, Windows Server 2003 SP2,
Windows Server 2008, Windows Server 2008 R2, Windows Vista SP 1, Windows XP Windows Server 2008, Windows Server 2008 R2, Windows Vista SP1, Windows XP
SP3. SP3.
Hardware requirements Requisiti Hardware
CPU:x86\x64 bit 1,5GHz (>1,6 GHz recommended) CPU: x86\x64 bit 1,5 GHz (consigliato>1, 6GHz)
RAM 1GB (recommended 2GB) RAM 1GB (consigliato 2GB)
3 MB HD free space (recommended 2GB) 3 MB di spazio libero sul disco libero (consigliato 2GB)
Software Requirements Requisiti Software
Microsoft .NET Framework 4.0 (if not installed on the system, it’s requested a work- Microsoft .NET Framework 4.0 o successivo (se non è installato nel computer è ne-
ing internet connection). cessaria una connessione internet funzionante).
pag. 3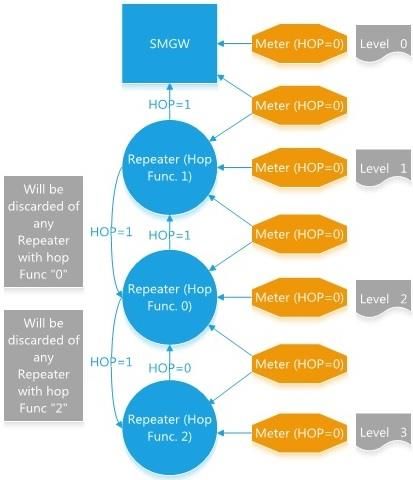
Config RFM-RPT-3 Software Manual – Manuale del software v 1.1
1. Software Installation – Installazione del software
To install the Config RFM-RPT3 Software on your computer, copy the compressed Per procedere con l’installazione del software Config RFM-RPT3 nel vostro com-
folder RFM_RPT3 to a local folder on your computer (for example the desktop of puter, copiare la cartella compressa RFM_RPT3 in una cartella locale del compu-
windows), select the file and decompress it (right button Extract file…, set the ter (per esempio il desktop di Windows), selezionare il file e procedere con
destination folder and then click OK). l’estrazione (tasto destro Estrai i file…, impostare la destinazione e poi sce-
gliere OK).
After decompress all the file in your folder, enter in the folder just created and Dopo aver estratto nella propria cartella tutti i file, entrare nella cartella appena
double click on the setup exe, this will run the installation process. Follow the in- creata e fare doppio click sul setup eseguibile, questo farà eseguire il processo di
structions to install the software. installazione. Seguire la procedura guidata di installazione del software.
pag. 4
Config RFM-RPT-3 Software Manual – Manuale del software v 1.1
2. Software Windows description – Descrizione delle finestre del software
2.1 New Connection – Connessione
When you start the software you’ll be asked to select the COM port where the All’avvio del software viene richiesta la selezione della porta in cui è collegato il
RFM-RX2 radio receiver is installed. To find out which port is linked to the re- ricevitore radio RFM-RX2. Per capire quale porta viene attribuita al ricevitore,
ceiver, please check the Device Manager (This PC right click Manage De- consultare la Gestione dispositivi del PC (Questo PC Tasto destro del mouse
vice manager Ports (COM and LPT). Please refer to the RFM-RX2 Product man- Gestione Gestione dispositivi Porte (COM e LPT). Fare riferimento al manuale
ual how to install the device. Once the correct COM port is selected, push the prodotto RFM-RX2 per le istruzioni di installazione del dispositivo. Una volta
OPEN button. selezionata la porta corretta premere il pulsante OPEN.
The port number will be saved by the program and loaded as default value for Il numero della porta sarà memorizzato dal programma e in un futuro avvio del
future software launches. software sarà selezionato di default dall’elenco.
Near the connection menu, it is possible to select the desired language from the A fianco al menù di connessione è possibile impostare la scelta della lingua nel
Language menu. menù Lingua.
pag. 5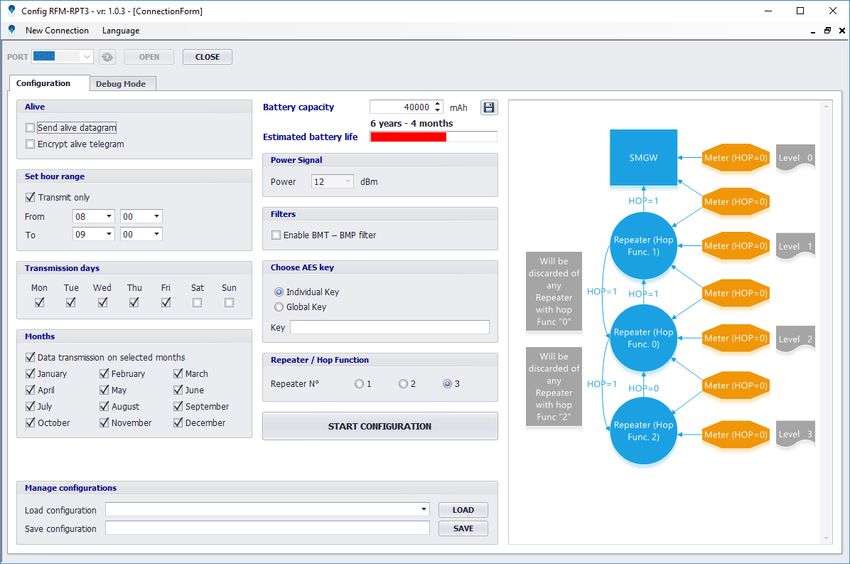
Config RFM-RPT-3 Software Manual – Manuale del software                                                                                                                  v 1.1

2.2 Configuration menu - Menù di configurazione

The Configuration Tab is used to set all working parameters of the repeater. The       La finestra di configurazione permette di impostare tutti i parametri di funziona-
device configuration is necessary for its correct functioning.                         mento del ripetitore. La configurazione del dispositivo è necessaria per il suo cor-
This configuration consist in the setting of working hours, days of the week,          retto funzionamento. La configurazione consiste nell’impostare ore, giorni della
months, transmission power, encryption key for the alive telegram, number of           settimana e mesi di funzionamento, potenza di trasmissione, eventuale chiave di
repeaters (depending on the signal repetition system: single, double or triple         criptatura per il telegramma di alive, numero di ripetitori (dipendentemente dal
hop).                                                                                  sistema si ripetizione segnale: salto singolo, doppio o triplo).

It is also possible to save the current configuration and load saved configurations. E’ inoltre possibile salvare la configurazione e caricare configurazioni salvate. Nella
On the right side of the panel a picture shows a schematic view of the chain of parte destra un immagine mostra schematicamente la catena in base al numero
repeaters, based on the number of configured devices.                                di ripetitori configurati.

                                                                                                                                                                       pag. 6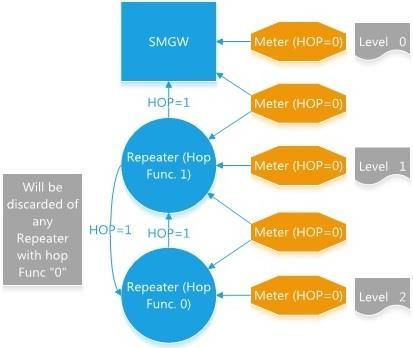
Config RFM-RPT-3 Software Manual – Manuale del software v 1.1
Description of selectable parameters: Descrizione dei parametri selezionabili:
Alive – it allows to enable/disable the periodic (roughly every 15 min) of a Alive – Permette di abilitare/disabilitare l’invio periodico dal ripetitore (circa
datagram from the repeater containing information about the battery sta- ogni 15 minuti) di un messaggio che fornisce informazioni circa lo stato della
tus, date and time (Alive telegram). To obtain the alive telegram format de- batteria, l‘ora e la data (telegramma di alive). Per ottenere il formato del tele-
scription, please contact B METERS. The selectable options are: gramma di alive, contattare B METERS.
Send alive datagram: tick/untick; Le opzioni selezionabili sono:
Encrypt alive datagram: tick/untick. Invia telegramma di alive: seleziona/deseleziona;
Cripta il telegramma di alive: seleziona/deseleziona.
Set hour range – Tick the checkbox to use this parameter. If the checkbox isn’t Fasce orari invio dati – Spuntare la casella per utilizzare questo parametro. Se
ticked, the device will transmit 24/24h (in case of non-electrical power sup- la casella non viene spuntata, il dispositivo trasmetterà 24/24h (in assenza di
plied device, this setting is not recommended due to excessive battery con- alimentazione elettrica, non si raccomanda questa opzione per il consumo ec-
sumption). cesivo di batteria).
Warning: the battery lifetime depends directly on the hour span that will be Attenzione: la stima di durata della batteria dipende direttamente dall’orario
set. impostato.
Note: The “From” time should always be antecedent to the “To” time. Nota: L’orario “Da” deve sempre essere antecedente all’orario “A”.
The time configured on the repeater is set depending on your laptop clock. L’ora impostata sul ripetitore è configurata in base all’orologio del PC. Assicu-
Make sure you laptop is correctly synchronized. rarsi che quest’ultimo sia correttamente sincronizzato.
pag. 7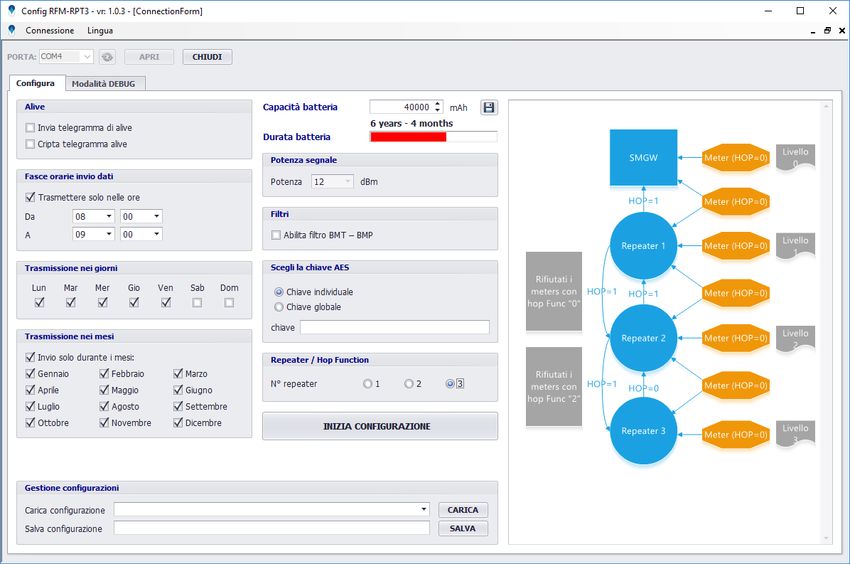
Config RFM-RPT-3 Software Manual – Manuale del software v 1.1
Transmission days – Allows to select the week days in which the repeater Trasmissione nei giorni – Permette di selezionare i giorni della settimana in
will be active. cui il ripetitore sarà in funzione.
Months – Allows to set the working months during the year. tick the “Data Trasmissioni nei mesi – permette di impostare i mesi di funzionamento. Spun-
transmission on the select months” checkbox, to select the working months tare “Invia solo durante i mesi” per selezionare i mesi di funzionamento.
Battery capacity – Allows to set the total installed battery capacity, which is Capacità batteria – Permette di impostare la capacità totale delle batterie in-
by default 40000mAh. stallate, che di default è di 40000mAh.
Changing the capacity affect the estimated battery life calculation. To save the Cambiamenti della capacità influiscono sulla stima della durata di vita della
value, use the button on the right. This saving function is protected by pass- batteria. Per salvare l’impostazione, premere il pulsante a destra. Questa fun-
word. zione di salvataggio è protetta da password.
If it is necessary to change this setting, contact B METERS Se dovesse essere necessario modificare l’impostazione, contattare B METERS.
Estimated battery life - shows the estimation of the battery lifetime, basing Durata Batteria - indica una stima di vita della batteria, basandosi sulle impo-
on the previous settings. A value lower than 7 years is indicated with a red bar. stazioni precedenti. Un valore inferiore ai 7 anni viene indicato con una barra
Even in this case it is still possible to configure the device. rossa. Anche in questo caso è comunque possibile effettuare la configurazione.
pag. 8
Config RFM-RPT-3 Software Manual – Manuale del software v 1.1
Filters – This option allows to set a filter on the repeated telegrams, basing Filtri – Questa opzione permette di applicare un filtro ai telegrammi ripetuti,
on the manufacturer code (M field of the telegram). If checked, the filter is in base al codice costruttore (M Field del telegramma). Se spuntato, il filtro è
enabled and only the devices with BMT and BMP manufacturer code (so, B abilitato e vengono ripetuti i soli dispositivi con codice costruttore BMT e BMP
METERS devices only) will be repeated. If not ticked all the devices (even (dunque solamente dispositivi B METERS). Se non spuntato tutti i dispositivi
non-B METERS) will be repeated, without any filter. (anche non B METERS) verranno ripetuti senza alcun filtro.
Choose AES Key – It allows to select the encryption key type for the alive tel- Scegli la chiave AES – Permette di selezionare una chiave di criptatura per il
egram sent by the repeater. It is possible to choose between a global AES key telegramma di alive del ripetitore. E’ possibile scegliere fra una chiave AES glo-
or an individual AES key (OMS compliant). bale o una chiave AES individuale (secondo OMS).
Individual Key: will generate a unique key for each repeater; Chiave individuale: genera una chiave unica per ciascun ripetitore;
Global Key: it must be specified by the user as a hexadecimal number Chiave globale: deve essere inserita dall’utente come numero esade-
with 16 digit. cimale a 16 cifre.
NOTE: the loss of the global key will cause the impossibility of read- Nota: la perdita della chiave globale renderà impossibile la lettura
ing the data of the alive telegram transmitted by the repeater. dei dati del telegramma di alive trasmesso dal ripetitore.
It is recommended to keep carefully the encryption key. Si raccomanda di salvare la chiave di criptatura.
pag. 9
Config RFM-RPT-3 Software Manual – Manuale del software v 1.1
Manage Configurations – When all the parameters has been set, it is possible Gestisci configurazioni – Una volta impostati tutti i parametri, è possibile sal-
to save the configuration by typing a valid name in the “Save configuration” vare la configurazione digitando un nome valido nella casella di testo “Salva
text box, thus pressing Save button. A saved configuration can then be loaded configurazione” e premendo di conseguenza il pulsante Salva. Una configura-
by selecting it from the drop down menu “Load configuration”, thus pressing zione salvata può essere caricata selezionandola nel menu a tendina “Carica
Load button. configurazione” e premendo di conseguenza il pulsante Carica.
Repeater / Hop Function - The RFM- RPT3 repeater allows to create a chain Repeater / Hop Function - Il ripetitore RFM-RPT3 permette di creare una ca-
of repeaters of up to three units. It is possible to use the device as single re- tena di ripetitori fino a tre unità. E’ possibile utilizzare il dispositivo come sin-
peater (WMBUS standard) or it is possible to create a chain of devices when golo ripetitore (WMBUS standard) oppure è possibile creare una catena
the installation of devices is distributed among different floors, or the concen- quando si hanno installazioni di dispositivi distribuiti fra diversi piani, o il con-
trator is placed far away from the devices. Up to three Hops are possible. centratore è posto lontano dai dispositivi. Sono possibili fino a tre salti (Hops).
First all, it is necessary to plan the chain system, deciding the number of re- E’ necessario prima di tutto pianificare la catena, stabilendo il numero di ripe-
peaters and where to install them, in order to evenly cover the area in which titori e dove posizionarli, in modo da coprire uniformemente tutta l’area di in-
the meters are installed. Then, configure them from the furthermost device stallazione dei contatori. Quindi configurare i ripetitori, partendo dal più lon-
to the closest one (compared to the concentrator). The picture on the right tano al più vicino (rispetto al concentratore). La figura sulla destra visualizza il
side shows the number of levels basing on the number of repeaters, with the numero di livelli, in base al numero di ripetitori della catena, la loro funzione
hop functions and the way the repeaters operate inside the chain system. di hop e il loro modo di operare all’interno della catena.
pag. 10Config RFM-RPT-3 Software Manual – Manuale del software v 1.1
N° repeater = 1 - A single repeater with hop function = 1 transmit the tel- N° ripetitori = 1 - Con un singolo ripetitore con hop function = 1, il tele-
egram with the hop function of the meters (with hop = 0) switched to 1. gramma ricevuto dai meters (con hop = 0) , viene trasmesso con hop func-
This is the standard function planned for the standard wireless MBUS sys- tion cambiato a 1.
tems. Questa è la funzione standard prevista dai sistemi Wireless MBUS stan-
To set up a completely standard network, it is necessary to choose this dard. Per realizzare una rete completamente standard, sarà necessario
option. utilizzare questa opzione.
pag. 11Config RFM-RPT-3 Software Manual – Manuale del software v 1.1
N° repeaters = 2 - With two repeaters: N° ripetitori = 2 – Con due ripetitori:
The hop function 0 repeater receive hop = 0 from the meters and il ripetitore con hop = 0 riceve dai contatori hop = 0 e lo cambia a 1,
switch it to 1, discard the hop = 1 transmissions. mentre scarta le trasmissioni con hop = 1.
The hop function 1 repeater receive hop = 0 from the meters and Il ripetitore con hop = 1 riceve dai contatori hop = 0 e lo cambia a 1
switch to 1 and receive hop function 1 from the previous repeater e riceve hop = 1 dal precedente ripetitore e lo mantiene a 1.
and keep it to 1.
pag. 12Config RFM-RPT-3 Software Manual – Manuale del software v 1.1
N° repeater = 3 - With three repeaters: N° ripetitori = 3 – Con tre ripetitori:
The hop function 2 repeater receive hop = 0 from the meters and Il ripetitore con hop function = 2 riceve hop = 0 dai contatori e lo
keep it 0, while discard the hop = 1 transmissions. mantiene a 0, mentre scarta le trasmissioni che hanno hop = 1.
The hop function 0 repeater receive hop = 0 from the meters or Il ripetitore con hop function = 0 riceve hop = 0 dai contatori o dal
previous repeater and switch it to 1, while discard the hop = 1 trans- precedente ripetitore e lo imposta a 1, mentre scarta le trasmissioni
missions. con hop = 1.
The hop function 1 repeater receive hop = 0 from the meters and Il ripetitore con hop function = 1 riceve hop = 0 dai contatori e lo
switch to 1 and receive hop = 1 from the repeater and keep it to 1 imposta a 1 e riceve hop = 1 dal ripetitore e lo mantiene a 1
pag. 13Config RFM-RPT-3 Software Manual – Manuale del software v 1.1
Once the number of repeaters is set, push the button START CONFIGURA- Una volta impostato il numero di ripetitori da configurare premere il pulsante
TION. In the drawing on the right, the repeater that should be about to be INIZIA CONFIGURAZIONE. Viene evidenziato nel disegno a lato, con un cerchio
configured will be highlighted with a yellow circle. giallo, il ripetitore della catena da configurare.
As pointed out in the indication below the button, to configure the repeater it Come riportato nell’indicazione sotto al pulsante, per configurare il ripetitore
is necessary to pass a magnet on the device. The magnet should be slid on the è necessario passare un magnete sul dispositivo. Il magnete deve essere avvi-
B Meters logo on the left-upper side of the repeater label. cinato sopra al logo B Meters in alto a sinistra sull’etichetta del ripetitore.
pag. 14Config RFM-RPT-3 Software Manual – Manuale del software v 1.1
2.3 Debug mode - Modalità debug
The debug mode sets the repeater to an operative mode that shows the received La modalità di debug (Debug Mode) imposta il ripetitore in un modo operativo du-
telegrams with the corresponding information (receiving signal power, device serial rante il quale vengono visualizzati i telegrammi ricevuti, con le corrispondenti infor-
number, etc…). mazioni collegate (potenza del segnale ricevuto, seriale del dispositivo ecc…).
In general you can choose to visualize all the information that has been set during In generale possono essere visualizzate, a scelta, tutte le informazioni che sono state
the configuration process of the radio modules. The RFM-RPT-3 repeater can be set impostate in fase di configurazione dei moduli radio. Il ripetitore RFM-RPT-3 può
in debug mode both before and after its configuration. essere messo in modalità debug, sia prima sia dopo il processo di configurazione.
pag. 15Config RFM-RPT-3 Software Manual – Manuale del software v 1.1
Enter and exit from debug mode – To enter the debug mode press the Start de- Entrare e uscire dalla modalità di debug – Per entrare in modalità di debug, pre-
bug button. You will be asked to pass a magnet on the repeater. Then pass the mere il pulsante Inizia debug. Verrà chiesto di passare il magnete sul ripetitore.
magnet on the repeater, near the B Meters logo on the left-upper part of the box. Passare dunque il magnete sopra il ripetitore, vicino al logo B Meters in alto a
As the command will be accepted, the message of “Debug mode On” will be sinistra sulla scatola. Non appena verrà accettato il comando, viene mostrato il
shown. messaggio di “Modalità debug attivata”.
If you choose “With list” option you must load a list file (.15t) to enable the Start Se viene scelta l’opzione “Con lista”, deve essere caricato un file di lista (.15t) af-
debug button. finché il pulsante Inizia debug sia abilitato.
To exit the debug mode press the button Stop debug. You will be asked to pass a Per uscire dalla modalità di debug premere il pulsante Stop debug. Verrà richiesto
magnet on the repeater. If accepted, the message of “Debug mode OFF” will be di passare il magnete sul ripetitore. Se accettato, verrà mostrato il messaggio di
shown. “Modalità debug disattivata”.
List – This allows to select the test option for the debug mode (with or without Lista – Permette di selezionare l’opzione di svolgimento del test in debug mode
list). (con o senza lista).
pag. 16Config RFM-RPT-3 Software Manual – Manuale del software v 1.1
With list file – Select this option if you want to visualize a list while per- Con lista - Selezionare questa opzione se si desidera utilizzare una
forming the test in debug mode. A list file is useful to verify whether all lista in modalità di debug. Una lista è utile per verificare che tutti i
the modules in list are properly received by the repeater. dispositivi in lista vengano ricevuti correttamente dal ripetitore.
Without List file – Select this option if you want to visualize all the mod- Senza lista – Selezionare questa opzione se si desidera visualizzare
ules received by the repeater. tutti i dispositivi ricevuti.
Import – This panel is available only if the option “with list file” is selected. Import – Questo pannello viene abilitato solo se l’opzione “Con lista” viene selezio-
Here it is possible to load a list file (.csv or .15t format). nata. In questo pannello è possibile caricare un file lista (estensione .csv o .15t).
Use the “browse” function on the first List file field to load the file. Utilizzare la funzione “Sfoglia” del primo campo File di lista per caricare il file.
In the Radio Nr drop down it is necessary to select the column in which the serial Nel menù a tendina Matricola Modulo è necessario selezionare la colonna della
number of the radio module, allocator etc is located. This is the only compulsory lista nella quale viene riportata la matricola del modulo radio, ripartitore ecc. Que-
field in order to correctly perform the test in debug mode with list file. sto è l’unico campo obbligatorio per un corretto svolgimento del test in debug con
It is anyway possible to load other optional fields by using the drop down menus lista.
below. E’ comunque possibile inserire altri campi facoltativi tramite i menu a tendina a se-
Once the desired fields are selected, press the Import button. guire.
Una volta selezionati i campi desiderati, premere il pulsante Importa.
pag. 17Config RFM-RPT-3 Software Manual – Manuale del software v 1.1
Next to the selected fields, two additional columns are added: Accanto ai campi selezionati vengono aggiunte due colonne alla tabella:
Signal power – it shows the signal quality of the radio reception of the radio Potenza segnale – mostra l’intensità del segnale di ricezione del modulo
module (shown in dBm); (espressa in dBm);
N° received telegrams – it shows the number of radio packets received N° Pacchetti ricevuti – indica il numero di pacchetti radio ricevuti dal mo-
from the module. dulo.
Azzera contatore - Premendo il pulsante “Azzera contatore”, vengono azzerati
i conteggi della colonna N° pacchetti ricevuti. Assieme al pulsante di Azzera
pag. 18Config RFM-RPT-3 Software Manual – Manuale del software v 1.1
Counter reset – By pushing the “counter reset” button, all the totalizers in the contatore viene indicato il numero di dispositivi ricevuti. Questo contatore viene
N° of received telegrams column will be reset. Along with the counter reset but- azzerato solo quando si esce dalla modalità di debug.
ton you can find the indication of the devices received. This counter is reset only
when the debug mode is ended.
Durante la fase iniziale di messa in servizio, è possibile spostare il ripetitore e
verificare che i telegrammi vengano ricevuti con migliore qualità o meno. Questo
During the initial commissioning process, you can move the repeater and check permetterà di identificare il punto di installazione più idoneo per il dispositivo.
whether the telegrams are received with better quality or not. This allows to
identify the best installation point for the device.
3. Configuration procedure – Procedura di configurazione
Here below you can see a step by step guide for the configuration of the RFM-RPT- Di seguito viene riportata una guida passo passo per la configurazione del ripetitore
3 repeater. RFM-RPT3.
Tools needed: Strumenti necessari:
A Windows PC or tablet with an USB port available. Un PC o tablet Windows con una porta USB disponibile;
A receiver mod.RFM-RX2. Una chiavetta mod.RFM-RX2;
The Config RFM-RPT-3 software, distributed by B METERS. Il software Config RFM-RPT-3 distribuito da BMETERS.
A magnet. Un magnete.
Configuration: Configurazione:
Connect the RFM-RX2 transceiver into an USB port of the PC or tablet. Collegare la chiavetta RFM-RX2 in una porta USB del PC o tablet.
For additional details, follow the instructions described in the quick user guide Per maggiori dettagli, fare riferimento alla Quick User Guide della RFM-RX2.
of the RFM-RX2.
pag. 19Config RFM-RPT-3 Software Manual – Manuale del software v 1.1
Once the key is connected, verify that the driver is installed correctly. For addi- Una volta collegata la chiavetta, verificare che il driver sia installato corretta-
tional details, follow the instructions described in the RFM-RX2 product manual. mente. Per maggiori dettagli, fare riferimento al manuale prodotto della RFM-
RX2.
Launch the Config RFM-RPT-3 software, previously installed in your PC or tablet. Lanciare il software Config RFM-RPT-3 precedentemente installato nel PC o ta-
In the software it is necessary to set: blet. Nel software è necessario impostare:
The number of repeaters of the chain (they can be chained together in a Il numero di ripetitori della catena (possono essere messi in cascata fino a tre
multi-hop configuration up to three repeaters). ripetitori in una configurazione multi-hop).
The hours in a day (with a resolution of ten minutes), the days in the week, Le ore del giorno (con risoluzione fino a dieci minuti), i giorni della settimana,
the months in the year in which the repeater will be active. i mesi dell’anno, durante i quali il ripetitore sarà attivo.
The optional filter for the telegrams that should be received. Il filtro opzionale per i telegrammi ricevuti dal ripetitore.
The encryption option. Il tipo di criptatura.
See the previous sections of this software manual guide for a detail description Fare riferimento alle precedenti sezioni del presente manuale del software per
of each option. una descrizione dettagliata di ciascuna opzione di configurazione.
Once the desired options are set, pass the magnet on the repeater. Una volta impostate le opzioni desiderate, passare il magnete sopra al ripetitore.
This will send the configuration telegram to the repeater. In questo modo verrà inviato il telegramma di configurazione al ripetitore.
pag. 20Config RFM-RPT-3 Software Manual – Manuale del software v 1.1
A message of configuration success will be showed by the software. In case you Un messaggio di conferma di avvenuta configurazione verrà mostrato dal soft-
won’t see this message, pass the magnet again on the repeater. ware. In caso contrario, passare nuovamente il magnete sul dispositivo.
Repeat the previous steps for all the repeaters. Ripetere i passi precedenti per tutti i ripetitori.
From now on the repeaters are operative. You can check which radio modules are D’ora in poi i ripetitori configurati sono operativi. Si può verificare quali dispositivi
received by the repeater by using the debug mode. nel campo sono ricevuti da parte del ripetitore, utilizzando la modalità di debug.
Enter and exit from debug mode – To enter the debug mode press the Start Entrare e uscire dalla modalità di debug – Per entrare in modalità di debug,
debug button. You will be asked to pass a magnet on the repeater. Then pass premere il pulsante Inizia debug. Verrà chiesto di passare il magnete sul ripeti-
the magnet on the repeater, near the B Meters logo on the left-upper part of tore. Passare dunque il magnete sopra il ripetitore, vicino al logo B Meters in alto
the box. As the command will be accepted, the message of “Debug mode On” a sinistra sulla scatola. Non appena verrà accettato il comando, viene mostrato
will be shown. il messaggio di “Modalità debug attivata”.
Check that all the radio modules are properly received. Verificare che tutti i moduli radio vengano ricevuti correttamente.
pag. 21Config RFM-RPT-3 Software Manual – Manuale del software v 1.1
Exit the debug mode – press the button Stop debug. You will be asked to pass Uscire dalla modalità di debug – premere il pulsante Stop debug. Verrà richiesto
a magnet on the repeater. If accepted, the message of “Debug mode OFF” will di passare il magnete sul ripetitore. Se accettato, verrà mostrato il messaggio di
be shown. “Modalità debug disattivata”.
It is now possible to mount the repeater on the wall, in the point identified as most E’ possibile ora fissare il ripetitore a muro nel punto individuato come più ideale.
ideal.
B METERS s.r.l.
Via Friuli 3, Gonars (UD), 33050 - ITALY
Tel +39 0432 931415
Fax +39 0432 992661
info@bmeters.com
support@bmeters.com
www.bmeters.com
pag. 22Puoi anche leggere