INSTALLAZIONE E MANUALE D'USO INSTALLATION AND USER MANUAL - Double Duct Air Conditioner ITA - ENG
←
→
Trascrizione del contenuto della pagina
Se il tuo browser non visualizza correttamente la pagina, ti preghiamo di leggere il contenuto della pagina quaggiù
Double Duct Air Conditioner

           ITA - ENG
INSTALLAZIONE E MANUALE D’USO
INSTALLATION AND USER MANUAL

            MADE IN ITALY
2 SANTIAGO
R32

      SANTIAGO   3
1. INFORMAZIONI GENERALI                                                        ITALIANO

                                                                                 P0
                                                                            1
                                                                                  4
                                                                    3
                                                       2
                                                                            5
                                                  12

                                                       6                         5
                                                                6
                                                   7
                                                           11
                                                                        9
                                                       8
                                                                                     10

1.5 LISTA ACCESSORI (Figura P0)
1.STAFFA FISSAGGIO
2.TELECOMANDO
3.PORTATELECOMANDO
4.TUBO SCARICO ACQUA
5.GRIGLIE ESTERNE
6.TUBO ESPULSIONE&INGRESSO ARIA
7.KIT VITI
8.CORDA FISSAGGIO GRIGLIE ESTERNE
9.MANUALE
10.FOGLIO DIMA DI INSTALLAZIONE
(See page)
11.ANELLO DI CENTRAGGIO TUBO DIAMETRO 160mm
12.ANELLO DI CENTRAGGIO TUBO DIAMETRO 150mm

                                              3
  4   SANTIAGO
Modello                                                     SANTIAGO
 Potenza condizionamento* W (BTU/h)                                3480
 Potenza riscaldamento* W (BTU/h)                                  3180
 Resistenza elettrica di post riscaldamento* W                     2000
 Voltaggio (V)                                                     230
 Consumo in raffreddamento* (W)                                    932
 Amperaggio in raffreddamento* (A)                                  4.1
 Consumo in riscaldamento* (W)                                  790+2000
 Amperaggio in riscaldamento* (A)                                3.7+8.7
 Volume aria (m3/h)                                                450
 Livello sonoro (dB A)                                              50
 Deumidificazione* (L/24h)                                         22.5
 Opzioni temperatura (telecomando)                               18-30° C
 Fusibile (T3 , 15L) 2                                            250V
 Refrigerante                                                     R410A
 Potenziale di riscaldamento globale (GWP)                         2088
 Dimensioni W/HID(cm)                                          58/110/24.5
 Peso (kg)                                                          52

*I dati riportati in tabella sono soggetti a cambiamenti dovuti a migliorie
 apportate al prodotto per aumentarne le prestazioni.

CONDIZIONI DI PROVA STANDARD - EN 14511-

CONDIZIONI DI FUNZIONAMENTO IN RAFFREDDAMENTO
                                                                                 Riscaldatore elettrico PTC
E MODALITÀ DEUMIDIFICAZIONE
- Interno 27°C DB; 19°C WB
-fuori 35°C DB; 24° C WB

CONDIZIONI DaI FUNZIONAMENTO IN RISCALDAMENTO
- Fuori 7°C DB; 6°C WB
- Interno 20°C DB;

                                                                               SANTIAGO               5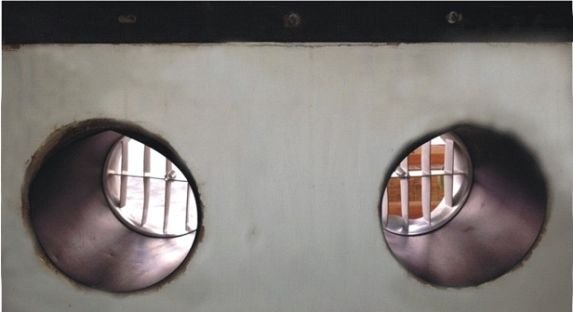
2. INSTALLAZIONE                            ITALIANO

                                  livella
                                            P4

                         P3
     Outdoor    Indoor

        2m

                         2m

                              5
 6   SANTIAGO
2. INSTALLAZIONE          ITALIANO

                   6
                       SANTIAGO   7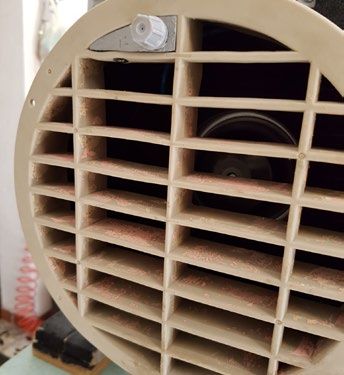
2. INSTALLAZIONE                                                     ITALIANO

                                                                 P13

      3° INCLINATION

                                                                 A     B

                       P5       Terminale di gomma

                                     Terminale di plastica   A         B

                            7
 8   SANTIAGO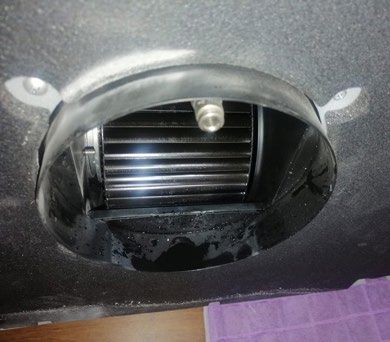
2. INSTALLAZIONE                                                   ITALIANO

                            - Misurare la profondita del muro e tagliare a
                            misura il film in plastica fornito. Arrotolare il
                            film e sigillare la linea di giunzione del film con
                            nastro adesivo.
                            - Inserirlo poi nel foro mantenendo la linea di
                            giunzione sul lato superiore.
                            - Una volta posizionati i due tubi, ultimate il
                            loro fissaggio fissando gli anelli di fissaggio
                            o tramite delle colla siliconica o mediante
                            della viti in corrispondenza degli apositi fori.

                   P6

                                150mm ring        160mm ring        P20

                        8
                                                            SANTIAGO         9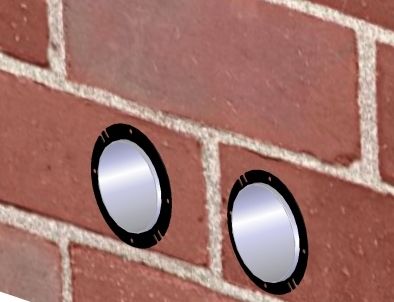
2. INSTALLAZIONE        ITALIANO

                       P7

                       P8

                       P9

                       P10

                   9
 10   SANTIAGO
2. INSTALLAZIONE ITALIANO
P14
P11
ALZARE QUI
ALZARE QUI
P12
10
SANTIAGO 113. USO E MANUTENZIONE ITALIANO
3.1 ICONE DEL TELECOMANDO
Significato Significato
Auto Velocita' ventilatore
Direzione aria
Raffreddamento
Deumidificazione Timer off
Ventilazione Timer on
Riscaldamento Notturno
Resistenza
Elettrica di
post- riscaldamento
Orologio Non in uso
3.2 FUNZIONI DEL TELECOMANDO
12
11
12 SANTIAGO3. USO E MANUTENZIONE ITALIANO
3.3 MODO RISCALDAMENTO
3.4 MODO RAFFREDDAMENTO
12
SANTIAGO 133. USO E MANUTENZIONE ITALIANO
3.5 MODO DEUMIDIFICAZIONE
3.6 MODO VENTILAZIONE
13
14 SANTIAGO3. USO E MANUTENZIONE ITALIANO
3.7 MODO NOTTURNO
3.8 MODO AUTOMATICO
14
SANTIAGO 153. USO E MANUTENZIONE ITALIANO
Sequenza delle operazioni.
3.9 SPEGNIMENTO CON IL TIMER Fare riferimento al punto 3.1 e 3.2
1
2
3
4
5
3.10 ACCENSIONE CON IL TIMER
Sequenza delle operazioni.
Fare riferimento al punto 3.1 e 3.2
1
2
15
16 SANTIAGO3. USO E MANUTENZIONE ITALIANO
Riscaldamento
16
SANTIAGO 173. USO E MANUTENZIONE ITALIANO
17
18 SANTIAGO3. USO E MANUTENZIONE ITALIANO
3.13 SISTEMA RICAMBIO ARIA CON FILTRAZIONE (OPZIONALE)
Tubo dell’aria fresca 50
Filtro dell’aria fresca
Sistema di aria fresca
Il sistema di fikltrazione aria della esterno per il ricambio è posto nel retro del climatizzatore.
Sul muro praticate un foro aggiuntivo da 50 mm per il tubo di prelievo aria dall’esterno.
L’aria all’interno della stanza si cambierà automaticamente . allo stesso tempo anche le
performance dell unità saranno minori (pertanto valutate correttamente se praticarlo o meno).
Il filtri deve essere regolarmente pulito per mantenerlo efficace. Sfilatelo come dalla fiugra
secondo la freccia lavatelo con acqua tiepida senza saponi o detergenti. Solo quando è
perfettamente asciutto riponetelo nel suo alloggiamento
ATTENZIONE: Non usare il climatizzaotre senza filtro.
3. 14 INSTALLAZIONE E CAMBIO DELL BATTERIE TELECOMANDO
18
SANTIAGO 193. USO E MANUTENZIONE ITALIANO
P16
visitate www.finteksrl.com.
N
P18
P17
P19
FILTRO ELETTROSTATICO
PASSIVO ANTIBATTERICO
P15
LIFT IT UP
HERE
LIFT IT UP
HERE
17
20 SANTIAGO3. USO E MANUTENZIONE ITALIANO
POSIZIONE DEI RISCALDATORI CERAMICI PTC
50
I riscaldatori ceramici sono posti ai lati
del climatizzatore e possono essere
controllati dal telecomando
Come indicato della freccia, la griglia
di ingresso puo essere stati rimossia
e i filtri rimossi per la manutenzione.
Per la pulizia dei filtri, consultare
il punto 3.14 MANUTENZIONE
“PULIZIA DEI FILTRI”
ATTENZIONE: Non coprire il
riscaldatore elettrico durante il lavoro.
3. 14 INSTALLAZIONE E CAMBIO DELL BATTERIE TELECOMANDO
La distanza tra il riscaldatore elettrico
e mobili di legno o altri mobili
infiammabili deve essere superiore a
1 metro
18
SANTIAGO 213. USO E MANUTENZIONE ITALIANO
3. 16 SOLUZIONE PROBLEMI
La temperatura massima di esercizio per l’aria
condizionatore: (max raffreddamento: esterno
DB43°C / WB26°C, interno DB32°C / WB23°C;
riscaldamento min: esterno DB-5°C / WB-6°C,
interno DB20°C)
20
22 SANTIAGOFIG.1
COLLEGAMENTO SISTEMA
NO SCARICO CONDENSA ELETTRONICO
Per collegare il sistema elettronico di smaltimento della condensa già
montato a bordo macchina, non è necessario praticare sul muro o sulla
superficie di installazione del climatizzatore nessun altro foro aggiun-
tivo.
Dopo aver praticato i fori sul muro per immissione ed espulsione
dell’aria dal lato del ventilatore di mandata troverete l’ugello di man-
data come indicato in FIG.1
SYDNEY / KYOTO
Successivamente collegate il tubo Rilhsen in dotazione e verificare che
aderisca perfettamente senza possibilità che esso si possa sfilare, in
alternativa provvedere con appositi collanti alla perfetta tenuta sull’u-
gello.
Collegare l’altra estremità del tubo, alla griglia di espulsione come in
figura, dopo averne fatto misura per la lunghezza del foro praticato
aggiungendo + 7cm per flessibilità di assemblaggio. (FIG.2/FIG.3)
OSLO 4.0/4.2 Fissate la griglia e posizionate l’unità condizionante nel seguito, la-
sciandovi un po di spazio per poter operare.
FIG.2 Il risultato finale sarà il seguente a seconda del tipo di griglia adottata:
FIG.3
SANTIAGO 2324
SANTIAGO
IL PRESENTE FOGLIETTO E’ PARTE INTEGRANTE DEL MANUALE D’USO ED INSTALLAZIONE
NB: QUALORA LA RIPARAZIONE NON FOSSE POSSIBILE IN LOCO.
CONSERVARE I CARTONI E LE PARTI IN POLISTIROLO PER UN
EVENTUALE ASSISTENZA IN GARANZIA,
L’EVENTUALE MANCANZA DELL’IMBALLAGGIO ORIGINALE NON
RENDERA’ TRASPORTABILE IL VS CLIMATIZZATORE CHE DOVRA’
ESSERE RECAPITATO A VS SPESE E A VS RESPONSABILTA’ PRESSO IL
CENTRO ASSISTENZA AUTORIZZATO
OPPURE ACQUISTARE UN IMBALLAGGIO INTEGRO PER IL TRASPORTOCERTIFICATO DI GARANZI
GARANZIA 12 MESI
+ 12 MESI NELL’AMBITO
PRIVATO
La società Fintek S.r.l., con sede in Via Tonso di Gualtiero, 46 - 47896 Faetano RS
DICHIARA che i seguenti prodotti:
La società FINTEK S.r.l., con sede in ViaTonso di Gualtiero 46
47896 Faetano Rep. di San Marino
Air Med che
DICHIARA Proi :seguenti
Purificatore d’aria di grado medicale
prodotti:
SANTIAGO
Sono garantiti anni 1 dalla data di acquisto se rivolti a uso professionale 24
Sonosegarantiti
mesi anni
nell’ambito 2 dalla
privato. data di acquisto
Si consiglia di annotare. i dati qui sotto in caso di
guasto prima di contattare il servizio assistenza. Per inviare Air Med Pro presso
l’assistenza si prega di conservare integro l’imballaggio.
Senza lo stesso il prodotto viaggia a rischio e pericolo del cliente
Contatto telefonico del Servizio Assistenza : 0549901950 r.a
Contatto via mail : assistenza@finteksrl.com
Data di acquisto : ………………………………………………………………………….
Scontrino o fattura numero : …………………………………………………………
Prodotto acquistato presso : ………………………………………………………..
FINTEK s.r.l.
Via Tonso di Gualtiero 46,
47986 Faetano ( RSM ) Italia
Phone : +378 0549901950 r.a
commercialeitalia@finteksrl.com.
18 www.finteksrl.comCONTENTS ENGLISH 1.GENERAL INFORMATION 1.1 INTRODUCTION 1 1.2 IMPORTANT SAFETY INSTRUCTIONS 1 1.3 RECIVING THE GOODS 2 1.4 HANDLING 2 1.5 LIST OF ACCESSORIES 2 1.6 TECHNICAL FEATURES 2 2.INSTALLATION 2.1 POSITIONING THE AIR CONDITIONER 4 2.2 PAPER TEMPLATE 4 2.3 DRILLING THE WALL 6 2.4 FASTENING THE BRACKET 7 2.5 INSTALLATION OF THE PIPES 7 2.6 FITTING THE GRATINGS 8 2.7 FITTING THE AIR CONDITIONER ON BRACKET 9 3.USE AND MAINTENANCE 3.1 INTRODUCTION OF LCD ICONS 10 3.2 REMOTE CONTROL FUNCTIONS 10 3.3 HEATING MODE 11 3.4 COOLING MODE 11 3.5 DRY MODE 12 3.6 FAN MODE 12 3.7 SLEEP MODE 13 3.8 AUTO MODE 13 3.9 TIMER OFF FUNCTION 14 3.10 TIMER ON FUNCTION 14 3.11 ELECTRICAL HEAT FUNCTION 15 3.12 ON BOARD CONTROL FUNCTION 16 3.13 FRESH AIR SYSTEM 17 3.14 INSTALL AND CHANGE THE BATTERY 17 3.15 MAINTENANCE 18 3.16 PROBLEM SOLVING 19 26 SANTIAGO
1.GENERAL INFORMATION                                                                  ENGLISH

1.1 INTRODUCTION
PLEASE NOTE: Don’t dispose of any pack-                 Do not attempt to repair or adjust any electri-
aging until the installation of the air condi-          cal or mechanical functions on this air condi-
tioner is completed.                                    tioner as this may void warranty, contact your
After having removed the packing, check that            service engineer.
all the content is intact and complete. (See            Always operate the product from a power
list of accessories). In the event of missing           source of the same voltage, frequency and
parts, contact your retailer.                           rating as indicated on the product identifica-
This air conditioner has been designed to cool          tion plate.
or heat the air of a room and should only be            This air conditioner is not intended for use in
used for this purpose.                                  wet or damp locations.
The manufacture can not be held liable for              Do not place the air conditioner near an open
damage caused to property or injure to per-             flame, cooking or heating appliance or hot
sons or animals due to incorrect installation,          surface.
regulation ans maintenance or improper use.             Do not let the power cord hand over the edge
This air conditioner contains R410A refriger-           of a table or counter. Arrange the power cord
ant, at the end of its life, the disposal of this       away from an area where it may be tripped
air conditioner must be accordance with the             over.
strict regulation governing the recycling of this       Never place the power cord under a carpet or
product, please operate with caution during             rug. Do not operate the air conditioner in
the disposal. Please contact your local author-         areas where petrol, paint, or other flammable
ity for regulation advice.                              liquid are used or stored.
Don’t switch on before having totally assem-            Do not carry out any cleaning or maintenance
bled the air conditioner and before installing          or access internal parts until the air condi-
in its correct operating position.                      tioner has been disconnected from the mains
Before starting the appliance, check that it is         electricity supply.
correctly earthed, according to the legislation         Do not alter the safety or regulating devices
in force in the country concerned.                      without the permission and instructions of the
                                                        air conditioner manufacturer.
1.2 IMPORTANT SAFETY                                    Do not pull, remove or twist the electric cable
INSTRUCTIONS                                            connected to the air conditioner, even if dis-
When using electrical appliance, basic safety           connected from the mains electricity supply
precautions should always be followed:                  avoid prolonged direct contact with the flow of
Don’t place objects on the products or allow            the air from the air conditioner and the room
objects to obstruct the inlet or outlet openings.       being closed with no ventilation for a long
Extreme care should be taken when any prod-             period of time.
uct is used by, or near children and pets, and          Repair or maintenance work must be carried
whenever the products is left operating and             out by a service engineer or by qualified tech-
unattended.                                             nicians in compliance with the instructions
Please note:                                            given in this booklet. Do not alter the appli-
Before operating the product, remove the air            ance, since hazardous situations could be
conditioner from its packaging and check it is          created while the manufacture of the appliance
in good condition.                                      will not be liable for any damage or injury
Do not let children play with the package, for          caused.
example the plastic bags.                               This instruction booklet is an integral part of
Do not operate any products with a damaged              the appliance and should therefore be care-
cord or plug, or after the air conditioner mal-         fully preserved and always accompany the
functions, has been dropped, or damaged in              appliance in the event of transfer to another
any manner. Return the air conditioner to an            owner or user or another installation engineer.
authorised service center for examination and           Should the booklet be damaged or lost, please
repair to avoid a hazard.                               request an additional.

                                                    1                            SANTIAGO       27
1.GENERAL INFORMATION ENGLISH
1.3 RECEIVING THE GOODS
The air conditioner is delivered in a protective
packaging and is accompanied by an instruc-
tion manual. This manual is an integral part of
the air conditioner and should therefore be
carefully read and preserved. When the air
conditioner is unpacked, please check that the
air conditioner and the accessory pack are
complete and undamaged.
1.4 HANDLING
Be fully aware of the weight of the air condi-
tioner before attempting to lift it. Take all nec-
essary precautions to avoid damaging the
product or causing personal injury.
It is advisable to remove the packaging only
when the air conditioner has been located in
the point of installation.
Carefully remove the adhesive strips posi-
tioned on the air conditioner.
Packaging components must be disposed cor-
rectly and not left within reach of children,
since they are a potential source of danger. This product has been manufactured to com-
ply with 2006/95/EC and with amendments
1.5 LIST OF ACCESSORIES(P0) 92/31/EE and 93/68/EEC
1. FASTENING BRACKET
2.REMOTE CONTROL
3.REMOTE CONTROL HOLDER
4.DRAINAGE PIPE
5.EXTERNAL GRATING
6.PLASTIC SHEET AIR PIPE
7.KIT OF SCREWS DISPOSAL:Do not dispose this product as
8.GRATING FIXING CORD unsorted municipal waste.
9.INSTRUCTION MANUAL Collection of such waste separately for
10.PAPER TEMPLATE FOR WALL DRILLING special treatment is necessary.
(See page)
11.160mm RING
12.150mm RING
13.Fresh air pipe
Any batteries used in the remote control
WZ-28EC Polar can be connected only to a contain materials, which are hazardous to
supply with system impedance no more than the environment. They must be removed
0.222 ohm. In case necessary , please from the remote control when they reach
consult your supply authority for system the end of their life and disposed of
impedance information. responsibly.
28 SANTIAGO
21.GENERAL INFORMATION ENGLISH
1.6 TECHNICAL FEATURES(P1,P2)
Model
P1
SANTIAGO
Cooling capacity*W 3480
Heating capacity*W 3180
Electrical Heat*W 2000
Rated voltage(V) 230
Absorbed power in cooling*( W ) 932
Absorbed current in cooling*( A ) 4.1
Absorbed power in heating*( W ) 790+2000
Absorbed current in heating*( A ) 3.7+8.7
Air flow(m /h )
3
450
Noise level( dB A ) 50
Dehumidification capacity*( L/24h ) 22.5
Optional temperature( remote control ) 18-30° C
Fuse (T3.15L) 250V
Refrigerant R410A
Global warmer potential( GWP ) 2088
Dimensions H/W/D( cm ) 58/110/24.5
Net weight (KG) 52
* The above datas could be change in order to improve the performances
STANDARD TEST CONDITIONS - EN 14511-
OPERATING CONDITIONS IN COOLING AND
Remote control box
Air directional flap Filter grating P2
DEHUMIDIFICATION MODE On board control
- Inside 27 C0 DB; 19 C WB
0 0
- Outside 35 C DB; 24 0C WB PTC electric heater
OPERATING CONDITIONS IN HEATING MODE
Power cord
- Outside 70 C DB; 6 0C WB
0
- Inside 20 C DB
DISPLAY
GREEN LED YELLOW LED RED LED power supply is connnected;
GREEN LED compressor is on;
YELLOW LED timer is on;
BLUE LED night mode is on;
The display will show both setting temperature
and ambient temperature.
After adjusting the setting temperature, the
setting temperature will flash 15 times on the
display, then the display will show the ambient
temperature for 70 seconds.
After that, the display will be off until next
adjustment.
BLUE LED RED LED
3 SANTIAGO 292.INSTALLATION ENGLISH
2.1 POSITIONING THE AIR
2.2 PAPER TEMPLATE(P4)
CONDITIONER(P3)
Fasten the template to the wall once the
To maintain the best performance from your air following guidelines have been thoroughly
conditioner, prevent breakdowns or hazards, you checked.
must position it correctly. Please follow the
guidelines and instruction below in full, as failure - Do not drill any holes until you are completely
to do so could cause potential installation problems. confident that there are no obstacles in the area
you wish to drill and there are no obstructions,
- The air conditioner must be installed on an which could be hidden by the construction of the
exterior wall that has access to the out side with a wall, for example: electrical wiring water & gas
minimum of 2 meters clearance to the outside. pipes or supporting lintels or beams.
- The air conditioner must be fitted leaving room
all around as illustrated in the paper template. - Ensure that a spirit level is used, as the air
- The wall on which the air conditioner is installed conditioner must be level.
must be sturdy and able to withstand the weight for
the air conditioner. - Follow the installation instructions in full.
After determining the best place for installation
as described above, please check to ensure that
the wall can be drilled in the chosen area without
spirit level
P4
interfering with other structures or installations(
beams, piers, pipes, wires, etc).
Please also ensure that there are no obstacles on
the outside of the wall, which may obstruct air
circulation through the drilled holes, for example:
(plants, and their leaves, slats or paneling, drain
pipes, overflows and gratings, etc.). Any
obstruction could interfere with the correct
performances of the air conditioner.
P3
Outdoor Indoor
2m
2m
30 SANTIAGO
42.INSTALLATION ENGLISH
5 SANTIAGO 312.INSTALLATION ENGLISH
2.3 DRILLING THE WALL(P5) DRAINAGE HOLE(P13)
Please note: If you are drilling the hole above This air conditioner has a double system to drain
ground floor level, please ensure that an area the condensate moisture automatically.
has been secured and while the holes are drilled Before install the Air Conditioner choose which
the outside area is supervised, until drilling has is the suitable system for your installation.
been completed. Please read carefully the follow instructions.
INTAKE AND OUTLET HOLES System “A”: drill a hole through the wall measur-
- This operation should be carried out using the ing 30mm in diameter in the position shown in
proper tools(diamond tip or core borers drills with the paper template. Drainage occurs by gravity.
high twisting torque and adjustable rotation speed). For this reason, it is essential for the drain
- Fasten the template to the wall taking care to line to have a minimum downward inclination
check the distance from the floor and or ceiling and at least 3 degrees throughout its length:
keep it horizontal by using a spirit level. connect the drain pipe(from rubber terminal) to
- Use a pilot drill to mark the center of each core the air conditioner (back side) after unplugged
hole to be drilled. the black rubber cup (see picture P13). With this
- Use a core boring head having a diameter of solution you can drain the condensate moisture
162 mm to drill the two holes for intake and outlet to a suitable place to do not cause any problems
the air. to your neighbors.
If use system ”A”, please do not unplug the black
It is recommended that the holes must rubber cup from system “B”.
have a slightly downward inclination of
3-5 degrees to prevent any back flow of water
from the pipes.
FRESH AIR HOLE P13
- For the fresh air hole, the diameter would be
52mm. It is optional for the customer.
3° INCLINATION
A B
P5 Soft terminal
Indoor Outdoor Hard terminal A
B
System “A” is more common use, and the
discharge pipe go outside where there is
no problem to connect or to discharge it,
this solution is OK for hot country and
normal cold temperature out side.
32 SANTIAGO
62.INSTALLATION ENGLISH
System “B” in case of impossibility to install 2.5 INSTALLATION OF THE PIPES (P20)
the drainage pipe as showed on”A” system,
- After drilling the holes, the plastic sheet supplied
please use system “B” to drain the conden-
sate moisture to a suitable place. with the air conditioner need to be fitted through
If use system “B”, please do not unplug the them.
black rubber cup from system “A”. - Measure the depth of the wall and cut supplied
plastic sheet.
Usually “B” hole is used in the installation - Roll the sheet and insert it into the hole, paying
when the outside temperature is very low. attention to the joint line, which must be always
and in this way we prevent no ice in the upper position. Remember that the sheet must
discharge water pipe. This solution is used have the same inclination of the holes(min 3 ).
0
also to be more easy for the installer to
Insert the rings into the holes.
connect the internal drainage pipa when he
don’t want to see the pipa from outside.
2.4 FASTENING THE BRACKET(P6)
- Drill the holes for anchoring the fastening
bracket to the wall using preferably the 6 holes
showed in black on the paper template. If the
wall is not sturdy enough it is advisable to use
extra anchor bolts using the holes showed in
grey on the paper template.
- The anchor bolts provided require a 8mm
holes; the wall should be inspected to determine
if provided bolts are useful or if it is necessary
to use a different anchorage. The manufacturer
is not liable in case of underestimation of the
structural consistency of the anchorage made
at the time of installation.
P6
7 SANTIAGO 332.INSTALLATION ENGLISH
2.6 FITTING THE GRATINGS
(P7,P8,P9,P10) P9
To fit the external two grating please proceed as
follows: familiarise yourself with the fitting of the
grating to the tube, before installation. Insert the
cords through the centre of the grating. One
grating fits on the outside of the tube and the other
fits inside. The air discharge is the bigger hole and
the grating therefore fits on the outside of the air
discharge tube. Insert the supplied cord into the
hole. Fold the outer grating in half grasping the
cord with your free hand. Insert your arm inside the
pipe with the grating and push all the way to the P10
outside. Let the grating unfold and pull the cord
toward you. One grating fits on the outside of the
tube and the other fits inside. With a little patience
and mainpulation the 2 gratings will fit the end of
the tubes. Grasping the cord, insert your fingers
between the fins and pull the grating toward you
until the same is properly slipped in the pipe,
keeping the fins in vertical position. If the external
grating is accessible to prevent its removal, it is
recommended to fasten it to the wall with wall
plugs and screws with a diameter of 6mm. Tighten
the cord and fasten it to the dent on the internal
flanges.
P7
P8
34 SANTIAGO
82.INSTALLATION ENGLISH
2.7 FITTING THE AIR CONDITIONER
ON BRACKET (P11,P12)
After checking again that the fastening bracket
is securely fastened to the wall, and that any
necessary preparations for electric connection The appliance shall not be installed the laundry.
and condensate drainage(if it needs) have been
made, fasten the air conditioner to its supporting The appliance must be positioned so that the
bracket. plug is accessible.
Lift it up by holding the sides at the bottom.
Tilt the air conditioner slightly toward it to the The appliance shall be installed in accordance
bracket. The air conditioner can now be pushed with national wiring regulations.
firmly against the wall. Inspect carefully the
installation to make sure that the insulating back
panel must fit firmly against the wall and there are
no fissures at the back of the air conditioner and
that the two plastic semicircle on the back side of
the air conditioner are placed inside of the two
P14
plastic hoses fixed inside the wall.
P11
LIFT IT UP Water
LIFT IT UP Water cap
HERE
HERE
P12
9 SANTIAGO 353.1 INTRODUCTION OF LCD ICONS
Icons Meaning Icons Meaning
Auto Fan speed
Cooling Airflow 1
direction
2
Dry Time off
4
3
Fan Time on 5
7
6
Heating Sleep 8 9
12
Electrical 10
TEMP 11
Heat
Clock Not Used
3.2 REMOTE CONTROL FUNCTIONS
1 MODE BUTTON: Set up the air conditioner operating mode
2 ON/OFF BUTTON: Turn on or turn off the air conditioner
3 UP BUTTON: Increase the temperature and time
4 DOWN BUTTON: Decrease the temperature and time
5 FAN SPEED BUTTON: Set up the fan speed
6 TIME ON BUTTON: Set up the time the air conditioner starts
7 TIME OFF BUTTON: Set up the time the air conditioner stops
8 CLOCK BUTTON: Adjust the clock
9 LOUVER SWING BUTTON: Adjust the airflow direction
10 SLEEP BUTTON: Automatically adjusting the setting temperature according the circadian rule.
11 RESET BUTTON
12 ELECTRICAL HEAT BUTTON: Switch on the electrical heat in order to get enough
heating capacity in cold winter.
36 SANTIAGO
103.USE AND MAINTENANCE ENGLISH
3.3 HEATING MODE
Sequence of the operations
Press the ON/OFF button " ",
switch on the air conditioner, it will
run by memory mode.
Press the MODE button " ", set
up the mode to heat " ", the air
conditioner will run in heating.
Press UP " " or DOWN " "
button, to adjust the setting up
temperature.
Press the FAN SPEED button
" ", set up the fan speed, is
low speed, is middle speed,
is high speed, ( flashing )
is auto speed . For auto fan,
the speed is chosen by the
difference of room temperature
and setting temperature.
Press the ON/OFF button " ",
switch on the air conditioner. Next
time when this button is pressed,
the air conditioner will operates
in this mode by memory.
3.4 COOLING MODE Sequence of the operations
Press the ON/OFF button " ",
switch on the air conditioner, it will
run by memory mode.
Press the MODE button " ", set
up the mode to cool " ", the air
conditioner will run in cooling.
Press UP " " or DOWN " "
button, to adjust the setting up
temperature.
Press the FAN SPEED button
" ", set up the fan speed, is
low speed, is middle speed,
is high speed, ( flashing )
is auto speed . For auto fan,
the speed is chosen by the
difference of room temperature
and setting temperature.
Press the ON/OFF button " ",
switch off the air conditioner. Next
time when this button is pressed,
the air conditioner will operates
in this mode by memory.
11 SANTIAGO 373.USE AND MAINTENANCE ENGLISH
3.5 DRY MODE
Sequence of the operations
Press the ON/OFF button " ",
switch on the air conditioner, it will
run by memory mode.
Press the MODE button " ", set
up the mode to dry " ", the air
conditioner will run in
dehumidifying.
Press UP " " or DOWN " "
button, to adjust the setting up
temperature.
FAN SPEED button is " "
disable, indoor fan speed always is
low in dry mode.
Press the ON/OFF button " ",
switch on the air conditioner. Next
time when this button is pressed,
the air conditioner will operates
in this mode by memory.
3.6 FAN MODE Sequence of the operations
Press the ON/OFF button " ",switch on the
air conditioner, it will run by memory mode.
Press the MODE button " ", setup the mode
to fan " ", the air conditioner will run in fan.
Press UP " " or DOWN " " button, to
adjust the setting up temperature
Press the FAN SPEED button " ", set up
the fan speed, is low speed, is middle
speed, is high speed, ( flashing ) is
auto speed.
For auto fan, the speed is chosen by the
difference of room temperature and setting
temperature.
Room temperature-setting temperature>5℃
high speed.
Room temperature- setting temperature>3℃
middle speed.
Room temperature- setting temperature>1℃
low speed.
Press the ON/OFF button " ", switch off the
air conditioner. Next time when this button
is pressed, the air conditioner will operates
in this mode by memory.
38 SANTIAGO
123.USE AND MAINTENANCE ENGLISH
3.7 SLEEP MODE Sequence of the operations
Press the ON/OFF button " ",
switch on the air conditioner, it will
run by memory mode.
Press the MODE button " ", set
up the mode to cool " " / heat " "
(heat pump) / auto" ", the air
conditioner will run in setting mode.
Press UP " " or DOWN " "
button, to adjust the setting up
temperature.
Press the SLEEP button " " , this
icon will display on LCD, sleep
function is set up; press it again,
cancel the sleep function.
If the sleep function is launched,
the fan speed is steady in low
speed.
3.8 AUTO MODE Sequence of the operations
Press the ON/OFF button " ", switch on the air
conditioner, it will run by memory mode.
Press the MODE button " ", set up the mode to
auto " ", the air conditioner will run in auto mode
.(Reference to “emergency operation”)
According to the difference of room temperature
and setting temperature automatically choose
the running mode(cool, heat, fan). The
temperature setting button UP “ ” and DOWN
“ ” are disable.
When room temperature 20 0 C, run with heat
mode.
When 20 0C room temperature 25 0 C, run with
fan mode.
When room temperature 25 0 C, run with cool
mode.
Press the FAN SPEED button " ", set up the
fan speed, is low speed, is middle speed,
is high speed, ( flashing ) is auto
speed.
For auto fan, the speed is chosen by the
difference of room temperature and setting
temperature.
Press the ON/OFF button " ", switch off the air
conditioner. Next time when this button is
pressed, the air conditioner will operates in
this mode by memory.
13 SANTIAGO 393.USE AND MAINTENANCE ENGLISH
3.9 TIMER OFF FUNCTION Sequence of the operations
Press the ON/OFF button " ",
switch on the air conditioner, it will
run by memory mode.
Press the MODE button " " set
up the mode to which you want.
Press UP " " or DOWN " "
button, to adjust the setting up
temperature.
Press the FAN SPEED button
" ", set up the fan speed, is
low speed, is middle speed,
is high speed, ( flashing )
is auto speed.
For auto fan, the speed is
chosen by the difference of room
temperature and setting
temperature.
Press the TIME OFF button " " ,
set up the time air conditioner
switch off. Press the button “ ”
each time, adjusting up 1 hour;
Press the button “ ” each time,
adjusting up 1 minute; When the
time is over, the air conditioner
will be switched off automatically.
If press this button again before
the air conditioner switch off, the
timer off setting will cancelled.
3.10 TIMER ON FUNCTION
Sequence of the operations
The air conditioner is switched off.
Press the TIME ON button " " ,
set up the time which the air
conditioner switch on. Press the
button “ ”each time, adjusting
up 1 hour; Press the button “ ”
each time, adjusting up 1 minute.
Set up the operation MODE,
TEMPERATURE, FAN SPEED etc.,
when the time is arrived, the air
conditioner will start automatically.
If the TIMER ON button is pressed
again, the TIMER ON setting will be
cancelled.
40 SANTIAGO
143.USE AND MAINTENANCE ENGLISH
3.11 ELECTRICAL HEAT FUNCTION
Sequence of the operations
Press the ON/OFF button " ",
switch on the air conditioner, it will
run by memory mode.
Press the MODE button " " set
up the mode to heat “ ”, the unit
will run in heating.
Press UP " " or DOWN " "
button, to adjust the setting up
temperature.
Press the FAN SPEED button
" ", set up the fan speed, is
low speed, is middle speed,
is high speed, ( flashing )
is auto speed.
For auto fan, the speed is
chosen by the difference of room
temperature and setting
temperature.
Press the assistant
ELECTRICAL HEAT button “ ”,
the icon will display on the LCD,
starting the assistant heat; press
this button again, stop the
assistant heat.
Press the ON/OFF button “ ”,
switch off the unit. Next time when
this button is pressed, the unit will
operates in this mode by memory.
15 SANTIAGO 413.USE AND MAINTENANCE ENGLISH
3.12 On board control function
RUNNING LED : Signal the working state of compressor
ON/OFF BUTTON: turn on or turn off the air conditioner
MODE BUTTON: turn on or turn off the air conditioner
COOLING LED: Signal the cooling state
HEATING LED: Signal the heating state
ELECTRICAL HEAT BUTTON: Turn on or turn off the electrical heat.
ELECTRICAL HEAT LED: Signal the electrical heat.
DOWN BUTTON: Decrease the temperature and time
UP BUTTON: Increase the temperature and time
FAN SPEED BUTTON: Set up the fan speed
HIGH SPEED LED: Signal the high speed working state
MIDDLE SPEED LED: Signal the middle speed working state
LOW SPEED LED: Signal the low speed working state
AUTO FAN LED: Signal the automatic fan state
If you select the AUTO speed, the fan speed is according with the room
temperature and setting temperature.
Room temperature-setting temperature>5 C, high speed.
0
Room temperature-setting temperature>3 C, middle speed.
0
Room temperature-setting temperature>1 C, low speed.
0
Temperature display window
The display will show both setting temperature and ambient temperature.
After adjusting the setting temperature, the setting temperature will flash
15 minutes on the display, then the display will show the ambient temperature
for 70seconds. After that, the display will be off until next adjustment.
42 SANTIAGO
163.USE AND MAINTENANCE ENGLISH
3.13 Fresh air system
Fresh air pipe 50
Fresh air filter
Fresh air system
There is fresh air system in the back of the unit. On the wall, the fresh air pipe would
be 50mm accordingly. The air conditioner will change the room air automatically, in
this way new clean and fresh air will intake to the room.
Same time, the air conditioner performance would be lower.
The filer should be cleaned regularly to keep the fresh air flow smoothly. Take out the
filter as the arrow direction, wash it (not use hot water) and only when it is dried replace
it in same way.
ATTENTION: Do not use the air conditioner without the filter.
3.14 INSTALL AND CHANGE THE BATTERY
- Open the cover of battery, hold the hook and
lightly pull up.
- Insert the battery(AAA,2pcs), the positive
must be same with the mark on the plastic
surface.
- Reinstall the cover of battery.
Inspection: If press ON / OFF button “ ” no
icons are displayed, please install the battery
again.
17 SANTIAGO 433.USE AND MAINTENANCE ENGLISH
3.15 MAINTENANCE
(P15,P16,P17,P18)
P16
FILTERS CLEANING:
The filter should be regularly cleaned to
keep the air conditioner running efficiently.
Clean the filters every two weeks.
How to proceed:
- Disconnect the air conditioner from the
electrical supply.
- Extract the filer grating. (P15) on the same
direction of the arrow.
Take out the filter as shown P17.
Proceen to wash them (not use hot water) and
only when they are dried replace them in the P18
same way.
ATTENTION: Do not use the air conditioner
without filters as it could seriously damage
the air conditioner.
P17
EXTERNAL CLEANING:
- Disconnect the air conditioner from the
electrical supply.
- Wipe external surfaces clean with a damp
cloth only.
- Do not use an abrasive cloth or solvents,
as this may damage the surfaces.
- Do not use excessively wet cloths or
P19
sponges, as water stagnation could damage
the air conditioner and compromise safety. ACTIVE CARBON FILTER
The unit includes active carbon filter, which not
only has the function of eliminating suspended
matters that a common mechanical filter has,
P15 but also can eliminate foreign matters such as
LIFT IT UP free chlorine, odors, colors and toxic matters
HERE
that are difficult to filter out by matters that are
LIFT IT UP difficult to filter out by using conventional
HERE
approaches.
With active carbon filter, the room air would be
fresh and good for the body health.
Is advisable to change them every three month,
because it’s not possible to wash or clean them.
44 SANTIAGO 183.USE AND MAINTENANCE ENGLISH
POSITION OF ELECTRIC HEATER POSSIBLE SOLUTIONS
1. Wrong setting of the timer / Check it.
2. Problems on the power supply / Call the
service center.
3. The filter could be dirty / Clean it.
4. The room temperature is too high / Wait
until the temperature goes down.
5. The temperature is not properly set / Check
it.
6. The grids could be obstructed / Check and
remove the eventual obstacles.
- Dampness in the room, coming from walls,
There are two electric heaters on both carpets, furnishing or similar.
sides of unit, and they would be controlled - Wrong installation of the air conditioner.
by remote control or on board control. - Wrong connection of the drainage pipe.
- Exhausted batteries.
- Wrong insertion of the batteries inside the
remote control.
- Protection of the conditioner. Wait for 3 min
and the air conditioner will start to work again.
If the supply cord damaged, it must be replaced
As the arrow direction, the inlet grille by manufacturer or its service agent or a
would be removed, and the filters would similarly qualified person in order to avoid a
be taken out. hazard.
For filters cleaning, please refer to 3.15
MAINTENANCE ”FILTER CLEANING” The max operation temperature for the air
conditioner:(max cooling: outdoor DB43 C /
0
ATTENTION:
Do not cover the electric heater during the WB26 C, indoor DB32 C / WB23 C; min heating:
0 0 0
working. outdoor DB-5 0C / WB-6 0C, indoor DB20 0C )
The distance between electric heater and
wooden furniture or other inflammable This appliance is not intended for use by
things should be more than 1m. persons (including children) with reduced
physical, sensory or mental capabilities, or lack
of experience and knowledge, unless they have
3.16 PROBLEM SOLVING
been given supervision or instruction concerning
PROBLEM POSSIBLE CAUSES use of the appliance by a person responsible for
- The air conditioner does not work. their safety.
- The air conditioner does not refrigerate the
room. Children should be supervised to ensure that
- Strange smell in the room. Water drips from they do not play with the appliance.
the air conditioner.
- The remote control does not work.
- The air conditioner does not work for 3 min when
switched on.
19 SANTIAGO 45Smaltimento delle apparecchiature obsolete
Disposal of your old appliance
Entsorgung von Altgeräten
Élimination des appareillages obsolètes
Como deshacerse de aparatos elèctricos y electrónicos fiejos
Eliminação do seu antigo aparelho
IT UK DE
Smaltimento delle apparecchia- Disposal of your old appliance Entsorgung von Altgeräten
ture obsolete 1. When this crossed-out bin sym- 1. Wenn dieses Symbol eines
1. Quando su n prodotto è riportato bol appears on a product it means durchgestrichenen Abfalleimers
il simbolo di un bidone della spaz- that the product is covered by Eu- auf einem Produkt angebracht ist,
zatura sbarrato da una croce signi- ropean Directive 2002/96/EC. unterliegt dieses Produkt der euro-
fica che il prodotto è coperto dalla 2. All electrical and electronic prod- päischen Richtlinie 2002/96/EC.
Direttiva Europea 2002/96/EC. ucts should be disposed of sepa- 2. Alle Elektro-und Elektronik-Alt-
2. Tutti i prodotti elettrici ed elettro- rately from the municipal waste geräte müssen getrennt vom Haus-
nici dovrebbero essere smaltiti se- stream via specific collection facili- müll uber dafür staatlich vorgese-
paratamente rispetto alla raccolta ties designated by the government hene Stellen entsorgt werden.
differenziata municipale, mediante or the local authorities. 3. Eine ordnungsgemäße Entsor-
impianti di raccolta specifici desi- 3. Proper disposal of your old ap- gung des Altgeräts trägt dazu bei,
gnati dal governo o dalle autorità pliance will hele prevent potential Schäden an der Umwelt und der
locali. negative consequences for the en- menschlichen Gesundheit zu ver-
3. Il corretto smaltimento delle ap- vironment and human health. meiden.
parecchiature obsolete contribuisce 4. For more detailed information 4. Weitere informationen zur Ent-
a prevenire possibili conseguenze about disposal of your old appli- sorgung des Altgeräts erhalten
negative sulla salute umana e sul- ance, please contact your munici- Sie bei der Stadtverwaltung, beim
l’ambiente. pality, the waste disposal service Entsorgungsamt oder in dem Ge-
4. Per informazioni più dettaglia- or the shop where you purchased schäft, in dem Sie das Produkt er-
te sullo smaltimento delle appa- the product. worben haben.
recchiature obsolete, contattare il
comune, il servizio di smaltimento
rifiuti o il negozio in cui è stati ac-
quistato il prodotto.
FR ES PT
Élimination des appareillages Como deshacerse de aparatos Eliminação do seu antigo apa-
obsolètes elèctricos y electrónicos fiejos relho
1. Quand figure sur un produit le 1. Si en un profucto aparece el 1. Quando este símbolo de caixo-
symbole représentant une poubelle símbolo de un contenedor de bas- te do lixo com uma cruz em cima
barrée d’une croix, cela indique que ura tachado, significa que èste se estiver afixado a un produto, sig-
le produit est assujetti à la Directive acoge a la Directiva 2002/96/EC. nifica que o produto se encontra
européenne 2002/96/EC. 2. Los aparatos elèctricos no se abrangido pela Directiva Europeia
2. Tous les appareils et composants deben desechar junto con los 2002/96/EC.
électriques et électroniques doivent residuos domèsticos,sino a travès 2. Todos os produtos eléctricos e
être èliminès auprès de déchetteries de puntos de recogida designados electrónicos devem ser eliminados
spécifiques indiquées par les pou- por el gobierno o las autoridades separadamente do lixo domèstico
voirs publics nationaux ou par les locales. atravès de pontos de recolha de-
autorités lacales. 3. La correcta recogida y tratami- signados para o edeito pelo gover-
3. La bonne élimination des appa- ento de los dispositivos inserivbles no ou pelas autoridades lacais.
reillages obsolètes contribue à pré- contribuye a evitar riesgos poten- 3. A eliminação crrecta do seu apa-
venir les conséquences dommagea- ciales para el medio ambiente y la relho antigo ajuda a evitar potenciais
bles pour la santé des personnes et salud pública. consequências negativas para o
pour l’enwironnement. 4. Para obtener más información ambiente e para a saúde humana.
4. Pour plus d’informations concer- sobre cómo deshacerse de sus 4. Para obter informações mais de-
nant l’élimination des appareillages aparatos elèctricos y electrónicos talhadas acerca da eliminação do
obsolètes, veuillez contacter votre viejos, póngase en contacto con su seu aparelho antigo, contacte as
mairie, le service d’élimination des ayuntamiento, el servicio de recog- autoridades locais, um serviço de
ordures ou encore le magasin où le ida de basuras o el estable cimiento eliminação de residuos ou a loja
produit a été acheté. donde adquirió el producto. onde comprou o produto.
46 SANTIAGO
20EN
12 MONTH WARRANTY
+ 12 MONTHS IN THE
AREA PRIVATE
FINTEK S.r.l., with registered office in ViaTonso di Gualtiero 46
47896 Faetano Rep. Of San Marino
DECLARES that the following products:
SANTIAGO
1 years are guaranteed from the date of purchase if aimed at professional use
24 months if in the private sphere. It is recommended to write down the data
below in case of failure before contacting the after-sales service. To send Clean
Air Plus to service, please keep the packaging intact.
Without the same, the product travels at the customer’s risk
Telephone contact of the Assistance Service: 0549901950 r.a.
Contact by email: assistenza@finteksrl.com
Purchase date: ...............................................................................
Receipt or invoice number: ...........................................................
Product purchased at: ...................................................................
FINTEK s.r.l.
Via Tonso di Gualtiero 46,
47986 Faetano ( RSM ) Italia
Phone : +378 0549901950 r.a
commercialeitalia@finteksrl.com.
www.finteksrl.comDon’t miss the video presentations
of our air-conditioning units and
much more on our YouTube channel
via Tonso di Gualtiero, 46
47896 Faetano RSM
Tel +378 0549 901 950
commercialeitalia@finteksrl.com
www.finteksrl.com
WWW.FINTEKSRL.COMPuoi anche leggere