YOUR HEATING SYSTEM USER MANUAL FOR APP AND REMOTE CONTROL
←
→
Trascrizione del contenuto della pagina
Se il tuo browser non visualizza correttamente la pagina, ti preghiamo di leggere il contenuto della pagina quaggiù

O L F O R
             C O N   T R
     TOTA L          N G  S Y S T EM
           H E A T I
    Y O UR

USER MANUAL
FOR APP AND
REMOTE CONTROL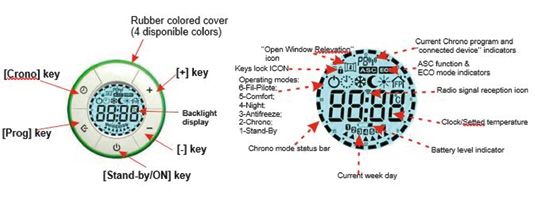
Fig. 6) Termostato SMART/SMART thermostat/Thermostat SMART

a                                                     b

Fig. 7 - Aggiungere il radiatore/Add the radiator/Ajouter le radiateur

  a                                 b                                    c

Fig. 8 - Mode STAND BY                Fig. 9 - Mode FIL PILOT            Fig. 10 - Mode COMFORT

Fig. 11 - Mode NIGHT                 Fig. 12 - Antigelo/                 Fig. 13 - Mode Programme
                                     Antifreeze/Antigel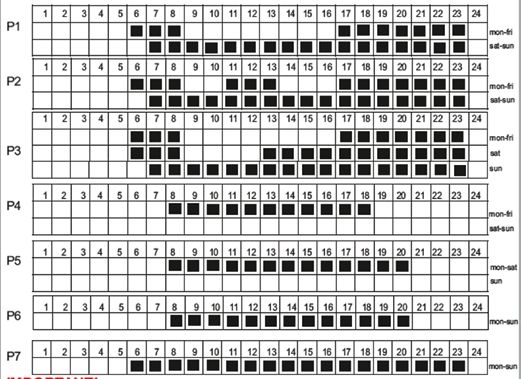
Fig. 14 - Boost 2H                 Fig. 15 - Rilevatore di finestre aperte /
                                   Open window detection

Fig. 16 - Wi-Fi

a                              b                                         c

Fig. 17- Telecomando remoto/
Remote control/Télécommande

    SU RICHIESTA/ON REQUEST
COME UTILIZZARE IL CRONOTERMOSTATO
[Fig. 6]
Il termostato ha due tasti:
1) CONNESSIONE: per connetterlo allo smartphone o al telecomando remoto; [Fig. 6a]
2) STAND-BY (Stand by o comfort 20°C). [Fig. 6b]
MODALITÀ OPERATIVE: Stand-by, Fil Pilot, Comfort, Riduzione notturna, antigelo,
termostato programmabile, BOOST 2H, ECO, rilevatore di finestre aperte, ASC.
LED: ogni funzione corrisponde a una luce LED sull’elettronica che si illumina con colori differenti
in base alle modalità operative, come segue:
COLORI LED COLORI LED
MODALITà OPERATIVE Termostato posizionato in basso Termostato posizionato di lato
STAND-BY verde verde
FIL-PILOT verde lampeggiante arancio
COMFORT rosso rosso
RIDUZIONE NOTTURNA blu azzurro
BOOST 2H rosso lampeggiante rosso lampeggiante
ANTIGELO blu lampeggiante blu
CHRONO verde lampeggiante
(velocità differente) bianco
RADIATORI 2000 SMART APP
Il termostato Radiatori 2000 smart comunica in modo bidirezionale con l’app
gratuita RADIATORI 2000 SMART app, disponibile per smartphone e tablet
compatibili con i sistemi iOS e Android. L’applicazione si connette al termo-
stato via Bluetooth o tramite il modulo Wi-Fi remoto con autenticazione
criptata al router di casa.
IL LED BLU INDICA IL TRAFFICO DATI BLUETOOTH, NON WI-FI.
OGNI VOLTA CHE IL TERMOSTATO RICEVE UN COMANDO BLUETOOTH, QUESTO VIENE
SEGNALATO SIA DAL LED BLU SIA DA UN SEGNALE ACUSTICO.
REQUISITI PER LA CONNESSIONE:
a) Scaricare la app gratuita Radiatori 2000 SMART da Google Play per sistemi Android o App
Store per sistemi iOS.
b) Verificare che siano ATTIVI GPS e POSIZIONE sullo smartphone/tablet;
c) Registrarsi all’app creando un account con mail e password facendo attenzione a non lasciare
spazi tra le lettere e numeri.
a b cA) CONNETTERE IL TERMOSTATO ALLA APP TRAMITE BLUETOOTH
ATTENZIONE:
- Sistemi compatibili per la connessione BLUETOOTH: iOS 10 o più recenti; Android 8 o più
recenti;
- Dispositivi NON compatibili con la connessione Bluetooth (consigliato uso di solo Wi-Fi):
Huawei P8/P9/P10 e P8/P9/P10 lite, Huawei P20 Lite; Xiaomi Mi 6.
PER LA CONNESSIONE BLUETOOTH:
1. Entrare nell’app e aggiungere dispositivo come richiesto dalla schermata nella sezione
Bluetooth:
a. Sistema ANDROID: premere subito il tasto di connessione sul termostato (attivo
per circa 90 sec). Apparirà una luce blu lampeggiante sul termostato. Aggiungere il
dispositivo come richiesto.
b. Sistema iOS: la connessione tra smartphone e termostato è immediata senza
necessità di premere il pulsante di connessione sul termostato: è sufficiente che il
radiatore sia collegato a una presa di alimentazione elettrica.
Aggiungere un dispositivo come da visualizzazione sulla schermata Bluetooth.
Se la connessione non dovesse andare a buon fine ripetere l’operazione.
2. Aggiungere il radiatore con il bottone + ADD ONE sullo schermo dello smartphone. Ogni
radiatore è inserito automaticamente con il nome ONE. [Fig. 7]
3. Rinominare ogni radiatore con il nome desiderato, selezionandolo. (per es. radiatore camera,
radiatore bagno ecc.).
4. Una volta registrati tutti i radiatori in casa, è possibile iniziare a controllare ognuno di essi
toccando il nome del radiatore scelto.
ASSOCIARE UN ULTERIORE TERMOSTATO ALL’APP TRAMITE BLUETOOTH:
1. Toccare il simbolo di impostazioni in alto a destra sulla schermata iniziale dell‘app.
2. Selezionare “AGGIUNGERE BLUETOOTH”.
3. Ripetere tutte le operazioni precedenti.
É possibile associare più dispositivi smartphone/tablet alla stessa app scaricandola su ogni
dispositivo. Tuttavia è possibile controllare i radiatori tramite un solo dispositivo alla volta.
B) CONNETTERE IL TERMOSTATO ALLA APP TRAMITE Wi-Fi
REQUISITI PER LA CONNESSIONE:
a) Verificare che siano ATTIVI GPS e POSIZIONE sullo smartphone/tablet;
b) Avere vicino il CODICE QR fornito insieme al termostato.
PER LA CONNESSIONE Wi-Fi:
1. Entrare nell’app e andare nell’area Wi-Fi dell’applicazione [Fig. 16a];
2. Selezionare AGGIUNGERE WI-FI [Fig. 16b];
3. Selezionare AGGIUNGERE TERMOSTATO NON ANCORA CONNESSO ALLA RETE DI CASA
[Fig. 16c];
4. Leggere attentamente i controlli proposti dalla app per il corretto funzionamento (per es.
Attivare il Wi-Fi dello smartphone/tablet);
5. Selezionare VAI ALLE IMPOSTAZIONI;
6. Attivare la rete Wi-Fi;
7. Connettere il dispositivo alla rete rad_2000_wifi_xxxx.NOTA BENE: Attendere che il dispositivo sia effettivamente connesso alla rete. Attendere la
comparsa della dicitura di connessione oppure la comparsa del simbolo Wi-Fi in alto a destra
sulla schermata del cellulare (l‘operazione può richiedere fino a 1 minuto di attesa).
Per i sistemi Android: accettare la connessione alla rete come da dicitura che compare sulla
schermata.
8. La app propone a questo punto le reti domestiche a cui ci si potrà associare. Nel caso in cui
non venga proposta la rete toccare RIPROVA.
9. Selezionare la rete domestica desiderata.
10. Inserire la password relativa alla rete di casa selezionata. NOTA BENE: Verificare la correttezza
della password con relativi spazi, minuscole e maiuscole.
(ATTENZIONE: se inserite una password errata, attivare la procedura di RESET: premere il tasto
di connessione del termostato per 15 secondi).
11. Confermare la rete domestica selezionata. Una volta confermata, l’app ci reindirizzerà alla
schermata Bluetooth.
12. Tornare alla schermata Wi-Fi.
13. Selezionare AGGIUNGERE Wi-Fi – aggiungi uno adesso [Fig. 16b];
14. Selezionare AGGIUNGERE TERMOSTATO GIÀ CONNESSO ALLA RETE DI CASA [Fig. 16c];
15. A questo punto, scannerizzare il codice QR fornito insieme al termostato;
16. Rinominare il radiatore col nome desiderato.
ASSOCIARE UN ULTERIORE TERMOSTATO ALL’APP TRAMITE Wi-Fi:
1. Selezionare il simbolo impostazioni in alto a destra;
2. Selezionare AGGIUNGI Wi-Fi;
3. Selezionare AGGIUNGI TERMOSTATO GIÀ CONNESSO ALLA RETE DOMESTICA;
4. Inquadrare il codice QR del nuovo radiatore e rinominarlo come i precedenti.
RISOLUZIONE PROBLEMI
Se il radiatore dovesse avere problemi di programmazione con il Wi-Fi e non si accendesse/
spegnesse ad orari prestabiliti come da programmazione dell’utente (vedi paragrafi seguenti)
consigliamo:
A) Di connettere il termostato prima tramite Bluetooth e successiva-
BT
mente tramite Wi-Fi.
Consigliamo di effettuare questa operazione almeno una volta
alla prima connessione in modo che la app sincronizzi data e ora
prendendo come riferimento le impostazioni data e ora dello smar-
tphone/tablet.
B) Riprovare connessione Wi-Fi e riprogrammazione Cronotermostato.FUNZIONI Le seguenti funzioni possono essere attivate tramite l’app Radiatori 2000 SMART o tramite il telecomando remoto. 1. STAND-BY [Fig. 8] In modalità STAND-BY il termostato non scalda. 2. FIL PILOTE [Fig. 9] È possibile collegare il termostato ad una centralina Fil-Pilote. NOTA: tale connessione è possibile solo per i modelli in Classe II forniti senza spina. Il FIL PILOTE è un protocollo di comunicazione speciale che permette al radiatore d’essere gestito da un’unità di controllo speciale. La gestione della modalità è effettuata dalla centralina, mentre la regolazione della temperatura è gestita dall’utente sul cronotermostato. 6 types of command are recognized: 1) Comfort : SET POINT = temperatura della modalità di comfort 2) Riduzione notturna: SET POINT = comfort - 3.5°C 3) ECO1 : SET POINT = comfort -1°C 4) ECO2 : SET POINT = comfort -2°C 5) ANTIGELO: SET POINT = 7°C 6) Arresto: nessuna regolazione della temperatura, radiatore spento. Modalità STAND-BY. Le temperature di riferimento sono quelle definite in modalità comfort. 3. COMFORT [Fig. 10] In modalità COMFORT, è possibile regolare la temperatura preferita con i tasti PIÙ e MENO. Il radiatore rimane acceso fino al raggiungimento della temperatura selezionata. Il programma COMFORT è indicato da una freccia a sinistra sul simbolo del sole e la temperatura di comfort è mostrata sullo schermo. La temperatura selezionata è utilizzata sia per la programmazione settimanale come livello di comfort e nella modalità FIL PILOTE come temperatura di comfort. 4. RIDUZIONE NOTTURNA [Fig. 11] In modalità notturna, si può regolare la temperatura preferita con i tasti PIÙ e MENO. Questa temperatura è indipendente dalla temperatura di comfort. Il programma di riduzione notturna è indicata dalla freccia sul simbolo della luna. La temperatura selezionata è utilizzata sia per la programmazione settimanale (par. 8) sia come livello di temperatura notturna. 5. ANTIGELO [Fig. 12] In questa modalità di funzionamento, la temperatura non può essere regolata dall’utente, ma è fissa a 7°C. In modalità antigelo, la freccia indica il simbolo della neve e sullo schermo vengono mostrati 7°C. Questa modalità impedisce alla temperatura dell’ambiente di scendere al di sotto dei 7°C. 6. MODALITÀ PROGRAMMAZIONE [Fig. 13] Il termostato ONE offre una programmazione giornaliera e settimanale. In questa modalità operativa, il termostato regola la temperatura secondo il programma giornaliero, usando la temperatura di comfort e la riduzione notturna impostate. La funzione è indicata dal simbolo dell’orologio. La temperatura selezionata è visibile sullo schermo dello smartphone. Per programmare il termostato, andare al paragrafo 9.
7. BOOST 2H           [Fig. 14]
La modalità BOOST 2H può essere utilizzata per riscaldare rapidamente l'ambiente o accelerare
l'asciugatura delle salviette. L'apparecchio viene acceso alla massima potenza per 2 ore, con
temperatura impostata a 30 ° C. La modalità BOOST 2H è impostata per arrestarsi automaticamente
dopo un periodo di 2 ore e tornare alla modalità operativa precedentemente impostata. L’utente può
tornare a qualsiasi modalità operativa semplicemente selezionando l’icona corrispettiva sullo
smartphone.

8. RILEVATORE DI FINESTRE APERTE [Fig. 15]
La funzione è rilevata dal rilevatore di finestre aperte. La funzione è attivata quando la temperatura
scende rapidamente, (quando una finestra è aperta nella stanza). Quando lo stato di finestre aperte
è rilevato, lo schermo mostra l’icona della finestra aperta e il radiatore va in antigelo a 7°C. Lo stato
finisce automaticamente se viene rilevata la chiusura della finestra.

9. PROGRAMMAZIONE SETTIMANALE 24H/24 E 7J/7
Il termostato ha 7 programmi preimpostati e 2 programmi personalizzabili.
Per utilizzare la modalità programmazione, selezionare l’icona CRONO. [Fig. 14]
Qui di seguito i diagrammi dei 7 programmi predefiniti. I box neri corrispondno alla
temperatura di comfort: i box bianchi alla riduzione notturna.

Con i programmi P8 e P9, è possibile definire un calendario personalizzato per ogni giorno
della settimana. Dal giorno 1, selezionare la sequenza desiderata per scegliere, per ogni ora,
se avere la temperatura “COMFORT” (box neri) o “RIDUZIONE NOTTURNA” (box bianchi).
Ripetere la stessa procedura per i rimanenti 6 giorni della settimana.
CONTROLLO REMOTO [Fig. 17]
Alternativamente all’applicazione, l’elettronica comunica anche con un telecomando remoto
che può essere acquistato su richiesta.
Il telecomando remoto ha una connessione wireless: può essere portatile o agganciato al
mur vicino al radiatore (distanza massima: 4 metri).

Utilizzando il telecomando remoto, è possibile controllare il termostato SMART con le
stesse modalità operative: Stand-by, Fil Pilot, Comfort, Riduzione notturna, Antigelo,
Termostato programmabile, BOOST 2H, ECO, rilevatore di finestre aperte, ASC.

              Per ulteriori informazioni e istruzioni dettagliate, visitare il sito
                                        www.ridea.it
                                        o scrivere a
                             customerservice@radiatori2000.it

ASSOCIAZIONE AL TELECOMANDO
Premere il tasto ON / Stand-by per accendere l'unità o attivare la modalità "Stand-by".
Quando l'unità è attiva, vengono visualizzate la modalità e la temperatura impostate.

1) PRIMO AVVIO E ASSOCIAZIONE AL CONTROLLO REMOTO (telecomando)
Quando non è associato nessun dispositivo, il display del telecomando mostra la parola
“Conn” fino a che almeno un termostato One è associato.

2) CONNESSIONE DEL PRIMO DISPOSITIVO
Mentre la parola “Conn” è ancora presente sullo schermo, avvicinarsi all’unità fissa e premere
il tasto di Pairing del cronotermostato, e poi premere il tasto PROG del telecomando.
Il simbolo di ricerca appare sullo schermo finché non si trova il termostato, o passano 10
secondi.
Se in questo lasso di tempo il termostato non viene identificato, ripetere l’operazione, avvici-
nando maggiormente i due dispositivi e accertandosi che i passaggi siano seguiti corretta-
mente.

3) CONNESSIONE DI ULTERIORI DISPOSITIVI
STAND-BY ----> CRONO: per eseguire l'associazione occorre essere nello stato di Stand-by e
premere il tasto Crono per 5 secondi.
selezionare con + & - PAIR sullo schermo del telecomando e poi premere il tasto PROG
Seguendo i passaggi precedenti si accede alla schermata '' Conn '' (vedere paragrafo prece-
dente).
In questo caso, se si dispone già di un'unità fissa in memoria, premendo ON / OFF è possibile
uscire dalla schermata "Conn"; se sono già presenti 8 unità fisse in memoria verrà chiesto
quale eliminare e sostituire con la nuova unità (per la completa eliminazione del termostato
selezionato, la nuova connessione deve avere esito positivo).

4) CAMBIARE L'UNITÀ FISSA DA GESTIRE
Il telecomando utilizza una sola unità fissa alla volta. per selezionare un'altra unità fissa:
- Da STAND-BY: premere [Chrono] x 5 sec -----> Selezionare SLCT con [+] & [-] e premere
[Prog] per confermare.
- Da un diverso stato di stand-by: [Chrono] x 5 sec ------> seleziona dispositivo numero X con
[+] & [-] ------> Premere [Prog] per confermare.
5) RESET Elimina tutte le unità fisse memorizzate e resetta il telecomando alle impostazioni di fabbrica: STAND-BY ----> CRONO x 5 sec ----> selezionare con + & - RSET sullo schermo ----- -> PROG Il messaggio RSET lampeggerà sullo schermo, a questo punto premere nuovamente il tasto PROG per confermare. Ripristinare o premere il tasto ON/OFF (o attendere) per annullare. Il termostato ritorna in attesa della prima connessione. 6) ICONA BATTERIA Quando le batterie sono quasi scariche, l'icona della batteria si illumina. Il il telecomando può ancora essere utilizzato, ma è meglio usare batterie nuove. Quando la carica della batteria non è più sufficiente, viene visualizzata sul telecomando la parola "BATT" e smette di funzionare fino allo spegnimento o alla sostituzione delle batterie. SPECIFICA DELLE FUNZIONI E CONTROLLO CON TELECOMANDO STAND-BY Premere il tasto ON / Stand-by per accendere l'unità o attivare la modalità "Stand-by". Quando l'unità è attiva, vengono visualizzate la modalità e la temperatura impostate. Durante lo stato "Stand-by" il display mostra il simbolo On / Off, l'ora corrente e il giorno della settimana. NOTA: quando il dispositivo entra in modalità "Stand-by", vengono emessi 2 suoni di 0,5 secon- di. Quando il dispositivo è acceso, emette due suoni della durata di un secondo. COMFORT / NOTTE È possibile impostare due diversi livelli di temperatura: TEMPERATURA "COMFORT": è la temperatura utilizzata per le modalità "Crono", "Fil-Pilote" e "Comfort". TEMPERATURA "NOTTE": questa è la temperatura utilizzata per le modalità "Notte" e "Crono" e "Fil-Pilote". L'impostazione della temperatura desiderata può essere impostata premendo i pulsanti [+] e [-]. L'intervallo di regolazione della temperatura è compreso tra 7 ° C e 30 ° C. IMPORTANTE! La temperatura "Notte" è sempre inferiore alla temperatura "Comfort" e la priori- tà viene assegnata alla temperatura "Comfort". Per questo motivo la temperatura "Notte" può essere impostata nell'intervallo 7 ° C ÷ (Temperatura comfort selezionata), la temperatura "Comfort" può essere impostata nell'intero intervallo:da 7 a 30 °C. La modalità "Comfort" consente di mantenere la temperatura ambiente impostata. Per imposta- re questa modalità: Premere il tasto [Prog] fino a quando l'icona della modalità "Comfort" appare sul display. Impostare la temperatura desiderata con i pulsanti [+] e [-].
In modalità "Notte", viene impostata una temperatura inferiore alla temperatura "Comfort". Si
consiglia di utilizzare questa modalità di notte o quando la stanza non viene utilizzata per 2
ore o più.
Premere il tasto [Prog] fino a quando l'icona "Night" appare sul display.
Impostare la temperatura desiderata con i pulsanti [+] e [-].

ANTIGELO
Nella modalità "Antigelo" la temperatura è impostata a 7 ° C. L'apparecchio attiva l'elemento
riscaldante quando la temperatura ambiente scende sotto i 7 ° C. Si consiglia di utilizzare
questa modalità quando la stanza non viene utilizzata per diversi giorni. Premere il tasto
[Prog] fino a quando l'icona "Antigelo" appare sul display.

BOOST 2H
La modalità "2h Timer" può essere utilizzata per riscaldare rapidamente l'ambiente o accele-
rare l'asciugatura delle salviette.
- Premere il tasto [Prog] fino a quando l'icona "2h"appare sul display.
L'apparecchio viene acceso alla massima potenza per 2 ore, con temperatura impostata a 30
° C. La modalità "2h Timer" è impostata per arrestarsi automaticamente dopo un periodo di 2
ore e tornare alla modalità operativa precedentemente impostata. Se necessario, l'utente può
tornare ad altre modalità in qualsiasi momento semplicemente premendo il tasto [Prog].

FIL-PILOTE
È possibile collegare il termostato ad una centralina Fil-Pilote.
NOTA: tale connessione è possibile solo per i modelli in Classe II forniti senza spina.

MODALITA' CRONO - PROGRAMMAZIONE
a) Impostare il giorno e l'ora correnti tramite i seguenti passaggi:
- Attiva la modalità "Stand-by" e premi il tasto [Crono] per più di 3 secondi.
- Il display mostrerà le parole: "Time"
- Premere il tasto [Prog] per accedere alla modalità.
- Impostare l'anno corrente con i tasti [+] e [-].
- Premere nuovamente il tasto [Prog] per confermare.
Impostare il mese corrente con i tasti [+] e [-].
- Premere nuovamente il tasto [Prog] per confermare. Impostare il giorno corrente con i tasti
[+] e [-].
- Premere nuovamente il tasto [Prog] per confermare.
Il display ora mostra l'ora corrente da confermare
'Ore': utilizzare i tasti [+] e [-] per impostare l'ora e confermare con Tasto [Prog].
'Minuti': ripetere la stessa procedura e confermare con il tasto [Prog].
- Alla fine il termostato torna in modalità "Stand-by".

ATTENZIONE: se non vengono impostati il giorno e l’ora correnti prima di programmare il
termostato, la programmazione delle fasce orarie settimanali non risulterà corretta.

b) Impostare il programma per la modalità Crono:
- Accedere alla modalità "Stand-by" e premere il tasto [Crono] per più di 3 secondi.
- Nella parte superiore del display vedrai le parole: "Time".

c) Per utilizzare una modalità predefinita o per utilizzare una delle due modalità programma-
bili (Pr8 e Pr9) premere il tasto [Stand-By / ON] e uscire dalla modalità stand-by, premere il
tasto [Prog] fino a quando sul display non viene visualizzato il simbolo .
Nella parte superiore del display viene visualizzato il programma in uso (da P1 a P9), i
programmi vengono selezionati premendo il tasto [Crono], nella parte esterna del display è
possibile vedere, per ciascun programma, le barre di funzionamento del tempo di il program-
ma indicato.
Di seguito riportati i diagrammi dei 7 programmi preimpostati:

- Per impostare la sequenza temporale programmabile della modalità "Chrono", premere il
tasto [+] fino a quando sul display non compaiono le parole Pr8 o Pr9 (Programmazione).
- Premere il tasto [Prog] per accedere alla modalità.
Ora è possibile impostare una sequenza temporale per ogni giorno della settimana.
A partire dal giorno 1, selezionare la sequenza desiderata con i tasti [+] e [-] per selezionare,
per ogni ora, tra il pulsante della temperatura "comfort" (barra piena) [+]
e il tasto [-] temperatura "Notte" (barra vuota). Premere [Prog] per confermare l'impostazio-
ne del primo giorno, ripetere la stessa procedura per i restanti 6 giorni della settimana.

FUNZIONE FINESTRE APERTE
Il dispositivo consente di rilevare la presenza di una finestra aperta per limitare il consumo di
energia. Per attivare questa modalità, attivare la modalità Stand-by, premere il tasto [Crono]
per più di 3 secondi, scorrere le modalità con il tasto [+] e selezionare FUNC con il tasto
[Prog], l'icona della finestra lampeggerà nella parte superiore sinistra del display, usando il
tasto [+] selezionare ON / OFF, visibile al centro del display, e confermare con [Prog].
      L'icona sarà attiva durante il funzionamento del termostato; se viene rilevata la finestra
aperta, l'icona lampeggerà e il sistema spegnerà il riscaldamento per un massimo di 30 minuti
o fino a un aumento della temperatura di almeno 1, 5 °C.

FUNZIONE ASC
Questa funzione consente di ottimizzare i tempi di funzionamento del dispositivo per limitare
i consumi. Attivando questa modalità, il dispositivo registrerà il tempo necessario per portare
una stanza specifica alla temperatura impostata, regolando il suo funzionamento automatica-
mente; in questo modo il termostato potrebbe essere attivato successivamente all'ora impo-
stata se è possibile raggiungere la temperatura desiderata in meno tempo di quello previsto
dagli intervalli di tempo di funzionamento che sono stati impostati.
Attivare la modalità Stand-by, premere il tasto CRONO per più di 5secondi, scorrere le moda-
lità con il tasto [+] e selezionare FUNC con il tasto PROG, premerlo fino a quando non appare
l'icona nella parte superiore dello schermo. Poi selezionare ON con il tasto [+] e premere
nuovamente PROG per confermare. Dopo pochi secondi, il telecomando torna automatica-
mente in modalità Stand-By.
FUNZIONE ECO
Questa modalità consente di limitare il consumo elettrico abbassando la temperatura di
comfort impostata di 3 gradi. Attivando questa modalità il dispositivo funziona mantenendo
una temperatura corrispondente a: TEMPERATURA IMPOSTATA - 3°C.
Attivare la modalità Stand-by, premere il tasto CRONO per per più di 5 secondi, scorrere le
modalità con il tasto [+], selezionare FUNC con il tasto PROG e premerlo fino a quando
appare l'icona; Selezionare ON con
il tasto [+] e premere nuovamente PROG per confermare. Dopo alcuni secondi, il telecoman-
do ritorna automaticamente in modalità Stand-by.
BLOCCO TASTIERA
Questa funzione consente all'utente di bloccare la tastiera per evitare cambiamenti acciden-
tali. Tutti i pulsanti sul telecomando sono bloccati. Per attivare la funzione di blocco, premere
PROG per 5 secondi.
Per disattivare la funzione, ripetere la procedura.
IMPORTANTE: IL TELECOMANDO E LA APP SONO MUTUALMENTE ESCLUSIVI E NON SI
POSSONO CONNETTERE SIMULTANEAMENTE ALLO STESSO TERMOSTATO.
RISOLUZIONE PROBLEMI
Problema Causa possibile Soluzione
Controllo operativo
é impostata una temperatura del radiatore aggiustando la
molto bassa, o molto vicina modalità comfort impostando
alla temperatura della stanza una temperatura di 25°C.
Il radiatore
non scalda
Controllare che il termostato
Il sensore della temperatura non sia coperto e
è coperto che il radiatore sia installato
ad almeno 20 cm dal pavimento.HOW TO USE THE THERMOSTAT
[Fig. 6]
The thermostat has two buttons:
1) CONNECTION: to connect a smartphone or a remote control; [Fig. 6a]
2) STAND-BY (Stand by or comfort 20 ° C). [Fig. 6b]
OPERATING MODES: Stand-by, Fil Pilot, Comfort, Night, Antifreeze, Programmable Thermostat,
BOOST 2H, ECO, detection of open windows, ASC.
LED: each function corresponds to a LED light of a different color on the electronics, as
following:
LED COLOURS LED COLOURS
OPERATING MODES Thermostat on the bottom Thermostat on the side
STAND-BY green green
FIL-PILOT flashing green orange
COMFORT red red
NIGHT REDUCTION blue light blue
BOOST 2H flashing red flashing red
ANTIFREEZE flashing blue blue
CHRONO flashing green
(different speed) white
RADIATORI 2000 SMART APP
The Radiatori 2000 smart thermostat communicates bidirectional with the free
RADIATORI 2000 SMART app, available for smartphones and tablets compati-
ble with systems iOS and Android.
The application connects to the thermostat via Bluetooth or via the module
Wi-Fi with encrypted authentication to the home router for remote control.
THE BLUE LED INDICATES THE BLUETOOTH DATA TRAFFIC, AND NOT THE Wi-Fi ONE.
EVERY TIME THE THERMOSTAT RECEIVES A BLUETOOTH COMMAND, THIS IS SIGNED BY
BOTH THE BLUE LED AND AN ACOUSTIC SIGNAL.
REQUIREMENTS FOR CONNECTION:
a) Download the free app Radiatori 2000 SMART from Google Play for Android or from App
Store for iOS systems.
b) Check that GPS and LOCATION are ACTIVE on the smartphone / tablet;
c) Register for the app by creating an account with email and password, taking care not to leave
spaces between letters and numbers.
a b cA) CONNECT THE THERMOSTAT TO THE APP VIA BLUETOOTH
ATTENTION:
- Compatible systems for BLUETOOTH connection: iOS 10 or newer; Android 8 or newer;
- Devices NOT compatible with Bluetooth connection (recommended use of Wi-Fi only):
Huawei P8 / P9 / P10 and P8 / P9 / P10 lite, Huawei P20 Lite; Xiaomi Mi 6.
FOR BLUETOOTH CONNECTION
1. Enter the app and add a device as required on the screen in the Bluetooth section:
a. ANDROID system: immediately press the connection button on the thermostat
(active for about 90 sec). A flashing blue light will appear on the thermostat. Add
the device as required.
b. iOS system: the connection between smartphone and thermostat is immediate
without the need to press the connection button on the thermostat: it is sufficient that
the radiator is connected to an electrical power socket.
Add a device as shown on the Bluetooth screen.
If the connection is not successful, repeat the operation.
2. Add the radiator with the + ADD ONE button on the smartphone screen. Each radiator is
automatically entered with the name ONE. [Fig. 7]
3. Rename each radiator to the desired name by selecting it. (e.g. room radiator, bathroom
radiator, etc.).
4. Once you have registered all the radiators in your home, you can start checking each of them
by tapping the name of the chosen radiator.
PAIRING TO AN ADDITIONAL THERMOSTAT TO THE APP VIA BLUETOOTH:
1. Touch the settings symbol at the top right of the app home screen.
2. Select “ADD BLUETOOTH”.
3. Repeat all the previous operations.
It is possible to associate multiple smartphone / tablet devices to the same app by downlo-
ading it to each device. However, it is possible to control the radiators with only one device
at a time.
B) CONNECT THE THERMOSTAT TO THE APP VIA Wi-Fi
REQUIREMENTS FOR CONNECTION:
a) Check that GPS and LOCATION are ACTIVE on the smartphone / tablet;
b) Have the QR CODE supplied with the thermostat nearby.
FOR Wi-Fi CONNECTION:
1. Enter the app and go to the Wi-Fi area of the application [Fig. 16a];
2. Select ADD Wi-Fi [Fig. 16b];
3. Select ADD THERMOSTAT NOT YET CONNECTED TO HOME NETWORK [Fig. 16c];
4. Carefully read the controls proposed by the app for correct operation (e.g. Activate the Wi-Fi
of the smartphone / tablet);
5. Select GO TO SETTINGS;
6. Activate the Wi-Fi network;
7. Connect the device to the network rad_2000_wifi_xxxx.PLEASE NOTE: Wait until the device is actually connected to the network. Wait for the word for
connection to appear or for the Wi-Fi symbol to appear at the top right of the mobile phone
screen (this can take up to 1 minute to wait).
For Android systems: accept the connection to the network as indicated on the screen.
8. At this point, the app proposes the home networks to which you can associate. If the network
is not proposed, tap RETRY.
9. Select the desired home network.
10. Enter the password for the selected home network. PLEASE NOTE: Check the correctness of
the password with relative spaces, lowercase and uppercase.
(ATTENTION: if you enter an incorrect password, activate the RESET procedure: press the
thermostat connection button for 15 seconds).
11. Confirm the selected home network. Once confirmed, the app will redirect you to the Bluetooth
screen.
12. Return to the Wi-Fi screen.
13. Select ADD Wi-Fi - add one now [Fig. 16b];
14. Select ADD THERMOSTAT ALREADY CONNECTED TO THE HOME NETWORK [Fig. 16c];
15. At this point, scan the QR code supplied with the thermostat;
16. Rename the radiator with the desired name.
PAIRING TO AN ADDITIONAL THERMOSTAT TO THE APP VIA Wi-Fi:
1. Select the settings symbol at the top right;
2. Select ADD Wi-Fi;
3. Select ADD THERMOSTAT ALREADY CONNECTED TO THE HOME NETWORK;
4. Scan the QR code of the new radiator and rename it like the previous ones.
TROUBLESHOOTING
If the radiator has programming problems with Wi-Fi and does not turn on / off at set times as
per user programming (see the following paragraphs), we recommend:
A) To connect the thermostat first via Bluetooth and then via Wi-Fi.
BT
We recommend carrying out this operation at least once at the first
connection so that the app synchronizes the date and time starting
from the date and time settings of the smartphone / tablet.
B) Retry Wi-Fi connection and programmable thermostat reprogram-
ming.FUNCTIONS
The following functions can be activated via the Radiatori 2000 SMART app or via he remote
control.
1. STAND-BY [Fig. 8]
In STAND-BY mode, the radiator does not heat up.
2. MODE FIL PILOTE [Fig. 9]
FIL PILOT is a special communication protocol that allows the radiator to be managed by a
special control unit. The modes are managed by the central, while the temperature setting
is managed by the user on the chronothermostat.
6 types of command are recognized.
Command Fil Pilote :
1) Comfort : set point = comfort mode temperature.
2) Night reduction : set point = comfort -3.5°C
3) ECO1 : set point = comfort -1°C
4) ECO2 : set point = comfort -2°C
5) Antifreeze: set point = 7°C
6) Stop: no temperature regulation, radiator off. Mode STAND-BY.
The reference temperatures are those defined in comfort mode.
3. MODE COMFORT [Fig. 10]
In Comfort mode, you can set the desired temperature with the PLUS and LESS buttons.
The radiator remains ON until the set temperature is reached. The Comfort program is
indicated by the sun symbol. The selected temperature is also used for the weekly program
(par. 9) as a comfort level and in FIL PILOTE mode (par. 2) as a comfort temperature point.
4. NIGHT MODE [Fig. 11]
In Night mode, you can set the desired temperature with the PLUS and LESS buttons.
This temperature is independent from the comfort temperature. The NIGHT program
is indicated by the moon symbol. The selected temperature is also used for the weekly
program (par. 9) as night level temperature.
5. ANTIFREEZE [Fig. 12]
In this operating mode, the temperature cannot be adjusted by the user, but is fixed at 7 ° C.
In antifreeze mode, the screen indicates the snow symbol and the antifreeze temperature,
bent at 7 ° C. This mode prevents the ambient temperature from falling below 7 ° C.
6. MODE PROGRAM [Fig. 13]
Radiatori 2000 Smart is a 24/7 programmable thermostat.
In this operating mode, the thermostat regulates the temperature according to the daily program,
using comfort temperature or night setback temperature programmed. The function is indicated
by the clock symbol. The selected temperature is displayed on the screen.7. BOOST 2H [Fig. 14] This mode can be used to heat the environment quickly. The device is delivered on full power for 2 hours with a temperature set at 30 ° C. BOOST 2H mode it is configured to stop automatically after a period of 2 hours and return to operating mode previously defined. If necessary, the user can return to other modes in any moment simply by selecting them. 8. OPEN WINDOWS DETECTION [Fig. 15] The function can detect the open window state. The function is activated when the temperature drops quickly, (when a window is open in the room). When the window open state is detected, the screen displays the window icon and the radiator goes to antifreeze at 7 ° C. The status automatically ends if the window closure is detected. 9. PROGRAMMAZIONE SETTIMANALE 24H/24 E 7J/7 The thermostat has 7 preset programs and 2 user customizable programs. To use the programmable mode, select the CHRONO icon. [Fig. 13] Here below the diagrams of the 7 predefined programs. The black boxes correspond to the comfort temperature; the white boxes to the night reduction. With programs P8 and P9, it is possible to define a personalized calendar for each day of the week. From day 1, select the desired sequence to choose, for every hour, to have the tempera- ture "COMFORT" (full boxes) or "NIGHT" (empty boxes). Repeat the same procedure for the remaining 6 days of the week.
REMOTE CONTROL                          [Fig. 17]
As an alternative to the application, the electronics also communicate with a remote remote
control which can be purchased on request.
The remote control has a wireless connection: it can be portable or docked to the mur near the
radiator (maximum distance: 4 meters).
Utilizzando il telecomando remoto, è possibile controllare il termostato SMART con le
stesse modalità operative: Stand-by, Fil Pilot, Comfort, Riduzione notturna, Antigelo,
Termostato programmabile, BOOST 2H, ECO, rilevatore di finestre aperte, ASC.

            For more information and detailed instructions, see the website.
                                    www.ridea.it
                                     or write to
                         customerservice@radiatori2000.it

PAIRING TO THE REMOTE CONTROL
Press the ON / Stand-by button to turn on the device or activate “Stand-by” mode.
When the unit is active, the setting mode and temperature are displayed.

1) FIRST USE AND PAIRING WITH THE REMOTE CONTROL
When no device is paired, the remote display will show the word “Conn” as long as at least one
thermostat is paired.

2) CONNECTION TO THE FIRST DEVICE
While the word “Conn” is still on the screen, approach the stationary unit and press the Pairing
button on the chronothermostat, then press the [PROG] button on the remote control.
The search symbol appears on the screen until the thermostat is found, or 10 seconds elapse.
If during this time the thermostat is not identified, repeat the operation bringing the two
devices together and making sure that the steps are correctly followed.

3) CONNECTION TO OTHER DEVICES
STAND-BY ----> CHRONO: to make the association, you must be in Stand-by and press the
Chrono button for 5 seconds.
Select with + & - PAIR on the remote control screen, then press the PROG button.
By following the previous steps, you access the ''Conn'' screen (see previous paragraph).
In this case, if you already have 8 units in memory, by pressing ON / OFF you can exit the
"Conn" screen; if there are already 8 fixed units in the memory, you will be asked which one to
delete and replace with the new unit (for the complete elimination of the selected thermostat,
the new connection must be successful).

4) CHANGE THE FIXED UNIT (THERMOSTAT) TO MANAGE
The remote control only uses one fixed unit at a time. To select another fixed reader:
- From STAND-BY: press [Chrono] for 5 sec -----> Select SLCT with [+] & [-] and press [Prog]
to confirm.
- From another operative mode: Press [Chrono] for 5 sec ------> select the number of the
device X with [+] & [-] ------> press [Prog] to confirm.
5) RESET Delete all stored fixed units and reset the remote control to factory settings: STAND-BY ----> CHRONO x 5 sec ----> select with + & - RSET on the screen ----- -> PROG. The message RSET will flash on the screen. At this point, press again the button PROG to confirm . Reset or press the button ON / OFF (or wait) to cancel. The thermostat returns to wait the first connection. 6) BATTERY ICON When the batteries are low, the battery icon will light up. The remote control can still be used, but it is best to use new batteries. When the battery power is low, the word "BATT" will be displayed on the remote control and will stop working until the batteries are turned off or replaced. SPECIFICATION OF FUNCTIONS WITH THE REMOTE CONTROL STAND-BY Press the ON / Stand-by button to turn on the device or activate “Stand-by” mode. When the unit is active, the setting mode and temperature are displayed. During the "Stand-by" state, the display shows the ON / OFF symbol, the current time and the day of the week. NOTE: when the device goes into “Stand-by” mode, 2 beeps of 0.5 seconds are emitted. When the device is on, it emits two beeps lasting one second. COMFORT / NIGHT REDUCTION Two different temperature levels can be set: TEMPERATURE "COMFORT": this is the temperature used for the "Crono", "Fil-Pilote" and "Comfort" modes. TEMPERATURE "NIGHT": this is the temperature used for the "Night", "Chrono" and "Fil-Pilote" modes. The desired temperature setting can be adjusted by pressing the [+] and [-] buttons. The temperature adjustment range is between 7 ° C et 30 ° C. IMPORTANT! The "Night" temperature is always lower than the "Comfort" temperature and priority is given to the "Comfort" temperature. For this reason, the "Night" temperature can be set in the range 7 ° C ÷ (selected comfort temperature), the "comfort" temperature can be set over the whole range: 7 to 30 ° C. The "Comfort" mode allows you to maintain the set room temperature. To adjust this mode: Press the [Prog] key until the “Comfort” mode icon appears on the screen. Set the desired temperature with the [+] and [-] buttons. In "Night" mode, a temperature lower than the "Comfort" temperature is set. It is recommended to use this mode at night or when the room is not used for 2 hours or more. Press the [Prog] key until the “Night” icon appears on the display. Set the desired temperature with the [+] and [-] buttons.
ANTIFREEZE
In "Antifreeze" mode, the temperature is set at 7 ° C. The device activates the heating element
when the ambient temperature drops below 7 ° C. It is recommended to use this mode when
the room is not used for several days. Press the [Prog] key until the "Antifreeze" icon appears
on the display.

BOOST 2H
The "BOOSTH 2h" mode allows you to quickly heat the room or speed up the drying of
towels.
- Press the [Prog] key until the "2h" icon appears on the screen.
The appliance is turned on at maximum power for 2 hours, with a temperature set at 30 ° C.
The "Boost 2h" mode is set to stop automatically after a period of 2 hours and return to the
previously set operating mode. If necessary, the user can return to other modes at any time
by simply pressing the [Prog] key.

FIL-PILOTE
It is possible to connect the thermostat to a Fil-Pilote control unit.
NOTE: this connection is only possible for Class II models supplied without plug.

CHRONO - PROGRAM MODE
a) Set the current day and time following the steps below:
- Activate the "Stand-by" mode and press the [Chrono] key for more than 3 seconds.
- The screen will display the words: "Time";
- Press the [Prog] key to enter the mode;
- Set the current year with the [+] and [-] keys;
- Press the [Prog] key again to confirm;
- Set the current month with the [+] and [-] keys;
- Press the [Prog] key again to confirm;
- Set the current day with the [+] and [-] keys;
- Press the [Prog] key again to confirm;
- The display now shows the current time to be confirmed;
- 'Hours': use the [+] and [-] keys to set the hour and confirm with the [Prog] key;
- 'Minutes': repeat the same procedure and confirm with the [Prog] key;
- Finally, the thermostat returns to "Stand-by" mode;

ATTENTION: if the current day and time are not set before programming the thermostat, the
programming of the weekly time bands will not be correct.

b) Set the program for Chrono mode:
- Access "Stand-by" mode and press the [Chrono] key for more than 3 seconds.
- At the top of the screen you will see the words: "Time".

c) To use a predefined mode or to use one of the two programmable modes (Pr8 and Pr9),
press the [Stand-By / ON] key and exit the stand-by mode, press the [Prog] key until what
the screen displays the symbol is displayed.
The program used is displayed in the upper part of the screen (from P1 to P9), the programs
are selected by pressing the [Chrono] key, in the external part of the screen it is possible to
see the command bars of the indicated program time.
The diagrams of the 7 predefined programs are shown:
- To set the programmable time sequence for "Chrono" mode, press the [+] key until the
words Pr8 or Pr9
(Programming) appear on the screen.
- Press the [Prog] key to enter the mode.
- You can now set a timeline for each day of the week.
- From day 1, select the desired sequence with the [+] and [-] keys to select, for each hour,
between the "comfort" temperature button (solid bar) [+] and the "Night temperature button
"[-] (empty bar). Press [Prog] to confirm the setting of the first day, repeat the same procedu-
re for the remaining 6 days of the week.

OPEN WINDOWS DETECTION
The device detects the presence of an open window to limit energy consumption.
To activate this mode, activate the Stand-by mode, press the [Chrono] key for more than 3
seconds, scroll through the modes with the [+] key and select FUNC with the [Prog] key. The
window icon will flash in the top left of the screen, using the [+] key, select ON / OFF, visible
in the center of the screen, and confirm with [Prog].
The icon will be active while the thermostat is operating; If the open window is detected, the
icon will flash and the system will stop heating for a maximum of 30 minutes or until a tempe-
rature increase of at least 1.5 ° C.

ASC FUNCTION
This mode allows you to limit power consumption by lowering the set comfort temperature
by 3 degrees. By activating this mode, the device operates while maintaining a temperature
corresponding to: SET TEMPERATURE - 3 ° C.
Activate the Stand-by mode, press the CHRONO key for more than 5 seconds, scroll through
the modes with the [+] key and select FUNC with the PROG key, press it until the icon appears
at the top of the screen. Then select ON with the [+] key and press PROG again to confirm.
After a few seconds, the remote control automatically returns to Stand-by mode.

ECO FUNCTION
This mode allows you to limit power consumption by lowering the set comfort temperature
by 3 degrees. By activating this mode, the device operates while maintaining a temperature
corresponding to: SET TEMPERATURE - 3 ° C.
Activate the Stand-by mode, press the CHRONO key for more than 5 seconds, scroll through
the modes with the [+] key, select FUNC with the PROG key and press it until the icon appe-
ars; Select ON with the [+] key and press PROG again to confirm. After a few seconds, the
remote control automatically returns to Stand-by mode.

KEYPAD LOCKED
This function allows the user to lock the keypad to prevent accidental changes.
All buttons on the remote control are locked. To activate the lock function, press PROG for 5
seconds.
To deactivate the function, repeat the procedure.

IMPORTANT: THE REMOTE CONTROL AND THE APPLICATION ARE MUTUALLY EXCLUSIVE
AND CANNOT BE SIMULTANEOUSLY CONNECTED TO THE SAME THERMOSTAT

                          TROUBLESHOOTING
    Problème              Cause possible                       Solution

                                                        Check operation of the
                        A low temperature is             radiator by adjusting
                        set, or is very close to          comfort mode to a
                        the room temperature             temperature of 25°C.
  The radiator
   does not
                                                       Check that the bottom
    heat up                                             of the radiator is not
                          The temperature
                          sensor is covered            covered and is at least
                                                       20 cm off the ground.
COMMENT UTILISER LE CHRONOTHERMOSTAT
[Fig. 6]
Le thermostat a deux boutons:
1) CONNEXION: pour connecter un smartphone ou une télécommande; [Fig. 6a]
2) STAND-BY (Stand by ou confort 20°C). [Fig. 6b]
MODES DE FONCTIONNEMENT: Stand-by, Fil Pilot, Confort, Nuit, Antigel, Thermostat
Programmable, BOOST 2H, ECO, détection de fenêtres ouvertes, ASC.
LED: chaque fonction correspond à une lumière LED d'une couleur différente sur l'électronique,
comme suit:
LED COLOURS LED COLOURS
OPERATING MODES Thermostat on the bottom Thermostat on the side
STAND-BY vert vert
FIL-PILOT vert clignotant orange
CONFORT rouge rouge
NUIT blue bleu clair
BOOST 2H rouge clignotant rouge clignotant
ANTIGEL bleu clignotant bleu
vert clignotant
MODE PROGRAMMATION (différent) blanc
RADIATORI 2000 SMART APP
Le thermostat intelligent Radiatori 2000 communique de manière bidirection-
nelle avec l'application gratuite RADIATORI 2000 SMART disponible pour
smartphones et tablettes compatibles avec les systèmes iOS et Android.
L'application se connecte au thermostat via Bluetooth ou via le module Wi-Fi
avec authentification cryptée auprès du routeur domestique pour télécomma-
nde.
LA LED BLEUE INDIQUE LE TRAFIC DE DONNÉES BLUETOOTH ET NON LE Wi-Fi ONE.
CHAQUE FOIS QUE LE THERMOSTAT REÇOIT UNE COMMANDE BLUETOOTH, CECI EST
SIGNÉE À LA FOIS PAR LA LED BLEUE ET UN SIGNAL ACOUSTIQUE.
EXIGENCES POUR LA CONNEXION:
a) Téléchargez l'appli gratuite Radiatori 2000 SMART de Google Play pour Android ou de l'App
Store pour les systèmes iOS.
b) Vérifiez que le GPS et la LOCATION sont ACTIFS sur le smartphone / tablette;
c) Inscrivez-vous à l'application en créant un compte avec email et mot de passe, en prenant soin
de ne pas laisser d'espace entre les lettres et les chiffres.
a b cA) CONNECTER LE THERMOSTAT À L'APPLICATION VIA BLUETOOTH
ATTENTION:
- Systèmes compatibles pour la connexion BLUETOOTH: iOS 10 ou plus récent; Android 8 ou
plus récent;
- Appareils NON compatibles avec la connexion Bluetooth (utilisation recommandée du Wi-Fi
uniquement): Huawei P8 / P9 / P10 et P8 / P9 / P10 lite, Huawei P20 Lite; Xiaomi Mi 6.
POUR LA CONNEXION BLUETOOTH1. Entrez dans l'application et ajoutez un appareil selon
les besoins sur l'écran dans la section Bluetooth:
a. Système ANDROID: appuyez immédiatement sur le bouton de connexion du thermo
stat (actif pendant environ 90 s). Une lumière bleue clignotante apparaîtra sur le
thermostat. Ajoutez l'appareil selon vos besoins.
b. Système iOS: la connexion entre smartphone et thermostat est immédiate sans qu'il
soit nécessaire d'appuyer sur le bouton de connexion du thermostat: il suffit
que le radiateur soit branché sur une prise électrique.
Ajoutez un appareil comme indiqué sur l'écran Bluetooth.
Si la connexion échoue, répétez l'opération.
2. Ajoutez le radiateur avec le bouton + ADD ONE sur l'écran du smartphone. Chaque radiateur
est automatiquement saisi avec le nom ONE. [Figure. 7]
3. Renommez chaque radiateur avec le nom souhaité en le sélectionnant. (par ex. radiateur de
pièce, radiateur de salle de bain, etc.).
4. Une fois que vous avez enregistré tous les radiateurs de votre maison, vous pouvez commen-
cer à vérifier chacun d'eux en appuyant sur le nom du radiateur choisi.
COUPLAGE À UN THERMOSTAT SUPPLÉMENTAIRE À L'APPLICATION VIA BLUE-
TOOTH:
1. Appuyez sur le symbole des paramètres en haut à droite de l'écran d'accueil de l'application.
2. Sélectionnez «AJOUTER BLUETOOTH».
3. Répétez toutes les opérations précédentes.
It is possible to associate multiple smartphone / tablet devices to the same app by downloading
it to each device. However, it is possible to control the radiators with only one device at a time.
B) CONNECTER LE THERMOSTAT À L'APP VIA Wi-Fi
EXIGENCES POUR LA CONNEXION:
a) Vérifiez que le GPS et la LOCATION sont ACTIFS sur le smartphone / tablette;
b) Ayez le QR CODE fourni avec le thermostat à proximité.
POUR LA CONNEXION Wi-Fi:
1. Entrez dans l'application et accédez à la zone Wi-Fi de l'application [Fig. 16a];
2. Sélectionnez AJOUTER Wi-Fi [Fig. 16b];
3. Sélectionnez AJOUTER UN THERMOSTAT PAS ENCORE CONNECTÉ AU RÉSEAU DOMESTI-
QUE [Fig. 16c];
4. Lisez attentivement les commandes proposées par l'application pour un fonctionnement
correct (par exemple, activer le Wi-Fi du smartphone/tablette);
5. Sélectionnez ALLER AUX PARAMÈTRES;
6. Activez le réseau Wi-Fi;
7. Connectez l'appareil au réseau rad_2000_wifi_xxxx.REMARQUE: attendez que l'appareil soit réellement connecté au réseau. Attendez que le mot de
connexion apparaisse ou que le symbole Wi-Fi apparaisse en haut à droite de l'écran du téléphone
portable (cela peut prendre jusqu'à 1 minute).
Pour les systèmes Android: acceptez la connexion au réseau comme indiqué à l'écran.
8. À ce stade, l'application propose les réseaux domestiques auxquels vous pouvez vous associer.
Si le réseau n'est pas proposé, appuyez sur RÉESSAYER.
9. Sélectionnez le réseau domestique souhaité.
10. Saisissez le mot de passe du réseau domestique sélectionné. REMARQUE: vérifiez l'exactitude
du mot de passe avec des espaces relatifs, des minuscules et des majuscules.
(ATTENTION: si vous saisissez un mot de passe incorrect, activez la procéd ure RESET: appuyez
sur le bouton de connexion du thermostat pendant 15 secondes).
11. Confirmez le réseau domestique sélectionné. Une fois confirmée, l'application vous redirigera
vers l'écran Bluetooth.
12. Revenez à l'écran Wi-Fi.
13. Sélectionnez AJOUTER Wi-Fi - ajoutez-en un maintenant [Fig. 16b];
14. Sélectionnez AJOUTER UN THERMOSTAT DÉJÀ CONNECTÉ AU RÉSEAU DOMESTIQUE [Fig.
16c];
15. À ce stade, scannez le code QR fourni avec le thermostat;
16. Renommez le radiateur avec le nom souhaité.
COUPLAGE À UN THERMOSTAT SUPPLÉMENTAIRE À L'APPLICATION VIA Wi-Fi:
1. Sélectionnez le symbole des paramètres en haut à droite;
2. Sélectionnez AJOUTER Wi-Fi;
3. Sélectionnez AJOUTER UN THERMOSTAT DÉJÀ CONNECTÉ AU RÉSEAU DOMESTIQUE;
4. Scannez le code QR du nouveau radiateur et renommez-le comme les précédents.
DÉPANNAGE
Si le radiateur a des problèmes de programmation avec le Wi-Fi et ne s'allume / s'éteint pas à
des heures définies selon la programmation utilisateur (voir les paragraphes suivants), nous vous
recommandons:
A) Pour connecter le thermostat d'abord via Bluetooth, puis via Wi-Fi.
BT
Nous vous recommandons d'effectuer cette opération au moins une
fois lors de la première connexion afin que l'application synchronise
la date et l'heure à partir des paramètres de date et d'heure du smar-
tphone / tablette.
B) Réessayez la connexion Wi-Fi et la reprogrammation du thermostat
programmable.FOCTIONS La gestion des fonctions suivantes ne peut être effectuée que via une application ou la télécommande. 1. STAND-BY [Fig. 8] En mode STAND-BY, le radiateur ne chauffe pas. 2. MODE FIL PILOTE [Fig. 9] Le FIL PILOTE est un protocole de communication spécial qui permet au radiateur d’être géré par une unité de contrôle spéciale. La gestion des modes est effectuée par la centrale, tandis que le réglage de la température est géré par l’utilisateur sur le chronothermostat. 6 types de commande sont reconnus. Commande Fil-Pilote: 1) Confort : point de consigne = température du mode confort. 2) Réduction de la nuit : point de consigne = confort -3.5°C 3) ECO1 : point de consigne = confort -1°C 4) ECO2 : point de consigne = confort -2°C 5) Antigel : point de consigne = 7°C 6) Arrêt : pas de régulation de la température, radiateur éteint. Mode STAND-BY. Les températures de référence sont celles définies en mode confort. 3. MODE COMFORT [Fig. 10] En mode Confort, il est possible de régler la température souhaitée avec les touches PLUS et MOINS. Le modèle reste allumé jusq’à ce que la temperature definie soit atteinte. Le programme Confort est indiqué par le symbole du soleil. La température sélectionnée est également employée pour le programme hebdomadaire (par. 9) en tant que niveau de confort et dans le mode FIL PILOTE (par. 2) en tant que point de temperature de confort. 4. MODE NUIT [Fig. 11] En mode Nuit, vous pouvez régler la température souhaitée avec les touches PLUS et MOINS. Cette température est indépendante de la température de confort. Le programme nuit est indiqué par le symbole de la lune. La température sélectionnée est également employée pour le programme hebdomadaire comme température de nuit niveau. 5. ANTIGEL [Fig. 12] Dans ce mode de fonctionnement, la température ne peut pas être réglé par l'utilisateur, mais est fixée à 7 ° C. En mode antigel, l’écran indique le symbole du gel et la température d’antigel, flèchie à 7 °C. Ce mode empêche la température ambiante de tomber en dessous de 7 ° C. 6. MODE PROGRAMME [Fig. 13] Dans ce mode de fonctionnement, la température ne peut pas être réglé par l'utilisateur, mais est fixée à 7 ° C. En mode antigel, l’écran indique le symbole du gel et la température d’antigel, flèchie à 7 °C. Ce mode empêche la température ambiante de tomber en dessous de 7 ° C.
Puoi anche leggere