RFM-C3 - RFM-C3 WMBUS / MBUS - GPRS/Wi-Fi/Ethernet Gateway User Manual - Manuale d'uso - B Meters
←
→
Trascrizione del contenuto della pagina
Se il tuo browser non visualizza correttamente la pagina, ti preghiamo di leggere il contenuto della pagina quaggiù
RFM-C3 WMBUS / MBUS – GPRS/Wi-Fi/Ethernet Gateway
User Manual – Manuale d’uso

RFM-C3

RFM-C3 WMBUS – GPRS/Ethernet Gateway                                                                                                                                                            User Manual – Manuale d’Uso v1.3

Table of contents - Indice

1. Description and installation – Descrizione e installazione ....................................................................................................................................................................... 3
           1.1 Description – Descrizione ................................................................................................................................................................................................................. 3
           1.2 Before you start – Prima di iniziare.................................................................................................................................................................................................. 8
           1.3 Mounting - Montaggio..................................................................................................................................................................................................................... 8

2. Function and use – Funzionamento e utilizzo.......................................................................................................................................................................................... 10
           2.1 Device startup – Avvio del dispositivo ........................................................................................................................................................................................... 10
           2.2 Notification LED and multi-functional button –LED di notifica e pulsante multifunzione ............................................................................................................. 10
           2.3 Wireless M-BUS interface – Interfaccia Wireless M-BUS ............................................................................................................................................................... 11

3. Configuration and commissioning – Configurazione e messa in opera ................................................................................................................................................ 11
           3.1 Configuration from WEB browser – Configurazione da WEB browser .......................................................................................................................................... 11
                       3.1.1 Configuration preparation – Preparazione alla configurazione ..................................................................................................................................... 12
                       3.1.2 Configuration page use – Utilizzo pagina di configurazione .......................................................................................................................................... 14
           3.2 Device test – Test dispositivo ......................................................................................................................................................................................................... 28
           3.3 Commissioning final phase – Fase finale messa in opera .............................................................................................................................................................. 29

                                                                                                                                                                                                                                               pag. 2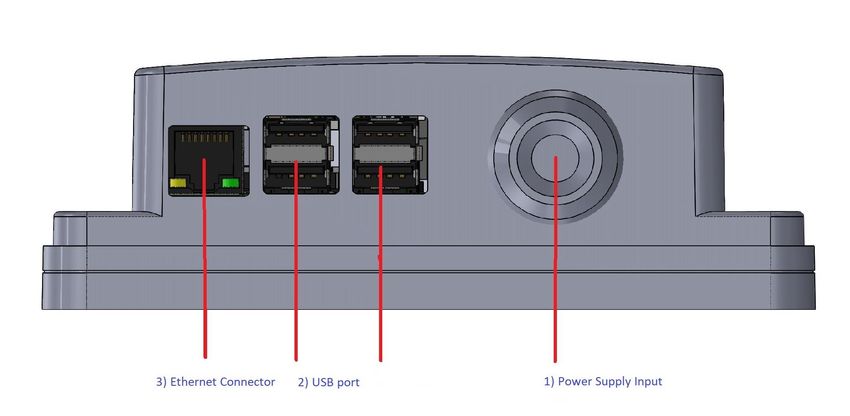
RFM-C3 WMBUS – GPRS/Ethernet Gateway                                                                                                 User Manual – Manuale d’Uso v1.3

1. Description and installation                                                       1. Descrizione e installazione
The RFM-C3 is a gateway/data concentrator that collects data sent from Wireless       L’RFM-C3 è un gateway che raccoglie i dati inviati da dispositivi M-Bus wireless e li
M-Bus devices and transmits them via GPRS signal or via Ethernet/LAN/Wi-Fi            ritrasmette tramite segnale GPRS o tramite l’utilizzo della rete Ethernet/LAN/Wi-
network. It can also be used in conjunction with the mod.MB-MASTER in order to        Fi. Può inoltre essere utilizzato congiuntamente al mod.MB-MASTER per l’invio a
remotely send the data detected from the wired MBUS modules.                          remoto dei dati rilevati dai dispositivi MBUS a filo.
The consumption data and the information sent by the compatible devices, are          I dati di consumo e le informazioni inviate dai dispositivi compatibili, vengono
collected by the RFM-C3 concentrator and sent via E-mail SMPT or using FTP server     raccolti dal concentratore RFM-C3 e, con frequenza di invio programmabile, inviati
connection by using the GPRS network or, alternatively, an Internet connection via    tramite E-Mail SMTP oppure utilizzando connessione FTP su server tramite la rete
Ethernet/LAN/Wi-Fi network.                                                           GPRS o, in alternativa, una connessione Internet sulla rete ETHERNET/LAN/Wi-Fi
The E-mail contains the file of the acquired telegrams in txt and csv format and it   La mail contiene il file dei telegrammi raccolti in formato .txt e .csv e viene inoltrata
is forwarded up to a maximum of five recipients, with hourly, daily, weekly,          fino ad un massimo di cinque indirizzi diversi con frequenza oraria, giornaliera,
monthly frequency, depending on the configuration set.                                settimanale, mensile, a seconda della configurazione.
The configuration of the device is performed by using a PC connected with a LAN       La configurazione del dispositivo avviene tramite l’utilizzo di un PC collegato
cable (RJ-45 connector) on the Ethernet port of the RFM-C3 concentrator.              tramite cavo di rete (connettore RJ-45) sulla porta Ethernet del concentratore RFM-
                                                                                      C3.

1.1 Description                                                                       1.1 Descrizione
RFM-C3 consists of a main electronic board and a Shield board dedicate to the L’RFM-C3 consiste in una scheda elettronica di comando e una scheda Shield che si
WMBUS and GPRS/GSM communication.                                             occupa della parte di comunicazione WMBUS e GPRS/GSM.

All the components are enclosed in a solid case that allows an adeguate protection    Tutti i componenti del dispositivo sono racchiusi in una solida scatola che permette
level.                                                                                un livello di protezione adeguato.
Mount the device on the wall, in a secure and protected area.                         Montare il dispositivo a muro, in luogo sicuro e protetto.
Package content:                                                                      Contenuto confezione:
▪ RFM-C3                                                                              ▪ RFM-C3
▪ Power supply +5VDC Output                                                           ▪ Alimentatore con uscita +5VDC
▪ SMA antenna                                                                         ▪ Antenna SMA
▪ GPRS antenna                                                                        ▪ Antenna GPRS
▪ “Quick User Guide” Instruction sheet                                                ▪ Foglio istruzioni “Quick User Guide”

                                                                                                                                                                      pag. 3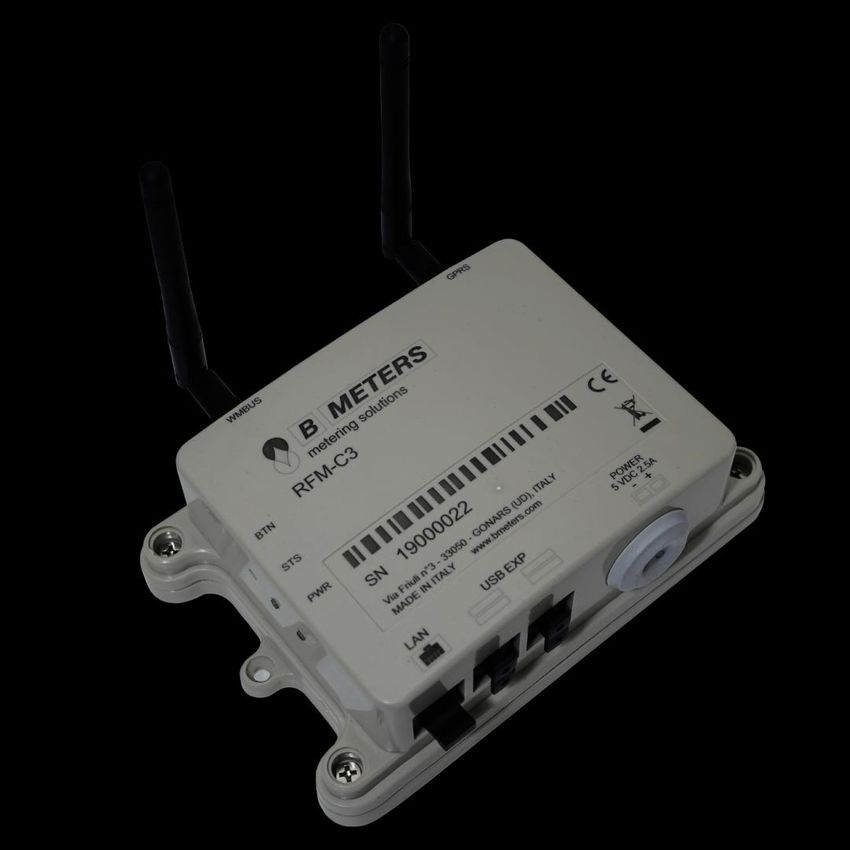
RFM-C3 WMBUS – GPRS/Ethernet Gateway                                                                           User Manual – Manuale d’Uso v1.3

Here below we describe the interfaces and connectors available.   Di seguito vengono descritte le interfacce e connettori disponibili.

1. Power supply connector                                         1. Connettore alimentatore
   Input: +5VDC                                                       Input: +5VDC
2. USB Port                                                       2. Porte USB
3. Ethernet Interface                                             3. Interfaccia Ethernet
   RJ-45                                                              RJ-45

                                                                                                                                         pag. 4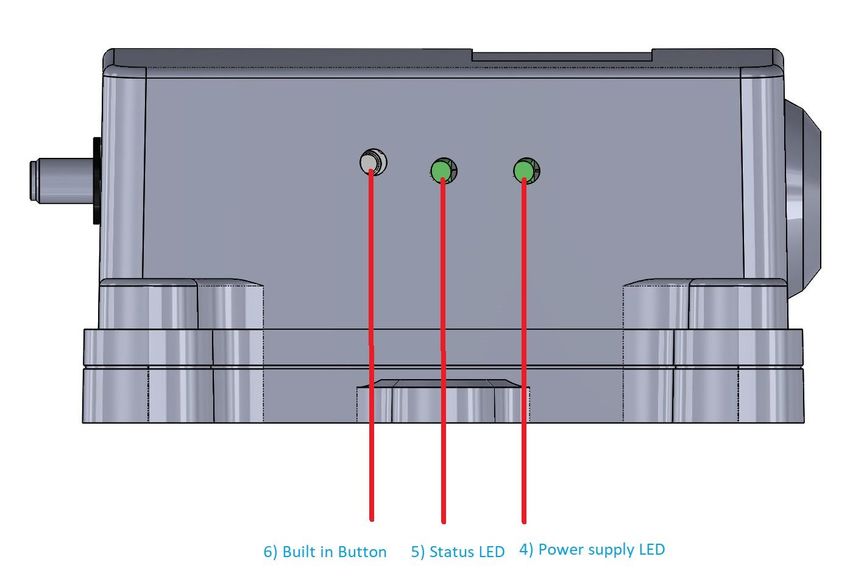
RFM-C3 WMBUS – GPRS/Ethernet Gateway                                   User Manual – Manuale d’Uso v1.3

4.   Green Power Supply LED            4. LED verde di alimentazione
5.   Red Status LED                    5. LED rosso di stato
6.   Built in Button                   6. Pulsante incassato

                                                                                                pag. 5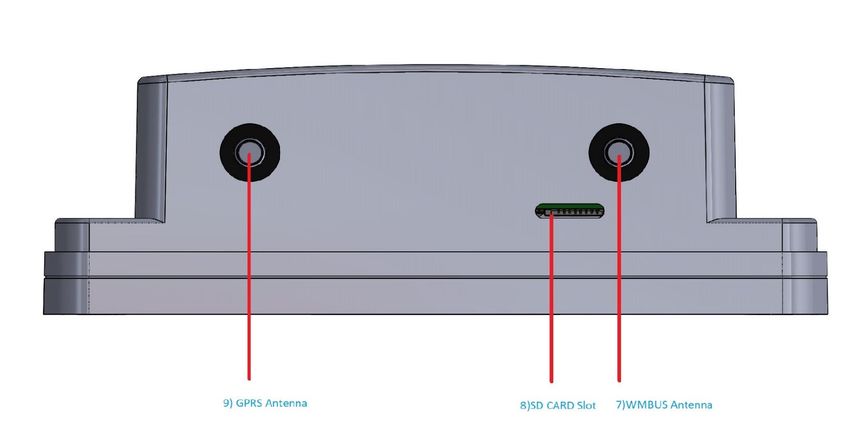
RFM-C3 WMBUS – GPRS/Ethernet Gateway                                                User Manual – Manuale d’Uso v1.3

   7. W-Mbus antenna SMA connector (included).   7. Connettore SMA per antenna W-Mbus (inclusa)
   8. SD CARD Slot                               8. Apertura per SD CARD
   9. GPRS antenna SMA connector (included).     9. Connettore SMA per antenna GPRS (inclusa).

                                                                                                             pag. 6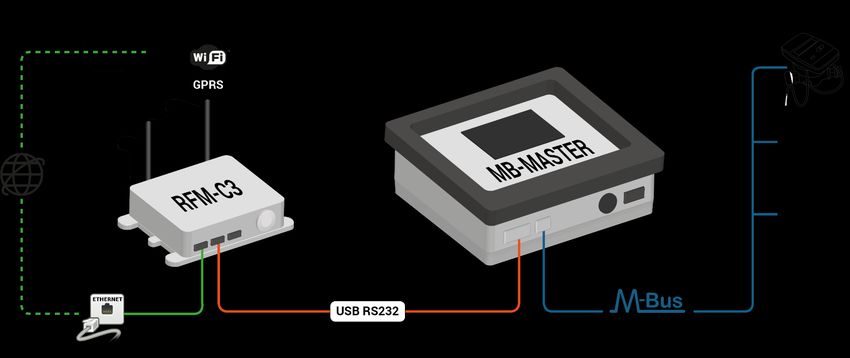
RFM-C3 WMBUS – GPRS/Ethernet Gateway User Manual – Manuale d’Uso v1.3
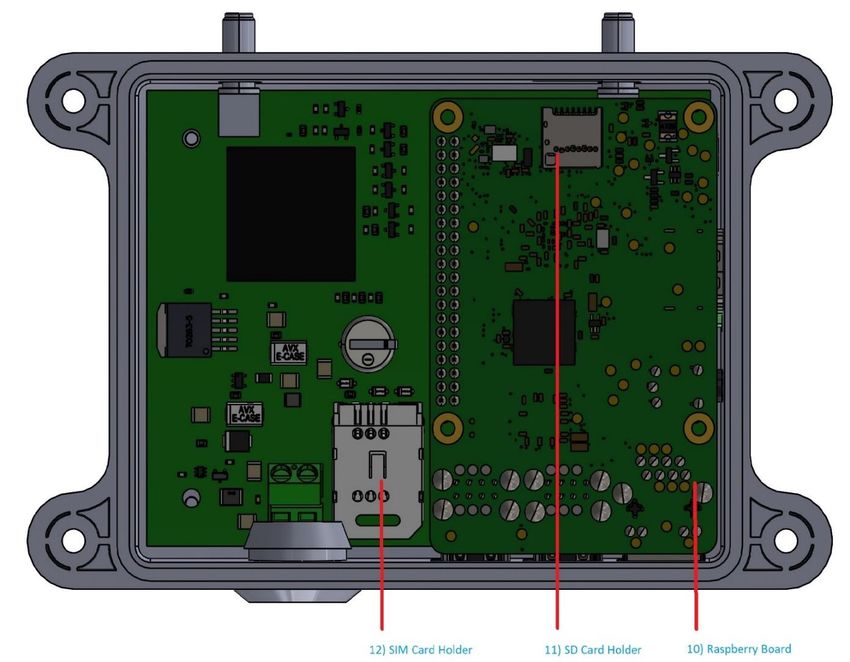
10. Raspberry Board 10. Scheda Raspberry
11. SD Card Holder 11. Supporto per SD Card
WARNING: NEVER REMOVE THIS CARD ATTENZIONE: NON RIMUOVERE MAI QUESTA SCHEDA
12. SIM card 12. SIM Card
pag. 7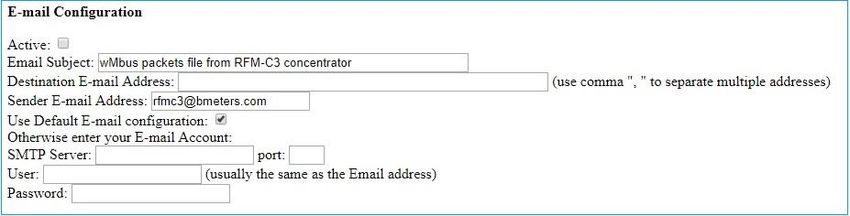
RFM-C3 WMBUS – GPRS/Ethernet Gateway                                                                                               User Manual – Manuale d’Uso v1.3

1.2 Before you start                                                                  1.2 Prima di iniziare

Installation Conditions                                                               Condizioni installazione

▪   Install RFM-C3 in a safe and protected area, away from possible radio shielding   ▪   Installare l’RFM-C3 in luogo sicuro e protetto, lontano da possibili schermature
    that might affect the reception quality.                                              radio che potrebbero influire negativamente sulla qualità della ricezione.
▪   Refer to the Technical Parameters for the allowed range of working                ▪   Fare riferimento ai Parametri Tecnici per l'intervallo di temperatura di esercizio
    temperatures.                                                                         consentito.
▪   RFM-C3 may not be operated on sites exposed to direct sunshine or in the          ▪   L’RFM-C3 non deve essere utilizzato su siti esposti alla luce del sole diretta o in
    nearby of heat sources.                                                               prossimità di fonti di calore.
▪   RFM-C3 is designed for indoor use only. Never expose it to rain, running water,   ▪   L’RFM-C3 è stato progettato per il solo uso interno. Non esporlo a pioggia,
    condensation moisture, humidity, etc.                                                 acqua corrente, formazione di condensa, umidità, ecc.
▪   RFM-C3 may not be exposed to aggressive gases, acid vapors, solvents and          ▪   L’RFM-C3 non deve essere esposto a gas aggressivi, vapori acidi, solventi e
    similar chemicals.                                                                    sostanze chimiche simili.

Caution: Make sure that you are equipped with all necessary technical means, Attenzione: Assicurarsi di avere tutti i mezzi tecnici necessari, in particolare una
particularly a GPRS supporting SIM card with PIN request disable or a PIN identical scheda SIM GPRS, con PIN disabilitato o un PIN identico a quello impostato nella
with that set in the RFM-C3 configuration                                           configurazione dell’RFM-C3.

1.3 Mounting                                                                          1.3 Montaggio

External Antenna Connection                                                           Connessione Antenna Esterna
Screw the enclosed antennas into the corresponding SMA connectors (see chapter Avvitare le antenne fornite nei connettori SMA corrispondenti (vedi paragrafo 2.1,
2.1, step 4).                                                                  punto 4).

Caution: Tighten the antennas gently with your hand; never use a tool!                Attenzione: Avvitare con cautela le antenne a mano; non utilizzare mai un utensile!

                                                                                                                                                                     pag. 8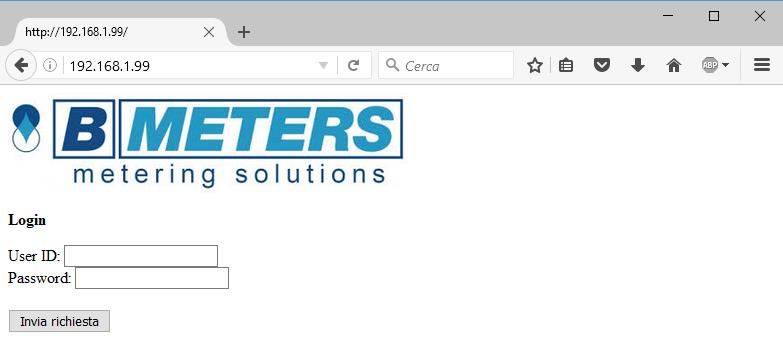
RFM-C3 WMBUS – GPRS/Ethernet Gateway                                                                                         User Manual – Manuale d’Uso v1.3

Connection to MB-MASTER                                                           Connessione a MB-MASTER

Connect the RS232-USB serial converter supplied with the MB-MASTER to one of Collegare convertitore seriale RS232-USB fornito con l’MB-MASTER ad una delle
the USB ports of the RFM-C3 concentrator (see picture below and page 4).     prese USB del concentratore RFM-C3 (vedere figura sotto e pag.4).

Note: The choice of the USB port is not crucial. It is possible to use one of your Nota: La scelta della porta USB non è fondamentale. È possibile utilizzare una a
choice.                                                                            scelta.

Power Supply                                                                      Alimentazione
RFM-C3 is +5VDC power supplied.                                             L’RFM-C3 è alimentato a +5VDC
Connect the output cable of the power supply:                               Collegare l’uscita dell’alimentatore fornito:
   - The two wires cable must be passed through the dedicated rubber gasket     ➢ il cavo dell’alimentatore va passato nel corrispondente passacavo (vedi
       (see picture above).                                                         figura sopra)
   - The two wires must be connected to the dedicated terminals inside the      ➢ i due fili del cavo di alimentazione vanno collegati alla morsettiera di
       box, paying attention to the correct polarity, +5V and ground.               alimentazione interna alla scatola, rispettando la polarità +5V e Massa.

                                                                                                                                                           pag. 9
RFM-C3 WMBUS – GPRS/Ethernet Gateway User Manual – Manuale d’Uso v1.3
Warning: Do not connect power supply before connecting an antenna to RFM-C3 Attenzione: Non connettere l’alimentazione al dispositivo prima di collegare
to avoid the WMBUS module damage. l’antenna RFM-C3 al fine di evitare danni al modulo WMBUS.
Do not connect any incompliant power supply to avoid potential irreversible Non collegare sorgenti di alimentazione incompatibili al fine di evitare danni
damages. potenzialmente irreversibili.
2. Function and use 2. Funzionamento e utilizzo
In this chapter, we provide the functions of the RFM-C3 and how to use it. In questo capitolo vengono descritte le funzioni dell’RFM-C3 e come utilizzarlo.
2.1 Device start-up 2.1 Avvio del dispositivo
To start the device up, it is sufficient to give power supply. Per avviare il dispositivo, sarà sufficiente fornirgli alimentazione elettrica.
After few moments, the LED will turn on for one minute or so (startup phase). Do Dopo qualche istante, il LED si accenderà per circa un minuto (fase di avvio). Non
not remove power supply during this procedure. rimuovere l’alimentazione elettrica durante la procedura.
During the first startup, it is recommended to reset all the parameters (see chapter Al primo avvio del dispositivo, si raccomanda di resettare i parametri (vedere
3.2) paragrafo 3.2)
2.2 Notification LED and multi-function button 2.2 LED di notifica e pulsante multifunzione
▪ Re-configuration and configuration e-mail sending: press the button for 1 ▪ Riconfigurazione e invio E-Mail di configurazione: premere il pulsante per 1
second and then release it. The led will blink once and then stay on during secondo e rilasciarlo. Il led lampeggerà una volta e poi rimarrà acceso durante
configuration sending. l’invio della configurazione.
Warning: it is important not to press the button again up to the moment when ATTENZIONE: è importante non premere nuovamente il pulsante fino a quando
the concentrator has completed this operation and the led will turn off. il concentratore non avrà terminato questa operazione e il led si spegnerà).
▪ Shut down: press the button for more than 3 seconds (and less than 8 ▪ Spegnimento: premere il pulsante per più di 3 secondi (e meno di 8 secondi),
seconds) and then release it in order to switch the concentrator off. This poi rilasciarlo per spegnere il dispositivo. Questo deve essere fatto ogni volta
should be done EVERY TIME you need to unplug the concentrator). The led will che si desidera scollegare il concentratore). Il LED lampeggerà 4 volte e dopo
blink 4 times and after 30 seconds, it will be safe to unplug the AC cord. 30 secondi sarà possibile scollegare il cavo di alimentazione in totale sicurezza.
▪ To reboot the device, it is sufficient to proceed with the shutdown (see above), ▪ Per riavviare il dispositivo, sarà sufficiente procedere prima con lo
then disconnect and re-connect the power supply. spegnimento (vedere sopra), poi scollegare e ricollegare l’alimentazione.
pag. 10RFM-C3 WMBUS – GPRS/Ethernet Gateway User Manual – Manuale d’Uso v1.3
▪ Reset parameters: press the button for more than 10 seconds and then ▪ Reset parametri: premere il pulsante per più di 10 secondi e rilasciarlo per
release it to reset configuration parameters and delete all packet data resettare i parametri di configurazione ed eliminare tutti i pacchetti ricevuti. Il
received. The led will blink twice and twice again after a second. led lampeggerà due volte e dopo un secondo altre due volte.
Note: as the device is in stand-by (so, as the device is on but no WMBUS packet is Nota: mentre il dispositivo è in stand-by (dunque, a dispositivo acceso in assenza
received and/or GPRS transmission is sent), the LED will blink every 10 seconds. di ricezione pacchetti WMBUS e/o trasmissioni GPRS), il LED lampeggerà ogni 10
secondi.
2.3 Wireless M-Bus interface 2.3 Interfaccia Wireless MBUS
The default mode of the RFM-C3 is the „listen all” (sniff mode). La modalità di default dell’RFM-C3 è in “ascolta tutto” (sniff mode).
The device will save the telegrams received in a buffer file in the internal memory, Il dispositivo salverà i telegrammi ricevuti in un file buffer nella memoria interna,
up to a maximum of 1000 telegrams. fino ad un massimo di 1000 telegrammi.
The concentrator overwrites the obsolete telegrams with newer telegrams Il concentratore sovrascrive i telegrammi obsoleti coi nuovi telegrammi ricevuti dai
received from the WMBUS devices, so the buffer file will always contain the most dispositivi WMBUS, dunque il file di buffer contiene sempre la lettura più
updated reading for each module. aggiornata di ogni modulo.
The WMBUS module 868MHz / 867MHz / 921Mhz, OMS compatible, works in T1 Il modulo WMBUS 868MHz / 867MHz / 921Mhz, compatibile OMS, funziona in
mode. It supports the data encryption. For safety reasons, the acquired messages modalità T1. È supportata la criptatura dei dati. Per questioni di sicurezza, i
are not decrypted, but they are stored as they were received. For the eventual messaggi ricevuti non vengono decriptati, ma vengono salvati così come sono stati
decryption, it will be necessary to use the reading software. ricevuti. Per l’eventuale decodifica, sarà necessario utilizzare i software di lettura.
3. Configuration and commissioning 3. Configurazione e messa in opera
In this section we describe the RFM-C3 configuration. In questa sezione viene descritta la configurazione dell’RFM-C3.
In order to proceed with the device configuration, connect the concentrator to the Per procedere alla configurazione del dispositivo, collegare il concentratore al
laptop by using an RJ-45 cable. computer utilizzando un cavo LAN RJ-45.
3.1 Configuration from WEB browser 3.1 Configurazione da browser WEB
The device can be easily configured by using the default WEB application. Il dispositivo può essere facilmente configurato utilizzando l’applicazione WEB di
Anyway, it is necessary to predispose the laptop for the communication via LAN default.
cable. To do so, follow the next instructions. Tuttavia, è necessario predisporre il computer alla comunicazione tramite cavo di
rete. Seguire dunque le seguenti istruzioni.
pag. 11RFM-C3 WMBUS – GPRS/Ethernet Gateway User Manual – Manuale d’Uso v1.3
3.1.1 Configuration preparation 3.1.1 Preparazione alla configurazione
Before proceeding with the configuration of the device, access the Control Panel Prima di procedere alla configurazione del dispositivo, accedere al Pannello di
of the laptop to predispose the laptop for the communication via LAN cable. Controllo del computer per predisporre i parametri di comunicazione tramite cavo
It will be sufficient to follow this procedure the first time only. This will allow to di rete. Sarà sufficiente seguire questa procedura soltanto la prima volta. Questo
automatically recognize the setting every time the LAN cable is connected to the permetterà di riconoscere in automatico l’impostazione ogni qualvolta che si
concentrator. collegherà il concentratore tramite cavo di rete.
Follow the next directory: Control Panel → Network and Internet → Network and Seguire dunque il seguente percorso: Pannello di controllo → Rete e Internet →
sharing center → Change adapter settings. Centro connessioni di rete e condivisione → Modifica impostazioni scheda.
On this window, right click on the “Local Network connection (LAN)”, then select Su questa finestra, premere col pulsante destro del mouse l’icona “Connessione
“Properties” from the drop-down menu. alla rete locale (LAN)”, poi selezionare “Proprietà” dal menu a tendina.
A new window will appear: select “Internet protocol version 4 (TCP/IPv4) and press Comparirà una nuova finestra: selezionare dunque “Protocollo internet versione 4
the button Properties. (TCP/IPv4) e premere il pulsante Proprietà.
pag. 12RFM-C3 WMBUS – GPRS/Ethernet Gateway User Manual – Manuale d’Uso v1.3
Comparirà una nuova finestra: selezionare “configurazione alternativa”
A new window will appear: select “Alternate configuration”
Set the option button on “User configured” and set: Impostare il pulsante di opzione su “Configurato dall’utente” ed impostare:
pag. 13RFM-C3 WMBUS – GPRS/Ethernet Gateway User Manual – Manuale d’Uso v1.3
▪ IP Address: 192.168.1.2 ▪ Indirizzo IP: 192.168.1.2
▪ Subnet Mask: 255.255.255.0 ▪ Subnet Mask: 255.255.255.0
Finally press OK to confirm the modifications. Premere infine OK per confermare le modifiche.
Then press the button Close. Premere poi il tasto Chiudi.
Now, the setting will be also maintained the next configuration via LAN cable, Ora, l’impostazione sarà mantenuta anche per le successive configurazioni via cavo
without influencing the general TCP/IPv4 settings of the laptop. LAN, senza influire sulle impostazioni TCP/IPv4 generali del computer.
3.1.2 Access to the WEB browser application 3.1.2 Accesso all’applicazione Browser WEB
To access the application, open a new window on a browser (internet Explorer, Per accedere all’applicazione, aprire una nuova finestra su un browser (Internet
Google Chrome, Mozilla Firefox etc.) and type the IP address 192.168.1.99 on the Explorer, Google Chrome, Mozilla Firefox ecc) e digitare l’indirizzo IP 192.168.1.99
URL bar and press the button “Enter” on your keyboard. sulla barra dell’URL e premere il pulsante “Invio” sulla tastiera.
pag. 14RFM-C3 WMBUS – GPRS/Ethernet Gateway User Manual – Manuale d’Uso v1.3
A login page will be shown. Verrà mostrata la pagina di login.
To access the configuration page, enter the following login information: Per accedere alla pagina di configurazione, inserire le credenziali di accesso:
User ID: admin User ID: admin
Password: bmeters Password: bmeters
3.1.2 Configuration page use 3.1.2 Utilizzo pagina di configurazione
The WEB browser configuration page allows to set all the configuration parameters La pagina di configurazione da browser WEB, permette di impostare tutti i
of the device. parametri di funzionamento del dispositivo.
Here below you can find the description of all the fields of the configuration page. Di seguito vengono riportate le descrizioni di tutti i campi presenti nella pagina di
configurazione.
pag. 15RFM-C3 WMBUS – GPRS/Ethernet Gateway User Manual – Manuale d’Uso v1.3
Ethernet configuration Configurazione Ethernet
This section allows to configure the parameters of the internet connection via LAN Questa sezione permette di configurare le impostazioni relative alla connessione
cable. alla rete internet tramite cavo LAN.
▪ Mode: It allows to set the functioning mode. Select Static if you want to assign ▪ Mode: permette di selezionare la modalità di assegnazione. Selezionare Static
a fixed IP address or Dynamic if you want the router to set all the net se si desidera impostare manualmente un IP fisso, Dynamic se si desidera che
parameters automatically. il router assegni automaticamente i parametri al concentratore.
▪ Static IP: this field allows to set the address assigned to the concentrator. In ▪ Static IP: questo campo permette di selezionare l’indirizzo IP assegnato al
Dynamic mode, if the concentrator is not connected to a router it will maintain concentratore. In modalità Dynamic, se il concentratore non fosse collegato ad
the Static IP address. un router, manterrà l’indirizzo Static IP.
▪ Subnet Mask: this field allows to set the subnet mask. ▪ Subnet mask: questo campo permette di impostare la maschera di sottorete.
▪ Static Router IP: it allows to set the gateway address (router). ▪ Static Router IP: permette di impostare l’indirizzo del gateway (router).
▪ Static DNS: this field allows to set the DNS (primary and secondary). The ▪ Static DNS: questo campo permette di impostare i DNS (primario e
default ones are 8.8.4.4 and 8.8.8.8. secondario). Di default vengono impostati i DNS 8.8.4.4 e 8.8.8.8.
▪ Dynamic IP: this shows the last IP address the concentrator has been assigned ▪ Dynamic IP: mostra l’ultimo indirizzo IP assegnato al concentratore.
to. Nota: per ottenere un IP dinamico, possono volerci fino a due minuti dopo
Note: to obtain a dynamic IP, it could take up to 2 minutes after the l’avvenuta configurazione.
configuration is completed.
pag. 16RFM-C3 WMBUS – GPRS/Ethernet Gateway User Manual – Manuale d’Uso v1.3
Wi-Fi configuration Configurazione Wi-Fi
This section allows to configure the parameters of the Wi-Fi internet connection. Questa sezione permette di configurare le impostazioni relative alla connessione
alla rete internet tramite Wi-Fi.
▪ Active: tick this checkbox to enable Wi-Fi connection ▪ Active: spuntando questa casella, si attiverà la connessione Wi-Fi.
▪ SSID: in this field it is necessary to enter the name of the Wi-Fi network (make ▪ SSID: in questo campo è necessario indicare il nome della rete Wi-Fi (prestare
sure to check capital letters and eventual spaces/symbols/numbers). attenzione alle lettere maiuscole e ad eventuali spazi/simboli/numeri).
▪ Password: in this field it is necessary to enter the password of the Wi-Fi ▪ Password: in questo campo è necessario inserire la password della rete Wi-Fi.
network (WPA2). ▪ Mode: permette di selezionare la modalità di assegnazione. Selezionare Static
▪ Mode: It allows to set the functioning mode. Select Static if you want to assign se si desidera impostare manualmente un IP fisso, Dynamic se si desidera che
a fixed IP address or Dynamic if you want the router to set all the net il router assegni automaticamente i parametri al concentratore.
parameters automatically. ▪ Static IP: questo campo permette di selezionare l’indirizzo IP assegnato al
▪ Static IP: this field allows to set the address assigned to the concentrator (if concentratore (se impostato in Static mode).
set in Static mode). ▪ Subnet mask: questo campo permette di impostare la maschera di sottorete.
▪ Subnet Mask: this field allows to set the subnet mask. ▪ Static Router IP: permette di impostare l’indirizzo del gateway (router)
▪ Static Router IP: it allows to set the gateway address (router). ▪ Static DNS: questo campo permette di impostare i DNS (primario e
▪ Static DNS: this field allows to set the DNS (primary and secondary). The secondario). Di default vengono impostati i DNS 8.8.4.4 e 8.8.8.8.
default ones are 8.8.4.4 and 8.8.8.8. ▪ Dynamic IP: mostra l’ultimo indirizzo IP assegnato al concentratore.
▪ Dynamic IP: this shows the last IP address that has been assigned. Nota: per ottenere un IP dinamico, possono volerci fino a due minuti dopo
Note: to obtain a dynamic IP, it could take up to 2 minutes after the l’avvenuta configurazione.
configuration is completed.
pag. 17RFM-C3 WMBUS – GPRS/Ethernet Gateway User Manual – Manuale d’Uso v1.3
GPRS configuration Configurazione GPRS
This section allows to configure the parameters of the GPRS internet connection. Questa sezione permette di configurare le impostazioni relative alla connessione
alla rete internet tramite GPRS.
▪ Active: tick this checkbox to enable GPRS connection ▪ Active: spuntando questa casella, si attiverà la connessione GPRS.
▪ Provider APN: in this field it is necessary to enter the Access Point Name (APN) ▪ Provider APN: in questo campo è necessario indicare l’Access Point Name
of the SIM card provider. (APN) del provider della scheda SIM.
▪ Username: enter the username of the APN (if required) ▪ Username: inserire l’username dell’APN (se richiesto).
▪ Password: enter the password of the APN (if required) ▪ Password: inserire la password dell’APN (se richiesta).
▪ PIN: in this field it is necessary to enter the PIN of the SIM card (if protected ▪ PIN: in questo campo è necessario inserire il PIN della SIM card (se protetta
by a PIN code) da codice PIN).
▪ Signal Strength: indication of the last GPRS signal level (read every time an e- ▪ Signal Strength: in questo campo viene mostrato l’ultima rilevazione del
mail is sent). segnale GPRS (viene letto ogni volta che viene spedita una mail).
pag. 18RFM-C3 WMBUS – GPRS/Ethernet Gateway User Manual – Manuale d’Uso v1.3
FTP configuration Configurazione FTP
This section allows to set the parameters of the FTP server where the report file Questa sezione permette di configurare le impostazioni relative al server FTP dove
will be sent. verranno inviati i file di report.
▪ Active: tick this checkbox to enable GPRS connection ▪ Active: spuntando questa casella si abilita il collegamento FTP
▪ FTP Server: enter here the FTP server IP address (e.g.: ▪ FTP Server: Inserire in questo campo l’indirizzo del server FTP (per
ftp://webftp.bmeters.com) esempio: ftp://webftp.bmeters.com)
▪ Username: enter the Username of the FTP server account ▪ Username: Inserire in questo campo il nome del server FTP
▪ Password: enter the Password of the FTP server account ▪ Password: Inserire in questo campo la Password del server FTP
▪ File Directory: Default directory for file transfer (e.g.: /user/RFM- ▪ File Directory: Directory di riferimento per il trasferimento dei files (per
C3_readings) esempio: /user/RFM-C3_letture)
Sender E-mail configuration Configurazione invio E-mail
This section allows to set the parameters of the SMTP server that will send the Questa sezione permette di configurare le impostazioni relative al server SMTP di
report and configuration mail. invio delle mail di report e configurazione.
pag. 19RFM-C3 WMBUS – GPRS/Ethernet Gateway User Manual – Manuale d’Uso v1.3
▪ Active: tick this checkbox to enable E-mail. ▪ Active: spuntando questa casella, si abiliterà la trasmissione delle E-mail.
▪ Email Subject: here you can enter the subject for the E-mail that will be sent. ▪ Email Subject: qui è possibile inserire un oggetto della mail che verrà spedita.
▪ Destination E-mail Address: in this field it is possible to enter the recipient ▪ Destination E-Mail address: in questo campo è possibile inserire gli indirizzi di
addresses of the report E-mail. It is possible to add up to five different destinazione delle mail di report. E’ possibile inserire fino a 5 diversi indirizzi
addresses (it is sufficient to separate them with a comma “ , “). (sarà sufficiente separarli da una virgola “ , “).
▪ Sender E-mail Address: in this field it is necessary to enter the E-Mail address ▪ Sender E-mail Address: in questo campo è necessario inserire l’indirizzo E-Mail
from which the report and configuration mail will be sent (it can be any dal quale vengono inviate le mail di report e configurazione (è possibile
address, but it’s advised to use one from the same domain name to avoid utilizzare qualsiasi indirizzo, ma si consiglia di utilizzarne uno appartenente allo
being recognized as spam). stesso dominio per evitare che i messaggi vengano riconosciuti come spam).
▪ Use Default E-mail configuration*: a default SMTP server is already provided. ▪ Use Default E-mail configuration*: un SMTP server di default è già presente.
In case you need to use your own E-mail account unselect this box and fill the Nel caso sia necessario utilizzare un account SMTP alternativo deselezionare
fields below. questa casella e compilare i campi sottostanti.
▪ SMTP Server*: type here the SMTP server address. ▪ SMTP server*: inserire in questo campo l’indirizzo del server SMTP.
▪ Port*: in this field you can type the port of the SMTP server. ▪ Port*: inserire in questo campo la porta del server SMTP.
▪ User*: type the SMTP E-Mail account username. ▪ User*: inserire l’username dell’account mail SMTP.
▪ Password*: type the SMTP E-Mail account password. ▪ Password*: inserire la password dell’account mail SMTP.
*Note: using of the default SMTP server (Use Default E-mail configuration: *Nota: l’utilizzo del server SMTP di default (Use Default E-mail configuration:
enabled) will only allow the pkfile.txt sending (therefore not of the csv file) abilitato) permetterà l’invio del solo pkfile.txt (dunque non del file csv) contenente
containing the telegrams received from both wireless and wired MBUS devices. In i telegrammi ricevuti dai dispositivi MBUS wireless e cablati. Non sarà inoltre
addition, data sending with hourly frequency will not be available (maximum disponibile l’invio con frequenza oraria (massima frequenza impostabile: 1 invio al
configurable frequency: 1 data transmission per day). giorno).
To enable the data transmission of the .csv file containing the reading reports and Per abilitare l’invio del file .csv contenente i report di lettura e la frequenza oraria,
the hourly frequency option, you will need to use your own SMTP server. sarà necessario utilizzare un server SMTP proprio.
Moreover, the .csv file can contain the information decoded from OMS compatible Inoltre, il file csv potrà contenere soltanto le informazioni decodificate da
telegrams. telegrammi OMS compatibili.
pag. 20RFM-C3 WMBUS – GPRS/Ethernet Gateway User Manual – Manuale d’Uso v1.3
Sending Data Invio dati
This section allows to configure the parameters of the sending of the report E- Questa sezione permette di configurare le impostazioni relative all’invio delle
mail/files. mail/file di report.
▪ Send Through: Is it possible to select the mode the data will be sent, E-mail ▪ Send Through: è possibile selezionare il modo di invio dei dati, E-mail o FTP o
or FTP or both mail. entrambi.
▪ Days of Month: it is possible to select the days in which the report will be sent ▪ Days of month: è possibile selezionare in quali giorni del mese inviare il report
by ticking one or more checkboxes. To send everyday just select ALL. spuntando una o più caselle. Per spedire ogni giorno selezionare ALL.
▪ Send Hour: This allows to set the hour of report sending. ▪ Send Hour: permette di selezionare l’orario di invio della mail.
▪ Send every hour: spuntando questa opzione, verrà abilitato l’invio orario dei
▪ Send every hour: by ticking this option, the hourly report data sending
report di lettura.
will be enabled. Per abilitare l’invio del file .csv contenente i report di lettura e la frequenza
To enable the data transmission of the .csv file containing the reading oraria, sarà necessario utilizzare un server SMTP proprio.
reports and the hourly frequency option, you will need to use your own Inoltre, il file csv potrà contenere soltanto le informazioni decodificate da
SMTP server. telegrammi OMS compatibili.
Moreover, the .csv file can contain the information decoded from OMS
compatible telegrams.
pag. 21RFM-C3 WMBUS – GPRS/Ethernet Gateway User Manual – Manuale d’Uso v1.3
Device configuration
This section allows to set the device basic parameters
Impostazioni dispositivo
Questa sezione permette di configurare le impostazioni base del dispositivo.
▪ Device ID: in this field you can indicate a reference code of the concentrator ▪ Device ID: in questo campo è possibile indicare codice di riferimento del
(will be shown in the E-Mail subject). concentratore (verrà mostrato nell’oggetto della E-Mail).
▪ Configuration E-mail Address: in this field you can enter an E-mail address ▪ Configuration E-Mail address: in questo campo è possibile inserire un indirizzo
where the configuration mails will be sent (if you leave this field blank the mail a cui spedire le mail di configurazione (nel caso in cui il campo venga
destination address will be used) lasciato vuoto, verrà utilizzata la mail indicata sul Destination E-mail address).
▪ Current Date / Time: time and date of the device will be automatically ▪ Current date/ time: data e ora del dispositivo vengono aggiornate in
updated as the device connects to the internet. automatico non appena il dispositivo si collegherà alla rete internet.
▪ Continent: Select the continent where the device will be installed. ▪ Continent: selezionare il continente dove il dispositivo verrà installato.
▪ City: select the reference city for the Time Zone selection. ▪ Città: selezionare la città di riferimento per il fuso orario.
Reading options configuration Configurazione opzioni lettura
In this section it is possible to set the reading options. In questa sezione è possibile impostare le opzioni di lettura.
pag. 22RFM-C3 WMBUS – GPRS/Ethernet Gateway User Manual – Manuale d’Uso v1.3
▪ Read always: if this is selected the concentrator will read all the time. ▪ Read always: se selezionato, il concentratore sarà sempre in ricezione.
▪ Days of Week: select the reading day/s by ticking one or more checkboxes. ▪ Days of Week: selezionare il/i giorno/i di lettura spuntando una o più caselle.
▪ Start Reading Hour: the hour of reading start. ▪ Start Reading Hour: permette di impostare l’ora di inizio lettura.
▪ Stop Reading Hour: the hour of reading end ▪ Stop Reading Hour: permette di impostare l’ora di fine lettura.
▪ Number of wMbus Devices Installed: Select the number of devices installed ▪ Number of WMBUS Devices installed: selezionare il numero di dispositivi
on field. installati in campo.
▪ Erase old packets: it allows to delete the data packets stored. ▪ Erase old packets: permette l’eliminazione dei pacchetti dati memorizzati.
The following options are available: Sono disponibili le seguenti opzioni:
➢ Never: by ticking this option, the packets will never be deleted (they will ➢ Never: spuntando questa opzione i pacchetti non verranno mai eliminati
be overwritten anyway as per normal operation). (saranno comunque sovrascritti come da regolare funzionamento).
➢ Only once: by ticking this option, the packets will be deleted only when ➢ Only once: spuntando questa opzione i pacchetti verranno cancellati solo
the device is configured. in occasione della configurazione del dispositivo.
➢ Every Monday: by ticking this option the packets will be deleted at 00:00 ➢ Every Monday: spuntando questa opzione i pacchetti verranno cancellati
on every Monday. solo alle 00:00 di ogni lunedì.
➢ Every 1 ° of the month: by checking this option, the packages will be ➢ Every 1° of the month: spuntando questa opzione i pacchetti verranno
cancellati solo alle 00:00 di ogni primo del mese.
deleted at 00:00 on the first day of every month.
CSV Configuration Configurazione CSV
In this section it is possible to configure the options regarding the data report In questa sezione è possibile impostare le opzioni relative all’invio del file di report
sending in a csv file. This file contains the reading data already decripted and in formato csv. Questo file conterrà i dati di lettura già decriptati e ordinati per una
orderd for an easier and quicker consult (for OMS compatible devices only). più facile e veloce consultazione (disponibile solo per dispositivi compatibili OMS).
pag. 23RFM-C3 WMBUS – GPRS/Ethernet Gateway User Manual – Manuale d’Uso v1.3
▪ Send raw file: by selecting this checkbox, the raw file (pkfile) containing the ▪ Send raw file: selezionando questa spunta, verrà inviato il file raw (pkfile)
"raw" telegrams of the wired and wireless MBUS modules will be sent. contenente i telegrammi „grezzi” dei dispositivi MBUS cablati e wireless.
▪ Send also .csv files: by selecting this check, in addition to the raw file sending, ▪ Send also .csv files: selezionando questa spunta, oltre all’invio del file raw,
the csv files data sending will be enabled. verrà abilitato l’invio dei file csv.
Note: To enable this feature, you will need to use your own SMTP server (Email Nota: per abilitare questa funzione, sarà necessario utilizzare un server SMTP
and Email+FTP sending option only; FTP sender only won’t require it)). proprio (solo per invio Email e Email+FTP; per l’invio solo FTP non è richiesto).
▪ WaterMeter / HeatMeter / HeatCostAllocator / ▪ WaterMeter / HeatMeter / HeatCostAllocator /
HumidityTemperatureSensor / Other: Here you can select the type of HumidityTemperatureSensor / Other: qui è possibile selezionare il tipo di
Wireless MBUS devices that will be received. The concentrator will create and dispositivi Wireless MBUS che verranno ricevuti. Il concentratore creerà e
send a different csv file for each of these categories, containing the data of the invierà un file csv diverso per ognuna di queste categorie, contenente i dati dei
relative device types. relativi tipi di dispositivi.
▪ Single File: by selecting this option, the transmission of a single csv file will be ▪ Single File: selezionando questa opzione, verrà abilitato l’invio di un file csv
enabled for all Wireless MBUS devices received. Unlike the previous category, unico per tutti i dispositivi Wireless MBUS ricevuti. Diversamente dalla
this file contains less details, but will group all devices into one file only. categoria precedente, questo file conterrà meno dettagli, ma raggrupperà tutti
▪ M-BUS: selecting this option enables the transmission of a csv file containing i dispositivi in un unico file.
the reading data of the wired MBUS modules of the network of the MB- ▪ M-BUS: selezionando questa opzione, verrà abilitato l’invio di un file csv
MASTER connected to the concentrator. contenente i dati di lettura dei moduli MBUS a filo della rete dell’MB-MASTER
▪ Export file language: Here you can select the language of the csv file sent. collegato.
pag. 24RFM-C3 WMBUS – GPRS/Ethernet Gateway User Manual – Manuale d’Uso v1.3
(Italian / English). ▪ Export file language: Qui è possibile selezionare la lingua del file csv inviato.
▪ AES Global key 1-2-3: if the Wireless MBUS devices are encrypted with a global (italiano / inglese).
key, it will be necessary to indicate the global AES key set so that the ▪ AES Global key 1-2-3: nel caso in cui i dispositivi Wireless MBUS siano criptati
concentrator can decrypt the data and report them in the csv file. It is possible con chiave globale, sarà necessario indicare la chiave AES globale impostata
to indicate up to three keys: the concentrator will attempt to decrypt with all così che il concentratore possa decriptare i dati e riportarli “in chiaro” nel file
three of them. csv. È possibile indicare fino a tre chiavi: il concentratore tenterà di decriptare
▪ Individual AES keys: in case the Wireless MBUS devices are encrypted with an con tutte e tre.
individual key, it will be necessary to upload the file (.keys) of the individual ▪ Individual AES keys: nel caso in cui i dispositivi Wireless MBUS siano criptati
AES keys so that the concentrator can decrypt the data and report them in the con chiave individuale, sarà necessario caricare il file (.keys) delle chiavi AES
csv file. individuali così che il concentratore possa decriptare i dati e riportarli “in
It is necessary to upload a single file containing the keys of all devices to be chiaro” nel file csv.
decrypted. Attempting to load multiple files in sequence is not allowed, as the È necessario caricare un file unico contenente le chiavi di tutti i dispositivi da
concentrator will overwrite the files from time to time. decriptare. Tentare di caricare più file in sequenza non è concesso, in quanto il
concentratore sovrascriverà i file di volta in volta.
Configuration submit (SUBMIT button) Conferma configurazione (pulsante SUBMIT)
Una volta inseriti tutti i parametri di configurazione desiderati, premere il pulsante
As all the configuration data has been entered, press the button Submit
in order to confirm the configuration and to send the configuration parameters to Submit per confermare la configurazione e per trasmettere i parametri
the concentrator. After few seconds the LED will turn on (parameters saving al concentratore. Dopo pochi istanti il LED si accenderà (fase di salvataggio
phase). impostazioni).
Within one minute the configuration saving process will be completer and the LED Entro un minuto il processo di configurazione sarà terminato e il LED si spegnerà.
will turn off.
pag. 25RFM-C3 WMBUS – GPRS/Ethernet Gateway User Manual – Manuale d’Uso v1.3
MBUS Wired Setup Configurazione MBUS cablato
In this section it is possible to configure the options regarding MBUS network In questa sezione è possibile impostare le opzioni relative alla rete MBUS
controlled by the MB-MASTER connected to the concentrator. controllata dall’MB-MASTER collegato al concentratore.
▪ Retries: Here you can set the number of retries for the MBUS scan. ▪ Retries: Qui è possibile impostare il numero di tentativi per la scansione MBUS.
▪ Timeout (s): Here you can select the response timeout value for the MBUS ▪ Timeout (s): Qui è possibile selezionare il valore di timeout risposte per la
scan. It is recommended to keep at least 2,0 seconds. scansione MBUS. Si raccomanda di tenere almeno 2,0 secondi.
▪ Primary address search: by ticking the checkbox, the search by primary ▪ Primary address search: spuntando la casella, viene abilitata la ricerca per
address is enabled. Unticking the checkbox will make the concentrator search indirizzo primario. Non spuntare la casella farà eseguire al concentratore la
by secondary address. ricerca per indirizzo secondario.
pag. 26RFM-C3 WMBUS – GPRS/Ethernet Gateway User Manual – Manuale d’Uso v1.3
▪ From [] to []: here you can indicate the range of primary addresses to be ▪ From [] to []: qui è possibile indicare l’intervallo di indirizzi primari da
searched during the MBUS scan. interrogare durante la scansione MBUS.
▪ Scan Devices: it allows you to start scanning the MBUS network. The scanning ▪ Scan Devices: permette di avviare la scansione della rete MBUS. La scansione
will be done by primary address if the primary address search checkbox is avverrà per indirizzo primario se la casella primary address search è
ticked, or by secondary address if the primary address search checkbox is selezionata, oppure per indirizzo secondario se la casella primary address
unticked. search è deselezionata.
During the scanning operation, the following icon will appear: Durante l’operazione di scansione, comparirà la seguente icona:
The end of the procedure will be signaled by a notification window of the Il termine della procedura verrà infine segnalato da una finestra di notifica del
browser in use. browser in uso.
▪ Secondary address search MSB / LSB: allows you to set the desired order of ▪ Secondary address search MSB/LSB: permette di impostare l’ordine dei bit
the bits for the search by secondary address. desiderato per la ricerca per indirizzo secondario.
If you opt for the search by secondary ID without indicating the specific Nel caso in cui si opti per eseguire una ricerca per secondario senza indicare gli
addresses to be queried (in the table below), you will need to indicate one of indirizzi specifici da interrogare (nella tabella sottostante), sarà necessario
the two boxes. indicare una delle due caselle.
▪ Table of secondary addresses to search: if you prefer to search for specific ▪ Tabella indirizzi secondari da interrogare: nel caso in cui si desideri
secondary addresses, it will be possible to indicate them in the text table by interrogare degli indirizzi secondari specifici, sarà possibile indicarli nella
reporting the various serial numbers separated by a comma [,], as shown in tabella di testo riportando i vari seriali separati da una virgola [,], come
the example above. mostrato nell’esempio sopra.
▪ Detected Device List: the devices detected during the MBUS scan will be listed ▪ Elenco dispositivi rilevati: i dispositivi rilevati durante la scansione MBUS
at the end of the web page. verranno riportati in un elenco alla fine della pagina web.
Note: for a better performance and ease of use, it is advisable to set the MBUS Nota: per una migliore performance e semplicità di utilizzo, si consiglia di
network up by using the MB-MASTER + BMBUS software. As soon as all the devices configurare la rete MBUS utilizzando l’MB-MASTER + software BMBUS. Non
in the network are given a primary address and are completerly set up, you can appena tutti i dispositivi nella rete hanno ricevuto un indirizzo primario e sono stati
proceed with the primary address search and configuration with the RFM-C3 web completamente impostati, si potrà poi procedere con la ricerca per indirizzi primari
page. e la configurazione con la pagina web dell’RFM-C3.
This will speed up the commissioning process. Questo accelererà il processo di messa in servizio.
pag. 27RFM-C3 WMBUS – GPRS/Ethernet Gateway User Manual – Manuale d’Uso v1.3
3.2 Device test 3.2 Test dispositivo
During the commission process it is appropriate to test the WMBUS telegram Durante la messa in opera del dispositivo è opportuno testare la ricezione dei
reception and the correct mail sending. telegrammi WMBUS ed il corretto invio della mail.
These two tasks can be easily done after the configuration by pressing the button Questi passaggi possono essere effettuati semplicemente a seguito della
on the PCB for one second. This will send an E-mail that contains all the configurazione premendo il pulsante sulla scheda per un secondo. Questo invierà
configuration data and the reading file data in attachment. una mail contente tutti i dati di configurazione ed in allegato il file delle letture.
It is recommended to locate the installation point desired. Then, leave the device Si raccomanda quindi di individuare un punto di installazione, lasciare il dispositivo
acquire the reading for at least 10/15 minutes and finally press the button. in ascolto per almeno 10/15 minuti ed infine di premere il pulsante.
Once the mail is received, it will be possible to verify the telegrams received by Una volta ricevuta la mail, sarà possibile verificare dal file di buffer i telegrammi
reading the buffer file. ricevuti.
In the event the mail isn’t received, check the configuration parameter again and Nel caso in cui la mail non venga ricevuta, verificare nuovamente i parametri di
check the correct connection to the data network. configurazione e l’effettiva presenza di connessione alla rete dati.
In the event not all the telegrams of the devices installed in the area are received, Nel caso in cui non vengano ricevuti tutti i telegrammi dei dispositivi installati
it is necessary to find another installation point and then repeat the test again. nell’area, è necessario individuare un altro punto di installazione dove e ripetere il
test.
3.3 Commissioning final phase 3.3 Fase finale messa in opera
As the device test is successfully concluded, disconnect the LAN cable (or connect Una volta che il test del dispositivo si è concluso con successo, scollegare il cavo di
it to the router/LAN socket when Ethernet transmission are used) and close the rete (o collegarlo al router/presa LAN nel caso di utilizzo trasmissioni dati via
device lid again Ethernet) e richiudere il coperchio del dispositivo.
pag. 28Puoi anche leggere