CADIAX compact Registrazione dell'articolazione temporomandibolare nell'applicazione practica - GAMMA Dental
←
→
Trascrizione del contenuto della pagina
Se il tuo browser non visualizza correttamente la pagina, ti preghiamo di leggere il contenuto della pagina quaggiù
CADIAX compact
             Registrazione dell'articolazione
temporomandibolare nell'applicazione practica

                                Istruzioni per l'uso

C0483
GAMMA
Medizinisch-wissenschaftliche
Fortbildungs-GmbH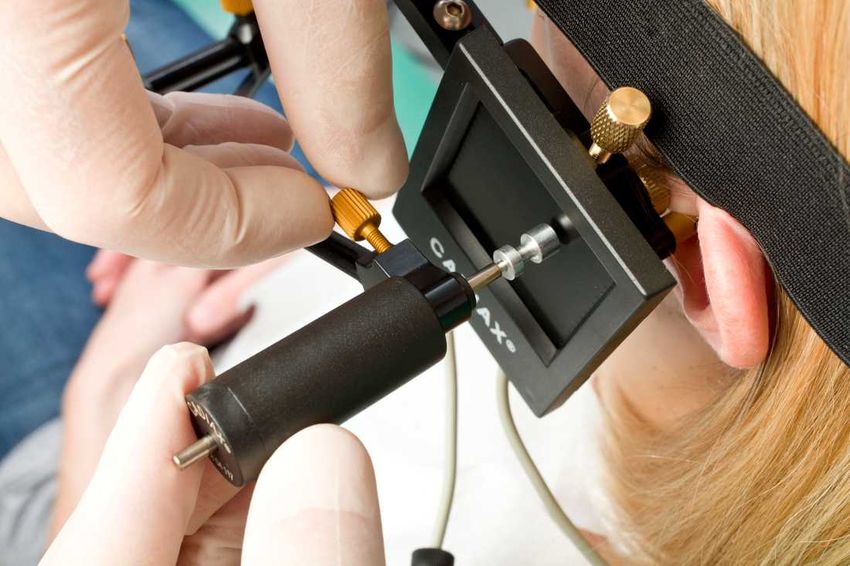
CADIAX compact

                                   Istruzioni per l'uso

                                                                         per
                                               CADIAX compact 2, modello A
                                                     versione firmware 1.14,
                                               CADIAX compact 2, modello B
                                                     versione firmware 2.13,
                                                        CADIAX 4, modello A
                                                      versione firmware 2.13,
                                                                         e
                                                CADIAX compact 2 Recorder
                                                           versione 2.13.0

                                                                 Revisione:
                                                                 24.04.2018

Copyright © 2018 GAMMA Medizinisch-wissenschaftliche Fortbildungs-GmbH
                                                Josef Brenner Strasse 10
                                                     3400 Klosterneuburg
                                                                  Austria
                                             Telefono: +43 (0)2243 34140
                                               Fax: +43 (0)2243 34140 90
                                       E-Mail: office@gammadental.com
                                        Internet: www.gammadental.com

                                                         C0483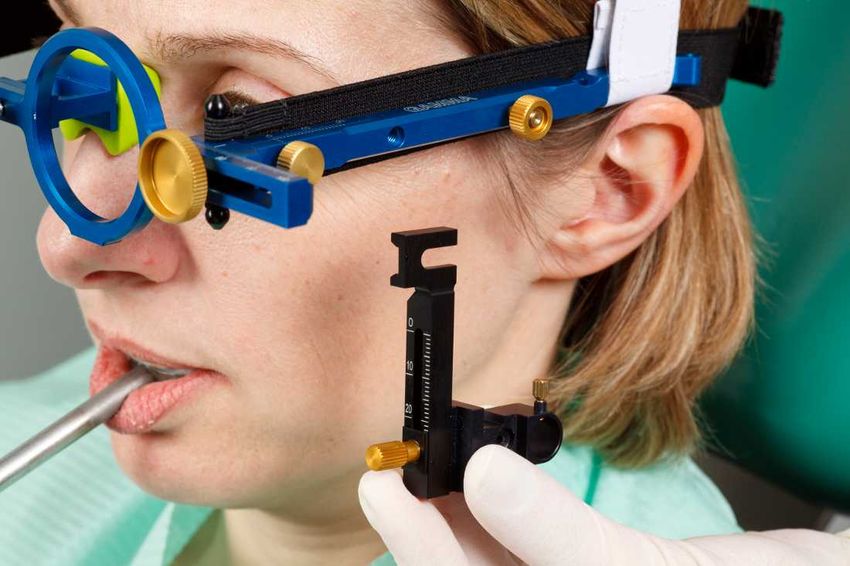
CADIAX compact

4
CADIAX compact

Garanzia e responsibilità
Le informazioni contenute in questa pubblicazione possono essere modificate senza preavviso. GAMMA
Medizinisch-wissenschaftliche Fortbildungs-GmbH esclude qualsiasi responsabilità e si riserva l’esplicito
diritto di modificare la documentazione senza informarne terzi.
GAMMA Medizinisch-wissenschaftliche Fortbildungs-GmbH non può escludere eventuali inesattezze dei
dati calcolati e delle analisi effettuate, dovute a errori di sistema, errori di manutenzione o errori
commessi dall’utente. Per questo motivo il medico o il tecnico responsabile devono sempre eseguire un
esame di plausibilità dei dati e delle misurazioni indicate. La decisione ultima sul tipo di trattamento e la
responsabilità per il paziente spettano sempre al medico curante. GAMMA Medizinisch-
wissenschaftliche Fortbildungs-GmbH esclude quindi qualsiasi responsabilità.

                                        Copyright © 2018 GAMMA Medizinisch-w issenschaftliche Fortbildungs-Gm bH
Questo documento contiene informazioni protette da copyright. Tutti i diritti riservati. È vietata la riproduzione e la traduzione in
altre lingue, totale o parziale, senza l’autorizzazione scritta ed espressa della GAMMA Medizinisch-w issenschaftliche
Fortbildungs-GmbH.

                                                                                                                      ®,™ Marchi:
Axiograph e SAM sono marchi registrati della Ditta SAM Präzisionstechnik GmbH, Germania. Microsoft e Window s sono
marchi della Ditta Microsoft Corporation, USA. Artex sono marchi registrati della Ditta AmannGirrbach GmbH, Germania.
Denar, Hanau e Whip Mix sono marchi della Ditta Whip Mix Corporation, USA. KaVo sono marchi registrati della Ditta KaVo
Kaltenbach & Voith GmbH & Co, Germania. Panadent sono marchi registrati della Ditta Panadent, USA. GAMMA, GAMMA
Dental Softw are, CADIAX e CADIAS sono marchi della Ditta GAMMA Medizinisch-w issenschaftliche Fortbildungs-GmbH,
Austria. Stratos sono marchi registrati della Ditta Ivoclar Vivadent AG, Liechtenstein.
Altri prodotti o denominazioni di prodotti sono marchi registrati dei rispettivi produttori. L'assenza del marchio ® e ™ non
significa che il nome è un marchio libero.

                                                                                                                                   5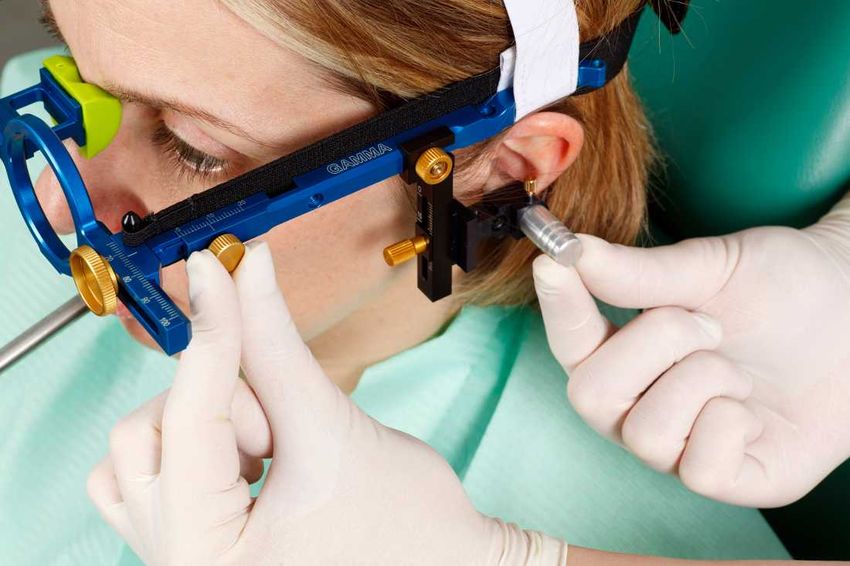
CADIAX compact

6
Indice

Indice
1        Introduzione............................................................................................................. 10
1.1      Legenda dei.............................................................................................................
                      simboli utilizzati sulla confezione e sul dispositivo                                                       10
1.2      Istruzioni importanti
                      .............................................................................................................
                                   per la sicurezza                                                                                 12
1.2.1    Istruzioni generali
                     .............................................................................................................
                               per la sicurezza                                                                                    12
1.2.2    Istruzioni speciali
                     .............................................................................................................
                               per dispositivi elettromedicali                                                                     13
1.2.3    Controindicazioni
                    .............................................................................................................
                              - Limitazione all’applicazione                                                                      16
1.2.4    Sensori magnetici
                   ............................................................................................................. 17
1.3      Utilizzo conforme
                     .............................................................................................................
                               alle prescrizioni                                                                                   17
1.4      Note sulle istruzioni
                     .............................................................................................................
                                  per l’uso                                                                                        17
1.4.1    Simboli e grafia
                    ............................................................................................................. 17
1.5      Fornitura standard
                     ............................................................................................................. 18
1.6      Requisiti di .............................................................................................................
                       sistema                                                                                                      19

2        Messa in funzione
                    .............................................................................................................
                               del dispositivo CADIAX                                                                             20
2.1      Installazione
                     .............................................................................................................
                        del software                                                                                               20
2.2      Impostazioni
                   .............................................................................................................
                      base del software                                                                                          22
2.2.1    Avvio e attivazione
                      .............................................................................................................
                                 del software                                                                                       22
2.2.2    Impostazione
                   .............................................................................................................
                       dell’arco facciale                                                                                        24
2.2.3    Impostazione
                   .............................................................................................................
                       dell’articolatore                                                                                         25

3        Registrazione
                    .............................................................................................................
                         del movimento condilare                                                                                  27
3.1      Postura del.............................................................................................................
                     paziente                                                                                                     27
3.2      Istruzione del
                     .............................................................................................................
                         paziente                                                                                                  27
3.3      Operazioni .............................................................................................................
                    preliminari                                                                                                   28
3.3.1    Fissaggio del
                    .............................................................................................................
                        cucchiaio di registrazione all’arcata dentaria inferiore                                                  28
3.4      Montaggio dell'arco
                   .............................................................................................................
                                facciale anatomico                                                                               33
3.4.1    Preparazione
                   .............................................................................................................
                       dell'arco facciale superiore                                                                              33
3.4.2    Montaggio dell'arco
                   .............................................................................................................
                                facciale superiore                                                                               33
3.4.3    Preparazione
                   .............................................................................................................
                       dell'arco di scrittura                                                                                    34
3.4.4    Montaggio dell'arco
                   .............................................................................................................
                                di scrittura                                                                                     34
3.4.5    Montaggio dei
                   .............................................................................................................
                        sensori                                                                                                  36
3.5      Montaggio dell'arco
                   .............................................................................................................
                                facciale cinematica                                                                              37
3.5.1    Condylograph
                   ............................................................................................................. 37
3.5.2    Condylograph
                   .............................................................................................................
                        comfort                                                                                                  39
3.5.3    Preparazione
                   .............................................................................................................
                       dell'arco di scrittura                                                                                    42
3.5.4    Montaggio dell'arco
                   .............................................................................................................
                                di scrittura                                                                                     43
3.5.5    Determinare.............................................................................................................
                      l'asse della cerniera                                                                                       44

                                                                                                                                    7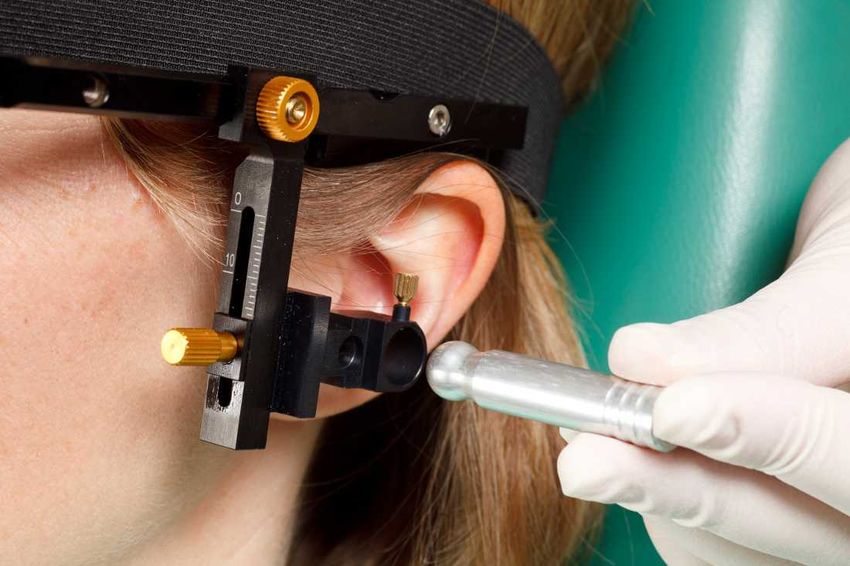
CADIAX compact

3.5.6        Montaggio dei
                       .............................................................................................................
                            sensori                                                                                                  45
3.6          Configurazione
                        .............................................................................................................
                              del sistema CADIAX                                                                                      46
3.7          Inserimento.............................................................................................................
                          dei parametri dell'arco facciale                                                                            47
3.7.1        Arco facciale
                        .............................................................................................................
                            anatomico                                                                                                 47
3.7.2        Condylograph
                       ............................................................................................................. 48
3.7.3        Condylograph
                       .............................................................................................................
                            comfort                                                                                                  49
3.8          Impostazione
                       .............................................................................................................
                           della posizione di riferimento                                                                            50
3.9          Registrazione
                        .............................................................................................................
                             dei movimenti condilari                                                                                  51
3.9.1        Curve condilari
                       ............................................................................................................. 51
3.9.2        Condyle position
                       .............................................................................................................
                                measurement (CPM)                                                                                    53
3.10         Completare.............................................................................................................
                        della registrazione                                                                                          55

4            Valutazione.............................................................................................................
                          dei dati                                                                                                    57
4.1          Recupero e.............................................................................................................
                        analisi delle registrazioni                                                                                  57
4.2          Calcolare le.............................................................................................................
                           impostazioni dell’articolatore                                                                              58
4.3          Stampa dei.............................................................................................................
                        dati                                                                                                         61

5            Informazioni.............................................................................................................
                           dettagliate                                                                                                 62
5.1          Il sistema di.............................................................................................................
                            coordinate di riferimento                                                                                   62
5.2          Montaggio in
                       .............................................................................................................
                          articulatore                                                                                               63
5.3          Valore di soglia
                        .............................................................................................................
                               ISS                                                                                                    65

6            Risoluzione............................................................................................................. 67

7            Specifiche ............................................................................................................. 70
7.1          Dati tecnici............................................................................................................. 70
7.2          Pulizia        ............................................................................................................. 70
7.2.1        Dispositivo .............................................................................................................
                         CADIAX                                                                                                        70
7.2.2        Lastre di misurazione
                        ............................................................................................................. 70
7.2.3        Stilo di misurazione
                         ............................................................................................................. 71
7.2.4        Face bow ............................................................................................................. 71
7.2.5        Functional occlusal
                        .............................................................................................................
                                     clutch                                                                                           71
7.2.6        Occlusal tray
                        .............................................................................................................
                            clutch                                                                                                    71
7.2.7        Bite fork      ............................................................................................................. 71
7.2.8        3D joint support
                        ............................................................................................................. 71
7.3          Verifiche periodiche
                         ............................................................................................................. 71
7.4          Condizioni di
                        .............................................................................................................
                           funzionamento                                                                                              72
7.5          Stoccaggio.............................................................................................................
                        e trasporto                                                                                                  72
7.6          Compatibilità
                        .............................................................................................................
                            elettromagnetica - Guida e dichiarazione del costruttore                                                  73
7.6.1        Emissioni elettromagnetiche
                        ............................................................................................................. 73
7.6.2        Immunità elettromagnetiche
                       ............................................................................................................. 73

8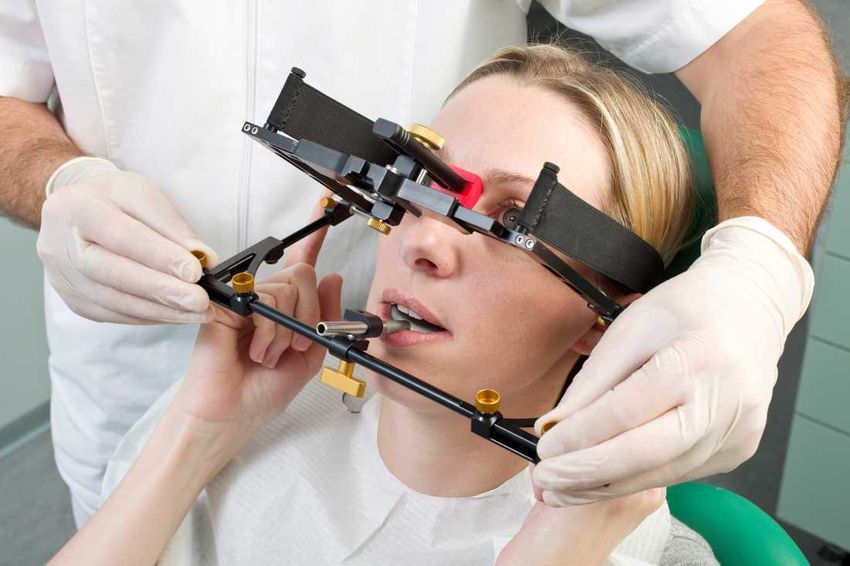
Indice

7.6.3   Distanze di separazione raccomandate tre apparecchi di radiocomunicazione portatili
        e mobili e il.............................................................................................................
                      dispositivo CADIAX                                                                                           75
7.7     Smaltimento
                  ............................................................................................................. 76

                                                                                                                                   9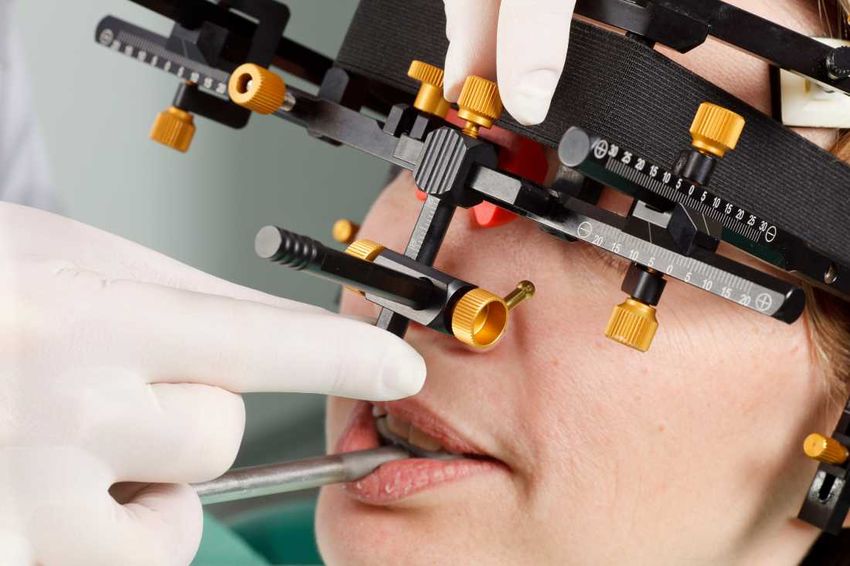
CADIAX compact

1           Introduzione
Vi ringraziamo per la fiducia accordataci con l’acquisto del sistema CADIAX. Avete acquistato un
prodotto tecnico-medicale di prima qualità in cui sono confluiti oltre 25 anni di esperienza nella
registrazione elettronica dei tragitti condilari.
Nelle pagine seguenti troverete tutte le informazioni necessarie per l’utilizzo del dispositivo CADIAX e
del relativo software.

1.1         Legenda dei simboli utilizzati sulla confezione e sul dispositivo

              Attenzione: attenersi alla documentazione allegata

              Attenzione: campo magnetico

              Applicazione tipo B

              Attenersi alle istruzioni per l’uso

              Produttore

              Data di produzione

              Numero di serie

              Upper and lower limit for temperature

10
Introduzione
Upper and lower limit for relative humidity
Upper and lower limit for atmospheric pressure
Smaltire separatamente da altri rifiuti
Presa per lastra e stilo lato destro
Presa per lastra e stilo lato sinistro
Presa per interruttore a pedale
Porta per Universal Serial Bus (USB)
Corrente continua
Non sedersi sul dispositivo
Non calpestare il dispositivo
11CADIAX compact
1.2 Istruzioni importanti per la sicurezza
Per la sicurezza dell’utente e per un funzionamento sicuro del dispositivo CADIAX, prima
della messa in funzione del dispositivo è necessario leggere attentamente le seguenti
istruzioni. Osservare sempre tutte le avvertenze e le istruzioni riportate in questo manuale
o sul dispositivo stesso.
1.2.1 Istruzioni generali per la sicurezza
The device must be operated in a roomy area, in order to allow for proper dissipation of
heat.
Never operate the device in areas where there is a danger of water or other liquids
seeping into the device.
The device is powered by the computer it is connected to, through the Universal Serial
Bus (USB). Only connect the device directly to a computer’s USB terminal. Never
operate the device through a USB hub and never use alternative power sources of any
kind.
Never set up the system in the proximity of potential fields of electromagnetic interference
(loudspeakers, mobile phones, sterilizers, etc.).
Never attempt to repair the device yourself. All repair work must be done by authorized,
trained technicians.
In the following cases disconnect the device from the computer and contact a qualified
service technician:
· If water or other liquid seeps into the device.
· If the device does not operate properly, although the operating instructions have been
followed correctly.
· If the device has fallen down or if the housing is damaged.
· If the device shows noticeable deviation from its normal operation.
Please make sure that the device is set up on a smooth, even surface, which is longer
and wider than the device itself.
The surface on which the device stands must be sufficiently stable, as the device could
be badly damaged by shaking or falling.
In choosing the working area and/or storage area, make sure that the device is not
subject to extreme deviations in temperature or humidity, as well as to direct sunlight and
excessive heat.
Make sure that the device is not subjected to vibrations and jolts.
Also make sure that the cable does not pose a hindrance (tripping hazard).
Do not sit on the device since this may cause it to be severely damaged.
12Introduzione
Do not step on the device since this may cause it to be severely damaged.
1.2.2 Istruzioni speciali per dispositivi elettromedicali
1.2.2.1 Installazione del dispositivo CADIAX
If the computer connected with the
CADIAX device is in the proximity of the
patient, it must have been tested in
compliance with standard EN 60601-1.
The patient proximity (definition according
to standard EN 60601-1) is the area
within which the patient could,
intentionally or unintentionally, come into
contact with:
· either any parts of the medical
electrical device/system, or
· with someone using or touching a part
of the device/system.
Definition of patient proximity, according to standard EN
60601-1
If the computer connected with the CADIAX device is not built according to standard EN 60601-1, it
must be set up outside the proximity of the patient.
If such a computer is set up inside the patient’s proximity, it and all devices connected to it (e.g.
monitor) have to be isolated according to EN 60601-1. Power sources have to be connected through a
medical isolation transformer and tethered network connections through a medical network isolator.
13CADIAX compact
The CADIAX device may not be operated in the direct proximity of other devices, or stacked with other
devices. If it does become necessary to operate the CADIAX device in the proximity of other devices, or
stacked with other devices, please make sure to observe the device carefully, to ensure its correct
operation in this system configuration.
1.2.2.2 Funzionamento del dispositivo CADIAX
Only switch the device into recording mode after the measuring sensors (flags and styli)
are completely mounted.
Make sure that the sensors are not touched during the registration, not by yourself nor by
the patient.
Always switch off the recording mode before detaching the flags and styli from the face
bow.
The sockets for the sensors on the front of the device are laid out as follows:
CADIAX compact 2
1: Right sensors
2: Left sensors
14Introduzione
CADIAX 4
1: Unused
2: Right sensors
3: Left sensors
4: Unused
The sockets for the foot switch and the USB connection to the PC can be found at the back of the
device.
The CADIAX device shows its operating state via a green LED on the front of the casing. This LED can
be in the following conditions:
LED is permanently on:
Device is ready for operation.
LED flashes with 5 Hz:
Measurement is in progress.
LED flashes with 0.5 Hz:
Hardware error, no measurement possible.
LED permanently off:
Device is not connected to a PC.
1.2.2.3 Compatibilità elettromagnetica
Medical electrical devices require special safety precautions, with regard to
electromagnetic tolerance. Therefore, the CADIAX device may only be installed and put
into operation according to the instructions contained in the chapter "Electromagnetic
compatibility - Guidance and manufacturer's declaration" of this handbook.
Only use accessories which are explicitly approved for CADIAX devices. Using other
accessories, especially cables which are longer than the cable lengths prescribed in this
user’s manual, can lead to increased emission of interferences, or to reduced interference
immunity of the CADIAX device.
15CADIAX compact
Portable and mobile HF-communication appliances, e.g., mobile telephones, cordless
telephones, computers, and laptops with activated WLAN, etc., can have detrimental
effects on medical electrical devices. Do not operate the CADIAX device in the proximity
of these potential sources of interference, and make sure to adhere to the safe distances
described in chapter "Recommended separation distances to portable and mobile RF
communication equipment" of this handbook.
1.2.2.4 Connessione di altre apparecchiature
Le apparecchiature collegate alle interfacce analogiche o digitali del dispositivo CADIAX
devono soddisfare in modo verificabile le relative specifiche EN (p. es. EN 60950 per
apparecchiature di elaborazione dati o EN 60601 per apparecchiature elettromedicali).
Inoltre, tutte le configurazioni devono soddisfare la normativa EN 60601-1 sui sistemi
elettromedicali. Chiunque colleghi apparecchiature supplementari all’ingresso o all’uscita
del segnale viene considerato esperto di configurazione di sistemi e quindi responsabile
dell’osservanza della norma EN 60601-1 sui sistemi elettromedicali.
1.2.3 Controindicazioni - Limitazione all’applicazione
Le seguenti condizioni possono impedire o limitare l’applicazione del sistema CADIAX:
· Facoltà cognitive: Pazienti non in grado di comprendere o di eseguire correttamente
le istruzioni dell’odontoiatra che effettua l’esame (p. es. spostare a destra la mandibola
ecc.) per impedimenti fisici o psichici.
· Quadri clinici generici: Pazienti con patologie che non consentono il montaggio di
un arco facciale per la registrazione. Tali patologie possono essere di natura fisica o
psichica (p. es. spasticità, epilessia, claustrofobia, danni o patologie della scatola
cranica o delle strutture molli del cranio, come le orecchie ecc.).
· Quadri patologici odontoiatrici: Pazienti con patologie dei denti o del parodonto che
non consentono un montaggio del cucchiaio (parodontosi, allentamento dei denti, danni
alla sostanza dentale, alterazioni della mucosa orale o faringea ecc.).
· Patologie particolari nell’area delle orecchie: Pazienti con patologie auricolari (p.
es. infiammazioni dolorose, tinnito, dolori all’orecchio ecc.).
· Pazienti con intensi dolori muscolari: I pazienti con intensi dolori muscolari
nell’area del capo e della nuca, per esempio, non sono in grado di sopportare l’arco
facciale per la durata necessaria all’esecuzione dell’esame.
· Pazienti di età compresa tra 0 e 9 anni: Solo a partire dai 10 anni i bambini sono in
grado di seguire le indicazioni del medico curante in modo che l’esame possa essere
effettuato. Inoltre i denti da latte ancora presenti rendono più difficile il fissaggio del
cucchiaio.
· Portatori di impianti: Nei pazienti con impianti attivi (p. es. pacemaker) è necessaria
particolare prudenza, perché le punte degli stili, alle quali è fissato un magnete,
possono venire a trovarsi in prossimità di tali impianti.
16Introduzione
1.2.4 Sensori magnetici
I sensori magnetici (sensori “M”) CADIAX contengono un magnete all’estremità dello stilo.
Per questo motivo è necessaria particolare attenzione nell’impiego dei sensori “M”
CADIAX su pazienti con pace-maker o defibrillatori impiantati! Fare estrema attenzione al
rispetto delle necessarie distanze di sicurezza! Consultare, se necessario, il cardiologo
curante. In caso di dubbio evitare l’impiego dei sensori „M“ CADIAX.
1.3 Utilizzo conforme alle prescrizioni
Il sistema CADIAX serve alla registrazione e alla rappresentazione dei movimenti della mandibola umana
attorno all’asse cerniera, alla conversione di questi movimenti in base a una distanza intercondilare
preimpostata sull’articolatore e al calcolo delle impostazioni dell’articolatore idonee al paziente.
L’utilizzo del sistema è riservato agli odontoiatri.
1.4 Note sulle istruzioni per l’uso
Gli autori presuppongono che il lettore possieda una conoscenza di base delle tecniche di esecuzione
dell’esame condilografico. L’utente deve essere in grado di lavorare con un arco facciale e di riprodurre
in articolatore i rapporti craniali.
Si presuppone inoltre una conoscenza di base del sistema operativo Windows di Microsoft, nonché una
buona esperienza nell’utilizzo dell’interfaccia utente e dei comandi dei programmi per Windows.
Le presenti istruzioni per l’uso non possono sostituire un buon corso di base nell’utilizzo del sistema
operativo Windows. Qualora l’utente non disponga della necessaria familiarità con il funzionamento del
sistema operativo Windows, è indispensabile che provveda innanzitutto a colmare questa lacuna. Solo
questo può garantire un utilizzo agevole del software.
1.4.1 Simboli e grafia
I simboli seguenti segnalano aspetti particolarmente importanti:
Questo simbolo segnala una possibile fonte di errore o il pericolo di un
Attenzione
malfunzionamento.
Informazioni supplementari particolarmente importanti sull’argomento
Informazione
descritto.
Consiglio Consigli e accorgimenti utili per lavorare con il sistema CADIAX.
In questo manuale vengono utilizzati i seguenti simboli e grafie per descrivere i comandi e le istruzioni:
· I nomi dei tasti vengono visualizzati in corsivo. Una combinazione di tasti è indicata da un segno più
che collega i nomi dei tasti.
p. es.: CTRL+D significa: premere e tenere premuto il tasto CTRL, quindi premere il tasto D.
· Le voci di menu del software CADIAX vengono visualizzate in corsivo. Se è necessario selezionare più
voci di menu consecutivamente, queste vengono collegate da una freccia.
p. es.: File Chiudi significa: fare clic dapprima sulla voce di menu File quindi, nel menu che viene
aperto, fare clic sulla voce Chiudi.
17CADIAX compact
To the "bars" of the user interface it is referred to as follows:
1 Menu bar
2 Tool bar
3 Status bar
You can find display settings regarding the display of these bars and the size of the icons in the
View and Options menus. Via the entry Shortcut Keys in the Settings menu, you can assign
custom key combinations to certain functions.
1.5 Fornitura standard
For the exact scope of delivery please refer to the accompanying packing list. When you receive your
CADIAX system, check the package contents for completeness and quality of delivery.
Material for fixing the clutch on the lower jar teeth of the patient is NOT included in the delivery package.
For fixing the occlusal clutch a bite registration material (e.g. Exabite II by GC) and the related
dispenser is needed.
For fixing the para-occlusal clutch you will need a composite for temporary restorations (e.g. Protemp II
by 3M ESPE) and a temporary cement such as a zinc oxide cement (e.g. TempBond by Kerr) or a
carboxyalt cement (e.g. Durelon by 3M ESPE).
Contact your local distributor for further information.
18Introduzione
1.6 Requisiti di sistema
Per utilizzare il sistema CADIAX è indispensabile un computer. Il software compreso nella fornitura
standard gira sui seguenti sistemi operativi:
· Windows 7 con Service Pack 1 (32-bit e 64-bit sistema operativo)
· Windows 8.1 (32-bit e 64-bit sistema operativo)
· Windows 10 (32-bit e 64-bit sistema operativo)
Requisiti minimi del computer:
· Almeno 1 GB di RAM
· Almeno 500 MB di spazio libero su disco rigido (consigliati)
· Lettore CD
· Un’interfaccia USB libera
Requisito indispensabile è uno schermo adeguato da utilizzare alla poltrona. Si noti che la distanza tra
l’utente e lo schermo può essere maggiore rispetto alle normali applicazioni di un computer.
19CADIAX compact
2 Messa in funzione del dispositivo CADIAX
Prima di poter cominciare a lavorare con il sistema CADIAX, è necessario effettuare alcune operazioni
preliminari.
2.1 Installazione del software
Install the software before connecting the CADIAX device to your computer for the first time. This
will install the necessary drivers to let your operating system to recognize the device.
Put the CD-ROM into your computer's optical drive. After a short time, the installation routine should
start automatically. If this is not the case, you can also start the installation by executing the file
setup.exe that you will find on the disc.
If you received a digital copy of the setup, you can start the installation by executing the received file.
When installing the CADIAX software, you will be asked
to specify the preferred language of the software. It can
also be changed at any time after the installation.
In the following dialog, click on Next to start the
installation procedure.
Please read through the conditions in the license
agreement carefully. If you accept its terms, select the
appropriate option and continue by clicking Next.
20Messa in funzione del dispositivo CADIAX
Enter your user information and your license code in the
corresponding fields and click Next to continue.
You find the license code in the accompanying license
letter or on your delivery note.
In the next step, you will be asked to which directory the
program files shall be copied. We recommend using the
default setting. Again, click Next to continue.
Preparations of the software installation are now
completed. To start copying the program files, click
Install.
The installation routine will now copy the necessary data
onto your computer. This can take several minutes.
21CADIAX compact
Once the data has been copied, you can connect your
CADIAX device with your PC to have your operating
system configure the device driver.
Installation of the software is now completed.
2.2 Impostazioni base del software
Dopo l’installazione del software CADIAX è necessario effettuare altre impostazioni.
Non è necessario che il dispositivo CADIAX sia collegato al computer.
2.2.1 Avvio e attivazione del software
The software CADIAX compact 2 Recorder can be started through the start menu (All Programs
Gamma Dental CADIAX® compact 2 Recorder) or via the link on the desktop:
If the CADIAX recording software is started as a component of GAMMA Dental Software, some
features may not be available since these are integrated in the other modules of the software
package.
If you plan using the software on a virtual environment (e.g. Parallels Desktop), we strongly
recommend to update both your operating system and your virtualization software to the latest
version before activating. Otherwise, software activation might not be possible.
Please also note that an update of your virtualization software, once CADIAX compact 2
Recorder is installed, can cause hardware information used to activate the software to be
changed, which will render your activation invalid. GAMMA does not take any responsibility for
22Messa in funzione del dispositivo CADIAX
validity of license codes being lost this way. Furthermore, using the software on a virtual
environment may cause poor performance or even the loss of certain functionalities.
For these reasons, please deactivate all automatic update functionalities of your virtualization
software and strongly consider using a native environment (on Apple Mac systems e.g.
Bootcamp) instead.
When starting the software for the first time, the activation
dialog will be shown.
If you are installing CADIAX compact 2 Recorder on a
computer with internet connection, simply select Online
activation and click Activate. No further step is required in
this case and you can immediately start using the
software.
If the computer does not have an internet connection,
select Offline activation. Send the activation code to
GAMMA either via mail, fax, or visit the activation website
to activate your software.
To avoid mistakes caused by typing the codes by hand, the system provides export and import
functionalities.
If you prefer to transmit your activation code via GAMMA's
homepage, start your web browser and visit
www.gammadental.com/GAMMA/e/aktivierung.html
Enter your customer number and the activation code and
click on Activate.
Enter the resulting confirmation code that you will see on
the website in the activation dialog. By clicking on
Activate, the activation is now also completed on a
system without internet connection.
Upon successful activation, the software is ready to be operated.
23CADIAX compact
2.2.2 Impostazione dell’arco facciale
Impostare il tipo di arco facciale che si utilizza nel menu Impostazioni Arco facciale:
The various face bows have different scales for entering face geometries. If a wrong face bow is
selected or a wrong scale value is entered, the recordings can not be recalculated correctly.
This leads to a distorted picture of the recorded condylar tracks and, in some circumstances, to
a falsification of the value settings for the articulator.
The face bow Condylograph comfort may be used with either of the following reference point indicators.
The fixed reference point indicators P (Patient) The individual reference point indicator.
and T (Transfer).
24Messa in funzione del dispositivo CADIAX
The fixed reference point indicators are mounted at a height of 22 mm, which cannot be
adjusted. If the anatomical situation of the patient requires a different height, the individual
reference point indicator should be used.
2.2.3 Impostazione dell’articolatore
Impostare inoltre il tipo di articolazione che si utilizza nel menu Impostazioni Articulatore:
CADIAX compact 2 Recorder supporta i seguenti tipi di articolatori (in ordine alfabetico):
Artex ® AP / CP Denar® Mark 330 Reference® A
Artex ® AR / CR Denar® Mark II Reference® I
Artex ® TK / CN Hanau® 96H2 Reference® SL
Artex ® TR / CT Hanau® Modular SAM®
Artex ® SL Hanau® Wide Vue WhipMix ® 2240
Denar® Anamark Ivoclar® Stratos 200 WhipMix ® 2340
Denar® D5A I Ivoclar® Stratos 300 WhipMix ® 3040
Denar® D5A R KaVo® Protar WhipMix ® 3140
Denar® Mark 320 Panadent® WhipMix ® 8500
You can find further information regarding the calculated articulator settings in chapter "Calculating
articulator settings". See chapter "ISS threshold" for more information regarding the ISS threshold.
25CADIAX compact
Per memorizzare queste impostazioni come valori standard per lavori successivi, spuntare la
casella di controllo „Memorizzare queste impostazioni come standard”.
26Registrazione del movimento condilare
3 Registrazione del movimento condilare
The CADIAX system allows joint movement recording by usage of both anatomic (arbitrary) and
kinematically determined (individual) joint axis. For recording on kinematically defined (exact)
joint axis, the face bows Condylograph or Condylograph comfort are required.
In principle, the registration of mandibular movement is always carried out in the following steps:
1. Preparations
2. Fixing the clutch onto the teeth of the lower jaw
3. Mounting the upper face bow
a. Anatomic face bow
b. Condylograph
c. Condylograph comfort
4. Mounting the writing bow
a. to the arbitrary face bow
b. to Condylograph or Condylograph comfort
5. Attaching the measurement flags and styli
a. on the arbitrary face bow
b. on the Condylograph or Condylograph comfort
6. Recording the joint track curves
7. Registration of CPM (if a para-occlusal clutch is used)
8. Finishing the registration, saving data
3.1 Postura del paziente
The patient should sit in an upright and relaxed position. Body movements during condylography
recording can change the hinge axis position and should be avoided. The head should be held upright
and the upper spine in the habitual normal position, i.e. not be bended forward or backward. It is
recommended to use a head and neck support.
Glasses, earrings, hair barrettes, etc. of the patient should be taken off. Electrostatically charged hair
can cause artifacts in the recordings. This effect is intensified by hairspray. For this reason, the patient
should wear a cap, e.g. a surgical cap as used by surgeons. Long hair should be combed back behind
the ears.
3.2 Istruzione del paziente
Explain the lower jaw movements like protrusion, retrusion, mediotrusion and medioretrusion to the
patient. Ask the patient to execute all these movements completely and as far as possible. Practice
these movements before mounting the face bow.
27CADIAX compact
3.3 Operazioni preliminari
Before starting the registration, prepare all necessary devices and materials.
Connect the CADIAX device to your computer and start the recording software. If the device has been
detected, this will be indicated in the status bar of the software. If this is not the case, you can find
information for error correction in the chapter "Troubleshooting".
Next, enter the patient data into the input fields above the coordinate system.
If CADIAX compact 2 Recorder is started from GAMMA Dental Software, the patient data will be
filled out automatically and cannot be changed.
3.3.1 Fissaggio del cucchiaio di registrazione all’arcata dentaria inferiore
There are two different kinds of clutches available for attaching the lower face bow to the lower jaw.
These are:
The occlusal-covering tray clutch. The para-occlusal clutch.
In the case of edentulous patients, the clutch can also be attached to the lower jaw using a mandibular
clamp.
The occlusal-covering tray clutch and the functional occlusal clutch are shipped in non-sterile
condition and must be disinfected and/or sterilized before use. For the hygienic instructions
regarding cleaning and reuse, please refer to chapter "Cleaning".
Verificare la situazione dell’arcata inferiore. In caso di situazione parodontale critica,
l’applicazione è sconsigliata o richiede (su responsabilità del medico) l’adozione di misure
protettive adeguate (p. es.: interlock e / o bloccaggio). I sottosquadri dell’arcata dentaria a livello
occlusale devono essere sempre bloccati con materiale adeguato (p. es. cera morbida), anche
nei pazienti con parodonto sano.
Quando il cucchiaio viene fissato a una protesi cementata provvisoriamente, esiste la possibilità
che la protesi si stacchi a causa delle sollecitazioni meccaniche. In questo caso, verificare
l’adeguatezza della cementazione provvisoria.
Verificare che il morsetto dell’arco di scrittura del mascellare inferiore sia facilmente apribile. In
caso contrario, non utilizzare questo cucchiaio.
28Registrazione del movimento condilare
3.3.1.1 Fissaggio del cucchiaio di registrazione a copertura occlusale
L’utente che utilizza un cucchiaio paraocclusale può saltare questo paragrafo.
Scegliere un cucchiaio adatto al paziente.
Prima dell’introduzione della massa siliconica, il cucchiaio viene preparato con 3 sottili rulli di
cera morbida (diametro 3-4 mm). I rulli vengono applicati trasversalmente all’arcata dentaria, uno
nel settore anteriore e gli altri due nei settori posteriori. In questo modo vengono creati dei punti
di rottura predeterminati che facilitano l’estrazione del cucchiaio.
Utilizzare esclusivamente adesivi siliconici (materiali per la registrazione occlusale) con durezza
Shore massima A60; attenersi alle indicazioni del produttore!
Versare la massa siliconica e riempire il cucchiaio per non più
di 2/3.
Place the filled clutch onto the lower jaw teeth and set the shaft
in a median-sagittal position. The patient draws back the lower
jaw and closes, thus automatically positioning the shaft so that
the smallest possible locked bite is achieved.
Prima del montaggio dell’arco di scrittura per il mascellare inferiore, il silicone deve essere
lasciato completamente indurire nella cavità orale semiaperta del paziente; attenersi alle
indicazioni del produttore! A scopo di controllo si consiglia una prova separata del materiale al di
fuori della cavità orale. Attenzione a evitare che il materiale fuoriuscito crei interferenze nel
settore posteriore.
29CADIAX compact
3.3.1.2 Fissaggio del cucchiaio di registrazione paraocclusale
L’utente che utilizza un cucchiaio a copertura occlusale può saltare questo paragrafo.
L’utilizzo di un cucchiaio paraocclusale consente l’analisi degli effetti dell’occlusione sulla posizione
dell’articolazione temporomandibolare e sul movimento attorno all’asse cerniera. Le misurazioni delle
posizioni dei condili (CPM) possono quindi essere effettuate direttamente nella bocca del paziente e
non più sui modelli di gesso montati. Il cucchiaio paraocclusale si trova al di fuori dell’occlusione; non
tocca quindi i denti del mascellare superiore, né in intercuspidazione né durante la funzione.
For fixing the para-occlusal clutch you will need a composite
for temporary restorations (e.g. Protemp II by 3M ESPE)
and a temporary cement such as a zinc oxide cement (e.g.
TempBond by Kerr) or a carboxyalt cement (e.g. Durelon by
3M ESPE).
Provare il cucchiaio in bocca piegandone le ali fino a farle
aderire all’arcata inferiore. Lasciare 1-2 mm di spazio tra i denti
e il cucchiaio per il silicone.
Posizionare una lastra di cera tra l’arcata superiore e quella
inferiore e chiedere al paziente di chiudere i denti. La lastra di
cera impedisce che la resina venga a contatto con l’arcata
superiore ed evita il laborioso molaggio della resina nel
cucchiaio.
Prepare the composite according to the manufacturer's
information.
30Registrazione del movimento condilare
Caricare con uno strato di resina dello spessore di 2 mm la
superficie del cucchiaio rivolta verso le superfici labiali e buccali
dei denti. Attendere che il materiale si indurisca leggermente.
Inserire il cucchiaio nella cavità orale del paziente e chiedere a
quest’ultimo di chiudere la bocca, senza però che i denti
dell’arcata superiore tocchino il cucchiaio (controllare).
L'albero della frizione deve trovarsi nel piano sagittale mediano.
Attendere la presa del materiale, quindi estrarre il cucchiaio
dalla bocca del paziente.
Rimuovere la resina in eccesso con un coltello affilato o una
fresa.
Utilizzare la minore quantità di resina possibile; un eccesso di materiale causa spesso dolori
alle gengive.
31CADIAX compact
Provare il cucchiaio in bocca per verificarne l’adattamento.
La carta di articolazione segna i contatti tra il cucchiaio e i denti dell’arcata superiore che
devono essere eliminati.
Se la resina non è ancora completamente indurita, deporre il cucchiaio e iniziare a montare
l’arco facciale superiore.
Prepare the cement according to the manufacturer's information.
Fix the clutch with the cement on the lower jaw teeth.
Evitare di fissare il cucchiaio paraocclusale a denti doloranti o allentati.
Il cucchiaio può essere rimosso facilmente dopo la registrazione. È necessaria solo una leggera pulizia
dei denti (scaling). Il cucchiaio caricato di resina può essere riutilizzato per lo stesso paziente (non è
indispensabile togliere i resti di adesivo rimasti sul cucchiaio).
32Registrazione del movimento condilare
3.4 Montaggio dell'arco facciale anatomico
3.4.1 Preparazione dell'arco facciale superiore
The flag adapters for the Reference AB face bow have to be
mounted before use, if this is not already the case.
Fixate the adapters with the accompanying screws and
screwdriver to the posterior ends of the face bow. The bore for
the fixing screw (the hole with the countersink) must face
forward.
The upper face bow is now ready to be mounted.
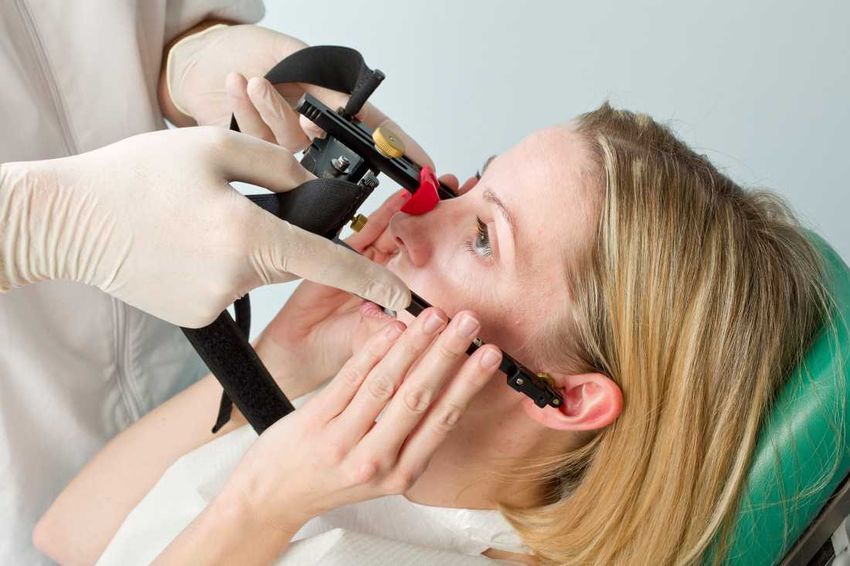
3.4.2 Montaggio dell'arco facciale superiore
Spostare all’indietro il supporto glabella. I nastri di fissaggio
sono fissati all’arco facciale. Il supporto per la forchetta
portaimpronta non si trova sull’arco.
Introdurre le olive auricolari dell’arco facciale anatomico in
entrambi i condotti uditivi. Durante questa operazione il
paziente può collaborare. L’ampiezza dell’arco viene fissata
tramite le viti di arresto sulla barra trasversale anteriore.
33CADIAX compact Il supporto glabella viene spinto contro la glabella, con delicatezza e senza esercitare pressione, e leggermente bloccato. I nastri di fissaggio vengono tesi in modo uniforme su entrambi i lati e chiusi dietro la testa con il nastro a velcro. La posizione delle olive auricolari nel condotto uditivo deve essere regolata (perlopiù dorsalmente) in modo tale da non ostacolare il condilo laterale durante i movimenti di escursione. Controllare l’esatto posizionamento dell’arco facciale. Se necessario, regolare il nastro di fissaggio e/o il supporto glabella; eventualmente eliminare la piega cutanea in corrispondenza della glabella tirando verso l’alto la pelle della fronte. Dopodichè serrare la vite di arresto del supporto glabella. 3.4.3 Preparazione dell'arco di scrittura Introdurre nei fori per gli stili destro e sinistro i perni di localizzazione assiale e fissarli. The writing bow is now ready to be mounted. 3.4.4 Montaggio dell'arco di scrittura Spingere i bracci laterali dell’arco di scrittura completamente verso l’esterno e fissarli leggermente. Il paziente tiene la mandibola chiusa in posizione centrica (retrusa). Applicare il morsetto doppio al cucchiaio di registrazione. 34
Registrazione del movimento condilare

I bracci laterali vengono poi avvicinati in modo tale che le punte
degli elementi ausiliari si innestino nel foro nell’arco superiore
indicante il punto dell’asse anatomico. In questo modo viene
fissata la posizione degli stili sull’asse anatomico e garantita
una corretta distanza rispetto alla lastra.
Il paziente o (l’assistente) esercita una leggera pressione su
questi elementi ausiliari su entrambi i lati, dall’esterno verso
l’interno.

L’arco di scrittura si trova ora in posizione parallela rispetto
all’arco facciale. Fissare con cautela i due morsetti di attacco
dei bracci laterali (destro e sinistro).

Tighten the clamp on the lower cross bar. In doing so, support
the lower face bow with your second hand to avoid too much
force being transferred to the clutch. Strong force can cause
pain or loosen the clutch.

       È importante che il doppio morsetto venga chiuso per ultimo e non prima del fissaggio dei due
       bracci laterali!

Rimuovere ora i due elementi ausiliari per la regolazione degli
assi anatomici. Durante questa operazione è fondamentale che
la posizione del braccio laterale non cambi.

       Un’eventuale evidente modifica della posizione indica che il sistema è stato montato in presenza
       di tensione o che uno dei morsetti non è fissato in modo corretto. In questo caso è necessario
       ripetere la procedura di montaggio dell’arco inferiore.
       An improperly mounted lower face bow can lead to false registrations!

                                                                                                       35
CADIAX compact
Arco facciale inferiore montato, regolato sul punto dell’asse
cerniera anatomico.
3.4.5 Montaggio dei sensori
Only touch the flags on their borders. Avoid touching the black measuring surface to prevent it
from being soiled or scratched. Also make sure that recording mode is turned off while you
mount the flags and styli.
Fixate the flags on the designated sockets of the upper face
bow. Avoid jamming anything between the side arms and the
flags in this process.
Fixate the styli with the respective screws in the retainers of
the lower face bow. The cable of the stylus should hang
downwards after it is fixated.
If the system is mounted properly and the lower jaw is in
centric position, the stylus tip should be located in the area of
the upper back quarter of the flag.
The styli should be positioned in a way that their axis protrude by about 1 cm to the outside.
This range of movement is, among other things, required for mediotrusive movements.
The circuit between stylus and flag should always remain closed, even when the system is
dismantled after use and the individual parts are stored in their packages. Improperly, jerkily
breaking the circuit could lead to faults or disturbances in the system, e.g., broken cables.
Avoid touching the measuring surface of the flags and the stylus pins during the measurement
procedure and preparatory work. This also applies to the patient.
36Registrazione del movimento condilare
3.5 Montaggio dell'arco facciale cinematica
3.5.1 Condylograph
3.5.1.1 Preparazione dell'arco facciale superiore
Before mounting the Condylograph on the patient, the forehead
bracings of the upper face bow need to be pulled back.
Slightly loosen the side arm clamp screws, so that the side
arms are movable in sagittal (upper clamp screw) and
transversal (lower clamp screw) direction.
Loosen and remove the orbital pointer.
The upper face bow is now ready to be mounted.
3.5.1.2 Montaggio dell'arco superiore
Adjust the width of the face bow in a way, that the side arms
are in contact with the skull above the ears evenly without
tension. The face bow should be adjusted symmetrically.
Fixate the flag adapters of the extension set with the respective
screws on the side arms.
Put the face bow on the patient's head, whereby the glabella
support is placed on the glabella and the side arms rest above
the ears.
37CADIAX compact
Lower the forehead supports until they are in skin contact and
fixate them. An even support on forehead and glabella should
be achieved, which stabilizes the face bow and significantly
improves the patient's comfort.
The restraining strap is placed parallel to the side arms and
fastened. Now, the face bow should hold firmly on the head
without further support.
Pay attention that the side arms lie above the ears. The face bow must not be pulled
downwards, on the pinna, or upwards by the restraining band.
The porus knobs are inserted into both ear canals through the
holes of the flag adapters.
Adjust the depth of the side arms and the height of the flag
adapters to a comfortable, painless position and fixate them.
Also here, asymmetries could be caused by a flawed mounting
of the bow.
Loosen and remove the porus knobs.
38Registrazione del movimento condilare
Attach the orbital pointer on the cross bar of the face bow and
adjust it to the orbital.
To indicate the position of the orbital point with a lead mark in a
subsequent x-ray, you can now mark the point on the skin.
Afterwards, fixate the orbital pointer and remove it from the face
bow.
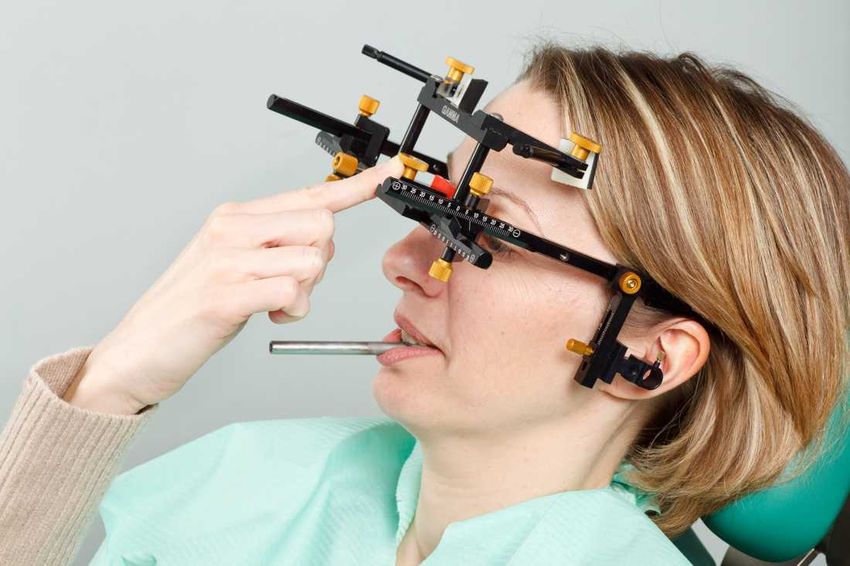
3.5.2 Condylograph comfort
3.5.2.1 Preparazione dell'arco facciale superiore
Slightly loosen the side arm clamp screws, so that the side
arms are movable in sagittal (upper clamp screw) and
transversal (lower clamp screw) direction.
Loosen and remove the orbital pointer.
Fixate the glabella support by pushing it from the side into the
center position until it snaps in.
The actual nose support can easily be exchanged. It is only put
on the glabella bridge.
39CADIAX compact
The upper face bow is now ready to be mounted.
3.5.2.2 Montaggio dell'arco superiore
Adjust the width of the face bow in a way, that the side arms
are in contact with the skull above the ears evenly without
tension. The face bow should be adjusted symmetrically.
Put the face bow on the patient's head, whereby the glabella
support is placed on the glabella and the side arms rest above
the ears.
The restraining strap is placed parallel to the side arms and
fastened. Now, the face bow should hold firmly on the head
without further support.
Pay attention that the side arms lie above the ears. The face bow must not be pulled
downwards, on the pinna, or upwards by the restraining band.
Fixate the flag adapters of the extension set with the respective
screws on the side arms.
40Registrazione del movimento condilare
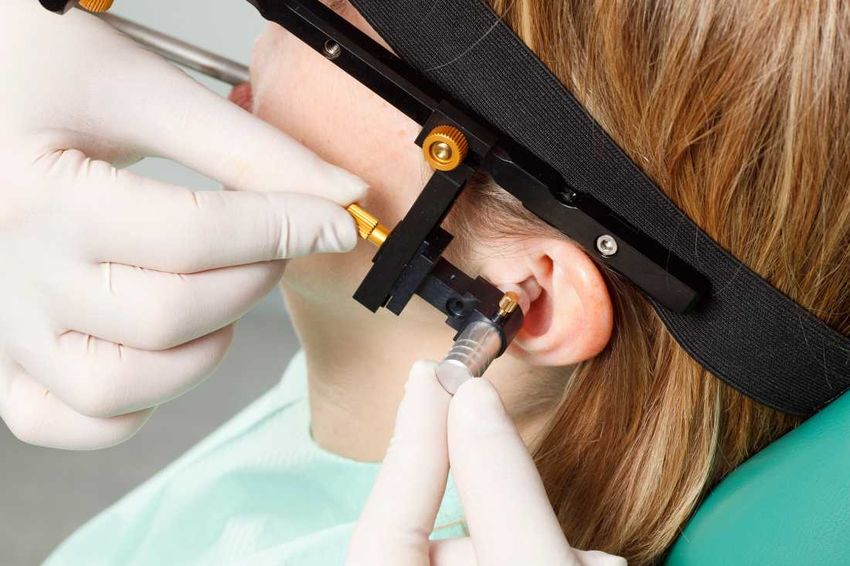
The porus knobs are inserted into both ear canals through the
holes of the flag adapters.
Adjust the depth of the side arms and the height of the flag
adapters to a comfortable, painless position and fixate them.
Also here, asymmetries could be caused by a flawed mounting
of the bow.
Loosen and remove the porus knobs.
Attach the orbital pointer on the cross bar of the face bow and
adjust it to the orbital.
41CADIAX compact To indicate the position of the orbital point with a lead mark in a subsequent x-ray, you can now mark the point on the skin. Afterwards, fixate the orbital pointer and remove it from the face bow. 3.5.3 Preparazione dell'arco di scrittura Move the side arms of the lower face bow into their center position. Slightly loosen the screws, so that the side arms and the double clamp on the crossbar are movable. Adjust the two axis needles so that they protrude 2 cm from the axis pin jack. The writing bow is now ready to be mounted. 42
Registrazione del movimento condilare

3.5.4        Montaggio dell'arco di scrittura
The two axis locators are inserted into the holes for the left and
right stylus and clamped firmly.

The side arms of the lower face bow are pushed completely
outwards, then slightly fixated. The patient holds the lower jaw
closed and in centric (retral) position. The double clamp is
pushed onto the clutch.
Make sure not to loosen the clutch and check once more that
it fits correctly.

The side arms are moved, so that the tips of the axis locators
slide into the bores on the flag adapters of the extension set,
which mark the anatomical axis point. This fixes the positions
of the styli on the anatomical axis, and also guarantees a
correct distance to the flag.
The patient or an assistant lightly presses both guides inwards.

The writing bow is now adjusted so that it is parallel to the
upper face bow. Both fixing clamps of the side arms are now
carefully clamped firmly.

Tighten the clamp on the lower cross bar. In doing so, support
the lower face bow with your second hand to avoid too much
force being transferred to the clutch. Strong force can cause
pain or loosen the clutch.

        It is important that the double clamp is tightened after the clamps of the side arms!

                                                                                                       43
Puoi anche leggere