BMBus-Read and Configuration Software Manual - BMBus-Manuale del software di configurazione e lettura - B Meters
←
→
Trascrizione del contenuto della pagina
Se il tuo browser non visualizza correttamente la pagina, ti preghiamo di leggere il contenuto della pagina quaggiù
BMBus–Read and Configuration Software Manual
BMBus–Manuale del software di configurazione e lettura
BMBus- Read and configuration Software – Software di configurazione e lettura                                                                                                      Operating Manual – Manuale d’uso

Table of contents - Indice

Introduction - Introduzione ........................................................................................................................................................................................................... 3
1.     Starting the program – Avvio del software ........................................................................................................................................................................... 4
2.     Main window – Finestra principale ....................................................................................................................................................................................... 6
     2.1.    MBUS device Setting – Configurazione dei dispositivi MBUS ........................................................................................................................................ 9
     2.2.    Communicazion devices – Dispositivi di comunicazione .............................................................................................................................................. 14
     2.3.    Setting up of the local display – Impostazione del display locale ................................................................................................................................ 15
     2.4.    Reading Operation – Letture dei consumi .................................................................................................................................................................... 20
     2.5.    A M-BUS network first setup operation example – Esempio di Prima configurazione di una rete M-BUS ................................................................. 21
     2.6.    Modify the display table (teneant’s name replacement) – Modificare la tabella del display (sostituzione nome utenza) ........................................ 26
3.     User Accounts – Account Utente ........................................................................................................................................................................................ 28
4.     Software settings – Impostazioni del software ................................................................................................................................................................... 29
5.     Language – Lingua .............................................................................................................................................................................................................. 30

                                                                                                                                                                                                                             pag. 2
BMBus- Read and configuration Software – Software di configurazione e lettura                                                Operating Manual – Manuale d’uso

Introduction - Introduzione

The BMBus software is a read and configuration utility useful to configure and   Il software BMBus è un utile strumento per la lettura dei consumi e per la
read consumptions of MBUS networks from the MBUS Master side.                    configurazione delle reti MBUS, che può essere effettuata dal punto d’installazione
The software is supplied within the device MB-MASTER (MBUS Concentrator)         del Master MBUS.
especially designed to manage heat and water metering networks of modules        Il software viene fornito con il dispositivo MB-MASTER (concentratore MBUS)
produced by BMETERS.                                                             progettato appositamente per gestire reti di trasmissione dei consumi di acqua e
                                                                                 calore composte da moduli prodotti da BMETERS.

                                                                                                                                                           pag. 3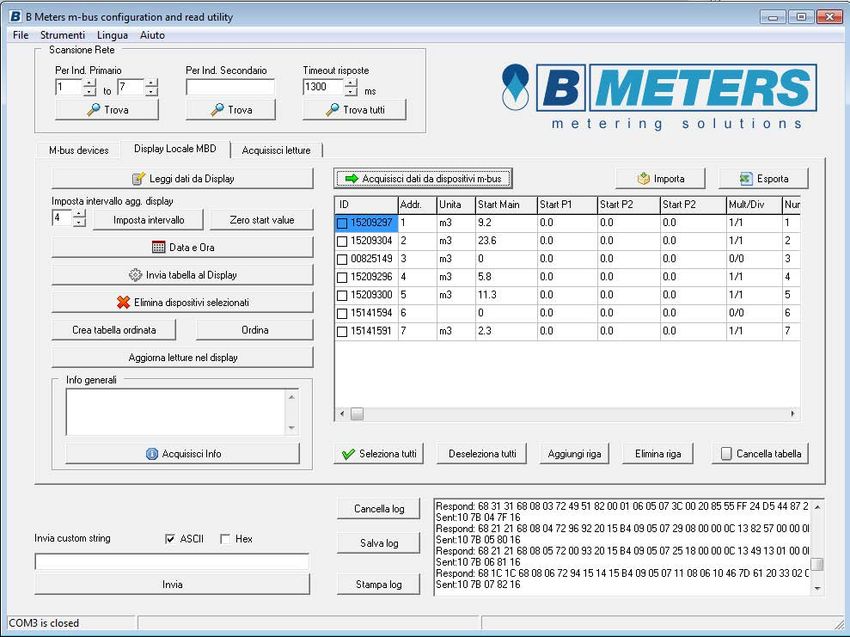
BMBus- Read and configuration Software – Software di configurazione e lettura Operating Manual – Manuale d’uso
1. Starting the program - Avvio del software
Program will start by double clicking the Desktop Shortcut icon Il programma si avvierà con doppio click sull’icona di programma del Desktop
Or launching the program from the corresponding Group Program O lanciando il programma dal corrispondente gruppo programmi
Start MenuProgramBMetersBMBUS Menù StartProgrammiBMetersBMBUS
After launching the software it will prompted a login window, the user need to Dopo l’avvio del software verrà mostrata la finestra di login, l’utente dovrà inserire
input the correct user and password. username e password valide.
For the first running use the following credentials. Per il primo avvio del software usare le seguenti credenziali.
User: admin User: admin
Password: admin Password: admin
The software will starting up using the Administrator account, password and Il software si avvierà utilizzando l’account di amministratore, password e
pag. 4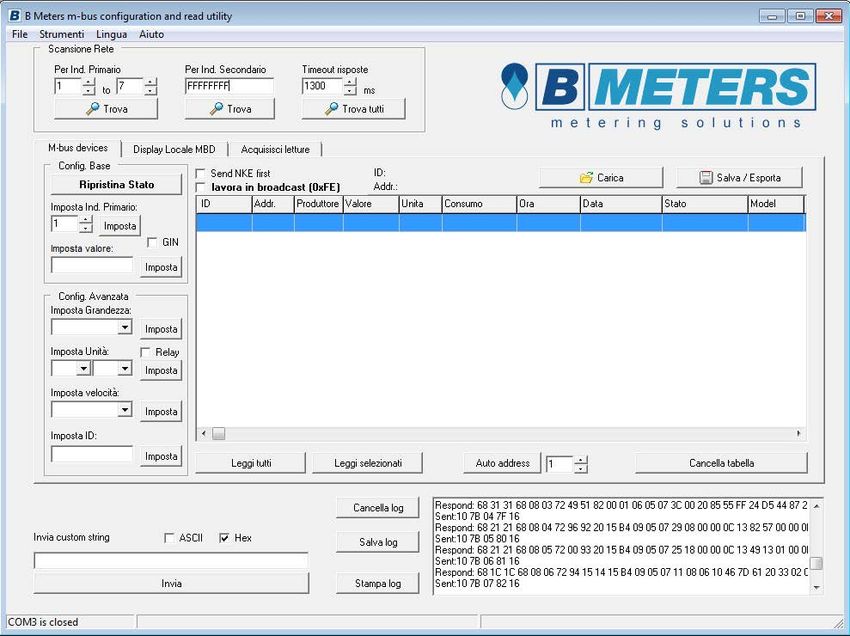
BMBus- Read and configuration Software – Software di configurazione e lettura                                                     Operating Manual – Manuale d’uso

username can be changed (refer to section “User Accounts”).                          username possono essere cambiati (fare riferimento alla sezione “Account
                                                                                     Utente”)
When username and password are entered, push the button                        , if
account credentials are valid the program will start, if not, an error message will Una volta inseriti username e password, premere il pulsante                   , se le
prompt and it will necessary to enter the correct account’s username and credenziali sono valide il software verrà avviato, in caso contrario verrà
password.                                                                           visualizzato un errore e sarà necessario inserire delle credenziali corrette.

The button             will close the program.                                       Il pulsante            chiuderà il programma.

                                                                                                                                                                pag. 5
BMBus- Read and configuration Software – Software di configurazione e lettura Operating Manual – Manuale d’uso
2. Main window - Finestra principale
The program interface is divided into four different TABs. L’interfaccia del software è suddivisa in 4 diverse schede.
Setting up of m-bus devices and getting actual consumptions Impostazione e lettura dati dai dispositivi MBUS
Setting up of communication devices (only for compatible Ethernet and/or Impostazione dei dispositivi di comunicazione (solo per Convertitori Ethernet
GPRS converters) e\o GPRS compatibili)
Setting up of local display (Local Display MBD) Impostazione del display locale
Getting readings and historical consumptions Lettura dei consumi e dati storici
After logging into the software the Mbus-devices Tab will be active. Dopo l’autenticazione sarà presentata la scheda Mbus-devices.
pag. 6
BMBus- Read and configuration Software – Software di configurazione e lettura Operating Manual – Manuale d’uso
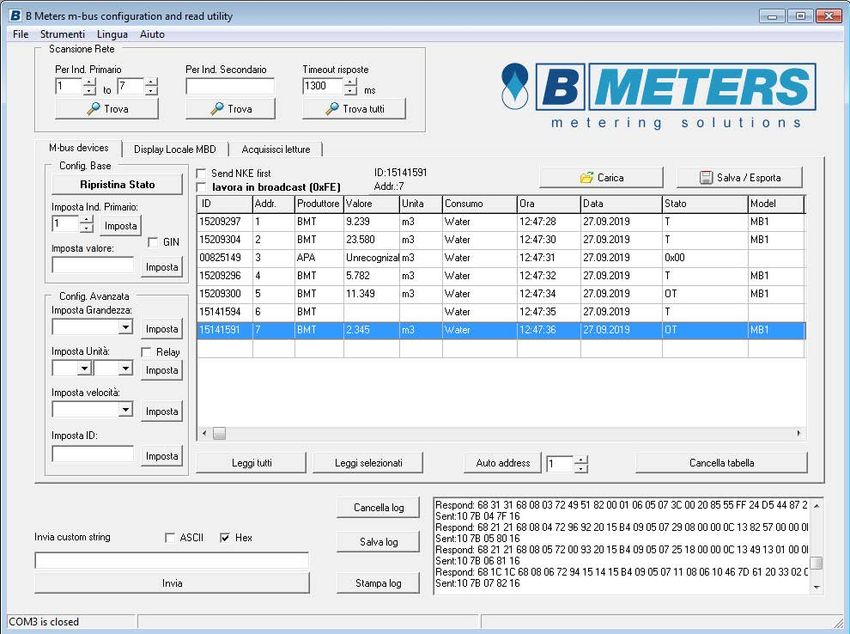
The main window is divided in 3 areas: La finestra principale è suddivisa in 3 sezioni:
Search network area Scansione rete
This allow to: Permette di:
- Scan the network by primary address from a starting address to an ending - Effettuare la scansione per indirizzo primario da un indirizzo di partenza ad
address (in the figure scanning will be performed from primary address 1 un indirizzo di arrivo (nella figura la scansione sarà effettuata dall’indirizzo
to address 12) primario 1 fino al 12)
- Search a determined device inputting the Secondary Address - Ricercare un determinato dispositivo inserendo il suo indirizzo secondario
- Scan the network by secondary address (it takes a long time) by selecting - Effettuare la scansione della rete per indirizzo secondario (richiede molto
Find all button tempo) selezionando il pulsante Trova tutti.
Main area, this will change according with the 4 different tabs: Sezione principale, varia a seconda di quale delle 4 schede disponibile è
- M-bus devices, it allows to search and configure MBUS network selezionata:
- Communication devices, it permit to configure GPRS and ETHERNET - M-bus devices, permette di scansionare e configurare la rete MBUS
converters - Comunicazione, permette di configurare i convertitori ETHERNET e GPRS
- Local display MBD, useful to configure the MB-MASTER display - Display Locale MBD, utile per configurare il display dell’MB-MASTER
- Get Readings, to get readings and historical values stored from the - Acquisisci letture, per leggere i consumi attuali e i valori storici
network devices memorizzati
Log and additional tools Log e strumenti aggiuntivi
In this area user can see log window and direct send custom string to serial In questa sezione è possibile vedere il log dei comandi inviati sulla rete e inviare
port. Every operation is notified into the log, the content of this window can delle stringhe custom attraverso porta seriale. Qualsiasi operazione è riportata
be saved, cleared or printed. nel log, il contenuto di questa finestra può essere salvato, cancellato o
pag. 7
BMBus- Read and configuration Software – Software di configurazione e lettura                                               Operating Manual – Manuale d’uso

   On the right side user can send custom commands to desired device. There         stampato.
   are two options for sending command:                                             Nella parte destra è possibile inviare comandi custom al dispositivo desiderato.
   ASCII – sends the command as plain text, written in the box                      Ci sono due opzioni per l’invio di tali comandi:
   HEX – sends the command in HEX values. For that purpose commands should          ASCII - invia il comando come testo semplice, come scritto nel campo relativo
   be send as sequence of couples of chars(‘XX’, that means 1 byte) with spaces     HEX – invia il comando con valori esadecimale. A questo scopo i comandi
   between every byte.                                                              devono essere inviati come sequenze di coppie di caratteri (‘XX’, che
   Example: if we want to get main info of MBD display, we should tick ASCII        corrispondono a 1 byte) con spazio tra ogni byte.
   mode, type ‘get main’ in the text box and press button Send.                     Esempio: se vogliamo ricevere le informazioni di stato dal display MBD,
   If the user wants to send m-bus command ‘Read’ to device with primary            dobbiamo selezionare ASCII, inserire ‘getmain’ nel campo di testo e premete
   address 1, the string in the box should look like this:                          Invia. Se si vuole inviare in comando m-bus ‘Read’ al dispositivo con indirizzo
   10 5B 01 5C 16                                                                   primario 1, la stringa nel campo testo deve essere del tipo:
   The response to the custom string sent is displayed in the log window with the   10 5B 01 5C 16
   same mode, HEX or ASCII selected on sending.                                     La risposta alla stringa custom inviata è visualizzata nella finestra logcon la
                                                                                    stessa modalità, HEX o ASCII selezionata in invio.

                                                                                                                                                           pag. 8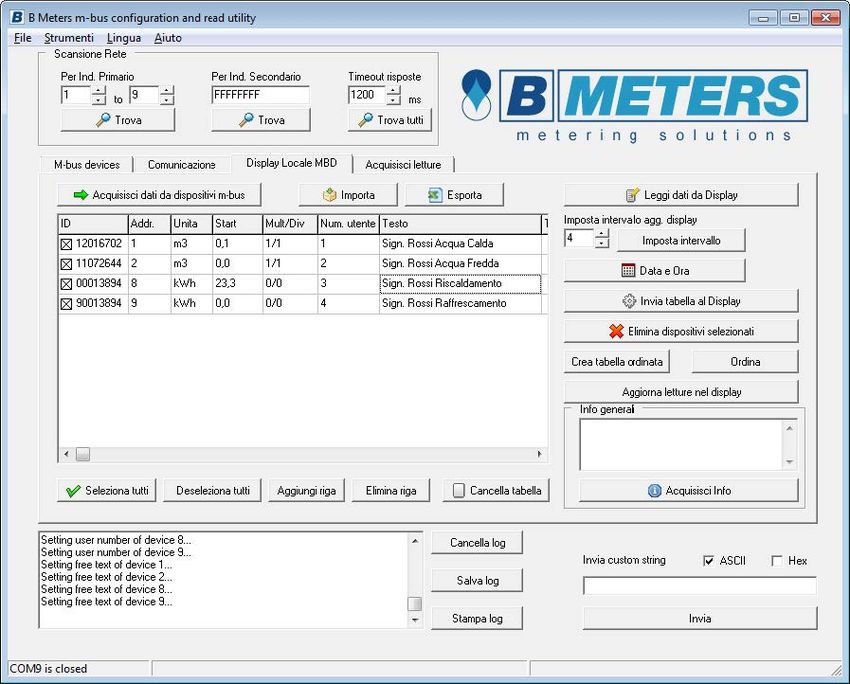
BMBus- Read and configuration Software – Software di configurazione e lettura Operating Manual – Manuale d’uso
2.1. MBUS device Setting - Configurazione dei dispositivi MBUS
The tab for setting up the MBUS devices on the network. Di seguito la scheda per la configurazione dei dispositivi MBUS nella rete.
For finding the devices on the network, it is possible to choose between scanning Per cercare i dispositivi nella rete, è possibile scegliere tra scansione per primario e
by primary or by secondary address. scansione per secondario.
The scanning by primary address can be performed from address 0 to 250, La scansione secondo indirizzo primario può essere effettuata per indirizzi da 0
according with MBUS protocol, following these steps: a 250, in accordo con il protocollo MBUS, seguendo i seguenti passi:
Select minimum primary address (it is 1 on the screenshot above) Selezionare l’indirizzo di partenza (è 1 nella schermata sopra)
Select maximum primary address (12 on the screenshot) Selezionare l’indirizzo di arrivo (12 nella schermata)
Press related Find button Premere il relativo pulsante Trova
pag. 9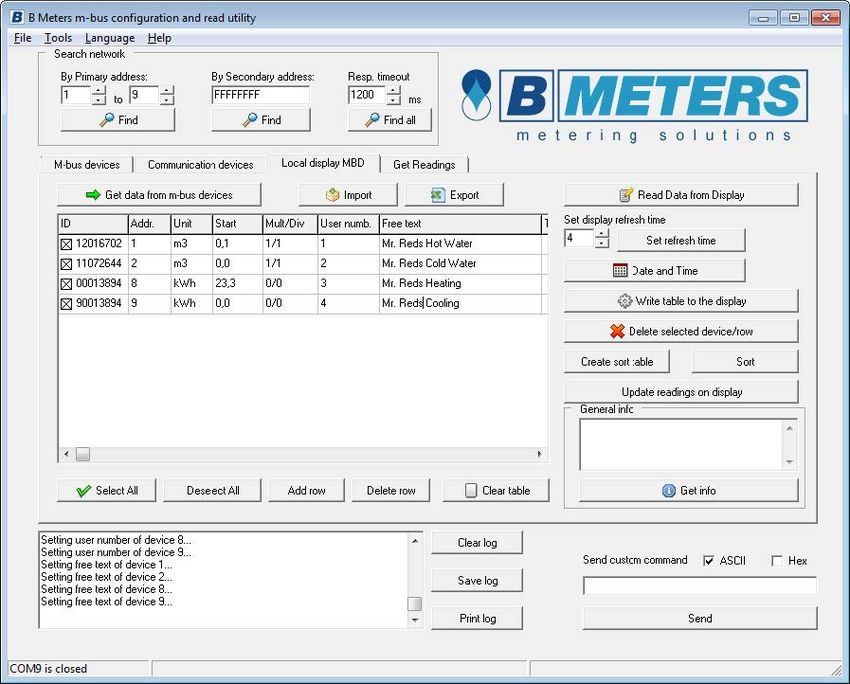
BMBus- Read and configuration Software – Software di configurazione e lettura Operating Manual – Manuale d’uso
It will prompted a message popup asking confirmation for clean actual table, if Yes Verrà mostrato un popup che chiederà se cancellare la tabella attuale, se verrà
is chosen the table will be cleaned and it will filled with scanning results, if No is scelto Sì, la tabella verrà svuotata e riempita con i risultati della scansione, se viene
chosen new devices found will be added on actual table. scelto No, i nuovi dispositivi trovati verranno aggiunti alla tabella attuale.
The network scan depends from two factors:
Response timeout (ms – milliseconds, default setting is 900ms as in the La scansione dipende da due fattori:
screenshot above), it should be set reasonably following network devices Timeout risposte (ms – millisecondi, l’impostazione di default è di 900ms come
specifications (some devices have respond of 200 bytes, others can have 30 nella schermata precedente), questo parametro dovrebbe essere settato in
bytes) maniera coerente con le specifiche dei dispositivi nella rete (alcuni dispositivi
Retries (the parameter can be set under Tools->Settings) hanno risposte di 200byte, altri potrebbero avere risposte da 30byte)
Tentativi (il parametro può essere settato in Strumenti->Impostazioni)
Every device found during scanning is listed in a row in the table, with the
following data: Ogni dispositivo trovato durante la scansione rappresenta una nuova riga nella
ID – this is the secondary address tabella, viene inserito con le seguenti informazioni:
Addr. – this is the primary address ID – indirizzo secondario
Mfr. – Manufacturer code Addr. – indirizzo primario
Value – actual value transmitted by the device Produttore – Codice produttore
Unit – unit of measure Valore – valore attuale trasmesso dal dispositivo
Medium – type of quantity measured Unità – unità di misura
Time Consumo – Grandezza misurata
Date Ora
Status – actual status (only for BMETERS RFM-MB1, RFM-MB2) Data
Model – type of device (only for BMETERS RFM-MB1, RFM-MB2) Stato – stato attuale del dispositivo (solo per BMETERS RFM-MB1, RFM-MB2)
Model – modello del dispositivo (solo per BMETERS RFM-MB1, RFM-MB2)
Scan by secondary address, is supported into 2 modes:
Single search of a determined ID (serial number), typing the ID into the text La scansione per secondario può essere eseguita in due modi:
field and pushing related Find button. Ricerca di un singolo ID (seriale), inserendo l’ID nel campo testo e premendo il
pag. 10BMBus- Read and configuration Software – Software di configurazione e lettura Operating Manual – Manuale d’uso
relativo pulsante Trova.
Full search, the scanning will be performed into the entire range of possible
ID’s, the operation will cost quite long time to be completed. Ricerca completa, la scansione verrà effettuata per tutti gli ID ammessi,
l’operazione richiede un lungo periodo di tempo per essere completata.
It is request only to type Find all button.
Both scanning operation (by primary or secondary address) can be stopped by E’ richiesto solo di premere il pulsante Trova Tutti.
pressing the button ESC on the keyboard. Sia nella scansione per seriale, che nella ricerca per secondario, è possibile
interrompere anticipatamente la ricerca premendo il tasto ESC sulla tastiera.
Once the scanning operation is completed the table should be filled with a
number of rows equal to the number of devices in the MBUS network. Una volta che l’operazione è completata la tabella risulta avere un numero di righe
uguale al numero di dispositivi MBUS nella rete.
pag. 11BMBus- Read and configuration Software – Software di configurazione e lettura Operating Manual – Manuale d’uso
From this table two operation can be performed: In questa tabella è possibile effettuare due tipologie di operazioni:
Read devices (meters), meters on the table can be read entirely by pushing Leggere i dati dai dispositivi (contatori), i contatori nella tabella possono
Read all meters or singularly by selecting one row and pushing Read Selected. essere letti interamente premendo Leggi tutti i dispositivi o singolarmente
Configure devices, for that purpose it is available on the left side of the selezionando una riga e premendo Leggi selezionati.
window a dedicated area. Configurare i dispositivi, a questo scopo è disponibile nella parte sinistra della
finestra un’area dedicata.
Basic Configuration
These square contains some basic parameters and functions, every parameters Configurazione Base
affect only the selected device in the table (to change a parameter it’s necessary Questa sezione contiene alcuni parametri di configurazione e funzioni basilari, ogni
to select the corresponding row) parametro ha effetto solo sul dispositivo selezionato nella tabella (per cambiare un
Reset Status - sends reset command parametro è necessario selezionare la corrispondente riga)
Set primary Address to - allow to change the Primary address Ripristina Stato – invia il comando di reset
Set Value to - allow to set the value into the device Imposta Ind. Primario – permette di cambiare l’indirizzo primario
IMPORTANT: for BMETERSRFM-MB1 and RFM-MB2, the value set must be Imposta valore – permette di impostare un valore nel dispositivo
entered in liters, i.e. the water meters is showing 1,231 m3, the value enter IMPORTANTE: per i dispositivi BMETERS RFM-MB1 e RFM-MB2, il valore da
must be 1231. impostare deve essere indicato in litri, es. il contatore d’acqua segna 1,231 m3,
il valore da impostare deve essere 1231.
pag. 12BMBus- Read and configuration Software – Software di configurazione e lettura Operating Manual – Manuale d’uso
Advanced Configuration Configurazione Avanzata
Available configuration parameters: Parametri disponibili:
Set Medium to – to configure the quantity measured by the device Imposta grandezza – configura la quantità misurata dal dispositivo
(ATTENTION: some devices support only a determined set of Medium) (ATTENZIONE: alcuni dispositivi supportano un determinato set di grandezze)
Set Unit to – allow to configure the unit of the quantity measured Imposta Unità– permette di impostare l’unità di misura del dispositivo
(ATTENTION: some devices support only a determined set of Units) (ATTENZIONE: alcuni dispositivi supportano un determinato set di unità)
Set new baud to – allows to change baud rate of the module, keep attention Imposta velocità – permette di modificare la velocità di comunicazione del
to modify the baud rate of the software according to that. dispositivo, successivamente modificare coerentemente la velocità del
Set new ID to – will change the secondary address of the device software per continuare a comunicare con il dispositivo.
Relay – this checkbox must be tick when performing configuration on Relay Imposta ID– modificherà l’indirizzo secondario del dispositivo
PADPULSE M2. Relay – questa casella deve essere selezionata se il dispositivo da configurare
è un Relay PADPULSE M2.
Configuration can be forbid by setting properly the user account, see the User
Account paragraph. L’operazione di configurazione può essere impedita ad alcuni utilizzatori del
software con appropriati settaggi dell’account utente, vedi il paragrafo Account
In case of network composed by only one device in the network, the software can utenti.
work using broadcast address, which can be selected above the meters table.
Nel caso di utilizzi un solo dispositivo nella rete, è possibile utilizzare il software
con l’indirizzo di broadcast, per far ciò di deve selezionare la casella sopra la
The meter’s table can be saved pressing button Save / Export a save into folder tabella dei dispositivi.
dialog will appears, asking the location and file name. The file is saved into CSV
format, it can be open for example by MS Excel or every calculation sheet
software. Once a file is saved it can be load on a next running of the software. La tabella dei dispositivi può essere salvata in un file premendo il pulsante Salva /
Esporta, verrà mostrata una finestra di dialogo per la scelta della locazione e
nome del file. Il file viene salvato nel formato CSV, può essere aperto per esempio
da MS Excel o qualsiasi software tipo foglio di calcolo. Una volta salvato lo stesso
file può essere caricato in un successivo avvio del software.
pag. 13BMBus- Read and configuration Software – Software di configurazione e lettura Operating Manual – Manuale d’uso
2.3. Setting up of the local display - Impostazione del display locale
Below the screenshot for configuring of the onboard display of the Di seguito la schermata di configurazione del display a bordo del
concentrator MB-MASTER. concentratore MB-MASTER.
The display settings is normally performed in the same time of the network La configurazione del display viene di solito eseguita nello stesso momento in cui si
configuration, for that reason is possible to import the device table from the M- configura la rete, per questa ragione è possibile importare la tabella dei dispositivi
bus devices Tab within the pressing of Get data from m-bus devices button. dalla scheda M-bus Devices premendo Acquisisci dati da dispositivi m-bus.
pag. 15BMBus- Read and configuration Software – Software di configurazione e lettura Operating Manual – Manuale d’uso
The resulted table is like the following: La tabella risulta essere come la seguente:
The columns on the display configuration table: Le colonne della tabella di configurazione del display sono:
ID – this is the secondary address ID – indirizzo secondario
Addr. – this is the primary address Addr. – indirizzo primario
Unit – the unit of measure displayed by the display Unità – l’unità di misura che visualizzerà il display
Start – filled with the actual value showed in the m-bus devices table Start – compilato con il consumo attuale trasmesso dal dispositivo
Mult./Div. – multiplier factor of the value displayed (recommended to keep as Mult./Div – fattore di moltiplicazione del valore visualizzato (consigliato
default) lasciare l’impostazione di default)
pag. 16BMBus- Read and configuration Software – Software di configurazione e lettura Operating Manual – Manuale d’uso
User numb. – that is filled automatically from 1 (user can modify it, but the Num. Utente – questo è compilato automaticamente partendo da 1 (l’utente
number must be univocal) può modificarlo, ma il numero deve essere univoco)
Free Text–this is a free text field and should be filled with tenant or meter Testo –campo testo libero,viene usato per l’utenza o la descrizione del
description (i.e. “Mr. Robert Reds”, or “Global Building Meter”). contatore (es. “Sig. Mario Rossi”, o “Contatore Generale Edificio”)
Total – this field is filled only in the case of reading actual display setting (it Total – questo campo è compilato solo in caso di lettura dell’impostazione
should be empty on setting up of display) attuale dal display (è vuoto durante la configurazione del display)
The table could be saved into a CSV file andcan beloaded from a previously saved La tabella può essere salva in un file CSV, è può essere caricata da file
file. precedentemente salvato.
Table Editing buttons Pulsanti di modifica della tabella
Select all – select all rows in the table Seleziona tutti – seleziona tutte le righe della tabella
Deselect all – deselect all rows in the table Deseleziona tutti – deseleziona le righe della tabella
Add row – add a new row Aggiungi riga – Aggiunge una nuova riga
Delete row – remove the selected row Elimina riga – cancella la riga selezionata
Clear table – remove all rows in the table Cancella tabella – cancella tutte le righe della tabella
IMPORTANT: modifications will not take effect in the display directly, it’s required IMPORTANTE: le modifiche della tabella non ha effetto diretto sul display, è
to send the table to the display. necessario inviarla al display.
Functionality Buttons Pulsanti funzione
Read Data from Display – allow to read actual table from the display (it works Leggi dati da Display – permette di leggere la tabella attualmente impostata
pag. 17BMBus- Read and configuration Software – Software di configurazione e lettura Operating Manual – Manuale d’uso
only if the display was already configured) nel display (funziona solo con display già configurato)
Set refresh time – it set the time of displaying per single row, every row in the Imposta intervallo – imposta il tempo di visualizzazione della singola riga, ogni
table correspond to a screen in the displayas follow: riga nella tabella corrisponde ad una singola schermata nel display, come la
seguente:
In the display these are the meanings of the data displayed:
“1-“ – that’s the user number Nella schermata del display le indicazioni visualizzate sono le seguenti:
“Water” – Quantity measured by the device (Medium in the M-bus devices “1-” – numero utente
table) “Water” – Grandezza misurata dal dispositivo (campo Consumo nella scheda
“/A001” – Primary address of the device (Addr. In the display table) M-bus devices)
“Mr. Robert Reds” - tenant’s name (Free text field in the display table) “/A001” – Indirizzo primario del dispositivo (campo Addr. nella tabella del
“Count” – precede the indication of the actual consumption display)
“57.1” – actual consumption “Sig. Roberto Rossi” – nome utenza (campo Testo nella tabella del display)
“m3” – unit of measure (Unit field in the display table) “Count” – precede l’indicazione del consumo attuale
“Tu, 06/Oct/2012” – Date on the display (current date) “57.1” – consumo attuale
“19:07” – Hour in the display (current Hour) “m3” – unità di misura
Date and Time – update the display date and time with the PC current “Tu, 06/Oct/2012” – Data del display (data corrente)
indication “19:07” – Ora del display (ora corrente)
Write table to display – send actual table (or only the selected rows to the Data e Ora – aggiorna l’ora e la data del display con l’indicazione del PC.
display). To send all the table it’s necessary to select every rows before to Invia tabella al display – invia la tabella attuale (o solamente le righe
press this button. selezionate). Per l’invio dell’intera tabella è necessario selezionare ogni riga
Delete selected Device\row – remove the selected row (devices) from the della tabella prima di premere il pulsante.
onboard display table Elimina dispositivi selezionati – rimuove le righe selezionata (dispositivi) dalla
Create sort table – it create a sort table inside the display tabella nella memoria del display
Sort – it sort the rows into the onboard table of the display Crea tabella ordinata – creerà una tabella indicizzata nella memoria interna
Update reading on display – It force the display to collect and display readings del display
from devices (meters). Ordina – ordina la tabella nella memoria interna del display
ATTENTION: during normal operation the display performs a reading and Aggiorna letture nel display – forza il display a leggere i consumi dai
updates the data displayed every 6 hours. dispositivi (contatori) ed aggiornarne la visualizzazione
ATTENZIONE: durante il funzionamento normale il display effettua lettura ed
aggiornamento dei dati di consumo visualizzati ogni 6 ore.
pag. 18BMBus- Read and configuration Software – Software di configurazione e lettura Operating Manual – Manuale d’uso
Service info button
The following area is dedicated for getting service info from the display. Informazioni di Servizio
La seguente sezione è dedicate per ricevere le informazioni di Servizio dal display.
Get Info – send request of service info to the display, the data received will be
showed on the text field above the button. This button is useful as diagnostic Acquisisci Info – invia richiesta delle informazioni di Servizio al display, I dati
tools for checking display status. ricevuto vengono mostrati nel campo testo sopra il pulsante. Questo pulsante
è utile come strumento diagnostico dello stato del display
pag. 19BMBus- Read and configuration Software – Software di configurazione e lettura Operating Manual – Manuale d’uso
2.4. Reading Operation - Letture dei consumi
The last tab allows to get reading from network modules in a clear and easy to L’ultima scheda consente di acquisire le letture dai moduli nella rete in una chiara
export table. tabella semplice da esportare.
Choosing Get all memory data, the first 8 columns from the left will be filled with Premendo Acquisisci tutti i dati, le prime 8 colonne da sinistra verranno compilate
actual data, historical values columns are filled only if there are some data con i dati attuali,le colonne dei valori storici vengono riempite solamente se sono
available. Historical values available can be up to 12 monthly indication, each disponibili i dati. I dati storici memorizzabili sono fino a 12 indicazioni mensili
indication is get at 1th of the month at 00.00. precedenti, ogni indicazione è memorizzata il primo del mese alle 00.00.
It’s also possible to get only the historical values (pushing related button) if the E’ anche possibile acquisire solo i dati storici (relativo pulsante) per esempio se i
actual ones are already present in the table, this will save some time to perform dati attuali sono già presenti nella tabella, questo permetterà di risparmiare del
the reading operation. tempo nell’operazione di lettura.
The readings table can be also edited, using dedicated buttons. La tabella delle letture può anche essere modificata, grazie ai pulsanti dedicati.
pag. 20BMBus- Read and configuration Software – Software di configurazione e lettura Operating Manual – Manuale d’uso
Add row – allows to add a row, it’s useful for example to insert a manual red Aggiungi riga – permette di aggiungere una riga, è utile per esempio per
meter in the same table inserire una lettura un contatore letto manualmente nella stessa tabella
Delete row – allow to remove one row from the table Cancella riga – elimina una riga dalla tabella
Clear table – removes all rows Cancella tabella – cancella tutte le righe
Sort table – function button to sort the table’s rows, by user number or Ordina tabella – pulsante di funzione per ordinare la tabella, per numero
address, depending on the checkbox selection on the right utente o per indirizzo a seconda della selezione della casella sulla destra
Most important button is the Export button (top right side of the table), that Il pulsante più importate è il pulsante Esporta (in alto a destra della tabella),
allows to save the table into a CSV file, to allow importing to the billing software. questo permette di salvare la tabella in un file CSV, per poter poi importarla nel
software per la fatturazione.
2.5. Example of M-BUS network first setup operation - Esempio di Prima configurazione di una rete M-BUS
Here an example of first setup for a M-bus network, supposing we have 3 meters Di seguito un esempio di prima configurazione di una rete M-BUS, supponiamo di
on the network (with BMETERS modules): avere 3 contatori nella rete (con moduli BMETERS ):
A water meter for cold water (GSD8-RFM with M-BUS module RFM-MB1) Un contatore per acqua fredda (GSD8-RFM con modulo M-BUS RFM-MB1)
A water meter for hot water (GSD8-RFM with M-BUS module RFM-MB1 ) Un contatore per acqua calda (GSD8-RFM con modulo M-BUS RFM-MB1)
A heat\cooling meter (HYDROCAL-M with embedded M-BUS capabilities) Un contatore di calore\raffrescamento (HYDROCAL-M con M-BUS integrato)
pag. 21BMBus- Read and configuration Software – Software di configurazione e lettura Operating Manual – Manuale d’uso
Operation to perform: Le operazioni da eseguire sono:
Execute the wiring of the network according to MBUS Master and modules Eseguire I cablaggi necessario con riferimento ai manuali del master e dei
manuals. moduli.
Connect PC and run the BMBUS software. Connettere il PC ed avviare il software BMBUS.
Perform a scan by secondary (Find all button), results should be the same as Effettuare una scansione per secondario (Trova tutti), i risultati dovrebbero
below. essere coerenti a come mostrato di seguito
In the table we can find: Nella tabella possiamo trovare:
Six water meters modules (RFM-MB1), these have Water as Medium, m3 as Sei moduli per contatori d’acqua (RFM-MB1), questi risultano avere Water
Unit, BMT as Mfr., 0 as Addr. (as factory defaults setting), moving the table to come Consumo, m3 come Unità, BMT come Produttore, 0 come
the left, there is also an additional column with the model of the module Addr.(impostazioni di fabbrica), muovendo la tabella verso sinistra, abbiamo la
(that’s filled only if module is BMETERS RFM-MB1). colonna Model che indica il tipo di dispositivo (compilata solo per RFM-MB1)
One row with address 3, that’s the heat meter address for heating (this
pag. 22BMBus- Read and configuration Software – Software di configurazione e lettura Operating Manual – Manuale d’uso
address is set before to scan the network according to the manual of the Una riga con indirizzo 3, questo è l’indirizzo del contatore di calore (viene
device, the address setting should be performed on the heat meter and settato prima di effettuare la scansione a bordo del contatore, non è possibile
cannot be performed by software). Medium for that row is Heat, unit is KWh. indirizzare il dispositivo via software, vedere manuale del contatore di calore).
Per questa riga il consumo è Heat e l’unità KWh.
According with that table we need to configure RFM-MB1, setting:
The primary address (from 1 to 250, without using the same of other devices In riferimento a questa tabella per l’RFM-MB1 dobbiamo configurare:
in the network). In the example we set ID 15209297 with Addr. 1, and ID L’indirizzo primario (da 1 a 250, senza usare indirizzi doppi), nell’esempio
15209304 with Addr. 2. abbiamo settato l’ID 15209297 con Ind. 1, e l’ID 15209304 con indirizzo 2.
pag. 23BMBus- Read and configuration Software – Software di configurazione e lettura Operating Manual – Manuale d’uso
The initial Value according with the value showed in the water meter GSD8- Il valore iniziale in relazione a quanto è riportato sul contatore d’acqua GSD8-
RFM(report all the 8 digit from the water meter to the value setting field). In RFM (riportare tutte le 8 cifre mostrate nel campo Imposta valore).
the example 9239 liters for Addr.1 and 23580 for Addr.2 (cold water). Nell’esempio 9239 litri per Ind. 1 e 23580 per Ind. 2 (acqua fredda).
After setting of RFM-MB1, perform a scanning by primary covering all the Dopo l’impostazione degli RFM-MB1, effettuare una scansione per primario
network device address, in the example case should be from address 1 to address comprendo tutti gli indirizzi della rete, nell’esempio dall’1 al 7.
7.
Una volta terminate queste operazioni dobbiamo configurare il display.
Once these tasks are performed we need to configure the display.
Scegliere la scheda Display Locale MBD e premere Acquisisci dati da
Switch the Tab to Local Display MBD and push Get data from m-bus devices. dispositivi m-bus
Fill the Free Text field Completare i campi Testo per ogni riga
pag. 24BMBus- Read and configuration Software – Software di configurazione e lettura Operating Manual – Manuale d’uso
Select all rows (Select All button) Selezionare tutte le righe (pulsante Seleziona tutti)
Set Date and Time of the display (Date and Time button) Impostare Data e Ora (pulsante Data e ora)
Write table to display (Write table to the display button) Inviare tabella al display (pulsante Invia tabella al Display)
Create sort table (Create sort table button) Creare tabella ordinata (pulsante Crea tabella ordinata)
Sort the table (Sort button) Ordinare la tabella (pulsante Ordina)
Update reading on display (Update readings on display button) Aggiornare i consumi dei dispositivi nel display (pulsante Aggiorna letture nel
After that operation of setting up the network is finished. Users must keep in display)
mind:
Dopo questa operazione la configurazione del display è finita. L’utente deve tenere
Resolution of displayed consumptions is 1/10 of units equal to 100 liters for a mente che:
RFM-MB1, 100 Watt for HYDROCAL. La risoluzione dei consumi mostrati dal display è 1/10 dell’unità uguale a 100
litri per RFM-MB1, 100 Watt per HYDROCAL-M.
Consumptions values are updated every 6 hours.
I valori dei consumi vengono aggiornati ogni 6 ore.
pag. 25BMBus- Read and configuration Software – Software di configurazione e lettura Operating Manual – Manuale d’uso
2.6. Modify the display table (tenant’s name replacement) - Modificare la tabella del display (sostituzione nome utenza)
To modify for example the tenant’s name in the table, these are steps to follow: Per modificare per esempio il nome dell’utenza, questi sono I passi da seguire:
Read actual display table (Read Data from display button) Leggere la tabella attualmente memorizzata nel display (Pulsante Leggi dati
da Display)
Change the Free Text field according with new tenant’s name. Modificare il campo testo con il nuovo nominative utenza
Write table to display, that will update the tenant’s name on the display. Inviare tabella al display, il nome a display verrà aggiornato.
pag. 26BMBus- Read and configuration Software – Software di configurazione e lettura Operating Manual – Manuale d’uso
pag. 27BMBus- Read and configuration Software – Software di configurazione e lettura Operating Manual – Manuale d’uso
3. User Accounts - Account Utente
The software supports 3 different levels of access for software users. Il software supporta 3 diversi livelli di accesso per gli utenti del software.
Additionally, some extra option scan be enabled or disabled, regardless of account In aggiunta possono essere selezionate delle opzioni extra per ciascun livello di
access level. accesso.
There are three main access levels, which are: Ci sono 3 principali livelli di accesso, I quali sono:
Administrator–which has full control of the software Amministratore – il quale ha il complete controllo del software
Setup operator, that enable to: Operatore di Setup, è abilitato a:
- change software settings - Modificare settaggi del software
- configure devices on the network - Configurare I dispositivi nella rete
- read consumptions from devices on the network - Leggere i consumi dai dispositivi nella rete
Operator, enabled to: Operatore, abilitato a:
- Read consumptions from devices on the network - Leggere i consumi dai dispositivi nella rete
The software is designed to be used mainly for configuration of MB-MASTER and Il software è progettato per essere principalmente usato per la configurazione
network devices, it has several different tabs dedicated to: dell’MB-MASTER e dei dispositivi di rete, ha diverse schede per:
Set m-bus devices (primary addresses, liter counters, etc.); Impostazione dei dispositivi di rete
Set communication devices (Ethernet or GPRS converters) Impostazione dispositivi di comunicazione (Convert. ETH o GPRS)
Set the display on the concentrator Impostazione del display nel concentratore
For each account, Administrator can enable or disable users for managing these Per ogni account, l’amministratore può abilitare o disabilitare la gestione di queste
tabs, that functionality is useful in case of not skilled users that should use the schede, queste opzioni sono utili in caso di utenti non esperti che devono usare il
software for only reading purpose. software per la sola lettura.
Follow the Users and accounts window, in the table is showed the list of current Di seguito la finestra Utenti e account, nella tabella è mostrata la lista degli
accounts activated. account attualmente attivi.
pag. 28BMBus- Read and configuration Software – Software di configurazione e lettura Operating Manual – Manuale d’uso
For creating a new users account, do the following: Per creare un nuovo utente, è necessario:
Fill User field with user name of the account Compilare il campo Nome utente
Type password for this account in the Password field Inserire la password nel relativo campo
Re-type the password in the related field as confirmation (if both passwords Re-inserire password come conferma (se le due password inserite non sono
does not match an error will be generated) uguali verrà generato un errore)
Select desired user access level from Access level drop down list Selezionare il livello di accesso dal relativo menù a tendina
Select the desired additional options for this user account – to eventually Selezionare le eventuali opzioni addizionali per l’utente – per abilitare
enable network devices setting, communication devices setting or Local MBD configurazione dei dispositivi nella rete, dei dispositivi di comunicazione o del
display settings display locale MBD.
Press button Add Premere aggiungi
User account with an already used user’s name will not be created.
Per eliminare un account:
To delete an account: Selezionare l’account nella tabella
Select the account from the table Premere Elimina
Press button Delete
4. Software settings - Impostazioni del software
To manage the setting of the software, user need to choose ToolsSettings. Per gestire la configurazione del software, l’utente deve scegliere
By this windows it’s possible to change: StrumentiImpostazioni. Da questa finestra è possibile modificare:
Serial port general parameters – COM port name, speed (bps), parity Parametri della porta seriale – Nome della COM, velocità (bps), parità
Export separator Separatore per l’esportazione
Retry times Tentativi
Serial port settings Parametri porta seriale
pag. 29BMBus- Read and configuration Software – Software di configurazione e lettura Operating Manual – Manuale d’uso
Name - select correct serial port name from COM1 to COM30 (that’s should Nome – selezionare il nome della porta seriale, è possibile scegliere un nome
be checked under OS devices list ) by choosing it from the related drop down da COM1 a COM30 (verificare nella lista dei dispositivi del S.O.) dal relativo
list. If the port is not selected properly, communication between PC and the menù a tendina. Se la porta non è selezionata correttamente, la
MB-MASTER could not be performed. comunicazione tra PC e MB-MASTER non può essere effettuata.
Speed- set it according to M-bus devices installed on the network, all devices Velocità – impostare il parametro coerentemente con i dispositivi M-bus
should have the same baud rate (known as Speed). Default setting is 2400bps installati nella rete, tutti i dispositivi dovrebbero usare la stessa baud rate
and Parity check (Even). (velocità). L’impostazione di default è 2400bps e parità (Even).
Export - This is the char used as separator for saving or loading CSV files. Separatore - questo è il carattere separatore usato nel salvataggio o nel
Default value is ‘;’ caricamento di file CSV. L’impostazione di default è ’;’
Retries - This option, involves the m-bus network reading and scanning. The Tentativi – questa impostazione, interessa la lettura e scansione della rete m-
retry number set the number of tries performed by the software during bus. Il numero di tentativi indica il numero di volte che il software prova a
reading operation of a certain device, if it is not responding. This setting completare l’operazione di lettura di un certo dispositivo se questo non
effects two : risponde. Questa impostazione ha effetto su due operazioni:
- Scanning by primary address - Scansione per primario
- Reading all devices in the table - Lettura di tutta la tabella dei dispositivi
In the second case not only lack of response is consider, but also if the Nel secondo caso non viene considerato solo il ritardo di risposta, ma anche la
telegram is wrong (wrong header, check sum or stop byte), the program will correttezza del telegramma (header sbagliato, check sum o byte di stop), il
try again to read the device that sends wrong telegram. If the setting of software tenterà nuovamente di leggere il dispositivo che invia telegramma
number of retries is too big (recommended is maximum 3 retries) the search errato. Se il valore di tentativi è troppo grande (consigliato massimo 3
for primary addresses could be too slow. Default value is 1, but it’s allowed to tentativi) la ricerca per primario potrebbe essere molto lenta. Il valore di
set the parameter from 0 to 9. default è 1, è possibile impostare il parametro da 0 a 9.
5. Language Lingua
Allow to set the language of the software. Permette di impostare la lingua del software.
Two language are actually supported: Attualmente sono supportate due lingue:
English Inglese
Italian Italiano
To have more languages supported contact BMETERS. Per estendere il supporto ad altre lingue contattare BMETERS.
pag. 30Puoi anche leggere