Configuration and Reading Software Manual - Manuale del software di configurazione e lettura - BMeters
←
→
Trascrizione del contenuto della pagina
Se il tuo browser non visualizza correttamente la pagina, ti preghiamo di leggere il contenuto della pagina quaggiù

Configuration and Reading Software Manual
Manuale del software di configurazione e lettura

                                                   pag. 1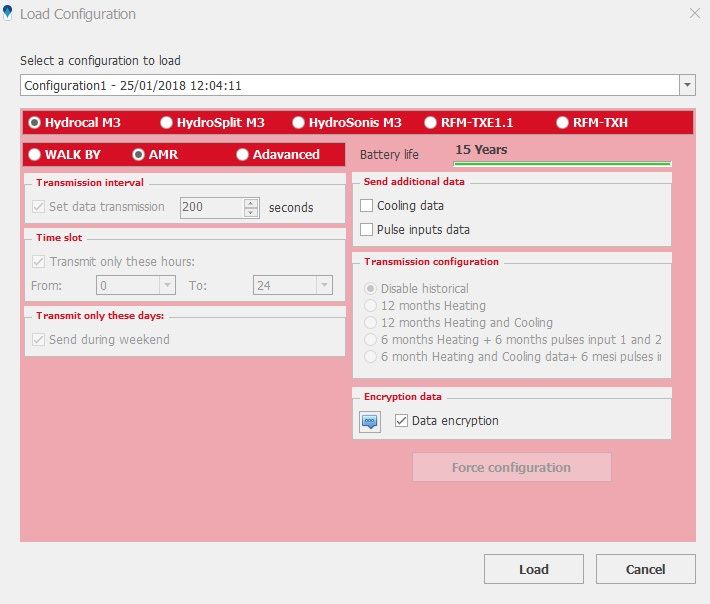
Index – Indice

Introduction - Introduzione ........................................................................................................................................................................................................... 4
1. Software Installation – Installazione del software .................................................................................................................................................................... 5
2. Software Running – Avvio del software .................................................................................................................................................................................... 7
3 Software windows description – Descrizione delle finestre del sistema ................................................................................................................................. 10
        3.1 Main Window sections – Composizione finestra principale........................................................................................................................... 10
        3.2 Options - Opzioni ......................................................................................................................................................................................... 12
        3.3 Registry – Anagrafica................................................................................................................................................................................... 16
           3.3.1 List management – Gestisci lista ............................................................................................................................................................................ 16
           3.3.2 Module Management – Gestisci modulo ............................................................................................................................................................... 18
           3.3.3 Import/Export lists – Importa ed Esporta liste ....................................................................................................................................................... 20
           3.3.4 Plant management – Gestisci impianto................................................................................................................................................................. 23
        3.4 Readings – Letture ....................................................................................................................................................................................... 24
           3.4.1 Manage Readings – Gestisci Letture ...................................................................................................................................................................... 24
           3.4.2 Manage out of list device – Gestisci dispositivi fuori lista...................................................................................................................................... 26
           3.4.3 Import/Export – Importa/Esporta letture .............................................................................................................................................................. 28
           3.4.4 Readings Legend – Legenda Letture....................................................................................................................................................................... 29
        3.5 Historical – Storici ........................................................................................................................................................................................ 31
        3.6 Configuration – Configurazione.................................................................................................................................................................... 31
           3.6.1 Manage Configuration – Gestisci Configurazione .................................................................................................................................................. 33
           3.6.2 Programming – Programmazione .......................................................................................................................................................................... 34
           3.6.3 Registry – Registro .................................................................................................................................................................................................. 36
           3.6.4 HYDRODIGIT and Water Meter Modules Configuration – Configurazione Moduli Contatori Acqua e HYDRODIGIT ............................................ 37

                                                                                                                                                                                                                              pag. 2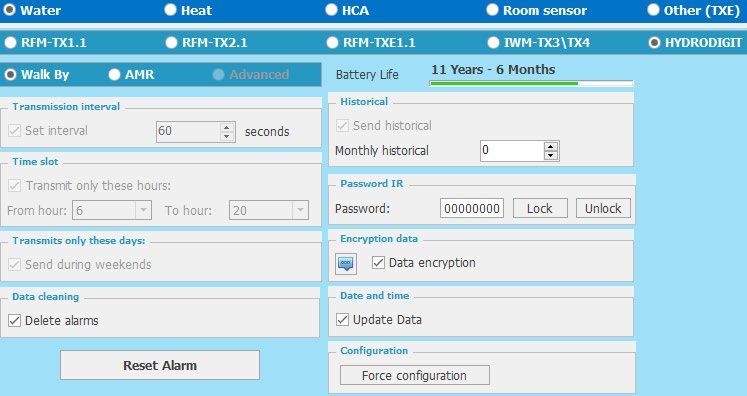
3.6.5 Heating Meter Modules Configuration – Configurazione Moduli Contatori Calore .............................................................................................. 43
          3.6.5.1 HydroSplit-M3/Hydrocal-M3 Configuration - Configurazione HydroSplit-M3/Hydrocal-M3 ............................................................................. 43
          3.6.5.2 HydroSonis Configuration - Configurazione HydroSonis ..................................................................................................................................... 46
          3.6.5.3 RFM-TXE1.1 Configuration - Configurazione RFM-TXE1.1 .................................................................................................................................. 49
          3.6.5.4 RFM-TXH Configuration - Configurazione RFM-TXH ........................................................................................................................................... 52
          3.6.6 Heat Cost Allocator Configuration - Configurazione Ripartitori ............................................................................................................................. 55
          3.6.6.1 HydroClima RFM/HydroClima EXT Configuration - Configurazione HydroClima RFM/HydroClima EXT ............................................................ 55
          3.6.7 Room Sensor Configuration - Configurazione Sensori Ambiente ........................................................................................................................... 60
          3.6.8 Other (TXE) Configuration - Configurazione Altro (TXE) ........................................................................................................................................ 64
4. Software use – Uso del programma ....................................................................................................................................................................................... 69
        4.1 “Step by step” procedure – “Procedimento passo passo” ............................................................................................................................. 69
          4.1.1 RFM-TX1.1,RFM-TX2.1,RFM-TXE1.1,RFM-AMB Configuration – Configurazione RFM-TX1.1,RFM-TX2.1,RFM-TXE1.1,RFM-AMB ...................... 69
          4.1.2 HydroSplit M3, HydroCal M3(HC-Radio) Configuration – Configurazione moduli HydroSplit M3, HydroCal M3(HC-Radio) ................................ 72
          4.1.3 RFM-TXH, HydroSonis (UC-Radio) Configuration – Configurazione moduli RFM-TXH, HydroSonis (UC-Radio) .................................................... 78
          4.1.4 HydroClima RFM, HydroClima EXT HCA Configuration – Configurazione ripartitori HydroClima RFM, HydroClima EXT ..................................... 81
          4.1.5 IWM-TX3, IWM-TX4 Configuration – Configurazioni modulo IWM-TX3, IWM-TX4............................................................................................... 86
          4.1.6 Hydrosonis-ULC, Hydrodigit Configuration – Configurazioni contatori Hydrosonis-ULC, Hydrodigit .................................................................... 88

                                                                                                                                                                                                                  pag. 3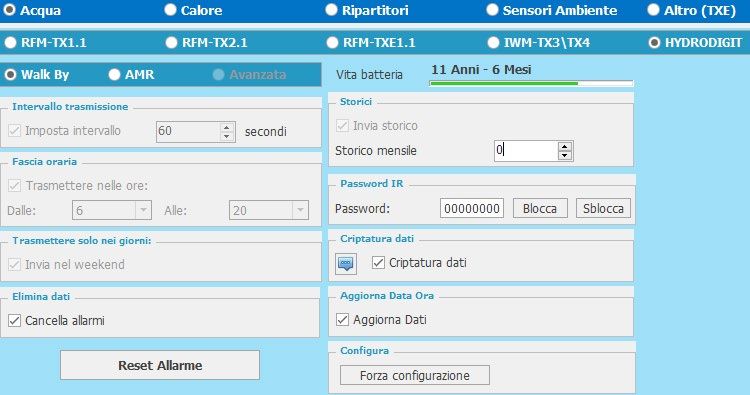
Introduction - Introduzione
The software described in this manual is intended for the collection of data Il software descritto nel presente manuale è destinato alla raccolta dei dati
transmitted by the B METERS metering devices endowed of radio transmission trasmessi dagli strumenti per la contabilizzazione dotati di trasmissione radio
feature. It allows setting of the devices radio transmission configuration parameters prodotti da B METERS. Lo stesso consente l'impostazione dei parametri di
and importing / export of data to and from third-party programs (billing, registry, configurazione della trasmissione radio degli strumenti e
other tele reading software) using file’s format CSV, XML and 15t (list file format of l’importazione/esportazione dei dati da e verso programmi di terze parti
previous B METERS software). (fatturazione, anagrafica, altri software di telelettura), con l’utilizzo di file in
formato CSV, XML e 15t (formato del file di lista dei precedenti software B METERS).
Inside the manual the names of the program buttons/boxes are always printed in
bold, like: Button. All’interno del manuale i nomi dei pulsanti/spie del programma sono sempre
riportati in grassetto, per esempio: Pulsante.
The program requires installation, to use it, you must run the setup.exe application
file of the installation package previously obtained (usually it can be obtained Il programma richiede l’installazione, per utilizzarlo è necessario eseguire il file
through downloads from the dedicated BMETERS customer portal) and follow the applicativo setup.exe del pacchetto di installazione precedentemente ottenuto
wizard's suggestions. (solitamente attraverso download dal portale dedicato ai clienti BMETERS) e
seguire le indicazione del wizard che viene proposto.
System requirements Requisiti di sistema per l’utilizzo del programma
Operating System Sistema Operativo
Windows 10, Windows 8.1, Windows 8, Windows 7, Windows Server 2016, Windows 10, Windows 8.1, Windows 8, Windows 7, Windows Server 2016,
Windows Server 2012 R2, Windows Server 2008 R2, Windows Vista SP2. Windows Server 2012 R2, Windows Server 2008 R2, Windows Vista SP2.
Hardware requirements Requisiti Hardware
CPU:x86/x64 bit 1,5 GHz (>2 GHz recommended) CPU: x86/x64 bit 1,5 GHz (consigliato>2GHz)
RAM 2GB (recommended 4GB) RAM 2GB (consigliato 4GB)
150 MB HD free space (recommended 2GB) for the application. 150 MB di spazio libero sul disco libero (consigliato 2GB) per l’applicazione.
1GB for database and readings (estimation, the necessary space depends by 1 GB per database e letture (stima, lo spazio necessario dipende da numero di
number of modules managed and the number of reading acquired) moduli gestiti e numero di letture acquisite)
1 USB port (2 USB ports recommended) 1 porta USB (consigliate 2 porte USB)
Software Requirements Requisiti Software
Microsoft .NET Framework 4.5.2 (if not installed on the system, it’s requested a Microsoft .NET Framework 4.5.2 (se non installato è necessario disporre di una
working internet connection) connessione ad Internet attiva durante l’installazione)
pag. 4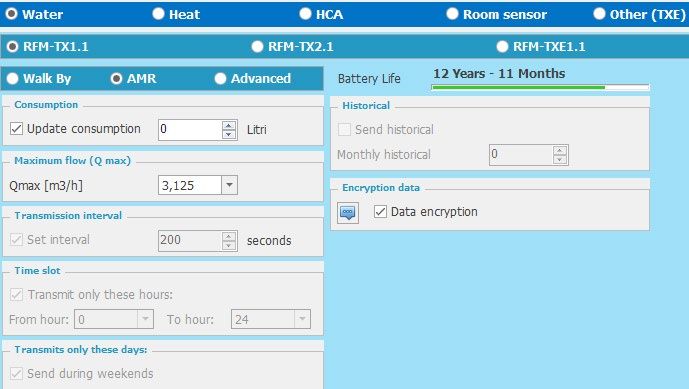
1. Software Installation – Installazione del software
To proceed with installing the B METERING software on your computer, copy the Per procedere con l’installazione del software B METERING nel vostro computer,
installation package folder to a local computer folder (for example, the Windows copiare la cartella del pacchetto d’installazione in una cartella locale del computer
desktop), select the file and proceed with the extraction (right button Extract (per esempio il desktop di windows), selezionare il file e procedere con l’estrazione
all…, set the destination folder and then choose Extract). (tasto destroEstrai tutto…, impostare la destinazione e poi scegliere Estrai).
Then start the installation by double-clicking the setup.exe icon inside the Successivamente avviare l’installazione facendo doppio click sull’icona setup.exe
extracted folder. all’interno della cartella estratta.
NOTE: If the Microsoft .NET Framework 4.5.2 component installation window NOTA BENE: Se compare la finestra d’installazione del componente Microsoft .NET
appears, install as it is necessary to operate the software. If the component is Framework 4.5.2 procedere all’installazione in quanto necessario per il
already present in your computer, no such window will appear. funzionamento del software. Se il componente è già presente nel vostro computer
Once the .NET Framework component is installed, the installation process of the B non comparirà alcuna finestra di questo tipo.
METERING Software will begin. Una volta che l’installazione del componente .NET Framework sarà terminata avrà
inizio il processo d’installazione del Software B METERING.
During installation of the software, drivers of the following devices will also be Durante l’installazione saranno inoltre installati i driver che permettono il corretto
installed to let them work properly: funzionamento dei dispositivi:
RFM-RX2 - Wireless M-BUS radio receiver for B METERS modules RFM-RX2 – Ricevitore M-BUS wireless per moduli radio B METERS
OPTO-USB - Optical programming head for B METERS Heat cost allocators OPTO-USB – Chiavetta di programmazione ottica per ripartitori di calore B
Accept any windows presented during the software installation regarding the METERS
drivers for these devices. Accettare eventuali finestre presentate durante l’installazione del software
riguardanti i driver di questi dispositivi.
Setup will end with the window below, click Close. L’installazione terminerà con la visualizzazione della finestra sotto riportata,
scegliere Close.
They will be created respectively:
Saranno state create rispettivamente:
A program icon on the Desktop
A new set of programs named B METERING Software with its connection at Un’icona del programma sul Desktop
startup of the program. Un nuovo gruppo di programmi nominato B METERING Software con il relativo
collegamento all’avvio del programma.
pag. 5
For the next start of the program choose one of the two proposed solutions.         Per il successivo avvio del programma scegliere una delle due soluzioni proposte.

NOTE: the software is licensed for perpetual use after the purchasing of a license NOTA BENE: Il software è concesso in licenza d’uso perpetua a seguito dell’acquisto
for each computer in which it wants to be installed and executed.                  di una licenza per ciascun computer nel quale vuole essere installato ed eseguito.

                                                                                                                                                             pag. 6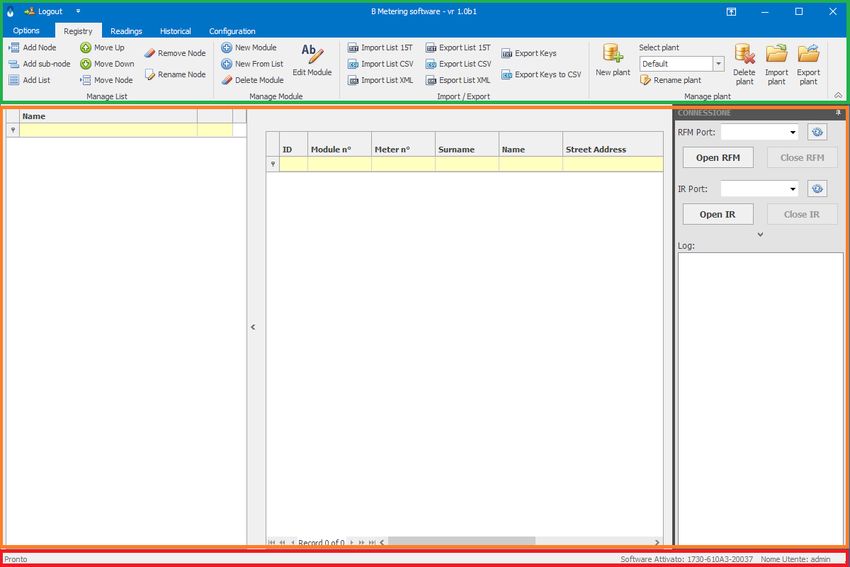
2. Software Running – Avvio del software
First running of the product Primo avvio del prodotto
At first startup, the software will run in demo version, which will remain operative Al primo avvio il software verrà eseguito in versione demo, la quale rimane
with all features for a period of 15 days, after which it will be necessary to activate operativa con tutte le funzioni operative per un periodo di 15 giorni, trascorsi i quali
the product. sarà necessario attivare il prodotto per il suo utilizzo (per l’attivazione del software
It will be showed an activation mask that shows the remaining days before the fare riferimento al capitolo Attivazione).
expiration of the demo and some fields to fill to send the activation key request. Verrà presentata una maschera in lingua inglese, continuare premendo Continue.
For more information about software activation refer to the section Activation). Sarà necessario ora procedere alla selezione della lingua italiano per migliorare
This mask can be skipped by pressing Continue. l’uso del software.
A Login panel will be prompted, input the username admin and password admin Nel pannello di Login mostrato inserire user admin e password admin, scegliere
to access the software for the first time. If English is not your language, select quindi Login, si aprirà a questo punto la finestra del software. Scegliere la voce
Options than change the language setting following your needs. If your language Options, si aprirà la finestra con le opzioni di selezione della lingua, spostare la
is not listed, please contact B METERS to check the availability. selezione su Italiano.
Followings running Successivi avvii
In the subsequent launches of the software, the online software activation mask Nei successivi avvii del software verrà ripresentata la maschera per l’attivazione
will be displayed, which contains the following fields: online del prodotto la quale contiene i seguenti campi:
Indication of the number of remaining days before the end of the trial period Indicazione del numero di giorni mancanti prima della fine del periodo di prova
(demo). (demo).
The Active button for software activation (check the correct registration of the Il pulsante Attiva per l’attivazione del software (verificare la corretta
ID field below in your reserved area on BMeters Keygenerator license portal: registrazione dell’ID sottostante nella propria area riservata sul portale delle
http://keygenerator.bmetering.com/, or by pressing the button Go to site). licenze BMeters Keygenerator: http://keygenerator.bmetering.com/, oppure
premendo il pulsante Vai al sito).
NOTE: If the software is enabled, the activation mask will not be displayed but it NOTA BENE: se il software è stato attivato, la maschera d’attivazione non verrà
will proceed directly to the Login panel. visualizzata ma si procederà direttamente al pannello di Login.
To continue running the software, you must close the Software Activation panel, Per proseguire con l’esecuzione del software è necessario chiudere la maschera
this is possible by pressing Continue, then deciding to continue using the demo Attivazione software, questo è possibile premendo Continua, decidendo quindi di
version, or pressing Activate button. continuare ad utilizzare la versione demo, oppure premendo il pulsante Attiva.
pag. 7
Activation                                                                               Attivazione
As described above, software is licensed for perpetual use following the purchase        Come descritto in precedenza il software viene concesso in licenza d’utilizzo
of a license. For your purchasing, please contact your local distributor or sales        perpetua a seguito dell’acquisto di una licenza. Per l’acquisto fare riferimento al
contact.                                                                                 proprio distributore di riferimento o contatto commerciale.
Once you have purchased the license, you should install the software into the            Una volta acquistata la licenza è necessario provvedere all’installazione del
machine selected for the usage, at the startup of the software, follow the               software nella macchina prescelta per l’utilizzo, all’avvio del software utilizzare la
Activation Software form to activate the software.                                       maschera Attivazione software per effettuare l’attivazione.
In the Software Activation screen, an ID is displayed, unique for each machine on        Nella maschera Attivazione software è visualizzato un ID, univoco per ogni
which the software is installed, based on this ID the key is generated. A key is valid   macchina sul quale viene installato il software, sulla base di questo ID viene
only for the ID that was used for the software license key generation.                   generata la relativa chiave. Una chiave è valida unicamente per l’ID che è stato
                                                                                         utilizzato in fase di generazione chiave.

NOTE: The license is valid only for the PC for which the key was requested, NOTA BENE: la licenza è valida esclusivamente per il PC per il quale è stata richiesta
installing the software on a further PC requires a further license.         la chiave, l’installazione del software in un ulteriore PC richiede un’ulteriore licenza.

The software activation can also be verified on the main screen once the software L’avvenuta attivazione del software può essere verificata anche nella schermata
is started, in the status bar at the far lower right side it will appear the relative principale una volta che il software è avviato, nella barra di stato all’estremo basso
information.                                                                          destra comparirà la relativa scritta.

If the software is not activated, you will find the following:                           Nel caso in cui il software non fosse attivato si troverà la seguente:

Pressing Activate Software will display the Activation Software screen. It will then Premendo Attiva software comparirà la maschera Attivazione Software. Sarà

                                                                                                                                                                       pag. 8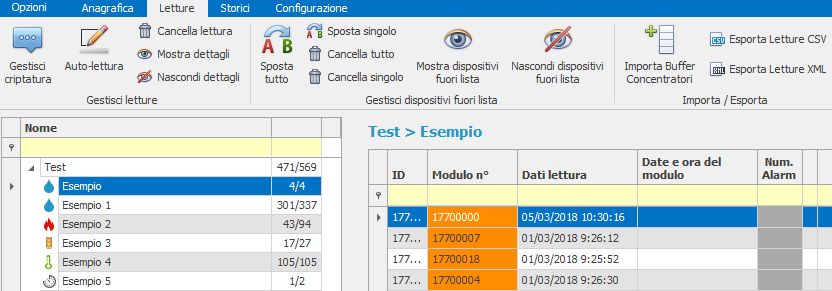
be possible to proceed as described above.                                             quindi possibile procedere come sopra descritto.

If the PC does not have an active internet connection the following screen will Nel caso invece in cui il PC non disponesse di una connessione internet attiva si
appear:                                                                         visualizzerà la seguente schermata:

The indication 'Offline-X', where X stands for startups, indicates the number of       La dicitura ‘Offline-X’, dove X sta per avvii, indica il numero di avvii offline mancanti
offline missing startups before the online license control. The maximum limit is 10    prima del controllo della licenza online. Il limite massimo è di 10 avvii. Il contatore
software startups. The counter resets once the software is launched with an active     si resetta una volta che il software verrà aperto con una connessione ad internet
internet connection or when the activation procedure is completed by pressing          attiva o quando verrà completata la procedura di controllo licenza premendo il
the 'Activate' button.                                                                 pulsante ‘Attiva’

Login Panel                                                                            Pannello Login
Once the software is started, you will be presented with the login panel in which      Una volta che il software viene avviato verrà presentato il pannello di login nel
you enter your username and password to access the software.                           quale inserire nome utente e password per accedere all’utilizzo del software.
Default credentials are:                                                               Le credenziali di Default sono:

Username: admin                                                                        Nome utente: admin
Password: admin                                                                        Password: admin

After the first startup, you can change the credentials of access to the software      Successivamente al primo avvio è possibile andare a cambiare le credenziali
through the User Management section of the software (for details refer to the          d’accesso al software attraverso la sezione gestione Utenti del software (per
relevant paragraph in this manual) or disable access control, in this case the Login   dettagli fare riferimento al relativo paragrafo di questo manuale) oppure
panel will not be presented, but the software will start directly.                     disabilitare il controllo accesso, in questo caso non verrà presentato il pannello di
                                                                                       Login, ma il software si avvierà direttamente.

                                                                                                                                                                       pag. 9
3 Software windows description – Descrizione delle finestre del sistema
3.1 Main Window sections – Composizione finestra principale
The screen that can be seen after the start of the program is composed by: La schermata visibile dopo l’avviamento del programma è così composta:
The Top part of the screen called Ribbon Bar highlighted in green in the above Parte superiore chiamata Ribbon Bar evidenziata in verde nell’immagine
image, which contains in descending order: soprastante, la quale contiene in ordine discendente:
Title bar, this is the top part of the window in which we find it Barra del titolo, si tratta della parte più in alto della finestra nella quale
the software icon troviamo
The logout button, which allows you to log out of current user l’icona del software
account and reenter the software with another username and Il pulsante di logout , il quale permette di uscire dall’account
password. Pressing it will prompt you the login panel to enter a valid utente in uso e rientrare con un altro nome utente e password. Premuto
username and password for accessing the software again. il pulsante verrà richiesto di inserire un nome utente e password valide
The name of the software and its version per accedere nuovamente al software.
Il nome del software e relativa versione
The Ribbon Bar display management icon , which allows you to L’icona per la gestione della visualizzazione della Ribbon Bar ,
pag. 10manage the menu bar and command bar displaying grazie alla quale è possibile gestire la visualizzazione della barra dei
Menu bar, this contains 5 entries: Options, Registry, Readings, History, menù e della barra dei comandi
Configuration. Barra dei menù, questa contiene 5 voci: Opzioni, Anagrafica, Letture, Storici,
Command Bar, this is the list of commands executable by the software, these Configurazione.
vary with the selection made in the menu bar. Barra dei Comandi, si tratta della lista dei comandi eseguibili dal software,
questi variano contestualmente alla selezione fatta nella barra dei menù.
Central part, highlighted in orange:
Frame structure (left), panel in which the list of devices that are managed by Parte centrale, evidenziata in arancio:
the software will be displayed Riquadro struttura (sinistra), riquadro nel quale verrà visualizzata la struttura
Data Management Panel (Central), panel used to represent the data of any delle liste inserite di dispositivi gestiti dal software
individual managed radio devices Riquadro gestione dati (centrale), riquadro utilizzato per raffigurare i dati dei
Connection Management Panel (right), this part of the screen can handle singoli dispositivi radio gestiti
connections to read and configuration devices, which can be: Riquadro gestione connessioni (destra), in questa parte dello schermo è
RFM PORT: Select the COM port assigned to the RFM-RX2 Wireless possibile gestire le connessioni ai dispositivi di lettura e configurazione, i quali
M-BUS Receiver for B METERS radio modules required for the possono essere:
configuration and reading of the radio modules, click Open to enable PORTA RFM: selezionare la porta COM assegnata all’RFM-RX2
the connection (necessary for configuration and radio read out) ricevitore M-BUS wireless per moduli radio B METERS, necessario per
IR PORT: Select the COM port assigned to OPTO-USB - Optical la configurazione e lettura dei moduli radio, scegliere Apri per abilitare
programming key for B METERS heat cost allocator or UC-CABLE la connessione (necessario per operazioni di configurazione e lettura
Optical / USB cable for reading and configuring heat meters via radio).
PORTA IR: selezionare la porta COM assegnata a OPTO-USB – Chiavetta
di programmazione ottica per ripartitori di calore B METERS oppure UC-
CABLE Cavo Ottico/USB per lettura e configurazione contatori di calore.
Bottom part Parte inferiore
Software Status Bar, presents: Barra di stato del software, presenta:
Status of the software stato del software
information on the state of activation; in the case of software informazioni a riguardo dello stato dell’attivazione; nel caso di software
activated, you will also see the corresponding computer ID where it attivato, si vedrà anche il relativo ID del computer nel quale è installato:
is installed: . .
In case of the demo mode: Nel caso sia in modalità demo:
software in
software in demo mode, with 8 remaining days. modalità demo, con 12 giorni rimanenti.
The Activation panel of the software can be called by pressing Il pannello di Attivazione del software può essere richiamato
"Activate software" premendo “Attiva software”
pag. 11 User in use Utente in uso
3.2 Options - Opzioni
By selecting the Options item from the menu bar, you can access the software Selezionando dalla barra dei menù la voce Opzioni, si potrà accedere alla schermata
configuration parameters screen. dei parametri di configurazione del software.
Language Lingua
Language Settings proposes the list of languages supported by the software, Impostazioni Lingua propone la lista delle lingue supportate dal software,
selecting the language you want the software will promptly present all the labels in selezionando la lingua desiderata il software presenterà immediatamente tutte le
the new idiom. In addition to the languages already embedded, the Import New label nel nuovo idioma. Oltre alle lingue proposte è disponibile il pulsante Importa
Language button is available, which allows you to add a language that is not yet nuova lingua, che permette di aggiungere una lingua non ancora presente tra quelle
present among those proposed. To check the availability of the required language proposte. Per verificare la disponibilità del file di lingua richiesto contattare B
file contact B METERS. METERS.
Encoding, allows you to manage different encodings for the characters used in the Codifica, permette di gestire codifiche diverse per i caratteri usati all’interno del
software. If you do not use alphabets with special characters (such as Northern software. Se non si utilizzano alfabeti con caratteri speciali (come ad esempio, lingue
pag. 12European or Eastern European languages), leave the selection on system encoding. nordeuropee o est europee), lasciare la selezione sulla codifica di sistema.
User Settings Impostazioni Utente
The list of enabled users is displayed on this screen. By default, there is a single Nella schermata è presentata la lista degli utenti abilitati all’uso del software, di
admin user with Administrator privileges. default è presente un unico utente admin con privilegi di Amministratore.
You can add new users by pressing the Create New User button, and you will be È possibile aggiungere nuovi utenti premendo il pulsante Crea Nuovo Utente, verrà
presented with its new user creation panel. presentato relativo pannello di creazione nuovo utente.
You must complete all fields and assign privileges according to the function you È necessario compilare tutti i campi e assegnare i privilegi in funzione della funzione
want to assign to the user. che si vuole assegnare all’utente.
The following are the standard profiles and relative privileges: Di seguito vengono proposti dei profili standard e relativi privilegi:
Admin (default user, cannot be deleted): has all privileges. Admin (utente di default, non eliminabile): possiede tutti i privilegi.
Installer: list management, module configuration, data import Installatore: gestione lista, configurazione moduli, importazione dati
Reader: Import data Letturista: importa dati
User: No privilege, will only be able to read the list configured by the Installer or Utenza: nessun privilegio, sarà in grado solo di effettuare letture sulla lista
Administrator users. configurata dagli utenti Installatore o Amministratore
pag. 13It is also possible to select the default user from the Default User box. In this case, È possibile, inoltre, selezionare l’utente di default tramite la casella Default User, in
when the software starts, the access will automatically be done with the user's questo caso, all’avvio del software l’accesso verrà effettuato automaticamente con
privileges selected without requesting access credentials. i privilegi dell’utente selezionato senza richiesta delle credenziali d’accesso.
Information Informazioni
pag. 14It contains information from the software vendor and the setting for notification of Contiene informazioni del produttore del software e l’impostazione per la notifica
the presence of new versions of the software. della presenza di nuove versioni del software.
pag. 153.3 Registry – Anagrafica
This section allows you to manage the various lists of registered devices for Questa sezione permette di gestire le varie liste dei dispositivi censiti dei quali si
which you want to collect reading data. vogliono raccogliere i dati di lettura.
Once this item is selected from the menu bar you will see a series of commands Una volta selezionata questa voce dalla barra dei menù verranno visualizzati una
available that allow you to build and organize the devices management structure. serie di comandi disponibili che permettono di costruire ed organizzare la struttura
di gestione dei dispositivi.
3.3.1 List management – Gestisci lista
The List Management section is dedicated to the creation of the tree structure La sezione Gestisci Lista è dedicata alla creazione della struttura ad albero con la
with which you decide to organize the management of the devices controlled by quale si decide di organizzare la gestione dei dispositivi controllati con il software.
the software.
permette di creare un capostipite di una struttura ad albero, ad esempio
allows to create a progenitor of a tree structure, for example “Complesso residenziale”. È assimilabile al concetto di cartella.
„Complesso residenziale” complex. It is similar to the concept of a folder. permette di creare un elemento figlio di un capostipite (sottocartella),
allows you to create a child element of a progenitor (subfolder), for ad esempio “Condominio Margherita”, il quale potrà contenere una o più liste di
example „Condominio Margherita”, which may contaisn one or more devices lists. dispositivi.
allows you to create a list of devices. At the time of creation it is consente di creare una lista di dispositivi. Al momento della creazione
proposed to make a choice: viene proposto di eseguire una scelta:
Then assign a name and choose the type of devices desired for the list in question. Quindi assegnare un nome e scegliere il tipo di dispositivi desiderato per la lista in
questione.
pag. 16PLEASE NOTE: It is not necessary to respect a specific structure, this folders NOTA BENE: Non è necessario rispettare una determinata struttura, la gestione ad
management has been built to improve the organization of all the lists managed albero è stata costruita per migliorare l’organizzazione di tutte le liste gestite è
and can be constructed at will of the user of the software. costruibile a piacimento dell’utilizzatore del software.
Example of a folders structure with multiple lists: Esempio di struttura ad albero con più liste:
, Allow to move the position of a list within a node or sub-node. , Consentono di spostare la posizione di una lista all’interno di un
nodo o sottonodo.
allows you to move a list from one node or sub-node to another
permette di poter spostare una lista da un nodo o sottonodo ad un altro
pag. 17allows to remove the node, the sub-node or the selected list. Before permette di rimuove il nodo, il sottonodo o la lista selezionato. Prima
removal, you are asked to confirm the removal, once the element has been della rimozione viene richiesto di confermare la rimozione, una volta eliminato
removed the operation is not reversible. l’elemento l’operazione non è reversibile.
provides the ability to rename the selected item. fornisce la possibilità di rinominare l’elemento selezionato.
3.3.2 Module Management – Gestisci modulo
The module management section allows you to modify the lists of devices for which La sezione Gestisci modulo permette di modificare le liste dei dispositivi di cui si
you want to collect reading data. vogliono raccogliere i dati di lettura.
To proceed with any changes, you need to select a list. Following selection, the Data Per procedere con qualsiasi modifica, è necessario selezionare una lista. A seguito
Management Panel will change its appearance, displaying the details of the devices della selezione il Riquadro Gestione Dati cambierà aspetto visualizzando il dettaglio
contained in the selected list. dei dispositivi contenuti nella lista selezionata.
The figure shows a list without devices. In figura è visualizzata una lista priva di dispositivi.
NOTE: in the Data Management Panel there is the path of the nodes and sub-nodes NOTA BENE: nel Riquadro Gestione Dati è presente il percorso dei nodi e sotto-nodi
in which the list is contained. in cui la lista e contenuta.
Opens the form to insert a new module which allows you to enter the Apre la maschera di inserimento di un nuovo modulo la quale permette
personal data of the device you want to add di inserire i dati di anagrafica del dispositivo che si vuole aggiungere
ID: alphanumeric field typically used for user identification ID: campo alfanumerico tipicamente usato per identificazione dell’utenza
Module n °: serial number of the radio module of the device (for some Modulo n°: matricola del modulo radio del dispositivo (per alcuni prodotti
coincide con quella del dispositivo di misura, ad es. Ripartitori) QUESTO
products it coincides with the serial number of the measuring device, eg
CAMPO È RICHIESTO
Heat cost allocators) THIS FIELD IS REQUIRED
Contatore n°: matricola dello strumento di misura
Counter No.: serial number of the measuring instrument
pag. 18 Name, Surname, Address, City, Postal code: user data / installation point Nome, Cognome, Indirizzo, Città, CAP: dati dell’utenza/punto
location d’installazione
Notes: alphanumeric field to insert further indications to identify the device Note: campo alfanumerico per inserire ulteriori indicazioni per identificare
il dispositivo
It allows to generate a new device to be inserted in the list, selecting an
already existing one, this will allow to keep the personal data of the selected Permette di generare un nuovo dispositivo da inserire in lista,
facilitating the insertion of a further device (which will have different serial number) selezionandone uno già esistente, questo permetterà di mantenere i dati anagrafici
with the same personal data. This is useful when the same user owns multiple del selezionato facilitando l’inserimento di un ulteriore dispositivo (che avrà
devices (for example 5-6 Distributors) matricola diversa) con stessi dati anagrafica. Questo è utile quando una stessa
utenza è titolare di più dispositivi (ad esempio 5-6 Ripartitori)
remove the selected device (confirmation is requested before the final
cancellation) rimuove il dispositivo selezionato (prima della definitiva eliminazione
viene richiesta conferma)
allows you to move a module from one list to another (of the same type) consente di spostare un modulo da una lista ad un’altra (della stessa tipologia)
allows you to change the data previously entered.
consente di modificare i dati precedentemente inseriti.
Once the module is present into the list, it is possible to select it and by right clicking
on it, to show the contextual menu. This one, in addition to the above mentioned Una volta che il modulo è presente in lista, è possibile selezionarlo e con click del
operations also allows you to view the last configuration set on the selected device tasto destro del mouse far apparire il menù contestuale che oltre alle operazioni
pag. 19(if set with the software and the computer in use). sopra menzionate permette anche di visualizzare l’ultima configurazione impostata
sul dispositivo selezionato (se presente nel database del software in uso).
3.3.3 Import/Export lists – Importa ed Esporta liste
This section provides a set of tools developed to allow the import and export of Questa sezione prevede una serie di strumenti sviluppati per consentire
registry data to and from third-party software or PCs different between the one in l’importazione e l’esportazione dei dati di anagrafica da e per software di terze
use. parti o PC diversi da quello in uso.
it allows to import a list file of format 15.t (format adopted by the consente di importare un file di lista da formato 15.t (formato
previous generation of B METERS reading software.) To use this tool, it is necessary adottato dalla generazione precedente di software di lettura B METERS). Per
to have previously created a list node, selected it and proceeding to press the l’utilizzo di questo strumento è necessario aver precedentemente creato un nodo
relative icon. lista, selezionarlo e procedere a premere la relativa icona.
it allows the importation of a list file from CSV format (commonly used consente l’importazione di un file di lista da formato CSV (formato
by management software and worksheets), similarly to the previous one it comunemente usato da software gestionali e fogli di lavoro), analogamente al
requires a list node selected before its choosing. precedente prevede che ci sia un nodo lista selezionato precedentemente.
Both functions start an import wizard, which requires: Entrambe queste funzioni avviano un wizard di importazione, il quale richiede:
Selezione del file da importare
Selection of the file to import
pag. 20.
Assignment of the various fields in the file to the related destination fields Assegnazione dei vari campi presenti nel file ai relativi campi di
of the devices list. destinazione della lista dei dispositivi.
The same wizard provides a preview of the appearance of the data in the Lo stesso wizard fornisce un’anteprima dell’apparenza dei dati nella tabella di
destination table, through which you can see the correctness of the assignment of destinazione, tramite la quale si può constatare la correttezza dell’assegnazione
the field in the file with the field of the resulting list. del campo presente nel file con il campo della lista risultante.
pag. 21Allows you to import an XML file from a software similar to the one in Permette di importare un file XML proveniente da un software analogo
use. In this case, for example, to transfer a registry from one PC to another. a quello in uso. In questo caso, per esempio, per trasferire un’anagrafica da un PC
ad un altro.
it allows to export lists of devices to B METERS software (previous
and current generation). In this case it is required to select a list node. consente di esportare liste di dispositivi verso software B METERS
(precedente ed attuale generazione). In questo caso è richiesto di selezionare nodo
export a device list file in CSV format, to proceed with the export select lista.
a list node
esporta un file di lista dispositivi in formato CSV, per procedere
it allows to export in an XML file part or the whole registry of the all’esportazione selezionare un nodo lista
devices present in the Registry section, in order to proceed it is necessary to select
a parent node or a sub-node. permette di esportare in un file XML parte o l’intera anagrafica dei
dispositivi presenti nella sezione Anagrafica, per poter procedere è necessario
NOTE: the xml format allows you to export the entire structure of the lists present, selezionare un nodo capostipite o un sotto-nodo.
this file can be correctly imported only by B Metering software. Together with the
Registry data also the export of the set encryption keys to each of the devices on NOTA BENE: il formato xml permette di esportare l’intera struttura delle liste
the selected node is also possible by using this xml format. presenti, questo file potrà essere correttamente importato solo da software B
pag. 22creates a. keys file containing the encryption keys of the devices Metering. È anche possibile esportare le chiavi di criptatura impostate nei
present in the selected list node. This file format is commonly used by the previous dispositivi usando questo formato di file.
generation of B METERS software.
crea un file. keys contenente le chiavi di criptatura dei dispositivi
creates a CSV file containing the encryption keys and serial presenti nel nodo lista selezionato. Questo formato di file è comunemente usato
numbers of the devices present in the selected list node, to let them be imported dalla generazione precedente dei software B METERS.
by third-party software. It is also possible to insert in the CSV file information
about the GENERATION, TYPE (or MEDIUM) and MANUFACTURER fields of the crea un file CSV contenente le chiavi di criptatura ed i seriali dei
configured B METERS WMBUS device. dispositivi presenti nel nodo lista selezionato per consentire la loro importazione in
software di terze parti. E anche possibile inserire nel file CSV le informazioni relative
NOTE: the export of keys is successful only for the configured devices with ai campi GENERATION, TYPE (o anche MEDIUM) e COSTRUTTORE del dispositivo
encryption enabled and whose key is present in the database of the software in WMBUS configurato.
use.
NOTA BENE: l’esportazione delle chiavi ha successo solo per i dispositivi configurati
con criptatura abilitata e la cui chiave è presente nel database del software in uso
3.3.4 Plant management – Gestisci impianto
This function allows you to use a higher level of subdivision of devices in the list. If Questa funzione permette di utilizzare un livello superiore di suddivisione dei
you want, you can use this type of management to create additional groupings. dispositivi in lista. Qualora si voglia si può utilizzare questo tipo di gestione per creare
For example, you could set up geographic location management, using the names ulteriori raggruppamenti.
of the cities where the plants are managed, but customer names or other methods Per esempio, si potrebbe impostare una gestione per locazione geografica, usando i
could be used instead. nomi delle città in cui si gestiscono gli impianti, ma potrebbero essere invece usati i
nomi dei clienti, o ulteriori metodi.
Usually the software creates a single database called "default", it will then be
possible to change the name to your liking. Di norma il software crea un unico database di nome “default”, sarà poi possibile
modificarne il nome a proprio piacimento.
If an additional database is created, giving it a name, the plant management will
provide a drop-down menu with which you can easily switch from one database to Se viene creato un ulteriore database, assegnandogli un nome, la gestione impianti
another. fornirà un menù a tendina con il quale è possibile passare facilmente da un database
all’altro.
It is also available the import and export of the entire database, useful operation
pag. 23in case of change of the PC in use or increase of workstations. È anche disponibile l’importazione e l’esportazione dell’intero database, operazione
utile nel caso di cambio del PC in uso o incremento delle postazioni di lavoro.
PLEASE NOTE: the export of the database allows to export all the data of the
registry, all the readings collected and the configurations (with relative keys of NOTA BENE: l’export del database permette di esportare tutti i dati di anagrafica,
encryption) related to that system. tutte le letture raccolte e le configurazioni (con relative chiavi di criptatura) relative
a quell’impianto.
3.4 Readings – Letture
This section allows you to collect readings data of the Bmeters radio modules. Questa sezione permette di acquisire i dati di lettura dei moduli radio BMeters.
Note: the readings contained in the buffer are automatically reset at midnight on N.B: le letture contenute nel buffer vengono resettate automaticamente alle ore
the day on which they are carried out. 24 del giorno in cui vengono effettuate.
It’s therefore recommended to export the readings, using the appropriate È consigliato dunque esportare le letture, tramite le appropriate funzioni software,
software functions, as soon as they are performed. non appena vengono effettuate.
However, it is possible to export all the readings performed from the 'Historical' È possibile comunque esportare tutte le letture eseguite dal tab ‘Storici’ ‘Esporta
tab 'Node Export Last Readings CSV/XML'. Ultime Letture Nodo CSV/XML’.
3.4.1 Manage Readings – Gestisci Letture
The Readings Management section allows you to manage the encryption system La sezione Gestisci Letture permette la gestione del sistema di criptatura e
and the readings system for modules. l’organizzazione delle letture per i moduli.
allows you to select the encryption key type (global or individual). permette di selezionare il tipo di chiave di crittografia da utilizzare (globale
It is possible to choose a global AES key or individual AES key (OMS compliant). o individuale). Sarà possibile scegliere tra una chiave AES globale o una chiave AES
PLEASE NOTE: the loss of the global key or the loss of the file containing the AES individuale per ogni modulo (conforme OMS).
pag. 24individual key will cause the impossibility of reading the data. NOTA BENE: La perdita della chiave globale o del file della chiave AES individuale
comporterà l’impossibilità di lettura dei dati.
The Import Button allow you to select a type of module and import the keys stored Il pulsante Importa consente, attraverso una procedura guidata, di selezionare il
in a file with “keys” or “csv” extension. A wizard will be shown for the .csv file to tipo di modulo e di importare le chiavi corrispondenti salvate in un file con
allow the correct association of the primary fields and their import. estensione “keys” o “csv”. Per il file con estensione .csv verrà mostrato un wizard per
permettere la corretta associazione dei campi primari e la relativa importazione.
allows you to insert a self-reading manually
permette di inserire manualmente un’auto-lettura.
allows you to delete all the readings made. Before the cancellation,
you are asked to confirm the cancellation, once the readings has been deleted the consente di cancellare tutte le letture effettuate. Prima della
operation is not reversible. cancellazione viene richiesto di confermare la cancellazione, una volta eliminate le
letture l’operazione non è reversibile.
, allows you to show or hide the details like name, surname,
address, etc. , consente di mostrare o nascondere dettagli come nome,
cognome, indirizzo, etc.
pag. 253.4.2 Manage out of list device – Gestisci dispositivi fuori lista
This section allows you to manage all the devices that are not included in your list, Questa sezione permette di gestire tutti quei dispositivi che non sono inseriti nelle
but that are still detected by the antenna. proprie liste, ma che vengono comunque rilevati dall’antenna.
allows you to move with just one click all the devices that are not includend in
consente di spostare con un solo click tutti i dispositivi rilevati nella fuori lista.
your list. To move a single one simply press the Move single button.
Per spostarne uno singolo è sufficiente premere il comando Sposta singolo.
, allows you to delete a single/all device(s) that are not
, permette di cancellare un/i singolo/tutti dispositivo/i
included in your list.
fuori lista.
allows you to show all the devices that are not included in your list.
consente di mostrare tutti i dispositivi non inclusi nella lista.
hides the Out of list section and automatically expanding the Data nasconde la sezione Fuori Lista espandendo automaticamente il Riquadro
Management Panel. Gestione Dati.
allows you to read through UC-CABLE all the information of a water meter, consente di leggere tramite UC-CABLE tutte le informazioni di un contatore
heat meter, etc. prepared for this functionality. d’acqua, contatori di calore, etc. predisposto per tale funzionalità.
pag. 26allows you to get all the information about heat cost allocator. It’s possible consente di leggere tutte le informazioni di un ripartitore. È possibile
to get configuration setting, all the data registered in memory (such historical of acquisire la configurazione attualmente impostata e tutti i dati registrati nella sua
consumption units, thermal comfort and number of different summaries for memoria quali: storico dei consumi, storico dell’andamento del comfort termico, e le
temperature ranges). To view the data read, it’s necessary to move to the 'Registry’ statistiche di temperatura registrate. Per visualizzare i dati letti è necessario
menu, right-click on the heat cost allocator (previously entered) and select the 'Show spostarsi nel menù ‘Anagrafica’, cliccare con il tasto destro sul ripartitore (inserito
IrDA More info' item: precedentemente) e selezionare la voce ‘Show IrDA More info’:
The 'Save' button allows you to export the data of the readings taken in a TXT file for Il tasto ‘Salva’ permette di esportare i dati delle letture effettuate in un file TXT per
processing with external software. l’elaborazione con software esterni.
pag. 273.4.3 Import/Export – Importa/Esporta letture
This section provides a set of tools to allow the import and export of readings data. Questa sezione prevede una serie di strumenti per consentire l’importazione e
l’esportazione delle letture.
allows you to import the buffer files received from concentrators. permette di importare i file di buffer ricevuti dai concentratori.
creates a CSV file containing all the readings data (commonly used crea un file CSV contenente tutte le letture (formato comunemente
by management software and worksheets). usato da software gestionali e fogli di lavoro).
it allows to export in a XML file all of the readings data. consente l’esportazione delle letture in un file con formato XML.
These last two functions start an export wizard, which requires: Queste due ultime funzioni avviano un wizard di esportazione, il quale richiede:
Selection of the file to export Selezione del file da esportare
Assignment of the various fields in the readings data to the releated Assegnazione dei vari campi presenti nelle letture ai relativi campi del file di
destination field (CSV o XML). destinazione (CSV o XML).
pag. 283.4.4 Readings Legend – Legenda Letture
In this section there is a legend that represents, for the radio modules read, an In questa sezione è presente una legenda che rappresenta, per i moduli radio letti,
alarm status. There are highlighted by a different color based on the type of alarm uno stato d’allarme. Sono evidenziati da una differente colorazione a seconda della
detected. tipologia d’allarme rilevata.
The Data Management Panel display on this screen a series of colours identified in the legend
Nella schermata Riquadro Gestione Dati sono visibili una serie di colori identificati nella legenda
described above.
sopra descritta.
Note: the readings contained in the buffer are automatically reset at midnight
N.B: le letture contenute nel buffer vengono resettate automaticamente alle ore
on the day on which they are carried out.
24 del giorno in cui vengono effettuate.
It’s therefore recommended to export the readings, using the appropriate
È consigliato dunque esportare le letture, tramite le appropriate funzioni
software functions, as soon as they are performed.
software, non appena vengono effettuate.
Legend: Legenda:
Reading OK: reading done correctly, no alarm status present. Lettura OK: lettura effettuata correttamente, nessun stato d’allarme presente.
Reading error: the radio modules read have one or more types of alarms Errore Lettura: i moduli radio letti presentano una o più tipologie d’allarme
identified with different colors and described below. identificate con colorazioni differenti e descritte di seguito.
pag. 29Note: for the alarm thresholds, refer to the configuration performed on the N.B: per le soglie d’allarme fare riferimento alla configurazione eseguita sui
devices read. dispositivi letti.
QMax overflow: exceeding the maximum flow rate (QMax) for a certain Superamento QMax: superamento della portata massima (QMax) per un certo
continuous time interval. The alarm allows you to identify problems related to intervallo di tempo continuativo. L’allarme permette di identificare problemi
counting or damage to the devices. The alarm can be reset with a relativi al conteggio o al danneggiamento dei dispositivi. L’allarme può essere
reconfiguration of the radio module. resettato con una riconfigurazione del modulo radio.
Optical/sensor fraud: dazzle of the sensors relating to an attempted fraud Frode ottica/sensore: abbagliamento dei sensori relativo ad un tentativo di
(example: passing an aluminum blade between the module and the frode (esempio: far passare una lamella di alluminio tra il modulo ed il
mechanical water meter). The alarm allows you to identify problems related contatore meccanico). L’allarme permette di identificare problemi relativi al
to counting and can be reset by reconfiguring the radio module. conteggio e può essere resettato con una riconfigurazione del modulo radio.
Module removal: removal of the radio module from the mechanical water Rimozione modulo: rimozione del modulo radio dal contatore meccanico
meter or incorrect installation. The alarm allows you to identify problems oppure un’errata installazione. L’allarme permette di identificare problemi
related to counting or an attempted fraud. The alarm can be reset with a relativi al conteggio o ad un tentativo di frode. L’allarme può essere resettato
reconfiguration of the radio module. con una riconfigurazione del modulo radio.
Magnetic fraud: attempted fraud relating to the positioning of a magnet for a Frode magnetica: tentativo di frode relativo al posizionamento di un magnete
certain continuous time interval. The alarm allows you to identify problems per un certo intervallo di tempo continuativo. L’allarme permette di identificare
related to counting and can be reset by reconfiguring the radio module. problemi relativi al conteggio e può essere resettato con una riconfigurazione
Water loss: continuous flow for a certain period of time (example: filling a del modulo radio.
swimming pool for 6 continuous hours). The alarm allows you to identify Perdita d’acqua: flusso continuato per un certo intervallo di tempo (esempio:
possible water leaks. It automatically disappears as soon as the flow stops for riempimento di una piscina per 6 ore continue). L’allarme permette di
a certain period. identificare possibili perdite d’acqua. Esso scompare automaticamente non
Battery: low battery voltage that allows you to identify its residual life (Puoi anche leggere