Art. 5517192 PIAGGIO 50 - ACCENSIONE Power Ciao Power Ciao IGNITION ALLUMAGE Power Ciao - JMPB Onderdelen
←
→
Trascrizione del contenuto della pagina
Se il tuo browser non visualizza correttamente la pagina, ti preghiamo di leggere il contenuto della pagina quaggiù

01/2021 - 7317192

                                                    Art. 5517192
                    ACCENSIONE Power Ciao
                        Istruzioni di Montaggio
                                                    PIAGGIO 50
                     Power Ciao IGNITION            BRAVO
                        Installation Instructions   BOSS
                                                    CIAO
                    ALLUMAGE Power Ciao             CIAO PX
                        Instructions de Montage     GRILLO
                                                    SI
                                                    SUPERBRAVO

                                                                 1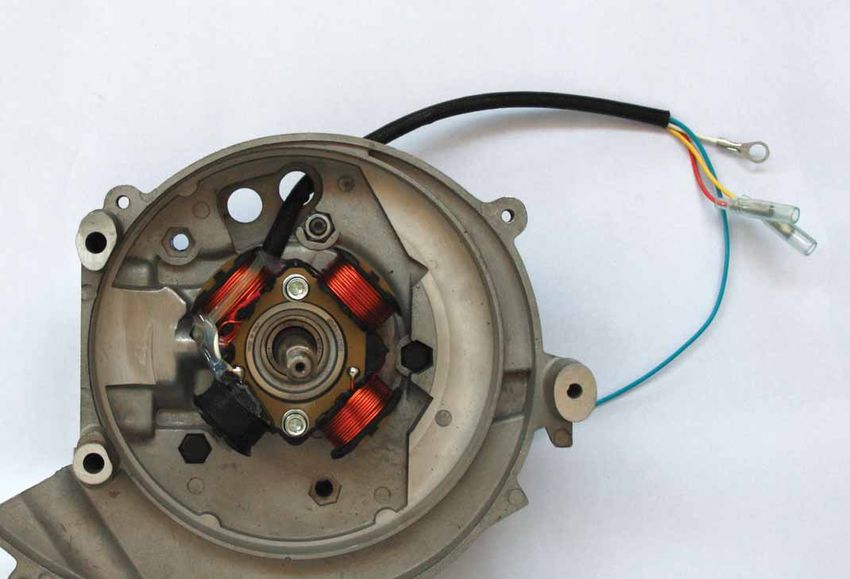
ITALIANO   Nasce la nuova linea di accensioni complete per ciclomotori Piaggio.
           Per consentire una perfetta e facile installazione, è stata studiata una versione specifica per ogni
           modello.
           L’accensione si distingue per:
           • volano alleggerito (peso kg 0,88) con momento di inerzia come da tabella, ricavato da un forgiato
           • statore a 4 poli 12 V (90 Watt ) con uscita per ricarica batteria
           • ventola in materiale plastico di colore rosso (profilo ventola, distribuzione assorbimento ottimizzati)
           • cablaggio dedicato ad ogni specifica applicazione
           • bobina/centralina integrata
           • regolatore di tensione

                                                     ACCENSIONE Power
                                        Cono albero motore         Peso statico              Momento di inerzia
                    Codice
                                                Ø                      kg.                       Kg/cm2
                   5517192                      12,2                      0,88                       16

           The new range of complete ignitions for Piaggio mopeds was born.
ENGLISH

           In order to allow an easy and perfect installation, a specific version for each model has been studied.
           The new ignition range features:
           • lightened flywheel (weight 0.88 kg) with moment of inertia as shown in the attached chart, made
               from forged
           • 12 V (90 Watt ) 4-pole stator with output for battery charging
           • red colored plastic fan (optimized fan profile and distribution absorption)
           • wiring dedicated to each specific application
           • integrated coil/ control unit
           • voltage regulator

                                                       Power IGNITION
                                          Crankshaft cone           Static weight             Moment of inertia
                     Code
                                                Ø                        kg.                     Kg/cm2
                   5517192                      12.2                      0.88                       16

           Une nouvelle ligne d’allumages complets est née pour les cyclomoteurs Piaggio.
FRANÇAIS

           Pour permettre un parfait et facile montage on a étudié une version spécifique pour chaque modèle.
           L’allumage se caractérise par:
           • volant plus léger (poids kg 0,88) avec moment d’inertie comme indiqué dans le tableau jointe, tiré
               de un forgé
           • stator à 4 pôles 12 V (90 Watt ) avec sortie pour charge de batterie
           • ventilateur en matériau plastique rouge (profil ventilateur et distribution d’absorption optimisés)
           • câblage spécifique pour chaque application
           • bobine/boitier intégré
           • régulateur de tension

                                                       ALLUMAGE Power
                                          Cône vilebrequin         Poids statique             Moment d’inertie
                   Réference
                                                  Ø                     kg.                      Kg/cm2
                   5517192                      12,2                      0,88                       16

   2
ISTRUZIONI DI MONTAGGIO
-   Lavare accuratamente tutto il veicolo e in modo particolare la zona del motore su cui si andrà ad operare.
-   Smontare il motore dal telaio.
-   Smontare il convogliatore aria.
-   Smontare il volano d’accensione con gli appositi estrattori.
-   Smontare la flangia di supporto statore / pick-up.
-   Smontare dal veicolo la bobina di alta tensione e la centralina originale.
-   Scollegare ed eliminare tutti i cavi che alimentano i restanti servizi elettrici (luci, ricarica, batteria, ecc).
-   Smontare lo statore originale.

                                       ASSEMBLY INSTRUCTIONS
-   Thoroughly wash the whole vehicle, especially the engine area where work will be performed.
-   Remove the engine from the vehicle.
-   Remove the air pipe.
-   Remove the ignition flywheel by using special extractors.
-   Remove the stator-holding flange / the pick-up.
-   Remove the high voltage coil and the original control unit from the vehicle.
-   Disconnect and eliminate all cables supplying power to the other electrical devices (such as lights,
    charger, battery, etc.).
-   Remove the original stator.

                                           NOTICE DE MONTAGE
-   Lavez soigneusement tout le véhicule et en particulier la partie du moteur sur laquelle on va travailler
-   Démontez le moteur du véhicule.
-   Démontez le manchon à air.
-   A l’aide des extracteurs prévus à cet effet, démontez le volant d’allumage.
-   Démontez la bride de support du stator / le pick-up.
-   Démontez la bobine haute tension et le boîtier électronique d’origine.
-   Débranchez et retirez tous les autres fils d’alimentation (éclairage, recharge, batterie, etc.).
-   Démontez le stator d’origine.

                                                                                                                 3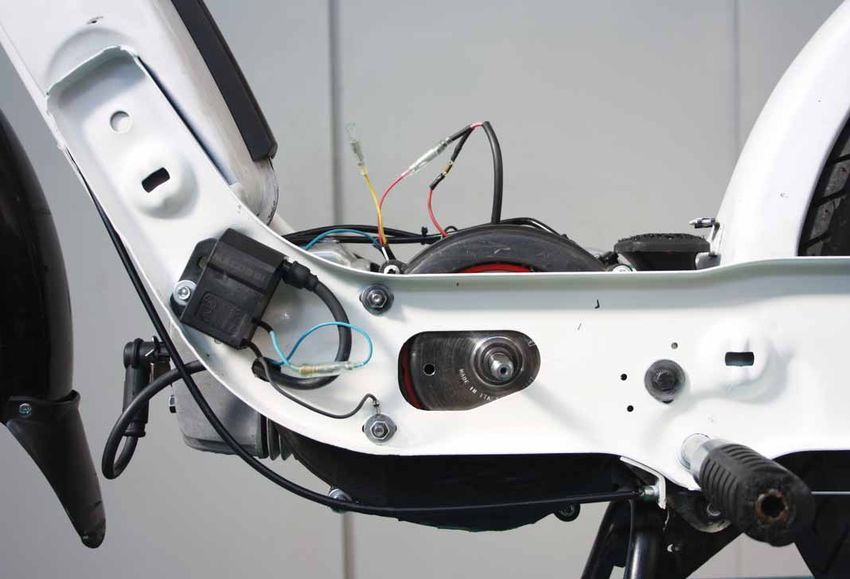
1

         3

             8

     6
                     9

                                 4
                 7

                         2

         5

    10

4
ITALIANO                                               MONTAGGIO
           -   Pulire accuratamente tutta la zona interna al carter motore dal lato dell’accensione compreso il
               cono dell’albero motore.

           -   ATTENZIONE - CARTER ORIGINALE:
               prima di procedere al montaggio della flangia, intervenire sul carter asportando il materiale indicato
               in Fig. 1A fino al raggiungimento del piano A. Verificare attentamente posizionando il volano che
               non vi siano interferenze ed eventualmente rimuoverle (Fig. 1).

           -   ATTENZIONE - CARTER MALOSSI (ad ESCLUSIONE dei carter CARTER MP-One):
               Oltre alle modifiche sulla parte esterna (Fig. 1B) è necessario inserire il rasamento fornito nel kit
               (Ø35x25x0,5mm) tra semicarter lato cieco e cuscinetto di banco e assemblare poi il motore SENZA
               guarnizione tra i 2 semicarter. Questa modifica consente comunque di mantenere un gioco assiale
               sufficiente di circa 0,5 mm ed evitare sfregamenti del volano sul carter.

           -   Collocare in sede lo statore nella flangia stessa, posizionandolo come indicato in Fig. 2.
           -   Montare le 2 viti di fissaggio M5 in dotazione (4).
           -   Posizionare il cavo di uscita della tensione facendolo passare completamente attraverso l’apposita

                                                     ASSEMBLY
ENGLISH

           -   Thoroughly clean and wipe the inside of the engine casing on the ignition side, including the
               crankshaft cone.

           -   ATTENTION - ORIGINAL CRANKCASE:
               Prior to proceeding with the flange assembly, it is necessary to machine the crankcase, filing off the
               point of collision till the surface A as shown in Fig. 1A. Positioning the flywheel, check carefully that
               there is no interference, and in case remove them (Fig. 1).

           -   ATTENTION – CRANKCASE MALOSSI (EXCEPT MP-One crankcase):
               Besides modifications on the outer part (Fig. 1B) you must insert the shim supplied into the kit
               (Ø35x25x0,5mm) between crankcase half blind side and crankshaft bearing. Then assemble the
               engine WITHOUT gasket between the two crankcase halves. This modification allows to keep
               a sufficient axial play of about 0,5mm, thus preventing the flywheel from rubbing against the
               crankcase.

           -   Place the stator inside the flange itself, positioning it as shown in Fig. 2.
           -   Install the 2 M5 fixing screws supplied into the kit (4).

                                                        MONTAGE
FRANÇAIS

           -   Nettoyez soigneusement toute la partie interne du carter moteur côté allumage, y compris le cône
               du vilebrequin.

           -   ATTENTION - CARTER D’ORIGINE:
               Avant de procéder au montage de la bride, il est nécessaire d’usiner le carter en limant le matériel
               indiqué en la Fig. 1A jusqu’au plan A. Vérifiez soigneusement en positionnant le volant qu’il n’y a
               pas d’interférences et éventuellement enlevez-les (Fig. 1).

           -   ATTENTION – CARTER MALOSSI (EXCLUS les carters MP-One):
               En plus des modifications sur la partie externe (Fig.1B) il faut insérer la bague fournie dans le kit
               (Ø35x25x0,5mm) entre le demi-carter côté serré et le roulement et ensuite il faut monter le moteur
               SANS le joint entre les 2 demi-carter. Cette modification permet de garder un suffisant jeu axiale de
               0,5 mm environ en évitant les frottements du volant sur le carter.

           -   Placez le stator dans la bride, en le positionnant comme indiqué dans la Fig. 2.
           -   Montez les 2 vis de fixation M5 fournies dans le kit (4).
           -   Introduisez le câble de sortie de la tension à travers la fente spéciale.

                                                                                                                    5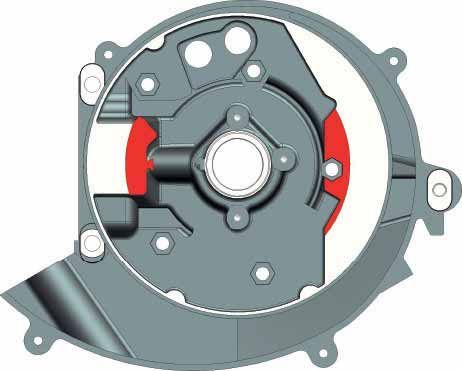
ITALIANO       asola.
           -   Inserire accuratamente la chiavetta nell’apposita sede dell’albero motore.
           -   Montare successivamente il volano inserendolo perfettamente in fase con la chiavetta e, dopo
               averlo assestato nel cono dell’albero motore, serrare il dado a 30 Nm (3 kgm) verificando che il
               rotore giri perfettamente senza toccare le polarità dello statore. In caso contrario rimuovere le
               cause.
           -   Montare la ventola utilizzando le 6 viti a brugola (3) e le boccole speciali (8) inserite nel kit.
           -   Rimontare il convogliatore d’aria (1).
           -   Installare il motore nel telaio.

           -   Insert the voltage output cable by passing completely through the appropriate slot.
ENGLISH

           -   Carefully insert the key into the proper seat of the crankshaft.
           -   Subsequently assemble the flywheel perfectly timed with the key. After fitting it in the crankshaft
               cone, tighten the rotor-locking nut applying a 30 Nm (3 kgm) torque checking that the rotor perfectly
               turns without touching the stator polarities. Otherwise, eliminate the causes.
           -   Fit the fan using the 6 Allen screws (3) and special bushings (8) included in the kit.
           -   Re-fit the air pipe (1).
           -   Install the engine on the frame.

           -   Introduisez soigneusement la clavette dans son logement du vilebrequin.
FRANÇAIS

           -   Montez ensuite le volant en l’insérant parfaitement en phase avec la clavette et, après l’avoir bien
               placé dans le cône du vilebrequin, serrez l’écrou à 30 Nm (3 Kgm) en vérifiant que le rotor tourne
               parfaitement sans toucher les polarités du stator. Dans le cas contraire, éliminez les causes.
           -   Montez le ventilateur en employant les 6 vis Allen (3) et les douilles spéciales (8) fournies dans le
               kit.
           -   Remontez de manchon à air (1).
           -   Montez le moteur sur le cadre.

   6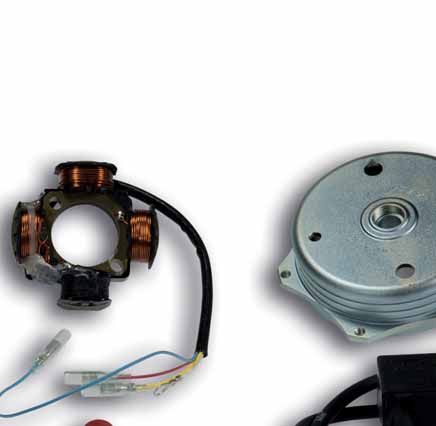
COLLEGAMENTI ELETTRICI
-   Montare il trasduttore sul telaio (Fig. 3 (11))
-   Posizionare il cavo di massa con occhiello del trasduttore come indicato in figura (Fig. 3 (12)).
-   Allacciare il cavo azzurro proveniente dal trasduttore al cavo azzurro dello statore (Fig. 3 (13)).
-   Posizionare il regolatore come indicato in figura (14), collegando a massa il cavo nero (Fig. 4).
-   Inserire il connettore del cablaggio Malossi nel regolatore (15), connettendo le altre due estremità al cavo
    rosso dello statore (16) e al cavo rosso dell’impianto elettrico originale (17) isolandolo (Fig. 4).
-   Collegare a massa il cavo bianco con occhiello (18) come indicato in Fig. 5.

Il cavo giallo del volano (19) può essere utilizzato per poter essere allacciato a servizi / ricarica batteria
(Fig. 5).

                                        ELECTRICAL CONNECTIONS
-   Mount the transducer on the frame (Fig. 3 (11))
-   Place the transducer ground cable with eyelet as shown in picture (Fig. 3 (12)).
-   Connect the light blue cable coming out of the transducer to the light blue cable of the stator
    (Fig. 3 (13)).
-   Place the regulator as shown in the photo (14), connecting the black wire to the ground (Fig. 4).
-   Insert the connector of the Malossi wiring to the regulator (15), connecting the other two ends to the red
    cable of the stator (16) and to the red cable of the original wiring (17), isolating it (Fig. 4).
-   The white cable with eyelet (18) must be grounded, as shown in Fig. 5.

The flywheel yellow cable (19) can be connected to other devices / battery charger kit (Fig. 5).

                                       CONNEXIONS ELECTRIQUES
-   Montez le transducteur sur le cadre (Fig. 3 (11))
-   Positionnez le câble de masse avec œillet du transducteur comme indiqué dans la photo (Fig. 3 (12)).
-   Raccordez le câble bleu venant du transducteur au câble bleu du stator (Fig. 3 (13)).
-   Positionnez le régulateur comme indiqué dan la photo (14), en reliant le câble noir à la masse (Fig. 4).
-   Insérez le connecteur du câblage Malossi au régulateur (15),en connectant les autres deux extrémités au
    câble rouge du stator (16) et au câble rouge du câble d’origine (17) en le isolant (Fig. 4).
-   Raccordez à la masse le câble blanc avec œillet (18) comme indiqué dans la Fig. 5.

Le câble jaune du volant (19) peut être utilisé pour pouvoir être raccordé au pour service / recharge batterie
(Fig. 5).

                                                                                                            7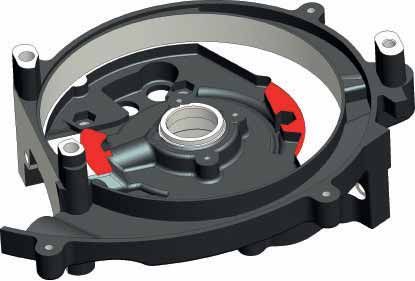
ITALIANO                                   MESSA IN FASE DELL’ACCENSIONE
           Questo tipo di accensione non prevede nessuna regolazione di fase.
           La regolazione fornita è 23° a 4.000 rpm.

                                                      IGNITION TIMING
ENGLISH

           This kind of ignition does not require any timing set-up.
           The supplied set-up is 23° at 4,000 rpm.

                                            MISE EN PHASE DE L’ALLUMAGE
FRANÇAIS

           Ce type d’allumage ne demande aucune réglage de phase.
           Le réglage fourni est 23° à 4.000 tours.

   8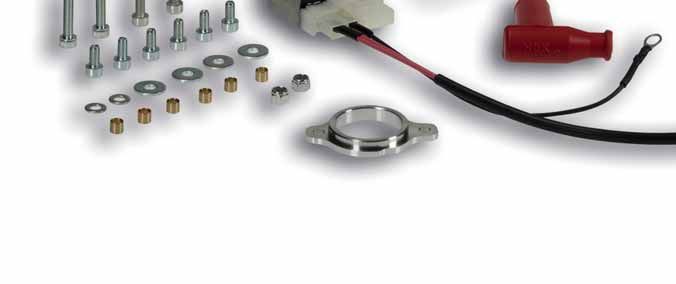
Speriamo che lei abbia trovato sufficientemente esaustive le indicazioni che precedono. Nel caso in cui qualche
punto le risultasse poco chiaro, potrà interpellarci per iscritto compilando l’apposito modulo inserito nella sezione
“contatti” del ns. sito Internet (www.malossi.com). Ringraziamo fin d’ora per le osservazioni e suggerimenti che
vorrà eventualmente farci pervenire. La Malossi si commiata e coglie l’occasione per complimentarsi ulteriormente
con Lei ed augurarle un Buon Divertimento. In BOCCA al LUPO e ... alla prossima.

Le descrizioni riportate nella presente pubblicazione, si intendono non impegnative. Malossi si
riserva il diritto di apportare modifiche, qualora lo ritenesse necessario, al fine di migliorare il
prodotto, e non si assume nessuna responsabilità per eventuali errori tipografici e di stampa. La
presente pubblicazione sostituisce ed annulla tutte le precedenti riferite agli aggiornamenti trattati.

GARANZIA
Consulta le condizioni relative alla garanzia sul nostro sito www.malossi.com.

Prodotti riservati esclusivamente alle competizioni nei luoghi ad esse destinate secondo le disposizioni
delle competenti autorità sportive. Decliniamo ogni responsabilità per l’uso improprio.

We hope you found the above instructions sufficiently clear. However, if any points are not particularly clear,
please contact us completing the special form inserted in the “contact” section on our Internet site (www.
malossi.com). We thank you in advance for any comments and suggestions you may wish to send us. So
goodbye from us all at Malossi, and please accept our compliments. Have Fun. GOOD LUCK and … see you
next time.

The descriptions in this publication are not binding. Malossi reserves the right to make modifications, if it considers
them necessary, and does not accept any responsibility for any typographic or printing errors. This publication
replaces all previous publications referring to the updating matters contained therein.

WARRANTY
Look up warranty terms in our website www.malossi.com.

These products are reserved solely for races in locations reserved for those purposes and in accordance
with the regulations issued by the competent authorities for sports events. We decline any and all
responsibility for improper use.

Nous espérons que vous avez trouvé suffisamment claire les indications qui ont précédé. Dans le cas ou certains
points ne vous seraient pas clairs, ils vous est possible de nous interpeller en remplissant le module se trouvant
dans la section “contact” de notre site internet (www.malossi.com). Nous vous remercions d’avance des
éventuelles observations et suggestions que vous voudrez bien nous faire parvenir. Malossi prend maintenant
congé et profite de l’occasion pour vous féliciter une fois encore et vous souhaiter un Bon Divertissement.
BONNE CHANCE et…à la prochaine!

Les descriptions reportées dans cette publication n’engagent à rien. Malossi se réserve le droit d’apporter toutes
les modifications qu’elle jugera nécessaires et décline toute responsabilité pour d’éventuelles coquilles et erreurs
d’impression. Cette publication remplace et annulle toutes les publications précédentes relatives aux thèmes mis
à jour.

GARANTIE
Consultez les conditions relatives à la garantie sur notre site www.malossi.com.

Ces articles sont uniquement destinés aux compétitions dans les lieux qui leur sont réservés, conformément
aux dispositions des autorités sportives compétentes. Nous déclinons toute responsabilité en cas
d’utilisation abusive.

                                                                                                                   9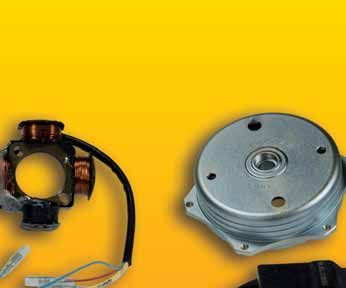
CARTER ORIGINALE - ORIGINAL CRANKCASE - CARTER D’ORIGINE
                                                                                           Fig. 1A

              Piano A
             Surface A
              Plan A

     - Per eliminare l’interferenza fra carter e volano, asportare materiale fino a raggiungere
       il piano A.
     - To remove the interference between the crankcase and the flywheel, machine the
       crankcase till the surface A.
     - Pour éliminer l’interférence entre le carter et le volant, limer le matériel jusqu’au
       plan A.

10
SECTION A-A
• Modifica A :
Profondità della modifica
misurata dall’interfaccia
coperchio ventola
• Modification A :
depth of modification
measured from fan cover interface
19 mm
• Modification A : • Modifica A :
profondeur de la modification Ø esterno 106 mm / Ø interno 80 mm / Profondità 19 mm (Zona rossa)
mesurée de l’interface couvercle volant • Modification A :
Outer Ø 106 mm / Inner Ø 80 mm / Depth 19 mm (Red zone)
• Modification A :
Ø externe 106 mm / Ø interne 80 mm / profondeur 19 mm (zone rouge)
80 m
m
106 mm
A A
Rasamento
Shim
CARTER MALOSSI - MALOSSI CRANKCASE - CARTER MALOSSI
Bague
Ø35x25x0,5mm
Fig. 1B
1112
Fig. 2Fig. 3
(11)
(13)
(12)
1314
Fig. 4
(16)
(17)
(14)
(15)Fig. 5
(19)
(18)
1516
Volano
Statore Flywheel
Volant
Stator
Regolatore
Regulator Stator
Régulateur
Ventola
Fan
Ventilateur
Trasduttore
Transducer
Transducteur
Flangia supporto statore Pipa candela Cablaggio
Stator support flange Spark plug cap Wiring
Bride de support stator Capuchon bougie CâblagePuoi anche leggere