RIVESTIMENTI COATINGS - ISTRUZIONI KIT RITOCCO - Angoli in CIMENTO ...
←
→
Trascrizione del contenuto della pagina
Se il tuo browser non visualizza correttamente la pagina, ti preghiamo di leggere il contenuto della pagina quaggiù

RIVESTIMENTI
     COATINGS

 ISTRUZIONI KIT RITOCCO
TOUCH UP KIT ISTRUCTIONS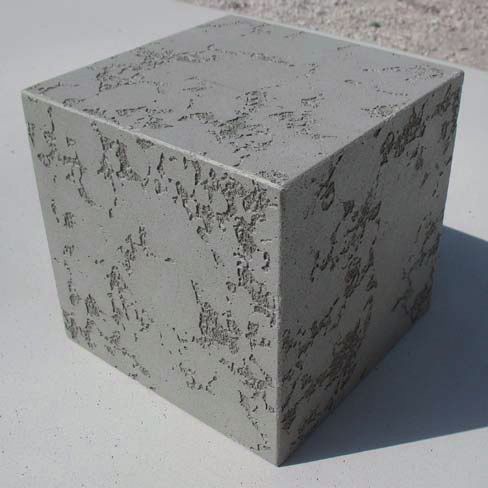
ISTRUZIONI per uso KIT RITOCCO - Angoli in CIMENTO®
TOUCH UP KIT INSTRUCTIONS - Edges of CIMENTO®

          1                         2

                                                                                                                                                                  SOLID PART

               5             3                                                                                                                               Contenitore con misurazioni
                                                                                                                                                                   graduated tub

                                            4

                                                                                                                                       Livello evidenziato

                             7
                                                                                                                                          Marked Level

                   6
                                                8

COMPONENTI e UTENSILI per applicazione KIT RITOCCO             PASSO 1                                                              PASSO 2
ELEMENTS and TOOLS for application of the TOUCH UP KIT
                                                               Aprire la tanica LIQUID PART e versare il componente liquido         Aprire il vaso SOLID PART e versare il componente solido nel
                                                               fino a raggiungere la quantità pari a 200 ml.                        vasetto medio 3M (con etichetta SOLID PART 500 gr) fino ad
1 - LIQUID PART: Tanica 2 Lt - 2lt bottle                                                                                           arrivare ad una quantità pari a 365 ml (1 mm sopra la riga dei 350
2 - SOLID PART: Vaso 5 Kg - 5kg tub                            Nel caso di confezioni da 250 gr già pronte da miscelare,            ml).
                                                               partire dal Passo 3.
3 - LIQUID PART: Contenitore con misurazioni - graduated tub
                                                                                                                                    Nel caso di confezioni da 250 gr già pronte da miscelare, passa-
4 - SOLID PART: Contenitore con misurazioni - graduated tub                                                                         re subito al Passo 3.
5 - TAMPONE IN GOMMA per carta vetrata                         STEP 1
   RUBBER BUFFER for sandpaper
                                                               Open the 2lt bottle labelled LIQUID PART and fill the smaller 3M     STEP 2
6 - CARTA VETRATA 200/240 gr                                   tub (also labelled LIQUID PART) to the 200ml level.
   SANDPAPER 200/240gr                                                                                                              Open the 5kg tub labelled SOLID PART and fill the smaller 3M
7 - SCOTCH CARTA BLU 3M (Scotch® mascking tape 3434)           Steps 1 and 2 are relevant only if you have received large quanti-   tub (also labelled SOLID PART) to the 365ml level (1mm above
                                                               ties (the 2 litre bottle of & 5 kg tub) of the concrete mix.         the 350ml level).
   BLUE PAPER TAPE 3M (Scotch® mascking tape 3434)
8 - SPATOLA per applicazione composto
   SPATULA for the application of the mixture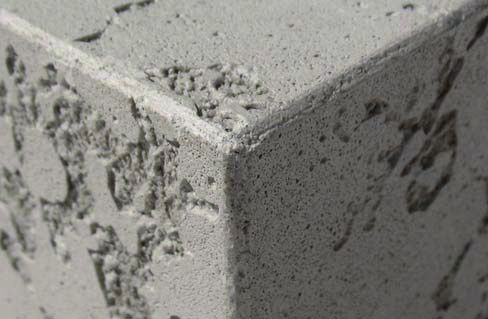
ISTRUZIONI per uso KIT RITOCCO - Angoli in CIMENTO®
TOUCH UP KIT INSTRUCTIONS - Edges of CIMENTO®

                                                                                                                                                                     HO
                                                                                                                                                                      2

PASSO 3                                                PASSO 4                                                              PASSO 5

Versare il componente liquido nel componente solido.   Mescolare bene in modo che i due componenti si uniscano, i           Se necessario aggiungere qualche goccia d’acqua fino a che
                                                       grumi spariscano e l’impasto diventi cremoso.                        l’impasto diventi della densità necessaria al tipo di ritocco da
                                                       ATTENZIONE: una volta uniti i due componenti inizia una              fare:
STEP 3                                                 reazione di catalisi che può essere ritardata fino a qualche ora     - se fatto a pennello deve essere piuttosto liquida;
                                                       aggiungendo qualche goccia di acqua mescolando di tanto in           - se fatto a spatola meglio se l’impasto resta più solido;
Put the liquid part into the solid part.               tanto, ma una volta indurito il composto non è più riutilizzabile.

                                                       STEP 4                                                               STEP 5

                                                       Mix the components to make a smooth and consistent paste.            Add small quantities of water to alter the consistency of the
                                                       ATTENTION: Mixing the components a chemical reaction starts.         concrete mix:
                                                       This chemical reaction is affected by the ambient heat of where      - if using a brush, the mixture should be more fluid;
                                                       it is being mixed and used. The duration of this reaction can be     - if using a spatula, the mixture should be thicker;
                                                       extended by small quantities of water being added and occasio-
                                                       nally mixing. Once the mixture has hardened, it cannot be used
                                                       again.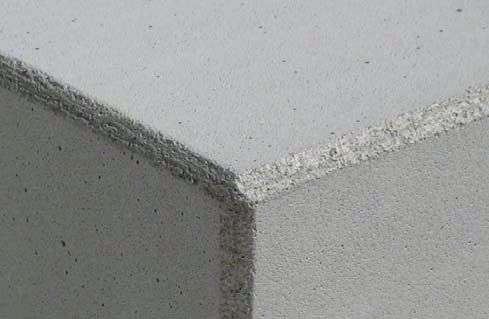
ISTRUZIONI per uso KIT RITOCCO - Angoli in CIMENTO®
TOUCH UP KIT INSTRUCTIONS - Edges of CIMENTO®

PASSO 6                                                         PASSO 7                                                            PASSO 8

Mascherare i due spigoli dei pannelli con scotch carta blu 3M   Eseguire il ritocco con l’uso della spatola o con il pennello      Per la fase finale usare carta abrasiva grana 200-240; dare una
(Scotch® masking tape 3434). Premere un dito sullo scotch       cercando di non sporcare le parti del pennello non interessate.    leggera levigata possibilmente solo nella parte ritoccata. Serve
facendolo aderire bene al pannello.                             Appena finito il ritocco, rimuovere la mascheratura e attendere    per togliere tutte le porzioni in pù di ritocco che comprometto-
                                                                che l’impasto asciughi (circa 4/6 ore). ATTENZIONE: si noterà      no visibilmente al linearità del bisello.
                                                                la differenza di colore dovuta al composto ancora fresco;
STEP 6                                                          l’impasto, una volta asciutto, prenderà la stessa tonalità del
                                                                pannello.                                                          STEP 8
Cover the edges of the panels using blue 3M masking tape
(Scotch masking tape 3434). Stick the tape making it well                                                                          For the final part use 200-240 grit abrasive paper; lightly
adhere to the panel.                                            STEP 7                                                             smooth it only in the retouched part. This is necessary to
                                                                                                                                   remove any excess concrete that compromises linearity.
                                                                Apply the wet concrete mix using a spatula, brush or suitable
                                                                finishing tool. Please avoid applying the mix to areas of the
                                                                panels that do not require repair. After application, remove the
                                                                masking tape and allow 4-6 hours for the concrete to dry.
                                                                ATTENTION: the colour will seem different because the mixture
                                                                is wet. The concrete will dry to the same colour as the panels.
ISTRUZIONI per uso KIT RITOCCO - Angoli in CIMENTO®
TOUCH UP KIT INSTRUCTIONS - Edges of CIMENTO®

                                                                                                    Horizontal
CIMENTO® Liscio | Smooth CIMENTO®   CIMENTO® Vibrato | Vibrated CIMENTO®   CIMENTO® Tavolato | Timber Planked CIMENTO®

                                                                                                        Vertical
CIMENTO®
HEADQUARTER SHOWROOM
Via J.F. Kennedy, 107/a - 30027 San Donà di Piave (Venezia) - ITALY
www.cimento.tech - info@cimento.tech

IT SHOWROOM
Via Borgogna, 7 - 20122 Milano - ITALY

ES SHOWROOM
Avenida Barcelona, 56 - 08700 Igualada (Barcelona) - SPAIN

CH SHOWROOM
Piazza Santa Lucia, 7 - 6900 Massagno (Lugano) - SWITZERLAND

UK SHOWROOM
The Cube Building | 17-21 Wenlock Road - N1 7GT London - UNITED KINGDOM
Puoi anche leggere