SCD-38 USB PORTABLE FM RADIO WITH CD/MP3-PLAYER AND USB CONNECTION - User manual For information and support, www.lenco.com
←
→
Trascrizione del contenuto della pagina
Se il tuo browser non visualizza correttamente la pagina, ti preghiamo di leggere il contenuto della pagina quaggiù
SCD-38 USB
PORTABLE FM RADIO WITH
CD/MP3-PLAYER AND USB
     CONNECTION

          User manual

   For information and support, www.lenco.com
                                         Lenco_SCD-38 USB_V1.1_ENG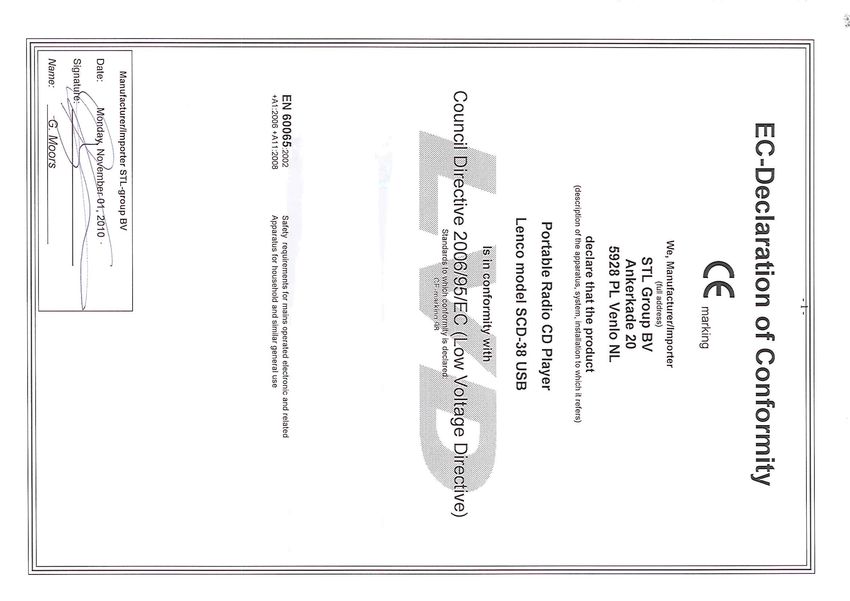
Safety Precautions
IMPORTANT SAFETY INSTRUCTIONS - READ CAREFULLY BEFORE USE.
CAUTION: TO PREVENT ELECTRICAL SHOCK, DO NOT REMOVE
ANY COVER SCREWS. THERE ARE NO USER SERVICEABLE
PARTS INSIDE. REQUEST A QUALIFIED SERVICE PERSON TO
PERFORM SERVICING.
This symbol indicates that there are important operating maintenance
instructions in the user manual accompanying this unit.
This symbol indicates that dangerous voltage is present within this unit
constituting a risk of electric shock or personal injury.
Keep these instructions in mind:
Do not use this unit near water.
Clean only with a slightly damp cloth.
Do not cover or block any ventilation openings. When placing on a shelf leave 5 cm (2”) free
space around the whole unit.
Install in accordance with the supplied user manual.
Protect the power cord from being walked on or pinched, particularly at plugs, and the point
where it exits the unit. Do not place heavy items on the power cord, which may damage it.
Take note that the power cord cannot be reached and pulled by young children, avoiding
injury.
Unplug this unit during lightning storms or when unused for a long period of time.
Keep the unit away from heat sources such as radiators, heaters, stoves, candles and other
heat-generating products.
WARNING! NEVER INSERT AN OBJECT INTO THE PRODUCT THROUGH VENTS OR
OPENINGS. HIGH VOLTAGE FLOWS IN THE PRODUCT AND INSERTING AN OBJECT
CAN CAUSE ELECTRIC SHOCK AND/OR SHORT INTERNAL PARTS. FOR THE SAME
REASON, DO NOT SPILL WATER OR LIQUID ON THE PRODUCT.
Do NOT use in wet or moist areas such as bathrooms, steamy kitchens or near swimming
pools.
Do not use this unit when moisture condensation may occur.
NOTE: No naked flames such as candles should be placed on the radio.
2
SAFETY PRECAUTIONS (continued)
This unit has been produced according to all current safety regulations. The following safety tips
should safeguard users against careless use and the dangers connected with such use.
Although this unit has been carefully manufactured and rigorously checked before leaving the
factory, as with all electrical appliances, it is possible for problems to develop. If you notice
smoke, an excessive build up of heat or any other unexpected phenomena, you should
disconnect the plug from the mains power socket immediately.
Ensure that the unit is sufficiently ventilated!
The mains plug or appliance coupler is used as the disconnect device, the disconnect device
shall remain readily operable.
This unit must operate on a power source specified on the specification label. If you are not
sure of the type of power supply used in your home, consult your dealer or local power
company.
The socket outlet must be installed near the equipment and must be easily accessible.
Do not overload AC outlets or extension cords. Overloading can cause fire or electric shock.
Units with Class 1 construction shall be connected to a mains socket outlet with a protective
earthed connection.
Keep away from rodents. Rodents enjoy biting into power cords.
Always hold the plug when pulling out the plug from the mains supply socket. Do not pull the
power cord. This can cause a short circuit.
The screen is made of plastic and can break if damage is done to it. When broken, be careful
with sharp edged plastic splinters to avoid injury.
Avoid placing the unit on any surfaces that may be subject to vibrations or shocks.
To protect the unit during a thunderstorm unplug the AC power cable and disconnect the
aerial. Caution: Do not touch the aerial (RF) connector.
When the unit is not used for long periods of time, unplug the AC power cable for safety
reasons.
Do NOT tap or shake the screen, you may damage the internal circuits. Take good care of
the remote control, do not drop.
To clean the TV use a soft dry cloth. Do NOT use solvents or petrol based fluids. For
stubborn stains, you may use a damp cloth with dilute detergent.
The laser beam used in the CD player section may be harmful to the eyes. Do not attempt to
disassemble the cabinet. Refer servicing to qualified personnel only.
If the player is left in a car parked in the sun, be sure to choose a location in the car where the
player will not be subjected to the direct sunlight.
CD
Before playing, clean the CD with a cleaning cloth.
Do not expose the CD to direct sunlight or heat sources such as hot air ducts. Do not leave it
in a car parked in direct sunlight as there can be a considerable rise in temperature inside of
the car.
Do not stick paper or stickers on the CD, nor scratch the CD.
After playing, store the CD in its case. Scratches, dirt or fingerprints on the CD may cause
tracking errors or skipping.
If the player is brought directly from a cold to a warm location, or is placed in a very damp
room, moisture may condense on the lens inside of the CD player section. Should this occur
the player will not operate properly in this case, remove the CD and wait about an hour for
the moisture to evaporate.
This CD player is designed to be played on a stable no vibration position. If you bump the set
during CD play, the music will stop or skip for a few seconds. This is normal for this type of
player.
3Scratched discs
If your disc is badly scratched, it will not play. You may be able to repair the disc if you use a disc
polisher.
Cleaning the Lens
If the lens becomes dirty, it may cause a skipping of sound during CD operation. Clean the lens
with a commercially available lens cleaner and blower or carefully wipe it with a soft dry cloth.
Where to install
Locate the unit away from direct sunlight and strong lights, soft indirect lighting is recommended
for comfortable viewing. Use curtains or blinds to prevent direct sunlight falling on the screen.
Place the TV on a sturdy platform of which the surface should be flat and steady. This will prevent
it from falling over. Make sure the television is located in a position where it cannot be pushed or
hit by objects, as pressure will break or damage the screen, and so that small objects cannot be
inserted into the ventilation slots or openings in the cabinet.
WARNING: Prolonged exposure to loud sounds from personal music players may lead
to temporary or permanent hearing loss.
Note:
This user manual is printed prior to the product development. When a part of the
product specification has to be changed to improve operability or other functions,
priority is given to the product specification itself. In such cases, the instruction
manual may not entirely match all the functions of the actual product. Therefore,
the actual product and packaging, as well as the name and illustrations, may
differ from the manual. The drawings shown as an example in this manual may
be different from the actual appearance of the unit.
Lenco is not liable for any consequential damage.
IMPORTANT NOTE:
The USB memory stick should be plugged into the unit directly. Don’t
use an USB extension cable because it can cause interference
resulting in failing of data.
Lenco recommends using A-brand batteries for longer life and better results.
When the unit will not be used for a few weeks or more, remove the batteries
to avoid damage that can be caused by battery leakage or corrosion.
Batteries shall not be exposed to excessive heat such as sunshine or fire.
4Dear customer,
Thank you for purchasing this Lenco product. Quality and usability is our top
priority, in order to let you enjoy maximal of this product we manufactured your
product with high quality materials, components and care. Before connecting
parts and power, please carefully read the user manual and always keep these
instructions close by your apparatus.
What’s in the box?
1x SCD-38 USB
1x AC Power cable
1x Quick guide
Our factory assembles the content of the box with the utmost care. If
unfortunately an accessory is missing in the box, you need to contact your dealer
as soon as possible.
Table of content
Safety Precautions ............................................................................. 2
End of Life .......................................................................................... 5
What’s in the box? .............................................................................. 5
Exploring the device ........................................................................... 6
Top view ...................................................................................................................................... 6
Front view .................................................................................................................................... 7
Left view ...................................................................................................................................... 7
Right view .................................................................................................................................... 8
Back view .................................................................................................................................... 8
The display (6)............................................................................................................................. 9
Selecting a power source ................................................................. 10
Connecting via the AC power cord............................................................................................ 10
Using the device on batteries .................................................................................................... 10
Basic operation ................................................................................. 11
Listening to the radio ................................................................................................................. 11
Playing an audio, MP3 or WMA CD ......................................................................................... 11
Playing an USB device .............................................................................................................. 12
Connecting an external audio source............................................................ 䫭䇃ʽᅮНкㅒDŽ
Troubleshooting ................................................................................ 15
Specification ..................................................................................... 16
Service and support ......................................................................... 17
5Exploring the device
Top view
1. Folder button: Switch between folders (during MP3/WMA playback).
2. Next button: skip to the next track; hold the button to fast forward.
3. Prev button: skip to the previous track; hold the button to fast backward.
4. Repeat button: repeat a track, a folder or everything.
5. Power indicator.
6. Display.
7. FM Stereo indicator.
8. Stop button: stop playback
9. Play/pause button: Press this to play / pause CD/USB.
10. PROG: Program your desired tracks.
11. OPEN/CLOSE notch: open or close CD compartment.
12. CD door
13. FM antenna
14. Speakers
6Front view
15. USB socket: connection for a USB device.
Left view
16. Function switch.
17. VOLUME control: increase/decrease the volume.
7Right view
18. Tuning control
19. FM MONO/STEREO Switch
20. FM frequency display
Back view
21. AUX IN socket (Input audio signal)
22. AC IN socket
8The display (6)
A. Program LED: Indicates that “program mode” is active.
B. Play LED: Indicates that “playback mode” is active.
C. Repeat LED: Indicates that “repeat mode” is active.
NOTE: "no" will be shown in the display if there is no disc in the CD
compartment or when a disc error occurs.
9Selecting a power source
You can use the AC power outlet or batteries as a power source.
Note: Batteries are not included.
Connecting via the AC power cord
Insert one end of the supplied AC power cord into the AC IN socket located at
the rear view of the player, and the other end to the wall outlet.
Note: If the plug of the AC power cord does not match your outlet, do not force it.
Reverse it and try again. The plug is polarized and only fits one way into the wall
outlet and rear of the set.
Using the device on batteries
Important: Remove the AC power cord while operating the unit on batteries.
Notes:
-Lenco recommends the use of A-Brand batteries.
-Replace the batteries when the POWER LED dims or when the player
stops operating.
-If the CD does not play, this means that the batteries are almost empty.
Loading the batteries:
1. Roll over the unit so that the
battery compartment leg leg
becomes accessible.
2. Use one finger to press the
leg leg
sagging block towards the
arrow on the battery cover buckle
and then push the cover to
sagging block
the arrow until hearing a click,
now hold the front edge of the
cover and turn up to remove it.
3. Place 6 size "C" batteries into
leg groove leg groove
the battery compartment
according to the direction of
“+” and “-“electrode marked leg groove leg groove
inside of the battery buckle groove
compartment.
4. Place the buckle of the cover
towards the buckle groove and place the 4 legs of the cover face to the leg
grooves to wedge the cover onto the player and then push it into previous
position to close it.
10Basic operation
Listening to the radio
1. Slide the FUNCTION switch (16) into RADIO position, the POWER LED will
turn on.
2. Tune to the desired frequency using the TUNING control wheel (18). In the
FM frequency display (20) you can see what the current frequency is.
3. Extend the antenna (13) fully for the best reception; move it around to search
for better reception if necessary.
Turn the volume knob (17) to adjust the volume.
Slide the FM MONO/STEREO switch (19) into the position that you prefer.
4. Slide the FUNCTION switch (16) into OFF position to turn off the radio.
Note: If the FM stereo reception is good, the FM ST LED will lighten up.
Playing an audio, MP3 or WMA CD
Open the CD compartment and place a CD in the CD compartment with the
label side up.
Close the CD compartment.
1. Slide the FUNCTION switch (16) into CD/USB (AUX IN) position.
The unit will now start reading the CD, this may take some time.
After this the unit will start to play automatically.
2. Slide the FUNCTION switch (16) into OFF position to turn off the unit.
Notes:
When a disc is being played and a USB device is connected the unit will
automatically switch to play content from the USB device.
When a USB device is being played and a CD is inserted, the unit will
automatically switch to play the CD.
When both a USB device and a CD are inserted and you turn on the unit, the
unit will start playing content from the USB device.
When an AUX cable is connected, the unit will switch to AUX mode.
Play / pause playback
During playback press the play / pause button (9) to pause the playback.
In pause mode press the play / pause button to resume the playback.
In stop mode press the play / pause button to start the playback.
Stop playback
During playback press the stop button (8) to stop the playback.
Go to the next track
Press the next button (2) to skip to the next track.
Note: If you have reached the last track of the root directory or in the current
folder and there are multiple folders in the root directory the unit will automatically
skip to the next folder (USB playback).
Fast forward through the currently playing track
Press and hold the next button (2) to fast forward through the currently playing
track.
Go to the previous track
Press the prev button (3) to go back to the previous track.
11Note A: If you have reached the first track of the root directory or in the current
folder and there are multiple folders in the root directory the unit will automatically
go back to the last track of the previous folder (USB playback).
Note B: The prev button also works as a rewind function so sometimes this
button must be pressed twice to go to the previous track.
Fast backward through the currently playing track
Press and hold the prev button (3) to fast backward through the currently playing
track.
Switching between folders (MP3/WMA only)
Press the folder button (1) once to activate the folder mode. When this mode
is active the current folder numbers starts to flash in the display.
Press the folder button (1) again to move to the next folder.
Repeat function
Press the REPEAT button (4) once to repeat the currently playing track.
When this mode is active the repeat LED flashes.
Press the REPEAT button (4) twice to repeat the current folder. When this
mode is active the repeat LED burns continuously but after a few seconds the
display flashes and will show the folder number.
Press the REPEAT button (4) three times to repeat the whole medium. When
this mode is active the repeat LED burns continuously.
Creating a playlist
You can make a playlist up to 20 tracks.
1. Press the STOP button (8).
2. Press the PROG button (10) P.01 will start to flash.
3. Press the PREV/NEXT button (3/2) to select the desired track, and press the
PROG button (10) to confirm.
Note: (If available) to step through the folders, activate folder mode by
pressing the folder button (1). Now press the folder button (1) to step through
the folders. For example, to go to folder 3 press 3 time the folder button (1).
Via the PREV/NEXT button (3/2) you can select the desired track, press the
PROG button to confirm.
Repeat step 3 to program other tracks.
4. When you are finished, press the PLAY/PAUSE button (9) to start the playlist.
Repeat the playlist
Press the REPEAT button (4) once to repeat the current track.
Press the REPEAT button (4) twice to repeat the playlist.
Cancel the playlist
Press the STOP button (8) twice to cancel the playlist.
Playing an USB device
Connect a USB device to the USB socket (15).
1. Slide the FUNCTION switch (16) into CD/USB (AUX IN) position.
The unit will now start reading the USB device. This may take some time.
After the reading is complete the unit will start to play automatically.
2. Slide the FUNCTION switch (16) into OFF position to turn off the unit.
12Notes:
When a disc is being played and a USB device is connected the unit will
automatically switch to play content from the USB device.
When a USB device is being played and a CD is inserted, the unit will
automatically switch to play the CD.
When both a USB device and a CD are inserted and you turn on the unit, the
unit will start playing content from the USB device.
When an AUX cable is connected, the unit will switch to AUX mode.
Play / pause playback
During playback press the play / pause button (9) to pause the playback.
In pause mode press the play / pause button to resume the playback.
In stop mode press the play / pause button to start the playback.
Stop playback
During playback press the stop button (8) to stop the playback.
Go to the next track
Press the next button (2) to skip to the next track.
Note: If you have reached the last track of the root directory or in the current
folder and there are multiple folders in the root directory the unit will automatically
skip to the next folder (USB playback).
Fast forward through the currently playing track
Press and hold the next button (2) to fast forward through the currently playing
track.
Go to the previous track
Press the prev button (3) to go back to the previous track.
Note A: If you have reached the first track of the root directory or in the current
folder and there are multiple folders in the root directory the unit will automatically
go back to the last track of the previous folder. (USB playback).
Note B: The prev button also works as a rewind function so sometimes this
button must be pressed twice to go to the previous track.
Fast backward through the currently playing track
Press and hold the prev button (3) to fast backward through the currently playing
track.
Switching between folders (MP3/WMA only)
Press the folder button (1) once to activate the folder mode. When this mode
is active the current folder numbers starts to flash in the display.
Press the folder button (1) again to move to the next folder.
Repeat function
Press the REPEAT button (4) once to repeat the currently playing track.
When this mode is active the repeat LED flashes.
Press the REPEAT button (4) twice to repeat the current folder. When this
mode is active the repeat LED burns continuously but after a few seconds the
display flashes and will show the folder number.
Press the REPEAT button (4) three times to repeat the whole medium. When
this mode is active the repeat LED burns continuously.
13Creating a playlist
You can make a playlist up to 20 tracks.
1. Press the STOP button (8).
2. Press the PROG button (10) P.01 will start to flash.
3. Press the PREV/NEXT button (3/2) to select the desired track, and press the
PROG button (10) to confirm.
Note: (If available) to step through the folders, activate folder mode by
pressing the folder button (1). Now press the folder button (1) to step through
the folders. For example, to go to folder 3 press 3 time the folder button (1).
Via the PREV/NEXT button (3/2) you can select the desired track, press the
PROG button to confirm.
Repeat step 3 to program other tracks.
4. When you are finished, press the PLAY/PAUSE button (9) to start the playlist.
Repeat the playlist
Press the REPEAT button (4) once to repeat the current track.
Press the REPEAT button (4) twice to repeat the playlist.
Cancel the playlist
Press the STOP button (8) twice to cancel the playlist.
Connecting an external audio source
Connect a 3,5 mm stereo jack aux cable to the AUX IN socket (18).
1. Slide the FUNCTION switch (16) into CD/USB (AUX IN) position. The unit will
now activate the AUX IN mode.
2. Slide the FUNCTION switch (16) into OFF position to turn off the unit.
Note: A 3,5mm stereo jack cable is not included.
You can only increase / decrease the volume by using the volume control (17).
All other functions need to be operated from the external audio source.
14Troubleshooting
Please refer to the following instruction when there are problems with the unit.
If the problem still exits, please consult your dealer.
Problem Remedy
Check the AC power cord.
The unit does not turn on Check the batteries
General
Check the FUNCTION switch.
There is no sound Adjust the volume
"- - -" or "nl" Appears in the
Is the disk format supported?
display
Is the CD compartment closed?
Take out the CD and leave the
CD DOOR open for about an hour
to dry moisture condensation
Make sure the CD is not
CD does not play scratched
Clean the CD
Make sure the FUNCTION switch
is at CD/USB/AUX IN position
CD Player
If connected; disconnect the audio
cable from the AUX IN jack.
Clean the CD, or replace it if the
CD is badly damaged
The sound drips out Place the player in a location free
from vibration
Check if your batteries are okay
It is normal since the radio uses
CD does not play while the
less power than the CD player.
radio continues to play on
Replace the batteries to be able
battery power
to playback the CD again.
Replace all the batteries with new
The sound is weak or has
Radio ones, or bring the set near a
poor quality
window, or rotate the set/antenna
15Specification
Power source AC 230V 50 Hz
DC 9V (6 size ”C” batteries)
Power consumption < 1 W in standby
Max. 13W
Speakers 1 Watt / 4 ohms
Dimensions 259 X 223 X 118
Weight 1295g(without batteries)
Playable disc type and format Type: CD-DA , CD-R , CD-RW
Format: CD , MP3 , WMA
Max tracks folders 1: USB
Max files : 999
Max folder: 128
Max files in folder :128
2:MP3 CD,WMA CD
Max folder + file: 464 (e.g. 1folder + 463
songs; 2 folders + 462 songs ; ...... etc)
Max folder : 47
Radio Frequency range FM:87.5-108 MHz
16Service and support
For information: www.lenco.com
For support: http://lencosupport.zendesk.com
Lenco helpdesk:
Germany 0900-1520530 (Local charges)
The Netherlands 0900-23553626 (Local charges + 1ct p/min)
Belgium 02-6200115 (Local charges)
France 03-81484280 (Local charges)
The helpdesk is accessible from Monday till Friday from 9 AM till 6 PM.
When contacting Lenco, you will always be asked for the model and serial
number of your product. The serial number can be found on the back of the
device. Please write down the serial number below:
Model: SCD-38 USB
Serial number:_________________________________
Lenco offers service and warranty in accordance to European law, which means
that in case of repairs (both during and after the warranty period) you should
contact your local dealer.
Important note: It is not possible to send products that need repairs to Lenco
directly.
Important note: If this unit is opened or accessed by a non-official service center
in any way, the warranty expires.
This device is not suitable for professional use. In case of professional use, all
warranty obligations of the manufacturer will be voided.
This symbol indicates that the relevant electrical product or
battery should not be disposed of as general household waste in
Europe. To ensure the correct waste treatment of the product
and battery, please dispose them in accordance to any
applicable local laws of requirement for disposal of electrical
equipment or batteries. In so doing, you will help to conserve
natural resources and improve standards of environmental
protection in treatment and disposal of electrical waste (Waste
Electrical and Electronic Equipment Directive).
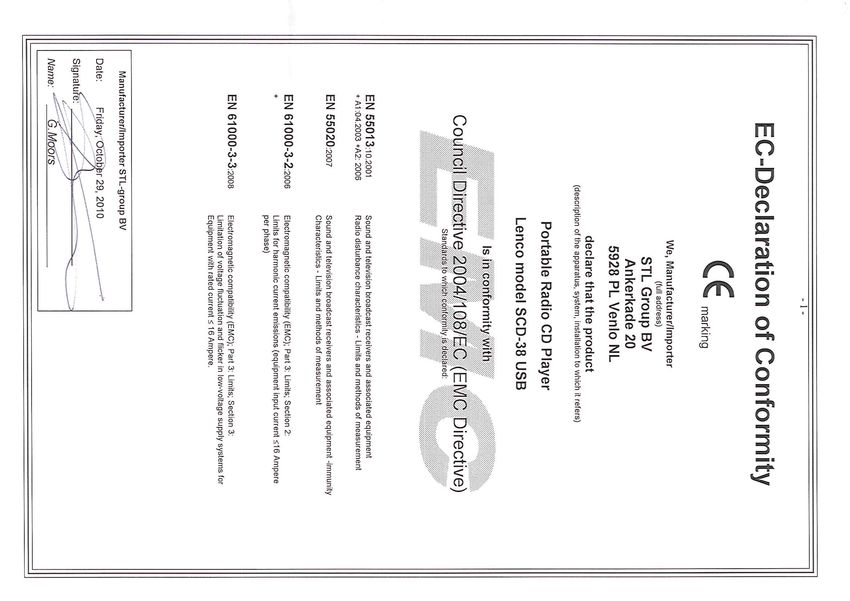
Products with the CE marking comply with the EMC Directive
(2004/108/EC) and the Low Voltage Directive (2006/95/EC)
issued by the Commission of the European Community.
The declaration of conformity may be consulted at
http://www.lenco.eu/supportfiles/CE/bhufwuifs89f9f.pdf
®All rights reserved
17SCD-38 USB
TRAGBARES UKW-RADIO MIT
CD/MP3-PLAYER UND USB-
ANSCHLUSS
Benutzerhandbuch
Zur Information und Unterstützung, www.lenco.com
Lenco_SCD-38 USB_V1.1_GERSicherheitshinweise
WICHTIGE SICHERHEITSHINWEISE - VOR DER BENUTZUNG BITTE
SORGFÄLTIG LESEN!
ACHTUNG: UM STROMSCHLÄGE ZU VERMEIDEN, ENTFERNEN
SIE KEINE SCHRAUBEN VOM GEHÄUSE. ES BEFINDEN SICH
KEINE TEILE IM INNEREN DES GERÄTS, DIE VOM BENUTZER
GEWARTET WERDEN KÖNNEN. WENDEN SIE SICH AN EINEN
QUALIFIZIERTEN WARTUNGSTECHNIKER FÜR REPARATUREN.
Das nebenstehende Symbol verweist auf wichtige Bedienungs- und
Wartungshinweise in der dem Gerät beigelegten Bedienungsanleitung.
Das nebenstehende Symbol weist auf gefährliche Spannungen im
Inneren des Geräts hin, die eine Gefahr eines Stromschlags oder
Verletzungen bilden.
Beachten Sie die folgenden Hinweise:
Verwenden Sie dieses Gerät nicht in Wassernähe.
Nur mit einem leicht angefeuchteten Tuch reinigen.
Nicht abdecken und keine der Ventilationsöffnungen blockieren. Wenn Sie das Gerät auf ein
Regal stellen, achten Sie auf einen Mindestabstand von 5 cm nach allen Seiten.
Schließen Sie das Gerät entsprechend der mitgelieferten Bedienungsanleitung an.
Schützen Sie das Netzkabel vor Druckeinwirkung, insbesondere am Netzstecker, bei
Steckdosen oder am Ausgangspunkts des Geräts. Stellen Sie keine schweren Gegenstände
auf das Netzkabel, um Beschädigungen zu vermeiden. Achten Sie darauf, dass das
Netzkabel für Kleinkindern unzugänglich bleibt.
Ziehen Sie bei Gewittern oder bei längerer Nichtbenutzung den Stecker aus der Steckdose.
Halten Sie das Gerät fern von Wärmequellen wie Heizkörpern, Heizungen, Öfen, Kerzen und
anderen Hitze erzeugenden Objekten.
WARNUNG! STECKEN SIE NIEMALS GEGENSTÄNDE DURCH DIE ÖFFNUNGEN DES
GERÄTS.IM INNEREN DES GERÄTS BEFINDEN SICH HOCHSPANNUNGSTEILE, DIE
DURCH DIE EINGEFÜGTEN GEGENSTÄNDE BERÜHRT WERDEN KÖNNEN UND DAMIT
ZU STROMSCHLÄGEN ODER KURZSCHLÜSSEN FÜHREN KÖNNEN.AUS DEM
GLEICHEN GRUND DÜRFEN KEIN WASSER ODER ANDERE FLÜSSIGKEITEN IN DAS
GERÄT GELANGEN.
Benutzen Sie es NICHT in nasser oder feuchter Umgebung, wie z. B. Badezimmern,
heißfeuchten Küchen oder neben Schwimmbecken.
Benutzen Sie das Gerät nicht, wenn Feuchtigkeit kondensieren kann.
HINWEIS: Gegenstände mit offenen Flammen, wie z. B. Kerzen, dürfen niemals
auf das Radio gestellt werden.
2SICHERHEITSHINWEISE
Dieses Gerät wurde allen geltenden Sicherheitsvorschriften entsprechend hergestellt. Die
folgenden Hinweise sind dazu gedacht, den Benutzer auf vorhandene Gefahren hinzuweisen
und vor fahrlässiger Benutzung zu warnen.
Obwohl dieses Gerät wurde mit Sorgfalt hergestellt und auf seine Funktionstüchtigkeit
überprüft wurde, bevor es ausgeliefert wurde, ist es, wie bei allen elektrischen Geräten,
möglich, dass Probleme auftreten .Bei Rauchbildung, Überhitzung oder anderen unerwartet
auftretenden Erscheinungsbildern, ziehen Sie bitte umgehend den Netzstecker aus der
Steckdose heraus.
Vergewissern Sie sich, dass das Gerät ausreichend belüftet wird!
Wenn ein Netzstecker oder eine Steckdose zum Ein- und Ausschalten des Geräts benutzt
wird, achten Sie bitte immer darauf, dass die Steckdose immer durch den Benutzer
erreichbar bleibt.
Das Gerät muss mit einer Stromversorgung betrieben werden, die den Angaben auf dem
Typenschild entspricht. Falls Sie sich nicht sicher über die Spezifikationen Ihres Netzstroms
sind, wenden Sie sich bitte an Ihren Händler oder Ihren Stromnetzbetreiber.
Die Steckdose muss sich in Bereich des Geräts befinden und leicht zugänglich sein.
Vermeiden Sie die Überlastung von Steckdosen oder Verlängerungskabeln. Eine
Überlastung kann zu Feuer- und Stromschlaggefahr führen.
Geräte der Sicherheitsklasse I dürfen nur an geerdete Steckdosen angeschlossen werden.
Halten Sie Nagetiere fern. Nagetiere genießen es in elektrische Leitungen zu beißen.
Halten Sie den Netzstecker mit der Hand fest, wenn Sie ihn aus der Steckdose herausziehen.
Ziehen Sie nicht am Netzkabel. Dies kann einen Kurzschluss verursachen.
Der Bildschirm besteht aus Kunststoff und kann durch Beschädigungen brechen. Seien Sie
besonders vorsichtig, wenn Sie Stücke eines beschädigten Kunststoffbildschirms
aufsammeln, um Verletzungen zu vermeiden.
Vermeiden Sie es das Gerät auf Oberflächen aufzustellen, die Vibrationen oder Stößen
ausgesetzt werden können.
Um das Gerät während eines Gewitters zu schützen, ziehen Sie bitte das Netzkabel aus der
Steckdose heraus und trennen Sie die Antenne ab. Achtung: Berühren Sie nicht den
Antennenanschluss (RF).
Wenn das Gerät nicht für längere Zeit nicht benutzt, ziehen Sie den Netzstecker aus
Sicherheitsgründen aus der Steckdose heraus.
Drücken und schütteln Sie niemals den Bildschirm, da dadurch die Elektronik des Geräts
beschädigt werden kann. Behandeln Sie die Fernbedienung mit Sorgfalt und lassen Sie sie
nicht fallen.
Zur Reinigung des Geräts, benutzen Sie bitte ein weiches, trockenes Tuch. Benutzen Sie
keine Lösungsmittel oder benzinbasierende Reinigungsmittel. In hartnäckigen Fällen können
Sie ein leicht angefeuchtetes Tuch mit etwas Reinigungsmittel zur Reinigung benutzen.
Der von diesem CD-Player benutzte Laserstrahl ist schädlich für die Augen. Versuchen Sie
niemals das Gerät auseinander zunehmen. Überlassen Sie Wartungsarbeiten immer
qualifiziertem Fachpersonal.
Wenn der Player in einem in der Sonne geparktem Fahrzeug gelassen wird, stellen Sie
sicher, dass der Player sich an einer Stelle im Fahrzeug befindet, an der der Player nicht
dem direkten Sonnenlicht ausgesetzt ist.
3CD
Bevor Sie eine Disc abspielen, reinigen Sie sie mit einem sauberem Tuch.
Setzen Sie die CD keinem direkten Sonnenlicht aus und legen Sie sich nicht in die Nähe von
Hitzequellen. Lassen Sie keine Disc im Fahrzeug liegen, wenn es in direktem Sonnenlicht
geparkt wurde, da dadurch ein erheblicher Anstieg der Temperatur im Inneren des
Fahrzeugs entsteht.
Befestigen Sie kein Papier oder Aufkleber auf die Discs. Vermeiden Sie Kratzer.
Legen Sie die CD nach dem Abpielen in ihre Hülle zurück. Auf der CD vorhandene Kratzer,
Schmutz oder Fingerabdrücke können Abspielfehler oder Aussetzer verursachen.
Wenn das Gerät von einem kalten Ort an einen warmen oder feuchten Ort getragen wird,
kann sich im Inneren des Geräts Kondensation bilden. In diesem Fall wird der Player nicht
richtig funktionieren. Entfernen Sie die CD und warten Sie etwa eine Stunde, bis die
Feuchtigkeit verflogen ist.
Dieser CD-Player ist nur für die Benutzung auf einer stabilen, vibrationsfreien Unterlage
konzipiert. Bei Erschütterungen stoppt die Wiedergabe für mehrere Sekunden bzw.
vollständig. Dies ist normal für diese Art von Abspielgerät.
Zerkratzte Discs
Wenn eine Disc stark zerkratzt ist, kann sie nicht abgespielt werden. Sie können sie allerdings mit
einer Disc-Politur reparieren.
Reinigung der Laseroptik
Wenn die Laseroptik verschmutzt ist, kann es zu Aussetzern während des CD-Betriebs kommen.
Reinigen Sie die Optik mit einem kommerziell erhältlichen Objektivreiniger und -Gebläse oder
wischen Sie sie mit einem weichen, trockenen Tuch ab.
Aufstellungsort
Stellen Sie den radio an einem Ort auf, an dem er keinem Sonnenlicht oder besonders heller
Beleuchtung ausgesetzt ist. Es wird empfohlen für ein Maximum an Komfort, eine weiche
indirekte Beleuchtung zu wählen. Benutzen Sie Vorhänge oder Jalousien, um zu verhindern,
dass direktes Sonnenlicht auf den radio fällt. Stellen Sie den radio auf eine stabile, ebene
Unterlage. Dadurch kann verhindert werden, dass das Gerät herunterfallen kann. Vergewissern
Sie sich, dass der radio an einem Ort aufgestellt ist, an dem er nicht durch andere Gegenstände
verschoben oder getroffen werden kann. Der Druck innerhalb des Bildschirms kann ihn
beschädigen oder brechen. Dies gilt ebenfalls für Gegenstände, die durch die
Ventilationsöffungen in das Innere des Geräts gelangen.
WARNUNG: Eine langfristige Belastung durch hohe Lautstärken von tragbaren
Musikgeräten kann vorübergehend oder dauerhaft zu Gehörverlust führen.
4Hinweis:
Diese Bedienungsanleitung wurde vor der Produktentwicklung gedruckt. Wenn
die Spezifikationen teilweise nicht dem Gerät entsprechen, da die Bedienbarkeit
oder andere Funktionen verbessert wurden, gelten die Spezifikationen des
Geräts. In solchen Fällen kann es sein, dass die Bedienungsanleitung nicht alle
Funktionen des eigentlichen Produkts abdeckt. Daher kann das tatsächliche
Produkt und die Verpackung, sowie Bezeichnungen und Abbildungen in der
Bedienungsanleitung Abweichungen aufweisen. Die Beispielzeichnungen in
diesem Handbuch können von dem tatsächlichen Aussehen des Geräts
abweichen.
Die Firma Lenco ist nicht haftbar für jegliche Folgeschäden.
WICHTIGER HINWEIS:
USB-Speichermedien müssen direkt am Gerät angeschlossen werden.
Verwenden Sie keine USB-Verlängerungskabel, da diese zu
Störungen und Datenverlust führen können.
Lenco empfiehlt die Verwendung von Markenbatterien, um eine längere
Lebensdauer und optimale Ergebnisse zu erhalten.
Wenn das Gerät für ein paar Wochen oder länger nicht verwendet wird,
entfernen Sie die Batterien, um Schäden Auslaufen oder Korrosion zu
vermeiden.
Die Batterien dürfen niemals starker Hitze, wie z. B. bei Sonnenlicht, Feuer o.
Ä. ausgesetzt werden.
5Sehr geehrter Kunde,
Vielen Dank für den Kauf dieses Produkts der Firma Lenco. Qualität und
Benutzerfreundlichkeit sind unser oberstes Gebot, damit Sie dieses Produkt, das
mit hochwertigen Materialien, Komponenten und Sorgfalt hergestellt wurde,
vollständig genießen können. Vor dem Anschließen von Einzelteilen und der
Stromversorgung, lesen Sie sich bitte die Bedienungsanleitung durch und
bewahren Sie die Anleitung immer in der Nähe Ihres Geräts auf.
Verpackungsinhalt
1 x SCD-38 USB
1 x Netzkabel
1 x Kurzanleitung
Der Verpackungsinhalt wird werksmäßig immer mit größtmöglicher Sorgfalt
zusammengestellt. Wenn trotzdem Teile fehlen, wenden Sie sich bitte so schnell
wie möglich an Ihren Händler.
Inhalt
Ende der Lebensdauer ....................................................................... 6
Verpackungsinhalt .............................................................................. 6
Geräteteile und Bedienelemente ........................................................ 7
Oberseitenansicht ....................................................................................................................... 7
Vorderseitenansicht..................................................................................................................... 8
Linke Seitenansicht ..................................................................................................................... 8
Rechte Seitenansicht .................................................................................................................. 9
Rückseitenansicht ....................................................................................................................... 9
Anzeige (6) ................................................................................................................................ 10
Auswahl der Stromquelle.................................................................. 11
Anschluss über das Netzkabel .................................................................................................. 11
Batteriebetrieb ........................................................................................................................... 11
Grundlegende Bedienung................................................................. 12
Radiobetrieb .............................................................................................................................. 12
Wiedergabe einer Audio-, MP3- oder WMA-CD ....................................................................... 12
Wiedergabe von USB-Medien ................................................................................................... 15
Anschluss externer Audiogeräte ............................................................................................... 17
Fehlerbehebung ............................................................................... 18
Technische Daten ............................................................................ 19
Kundendienst ................................................................................... 20
6Geräteteile und Bedienelemente
Oberseitenansicht
1. Folder: Wechseln zwischen Verzeichnissen (während der MP3/WMA-
Wiedergabe).
2. Vor: zum nächsten Titel; halten Sie die Taste gedrückt, um den Schnellvorlauf
zu starten.
3. Zurück: zum vorigen Titel; halten Sie die Taste gedrückt, um den
Schnellrücklauf zu starten.
4. Wiederholung: Wiederholen eines Titels, Verzeichnisses oder aller Titel.
5. Kontrolllampe
6. Anzeige
7. UKW-Stereo-Anzeige
8. Stop: Wiedergabe stoppen
9. Play / Pause: Betätigen Sie diese Taste zum Starten bzw. Anhalten der
CD/USB-Wiedergabe.
10. PROG: Programmieren der Titel in Ihrer gewünschten Reihenfolge.
11. OPEN / CLOSE: Öffnen oder Schließen des CD-Ladefachs.
12. CD-Ladefach
13. UKW-Antenne
14. Lautsprecher
7Vorderseitenansicht
15. USB-Anschluss: Anschluss eines USB-Speichermediums.
Linke Seitenansicht
16. Funktionsschalter
17. VOLUME: Erhöhen/Verringern der Lautstärke
8Rechte Seitenansicht
18. Frequenzauswahlrad
19. UKW-Stereo/Mono
20. UKW-Frequenzanzeige
Rückseitenansicht
21. AUX IN-Eingang (Eingang für externe Audiosignale)
22. Stromversorgungseingang
9Anzeige (6)
A. Programm-LED: Zeigt an, ob der "Programmmodus" aktiv ist.
B. Wiedergabe-LED: Zeigt an, ob der "Wiedergabemodus" aktiv ist.
C. Wiederholungs-LED: Zeigt an, ob der "Wiederholungsmodus" aktiv ist.
HINWEIS: "no" wird angezeigt, wenn sich keine Disc im CD-Ladefach
befindet oder wenn ein Disc-Fehler auftritt.
10Auswahl der Stromquelle
Sie können das Gerät entweder über den Netzstrom oder die Batterien mit Strom
versorgen.
Hinweis: Die Batterien sind nicht im Lieferumfang enthalten
Anschluss über das Netzkabel
Schließen Sie das eine Ende des Netzkabels am Netzanschluss an der
Geräterückseite an und das andere Ende in eine Steckdose.
Hinweis: Wenn der Netzstecker nicht in die Steckdose passt, versuchen Sie ihn
nicht mit Gewalt zu verbinden. Drehen Sie den Stecker um und versuchen Sie es
erneut. Bestimmte Netzstecker sind polarisiert und passen nur, wenn sie richtig
herum angeschlossen werden.
Batteriebetrieb
Wichtig : Entfernen Sie während des Batteriebetriebs das Netzkabel.
Anmerkungen:
- Die Firma Lenco empfiehlt die Benutzung von Markenbatterien.
- Wenn die Kontrolllampe schwächer wird, tauschen Sie die Batterien bitte
gegen neue aus.
- Wenn die CD-Wiedergabe nicht gestartet werde kann, bedeutet dies,
dass die Batterien fast leer sind.
Einlegen der Batterien:
1. Legen Sie das Gerät auf den Kopf, sodass
leg
das Batteriefach zugänglich wird. leg
2. Benutzen Sie einen Finger, um den
Verschluss in Pfeilrichtung aufzudrücken
leg leg
und Sie können den Deckel in Pfeilrichtung
drücken, bis ein Klicken zu hören ist. Halten buckle
Sie nun die vordere Kante der Abdeckung
sagging block
fest und ziehen Sie sie nach oben, um sie
zu entfernen.
3. Legen Sie 6 Batterien der Größe C in das
Batteriefach entsprechend der "+" und "-"
Markierungen ein. leg groove leg groove
4. Schließen Sie die Abdeckung, indem Sie
den Verschluss in die Einfassung und die leg groove leg groove
4 Beine des Deckels in die Einkerbungen
buckle groove
setzen. Dann können Sie die Abdeckung
in die ursprüngliche Position
zurückdrücken.
11Grundlegende Bedienung
Radiobetrieb
1. Schieben Sie den Funktionsschalter (16) in die RADIO-Position und die
POWER-LED wird eingeschaltet.
2. Stellen Sie die gewünschte Frequenz mithilfe des Frequenzauswahlrads (18)
ein. In der UKW-Frequenzanzeige (20) wird dabei die aktuelle Frequenz
angezeigt.
3. Ziehen Sie die Antenne (13) vollständig heraus, um einen optimalen Empfang
zu ermöglichen. Richten Sie sie erneut aus, wenn es notwendig ist den
Empfang zu verbessern.
Drehen Sie am Lautstärkeregler (17), um die Lautstärke einzustellen.
Schieben Sie den FM MONO/STEREO-Schalter (19) in die gewünschte
Position.
4. Schieben Sie den Funktionsschalter (16) in die OFF-Position, um das Radio
wieder auszuschalten.
Hinweis: Wenn der UKW-Empfang gut genug ist, leuchtet die FM-ST-LED auf.
Wiedergabe einer Audio-, MP3- oder WMA-CD
Öffnen Sie das CD-Ladefach und legen Sie eine CD mit der beschrifteten
Seite nach oben in das Ladefach.
Schließen Sie das CD-Ladefach wieder.
1. Schieben Sie den Funktionsschalter (16) in die CD/USB(AUX IN)-Position.
Das Gerät liest dann die CD ein. Dies kann einen Moment dauern.
Danach beginnt automatisch die Wiedergabe.
2. Schieben Sie den Funktionsschalter (16) in die OFF-Position, um das Gerät
wieder auszuschalten.
Anmerkungen:
Wenn während der Disc-Wiedergabe ein USB-Gerät angeschlossen wird,
springt das Gerät automatisch zur USB-Wiedergabe.
Wenn während der USB-Wiedergabe und eine CD eingelegt wird, springt das
Gerät automatisch zur CD-Wiedergabe.
Wenn sowohl ein USB-Medium angeschlossen und eine CD eingelegt ist und
Sie dann das Gerät einschalten, beginnt das Gerät mit der Wiedergabe des
USB-Mediums.
Wenn ein AUX-Kabel angeschlossen wird, geht das Gerät in den AUX-Modus.
Wiedergabe / Pause
Betätigen Sie während der Wiedergabe die Play/Pause-Taste (9), um die
Wiedergabe vorübergehend anzuhalten.
Betätigen Sie im Pause-Modus die Play/Pause-Taste erneut, um die Wiedergabe
fortzusetzen.
Im gestoppten Zustand können Sie durch Betätigung der Play/Pause-Taste die
Wiedergabe starten.
12Stoppen der Wiedergabe
Betätigen Sie die die Stop-Taste (8) während der Wiedergabe, um die
Wiedergabe zu stoppen.
Springen zum nächsten Musiktitel
Betätigen Sie die Vor-Taste (2), um zum nächsten Titel zu springen.
Hinweis: Wenn Sie beim letzten Titel des Hauptverzeichnisses bzw. des
aktuellen Verzeichnisses angelangt sind und weitere Verzeichnisses im
Hauptverzeichnis des Geräts vorhanden sind, springt die Wiedergabe
automatisch zum nächsten Verzeichnis (USB-Wiedergabe).
Schnellvorlauf im aktuellen Titel
Halten Sie die Vor-Taste (2) gedrückt, um den Schnellvorlauf im momentan
spielenden Titel zu starten.
Springen zum vorigen Musiktitel
Betätigen Sie die Zurück-Taste (3), um zum vorigen Titel zu springen.
Hinweis A: Wenn Sie beim ersten Titel des Hauptverzeichnisses bzw. des
aktuellen Verzeichnisses angelangt sind und weitere Verzeichnisses im
Hauptverzeichnis des Geräts vorhanden sind, springt die Wiedergabe
automatisch zum letzten Titel des vorigen Verzeichnisses (USB-Wiedergabe).
Hinweis B: Die Zurück-Taste wird ebenfalls als Rücklauf-Taste verwendet. Sie
müssen deshalb die Taste in manchen Fällen zweimal betätigen, um zum
vorigen Titel zu springen.
Schnellrücklauf im aktuellen Titel
Halten Sie die Zurück-Taste (3) gedrückt, um den Schnellrücklauf im momentan
spielenden Titel zu starten.
Verzeichniswechsel (nur MP3/WMA)
Betätigen Sie die Folder-Taste (1), um den Verzeichnismodus zu aktivieren.
Wenn dieser Modus aktiviert ist, fängt die Nummer des aktuellen
Verzeichnisses in der Anzeige an zu blinken.
Betätigen Sie die Folder-Taste (1) erneut, um zum nächsten Verzeichnis zu
wechseln.
13Wiederholungsfunktion
Betätigen Sie die REPEAT-Taste (4) einmal, um den aktuellen Titel zu
wiederholen. Wenn dieser Modus aktiviert ist, fängt die Wiederholungs-LED
an zu blinken.
Betätigen Sie die REPEAT-Taste (4) zweimal, um das aktuelle Verzeichnis zu
wiederholen. Wenn dieser Modus aktiviert ist, geht die Wiederholungs-LED
an ohne zu blinken. Nach ein paar Sekunden blinkt die Anzeige dann und die
Verzeichnisnummer wird angezeigt.
Betätigen Sie die REPEAT-Taste (4) dreimal, um alle Titel auf dem
Speichermedium zu wiederholen. Wenn dieser Modus aktiviert ist, geht die
Wiederholungs-LED an ohne zu blinken.
Erstellen einer Wiedergabeliste
Sie können eine Wiedergabeliste von bis zu 20 Titeln erstellen.
1. Betätigen Sie die STOP-Taste (8).
2. Betätigen Sie die PROG-Taste (10) und "P.01" beginnt in der Anzeige zu
blinken.
3. Benutzen Sie die Tasten Zurück / Vor (3/2), um den gewünschten Titel
auszuwählen und betätigen Sie dann die PROG-Taste (10) zur Bestätigung.
Hinweis (falls zutreffend): Aktivieren Sie den Verzeichnismodus zur
Auswahl eines Verzeichnisses, indem Sie die Folder-Taste (1) betätigen.
Benutzen Sie dann die Verzeichnistaste (1), um das Verzeichnis zu wechseln.
Beispiel: Um zum Verzeichnis 3 zu wechseln, betätigen Sie die Folder-Taste
(1) bitte 3 Mal. Benutzen Sie die Tasten Zurück / Vor (3/2), um den
gewünschten Titel auszuwählen und betätigen Sie dann die PROG-Taste zur
Bestätigung.
Wiederholen Sie Schritt 3, um weitere Titel zu programmieren.
4. Wenn Sie fertig sind, betätigen Sie die PLAY/PAUSE-Taste (9), um die
Wiedergabe der Liste zu starten.
Wiederholen der Wiedergabeliste
Betätigen Sie die REPEAT-Taste (4) einmal, um den aktuellen Titel zu
wiederholen.
Betätigen Sie die REPEAT-Taste (4) zweimal, um die gesamte Wiedergabeliste
zu wiederholen.
Abbrechen der Wiedergabeliste
Betätigen Sie die STOP-Taste (8) zweimal, um die Wiedergabe der Liste
abzubrechen.
14Wiedergabe von USB-Medien
Schließen Sie Ihr USB-Medium am USB-Anschluss (15) an.
1. Schieben Sie den Funktionsschalter (16) in die CD/USB(AUX IN)-Position.
Das Gerät liest nun das USB-Medium ein. Dies kann einen Moment dauern.
Nachdem das Medium eingelesen wurde, beginnt das Gerät automatisch mit
der Wiedergabe.
2. Schieben Sie den Funktionsschalter (16) in die OFF-Position, um das Gerät
wieder auszuschalten.
Anmerkungen:
Wenn während der Disc-Wiedergabe ein USB-Gerät angeschlossen wird,
springt das Gerät automatisch zur USB-Wiedergabe.
Wenn während der USB-Wiedergabe und eine CD eingelegt wird, springt das
Gerät automatisch zur CD-Wiedergabe.
Wenn sowohl ein USB-Medium angeschlossen und eine CD eingelegt ist und
Sie dann das Gerät einschalten, beginnt das Gerät mit der Wiedergabe des
USB-Mediums.
Wenn ein AUX-Kabel angeschlossen wird, geht das Gerät in den AUX-Modus.
Wiedergabe / Pause
Betätigen Sie während der Wiedergabe die Play/Pause-Taste (9), um die
Wiedergabe vorübergehend anzuhalten.
Betätigen Sie im Pause-Modus die Play/Pause-Taste erneut, um die Wiedergabe
fortzusetzen.
Im gestoppten Zustand können Sie durch Betätigung der Play/Pause-Taste die
Wiedergabe starten.
Stoppen der Wiedergabe
Betätigen Sie die die Stop-Taste (8) während der Wiedergabe, um die
Wiedergabe zu stoppen.
Springen zum nächsten Musiktitel
Betätigen Sie die Vor-Taste (2), um zum nächsten Titel zu springen.
Hinweis: Wenn Sie beim letzten Titel des Hauptverzeichnisses bzw. des
aktuellen Verzeichnisses angelangt sind und weitere Verzeichnisses im
Hauptverzeichnis des Geräts vorhanden sind, springt die Wiedergabe
automatisch zum nächsten Verzeichnis (USB-Wiedergabe).
Schnellvorlauf im aktuellen Titel
Halten Sie die Vor-Taste (2) gedrückt, um den Schnellvorlauf im momentan
spielenden Titel zu starten.
15Springen zum vorigen Musiktitel
Betätigen Sie die Zurück-Taste (3), um zum vorigen Titel zu springen.
Hinweis A: Wenn Sie beim ersten Titel des Hauptverzeichnisses bzw. des
aktuellen Verzeichnisses angelangt sind und weitere Verzeichnisses im
Hauptverzeichnis des Geräts vorhanden sind, springt die Wiedergabe
automatisch zum letzten Titel des vorigen Verzeichnisses (USB-Wiedergabe).
Hinweis B: Die Zurück-Taste wird ebenfalls als Rücklauf-Taste verwendet. Sie
müssen deshalb die Taste in manchen Fällen zweimal betätigen, um zum
vorigen Titel zu springen.
Schnellrücklauf im aktuellen Titel
Halten Sie die Zurück-Taste (3) gedrückt, um den Schnellrücklauf im momentan
spielenden Titel zu starten.
Verzeichniswechsel (nur MP3/WMA)
Betätigen Sie die Folder-Taste (1), um den Verzeichnismodus zu aktivieren.
Wenn dieser Modus aktiviert ist, fängt die Nummer des aktuellen
Verzeichnisses in der Anzeige an zu blinken.
Betätigen Sie die Folder-Taste (1) erneut, um zum nächsten Verzeichnis zu
wechseln.
Wiederholungsfunktion
Betätigen Sie die REPEAT-Taste (4) einmal, um den aktuellen Titel zu
wiederholen. Wenn dieser Modus aktiviert ist, fängt die Wiederholungs-LED
an zu blinken.
Betätigen Sie die REPEAT-Taste (4) zweimal, um das aktuelle Verzeichnis zu
wiederholen. Wenn dieser Modus aktiviert ist, geht die Wiederholungs-LED
an ohne zu blinken. Nach ein paar Sekunden blinkt die Anzeige dann und die
Verzeichnisnummer wird angezeigt.
Betätigen Sie die REPEAT-Taste (4) dreimal, um alle Titel auf dem
Speichermedium zu wiederholen. Wenn dieser Modus aktiviert ist, geht die
Wiederholungs-LED an ohne zu blinken.
16Erstellen einer Wiedergabeliste
Sie können eine Wiedergabeliste von bis zu 20 Titeln erstellen.
1. Betätigen Sie die STOP-Taste (8).
2. Betätigen Sie die PROG-Taste (10) und "P.01" beginnt in der Anzeige zu
blinken.
3. Benutzen Sie die Tasten Zurück / Vor (3/2), um den gewünschten Titel
auszuwählen und betätigen Sie dann die PROG-Taste (10) zur Bestätigung.
Hinweis (falls zutreffend): Aktivieren Sie den Verzeichnismodus zur
Auswahl eines Verzeichnisses, indem Sie die Folder-Taste (1) betätigen.
Benutzen Sie dann die Verzeichnistaste (1), um das Verzeichnis zu wechseln.
Beispiel: Um zum Verzeichnis 3 zu wechseln, betätigen Sie die Folder-Taste
(1) bitte 3 Mal. Benutzen Sie die Tasten Zurück / Vor (3/2), um den
gewünschten Titel auszuwählen und betätigen Sie dann die PROG-Taste zur
Bestätigung.
Wiederholen Sie Schritt 3, um weitere Titel zu programmieren.
4. Wenn Sie fertig sind, betätigen Sie die PLAY/PAUSE-Taste (9), um die
Wiedergabe der Liste zu starten.
Wiederholen der Wiedergabeliste
Betätigen Sie die REPEAT-Taste (4) einmal, um den aktuellen Titel zu
wiederholen.
Betätigen Sie die REPEAT-Taste (4) zweimal, um die gesamte Wiedergabeliste
zu wiederholen.
Abbrechen der Wiedergabeliste
Betätigen Sie die STOP-Taste (8) zweimal, um die Wiedergabe der Liste
abzubrechen.
Anschluss externer Audiogeräte
Verbinden Sie ein 3,5-mm-Stereo-Audiokabel mit dem AUX-IN-Eingang (18).
des Geräts.
1. Schieben Sie den Funktionsschalter (16) in die CD/USB(AUX IN)-Position.
Das Gerät aktiviert damit den AUX-Modus.
2. Schieben Sie den Funktionsschalter (16) in die OFF-Position, um das Gerät
wieder auszuschalten.
Hinweis: Ein 3,5-mm-Stereo-Audiokabel nicht im Lieferumfang enthalten.
Sie können dann die Lautstärke mit dem Lautstärkeregler (17) erhöhen bzw.
verringern. Alle anderen Funktionen werden direkt am externen Audiogerät
gesteuert.
17Fehlerbehebung
Benutzen Sie bitte folgende Fehlerbehebungsliste, wenn Funktionsstörungen
auftreten. Wenn das Problem mit der folgenden Liste nicht zu beheben ist,
wenden Sie sich bitte an Ihren Händler.
Problem Behebung
Überprüfen Sie das Netzkabel.
Das Gerät lässt sich nicht
Überprüfen Sie die Batterien.
Allgemein einschalten
Überprüfen Sie den Funktionsschalter.
Kein Ton. Stellen Sie die Lautstärke ein.
"- - -" oder "nl" erscheint in
Wird das Disc-Format unterstützt?
der Anzeige
Ist das CD-Ladefach geschlossen?
Entfernen Sie die CD aus dem Gerät
und lassen Sie das CD-Ladefach für
ca. eine Stunde geöffnet, damit sich
kondensierte Feuchtigkeit
verflüchtigen kann.
Achten Sie darauf, dass die CD nicht
Disc kann nicht
zerkratzt ist.
wiedergegeben werden
Reinigen Sie die CD.
Vergewissern Sie sich, dass sich der
Funktionsschalter in der CD/USB/AUX
CD- IN-Position befindet.
Player Wenn verbunden, ziehen Sie das
Audiokabel aus dem AUX-IN-
Anschluss heraus.
Reinigen oder ersetzen Sie die Disc,
wenn sie stark beschädigt ist.
Stellen Sie das Gerät an einem Ort
Der Ton setzt aus
auf, der frei von Vibrationen ist.
Überprüfen Sie, ob die Batterien über
ausreichend Strom verfügen.
Im Batteriebetrieb ist eine Dies ist vollkommen normal, da der
Radiowiedergabe möglich Radiobetrieb weniger Strom
während CDs nicht verbraucht als der CD-Betrieb.
wiedergegeben werden Ersetzen Sie die Batterien, um die CD-
können. Wiedergabe wieder zu ermöglichen.
Versuchen Sie alle Batterien durch
neue zu ersetzen oder stellen Sie das
Gerät in Fensternähe auf. Sie können
Radio Schlechte Tonqualität
ebenfalls versuchen den Empfang
durch Drehen der Geräts zu
verbessern.
18Technische Daten
Stromversorgung AC 230 V, 50 Hz
DC 9 V (6 Batterien der Größe C)
StromverbrauchService und Hilfe
Für Informationen: www.lenco.com
Für Hilfe: http://lencosupport.zendesk.com
Lenco Hotlines:
Deutschland 0900-1520530 (Ortsgebundener Tarif)
Die Niederlande 0900-23553626 (Ortsgebundener Tarif + 1ct p/min)
Belgien 02-6200115 (Ortsgebundener Tarif)
Frankreich 03-81484280 (Ortsgebundener Tarif)
Die Hotline erreichen Sie montags bis freitags von 9 bis 18 Uhr.
Wenn Sie Lenco kontaktieren, werden Sie immer nach der Modell- und
Seriennummer des Geräts gefragt. Die Seriennummer finden Sie auf der
Rückseite des Geräts. Bitte notieren Sie hier die Seriennummer:
Modell: SCD-38 USB
Seriennummer:_________________________________
Lenco bietet Leistungen und Garantien im Einklang mit Europäischem Recht. Im
Falle von Reparaturen (sowohl während als auch nach Ablauf der Garantiezeit)
sollten Sie deshalb Ihren Einzelhändler kontaktieren.
Beachten Sie: Es ist nicht möglich, Geräte für Reparaturen direkt an Lenco zu
schicken.
Wichtiger Hinweis:
Falls dieses Gerät von einem nicht autorisierten Kundendienst geöffnet oder
darauf zugegriffen wird, erlischt die Garantie.
Dieses Gerät ist nicht für professionelle Zwecke geeignet. Falls das Gerät für
professionelle Zwecke eingesetzt wird, erlöschen alle Garantieverpflichtungen
seitens des Herstellers.
Dieses Symbol zeigt an, dass das entsprechende Produkt oder dessen Batterie
in Europa nicht mit dem normalen Hausmüll entsorgt werden darf.
Um die ordnungsgemäße Abfallbehandlung des Produkts und dessen
Batterie zu gewährleisten, müssen diese im Einklang mit allen
anwendbaren örtlichen Vorschriften zur Entsorgung von
Elektrogeräten und Batterien entsorgt werden. Dabei helfen Sie
natürliche Ressourcen zu schonen und Umweltschutzstandards zur
Verwertung und Entsorgung von Altgeräten aufrecht zu halten (Waste
Electrical and Electronic Equipment Directive).
Produkte mit der CE Kennzeichnung entsprechen der EMC-Richtlinie
(2004/108/EC) und der Niederspannungsrichtlinie (2006/95/EC),
herausgegeben von der Kommission der Europäischen Gemeinschaft.
Konformitätserklärung kann unter folgender Adresse gefunden werden:
http://www.lenco.eu/supportfiles/CE/bhufwuifs89f9f.pdf
®Alle Rechte vorbehalten
20Puoi anche leggere