MANUALE FORNI DA INCASSO FE960 - FE760 FE960 - FE760 BUILT-IN OVENS MANUAL
←
→
Trascrizione del contenuto della pagina
Se il tuo browser non visualizza correttamente la pagina, ti preghiamo di leggere il contenuto della pagina quaggiù
M A D E   I N   I T A L Y

MANUALE FORNI DA INCASSO
      FE960 - FE760

FE960 - FE760 BUILT-IN OVENS
          MANUAL
Etichetta dati caratteristici del prodotto

                            Rating Plate of the producs

                                Informazioni strettamente confidenziali.
                 Tutti i diritti sui contenuti di questo documento sono riservati.
È vietato copiare, utilizzare, distribuire anche parzialmente o mettere altrimenti in circolazione
                tali informazioni, salvo espressa autorizzazione del produttore.
                        Le violazioni saranno perseguite ai sensi di legge.

                                   Strictly confidential information.
                     All rights to the contents of this document are reserved.
     It is forbidden to copy, use, distribute even partially or otherwise put into circulation
               such information, unless expressly authorized by the manufacturer.
                        Violations will be prosecuted according to the law.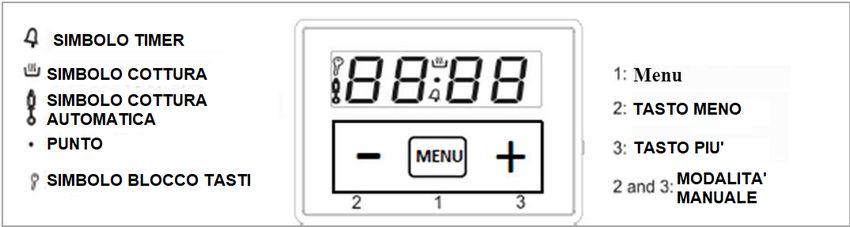
FORNO DA INCASSO
                              Manuale di istruzioni
                                                        IT
                                Istruzioni originali

                               BUILT-IN OVEN
                               Instruction Manual       EN
                  Translate of original instruction

                Man. L001_017 FE960 - FE760
                            Rev. 05_05/2021

Leggere attentamente prima dell’installazione ed uso
           Read carefully before installation and use
MANUALE D’USO IT Vi ringraziamo per la scelta di uno dei nostri prodotti e speriamo che otteniate da questo elettrodomestico le migliori prestazioni. Prima di utilizzare l’apparecchio, leggere attentamente le avvertenze contenute nel presente libretto istruzioni, in quanto forniscono importanti indicazioni riguardanti la sicurezza di installazione, d’uso e di manutenzione. Conservare con cura questo libretto per ogni eventuale successiva consultazione. Il produttore si riserva il diritto di apportare ai propri apparecchi modifiche che si ritenessero necessarie ed utili, senza alcun preavviso. Questo apparecchio è conforme alle seguenti direttive CE: 2006/95/CE : Bassa tensione e successive modificazioni 2004/108/CEE : Compatibilità elettromagnetica e successive modificazioni Questo apparecchio è contrassegnato in conformità alla Direttiva Europea 2002/96/EC, Waste Electrical and Electronic Equipment (WEEE) e al Regolamento CE n. 1275/2008 (Standby). Assicurandosi che questo prodotto sia smaltito in modo corretto, l'utente contribuisce a prevenire le potenziali conseguenze negative per l'ambiente e la salute. Il simbolo sul prodotto, o sulla documentazione di accompagnamento, indica che questo prodotto non deve essere trattato come rifiuto domestico ma deve essere consegnato presso l'idoneo punto di raccolta per il riciclaggio di apparecchiature elettriche ed elettroniche. Disfarsene seguendo le normative locali per lo smaltimento dei rifiuti. Per ulteriori informazioni sul trattamento, recupero e riciclaggio di questo prodotto, contattare l'idoneo ufficio locale, il servizio di raccolta dei rifiuti domestici o il negozio presso cui il prodotto è stato acquistato. Questo apparecchio può essere utilizzato da bambini di età pari o superiore a 8 anni e da persone con ridotte capacità fisiche, sensoriali o mentali o con mancanza di esperienza e conoscenza se sono stati supervisionati o istruiti sull’uso dell’apparecchio in modo sicuro e comprendono i pericoli coinvolti. I bambini non devono giocare con l’apparecchio. La pulizia e la manutenzione dell’apparecchio non devono essere eseguite da bambini senza supervisione. 4 / IT
MANUALE D’USO

AVVERTENZE GENERALI
QUESTO PRODOTTO È STATO PROGETTATO PER UN IMPIEGO DI TIPO
DOMESTICO.
• Dopo aver tolto l’imballaggio assicurarsi dell’integrità dell’apparecchio. In
  caso di dubbio rivolgersi a personale professionalmente qualificato.
• Gli elementi dell’imballaggio (es. polistirolo, sacchetti, ecc.) possono
  risultare pericolosi per i bambini (pericolo di soffocamento).Tenere le parti
  dell’imballaggio fuori della portata dei bambini.
• Questo manuale costituisce parte integrante dell’apparecchio. Si
  raccomanda di conservarlo per l’intero ciclo di vita dell’apparecchio
  e di leggerlo attentamente per procedere all’installazione, utilizzo,
  manutenzione, pulizia e trattamento dell’apparecchio.
• Queste istruzioni sono valide solamente per i paesi di destinazione i cui
  simboli di identificazione figurano sulla targhetta posta nel libretto istruzioni
  e sull’apparecchio.
• Il sollevamento e la movimentazione di apparecchi di peso >25kg o
  di dimensioni che non consentono agevole presa deve essere fatto
  adoperando mezzi idonei o con l’intervento di due persone al fine di evitare
  rischi o disagi.
• Non lasciare esposto l’apparecchio ad agenti atmosferici (pioggia, sole,
  ecc.).
• Allorché si decida di non utilizzare più l’apparecchio, si raccomanda di
  renderlo inoperante tagliandone il cavo alimentazione ed eventualmente
  scollegarlo dal gas. Si raccomanda inoltre di rendere innocue quelle parti
  dell’apparecchio suscettibili di costruire un pericolo.
• Gli accessori del prodotto che possono venire a contatto con gli alimenti,
  sono costruiti con materiali conformi a quanto prescritto dalla Direttiva CEE
  1935/2004.
• AVVERTENZA: le parti accessibili possono diventare calde durante
  l’uso.Tenere lontani i bambini piccoli.
• ATTENZIONE: L’apparecchio e le sue parti accessibili diventano molto
  calde durante l’uso. È necessario prestare attenzione per evitare di
  toccare gli elementi riscaldanti.
• Tenere lontani i bambini di età inferiore a 8 anni a meno che non siano
  costantemente sorvegliati
• ATTENZIONE: assicurarsi che l’apparecchio sia spento e scollegato
  prima di sostituire la lampada per evitare la possibilità di scosse
  elettriche.

                                                                             5 / IT
MANUALE D’USO
MANUTENZIONE E RIPARAZIONE
IL COSTRUTTORE DECLINA OGNI RESPONSABILITÀ NEL CASO DI
EVENTUALI DANNI A COSE O PERSONE DERIVANTI DA UNA NON
CORRETTA INSTALLAZIONE, MANUTENZIONE, DA UN USO IMPROPRIO,
ERRONEO, ASSURDO.
Attenzione: il collegamento a terra è obbligatorio a norma di legge
• L’installazione e tutti i collegamenti gas/elettrici devono essere eseguiti da
personale qualificato, nel pieno rispetto delle norme di sicurezza delle leggi
vigenti, sulla base delle indicazioni fornite dal costruttore.
• La targa di identificazione, con i dati tecnici, si trova visibilmente posizionata
sulla facciata del forno ed allegata a questo manuale. La targhetta non
deve mai essere rimossa.
• ALLACCIAMENTO: controllare che le specifiche della targhetta dei dati
di funzionamento corrispondono a quelle della Vostra alimentazione.
• Il forno deve essere collegato con un cavo di sezione minima da 1,5
mm², prevedendo un interruttore omnipolare conforme alle norme
in vigore, avente una distanza di apertura dei contatti di uguale o
superiore almeno 3mm.
• Il produttore declina ogni responsabilità nel caso in cui le norme
antinfortunistiche non vengano rispettate.
• Qualsiasi intervento deve essere effettuato con l’apparecchio disinserito
elettricamente e staccato dall’alimentazione gas.
• Se il forno presenta danni visibili o problemi di funzionamento, non metterlo
in funzione, staccarlo dalla rete elettrica e gas e rivolgersi al servizio
assistenza clienti.
• E’ sconsigliato l’uso di adattatori, prese multiple e/o prolunghe. Se non è
possibile farne a meno, ricordarsi sempre di utilizzare soltanto prolunghe e
adattatori singoli o multipli che siano conformi alle norme vigenti in materia
di sicurezza e non superare mai la capacità massima indicata sulla prolunga
o sull’adattatore singolo e la potenza massima indicata sull’adattatore
multiplo.
• In caso di guasto di funzionamento o di una riparazione indispensabile,
richiedere l’intervento del servizio assistenza clienti.
• Non è permesso eseguire modifiche, manipolazioni o tentativi di riparazione,
in particolare con l’uso di utensili (cacciavite, ecc.).
• Le riparazioni non appropriate possono provocare gravi incidenti,
danneggiare l’apparecchio e l’ equipaggiamento, nonché provocare disturbi
nel funzionamento.
• Agli apparecchi riparati dai centri di assistenza devono essere eseguite le
prove di routine, in particolare la prova di continuità del circuito di terra.
• Quando il cavo di collegamento è stato danneggiato, deve essere sostituito
6 / ITMANUALE D’USO
dal servizio assistenza clienti per evitare situazioni di pericolo.
PRIMO UTILIZZO
• Attenzione: l’apparecchio deve essere scollegato dalla rete elettrica e gas o
staccando la spina, o spegnendo l’interruttore dell’impianto.
• Prima di usare il forno, pulire accuratamente l’interno, le griglie e la leccar-
da con sapone non abrasivo e acqua tiepida. Inserire la griglia e la leccarda
nelle rispettive corsie.
• Una volta completata l’operazione, collegare il forno alla rete elettrica e
gas poi portarlo alla temperatura massima per 30 minuti circa, al fine di
eliminare eventuali residui grassi, olio, resine di fabbricazione che possono
causare cattivi odori durante la cottura; arieggiare il locale.
• Compiuta questa semplice operazione, il forno è pronto ad effettuare la
prima cottura.
FUNZIONAMENTO/PULIZIA
• L’apparecchio è previsto per essere usato da adulti che conoscono le pre-
senti istruzioni per l’uso.
• I bambini spesso non sono in grado di riconoscere i rischi connessi all’uso
dell’apparecchio. Durante il funzionamento del prodotto fare attenzione e
tenerli a distanza.
• Assicurarsi che i bambini non giochino con l’apparecchio.
• I portatori di handicap devono essere assistiti da persone adulte idonee.
• Non usare l’apparecchio per riscaldare la stanza.
• Durante il funzionamento il prodotto diventa molto caldo. Fare attenzione a
non toccare gli elementi riscaldanti.
• Attendere un periodo di tempo sufficientemente lungo prima di intraprende-
re, per esempio, lavori di pulizia.
• Non toccare l’apparecchio con mani o piedi bagnati o umidi.
• Non tirare il cavo di alimentazione, o l’apparecchio stesso, per staccare la
spina dalla presa di corrente.
• I grassi e gli oli surriscaldati prendono facilmente fuoco. Fare attenzione.
Non cercare mai di spegnere con l’acqua olio o grasso che bruciano (peri-
colo di esplosione); soffocare le fiamme con dei panni bagnati.
• La griglia e i contenitori di cottura diventano caldissimi. Usare guanti di pro-
tezione o canovacci per pentole.
• ATTENZIONE: IN CASO DI SMONTAGGIO, MANUTENZIONE E PULIZIA
DELL’APPARECCHIO, SI RACCOMANDA L’UTILIZZO DI ADEGUATI
STRUMENTI DI PREVENZIONE E PROTEZIONE (GUANTI, ECC.).
• Non usare pulitori a vapore per la pulizia del forno.
• Evitare di effettuare pulizie sulle parti ancora calde dell’apparecchiatura.
7 / ITMANUALE D’USO
• Le parti smaltate, cromate ed in vetro vanno lavate con acqua tiepida.
• Le parti in acciaio e soprattutto le zone con i simboli serigrafati non devono
essere pulite con diluenti o detersivi abrasivi; utilizzare preferibilmente solo
un panno morbido inumidito con acqua tiepida e detersivo liquido per piatti.
• Per lo sporco difficile è consentito l’uso di alcool denaturato.
• L’acciaio inox può rimanere macchiato se rimane a contatto per lungo tem-
po con acqua fortemente calcarea o con detergenti aggressivi (contenenti
fosforo). Alla fine della pulizia, risciacquare abbondantemente e asciugare
accuratamente con un panno morbido.
• Evitare di lasciare sulle parti smaltate o verniciate dei liquidi acidi (aceto,
succo di limone, detergenti aggressivi, ecc.)
• Non utilizzare per la pulizia pagliette o lane di acciaio , acido muriatico o
altro che possa graffiare o smerigliare.
• Per la pulizia del vetro delle porte non usare materiali ruvidi abrasivi o ra-
schietti metallici affilati perché possono graffiare la superficie e causare la
frantumazione del vetro stesso.
DATI TECNICI - CARATTERISTICHE DEL FORNO
Dimensioni del forno:
larghezza mm 895 [F960] - 746 [F760]
profondità mm 548
altezza mm 595
Potenze Assorbimento Parte Elettrica:
Luce W 25
Motoriduttore: W 4
Motoventilatore Radiale: W 11
Motoventilatore Tangenziale di raffreddamento: W 11
Resistenza Cielo: 1050 W
Resistenza Grill: 2250 W
Doppio Grill (dove previsto): 3300 W
Resistenza Suola: 1300 W
Resistenza Circolare (dove prevista): 1150 W
Pot. Max. assorbita: Vedere targa apparecchio
Tensione e frequenza di alimentazione:
220-240 V~ / 50/60Hz
8 / ITMANUALE D’USO
INSTALLAZIONE
Importante!
Le istruzioni sono rivolte ad un installatore qualificato.
L’apparecchiatura deve essere installata correttamente, in conformità alle
norme in vigore. Qualsiasi intervento deve essere eseguito con l’apparecchio
elettricamente disinserito.
Per garantire un buon funzionamento dell’apparecchio da incasso è necessario
che il mobile sia di caratteristiche adatte:
• i pannelli adiacenti il forno devono essere di materiale resistente al calore;
• nel caso di mobili in legno impiallacciato, le colle devono essere resistenti
alla temperatura di 90°C;
Il forno deve essere alloggiato in una apertura standard come da figura sotto
riportata, sia sotto un piano di lavoro, sia in posizionamento a colonna.
Il fissaggio del forno al mobile avviene per mezzo di 4 viti “A”, poste negli
appositi fori della cornice.
Fare attenzione nell’inserimento del forno nel foro a non fare leva con la porta;
inoltre non sottoporre ad eccessive pressioni la porta quando è aperta.
ATTENZIONE: l’apparecchio non deve essere installato dietro una porta
decorativa per evitare surriscaldamenti.
9 / ITMANUALE D’USO
90
585-588
min
560
90
5
-86
860
855 24
min
560
595
90
580
585-588
5
-86 524 89
6
860
INCASSO F960
90
585-588
min
560
90
5
-71
710
705 24
min
560
595
90
580
585-588
5
-71 524
710 74
6
INCASSO F760
10 / ITMANUALE D’USO
COLLEGAMENTO ELETTRICO MONOFASE
I prodotti dotati di cavo di alimentazione tripolare sono predisposti per il
funzionamento con corrente alternata, con tensione e frequenza indicate nella
targhetta caratteristiche posta sull’apparecchio.
Montaggio del cavo di alimentazione
1. Aprire la morsettiera facendo leva con un
cacciavite sulle linguette laterali del coperchio,
tirare e aprire il coperchio(vedi figura).
2. Mettere in opera il cavo di alimentazione,
svitare la vite del serracavo e le tre viti dei
contatti L-N- e poi fissare i cavetti sotto le
teste delle viti rispettando i colori Blu(N),
Marrone (L), Giallo-Verde (vedi figura).
3. Fissare il cavo nell’apposito ferma cavo.
4. Chiudere il coperchio della morsettiera.
Allacciamento del cavo di alimentazione alla rete
Per il collegamento diretto alla rete, è necessario prevedere un dispositivo che
assicuri la disconnessione dalla rete, con una distanza di apertura dei contatti
che consenta la disconnessione completa nelle condizioni della categoria di
sovratensione III, conformemente alle regole di installazione.
Montare sul cavo una spina normalizzata per il carico indicato nella targhetta
caratteristiche.
Il cavo di alimentazione deve essere posizionato in modo tale che in nessun
punto superi di 50°C la temperatura ambiente.
L’installatore è responsabile del corretto collegamento elettrico e dell’osservanza
delle norme di sicurezza.
Prima di effettuare l’allacciamento accertarsi che:
• la presa abbia la messa a terra e sia a norma di legge;
• la presa sia in grado di sopportare il carico massimo di potenza del forno,
11 / ITMANUALE D’USO
indicato nella targhetta caratteristiche (vedi sotto)
• la tensione di alimentazione sia compresa nei valori nella targhetta
caratteristiche;
• la presa sia compatibile con la spina dell’apparecchio. In caso contrario
sostituire la presa o la spina; non usare prolunghe e multiple.
• Ad apparecchio installato, il cavo elettrico e la presa della corrente devono
essere facilmente raggiungibili.
• Il cavo non deve subire piegature o compressioni.
• Il cavo deve essere controllato periodicamente e sostituito solo da tecnici
autorizzati.
• L’azienda declina ogni responsabilità qualora queste norme non vengano
rispettate.
Sostituzione del cavo di alimentazione
Nel caso di sostituzione del cavo è necessario usare solo cavi del tipo:
- H05 RR-F, - H05 V2V2-F, - H05 VV-F,
adatti al carico e alla temperatura di esercizio.
Il cavo di terra giallo-verde deve essere più lungo rispetto agli altri due conduttori
di circa 2 cm.
Se il cavo di alimentazione è danneggiato, esso deve essere sostituito
dal produttore, dal suo servizio assistenza o da personale qualificato, per
evitare pericoli
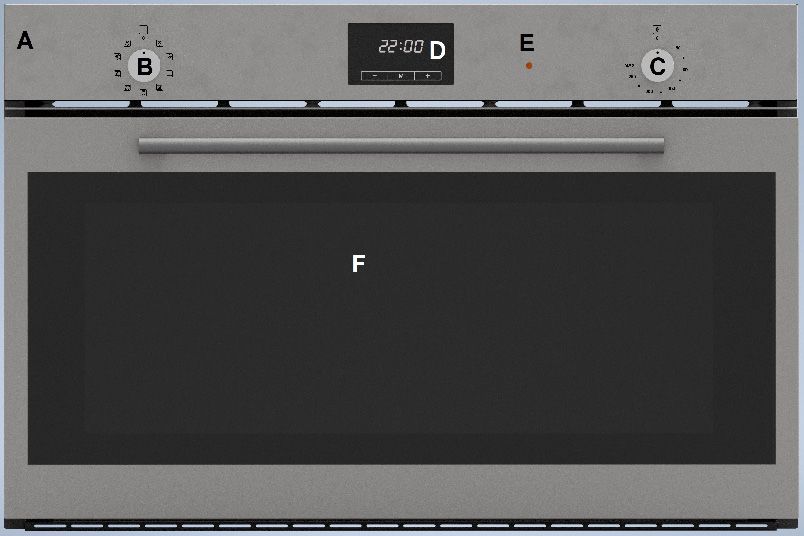
DESCRIZIONE DELL’APPARECCHIO
12 / ITMANUALE D’USO
A. Cruscotto comandi
B. Manopola di selezione funzioni di cottura
C. Manopola per la temperatura di cottura
D.Timer (digitale o analogico)
E. Spia di funzionamento del forno
F. Porta forno
Inserimento accessori nel forno
Posizionare gli accessori (griglia/leccarda) negli appositi supporti (livelli) previsti
13 / ITMANUALE D’USO FUNZIONI DEL SELETTORE LUCE FORNO COTTURA TRADIZIONALE Selezionare il simbolo tramite la manopola selettore. Selezionando questa funzione vengono inseriti gli elementi riscaldanti superiore ed inferiore che distribuiscono il calore dall’alto e dal basso sulle vivande. Questa cottura è adatta per cucinare qualsiasi tipo di alimento (carne, pesce, pane, pizza, dolci ecc.). COTTURA INFERIORE VENTILATA Selezionare il simbolo tramite la manopola selettore. Selezionando questa funzione viene inserito l’elemento riscaldante inferiore e la ventola che distribuisce il calore in maniera unifome COTTURA TRADIZIONALE FORZATA Selezionare il simbolo tramite la manopola selettore. Selezionando questa funzione vengono inseriti gli elementi riscaldanti superiore ed inferiore ed il calore irraggiato viene distribuito dal ventilatore. Questa cottura è particolarmente indicata per cuocere in modo rapido e simultaneo su diversi livelli. 14 / IT
MANUALE D’USO

COTTURA A CONVEZIONE FORZATA CON RESISTENZA POSTERIORE
Selezionare il simbolo tramite la manopola selettore.
Selezionando questa funzione viene inserito l’elemento riscaldante posteriore
ed il calore prodotto è fatto circolare dal ventilatore. Il calore pertanto raggiunge
rapidamente ed uniformemente il vano forno permettendo di cuocere
contemporaneamente diversi cibi sistemati su più livelli.

SCONGELAMENTO
La luce del forno e la spia verde si accendono come per tutte le altre funzioni
del forno.
Selezionare il simbolo ventola tramite la manopola selettore, non si ha la
propagazione di calore.
La porta del forno deve essere chiusa.
Questo tipo di funzione permette lo scongelamento delle vivande utilizzando
circa 1/3 del tempo normalmente impiegato.

GRILL
Selezionare il simbolo grill tramite la manopola selettore, tenere la porta del
forno chiusa.
Selezionando questa funzione viene inserito l’elemento riscaldante superiore
centrale che distribuisce direttamente il calore sulle vivande. Oltre a grigliare,
può essere utilizzata per dorare leggermente le vivande già cotte o tostare
pane. Se presente, verrà attivato anche il girarrosto.

DOPPIO GRILL
Selezionare il simbolo grill tramite la manopola selettore, tenere la porta del

                                                                              15 / IT
MANUALE D’USO
forno chiusa.
Selezionando questa funzione viene inserito l’elemento riscaldante doppio grill
che distribuisce direttamente il calore sulle vivande. La funzione può essere
usata per grigliare con più potenza rispetto al grill singolo. Se presente, verrà
attivato anche il girarrosto.
VENTOLA + DOPPIO GRILL
Selezionare il simbolo grill con ventola tramite la manopola selettore, tenere la
porta del forno chiusa.
L’azione della ventola, combinata all’azione della doppia resistenza grill
permette una cottura veloce e profonda per vivande particolari. Se presente,
verrà attivato anche il girarrosto.
Si consiglia di riscaldare il forno per qualche minuto prima di introdurre le
vivande.
Come si usa il grill
Collocare la vivanda da grigliare sull’apposita griglia o in una teglia dai bordi
molto bassi.
La griglia va posta nel gradino più alto possibile, mentre la leccarda per la
raccolta dei grassi, dovrà occupare il gradino sottostante. Per questo tipo di
cottura è possibile tenere la porta del forno chiusa.
In relazione al tipo di vivanda (es. carni, pesce, pollame, ecc…) è necessario
rivoltare le vivande per esporre i due lati ai raggi infrarossi.
La spia di funzionamento del forno (4)
1. Indica la fase di riscaldamento dello stesso, il suo spegnimento segnala
il raggiungimento all’interno del forno della temperatura impostata con la
manopola.
2. A questo punto l’alternativo accendersi e spegnersi di questa spia indica
che il termostato sta lavorando correttamente per mantenere costante la
temperatura del forno.
Come si usa il girarrosto
Nei forni è possibile utilizzare il girarrosto abbinato al funzionamento del forno
o del grill. Dopo aver preparato l’asta dello spiedo completa di carne, bloccarla
con le due forchette e procedere nel seguente modo:
• Posizionare il cibo nell’asta spiedo (1),
16 / ITMANUALE D’USO
• Fermarlo con le due forchette (2)
• Posizionare lo spiedo con il cibo nel girarrosto (3).
• Togliere l’impugnatura svitandola (4),
• Introdurre la leccarda nel gradino più basso,
• A cottura terminata avvitare l’impugnatura all’asta dello spiedo ed estrarlo
dal forno.
4
TIMER ELETTRONICO
IMPOSTARE L’ORARIO
Al primo collegamento del forno alla rete elettrica sul display lampeggeranno
“0.00”.
• Tenere premuto il tasto 1 per circa un secondo. Il simbolo di un punto inizierà a
lampeggiare. L’impostazione dell’ora avviene tramite i tasti 2 e 3. Entro 7 secondi
dall’impostazione dell’ora, il dispositivo uscirà dalla modalità impostazioni.
Se è necessario impostare nuovamente l’ora:
• Tenere premuti per circa un secondo i tasti 2 e 3. Il simbolo di un punto inizierà
a lampeggiare. Impostare l’ora tramite i tasti 2 e 3.
MODALITÀ MANUALE
Una volta impostato l’orario, è possibile cucinare in modalità manuale
senza agire in nessun modo sul timer.
17 / ITMANUALE D’USO IMPOSTAZIONE DEL TIMER La modalità “Impostazione del timer” può essere impostata separatamente dagli altri programmi. Il timer può essere impostato per un periodo compreso tra 1 minuto e 23 ore e 59 minuti. Tenere premuto il tasto 1 fino a quando il simbolo dell’allarme inizia a lampeggiare e il display mostra “0.00”. Il tempo richiesto deve essere regolato utilizzando i tasti 2 e 3. Fino alla fine di questo tempo il display mostrerà permanentemente il simbolo dell’allarme del timer. Al termine del tempo impostato, il timer inizia a suonare per 7 minuti e il simbolo dell’allarme del timer inizia a lampeggiare di nuovo. Dopo aver premuto i tasti 1, 2 o 3 il timer si spegnerà e il display mostrerà l’ora corrente. IMPOSTAZIONE DEL VOLUME DELL’ALLARME DEL TIMER Premere i tasti 2 e 3. Premere il tasto 1, il display mostrerà il livello di segnale corrente “TON.1”. Premendo il pulsante 2 è possibile selezionare i livelli 1, 2 e 3. CANCELLAZIONE DEL TEMPO Annullamento della funzione automatica: Premere i tasti 2 e 3. CANCELLAZIONE DELLE IMPOSTAZIONI DEL TIMER Premere il tasto 1 e selezionare la modalità “Impostazione timer” Premere i tasti 2 e 3. IMPOSTAZIONE DURATA COTTURA Per impostare la funzione DURATA COTTURA, tenere premuto il tasto 1 finchè sul display lampeggia “dur” e “0.00”, oltre al simbolo AUTO sulla sinistra. Impostare il tempo di durata della cottura con i tasti + e -, la durata può essere impostata tra 1 minuto e 10 ore. Entro 7 secondi dall’impostazione ritornerà visibile l’ora corrente, e resterà acceso il simbolo AUTO sulla sinistra. Allo scadere del tempo impostato la cottura si interromperà, e il timer suonerà per 7 minuti. Dopo aver premuto i tasti 1, 2 o 3 il timer si spegnerà e il display mostrerà l’ora corrente. IMPOSTAZIONE FINE COTTURA Per impostare la funzione FINE COTTURA, tenere premuto il tasto 1 finchè sul display lampeggia “end” e l’ora corrente, oltre al simbolo AUTO sulla sinistra. Impostare l’ora di fine cottura con i tasti + e -, la durata può essere impostata 18 / IT
MANUALE D’USO

tra 1 minuto e 10 ore.
Entro 7 secondi dall’impostazione ritornerà visibile l’ora corrente, e resterà
acceso il simbolo AUTO sulla sinistra. Al raggiungimento dell’ora impostata la
cottura si interromperà, e il timer suonerà per 7 minuti. Dopo aver premuto i tasti
1, 2 o 3 il timer si spegnerà e il display mostrerà l’ora corrente.

IMPOSTAZIONE PARTENZA RITARDATA
Per impostare la funzione PARTENZA RITARDATA, bisogna attivare entrambe
le funzioni DURATA e FINE COTTURA, come descritto sopra.
Ad esempio, se si vuole far partire la cottura alle ore 11.00 e farla finire alle
12.30, bisognerà impostare DURATA COTTURA a 1.30h e FINE COTTURA
alle 12.30.
In questo modo il forno partirà alle ore 11 e finirà la cottura alle 12.30.

BLOCCO TASTI
Quando il forno non viene utilizzato, è possibile attivare o disattivare il blocco
tasti premendo il tasto 3 e mantenendolo premuto per 3 secondi.
Se durante il funzionamento del programma di cottura viene attivato il blocco
tasti, in questo caso vengono bloccati solo i tasti del display. Se il blocco tasti
è attivato in modalità manuale, gli interruttori di modalità e le manopole della
temperatura vengono bloccati e il forno viene messo in modalità inattiva.

                                                                            19 / IT
MANUALE D’USO CONTAMINUTI ANALOGICO FINE COTTURA È possibile impostare il timer fino a 90 minuti ruotando la manopola in senso orario. Il timer fa partire il forno non appena impostato e lo spegne automaticamente quando il tempo è scaduto. Dopo aver infornato, impostare le funzioni di cottura e la temperatura utilizzando le manopole e ruotare il contatore meccanico dei minuti nella posizione desiderata. Quando il tempo è scaduto, viene emesso un segnale acustico e il forno si spegne. Il tempo di funzionamento del forno è impostato fino a 90 minuti con interruttore automatico. È possibile impostare il manuale se il tempo è superiore a 90 minuti. Per l’uso manuale, ruotare la manopola in senso antiorario. Per terminare la cottura in maniera manuale, riportare la manopola in posizione ‘0’ ruotando in senso orario. 20 / IT
MANUALE D’USO

SOSTITUZIONE DELLA LAMPADA DEL FORNO
La lampada ha la seguente caratteristica:
· tensione di alimentazione 220-240 V (50/60Hz)                      A         B
· potenza 25 W.
· Attacco tipo: E-14
· Temperatura massima di esercizio 300°C

Per la sostituzione della lampada procedere come segue:
ATTENZIONE: Assicurarsi che l’apparecchio sia spento e disconnesso
prima di sostituire la lampada per evitare la possibilità di scosse elettriche.
1. Controllare se il forno è a temperatura ambiente, in caso contrario aspettare
    che si raffreddi.
2. Togliere la copertura di protezione A svitandola in senso antiorario.
3. Togliere la lampada B svitandola in senso antiorario.
4. Dopo aver sostituito la lampada, rimontare la copertura di protezione A .
SOSTITUZIONE DELLA GUARNIZIONE DEL FORNO
La guarnizione posta attorno al vano camera cottura se presenta crepe deve
essere sostituita.
Per motivi di sicurezza la guarnizione deve essere cambiata da un tecnico di un
Centro Assistenza Autorizzato.

SMONTAGGIO/RIMONTAGGIO DELLE GRIGLIE LATERALI
Per togliere le guide laterali basta esercitare una
leggera pressione verso il basso sul particolare A
e B.
Per il rimontaggio, procedere a ritroso.

SMONTAGGIO DELLA PORTA DEL FORNO
E’ possibile togliere la porta del forno agendo sulle cerniere in questo modo:
• Le cerniere A sono dotate di due levette mobili B.
• Se la levetta B viene sollevata, la cerniera si libera dalla sua sede.
• Si può allora sollevare la porta verso l’alto ed estrarla facendola scivolare
    verso l’esterno; per effettuare questa operazione, afferrare la porta per i lati
    vicino alle cerniere.
• Per reinstallare la porta, prima inserire le cerniere nelle loro sedi.
• Prima di richiudere la porta, non dimenticare di riposizionare le due levette
    mobili B utilizzate per agganciare le cerniere.

                                                                             21 / IT
MANUALE D’USO ASSISTENZA TECNICA E RICAMBI Se le verifiche suggerite non sono utili alla risoluzione del problema, rivolgetevi al più vicino centro di Assistenza Tecnica autorizzato, indicando il tipo di difetto, il modello di apparecchiatura e il numero di fabbricazione che trovate stampati sulla targhetta di identificazione del forno. La targhetta è collocata sulla parte esterna del forno ed è visibile, aprendo la porta. I ricambi originali, certificati dal costruttore del prodotto, si trovano solo presso i nostri Centri di Assistenza Tecnica e Negozi di Ricambi Autorizzati. CONDIZIONI DI GARANZIA La Sua nuova apparecchiatura è coperta da garanzia. Conservi con cura, insieme questo libretto, la ricevuta o lo scontrino fiscale (solo se con il modello indicato), oppure ancora la bolla di accompagnamento, che servono a documentare l’acquisto della Sua apparecchiatura e la data in cui è avvenuto. In caso di intervento del Servizio di Assistenza, esibite questi documenti al personale incaricato. Senza il rispetto di questa procedura, il Servizio di Assistenza sarà costretto ad addebitare qualsiasi eventuale riparazione. 22 / IT
INSTRUCTION FOR USE

We thank you for choosing one of our products and we hope you get the best
performance from this appliance.

Before using the appliance, carefully read the warnings contained in this
instruction booklet, as they provide important information regarding the safety
of installation, use and maintenance. Keep this booklet carefully for any
subsequent consultation.

The manufacturer reserves the right to make changes to its devices that are
deemed necessary and useful, without prior notice.
This appliance complies with the following EC directives:

2006/95 / EC: Low voltage and subsequent amendments
2004/108/EEC:    Electromagnetic      compatibility  and   subsequent
amendments
This appliance is marked in accordance with the European Directive
2002/96 / EC, Waste Electrical and Electronic Equipment (WEEE) and the
EC Regulation No. 1275/2008 (Standby).

By ensuring this product is disposed of correctly, the user will help prevent
potential negative consequences for the environment and health.
The symbol on the product, or on the accompanying documentation, indicates
that this product must not be treated as household waste but must be delivered
to a suitable collection point for the recycling of electrical and electronic
equipment.
Dispose of it according to local waste disposal regulations.
For more information on the treatment, recovery and recycling of this product,
contact the appropriate local office, the household waste collection service or
the shop where the product was purchased.

This appliance can be used by children aged from 8 years and above and
persons with reduced physical, sensory or mental capabilities or lack of
experience and
knowledge if they have been given supervision or instruction concerning
use of the appliance in a safe way and understand the hazards involved.
Children shall not play with the appliance. Cleaning and user maintenance
shall not be made by children without supervision.

                                                                       25 / EN
INSTRUCTION FOR USE
GENERAL WARNINGS
THIS PRODUCT HAS BEEN DESIGNED FOR A DOMESTIC
USE.
• After removing the packaging, make sure the device is intact. In case of
doubt, contact professionally qualified personnel.
• The packaging elements (eg polystyrene, bags, etc.) can be dangerous for
children (danger of suffocation). Keep the packaging parts out of the reach
of children.
• This manual is an integral part of the appliance. It is recommended to keep
it for the entire life cycle of the appliance and to read it carefully to proceed
with the installation, use, maintenance, cleaning and treatment of the ap-
pliance.
• These instructions are valid only for the countries of destination whose
identification symbols appear on the plate located in the instruction booklet
and on the device.
• The lifting and handling of appliances weighing> 25kg or of dimensions that
do not allow easy grip must be done using suitable means or with the inter-
vention of two people in order to avoid risks or inconveniences.
• Do not leave the appliance exposed to atmospheric agents (rain, sun, etc.).
• When you decide not to use the appliance anymore, it is recommended to
render it inoperative by cutting the power cable.
• The accessories of the product that may come into contact with food are
made of materials that comply with the requirements of the EEC Directive
1935/2004.
• WARNING: Accessible parts may become hot during use. Young
children should be kept away.
• WARNING: The appliance and its accessible parts become hot during
use. Care should be taken to avoid touching heating elements.
• Children less than 8 years of age shall be kept away unless continuously
supervised
• WARNING: Make sure that the appliance is turned off and disconnected
before replacing the lamp to avoid the possibility of electric shock.
26 / ENINSTRUCTION FOR USE
MAINTENANCE AND REPAIR
THE MANUFACTURER DECLINES ALL LIABILITY IN THE EVENT OF
ANY DAMAGE TO THINGS OR PEOPLE RESULTING FROM IMPROPER
INSTALLATION, MAINTENANCE, IMPROPER, ERRONOUS, ABSURD USE.
Attention: the earth connection is required by law
• Installation and all gas / electrical connections must be carried out by
qualified personnel, in full compliance with the safety standards of the laws
in force, based on the instructions provided by the manufacturer.
• The identification plate, with the technical data, is visibly positioned on the
front of the oven and attached to this manual. The nameplate must never
be removed.
• CONNECTION: check that the specifications on the operating data
plate correspond to those of your power supply.
• The oven must be connected with a cable with a minimum section of
1.5 mm², providing an omnipolar switch compliant with the standards
in force, with a contact opening distance of at least 3mm or more.
• The manufacturer declines all responsibility in the event that the accident
prevention regulations are not respected.
• Any intervention must be carried out with the appliance electrically
disconnected and disconnected from the gas supply.
• If the oven shows visible damage or malfunctions, do not start it, disconnect
it from the electricity and gas mains and contact customer service.
• The use of adapters, multiple sockets and / or extensions is not
recommended. If you cannot do without it, always remember to use only
single or multiple extension cords and adapters that comply with current
safety regulations and never exceed the maximum capacity indicated on
the extension cord or single adapter and the maximum power indicated on
the multiple adapter.
• In the event of a malfunction or an essential repair, request the intervention
of customer service.
• It is not allowed to carry out modifications, manipulations or repair attempts,
in particular with the use of tools (screwdrivers, etc.).
• Inappropriate repairs can cause serious accidents, damage the appliance
and equipment, as well as cause malfunctions.
• Routine tests, in particular the continuity test of the earth circuit, must be
carried out on equipment repaired by service centers.
• When the connection cable has been damaged, it must be replaced by cu-
stomer service to avoid dangerous situations.
27 / ENINSTRUCTION FOR USE
FIRST USE
• Attention: the appliance must be disconnected from the mains or by
unplugging, or by turning off the system switch.
• Before using the oven, carefully clean the inside, the racks and the drip pan
with non-abrasive soap and warm water. Insert the grill and drip pan in their
respective lanes.
• Once the operation is complete, connect the oven to the electricity mains
then bring it to the maximum temperature for about 30 minutes, in order to
eliminate any residual grease, oil, manufacturing resins that can cause bad
smells during cooking; ventilate the room.
• Once this simple operation has been completed, the oven is ready to carry
out the first cooking.
OPERATION / CLEANING
• The device is intended for use by adults who are familiar with these
instructions for use.
• Children are often unable to recognize the risks associated with using the
appliance. When operating the product, be careful and keep them at a
distance.
• Make sure that children do not play with the appliance.
• The handicapped must be assisted by suitable adults.
• Do not use the appliance to heat the room.
• The product becomes very hot during operation. Be careful not to touch the
heating elements.
• Wait a sufficiently long period of time before starting, for example, cleaning
work.
• Do not touch the appliance with wet or damp hands or feet.
• Do not pull the power cord, or the appliance itself, to remove the plug from
the socket.
• Overheated fats and oils catch fire easily. Pay attention. Never try to
extinguish burning oil or fat with water (danger of explosion); smother the
flames with wet cloths.
• The grill and the cooking containers become very hot. Use protective gloves
or dish cloths.
• ATTENTION: IN CASE OF DISASSEMBLY, MAINTENANCE AND CLE-
ANING OF THE EQUIPMENT, WE RECOMMEND THE USE OF APPRO-
PRIATE PREVENTION AND PROTECTION INSTRUMENTS (GLOVES,
ETC.).
• Do not use steam cleaners to clean the oven.
• Avoid cleaning the still hot parts of the equipment.
28 / ENINSTRUCTION FOR USE
• The enamelled, chromed and glass parts must be washed with warm water.
• The steel parts and especially the areas with the silk-screened symbols
must not be cleaned with diluents or abrasive detergents; preferably use
only a soft cloth moistened with warm water and liquid dish detergent.
• For stubborn dirt, the use of denatured alcohol is allowed.
• Stainless steel can remain stained if it remains in contact for a long time
with highly calcareous water or with aggressive detergents (containing pho-
sphorus). At the end of cleaning, rinse thoroughly and dry thoroughly with
a soft cloth.
• Avoid leaving acidic liquids (vinegar, lemon juice, aggressive detergents,
etc.) on the enamelled or painted parts.
• Do not use steel wool or steel wool, muriatic acid or anything else that can
scratch or sand for cleaning.
• To clean the glass of the doors, do not use rough abrasive materials or
sharp metal scrapers because they can scratch the surface and cause the
glass to shatter.
TECHNICAL DATA - OVEN CHARACTERISTICS
Oven dimensions:
width mm 895 [F960] - 746 [F760]
depth 548 mm
height 595 mm
Power Absorption Electric Part:
Light W 25
Gearmotor: W 4
Radial fan: W 11
Tangential cooling motor fan: W 11
Sky resistance: 1050 W
Grill resistance: 2250 W
Double Grill (where provided): 3300 W
Sole resistance: 1300 W
Circular Resistance (where provided): 1150 W
Max. Absorbed power: See appliance plate
Power supply voltage and frequency:
220-240V ~ / 50 / 60Hz
29 / ENINSTRUCTION FOR USE INSTALLATION Important! The instructions are intended for a qualified installer. The equipment must be installed correctly, in compliance with the regulations in force. Any intervention must be performed with the appliance electrically di- sconnected. To ensure proper operation of the built-in appliance, the furniture must have suitable characteristics: the panels adjacent to the oven must be of heat-resistant material; in the case of furniture in veneered wood, the glues must be resistant to tem- peratures of 90 ° C; The oven must be housed in a standard opening as shown in the figure below, both under a worktop and in a column position. The oven is fixed to the cabinet by means of 4 screws “A”, placed in the appro- priate holes in the frame. Be careful when inserting the oven in the hole not to leverage the door; also do not subject the door to excessive pressure when it is open. WARNING: the appliance must not be installed behind a decorative door in order to avoid overheating. 30 / EN
INSTRUCTION FOR USE

                                      90

                                                      585-588
                                      min
                                                560
                                          90

                                                5
                                          -86
                                    860

                                     855                                   24

                 min
                        560

                                                                          595
                  90
                              580
585-588

                    5
                 -86                524                          89
                                                                      6
           860

          BUILT-IN SCHEME F960
                                      90
                                                      585-588

                                      min
                                                560
                                          90

                                               5
                                          -71
                                    710

                                    705                                    24

                 min
                        560
                                                                          595

                  90
                              580
585-588

                   5
              -71                   524
           710                                                  74
                                                                  6

          BUILT-IN SCHEME F760

                                                                                31 / EN
INSTRUCTION FOR USE
SINGLE-PHASE ELECTRICAL CONNECTION
Products equipped with a three-pole power cable are designed for operation
with alternating current, with the voltage and frequency indicated on the data
plate placed on the device.
Mounting the power cable
1. Open the terminal board by levering with
a screwdriver on the side tabs of the
cover, pull and open the cover (see figure).
2. Install the power supply cable, unscrew the
cable clamp screw and the three screws of
the LN- contacts and then fix the cables under
the screw heads respecting the colors Blue
(N), Brown (L), Yellow-Green (see figure ).
3. Secure the cable in the appropriate cable
clamp.
4. Close the terminal block cover.
Connecting the power cable to the mains
For direct connection to the grid, it is necessary to provide a device that ensures
disconnection from the grid, with a contact opening distance that allows complete
disconnection in the conditions of overvoltage category III, in accordance with
the installation rules.
Fit a standard plug on the cable for the load indicated on the data plate.
The power cord must be positioned in such a way that at no point does it exceed
the ambient temperature by 50 ° C.
The installer is responsible for the correct electrical connection and compliance
with safety regulations.
Before making the connection, make sure that:
• the socket is earthed and complies with the law;
• the socket is able to withstand the maximum power load of the oven,
indicated on the data plate (see below)
• the power supply voltage is included in the values on the data plate;
• the socket is compatible with the plug of the appliance. If not, replace the
32 / ENINSTRUCTION FOR USE
socket or plug; do not use extensions and multiple.
• Once the appliance has been installed, the electric cable and socket must
be easily accessible.
• The cable must not be bent or compressed.
• The cable must be checked periodically and replaced by authorized
technicians only.
The company declines all responsibility if these rules are not respected.
Power cord replacement
In case of replacement of the cable it is necessary to use only cables of the
type:
- H05 RR-F, - H05 V2V2-F, - H05 VV-F, suitable for the load and operating
temperature.
The yellow-green earth cable must be about 2 cm longer than the other two
conductors.
If the supply cord is damaged, it must be replaced by the manufacturer,
its service agent or similarly qualified persons in order to avoid a hazard.
OVEN DESCRIPTION
33 / ENINSTRUCTION FOR USE A. Control panel B. Cooking function selection knob C. Knob for cooking temperature D. Timer (digital or analogic) E. Oven operation indicator F. Oven door IInsertion of accessories in the oven Place the accessories (grill / dripping pan) in the appropriate supports (levels) provided 34 / EN
INSTRUCTION FOR USE

COOKING FUNCTIONS (according to the model selected)

OVEN LIGHT

STATIC COOKING
Select the symbol using the selector knob.
By selecting this function, the upper and lower heating elements are inserted
which distribute the heat from above and below onto the food. This cooking is
suitable for cooking any type of food (meat, fish, bread, pizza, sweets, etc.).

LOWER VENTILATED COOKING
Select the symbol using the selector knob.
By selecting this function, the lower heating element and the fan are inserted,
which distributes heat uniformly

TRADITIONAL VENTILATED COOKING
Select the symbol using the selector knob.
By selecting this function, the upper and lower heating elements are switched
on and the radiated heat is distributed by the fan.
This cooking is particularly suitable for cooking quickly and simultaneously on
different levels.

FORCED CONVECTION COOKING WITH REAR HEATING ELEMENT
Select the symbol using the selector knob.
By selecting this function the rear heating element is inserted and the heat
                                                                       35 / EN
INSTRUCTION FOR USE produced is circulated by the fan. The heat therefore reaches the oven compartment quickly and uniformly, allowing you to cook different foods arranged on several levels at the same time. DEFROST The oven light and green light come on as for all the other oven functions. Select the fan symbol using the selector knob, there is no heat propagation. The oven door must be closed. This type of function allows food to be defrosted using about 1/3 of the time normally used. GRILL Select the grill symbol using the selector knob, keep the oven door closed. By selecting this function, the upper central heating element is inserted which directly distributes the heat on the food. In addition to grilling, it can be used to lightly brown cooked food or toast bread. If present, the rotisserie will also be activated. DOUBLE GRILL Select the grill symbol using the selector knob, keep the oven door closed. By selecting this function, the double grill heating element is inserted which directly distributes the heat on the food. The function can be used to grill with more power than the single grill. If present, the rotisserie will also be activated. FAN + DOUBLE GRILL Select the grill with fan symbol using the selector knob, keep the oven door closed. The action of the fan, combined with the action of the double grill resistance 36 / EN
INSTRUCTION FOR USE

allows fast and deep cooking for special dishes. If present, the rotisserie will
also be activated.
It is advisable to heat the oven for a few minutes before putting in the food.

How to use the grill
Place the food to be grilled on the grill or in a pan with very low edges.
The grid must be placed on the highest possible step, while the drip pan for
the collection of fats must occupy the step below. For this type of cooking it is
possible to keep the oven door closed.
In relation to the type of food (eg meat, fish, poultry, etc…) it is necessary to turn
the food inside out to expose both sides to infrared rays.

The oven operating light (4)
1. Indicates the heating phase of the same, when it is turned off it signals that
   the temperature set with the knob is reached inside the oven.
2. At this point, the alternate turning on and off of this light indicates that the
   thermostat is working correctly to keep the oven temperature constant.

How to use the rotisserie
In the ovens it is possible to use the rotisserie combined with the operation of
the oven or grill. After having prepared the spit rod complete with meat, block it
with the two forks and proceed as follows:
• Place the food in the spit rod (1),
• Stop it with the two forks (2)
• Place the spit with the food in the rotisserie (3).
• Remove the handle by unscrewing it (4),
• Insert the dripping pan on the lowest step,
• When cooked, screw the handle onto the spit rod and remove it from the
     oven.

                                                                        4

                                                                             37 / EN
INSTRUCTION FOR USE ELECTRONIC TIMER SET THE TIME When the oven is connected to the mains for the first time, “0.00” will flash on the display. • Press and hold key 1 for about one second. A point symbol will start flashing. The time is set using keys 2 and 3. Within 7 seconds of setting the time, the device will exit the settings mode. If you need to set the time again: • Keep keys 2 and 3 pressed for about one second. The symbol of a point will start flashing. Set the time using keys 2 and 3. MANUAL MODE Once the time has been set, it is possible to cook in manual mode without acting on the timer in any way. SETTING THE TIMER The “Timer Setting” mode can be set separately from other programs. The timer can be set for a period from 1 minute to 23 hours and 59 minutes. Press and hold key 1 until the alarm symbol starts flashing and the display shows “0.00”. The required time must be adjusted using keys 2 and 3. Until the end of this time the display will permanently show the timer alarm symbol. At the end of the set time, the timer starts to sound for 7 minutes and the timer alarm symbol starts flashing again. After pressing keys 1, 2 or 3 the timer will turn off and the display will show the current time. SETTING THE TIMER ALARM VOLUME Press keys 2 and 3. Press key 1, the display will show the current signal level “TON.1”. By pressing button 2 it is possible to select levels 1, 2 and 3. 38 / EN
INSTRUCTION FOR USE

TIME CANCELLATION
Canceling the automatic function:
Press keys 2 and 3.
CLEARING THE TIMER SETTINGS
Press key 1 and select the “Timer setting” mode
Press keys 2 and 3.

KEY LOCK
When the oven is not in use, the key lock can be activated or deactivated by
pressing key 3 and holding it down for 3 seconds.
If the key lock is activated while the cooking program is running, only the display
keys are locked in this case. If the key lock is activated in manual mode, the
mode switches and temperature knobs are locked and the oven is placed in idle
mode.

COOKING DURATION SETTING
To set the COOKING DURATION function, keep key 1 pressed until “dur” and
“0.00” flash on the display, in addition to the AUTO symbol on the left.
Set the cooking duration time with the + and - buttons, the duration can be set
between 1 minute and 10 hours.
Within 7 seconds of setting the current time will be visible again, and the AUTO
symbol on the left will remain lit. At the end of the set time, cooking will stop, and
the timer will sound for 7 minutes. After pressing keys 1, 2 or 3 the timer will turn
off and the display will show the current time.

END OF COOKING SETTING
To set the END OF COOKING function, hold down key 1 until “end” and the
current time flash on the display, in addition to the AUTO symbol on the left.
Set the cooking end time with the + and - keys, the duration can be set between
1 minute and 10 hours.
Within 7 seconds of setting the current time will be visible again, and the AUTO
symbol on the left will remain lit. When the set time is reached, cooking will stop,
and the timer will sound for 7 minutes. After pressing keys 1, 2 or 3 the timer will
turn off and the display will show the current time.

DELAYED DEPARTURE SETTING
To set the DELAYED START function, both the DURATION and END OF
COOKING functions must be activated, as described above.
For example, if you want to start cooking at 11.00 and finish it at 12.30, you will
need to set COOKING DURATION at 1.30h and END OF COOKING at 12.30.
In this way the oven will start at 11 and finish cooking at 12.30.

                                                                             39 / EN
INSTRUCTION FOR USE END OF COOKING ANALOGIC TIMER You can set the timer up to 90 minutes by turning the knob clockwise. The timer starts the oven as soon as it is set and switches it off automatically when the time is up. After placing the oven in the oven, set the cooking functions and the temperature using the knobs and turn the mechanical minute counter to the desired position. When the time is up, an acoustic signal sounds and the oven switches off. The oven operating time is set up to 90 minutes with an automatic switch. You can set the manual if the time is more than 90 minutes. For manual use, turn the knob counterclockwise. To finish cooking manually, return the knob to the ‘0’ position by turning clockwise. REPLACING THE OVEN LAMP The lamp has the following feature: A B Power supply voltage 220-240 V (50 / 60Hz) Power 25 W. Attack type: E-14 · Maximum working temperature 300 ° C To replace the lamp proceed as follows: ATTENTION: Make sure that the appliance is turned off and disconnected before replacing the lamp to avoid the possibility of electric shock. 1. Check if the oven is at room temperature, if not, wait for it to cool down. 2. Remove the protective cover A by unscrewing it counterclockwise. 3. Remove the bulb B by unscrewing it anticlockwise. 4. After replacing the lamp, refit the protective cover A. 40 / EN
INSTRUCTION FOR USE

REPLACING THE OVEN GASKET
If the gasket placed around the cooking chamber shows cracks, it must be
replaced.
For safety reasons, the gasket must be changed by a technician from an
Authorized Service Center.

DISASSEMBLY / REASSEMBLY OF THE SIDE GRILLS
To remove the side guides just exert a slight
downward pressure on part A and B.
To reassemble, proceed in reverse order.

REMOVING THE OVEN DOOR
It is possible to remove the oven door by acting on the hinges as follows:
• Hinges A are equipped with two movable levers B.
• If the lever B is lifted, the hinge is released from its seat.
• You can then lift the door upwards and extract it by sliding it outwards; to do
      this, grasp the door by the sides near the hinges.
• To reinstall the door, first insert the hinges into their seats.
• Before closing the door, do not forget to reposition the two movable levers
      B used to hook the hinges.

                                                                         41 / EN
INSTRUCTION FOR USE TECHNICAL ASSISTANCE AND SPARE PARTS If the suggested checks are not useful for solving the problem, contact the nearest authorized Technical Assistance center, indicating the type of defect, the appliance model and the manufacturing number that you find printed on the oven identification plate. The plate is located on the outside of the oven and is visible when the door is opened. Original spare parts, certified by the manufacturer of the product, are found only in our Technical Assistance Centers and Authorized Spare Parts Shops. WARRANTY CONDITIONS Your new appliance is covered by warranty. Carefully keep, together with this booklet, the receipt or the receipt (only if with the model indicated), or the packing slip, which serve to document the purchase of your equipment and the date on which it took place. In case of intervention by the Assistance Service, show these documents to the staff in charge. Without respecting this procedure, the Assistance Service will be forced to charge for any repairs. 42 / EN
M A D E        I N     I T A L Y

MANUALE FORNI DA INCASSO
      FE960 - FE760

FE960 - FE760 BUILT-IN OVENS
          MANUAL

         ITALIAN DESIGN S.R.L.
          Via Antonio Bellucci, 14
        31010 - Farra di Soligo (TV)
                  ITALY

      www.lacottura.it / info@lacottura.it
Puoi anche leggere