ICONIK 03 - ISTRUZIONI INSTALLAZIONE, USO E MANUTENZIONE IT INSTRUCTIONS INSTALLATION, USE AND MAINTENANCE EN
←
→
Trascrizione del contenuto della pagina
Se il tuo browser non visualizza correttamente la pagina, ti preghiamo di leggere il contenuto della pagina quaggiù
ICONIK 03

                                      ISTRUZIONI IT
              INSTALLAZIONE, USO E MANUTENZIONE

                                     INSTRUCTIONS EN
               INSTALLATION, USE AND MAINTENANCE

Ed. 04/2021
Vi ringraziamo per aver scelto
                                                                                un nostro prodotto

                                                                           We thank You for choosing
                                                                                 one of our products

                                     Indice - Index

- Dati tecnici e ingombri........................................................... Pag. 4
- Techinical data and overall dimensions
- Prima dell’installazione ......................................................... Pag. 5
- Before installation
- Pre-installazione ....................................................................... Pag. 6
- Pre-installation
- Piletta con click clack e troppo pieno automatico ... Pag. 7
- Click clack waste with automatic overflow
- Sequenza di installazione .................................................... Pag. 8
- Installation sequence
- Utilizzo della vasca................................................................... Pag.10
- Use of the bathtub
- Funzionamento “troppopieno” ......................................... Pag.11
- “Overflow” functioning
- Pulizia vasca ................................................................................ Pag.12
- Bathtub cleaning
- Pulizia piletta click-clack ...................................................... Pag.13
- Click-clack drain cleaning
- KIT di riparazione ..................................................................... Pag.14
- Repair KIT
Dati tecnici e ingombri
ICONIK 03 Techinical data and overall dimensions
133
A-A
54
65
8
159
B
A A
72
Versione “unica” - “Single” version
B
Senza sistema Superficie antibatterica
57
Without system Antibacterial surface
B-B
54
NO ! OK !
Troppopieno Piletta anti debordo
Overflow Anti overflow drain
Dimensioni in “cm” (tolleranza ± 5mm) - Dimensions in “cm” (tolerance ± 5mm)
DATI TECNICI TECHNICAL DATA
• Tensione • Voltage ---
• Frequenza • Frequency ---
• Potenza totale assorbita • Total power absorbtion ---
• Corrente massima • Max current ---
• Allaccio acqua fredda e calda • Cold and hot waret fittings ---
• Scarico acqua • Water waste trop ø 40 mm
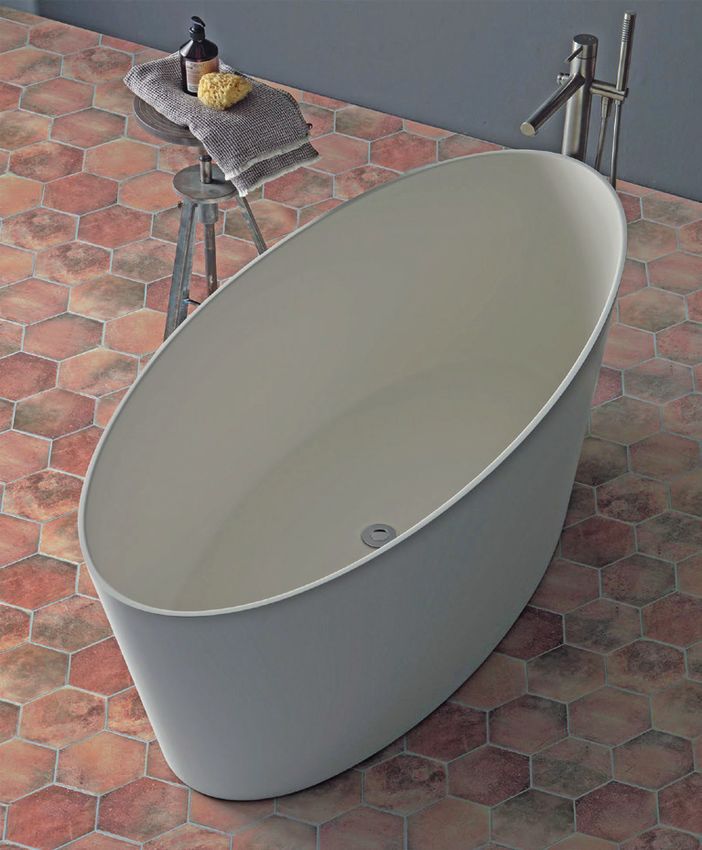
• Dimensioni vasca • Bathtub dimensions 159 x 72 x h65 cm
• Capacità acqua • Water volume 400 l
• Spessore minimo vasca • Minimum bathtub thickness 1,3 cm
• Altezza interna vasca (filo bordo) • Bathtub internal height (flush with the edge) 54 cm
• Peso a vuoto • Empty weight 84,5 kg
• Durevole nel tempo • Durable over time Si / Yes
• Temperatura acqua costante • Constant water temperature Si / Yes
• Piletta Iconik (di serie) • Iconik drain (standard) Si / Yes
• Sifone • Siphon Non fornita / Not supplied
• Rubinetteria • Tap Non fornita / Not supplied
• Ottima capacità di trattenere il calore, con una temperatura ambiente di 22° l’acqua in 60 minuti passa da 55° a 47°.
• Excellent ability to retain heat, with an ambient temperature of 22° the water goes from 55° to 47° in 60 minutes.
pag. 4/16Prima dell’installazione
Before installation ICONIK 03
IMPORTANTE
Prima di iniziare l’installazione leggere il presente
libretto istruzioni.
IMPORTANT
Read the following instruction manual before starting
installation.
- Dopo aver rimosso i componenti dagli imballi, verificare visivamente che gli stessi non
presentino difetti.
- Qualsiasi difetto deve essere segnalato al fornitore prima dell’assemblaggio delle varie parti
e dell’installazione.
- Qualsiasi reclamo relativo a imperfezioni del prodotto sarà accettato SOLO se segnalato
prima dell’assemblaggio delle varie parti e dell’installazione.
Verificare la presenza di tutti i componenti prima di iniziare il montaggio.
- After removing the components from packaging, visually check they do not show any defect.
- Any defect must be reported to the supplier before assembling the various parts and before
installation.
- Any complaint related to imperfections of the product will be accepted ONLY if reported before
assembling the various parts and before installation.
Check for the presence of all components before assembly.
Rimozione imballo
Packaging removal
Rimuovere dalla vasca le protezioni
in spugna e il cellofhan
Remove the sponge protections and
cellophane from the bathtub
Gli elementi dell’imballaggio non devono essere lasciati alla portata dei
bambini in quanto potenziali fonti di pericolo.
The packaging materials must not be left within reach of children as they
can be dangerous.
pag. 5/16Pre-installazione
ICONIK 03 Pre-installation
INSTALLAZIONE CONTRO ALLA PARETE X Area per installazione rubinetteria a parete
INSTALLATION AGAINST THE WALL Area for wall installation of taps
In centro Y Area per scarico a pavimento
In the center Area for floor drain
X
Z Area per installazione rubinetteria a piantana
Area for floorstanding installation of taps
V Scarico a pavimento da ø 40 mm
ø 40 mm floor drain
min
16
Min 5
78
75
42 ø4
Y
INSTALLAZIONE IN CENTRO AL LOCALE V
INSTALLATION IN THE MIDDLE OF THE ROOM
V
Y
Y
Z
75
20
42
Dimensioni in “cm” (tolleranza ± 5mm) - Dimensions in “cm” (tolerance ± 5mm)
IL COSTRUTTORE NON E’ RESPONSABILE PER I DANNI DOVUTI AD UNA ERRATA O NON CONFORME INSTALLAZIONE.
IN NO EVENT SHALL THE MANUFACTURER BE LIABLE FOR ANY DAMAGES WHATSOEVER THAT MAY ARISE FROM INAPPROPRIATE AND NON-COMPLIANT INSTALLATION PROCEDURES.
I dati e le caratteristiche indicate non impegnano IL COSTRUTTORE, che si riserva il diritto di apportare tutte le modifiche ritenute opportune senza obbligo di preavviso o sostituzione
Neither the information nor the characteristics reported are binding for THE MANUFACTURER. which reserves the right to make any improvements, as deemed necessary, without notice or with no liability to replacement.
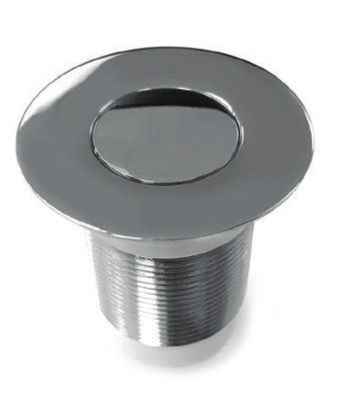
pag. 6/16Piletta con click clack e troppo pieno automatico
Click clack waste with automatic overflow ICONIK 03
Tasso di riempimento massimo 24l/min
Non rimuovere fino all’istallazione Maximum fill rate 24l/min
del sifone
Do not remove until fitting the
siphon
Chiave montaggio piletta
Drain assembly key
Chiave accesso tappo
Cap access key
Curva non fornita
Curve not provided
Min 61
Max 100
Ø7 Min 53
Max 98
6
7
8 Ø4
10
OK OK
Min 3°
NO
Max 30°
NO
NO
Dimensioni in “cm” (tolleranza ± 5mm) - Dimensions in “cm” (tolerance ± 5mm)
pag. 7/16Sequenza di installazione
ICONIK 03 Installation sequence
Sollevare la vasca e posizionare dei supporti
Lift the bathtub and place supports
MAX. 40°
Posizionare la vasca nel punto
di installazione Assicurarsi che la vasca non possa cadere
Place the bathtub in the Make sure the bathtub can not fall
installation point
Chiuso
Closed
Aperto
Open
Opzione 1
Option 1
Rimuovere
Remove
Opzione 2
Option 2
pag. 8/16Sequenza di installazione
Installation sequence ICONIK 03
Verificare i supporti
Check the supports
Assicurarsi che la vasca non possa cadere
Make sure the bathtub can not fall
Appoggiare la vasca a pavimento con attenzione ! Servirsi dei piedini regolabili per mette-
Carefully place the bathtub on the floor ! re in bolla la vasca.
Use the adjustable feet to level the
bathtub.
Installare la vasca verificando che sia perfettamen-
te a livello tanto nel senso della lunghezza che in
quello della larghezza!
Install the bathtub making sure it is perfectly level
Almeno 5mm
At least 5mm
both in the length and in the width!
Assicurarsi che il tubo flessibile non si pieghi in
modo anomalo
Make sure the flexible hose does not bend abnor-
mally
pag. 9/16Utilizzo della vasca
ICONIK 03 Use of the bathtub
Prima di ogni utilizzo lasciare scorrere l’acqua per
15 secondi prima di chiudere il tappo
Before every single use leave water flushing for 25
seconds before closing the valve
15s
Aperto
Open
Aperto
Open
Chiuso
Closed
Aperto
Open
La pietra dolomitica assorbe e trattiene il calore man- Terminato l’utilizzo della vasca, scaricare l’acqua apren-
tendo la temperatura dell’acqua per almeno 60 minuti. do la piletta clik-clack.
The dolomite stone absorbs and retains heat, maintaining After using the bathtub, drain the water by opening the
the water temperature for at least 60 minutes. clik-clack drain.
pag. 10/16Funzionamento “troppopieno”
“Overflow” functioning ICONIK 03
Piletta click-clack con sistema di sicurezza.
Si attiva quando il livello dell’acqua nella
vasca raggiunge il limite massimo, evitando la
fuoriuscita dell’acqua.
Click-clack drain with safety system.
It is activated when the water level in the batutub reaches
the maximum limit, preventing the water from escaping.
1. Quando l’acqua raggiunge il livello di apertura prestabili- 2. Fino alla completa apertura della piletta, il livello
to, si attiva il sistema di sicurezza aprendo gradualmente la dell’acqua continua ad aumentare fino ad arrivare al
piletta livello di sicurezza prestabilito.
When water reaches the preset level of opening, the safety Until complete opening of the drain, the water level con-
system activates gradually opening the drain tinues to increase until it reaches the preset safety level.
CHIUSO / CLOSED !
4. Dopo aver chiuso l’acqua, trascorsi alcuni minuti, l’acqua 3. Anche con il rubinetto aperto, l’acqua non deborda perchè la
raggiunge il livello minimo prestabilito e la piletta si piletta rimane aperta fino a quando non si chiude il rubinetto.
chiude.
After closing water, after a few minutes have passed, Even with tap open, water does not overflow since the drain
water reaches the preset minimum level and the drain remains open until the tap is closed.
closes.
pag. 11/16Pulizia vasca
ICONIK 03 Bathtub cleaning
• Dopo l’uso risciacquare con acqua corrente. I residui • After use, rinse with running water. Residues from personal
dei prodotti per la pulizia personale, sapone , shampoo, cleaning products, soap, shampoo, shower gel, etc. can cause
doccia schiuma, etc. possono causare danni; sciaquare damage; rinse thoroughly.
abbondantemente.
• Pulire la vasca utilizzando solamente spugne per piatti • Clean the tub using only dish sponges (soft side only), body
(solo dal lato morbido), spugne corpo, panni morbido o sponges, soft cloths or soft brushes. Do not use microfiber
spazzole morbida. Non utilizzare panni in microfibra. cloths.
• Per una pulizia regolare utilizzare un detergente universale • For regular cleaning, use an universal detergent with non-
con proprietà non abrasive, oppure acqua e sapone per abrasive properties, or water and non-abrasive dish soap.
stoviglie non abrasivo. Dopo ogni utilizzo la superficie After each use, the internal surface must be rinsed with water
interna deve essere risciacquata con acqua e asciugata con and dried with a soft cotton cloth.
un panno di cotone morbido.
Il calcare può essere trattato semplicemente Limescale can be treated simply with a solution
con una soluzione di acqua e aceto. of water and vinegar.
Evitare assolutamente l’utilizzo di tutti i pro- Absolutely avoid using all products that contain
dotti che contengono abrasivi! abrasives!
Rimozione delle macchie difficili
Difficult stains removal
Smalto o tinta per capelli fresca
Fresh nail polish or hair dye
Bagnare un panno di carta o del Al termine strofinare energicamente e sciac-
cotone con acetone quare abbondantemente con acqua
Wet a paper or cotton cloth At the end, rub vigorously and rinse thoroughly
with acetone with water
• Per le macchie più ostinate (macchie di grasso, olio, vernice • For stubborn stains (grease, oil, paint or ink stains), use
o inchiostro), utilizzare un detergente delicato abraviso. a mild abrasive cleaner. A little more scrubbing may be
Potrebbe essere necessario un pò più di strofinamento per required to effectively remove stains.
rimuovere efficacemente le macchie.
• Le macchie di tintura per capelli essiccate non possono • Dried hair dye stains cannot be totally removed with
essere rimosse totalmente con acetone o alcool. acetone or alcohol.
Effettuare una leggera levigatura con spugna abrasiva Lightly sand with a fine abrasive sponge or 3000-grit
fine o carta vetrata di grana 3000. Poi impregnare con olio sandpaper. Then soak with moisturizing baby oil.
idratante per bambini.
pag. 12/16Pulizia piletta click-clack
Click-clack drain cleaning ICONIK 03
Pulire con un sapone neutro, applicare con un panno umido, Clean with a mild soap, apply with a damp cloth, rub lightly and
strofinare leggermente e quindi scaquare con acqua. Infine then rinse with water. Finally polish with a soft and dry cloth.
lucidare con un panno morbido e asciutto. Per macchie di For limescale stains, clean with a solution of water (80%) and
calcare pulire con una soluzione di acqua (80%) e aceto white vinegar (20%), add sodium bicarbonate to the solution
bianco (20%), per un’azione igenizzante aggiungere alla for a sanitizing action. Always dry the surface to avoid stains
soluzione del bicarbonato di sodio. Asciugare sempre la su- resulting from water.
perficie in modo da evitare le macchia derivanti dall’acqua.
la resistenza alla corrosione al nichel-cromo si the corrosion resistance to nickel-chromium is re-
riduce sotto l’azione di acidi e composti aloge- duced under the action of acids and halogenated
nati (cloruri, bromuri, ioduri). Non utilizzare mai compounds (chlorides, bromides, iodides). Never
soluzioni a base di cloro (candeggina), detersivi use chlorine-based solutions (bleach), detergents
o spugne abrasive. Evitare la ruggine causata da or abrasive sponges. Avoid rust caused by exter-
materiali esterni (es. paglietta di acciaio). nal materials (e.g. steel wool).
pag. 13/16KIT di riparazione 1/3
ICONIK 03 Repair KIT 1/3
Contenuto del KIT
Content of the KIT
*
Gelcoat (20g) Pasta lucidante (20) Indurente (0,3g) Panno morbido (100x100mm)
Gelcoat (20g) Polishing paste (20) Hardener (0,3g) Soft cloth (100x100mm)
Spatola Blocchetto lucidante Carta smerigliata rossa Carta smerigliata grigia
Spatula Polishing block Red emery paper Grey emery paper
* Conservare questa confezione - la pasta potrà essere utilizzata nel futuro per correggere piccoli difetti sulle superfici sanitarie.
Keep the packaging - it can be used for polishing/removal of small scratches on cast marble surface.
Utensile affilato Guanti Sgrassante
Sharp tool Gloves Degreaser
Durante le operazioni di riparazione indossare sempre i guanti di gomma
The repair should be performed in rubber gloves
Prima dell’utilizzo del kit, leggere il volantino presente sotto le etichette delle confezioni.
For kit usage, read the note under the label on the packages.
Sequenza operazioni
Sequenza operazioni
1. Con l’utensile affilato 2. Pulire la parte danneggia- 3. Aprire la confezione di
pulire la parte danneg- ta con lo sgrassante (es. Gelcoat - per fare ciò
giata togliendo i residui acetone, alcool). togliere con cautela il film
di Gelcoat, polvere ed protettivo.
altri contaminanti.
1. Use the sharp tool to clean 2. Clean the damaged part 3. Open the Gelcoat package
the damaged part remov- with the degreaser (es. - remove the protective
ing Gelcoat residues, dust acetone, alcohol). film with caution.
and other contaminants.
pag. 14/16KIT di riparazione 2/3
Repair KIT 2/3 ICONIK 03
4. Aprire il contenitore con 5. Usando la spatola, 6. Riporre la massa ed
l’indurente. mescolare energicamente attendere altri 30
i componenti per 30 secondi.
secondi. Attenzione: la massa
diventa dura.
4. Open the container with 5. Using the spatula, 6. Leave the mass and wait
the hardener. energetically mix the another 30 seconds.
components for 30 Warning: the mass
seconds. hardens.
7. Con un’estremità della 8. Applicare una quantità 9. Riporre il prodotto
spatola applicare la adeguata della massa così preparato per
massa preparata sulla fino ad avere una l’asciugatura.
parte danneggiata. eccedenza di 1mm sopra Minimo 56 ore.
la superficie.
7. With one end of the 8. Apply an appropriate 9. Store the product prepared
spatula, apply the quantity of mass until you this way for drying.
prepared mass on the obtain an excess of 1mm Minimum: 56 hours.
damaged part. above the surface.
10. Al termine dell’applicazione, chiudere le confezioni
usate di Gelcoat e indurente.
Gettarle insieme agli attrezzi utilizzati.
La confezione con la pasta può essere conservata per
un futuro utilizzo.
10.At the end of application, close the used packages of
Gelcoat and hardener.
Put them together with the tools you used.
The package with the paste can be stored for future use.
pag. 15/16KIT di riparazione 3/3
ICONIK 03 Repair KIT 3/3
11. Mettere a bagno in 12. Fissare la carta al blocchetto.
acqua entrambi i pezzi di Con la parte rossa, smerigliare la zona riparata fino a togliere la parte
carta smerigliata. in eccesso della massa ed ottenere una superficie uniforme (a).
Se la riparazione è stata effettuata su una superficie arrotondata,
usare la carta senza il blocchetto (b).
11. Soak both pieces of emery 12.Fix paper to the block.
paper in water. With the red part, grind the repaired zone until the part in excess of the
mass is removed and an even surface is obtained (a).
If the repair has been performed on a rounded surface, use the paper
without the block (b).
13. Mettere la carta per smerigliare grigia sul blocchetto. 14. Togliere il film protettivo
Finire di smerigliare e rendere la parte trattata liscia (a). ed aprire la confezione di
Se la riparazione è stata effettuata su una superficie arrotondata, pasta lucidante.
usare la carta senza il blocchetto (b).
13.Put the grey emery paper on the block. 14.Remove the protective film
Finish grinding and make the treated part smooth (a). and open the package of
If the repair has been performed on a rounded surface, use the paper polishing paste.
without the block (b).
15. Mettere la pasta lucidante sul 16. Premere con il panno sulla parte
panno morbido. da lucidare e con movimenti
circolari lucidare la parte riparata.
15.Apply the polishing paste to the soft 16.Press the cloth on the part which
cloth. must be polished and polish the
repaired part with circular motions.
pag. 16/16Puoi anche leggere