FUSOLIERA - CANOPY - Flying Legend
←
→
Trascrizione del contenuto della pagina
Se il tuo browser non visualizza correttamente la pagina, ti preghiamo di leggere il contenuto della pagina quaggiù
FLYING LEGEND ITALIA

FUSELAGE-CANOPY
                       TUCANO REPLICA
                                  REV. 0
FUSOLIERA - CANOPY        N° PAGINE: 32
                              11/06/2018
FIREWALL                                                                                                                      TAIL

                                                                                                             The vertical measures have to be
                                                                                                             taken from the lips of the canopy
                                                                                                                           guide

                                                          Measure taken from the centre of the front hinge
                                                          to the centre of the rear hinge

Measure taken from the inclination change to the centre
of the hinge
Drill the holes from the hinge to the fuselage at ø3,2

    Ripassare i fori dalla cerniera
        alla fusoliera a Ø3,2.                                              Fare attenzione: la
Drill to the final size ø4 and rivet the lower half -hinge, if this is
painted, with rivet ø4x12,5
                                                                         cerniera posteriore è più
      Si consiglia di passare a                                          lunga di quella anteriore
      misura definitiva (Ø4) e                                           Pay attention: the rear hinge is longer than the front one

     rivettare la semi-cerniera
                                                                                      Longest part of the rear hinge
   inferiore, se questa risulta già
   verniciata, con rivetti Ø4x12,5
          Front hinge                                                               Back hinge

         Cerniera anteriore                                                         Cerniera posteriore
              (CA-HA)                                                                    (CA-HP)

             ORDINATA 3                                                  ORDINATA 5
              BULKHEAD 3
                                                                          BULKHEAD 5

                                                                                                                                      2
CODA        TAIL
                               CODA

SHAPE ADEQUATELY THE PLEXIGLASS BARS TO THE
EDGES AND IN THE INCLINATION CHANGE OF THE CANOPY
GUIDE

        SAGOMARE
  OPPORTUNAMENTE LE
 BACCHETTE IN PLEXIGLASS
   ALLE ESTREMITÀ E NEL
 CAMBIO DI INCLINAZIONE
   DELLA GUIDA CANOPY

                                                    3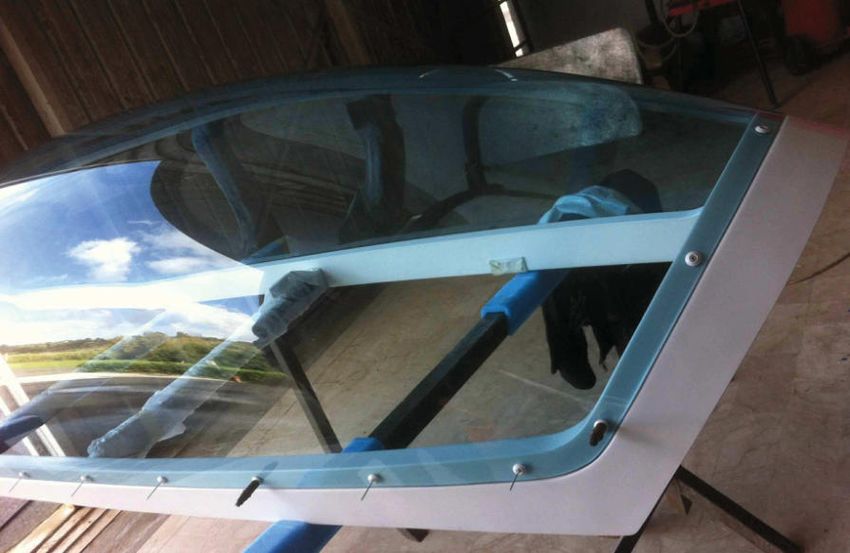
SEAL THE EMPTY SPACE            Sigillare i vuoti tra
                                                                                             BETWEEN BARS AND
CREATE A                                                                                                                  bacchette e telaio prima
                                                                                             FRAME BEFORE THE
LOCATION TO
                                                                                             FINAL PAINTING               della verniciatura finale
HIDE THE
RIVET HEAD

                                                                                                             Effettuare alcuni fori per lato
                                                                                                          facendo in modo che le bacchette
                                                                                                            tengano la sagoma (circa una
                                                                                                                 decina di fori per lato)
                                                                                                          Applicare spessori di 2mm, forare,
                                                                                                            svasare e rivettare con rivetti
                                                                                                                  Ø4x16 multigrip.
  DO SOME HOLES FOR EACH SIDE IN THIS WAY THE BARS WILL MAINTAIN THE SHAPE (AT LEAST 10 HOLES PER SIDE)
  APPLY THICKNESS OF 2MM, DRILL, CIUNTERSUNK AND RIVET WITH RIVETS ø4X16 MULTIGRIP                                                                    4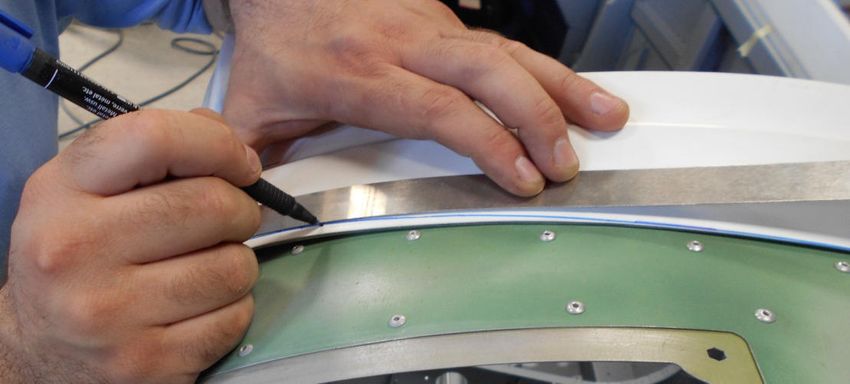
CODA   Tail                                   PARAFIAMMA
                                   Firewall

              Clear Canopy frame

                                                           5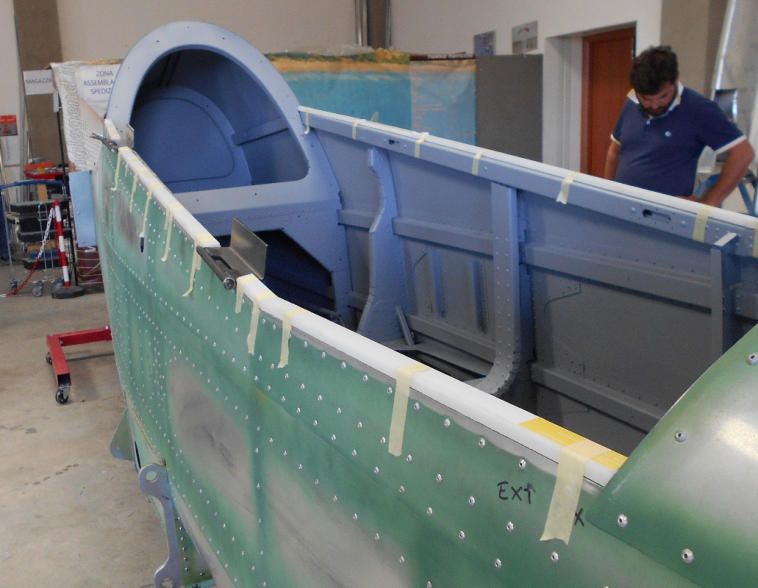
CODA   TAIL
                                                Firewall   PARAFIAMMA

              ALLINEARE I CENTRI DEL
              TELAIO CANOPY CON LE
              FILE DI RIVETTI PRESENTI
                  SULLA FUSOLIERA
              Align the centres of the canopy
              frame helping yourself with
              the rivet lines

                                                                        6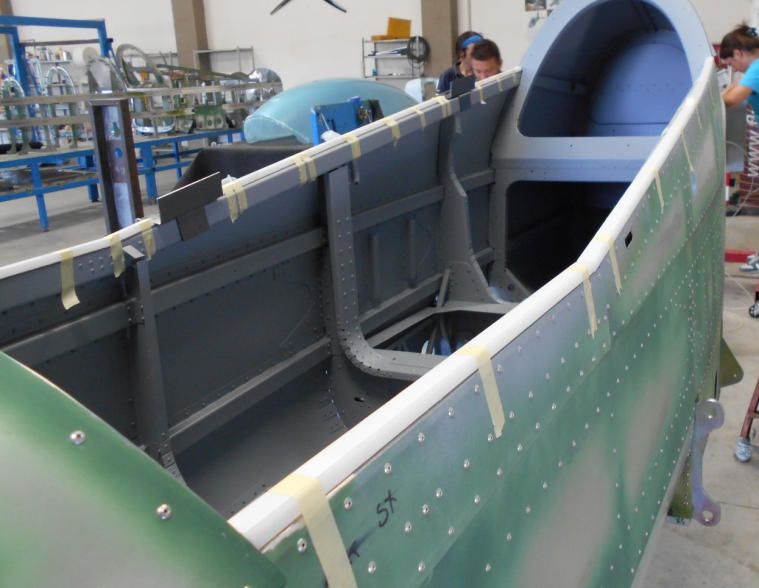
Left side cut line:
close to the rivet line
so that it overlaps                                                                     Right side cut line:
on the fuselage                                                                         close to the canopy
when the canopy is                                                                      guide to allow a correct
closed                                                                                  opening operation.
                                                                                        Take into consideration
                                                                                        also the hinges

      Traccia di taglio lato sinistro: rasente alla      Traccia di taglio lato destro: rasente alla
      fila di rivetti in modo da accavallarsi sulla     guida canopy per consentirne una corretta
          fusoliera quando il canopy è chiuso            apertura. Considerare anche le cerniere
      PARAFIAMMA                                                    Firewall           PARAFIAMMA
                          Firewall

                                     Left side        Right side

                                            LATO SX   LATO DX
                                                                                                            7
CODA    TAIL                                            FIREWALL              PARAFIAMMA

                                    LATO DESTRO: SCASSI PER CERNIERE
                                    RIGHT SIDE: NOTCHES FOR THE HINGES

PARAFIAMMA   FIREWALL                                                       FIREWALL          PARAFIAMMA

                        LEFT SIDE                                 RIGHT SIDE
                                         LATO SX       LATO DX
                                                                                                           8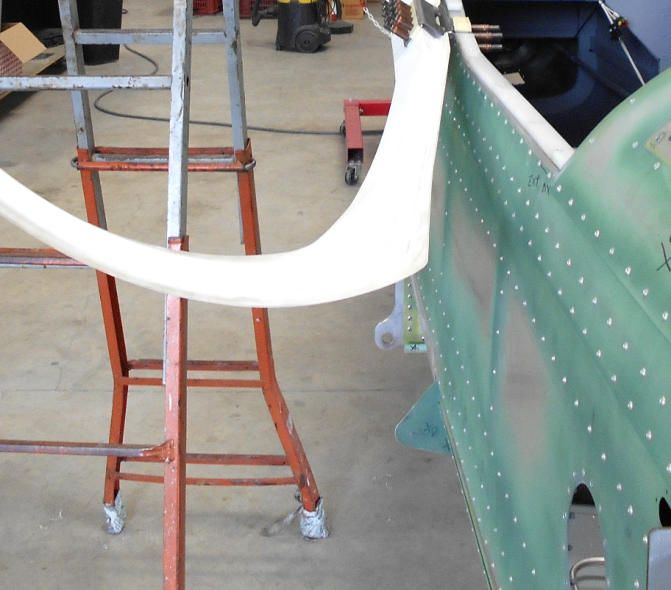
Applicare spessori verticali,
                  sagomarli, bloccarli sulla
              cerniera e forare il tutto a Ø3,2.
              Si consiglia di passare a misura
                  definitiva (Ø4) solo dopo
               l’applicazione del trasparente.

Apply vertical thicknesses, shape them, and stop
them on the hinge and drill everything at ø3,2.
Drill at the final size only once the clear is applied 9
Apply the horizontal thicknesses, shape them and drill
them at ø3,2.
Drill at the final size ø4 only once the clear is applied
Applicare spessori
orizzontali, sagomarli e
forare il tutto a Ø3,2.
Si consiglia di passare a
misura definitiva (Ø4) solo
dopo l’applicazione del
trasparente.
10PARAFIAMMA Tail CODA
Firewall
Before riveting the hinges, evaluate the painting status
Prima di rivettare le cerniere valutare la verniciatura
11Insert compensation vertical thickness to shape
Inserire spessore di compensazione
verticale da sagomare opportunamente
12PARAFIAMMA
Fireawall CODA
Tail
ATTENTION
ATTENZIONE
The sizes of the
LE compensation
MISURE RELATIVE
AGLI SPESSORI DI
thicknesses
Insert about 3mm ofDAthickness INSERIRE SPESSORE INCLINATO COMPENSAZIONE
INSERIRE SPESSORE 3mm (CIRCA) Insert inclined thickness here at the side are
3mm (CIRCA) - DIREZIONE PARAFIAMMA SPESSORE VERTICALE
Vertical Thickness RIPORTATE A FIANCO
about 3mm (firewall direction) just
SONOsuggestions.
DA RITENERSI An
2mm (CIRCA) - DIREZIONE CODA
about 2mm (tail direction PURAMENTE
assembly test INDICATIVE.
of the
SPESSORE VERTICALE
Vertical Thickness
UNA PROVA
canopy frameDIwill
MONTAGGIO DEL TELAIO
SPESSORE ORIZZONTALE
Horizontal thickness guide you
CANOPY how to
POTREBBE
shape the
PORTARE thickness
A SAGOMARE
SPESSOREthicknesses
Horizonthal ORIZZONTALE GLI SPESSORI
properly IN MODO
DIVERSO.
PRODUZIONE: STEP:
INSERIRE
Insert SPESSORE
inclined INCLINATO:
tickness QBK-RTF - CANOPY MONTAGGIO CERNIERE
DISEGNATO DA: PROGETTO: DATA: REV.:
5mm (CIRCA) - DIREZIONE PARAFIAMMA
about 5mm (firewall direction)
4mm (CIRCA) - DIREZIONE CODA INSERIRE SPESSORE
Insert thickness of DA 4.6mm
about 4.6(CIRCA)
mm D. CONIGLIONE TUCANO REPLICA
about 4 mm (tail direction)
SCALA:
N.D FLYING LEGEND ITALIA
MODIFICATO IL: OPERATORE C.DA CAUDARELLA
CERNIERA ANTERIORE Front hinge CERNIERA POSTERIORE Back hinge 95041 CALTAGIRONE (CT)
CONTROLLATO IL: OPERATORE
SITO WEB: www.flyinglegend.it
E-MAIL: info@flyinglegend.it
RIVETTI PREVISTI
Rivet to stop PER on
the hinges IL BLOCCAGGIO DELLE
the resin canopy: CERNIERE
Multigrip ø4x16.5SUL MODELLO: NOTE: DISEGNO
CANOPY IN RESINA: MULTIGRIP Ø4x16.5 (GRIP: 6.0mm - 13.0mm)
(GRIP: 6.00mm-13.0mm TR-_______ 13
This drawing is Flying Legend S.r.l property and cannot be used in any way without written authorizationFIREWALL
PARAFIAMMA
CODA
TAIL
14CODA PARAFIAMMA
FIREWALL
TAIL
MARK THE CANOPY SIDES AND CUT FIRST THE
SEGNARE
SHORT ONES ANDI CONTORNI SULONES,
THEN THE LONG CANOPY
SMOOTH
E TAGLIARETHE
PRIMA
EDGESI LATI CORTI E
POI I LATI LUNGHI.
ARROTONDARE
OPPORTUNAMENTE GLI SPIGOLI
15Drill the clear canopy
Forare
and trasparente
the frame at ø2,4
canopy e telaio
and cleco and makein
sure that adheres
resina a Ø2,4 e
between the two
clecareparts
garantendo
l’aderenza tra le
due parti
Drill the canopy strarting from the centre to
Forare il tettuccio partendo dal centro verso
lethe edges
estremità
16Rimuovere il trasparente canopy dal telaio in resina
REMOVE THE CANOPY FROM THE RESIN FRAME AND ENLARGE THE HOLES
OF IT AT ø3,2
ed allargare i fori di quest’ultimo a Ø3,2
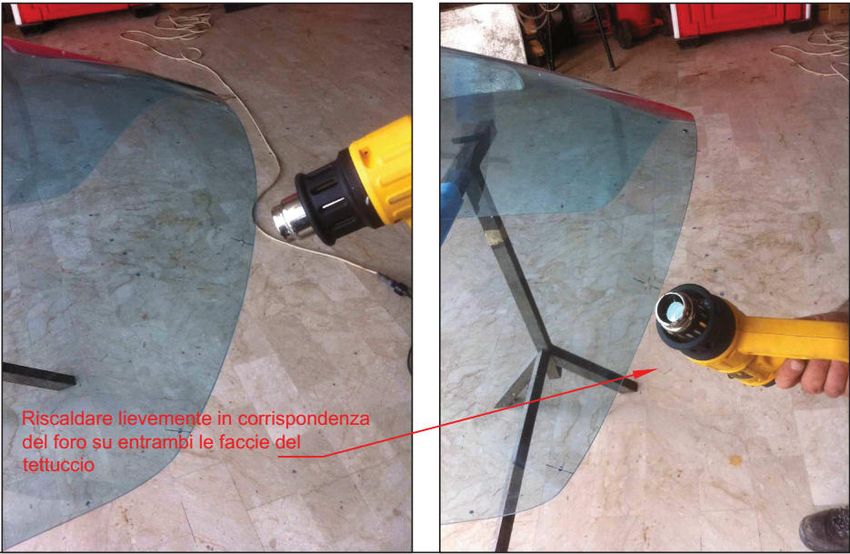
Dopo
ONCEaver riscaldato
HEATED, inAT
DRILL corrispondenza
ø6
dei fori, ripassare questi a Ø6
Riscaldare NEXT
HEAT SLIGHTLY lievemente
TO THEin HOLE
FROM BOTH
corrispondenza delSIDE
foro AND PAY
su entrambe le
ATTENTION NOT TO BURN THE
facciate del telaio facendo attenzione a
PLEXIGLASS
non bruciare il plexiglass
17Insert inside the hole the
Inserire all’interno del foro la
protection rubber which will avoid
Do the same
Ripetere for all the
la procedura perholes
tutti i fori Inserire
Insert the
gommina di protezione che eviterà
that the rivets ruins the plexiglass
che il rivetto tocchi il plexiglass
trasparente
canopy on its
canopy
resin frameil
sopra
telaiosure
being in resina
that
attenzionando
it adheresche
aderisca
perfectly and
perfettamente e
does not exit.
che non fuoriesca
Use rivet ø 3,2
dalla propria sede.
to rivet
Utilizzare rivetti
definitively
Ø3,2 per il
fissaggio definitivo
EVALUATE TO
External rubber with rivet
Gommina esterna con VALUTARE
location
sede per il rivetto PAINT THE
L’OPZIONE DI
FRAME BEFORE
VERNICIARETO
STARTING IL
TELAIO IN RESINA
RIVET THE
DEL CANOPY
CANOPY
PRIMA DI
PROCEDERE CON
Rubber protection
Gommina di protezione
LA RIVETTATURA
DEL TRASPARENTE
18Protect with some paper tape the parts which habe to be treated with the primer to limit the smears. The tape applied on the inner
Proteggere
side has to becon scotch
about 3 cmdifrom
cartathe
le edge
parti (che dovranno
apply essere
the canopy tinteggiate
on the frame andcon il primer
check allo
that the scopo
tape can di
belimitare le sbavature.
easily removed once itLo
is
scotch del lato interno dovrà essere
glue),applicato
while on thea circa
outer3cm
sidedal bordo
it has (adagiare
to be appaliedilontrasparente
the edge. sul telaio in resina e verificare
che lo scotch sia asportabile una volta avvenuto l’incollaggio), mentre dalla parte esterna sarà applicato a ridosso del bordo.
Smooth
Levigare
Smoothlathe superficie interna
inner side of the
del trasparente
canopy chebe
which will dovrà
glued
with theincollata
essere frame. Wecon suggest
il telaio to
PULIRE inuse briteSitape
resina. or sandpaper.
consiglia di usare
Clean the surface once the
scotch brite o carta abrasiva
Clean operation is finished
fine. Pulire la superficie al
termine dell’operazione
19EVALUATE THE POSSIBILITY TO PAINT THE FRAME OF THE CANOPY BEFORE
VALUTARE L’OPZIONEPROCEEDING
DI VERNICIARE IL TELAIO
TO GLUE IN RESINA DEL CANOPY
THE CANOPY
PRIMA DI PROCEDERE CON L’INCOLLAGGIO DELLA PARTE TRASPARENTE
Before gluing the canopy, protect with some
Prima di procedere all’incollaggio della
tape the parts which have to be treated with
parte trasparente, proteggere con scotch di
the primer to limit the smears. Apply the
carta
primer on le parti
the che dovranno
surface essere
to be glued and make
tinteggiate
sure you doconnotilleave
primer allouncovered
parts scopo di
limitare le sbavature. Passare il primer sulla
superficie da incollare assicurandosi di non
lasciare parti scoperte.
20Passare primer sul bordo interno del trasparente ed assicurarsi che questo sia tinto
in maniera uniforme in modo da non lasciare parti scoperte.
Prima di procedere all’incollaggio assicurarsi che il primer sia completamente asciutto.
Allo scopo, si consultino le specifiche indicazioni fornite dal produttore dello stesso
Apply the primer on the inner part of the canopy and make sure the paiting is uniform and not leave parts uncovered
Before starting the glue operation, make sure that the primer is perfectly dry. Check the indication of the product about it
21Passare
Apply una striscia
a glue di collante
line around sul telaio
the frame whereinyou
resina,
have
lungo tuttothe
applied il contorno coperto
primer. Make dalthat
sure primer, cercando
you are not
di garantireorlalacking
exceeding continuità
withdel
thecordone
quantitydiofadesivo.
the glue.
Assicurarsi che non vi siano assenze o eccessi di
Please check the indication
collante on the product used.
lungo il percorso.
Per le informazioni specifiche all’utilizzo del collante
si rimanda alle indicazioni fornite dal produttore
22ATTENTION: IN THIS STEP IT WOULD BE USEFUL IF THE OPERATION IS
ATTENZIONE: IN QUESTA FASE DELLA
PERFORMED LAVORAZIONE
BY FOUR PEOPLE SI CONSIGLIA DI
AVVALERSI DELL’AUSILIO DI QUATTRO PERSONE
Lean the canopy on the frame and enlarge
Appoggiare il trasparente canopy sul telaio
slightly the sides to ease the insertion.
in resina allargandolo lievemente dai lati per
agevolarne l’inserimento.
Make sure the elements are centered one
to the other.
Fare in modo che gli elementi siano
centrati l’uno rispetto all’altro.
Check the centrage between the
firewall sides and the tail 23Once the canopy is positioned, press between
A them
piazzamento avvenuto,
the canopy andpressare tra Use
the fame. loro canopy
clams e
telaio
only ifinnecessary,
resina. Utilizzare
and morsetti solo in not
pay attention casodo
di
necessità, facendo attenzione
damage a non danneggiare o
the canopy.
deformare il canopy
Spalmare il collante fuoriuscente, sia dal lato esterno
The empty space betwwen canopy and frame
che da quello interno, coprendo le intercapedini tra
and spread the in
telaio glue which
resina does exit cfrom the
e trasparente.
inner and outer side.
Togliere lo scotch di carta prima dell’asciugatura del
collante
Remove the tape before the glue dries
24FromDIinclination
DA CAMBIO changeAtoCENTRO
INCLINAZIONE the centre
PIASTRA Internal part
ESTERNO
External part
of the slab INTERNO
6m m
150mm
MISURA DA PRENDERE
Size to betaken DA BORDO
from the glass edge toVETRO
centre
PER CENTRARE LA MANIGLIA
the frame handle AL TELAIO DrillFORI
RIPASSARE the handle holes andE rivet
PLACCHETTA with AVEX
RIVETTARE CONø3.2x13.6
AVEX Ø3.2x13.6
FRONT REAR
Trim the LA
RIFILARE exceeding
PARTE part of the boltDEL
ECCEDENTE shaftGAMBO
once
DELLA VITE DOPO AVER boltedSERRATO IL TUTTO
Countersunk head rivet M4x10
VITE A TESTA SVASATA M4x10 ESTERNO
External part
Bolt M4x40
Inclination change
CAMBIO INCLINAZIONE
VITE M4x40
PRODUZIONE: STEP:
QBK-RTF - CANOPY MONTAGGIO MANIGLIE
TUBOhose
Spacer DISTANZIALE
(ø4 INT. DISEGNATO DA: PROGETTO: DATA: REV.:
Tk.1)(Ø4 INT.
to be cutSP.1)
to size D. CONIGLIONE TUCANO REPLICA 16/07/2018
DA TAGLIARE A MISURA SCALA:
N.D FLYING LEGEND ITALIA
MODIFICATO IL: OPERATORE C.DA CAUDARELLA
INTERNO
Internal part 27/07/2018
95041 CALTAGIRONE (CT)
CONTROLLATO IL: OPERATORE
DADO M4 AUTOBLOCCANTE + RONDELLA Ø4 SITO WEB: www.flyinglegend.it
E-MAIL: info@flyinglegend.it
MODELLO: NOTE: DISEGNO
Self locking nut M4 + washer ø 4
TR-_______ 25
This drawing is Flying Legend S.r.l property and cannot be used in any way without written authorizationINTERNO Internal part RIVETTARE
RivetLE PIASTRINE
the A Ø2.4
slab at ø2.4 INTERNO Internal part
LATO ESTERNO LATO Back side External part ESTERNO
ANTERIORE Front side POSTERIORE
External side
ESTERNO LATO External side ESTERNO
LATO Front side External
ANTERIORE side POSTERIORE
Back side
Threaded rod
M6 Threaded rod M6
INTERNO Stop all the knob with strong Loctite after everything was regulated INTERNO internal side
Internal side BLOCCARE TUTTI I POMELLI CON LOCTITE FORTE DOPO LA REGOLAZIONE
PAG 26Lasciare
Leave circa
about 2mm
2 mm
between the slab and
2mm trathe
la piastrina ed i
opening knobs 2mm
pomelli di apertura
Closing hook place
Closing hook
place
Si faccia
Pay attenzione
attention to the
alle differenze
difference of thtra i
two
due pomelli:
knobs quello
: the front one
anteriore
has ha flange
a thicker una
than the other
flangia one while
più spessa
Pomello posteriore Back knob thedell’altra
back knob has the
mentre Pomello anteriore Front knob
flanges
quello of equal
posteriore
thickness.
ha le flange di
spessore uguale
Rivet the slabs at ø 2,4
Rivettare le piastrine
a Ø2,4
27CODA Tail PARAFIAMMA
Firewall
The holes of the slabs have to be drilled
at ø 3.2 on the canopy frame
I fori delle piastre sono da ripassare a Ø3.2
(final (misura
sul telaio canopy size ø4)definitiva Ø4)
ATTENZIONE
ATTENTION
The bends of the closing slab have to be
Le pieghe delle piastre
attentioned di chiusura
every time
sono da determinare ogni volta
PRODUZIONE: STEP:
QBK-RTF - CANOPY MONTAGGIO CHIUSURE
DISEGNATO DA: PROGETTO: DATA: REV.:
D. CONIGLIONE TUCANO REPLICA 16/07/2018
SCALA:
N.D FLYING LEGEND ITALIA
MODIFICATO IL: OPERATORE C.DA CAUDARELLA
95041 CALTAGIRONE (CT)
REALIZZARE
At ALrivet
the third lower POSTOplaceDEL TERZO
of the RIVETTO
slab CA-GP , doINFERIORE DELLA
not apply the rivet, PIASTRA
but realizeCA-GP hole 27/07/2018
a treadUN
FORO
(with DA MASCHIARE
a thread equal to a A M6without
M6) FACENDO ATTENZIONE
passing the canopy.ACut
NON to ATTRAVERSARE IL CANOPY.
size the knob rod CA-MPP. Stop CONTROLLATO IL: OPERATORE
SITO WEB: www.flyinglegend.it
E-MAIL: info@flyinglegend.it
TAGLIARE A MISURA LA BARRA DEL POMELLO with strong CA-MPP.
Loctite. BLOCCARE CON LOCTITE FORTE
MODELLO: NOTE: DISEGNO
TR-_______ 28
This drawing is Flying Legend S.r.l property and cannot be used in any way without written authorizationCODA Tail Firewall PARAFIAMMA
ESTERNO
External part
INTERNO
Internal part
Bring the slab one close to the other one
PORTARE LE PIASTRE A CONTATTO L'UNA CON L'ALTRA
Drill the holes and rivet at ø3.2
FORI DA RIPASSARE E RIVETTARE A Ø3.2
10mm
10mm
PRODUZIONE: STEP:
FUSOLIERA - CANOPY MONTAGGIO PIASTRE AGGANCIO CAVO
DISEGNATO DA: PROGETTO: DATA: REV.:
D. CONIGLIONE TUCANO REPLICA 25/05/2018
SCALA:
N.D FLYING LEGEND ITALIA
MODIFICATO IL: OPERATORE C.DA CAUDARELLA
95041 CALTAGIRONE (CT)
CONTROLLATO IL: OPERATORE
SITO WEB: www.flyinglegend.it
E-MAIL: info@flyinglegend.it
MODELLO: NOTE: DISEGNO
TR-_______ 29
This drawing is Flying Legend S.r.l property and cannot be used in any way without written authorizationBolt M6x25+
ORD. 6 3Vite M6x25
washer ø6x25++
3 rondelle
self lockingØ6X25
+
nut M6
dado M6 autobloccante
To be sized
close to the
edge of the
circles
Moschettone
Cut a ø 3 SS cable to the opening size that you would
Tranciare
like to achieve.un cavotwo
Insert inox Ø3 aofmisura
portion a seconda
heat shrink gasket,
dell’apertura che si vuole abbia il canopy. Inserire
do two circles at the cable and crip with zip ties. Heat the
due porzioni di guainagaskettermorestringente, fare due
toocchielli
cover thealzip ties and the free
cavo e crimpare enduna
con of the cable.
coppia di
fascette per lato. Riscaldare la guaina
termorestringente in modo da coprire le fascette e
l’estremità libera del cavo.
Si suggerisce
Realize di realizzare
also a cable unThe
of 95 cm. cavo dato
size 95cm con misura
be taken from theda prendere
edge rasente
of the two al
centers.
bordo dei due occhielli.
Attaccare
Attach one un endcapo del
of the cavoonsul
cable rinforzo
the reinf. ofdell’attuatore flapand
the flap actuator e l’altro capo
the other sultomoschettone
one the carabiner
which
chewillsarà
be inserito
inserted in the squadrette
nelle L's close to the rear angle dell’angolo
in prossimità of the canopy posteriore del canopy.
Align thelastop
Allineare vitebolt with the lower
di fissaggio con il
rivetto inferiore della linguettaflap
rivet of the support slab of the di ItSiisconsiglia
suggested to pass
di far the cable
passare il cavowhich stops the canopy
di bloccaggio behind
del canopy the rear
dietro al sedile posteriore, tra
actuator and with the exiting hole seat, btween the two harness
supporto attuatore flap e con il le due bretelle della cintura di sicurezza.
which is just above
foro presente subito sopra 30Insert the spoonge
Insert the
gasket
Insert the
gasket
Insert the
spoonge
Attaccare delle
Attach some spugnette
spoonge whereadesive
the canopyladdove
leans oninthe
canopy
fame
(including the parts related to the hinge closing
in resina appoggia sul telaio (comprendere le parti
relative alle cerniere di chiusura)
Insert theguarnizioni
Inserire gaskets arounf the frontalle
attorno and rear
bend
curve anteriore e posteriore
31Misura: da
spigolo
interno
Measure: from the
internal edge
Measure: from the
POM
Realizzare POM
distanziale
chiusura canopy Realize with the POM
material a spacer for the
canopy closure 32CHECKLIST – FUSOLIERA – CANOPY TR - ____________
C:\Users\utente\Desktop\Tucano Replica produzione\CdP - Produzione attuale\CdP - FUSOLIERA – Canopy - REV0.PDF
For any doubt in the execution of these operations of this cycle production, please refer to the manual “General construction information”.
START PRODUCTION DATE ____/____/________ MODEL TR -
REFERENCE
PRODUCTION CYCLE: REV. 0 – 11/06/2018
DRAWING
DATE SIGNATURE
FUSELAGE - CANOPY REV. 0 – 11/06/2018
CONTROLLED ___/___/_______
DATE SIGNATURE
END PRODUCTION DATE ____/____/________ APPROVED ___/___/_______
WORKED
M STEP DESCRIPTION PAG OPERATOR
HOURS
Place the two lower half hinges on the canopy guide to take the reference points to do 4
holes in the internal part (Ø3,2). Cleco on the canpy guide and do other two holes on the
1 1, 2
lip guide following the centre line of this last one. Re drill to the final size all the holes of
the lower half-hinges paint and rivet.
Cut to size and palce the plexiglass rods on the canopy guide of the fuselage and shape the
2 edges. Jump over the part of the occupied by the hinges and stop on the fuselage with 2, 3, 4
some soft tape (paper tape).
3 Place thickness of 2mm under the plexiglass rods, drill, dimple the holes and rivet. 3, 4
Mark the centers of the front and rear bends and the grade change on the canopy resin
4 Da 5 a 8
frame. Place this last one on the fuselage and trim the edges to allow a perfect bond.
Drill the upper hinges and assembly these together with the ones already in the fuselage.
Place the resin frame on these and shape some thicknesses between it and the hinges.
5 Forare le cerniere superiori e assemblarle insieme a quelle già presenti in fusoliera. Re-drill 2, da 9 a 13
the holes on the thicknesses and canopy frame and check the correct opening of the resin
frame.
Mark the positions of the centers of the rear and front bends and the grade change on the
6 clear canopy, place it on the resin frame and adhere it correctly. Make sure that the 5, 14
reference points previously taken coincide with these already on the resin frame.
Pagina 1 di 3CHECKLIST – FUSOLIERA – CANOPY TR - ____________
C:\Users\utente\Desktop\Tucano Replica produzione\CdP - Produzione attuale\CdP - FUSOLIERA – Canopy - REV0.PDF
For any doubt in the execution of these operations of this cycle production, please refer to the manual “General construction information”.
WORKED
M STEP DESCRIPTION PAG OPERATOR
HOURS
Trim the clear canopy taking as reference its location where it should stay and clean any
7 burrs from the cutted edges. 5, 14, 15
.
Call the supervisor to evaluate if it was glued/rivet properly. Mark one og the following
option:
8 -
Riveted canopy
Glued canopy
Riveting:
from 16 to
18.
9 Rivet/glue the clear canopy
Glue option:
from 19 to
24
10 Assembly front handle on the resin frame 25
11 Rivet the slabs (CA-PI) e (CA-PE) and place the closing knobs front and rear. 26, 27
Once the frame is closed, place the closing slabs (CA-GP) and (CA-GA)and check the
12 correct system hook with the knobs. Adjust the threaded bar of the knobs and re-drill the 27, 28
holes of these slabs on the resin frame.
Insert the knob(CA-MPP) on the back slab (CA-GP) and, after having rechecked again the
13 28
opening system, rivet the closing slabs (CA-GP) and (CA-GA)
Install on the canopy and on the fuselage the cable which avoid the overturning and the L
14 29, 30
shape slabs.
15 Install the sponge and the seal and the POM of closing (NOTE 1) 31, 32
NOTE 1 – Evaluate to insert the rear seal, as it might be necessary.
Pagina 2 di 3CHECKLIST – FUSOLIERA – CANOPY TR - ____________
C:\Users\utente\Desktop\Tucano Replica produzione\CdP - Produzione attuale\CdP - FUSOLIERA – Canopy - REV0.PDF
For any doubt in the execution of these operations of this cycle production, please refer to the manual “General construction information”.
Pagina 3 di 3Puoi anche leggere