WINDOWS CORE INSTALLATION MANUAL - STRAUMANN CARES PC
←
→
Trascrizione del contenuto della pagina
Se il tuo browser non visualizza correttamente la pagina, ti preghiamo di leggere il contenuto della pagina quaggiù
Windows Core installation manual
    Straumann® CARES® PC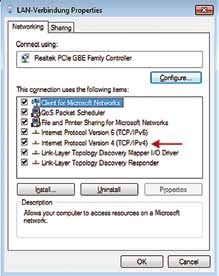
Contents

Deutsch     1

English    13

Français   25

Italiano   37

Español    48

Inhalt

1.    Einführung                                                                       2
1.1		 Vorwort		                                                                        2
1.2		 Über dieses Installationshandbuch                                                2

2.   Übertragen der Kundendatenbank                                                    3
2.1		Erste Schritte vor dem Hardwareaustausch                                          3
     2.1.1 Übertragen der Kundendaten                                                  3
     2.1.2	Download der Datenbank vom aktuellen PC                                     4
     2.1.3	Upload der Datenbank auf den neuen PC                                      6

3.    Hardwareaustausch und Installation                                               7
3.1		Einrichten der Hardware                                                           7
3.2		Installationsschritte                                                             7

4.    Internetverbindung                                                               8
4.1		Einrichten der Internetverbindung                                                 8
      4.1.1 Konfigurieren der Internetverbindung                                       8
     4.1.2	Konfigurieren einer Internetverbindung
               mit einer dynamischen IP-Adresse (DHCP)                        8
      4.1.3	Konfigurieren einer Internetverbindung mit einer statischen IP-Adresse    9

5.   Allgemeine Bedienungshinweise                                                    11
5.1		Starten des Straumann® CARES® Systems                                            11
5.2		my.Straumann® CARES® Desktop                                                     11

6.     Haftungsausschluss                                                             12
1. Einführung
1.1 Vorwort
Vielen Dank für Ihr Interesse und herzlich willkommen bei Straumann. Diese
Installationsanweisungen zeigen Ihnen, wie Sie den Straumann® CARES® PC
installieren. Bitte lesen Sie diese Anweisungen sorgfältig durch und machen
Sie sich mit ihnen vertraut, um den PC sicher und effektiv nutzen zu können.
Bewahren Sie diese Installationsanweisungen an einem sicheren Ort auf, falls
Sie sie in Zukunft noch einmal benötigen.
Dieses Gerät wurde mit grösster Sorgfalt hergestellt und verpackt. Sollten Sie
dennoch Probleme damit haben, kontaktieren Sie bitte Ihren örtlichen Straumann-
Vertriebsmitarbeiter.
Die Informationen in diesem Handbuch entsprechen dem neuesten Stand der
Technik. Dennoch ist zu beachten, dass die technischen Daten des PC ohne
vorherige Ankündigung geändert werden können.
Die Geschäftsbeziehung zwischen Straumann und dem Anwender unterliegt
ausschliesslich den Allgemeinen Geschäftsbedingungen von Straumann.
Straumann® Produkte müssen entsprechend ihrer beiliegenden Gebrauchs-
anweisung verwendet werden. Falls Sie zusätzliche Informationen über den
sachgemässen Gebrauch von Straumann® Produkten wünschen, wenden Sie
sich bitte an Ihren örtlichen Straumann-Händler.
1.2 Über dieses Installationshandbuch
Dieses Installationshandbuch soll Ihnen als Anleitung dazu dienen, wie Sie
Ihren aktuellen Straumann® CARES® PC mit installierter Straumann® CARES®
6.2 Software (Linux-Betriebssystem) durch den neuen Straumann® CARES® PC
(Windows-Betriebssystem) ersetzen.
22. Übertragen der Kundendatenbank
2.1 Erste Schritte vor dem Hardwareaustausch
Bevor Sie die Hardware austauschen, stellen Sie bitte sicher, dass Sie Ihre
Kundendatenbank übertragen haben, indem Sie die in diesem Kapitel beschrie-
benen Schritte durchführen.
2.1.1 Übertragen der Kundendaten
Sie können die Kundendatenbank vom Straumann® CARES® Visual 6.X System
(Linux-Betriebssystem) auf das neue Straumann® CARES® Visual 6.2 System
(Windows-Betriebssystem) übertragen.
Beachten Sie bitte, dass die Datenbank nicht automatisch auf die neue
Straumann® CARES® Visual 7.0 Software übertragen werden kann, da diese
eine andere Architektur aufweist. Die Struktur der Datenbank muss für die neue
Straumann® CARES® Visual 7.0 Software manuell wiederhergestellt werden.
Vorsicht
Das Format des USB-Sticks muss FAT32 sein. Andernfalls wird der USB-Stick
vom LINUX-PC möglicherweise nicht erkannt.
32.1.2 Download der Datenbank vom aktuellen PC
Laden Sie die Datenbank vom aktuellen PC mit der
Straumann® CARES® Visual 6.X Software (Linux-Betriebs-
system) wie nachfolgend beschrieben herunter.
1. Stecken Sie den USB-Stick ein.
2. Öffnen Sie den file manager (Dateimanager).
3. Gehen Sie auf settings (Einstellungen).
Unter den Kapiteln etscan/CARES/settings (etscan/CARES/
Einstellungen) auf der rechten Seite wird die Datenbank
kunden.db angezeigt.
4. Kopieren Sie die Datenbankdatei kunden.db.
45. Öffnen Sie den USB-Stick.
6. Fügen Sie die Datenbank kunden.db ein.
Vorsicht
Sie müssen erst den file manager (Dateimanager) schlies-
sen, bevor Sie den USB-Stick entfernen. Anderenfalls wer-
den die Dateien möglicherweise nicht auf den USB-Stick
übertragen.
52.1.3 Upload der Datenbank auf den neuen PC
Laden Sie die Datenbank auf den neuen PC mit der
Straumann® CARES® Visual 6.2 Software (Windows-
Betriebssystem). Bevor Sie diesen Schritt durchführen
können, müssen Sie zunächst die Schritte Hardwareaus-
tausch und Installation (siehe Abschnitt 3) und Internet-
verbindung (siehe Abschnitt 4) abgeschlossen haben.
1. Stecken Sie den USB-Stick ein.
2. Gehen Sie auf den USB-Stick und markieren Sie die
Datenbank kunden.db.
3. Kopieren Sie die Datenbankdatei kunden.db.
4. Gehen Sie auf settings (Einstellungen).
C:/Users/cares/Straumann/CARESvisual6/Settings
C:/Benutzer/cares/Straumann/CARESvisual6/Einstellungen)
5. Wählen Sie kunden.db im Windows-System aus.
6. Rechtsklicken Sie auf die Datei und wählen Sie
Rename (Umbenennen), um die Datenbank neu zu
benennen.
7. Benennen Sie die Datenbank kunden.db in kunden.
db-old um.
8. Fügen Sie die Datenbankdatei kunden.db vom USB-
Stick ein.
9. Entfernen Sie den USB-Stick und schliessen Sie das
Programm.
10. Öffnen Sie die neue Straumann® CARES® Visual 6.2
Software und überprüfen Sie alle Funktionen;
prüfen Sie auch, ob die Kundendatenbank korrekt
und vollständig übertragen wurde.
63. Hardwareaustausch und Installation
3.1 Einrichten der Hardware
Wir möchten Sie darauf hinweisen, dass für das Upgrade
auf den neuen Computer die bereits vorhandenen Kabel
verwendet werden sollten. Befolgen Sie die nachfolgenden
Schritte, um den Computer, Monitor, den Straumann®
CARES ® Scan CS2 Scanner, die Tastatur und Maus ein-
zurichten.
Vorsicht
Vergewissern Sie sich bitte, dass das gesamte System
heruntergefahren und der Hauptstromschalter am PC aus-
geschaltet ist, bevor Sie die Kabel von Ihrem Computer
abziehen. Ziehen Sie anschliessend zuerst das Netzkabel
aus der Wandsteckdose.
3.2 Installationsschritte
Ziehen Sie das alte Netzkabel, das Internet-Verbindungs-
kabel und das DVI-Kabel vom aktuellen Computer ab und 5
verbinden Sie sie mit dem aufgerüsteten Computer (wie
nachfolgend beschrieben).
1 2
1. Schliessen Sie die Tastatur (vorzugsweise via PS/2
Adapter) am vorgesehenen Anschluss an der Rückseite
des Computers an. 3
2. Schliessen Sie die Maus (vorzugsweise via PS/2
Adapter) am vorgesehenen Anschluss an der Rückseite
des Computers an.
4
3. Schliessen Sie den Scanner am vorgesehenen
Anschluss an der Rückseite des Computers an (USB).
4. Schliessen Sie das Bildschirmkabel (vorzugsweise
das mitgelieferte DVI-Kabel) am vorgesehenen An-
schluss an der Rückseite des Computers an.
5. Schliessen Sie den Computer mit dem beiliegenden
Hauptnetzkabel an eine Stromversorgung an.
74. Internetverbindung
4.1 Einrichten der Internetverbindung
Sofern Sie vor der Auslieferung keine spezielle System
konfiguration bestellt haben, erfolgt in der Standardein
stellung das Routing via DHCP.
4.1.1 Konfigurieren der Internetverbindung
Um eine Internetverbindung herzustellen, ist es erforderlich,
die Netzwerkkarte an der Rückseite des Computers über
das Netzwerkkabel mit einem Router zu verbinden. Für
Informationen über die Konfiguration und das Einrichten
weiterer Verbindungen für Ihren Router, lesen Sie bitte die
dazugehörige Bedienungsanleitung oder wenden Sie sich
an Ihren Servicetechniker.
4.1.2 Konfigurieren einer Internetverbindung
mit einer dynamischen IP-Adresse (DHCP)
1. Melden Sie sich beim Windows-Betriebssystem an.
2. Klicken Sie auf die Schaltfläche Start (Starten).
3. Geben Sie in das Suchfeld Network connections
(Netzwerkverbindungen) ein und klicken Sie dann auf
Show network connections (Netzwerkverbindungen
anzeigen).
4. Klicken Sie mit der rechten Maustaste auf Local
Area Connection (Lokale Netzwerkverbindung) und
wählen Sie dann Properties (Eigenschaften).
5. Aktivieren Sie mit der linken Maustaste Internet
Protocol (TCP/IPv4) (Internet-Protokoll [TCP/IPv4]) und
klicken Sie dann auf Properties (Eigenschaften).
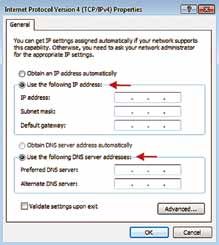
86. Wählen Sie Obtain an IP address automatically
(IP-Adresse automatisch beziehen) und Obtain DNS
server address automatically (DNS-Server-Adresse
automatisch beziehen).
7. Klicken Sie anschliessend auf OK.
8. Starten Sie den Internet Explorer, um die Verbindung
zu testen. Wenn die Homepage angezeigt wird,
ist Ihr Computer mit dem Internet verbunden.
4.1.3 Konfigurieren einer Internetverbindung mit
einer statischen IP-Adresse
1. Melden Sie sich beim Windows-Betriebssystem an.
2. Klicken Sie auf die Schaltfläche Start (Starten).
3. Geben Sie in das Suchfeld Network connections
(Netzwerkverbindungen) ein und klicken Sie dann auf
Show network connections (Netzwerkverbindungen
anzeigen).
4. Klicken Sie mit der rechten Maustaste auf Local
Area Connection (Lokale Netzwerkverbindung) und
wählen Sie dann Properties (Eigenschaften).
5. Aktivieren Sie mit der linken Maustaste Internet
Protocol (TCP/IPv4) (Internet-Protokoll [TCP/IPv4]) und
klicken Sie dann auf Properties (Eigenschaften).
96. Wählen Sie Use the following IP address (Folgende
IP-Adresse verwenden) und Use the following DNS
server addresses (Folgende DNS-Server-Adressen
verwenden).
7. Geben Sie in beiden Feldern gültige IP-Adressen ein.
8. Klicken Sie anschliessend auf OK.
9. Starten Sie den Internet Explorer, um die Verbindung
zu testen; wenn die Homepage angezeigt wird,
ist Ihr Computer mit dem Internet verbunden.
105. Allgemeine Bedienungshinweise
5.1 Starten des Straumann® CARES® Systems
Starten Sie nach der Upgrade-Installation das gesamte
System, indem Sie den Computer und den zugehörigen
Scanner mit dem Netzschalter einschalten.
5.2 my.Straumann® CARES® Desktop
Als Straumann-Kunde ist die Standardoption zur Einrichtung
des my.Straumann® CARES® Desktop aktiviert. Bei dieser
Voreinstellung werden Server und Client automatisch ge-
startet und Sie werden direkt zum my.Straumann® CARES®
Desktop, der die einzelnen Funktionsflächen mit den Strau-
mann® Applikationen enthält, geführt.
116. Haftungsausschluss
Der Inhalt dieses Installations-Handbuchs richtet sich an
Anwender, die eine vorherige Version des Straumann®
CARES® Systems installiert haben.
Falls Sie weitere Fragen zu dem Straumann® CARES®
System haben sollten, kontaktieren Sie bitte Straumann
über www.straumann.com.
12Contents
1. Introduction 14
1.1 Foreword 14
1.2 About this installation manual 14
2. Customer Database Transfer 15
2.1 First steps before changing hardware 15
2.1.1 Transfer of the customer data 15
2.1.2 Download of the database from the current PC 16
2.1.3 Upload of the database to the new PC 18
3. Hardware exchange and installation 19
3.1 Setup of the hardware 19
3.2 Installation steps 19
4. Internet connection 20
4.1 Setup of the internet connection 20
4.1.1 Configuration of the internet connection 20
4.1.2 Configuration of an internet connection with a dynamic IP address (DHCP) 20
4.1.3 Configuration of an internet connection with a static IP address 21
5. General use 23
5.1 Start of the Straumann® CARES® System 23
5.2 my.Straumann® CARES® Desktop 23
6. Disclaimer 241. Introduction
1.1 Foreword
Thank you for your interest and welcome to Straumann. These installation in-
structions show you how to install the Straumann® CARES ® PC. Please read
these instructions carefully to become familiar with the instructions for safe and
effective use. Please keep these installation instructions safe in case you require
them again in the future.
This device was manufactured and packed with the greatest care; however
should you experience problems, please contact your local Straumann repre-
sentative immediately.
The information in this manual corresponds to the latest state of the art, neverthe-
less, it must be noted that the specifications of the PC can be changed without
previous announcement.
The relationship between Straumann and the user is exclusively governed by
the General Terms and Conditions of Straumann. Straumann® products must be
used in accordance with their accompanying instructions for use. If you would
like additional information on the proper use of Straumann® products, you
should contact your local Straumann distributor.
1.2 About this installation manual
This installation manual is intended to give instructions how to replace your
current Straumann® CARES® PC which has the Straumann® CARES® 6.2 soft-
ware (Linux operating system) installed with the new Straumann® CARES® PC
(Windows operating system).
142. Customer Database Transfer
2.1 First steps before changing hardware
Before you exchange the hardware, please make sure, that you have trans-
ferred your customer database by completing the following steps as described
in this chapter.
2.1.1 Transfer of the customer data
It is possible to transfer the customer database of the Straumann® CARES®
Visual 6.X system (Linux operating system) to the new Straumann® CARES®
Visual 6.2 (Windows operating system).
Please be aware that the database cannot be automatically transferred to
the new Straumann® CARES® Visual 7.0 because the software has a different
architecture. You have to rebuild the database for the new Straumann® CARES®
Visual 7.0 manually.
Caution
The format of the USB stick must be FAT32. Otherwise, it is possible that the
LINUX PC does not recognize the USB stick.
152.1.2 Download of the database from the current PC
Download the database from the current PC with the
Straumann® CARES® Visual 6.X (Linux operating system) as
described below.
1. Plug in the USB stick.
2. Open the file manager.
3. Go to settings.
Referring to the chapters etscan/CARES/settings on the
right side, the kunden.db is shown.
4. Copy the kunden.db.
165. Open the USB stick.
6. Paste the kunden.db.
Caution
Before you remove the USB stick, you have to close the
file manager. Otherwise, it is possible that the files are not
transferred to the USB stick.
172.1.3 Upload of the database to the new PC
Upload the database to the new PC with the Straumann®
CARES® Visual 6.2 (Windows operating system). Before
completing this step, you have to follow the Hardware Ex-
change and Installation step in section 3 and the Internet
Connection step in section 4.
1. Plug in the USB stick.
2. Go to the USB stick and choose the
kunden.db.
3. Copy the kunden.db.
4. Go to settings.
The following path should be visible:
C:/Users/cares/Straumann/CARESvisual6/Settings
5. Choose the kunden.db on the Windows system.
6. Right-click and Rename the database.
7. Rename the kunden.db into kunden.db-old.
8. Paste the kunden.db from the USB stick.
9. Remove the USB stick and close the program.
10. Open the new Straumann® CARES® Visual 6.2
software and check if everything works and if the
customer database was correctly and completely
transferred.
183. Hardware exchange and installation
3.1 Setup of the hardware
Please be informed that the pre-existing cables should be
used for the upgrade to the new workstation. Follow these
steps to set up the computer, monitor, Straumann® CARES®
Scan CS2 scanner, keyboard and mouse.
Caution
Before you unplug any cables from your computer, please
make sure that you have shut down the whole system and
switched off the main power button on the PC. Then,
please first unplug the power cable from the power socket
in the wall.
3.2 Installation steps
Please unplug the old power cable, the internet cable
and the DVI cable from the current workstation and in- 5
stall them with the upgraded workstation as described
below.
1 2
1. Plug the keyboard (preferably via the PS/2 connector)
into the designated port on the back of the computer.
2. Plug the mouse (preferably via the PS/2 connector) 3
into the designated port on the back of the computer.
3. Plug the scanner into the designated port on the
back of the computer (USB).
4
4. Plug the monitor signal cable (preferably the supplied
DVI cable) into the designated port on the back of
the computer.
5. Connect the computer to a power outlet with the
enclosed main power cable.
194. Internet connection
4.1 Setup of the internet connection
Provided that you did not order a special system con-
figuration before delivery, the default setting is routing via
DHCP.
4.1.1 Configuration of the internet connection
To establish an internet connection, it is necessary to con-
nect the network card on the back of the computer with
a router via the network cable. For information on config-
uring and setting up further connections for your router,
please read the relevant operating instructions or contact
your service technician.
4.1.2 Configuration of an internet connection
with a dynamic IP address (DHCP)
1. Log into the Windows operating system.
2. Click on the Start button.
3. Enter Network connections in the search field and
click on Show network connections.
4. Right-click on Local Area Connection and then select
Properties.
5. Select Internet Protocol (TCP/IPv4) using the left
mouse key and then click on Properties.
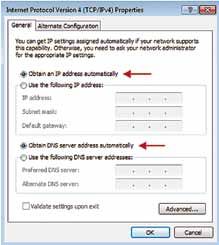
206. Select both Obtain an IP address automatically
and Obtain DNS server address automatically.
7. Then click OK.
8. Start Internet Explorer to test the connection; if the
home page is displayed, your computer is connected
to the internet.
4.1.3 Configuration of an internet connection
with a static IP address
1. Log into the Windows operating system.
2. Click on the Start button.
3. Enter Network connections in the search field and
click on Show network connections.
4. Right-click on Local Area Connection and then select
Properties.
5. Select Internet Protocol (TCP/IPv4) using the left
mouse key and then click on Properties.
216. Select both Use the following IP address and Use
the following DNS server addresses.
7. Enter valid IP addresses in both fields.
8. Then click OK.
9. Start Internet Explorer to test the connection; if the
home page is displayed, your computer is connected
to the internet.
225. General use
5.1 Start of the Straumann® CARES® System
After the upgrade installation, start the whole system by
turning on the workstation and respective scanner using
the power switch.
5.2 my.Straumann® CARES® Desktop
As a Straumann customer, the default option to set up the
my.Straumann® CARES® Desktop is activated. With the
pre-setting, the server and client are automatically started
and guides you immediately to the my.Straumann® CARES®
Desktop which contains individual tiles with Straumann®
applications.
236. Disclaimer
The content of the installation manual is addressed to users
who have installed a previous version of the Straumann®
CARES® System.
If you should have any further questions about the Strau-
mann® CARES® System, please contact Straumann via
www.straumann.com.
24Sommaire
1. Introduction 26
1.1 Avant-propos 26
1.2 À propos de ce manuel d’installation 26
2. Transfert de la base de données clients 27
2.1 Étapes préalables au changement de matériel 27
2.1.1 Transfert des données clients 27
2.1.2 Téléchargement de la base de données à partir du PC actuel 28
2.1.3 Chargement de la base de données vers le nouveau PC 30
3. Remplacement et installation du matériel 31
3.1 Mise en place du matériel 31
3.2 Procédure d’installation 31
4. Connexion Internet 32
4.1 Mise en place de la connexion Internet 32
4.1.1 Configuration de la connexion Internet 32
4.1.2 Configuration d’une connexion Internet avec
une adresse IP dynamique (DHCP) 32
4.1.3 Configuration d’une connexion Internet
avec une adresse IP statique 33
5. Utilisation générale 35
5.1 Démarrage du système Straumann® CARES® 35
5.2 Bureau my.Straumann® CARES® 35
6. Avertissement 361. Introduction
1.1 Avant-propos
Merci pour votre intérêt et bienvenue chez Straumann. Ce manuel décrit
l’installation du PC Straumann® CARES®. Veuillez le lire attentivement pour
vous familiariser avec les instructions et utiliser le produit de manière sûre et
efficace. Conservez ce manuel en lieu sûr pour le consulter ultérieurement en
cas de besoin.
Le produit a été fabriqué et emballé avec le plus grand soin ; si malgré tout
vous rencontrez des problèmes, merci de contacter immédiatement votre repré-
sentant Straumann local.
Les informations présentées dans ce manuel correspondent à l’état actuel de la
technique, toutefois, veuillez prendre en compte que les spécifications du PC
peuvent être modifiées sans information préalable.
La relation entre Straumann et l’utilisateur est exclusivement régie par les condi-
tions générales de Straumann. Les produits Straumann® doivent être utilisés
conformément aux instructions d’utilisation qui les accompagnent. Pour obtenir
des informations supplémentaires concernant l’utilisation conforme d’un produit
Straumann®, veuillez contacter votre distributeur Straumann local.
1.2 À propos de ce manuel d’installation
Ce manuel d’installation explique comment remplacer votre PC Straumann®
CARES® actuel équipé du logiciel Straumann® CARES® 6.2 (sous système
d’exploitation Linux) par le nouveau PC Straumann® CARES® (sous système
d’exploitation Windows).
262. Transfert de la base de données clients
2.1 Étapes préalables au changement de matériel
Avant de remplacer le matériel, assurez-vous de bien avoir transféré votre
base de données clients en suivant les étapes suivantes comme décrit dans
ce chapitre.
2.1.1 Transfert des données clients
Il est possible de transférer la base de données clients du système Straumann®
CARES® Visual 6.X (sous système d’exploitation Linux) vers le nouveau système
Straumann® CARES® Visual 6.2 (sous système d’exploitation Windows).
Veuillez bien prendre en compte que la base de données ne peut être transférée
automatiquement vers le nouveau système Straumann® CARES® Visual 7.0 car
le logiciel présente une architecture différente. Vous devez reconstruire manuel-
lement la base de données pour le nouveau système Straumann ® CARES ®
Visual 7.0.
Attention
La clé USB doit être au format FAT32. Dans le cas contraire, le PC LINUX peut
ne pas reconnaître la clé USB.
272.1.2 Téléchargement de la base de données à partir
du PC actuel
Téléchargez la base de données à partir du PC actuel
équipé du système Straumann® CARES® Visual 6.X (sous
système d’exploitation Linux) comme indiqué ci-dessous.
1. Branchez la clé USB.
2. Ouvrez le file manager
(Gestionnaire de fichiers).
3. Allez à settings (Paramètres).
Pour les sections etscan / CARES / settings (etscan / CARES /
Paramètres) sur le côté droit, le fichier kunden.db est affiché.
4. Copiez le fichier kunden.db.
285. Ouvrez la clé USB.
6. Collez le fichier kunden.db.
Attention
Vous devez fermer le gestionnaire de fichiers avant de reti-
rer la clé USB. Dans le cas contraire, il est possible que les
fichiers ne soient pas transférés sur la clé USB.
292.1.3 Chargement de la base de données vers
le nouveau PC
Chargez la base de données vers le nouveau PC équipé
du système Straumann® CARES® Visual 6.2 (sous système
d’exploitation Windows). Avant de procéder à cette étape,
vous devez suivre l’étape Remplacement et installation
du matériel de la section 3 et l’étape Connexion Internet
de la section 4.
1. Branchez la clé USB.
2. Naviguez vers la clé USB et choisissez le fichier
kunden.db.
3. Copiez le fichier kunden.db.
4. Allez à settings (Paramètres).
Le chemin suivant doit être affiché:
C:/Users/cares/Straumann/CARESvisual6/Settings
(C:/utilisateurs/cares/Straumann/CARESvisual6/Paramètres)
5. Sélectionnez le fichier kunden.db dans le système
Windows.
6. Faites un clic droit et choisissez Rename (Renommer).
7. Renommez le fichier kunden.db en kunden.db-old.
8. Collez le fichier kunden.db depuis la clé USB.
9. Retirez la clé USB et fermez le programme.
10. Ouvrez le nouveau logiciel Straumann® CARES®
Visual 6.2 et vérifiez le bon fonctionnement et le trans-
fert complet et correct de la base de données clients.
303. Remplacement et installation du matériel
3.1 Mise en place du matériel
Veuillez prendre en compte que les câbles utilisés jusque-là
le seront également pour la mise à jour vers la nouvelle
station de travail. Suivez les étapes d’installation de l’ordi-
nateur, du moniteur, du scanner Straumann® CARES® Scan
CS2, du clavier et de la souris.
Attention
Avant de débrancher quelque câble que ce soit de votre
ordinateur, assurez-vous d’avoir éteint tout le système et
coupé l’alimentation à l’aide de l’interrupteur disponible
sur le PC. Ensuite, débranchez en premier lieu le câble
d’alimentation de la prise murale.
3.2 Procédure d’installation
Débranchez l’ancien câble d’alimentation, le câble Inter-
net et le câble DVI de la station de travail actuelle et 5
connectez-les sur la station de travail actualisée comme
indiqué ci-dessous.
1 2
1. Branchez le clavier (de préférence via le connecteur
PS / 2) dans le port correspondant à l’arrière de
l’ordinateur. 3
2. Branchez la souris (de préférence via le connecteur
PS / 2) dans le port correspondant à l’arrière de
l’ordinateur.
4
3. Branchez le scanner dans le port correspondant
à l’arrière de l’ordinateur (USB).
4. Branchez le câble de signal du moniteur
(de préférence le câble DVI fourni) dans le port
correspondant à l’arrière de l’ordinateur.
5. Branchez l’ordinateur à une prise de courant avec
le câble d’alimentation principale fourni.
314. Connexion Internet
4.1 Mise en place de la connexion Internet
Si aucune configuration particulière n’a été demandée à
la commande, le système sera configuré par défaut pour
le routage via DHCP.
4.1.1 Configuration de la connexion Internet
Pour établir une connexion Internet, il est nécessaire de rac-
corder la carte réseau située à l’arrière de l’ordinateur à un
routeur à l’aide du câble réseau. Pour plus d’informations
sur la configuration et la mise en place d’autres connexions
pour le routeur, veuillez vous référer aux modes d’emploi
respectifs ou consulter votre technicien de maintenance.
4.1.2 Configuration d’une connexion Internet avec
une adresse IP dynamique (DHCP)
1. Connectez-vous au système d’exploitation Windows.
2. Cliquez sur le bouton Start (Démarrer).
3. Entrez Network connections (Connexions réseau)
dans le champ de recherche et cliquez sur Show
network connections (Afficher les connexions réseau).
4. Cliquez avec le bouton droit de la souris sur Local
Area Connection (Connexion au réseau local) puis
sélectionnez Properties (Propriétés).
5. Sélectionnez Internet Protocol (TCP / IPv4) (Protocole
Internet [TCP / IPv4]) avec le bouton gauche de la
souris puis cliquez sur Properties (Propriétés).
326. Sélectionnez Obtain an IP address automatically
(Obtenir une adresse IP automatiquement) et
Obtain DNS server address automatically (Obtenir
l’adresse du serveur DNS automatiquement).
7. Puis cliquez sur OK.
8. Lancez Internet Explorer pour tester la connexion ; si
la page d’accueil s’affiche, alors votre ordinateur est
correctement connecté à Internet.
4.1.3 Configuration d’une connexion Internet
avec une adresse IP statique
1. Connectez-vous au système d’exploitation Windows.
2. Cliquez sur le bouton Start (Démarrer).
3. Entrez Network connections (Connexions réseau)
dans le champ de recherche et cliquez sur
Show network connections (Afficher les connexions
réseau).
4. Cliquez avec le bouton droit de la souris sur
Local Area Connection (Connexion au réseau local)
puis sélectionnez Properties (Propriétés).
5. Sélectionnez Internet Protocol (TCP / IPv4) (Protocole
Internet [TCP/IPv4]) avec le bouton gauche de
la souris puis cliquez sur Properties (Propriétés).
336. Sélectionnez Use the following IP address (Utiliser
l’adresse IP suivante) et Use the following DNS
server addresses (Utiliser les adresses des serveurs
DNS suivantes).
7. Entrez des adresses IP valides dans les deux champs.
8. Puis cliquez sur OK.
9. Lancez Internet Explorer pour tester la connexion ;
si la page d’accueil s’affiche, alors votre ordinateur
est correctement connecté à Internet.
345. Utilisation générale
5.1 Démarrage du système Straumann® CARES®
Une fois la mise à jour installée, démarrez tout le système
en allumant la station de travail et le scanner correspon-
dant à l’aide du bouton marche / arrêt.
5.2 Bureau my.Straumann® CARES®
En tant que client Straumann, l’option par défaut pour con-
figurer le bureau my.Straumann® CARES® est activée. Avec
la préconfiguration, le serveur et le client sont automa-
tiquement lancés et vous guident immédiatement au bureau
my.Straumann® CARES® avec un affichage en mosaïque
des applications Straumann®.
356. Avertissement
Le contenu du guide d’installation est destiné à des uti-
lisateurs ayant installé une version antérieure du système
Straumann® CARES®.
Pour toute question concernant le système Straumann®
CARES®, veuillez contacter Straumann via
www.straumann.com.
36Indice
1. Introduzione 38
1.1 Prefazione 38
1.2 Informazioni sul presente manuale di installazione 38
2. Trasferimento della banca dati dei clienti 39
2.1 Prime fasi prima di sostituire l’hardware 39
2.1.1 Trasferimento dei dati dei clienti 39
2.1.2 Download della banca dati dal PC corrente 40
3. Sostituzione e installazione dell’hardware 43
3.1 Installazione dell’hardware 43
3.2 Istruzioni di installazione 43
4. Connessione Internet 44
4.1 Installazione della connessione Internet 44
4.1.1 Configurazione della connessione Internet 44
4.1.2 Configurazione di una connessione Internet 44
con indirizzo IP dinamico (DHCP) 44
4.1.3 Configurazione di una connessione Internet con indirizzo IP statico 45
5. Uso generale 47
5.1 Avvio del sistema Straumann ® CARES® 47
5.2 Desktop my.Straumann® CARES® 47
6. Avvertenze legali 481. Introduzione
1.1 Prefazione
Grazie per il Suo interesse e benvenuto in Straumann. Le presenti istruzioni di
installazione illustrano come installare il PC Straumann® CARES®. La preghiamo
di leggere attentamente il presente manuale per acquisire familiarità con le
istruzioni riguardanti l’uso sicuro ed efficace dello strumento. Conservare le
presenti istruzioni qualora sia necessario consultarle di nuovo in futuro.
Questo dispositivo è stato prodotto e imballato con la massima cura. Nel caso
in cui esso dovesse comunque presentare problemi, rivolgersi immediatamente
al proprio rappresentante Straumann locale.
Le informazioni contenute nel presente manuale corrispondano allo stato più
recente dell’arte; ciò nonostante, si segnala che le specifiche del PC potranno
essere modificate senza preavviso.
Il rapporto esistente tra Straumann e l’utilizzatore è disciplinato esclusivamente
dai Termini e Condizioni Generali di Straumann. I prodotti Straumann® devono
essere utilizzati in conformità con le istruzioni per l’uso fornite a corredo. Per
ulteriori informazioni sull’utilizzo corretto dei prodotti Straumann®, rivolgersi al
distributore Straumann locale.
1.2 Informazioni sul presente manuale di installazione
Il presente manuale di installazione si prefigge di fornire istruzioni in relazione
alle modalità di sostituzione del Suo attuale PC Straumann® CARES®, in cui è
installato il software Straumann® CARES ® 6.2 (sistema operativo Linux), con il
nuovo PC Straumann® CARES® (sistema operativo Windows).
382. Trasferimento della banca dati dei clienti
2.1 Prime fasi prima di sostituire l’hardware
Prima di sostituire l’hardware, verificare di avere trasferito la banca dati dei
vostri clienti osservando le seguenti istruzioni, come illustrato nel presente ca-
pitolo.
2.1.1 Trasferimento dei dati dei clienti
È possibile trasferire la banca dati dei clienti del sistema Straumann® CARES®
Visual 6.X (sistema operativo Linux) nel nuovo Straumann® CARES® Visual 6.2
(sistema operativo Windows).
Si segnala che la banca dati non può essere trasferita automaticamente
al nuovo Straumann ® CARES ® Visual 7.0 poiché il software ha una diversa
architettura. Per il nuovo Straumann ® CARES ® Visual 7.0 sarà necessario
ricreare manualmente la banca dati.
Attenzione
Il formato della chiavetta USB deve essere FAT32. In caso contrario, è possibile
che il PC LINUX non riconosca la chiavetta USB.
392.1.2 Download della banca dati dal PC corrente
Effetuare il download della banca dati dal PC corrente
con il software Straumann ® CARES ® Visual 6.X (sistema
operativo Linux) come descritto di seguito.
1. Inserire la chiavetta USB.
2. Aprire il file manager (Gestore di archivio).
3. Andare a settings (Impostazioni).
In riferimenti ai capitoli etscan/CARES/settings (etscan/
CARES/Impostazioni) sul lato destro, viene visualizzata
l’icona kunden.db.
4. Copiare kunden.db.
405. Aprire la chiavetta USB.
6. Incollare kunden.db.
Attenzione
Prima di rimuovere la chiavetta USB, occorre chiudere il
file manager (Gestore di archivio). In caso contrario, è
possibile che i file non siano trasferiti sulla chiavetta USB.
412.1.3 Upload della banca dati al nuovo PC
Effetuare il upload della banca dati al nuovo PC con il
soft ware Straumann® CARES® Visual 6.2. (sistema opera-
tivo Windows). Prima di completare questo passo, seguire
le istruzioni riportate nella sezione 3 Sostituzione e instal-
lazione dell’hardware e nella sezione 4 Connessione
Internet.
1. Inserire la chiavetta USB.
2. Andare alla chiavetta USB e selezionare kunden.db.
3. Copiare kunden.db.
4. Andare a settings (Impostazioni).
Deve essere visibile il seguente percorso:
C:/Users/cares/Straumann/CARESvisual6/Settings
(C:/Utenti/cares/Straumann/CARESvisual6/Impostazioni)
5. Selezionare kunden.db sul sistema Windows.
6. Fare clic con il pulsante destro del mouse e Rename
(Rinominare) la banca dati.
7. Rinominare kunden.db in kunden.db-old.
8. Incollare kunden.db dalla chiavetta USB.
9. Rimuovere la chiavetta USB e chiudere il programma.
10. Aprire il nuovo software Straumann® CARES® Visual
6.2 e controllare che tutto funzioni e che la banca
dati dei clienti sia stata trasferita in modo corretto e
completo.
423. Sostituzione e installazione dell’hardware
3.1 Installazione dell’hardware
I cavi pre-esistenti devono essere utilizzati per l’aggior-
namento alla nuova postazione di lavoro. Per installare il
computer, il monitor, lo scanner Straumann® CARES® Scan
CS2, la tastiera e il mouse, rispettare le istruzioni riportate
di seguito.
Attenzione
Prima di staccare qualsiasi cavo dal computer, accertarsi
di avere arrestato l’intero sistema e di avere spento il PC
con il pulsante di alimentazione principale. Quindi stac-
care innanzitutto il cavo di alimentazione dalla presa a
parete.
3.2 Istruzioni di installazione
Staccare il vecchio cavo di alimentazione, il cavo Internet
e il cavo DVI dall’attuale postazione di lavoro e collegarli 5
alla postazione di lavoro aggiornata, come descritto di
seguito.
1 2
1. Collegare la tastiera (preferibilmente tramite il
connettore PS/2) nell’apposita porta sul retro del
computer. 3
2. Collegare il mouse (preferibilmente tramite il
connettore PS/2) nell’apposita porta sul retro del
computer.
4
3. Collegare lo scanner nell’apposita porta sul retro
del computer (USB).
4. Collegare il cavo di segnale del monitor
(preferibilmente il cavo DVI fornito in dotazione)
nell’apposita porta sul retro del computer.
5. Collegare il computer a una presa elettrica
utilizzando il cavo di alimentazione principale
fornito in dotazione.
434. Connessione Internet
4.1 Installazione della connessione Internet
A condizione che non sia stata ordinata alcuna particolare
configurazione del sistema prima della consegna, l’impo-
stazione di default è il routing tramite DHCP.
4.1.1 Configurazione della connessione Internet
Per realizzare una connessione a Internet è necessario col-
legare la scheda di rete, situata sul retro del computer, con
un router mediante il cavo di rete. Per informazioni sulla
configurazione e sull’installazione di ulteriori connessioni
del router, leggere le corrispondenti istruzioni per l’uso o
contattare il tecnico dell’assistenza.
4.1.2 Configurazione di una connessione Internet
con indirizzo IP dinamico (DHCP)
1. Eseguire il login nel sistema operativo Windows.
2. Fare clic sul pulsante Start (Avvio).
3. Inserire Network connections (Connessioni di rete)
nel campo di ricerca, quindi fare clic su Show
network connections (Mostra connessioni di rete).
4. Con il pulsante destro del mouse, fare clic su
Local Area Connection (Connessione alla rete locale),
quindi selezionare Properties (Proprietà).
5. Selezionare Internet Protocol (TCP/IPv4) (Protocollo
Internet [TCP/IPv4]) usando il pulsante sinistro del
mouse, quindi fare clic su Properties (Proprietà).
446. Selezionare sia Obtain an IP address automatically
(Ottieni automaticamente un indirizzo IP) sia Obtain
DNS server address automatically (Ottieni automati-
camente un indirizzo server DNS).
7. Quindi fare clic su OK.
8. Avviare Internet Explorer per provare la connessione;
se viene mostrata la homepage il computer è
collegato a Internet.
4.1.3 Configurazione di una connessione Internet con
indirizzo IP statico
1. Eseguire il login nel sistema operativo Windows.
2. Fare clic sul pulsante Start (Avvio).
3. Inserire Network connections (Connessioni di rete)
nel campo di ricerca, quindi fare clic su Show
network connections (Mostra connessioni di rete).
4. Con il pulsante destro del mouse, fare clic su
Local Area Connection (Connessione alla rete locale),
quindi selezionare Properties (Proprietà).
5. Selezionare Internet Protocol (TCP/IPv4) (Protocollo
Internet [TCP/IPv4)) usando il pulsante sinistro del
mouse, quindi fare clic su Properties (Proprietà).
456. Selezionare sia Use the following IP address
(Usa il seguente indirizzo IP) sia Use the following
DNS server addresses (Usa i seguenti indirizzi
server DNS).
7. Immettere indirizzi IP validi in entrambi i campi.
8. Quindi fare clic su OK.
9. Avviare Internet Explorer per provare la connessione;
se viene mostrata la homepage il computer è
collegato a Internet.
465. Uso generale
5.1 Avvio del sistema Straumann® CARES®
Dopo avere eseguito l’installazione di aggiornamento,
avviare il sistema accendendo la postazione di lavoro e il
relativo scanner con l’interruttore di alimentazione.
5.2 Desktop my.Straumann® CARES®
In qualità di cliente Straumann, l’opzione di default per
installare il desktop my.Straumann® CARES ® è attivata.
Con la funzione di pre-impostazione, il server e il client
vengono avviati automaticamente e guidano l’operatore
immediatamente al desktop my.Straumann® CARES®, che
contiene singole sezioni con applicazioni Straumann®.
476. Avvertenze legali
Il contenuto del manuale di installazione è destinato a
operatori che hanno installato una precedente versione del
sistema Straumann® CARES®.
Per ulteriori informazioni sul sistema Straumann® CARES®,
contattare Straumann all’indirizzo www.straumann.com.
48Índice
1. Introducción 50
1.1 Preámbulo 50
1.2 Acerca de este manual de instalación 50
2. Transferencia de la base de datos de clientes 51
2.1 Primeros pasos antes de cambiar el hardware 51
2.1.1 Transferencia de los datos de clientes 51
2.1.2 Descarga de la base de datos del PC actual 52
2.1.3 Carga de la base de datos al nuevo PC 54
3. Cambio e instalación del hardware 55
3.1 Configuración del hardware 55
3.2 Pasos de instalación 55
4. Conexión a Internet 56
4.1 Preparación de la conexión a Internet 56
4.1.1 Configuración de la conexión a Internet 56
4.1.2 Configuración de una conexión a Internet con
una dirección IP dinámica (DHCP) 56
4.1.3 Configuración de una conexión a Internet
con una dirección IP estática 57
5. Uso general 59
5.1 Inicio del sistema Straumann® CARES® 59
5.2 El escritorio my.Straumann® CARES® 59
6. Aviso legal 601. Introducción
1.1 Preámbulo
Bienvenido a Straumann. Gracias por su interés. Estas instrucciones de ins-
talación le muestran cómo instalar el PC Straumann® CARES ®. Por favor lea
atentamente estas instrucciones para familiarizarse con ellas y conseguir así
un uso seguro y eficaz. Por favor conserve estas instrucciones de instalación
por si necesitara consultarlas de nuevo en un futuro.
Este equipo se ha fabricado y embalado con el máximo cuidado. No obs-
tante, si tuviese problemas, póngase inmediatamente en contacto con su
representante local de Straumann.
La información de este manual es la más actual disponible. Sin embargo
debemos recordarle que las especificaciones del PC pueden cambiar sin
previo aviso.
La relación entre Straumann y el usuario está sometida exclusivamente a los
Términos y Condiciones Generales de Straumann. Los productos Straumann®
deben utilizarse de acuerdo con las instrucciones de uso adjuntas. Si desea
información adicional sobre el uso correcto de los productos Straumann®,
póngase en contacto con su distribuidor local de Straumann.
1.2 Acerca de este manual de instalación
El objetivo de este manual de instalación es proporcionar instrucciones sobre
cómo sustituir su PC Straumann® CARES® actual que tiene instalado el software
Straumann® CARES® 6.2 (sistema operativo Linux) por el nuevo PC Straumann®
CARES® (sistema operativo Windows).
502. Transferencia de la base de datos de clientes
2.1 Primeros pasos antes de cambiar el hardware
Antes de cambiar el hardware, asegúrese de haber transferido su base de
datos de clientes realizando los pasos siguientes de la forma descrita en este
capítulo.
2.1.1 Transferencia de los datos de clientes
Es posible transferir la base de datos de clientes del sistema Straumann®
CARES® Visual 6.X (sistema operativo Linux) al nuevo Straumann® CARES®
Visual 6.2 (sistema operativo Windows).
Tenga en cuenta que la base de datos no se puede transferir automática-
mente al nuevo software Straumann ® CARES ® Visual 7.0 porque el software
tiene una arquitectura diferente. Deberá reestructurar la base de datos para
el nuevo software Straumann ® CARES ® Visual 7.0 manualmente.
Atención
El formato del lápiz de memoria USB debe ser FAT32. De lo contrario, es
posible que el PC LINUX no lo reconozca.
512.1.2 Descarga de la base de datos del PC actual
Descargue la base de datos del PC actual con el soft-
ware Straumann ® CARES ® Visual 6.X (sistema operativo
Linux) como se describe a continuación.
1. Inserte el lápiz USB.
2. Abra el file manager (Gestor de archivos).
3. Acceda a settings (Configuración).
Con respecto a los capítulos etscan/CARES/settings
(etscan/
CARES/Configuración) en el lado derecho, se
muestra la base de datos kunden.db.
4. Copie la kunden.db.
525. Abra el lápiz USB.
6. Pegue la kunden.db.
Atención
Antes de retirar el lápiz de memoria USB deberá cerrar
el file manager (Gestor de archivos). De lo contrario,
es posible que los archivos no se transfieran al lápiz de
memoria.
532.1.3 Carga de la base de datos al nuevo PC
Cargue la base de datos al nuevo PC con el software
Straumann® CARES® Visual 6.2 (sistema operativo Win-
dows). Antes de realizar este paso, deberá seguir el paso
Cambio e instalación de hardware en la sección 3 y el
paso Conexión a Internet en la sección 4.
1. Inserte el lápiz USB.
2. Acceda al lápiz USB y seleccione la base de datos
kunden.db.
3. Copie la kunden.db.
4. Acceda a settings (Configuración).
Debe estar visible la ruta siguiente:
C:/Users/cares/Straumann/CARESvisual6/Settings
(C:/Usuario/cares/Straumann/CARESvisual6/Configuración)
5. Seleccione la kunden.db en el sistema Windows.
6. Haga clic con el botón derecho del ratón en
Rename (Cambiar nombre) para cambiar el nombre
de la base de datos.
7. Cambie el nombre de kunden.db a kunden.db-old.
8. Pegue la kunden.db del lápiz USB.
9. Retire el lápiz USB y cierre el programa.
10. Abra el nuevo software Straumann® CARES®
Visual 6.2 y compruebe si todo funciona correcta
mente y si la base de datos de clientes se ha
transferido correcta y completamente.
543. Cambio e instalación del hardware
3.1 Configuración del hardware
Tenga en cuenta que para la mejora a la estación de
trabajo debe utilizar los cables ya existentes. Siga estos
pasos para instalar el ordenador, el monitor, el escáner
Straumann® CARES® Scan CS2, el teclado y el ratón.
Atención
Antes de desconectar los cables del ordenador, asegúrese
de que ha cerrado todo el sistema y apagado el botón
de encendido/apagado principal del PC. A continuación,
desconecte primero el cable de alimentación de la toma
de corriente de la pared.
3.2 Pasos de instalación
Desconecte el cable de alimentación antiguo, el cable
de Internet y el cable DVI de la estación de trabajo actual 5
e conéctelos en la nueva estación de trabajo como se
describe a continuación.
1 2
1. Enchufe el teclado (preferiblemente vía conector
PS/2) en el puerto asignado en la parte posterior
del ordenador. 3
2. Enchufe el ratón (preferiblemente vía conector PS/2)
en el puerto asignado en la parte posterior del
ordenador.
4
3. Enchufe el escáner en el puerto asignado en la parte
posterior del ordenador (USB).
4. Enchufe el cable de señales del monitor (preferi-
blemente mediante el cable DVI suministrado) en el
puerto asignado en la parte posterior del ordenador.
5. Conecte el ordenador a una toma de corriente
mediante el cable de alimentación que se incluye.
554. Conexión a Internet
4.1 Preparación de la conexión a Internet
En el caso de que no haya solicitado una configuración
especial del sistema antes de la entrega, la configuración
por defecto es el enrutamiento a través de DHCP.
4.1.1 Configuración de la conexión a Internet
Para establecer una conexión a Internet, es necesario co-
nectar la tarjeta de red en la parte posterior del ordenador
con un enrutador mediante el cable de red. Para obtener
información sobre cómo configurar y crear conexiones adi-
cionales para su enrutador, lea las instrucciones de uso per-
tinentes o póngase en contacto con su técnico de servicio.
4.1.2 Configuración de una conexión a Internet con
una dirección IP dinámica (DHCP)
1. Acceda al sistema operativo Windows.
2. Haga clic en el botón Start (Inicio).
3. Escriba Network connections (Conexiones de red)
en el campo de búsqueda y a continuación
haga clic en Show network connections (Mostrar
conexionesde red).
4. Con el botón derecho del ratón haga clic en Local
Area Connection (Conexión de área local) y a
continuación seleccione Properties (Propiedades).
5. Seleccione Internet Protocol (TCP/IPv4) (Protocolo
de Internet [TCP/IPv4]) utilizando el botón izquierdo
del ratón y a continuación haga clic en Properties
(Propiedades).
566. Seleccione Obtain an IP address automatically
(Obtener una dirección IP automáticamente) y
O btain DNS server address automatically (Obtener
la dirección del servidor DNS automáticamente).
7. A continuación haga clic en OK (Aceptar).
8. Inicie Internet Explorer para probar la conexión;
si se muestra la página de inicio, su ordenador está
conectado a Internet.
4.1.3 Configuración de una conexión a Internet
con una dirección IP estática
1. Acceda al sistema operativo Windows.
2. Haga clic en el botón Start (Inicio).
3. Escriba Network connections (Conexiones de red)
en el campo de búsqueda y a continuación
haga clic en Show network connections (Mostrar
conexiones de red).
4. Con el botón derecho del ratón haga clic en Local
Area Connection (Conexión de área local) y a
continuación seleccione Properties (Propiedades).
5. Seleccione Internet Protocol (TCP/IPv4) (Protocolo
de Internet [TCP/IPv4]) utilizando el botón izquierdo
del ratón y a continuación haga clic en Properties
(Propiedades).
576. Seleccione Use the following IP address (Usar la
siguiente dirección IP) y Use the following DNS
server addresses (Usar las siguientes direcciones de
servidor DNS).
7. Escriba direcciones IP válidas en ambos campos.
8. A continuación haga clic en OK (Aceptar).
9. Inicie Internet Explorer para probar la conexión;
si se muestra la página de inicio, su ordenador está
conectado a Internet.
585. Uso general
5.1 Inicio del sistema Straumann® CARES®
Tras la instalación de la mejora, inicie el sistema completo
encendiendo la estación de trabajo y el escáner corres-
pondiente con el interruptor de red.
5.2 El escritorio my.Straumann® CARES®
Como cliente de Straumann, la opción de configuración
del escritorio my.Straumann® CARES® estará activada por
defecto. Con la preconfiguración, el servidor y el cliente se
iniciarán automáticamente y le guiarán inmediatamente al
escritorio my.Straumann® CARES®, que contiene ventanas
en mosáico individuales con aplicaciones Straumann®.
596. Aviso legal
El contenido del manual de instalación está dirigido a
los usuarios que tienen instalada una versión anterior del
sistema Straumann® CARES®.
Si tiene más preguntas sobre el sistema Straumann ®
CARES®, póngase en contacto con Straumann en
www.straumann.com.
60Notes
w w w. s t rau m an n .c o m

International Headquarters
Institut Straumann AG
Peter Merian-Weg 12
CH-4002 Basel, Switzerland
Phone +41 (0)61 965 11 11
Fax      +41 (0)61 965 11 01
                                                                                                                                                    02/12  701285

© Institut Straumann AG, 2012. All rights reserved.
Straumann® and/or other trademarks and logos from Straumann® mentioned herein are the trademarks or registered trademarks of Straumann Holding AG
and/or its affiliates. All rights reserved.
Puoi anche leggere