TERMOVENTILATORE PTC A PARETE WALL MOUNTED PTC HEATER - INN-581 MANUALE D'USO USER MANUAL
←
→
Trascrizione del contenuto della pagina
Se il tuo browser non visualizza correttamente la pagina, ti preghiamo di leggere il contenuto della pagina quaggiù
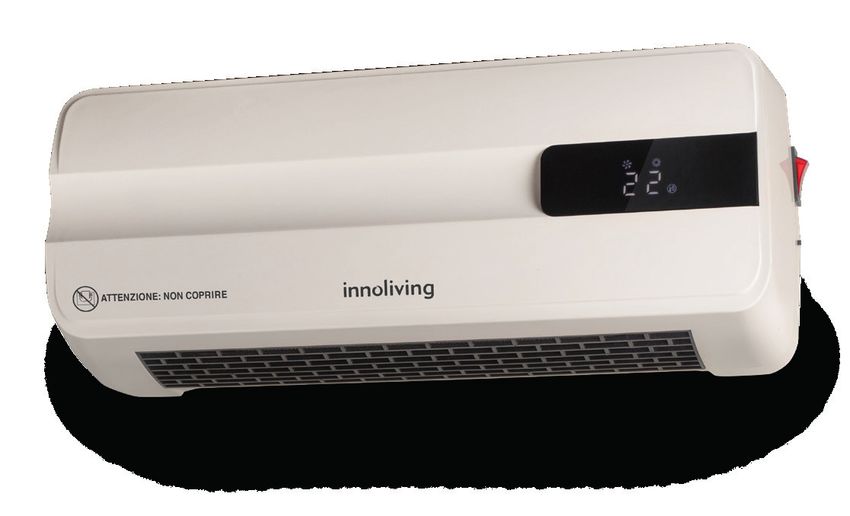
TERMOVENTILATORE PTC A PARETE
     WALL MOUNTED PTC HEATER

                       INN-581
                   MANUALE D’USO
                    USER MANUAL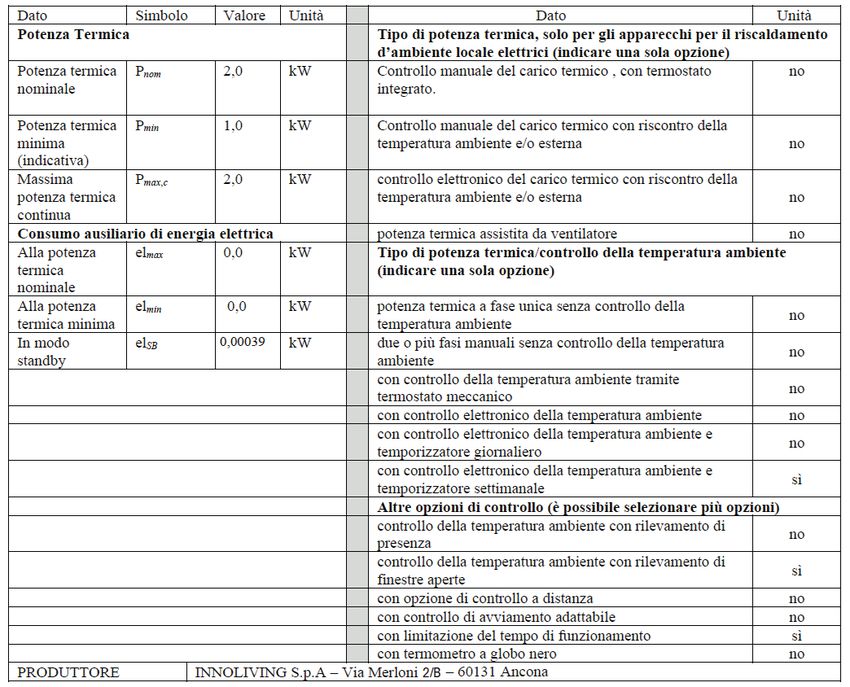
2
TERMOVENTILATORE PTC A PARETE                                                               I

Grazie per aver acquistato il termoventilatore INNOLIVING modello INN-581. Leggere
attentamente le avvertenze e istruzioni d’uso e conservare il presente manuale per eventuali
consultazioni future.

Prima dell’uso leggere attentamente il seguente manuale di istruzioni e
conservarlo per future consultazioni.
Prima di utilizzare l’apparecchio, leggere attentamente le istruzioni per l’uso e in particolare
le avvertenze sulla sicurezza, attenendosi ad esse. Conservare il presente manuale, per
l’intera durata di vita dell’apparecchio, a scopo di consultazione. La mancata osservanza
delle istruzioni potrebbe essere causa di incidenti e rendere nulla la garanzia, sollevando il
fabbricante da ogni responsabilità.
ll presente apparecchio deve essere utilizzato unicamente per lo scopo per cui è stato
progettato, ovvero come termoventilatore per uso domestico. Qualsiasi altro utilizzo è
considerato non conforme e pertanto pericoloso.

AVVERTENZE E IMPORTANTI NORME DI SICUREZZA
• Gli elementi di imballaggio (sacchetti di plastica, cartone, polistirolo ecc.)
  non devono essere lasciati alla portata dei bambini in quanto potenziali
  fonti di pericolo e devono essere smaltiti secondo quanto previsto dalle
  normative vigenti.
• Prima di inserire la spina nella presa di corrente verificare attentamente
  che la tensione elettrica della Vostra rete domestica corrisponda al
  valore indicato sull’apparecchio e che la presa di corrente e la linea di
  alimentazione siano dimensionate al carico richiesto.
• L’apparecchio deve essere utilizzato solo in configurazione fissa. Questo
  apparecchio è destinato esclusivamente all’uso domestico.
• Non usare l’apparecchio nelle immediate vicinanze di docce, vasche
  da bagno, piscine, ecc. Non utilizzare l’apparecchio in ambienti
  particolarmente umidi (bagni ecc.).
• Non coprire l’apparecchio durante il funzionamento, onde evitare rischi
  d’incendio.
• Il termoventilatore non deve essere posizionato direttamente sotto ad
  una presa di corrente. Non direzionare l’aria calda verso una presa di
  corrente.
                                                                                            3
I

• Non usare l’apparecchio per asciugare la biancheria. Non ostruire le
  griglie di entrata e uscita dell’aria (pericolo di surriscaldamento).
• Non immergere l’apparecchio o il cavo in acqua o in altri liquidi.
• Non toccare l’apparecchio con le mani bagnate.
• Non lasciare mai l’apparecchio incustodito quando in funzione.
• L’apparecchio può essere utilizzato da bambini di età non inferiore a
  8 anni e da persone con ridotte capacità fisiche, sensoriali o mentali,
  o prive di esperienza o della necessaria conoscenza, purché sotto
  sorveglianza oppure dopo che le stesse abbiano ricevuto istruzioni
  relative all’uso sicuro dell’apparecchio e alla comprensione dei pericoli ad
  esso inerenti. I bambini non devono giocare con l’apparecchio. La pulizia
  e la manutenzione destinata ad essere effettuata dall’utilizzatore non
  deve essere effettuata da bambini senza sorveglianza. Assicurarsi che i
  bambini non giochino con l’apparecchio.
• Bambini di età inferiore a 3 anni devono essere tenuti lontano
  dall’apparecchiatura se non sorvegliati continuamente.
• I bambini di età compresa tra i 3 e gli 8 anni devono solamente
  accendere/spegnere l’apparecchio purché sia stato posto o installato
  nella sua normale posizione di funzionamento e che essi ricevano
  sorveglianza o istruzioni riguardanti l’utilizzo dell’apparecchio in
  sicurezza e ne capiscano i pericoli. I bambini di età compresa tra i 3 e gli
  8 anni non devono inserire la spina, regolare o pulire l’apparecchio né
  eseguire la manutenzione a cura dell’utilizzatore.
  ATTENZIONE: Alcune parti del prodotto possono diventare molto calde
  durante l’uso e causare scottature. È necessario prestare particolari
  attenzioni quando sono presenti bambini o persone vulnerabili.
• Per una distanza di almeno 1 metro davanti all’apparecchio non devono
  esserci mobili, muri, tende o altri oggetti.
• È sconsigliato l’uso di prolunghe e adattatori.
 4
I

• Non tirare il cavo di rete per sollevare, trasportare o togliere la spina
  dalla presa di corrente.
• Assicurarsi che il cavo non presenti nodi o piegature.
• Verificare lo stato del cavo elettrico. Cavi danneggiati o annodati
  aumentano il rischio di scossa elettrica.
• Se il cavo di alimentazione è danneggiato, esso deve essere sostituito
  dal costruttore o dal suo servizio assistenza tecnica o comunque da una
  persona qualificata, in modo da prevenire ogni rischio.
• Scollegare sempre il termoventilatore dalla rete elettrica e attendere che
  si raffreddi prima di procedere con la pulizia.
• Non utilizzare detergenti aggressivi per pulire il prodotto.
• Non lasciare che l’apparecchio e/o il cavo entri a contatto con superfici
  incandescenti.
• Scollegare sempre il termoventilatore dalla rete elettrica quando non è
  in uso.
• Il presente apparecchio deve essere utilizzato unicamente per lo scopo
  per cui è stato concepito.
• Evitare di far cadere l’apparecchio.
• Se si dovessero riscontrare problemi con il dispositivo, contattare il centro di
  assistenza tecnica autorizzato. Non cercare di riparare il prodotto da soli.
• Non usare il prodotto se è caduto a terra, se ci sono visibili segni di
  danneggiamento o perdite. Evitare urti e cadute.
• In caso di guasto o di cattivo funzionamento dell’apparecchio,
  spegnerlo e non manometterlo. Per l’eventuale riparazione rivolgersi
  esclusivamente ad un centro di assistenza tecnica autorizzato.
• Si prega di non utilizzare il termoventilatore in luoghi pieni di gas
  combustibili o esplosivi. Non coprire l’uscita dell’aria.
• Durante l’utilizzo del termoventilatore, cercare di non aprire in maniera
  continua la porta o la finestra altrimenti questo influirà sull’effetto del
                                                                               5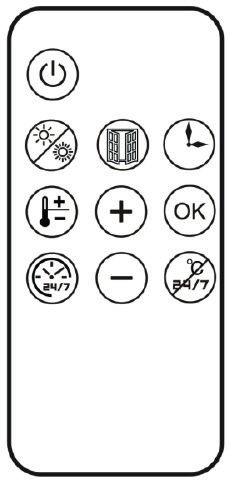
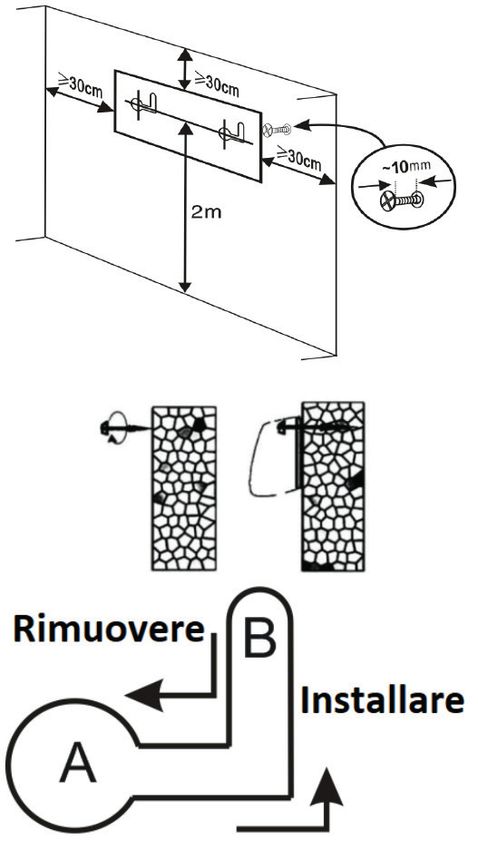
I

  riscaldamento.
• Se si desidera spegnere la macchina, premere l’interruttore on / off
  su off. La ventola continuerà a funzionare per altri 30 secondi fino a
  quando non smetterà di funzionare.
• Non utilizzare questo termoventilatore in bagno.
• Il termoventilatore deve essere installato in modo tale che interruttori e
  altri comandi non possano essere utilizzati dalla vasca da bagno o nella
  doccia.
AVVERTENZA: Non utilizzare questo apparecchio di riscaldamento con
programmatori, temporizzatori esterni o con qualsiasi altro dispositivo
che accenda automaticamente l’apparecchio, in quanto esiste il rischio di
incendio nel caso in cui l’apparecchio sia coperto o posizionato in modo
non corretto.
IMPORTANTE: Al fine di evitare surriscaldamenti, non coprire in nessun
caso l’apparecchio durante il funzionamento, poiché ciò provocherebbe
un pericoloso aumento di temperatura.
CARATTERISTICHE
1. Scocca di plastica di alta qualità e lunga durata.
2. Elementi riscaldanti in ceramica PTC, riscaldamento ad alta efficienza, rapido,
silenzioso, inodore, non inquinante.
3. Impostazione del calore a due livelli, per regolare la temperatura secondo le
proprie esigenze.
4. È presente un dispositivo di sicurezza per evitare il surriscaldamento.
L’apparecchio si spegne automaticamente quando l’uscita dell’aria è bloccata e si
riaccende quando è libera.
5. È possibile scegliere tra aria fredda e aria calda. In estate si consiglia di
chiudere le finestre per avere il maggior fresco possibile.

INSTALLAZIONE
Praticare due fori nel muro e mantenere una distanza di oltre 2,0 m dal suolo.
il diametro del foro deve contenere il tassello di espansione, il cui diametro è
di 6 mm. Dopo aver inserito il tassello inserire la vite all’interno di esso e fissare
il termoventilatore con il gancio. Assicurarsi di inserire fino in fondo. Fare
riferimento all’immagine.
  6
I

Utilizzare i componenti in dotazione (viti e tasselli di espansione) per il fissaggio
alla parete come illustrato nella figura seguente, e procedere poi ad agganciare
la macchina.
Nota: il peso massimo è di 4,1 kg, il muro deve essere in grado di sopportare
questo peso.

                                              1.La distanza tra il prodotto e il
                                              soffitto (e il lato) deve essere ≥30
                                              cm.
                                              2. Per le varie misure di
                                              installazione del prodotto guardare
                                              la figura.
                                              3. Nota: per agganciare il prodotto,
                                              la vite deve essere allineata con il
                                              foro “A” sul prodotto. Dopo averlo
                                              appeso, far scorrere l’apparecchio e
                                              agganciarlo verso la “B”, al fine di
                                              fissarlo saldamente.
                                              Per rimuoverlo, sganciarlo da “B”
                                              ad “A” e quindi estrarlo.

UTILIZZO
1. Collegare ad una presa di rete 220-240 V ~ 50-60 Hz
2. Inserire la spina nella presa a muro.
3. Accendere l’apparecchio utilizzando l’interruttore.
   “0” è “SPENTO”
   “I”: è “ACCESO”.
4. Utilizzare il termoventilatore tramite i tasti di
   controllo o tramite il telecomando.

                                                                                   7
I
1. Accendere l’apparecchio tramite
l’interruttore. Così facendo il
termoventilatore entrerà in
modalità standby.
2. Sul lato destro dell’apparecchio
c’è un pulsante “START / STOP”,
premendolo l’apparecchio si
avvierà di default in “calore
massima potenza”, premendo di
nuovo, l’apparecchio si spegnerà.
3. quando si spegne l’apparecchio, la
ventola continuerà a funzionare
per 30 secondi.
4. Tutte le funzioni disponibili sono
selezionabili tramite telecomando
Descrizione simboli display:
Ventola
Calore potenza minima 1000W
Calore potenza massima 2000W
Timer
Timer settimanale
Temperatura
Se l’icona è fissa: viene impostata la
temperatura scelta tra 18-45°C
Se lampeggia: viene avviato il
rilevamento finestra aperta.
8I
TELECOMANDO
Premendo “ ” si selezionano Accensione (modalità ventole
attiva), Spegnimento (La ventola lavora per altri 30 secondi
Accensione / dopo lo spegnimento).
spegnimento
Premendo “ ”: si selezionano Calore potenza minima,
Calore potenza massima, modalità ventola (temperatura
Calore ambiente).
Premendo “ ” è possibile impostare il timer per
1H,2H,3H.…8H. Non è possibile però impostare questo tipo di
timer quando è impostato il timer settimanale.
Timer
Premendo “ ”, è possibile impostare la temperatura
selezionandola con “+” e “-” tra 18-45°C.
Se la temperatura scelta è uguale a quella dell’ambiente
Impostazione circostante o più bassa, l’apparecchio smetterà di produrre
temperatura calore.
Se la temperatura scelta è superiore di 1-2°C, si attiverà la
modalità Calore potenza minima.
Se la temperatura scelta è superiore di 3°C, si attiverà la
modalità Calore potenza massima.
Per confermare l’impostazione, premere OK o attendere 5
secondi.
Questa funzione può essere attivata solo quando
l'apparecchio è in modalità riscaldamento o quando si è
impostata una temperatura da raggiungere (non può avviarsi
Rilevamento quando l'apparecchio ha in funzione solo la ventola).
finestra
aperta Premere “ ”, per attivare questa funzione. Il simbolo
comincerà a lampeggiare sul display.
L’apparecchio memorizza la temperatura misurata 1 minuto
dopo l’attivazione della funzione, quindi confronta le
temperature misurate effettive con questo valore ogni 5
minuti. Se la temperatura misurata corrente è di almeno 8
° C inferiore alla misurazione originale, l’unità si spegne per
motivi di risparmio energetico.
Il timer settimanale può essere usato solo quando
l’apparecchio è in modalità riscaldamento (non può essere
usato quando è in funzione solo la ventola) o in modalità
Timer temperatura impostata.
settimanale
9I
La prima volta che viene impostato il timer
(per esempio un avvio dopo un’interruzione di
corrente), è necessario impostare l’ora corrente.
Metodo di impostazione:
a. Impostare il giorno della settimana: sul display
Impo- compare 01, premere + o - per regolare il giorno
stazione corrente, da 01 a 07 ovvero da lunedì a domenica.
orario e Premere OK per confermare l’impostazione.
Timer giorno b. Impostare l’orario di funzionamento: sul display
settimanale della set- compare come orario 00, premere + o - per
timana regolare l’ora attuale, da 00H a 23H. Premere OK
per confermare l’impostazione.
c. Impostare i minuti: sul display compare 00,
premere + o - per regolare i minuti, da 00 a 59.
Premere OK per confermare l’impostazione.
Nota:
Non premere OK entro 10 secondi
dall’impostazione, altrimenti verrà annullata.
P1
Premendo , LED mostrerà P1, premere OK,
verrà impostata modalità P1.
(se non viene premuto OK entro 10 secondi, il
timer non verrà impostato)
P2
Premendo , LED mostrerà P2, premere OK,
verrà impostata modalità P2.
(se non viene premuto OK entro 10 secondi, il
timer non verrà impostato)
P3
Imposta- Premendo , LED mostrerà P3, premere OK,
zione di verrà impostata modalità P3.
Timer default (se non viene premuto OK entro 10 secondi, il
settimana timer non verrà impostato)
P4
Premendo , LED mostrerà P4, premere OK,
verrà impostata modalità P4.
(se non viene premuto OK entro 10 secondi, il
timer non verrà impostato)
P5
Premendo , LED mostrerà P5, premere OK,
verrà impostata modalità P5.
(se non viene premuto OK entro 10 secondi, il
timer non verrà impostato)
10I
P6
Premendo , LED mostrerà P6, premere OK,
verrà impostata modalità P6.
(se non viene premuto OK entro 10 secondi, il
timer non verrà impostato)
LED mostra di default 1, premere + o - da 1 a 7 per
impostare il giorno della settimana da Lunedì a
Domenica.
Lampeggia 1 (Lunedì)
Premere OK - Cominciare da lunedì
a. Il display mostra 00, premere + o – per
impostare l’orario da 0H to 24H, premere OK
per confermare. L’apparecchio si accenderà a
questa ora.
Impo- b. Il display mostra 00, premere + o – per
stazione impostare l’orario da 0H to 24H, premere OK
Timer persona- per confermare. L’apparecchio si spegnerà a
settimana lizzata questa ora.
Il display mostra 2-7 - Impostare I giorni della
settimana come fatto per il lunedì.
Note
1. È possibile impostare un solo ciclo di accensione/
spegnimento per giorno della settimana.
2. È possibile impostare le ore, non i minuti.
3. È necessario impostare sia l’orario di accensione
che di spegnimento.
4. Per validare le impostazioni personalizzate,
è necessarie impostare tutti I giorni dalla
settimana da 1 a 7, altrimenti non sarà attivata
l’impostazione del timer personalizzato. Una
volta impostati, il timer si attiverà e l’icona
comparirà sul display.
Schema Timer preimpostati
Modalità Lunedì Martedì Mercoledì Giovedì Venerdì Sabato Domenica
P1 8:00-17:00 8:00-17:00 8:00-17:00 8:00-17:00 8:00-17:00 8:00-17:00 8:00-17:00
P2 18:00-7:00 18:00-7:00 18:00-7:00 18:00-7:00 18:00-7:00 18:00-7:00 18:00-7:00
P3 8:00-17:00 8:00-17:00 8:00-17:00 8:00-17:00 8:00-17:00 Spento Spento
P4 18:00-7:00 18:00-7:00 18:00-7:00 18:00-7:00 18:00-7:00 Spento Spento
P5 Spento Spento Spento Spento Spento 00:00-23:59 00:00-23:59
P6 Libero Libero Libero Libero Libero Libero Libero
Note: P2 e P4, si disattiva la mattina del giorno seguente
11I
1. Quando è in funzione il timer settimanale, premere e poi
per cancellare questa impostazione.
Cancellare 2. Quando invece la temperatura da raggiungere è stata
modalità in raggiunta, premere prima poi per cancellare questa
funzione impostazione.
Spegnimento La massima temperatura supportata è di 51°C, una volta
automatico di raggiunti la macchina si spegne.
protezione
SOSTITUZIONE BATTERIE DEL TELECOMANDO
Sfilare il vano batterie dalla parte inferiore del telecomando.
Rimuovere la batteria esausta e inserire la batteria nuova, facendo attenzione
alla polarità. La batteria CR2025 è inclusa nella confezione. Una volta inserita,
riporre il vano batterie all’interno del telecomando e smaltire la batteria esausta
negli appositi contenitori o centri di raccolta differenziata.
PULIZIA E MANUTENZIONE
1. Se non si utilizza il termoventilatore da lungo periodo, pulire la superficie.
Attendere che la macchina si raffreddi e staccare la spina, quindi pulirla.
Utilizzare un panno o un detergente. Non lavare mai direttamente con acqua,
non far cadere l’acqua nella macchina. Non utilizzare mai acidi, diluenti
chimici, benzina, benzene ecc.
2. Prima di riutilizzare la macchina, controllare e assicurarsi che l’uscita dell’aria
non abbia ostacoli.
Avvertenza: non toccare la macchina durante il funzionamento e non coprire
l’uscita e l’ingresso dell’aria.
12I
ETICHETTA DATI
Questo prodotto è conforme a tutte le direttive europee applicabili.
Leggere attentamente le istruzioni per l’uso.
Non coprire l’apparecchio durante il funzionamento, onde evitare
rischi d’incendio.
Apparecchio con isolamento elettrico di classe II
INFORMAZIONI AGLI UTENTI ai sensi del Decreto Legislativo N° 49 del 14 Marzo
2014 “Attuazione della Direttiva 2012/19/UE sui rifiuti di apparecchiature
elettriche ed elettroniche (RAEE)”
Il simbolo del cassonetto barrato riportato sull’apparecchiatura indica che il
prodotto alla fine della propria vita utile deve essere raccolto separatamente dagli
altri rifiuti.
L’utente dovrà, pertanto, conferire l’apparecchiatura integra dei componenti essenziali giunta
a fine vita agli idonei centri di raccolta differenziata dei rifiuti elettronici ed elettrotecnici,
oppure riconsegnarla al rivenditore al momento dell’acquisto di nuova apparecchiatura di
tipo equivalente, in ragione di uno a uno, oppure 1 a zero per le apparecchiature aventi
lato maggiore inferiore a 25cm. L’adeguata raccolta differenziata per l’avvio successivo
dell’apparecchiatura dimessa al riciclaggio, al trattamento e allo smaltimento ambientale
compatibile contribuisce ad evitare possibili effetti negativi sull’ambiente e sulla salute e
favorisce il riciclo dei materiali di cui è composta l’apparecchiatura. Lo smaltimento abusivo
del prodotto da parte dell’utente comporta l’applicazione delle sanzioni amministrative di cui
al D.Lgs n. Decreto Legislativo N° 49 del 14 Marzo 2014.
13I
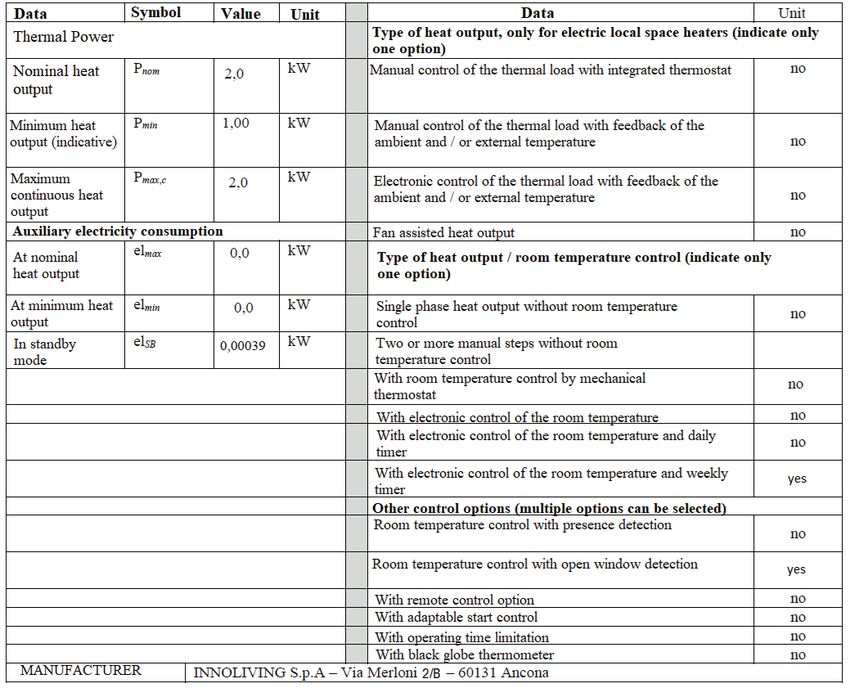
INFORMAZIONI PER GLI APPARECCHI PER IL RISCALDAMENTO DI
AMBIENTE LOCALE ELETTRICI
Il telecomando di questo apparecchio funziona con una batteria del tipo CR2025
che rientra nella direttiva europea 2013/56/UE e che non possono essere smaltite
con i normali rifiuti domestici. Informarsi sulle normative locali relative alla raccolta
differenziata delle batterie: un corretto smaltimento permette di evitare
conseguenze negative per l’ambiente e la salute. Non gettare le batterie nel fuoco.
1415
WALL MOUNTED PTC HEATER                                                                    GB

Thank you for purchasing the fan heater INNOLIVING INN-581.
Please read the following instructions carefully and save this manual for possible future
consultation.

Before using this appliance, please read the operating instructions carefully,
in particular the safety notes and follow them.
Keep this manual for the entire life of the appliance, for future consultation. Failure to follow
the instructions could cause accidents and void the warranty by raising the manufacturer
from any liability.
This appliance must be used only for the purpose for which it was designed, that is as fan
heater for domestic use. Any other use is considered improper and therefore dangerous.

IMPORTANT SAFETY NORMS AND WARNINGS
• Keep all packing material (plastic bags, cardboard, polystyrene, etc..) out
  of reach of the children, since they are potential sources of danger and
  must be disposed of as provided by law.
• Before plugging into the socket, make sure the voltage of your mains
  supply corresponds to the value indicated on the appliance and that the
  socket and power line are appropriate for the load required.
• The appliance must be used in the portable configuration only. The
  appliance is designed and produced for domestic use only.
• Do not use this appliance near showers, baths, swimming pools, etc.
  Don’t use in very wet environments (bathrooms, etc.).
• Do not cover the appliance when in operation to avoid the risk of fire.
• The fan heater must not be placed directly under a power socket. Do not
  direct hot air to a power outlet
• Do not use the heater to dry laundry. Never obstruct the intake and
  outlet grilles (danger of overheating).
• Do not immerse the appliance or the cable in water or other liquids.
• Do not touch the appliance with wet hands.
• Never leave the appliance unattended when in use.
• The appliance can be used by children over the age of 8 and by people
  with reduced physical, sensory or mental abilities, or without experience
 16
GB

   or the necessary knowledge, as long as they are supervised or after they
   have received instructions relating to the safe use of the appliance and
   an understanding of the dangers inherent to it. Children must not play
   with the appliance. Cleaning and maintenance intended to be carried
   out by the user must not be carried out by unsupervised children. Make
   sure that children do not play with the appliance.
• Children under 3 years old must be kept out of reach of the appliance if
   not constantly supervised.
• Children between the ages of 3 and 8 only need to switch the appliance
   on / off as long as it has been placed or installed in its normal operating
   position and that they receive supervision or instructions regarding
   the safe use of the appliance and understand the dangers. Children
   between the ages of 3 and 8 must not plug in, adjust or clean the
   appliance or perform maintenance by the user.
ATTENTION: Some parts of the product can become extremely hot during
operation and cause burns. Particular attention must be paid in the
presence of children or vulnerable people.
• The heater must be positioned at least 1m from furniture, walls, curtains,
   or other objects.
• The use of extension leads is not recommended.
• Do not use the power cord to lift or carry the appliance or pull the
   transformer plug out of the wall socket.
• Make sure that the cable has no kinks or bends.
• Check the status of the electrical cable. Damaged or knotted cable
   increase the risk of electric shock.
• If the power cable is damaged, it must be replaced by the manufacturer,
   the authorized after sales service or a qualified electrician in order to
   eliminate all risk.
• Always unplug the heater before proceeding with cleaning and wait for
                                                                          17
GB it cool down before cleaning. • Do not use aggressive detergents to clean the appliance. • Do not allow the appliance or the cable to come in contact with hot surfaces. • Always unplug the heater when not in use. • This appliance must be used only for the purpose for which it was conceived. • Avoid dropping the appliance. • If you encounter any problems with the device, contact the authorized after sales service. Do not try to repair the product yourself. • The appliance is not to be used if it has been dropped, if there are visible signs of damage or if it is leaking. • In case of failure or faulty operation, switch the appliance off and do not tamper. Contact the after sales service to repair it. • Please do not use the fan heater in places full of combustible or explosive gas. Do not cover the air outlet. • While using the fan heater, try not to open the door or window continuously otherwise this will affect the heating effect. • If you want to turn off the machine, press the on / off switch to off. The fan will continue to work for other 30 seconds until it stops working. • Do not use this fan heater in the bathroom. • The fan heater must be installed in a way that switches and other controls cannot be used from the bath or shower. WARNING: Do not use this heating appliance with programmers, external timers or any other device that automatically switches on the appliance, as there is a risk of fire if the appliance is covered or positioned incorrectly. IMPORTANT: In order to avoid overheating, never cover the appliance during operation, as this would cause a dangerous increase in temperature. 18
GB

FEATURES
1. High quality and long lasting plastic shell.
2. PTC ceramic heating elements, high efficiency heating, fast, quiet, odorless,
non-polluting.
3. Two-level heat setting, to adjust the temperature according to your needs.
4. There is a safety device to prevent overheating. The appliance switches off
automatically when the air outlet is blocked and switches on again when it is free.
5. You can choose between cold air and hot air. In summer, it is advisable to close
the windows to keep them as cool as possible.

INSTALLATION
Drill two holes in the wall and keep a distance of over 2.0m from the ground.
the diameter of the hole must contain the expansion plug, the diameter of
which is 6 mm. After inserting the plug, insert the screw inside it and fix the fan
heater with the hook. Be sure to insert all the way in. Refer to the image.
Use the supplied components (screws and expansion plugs) for fixing to the wall
as shown in the following figure, and then proceed to hook the machine.
Note: The maximum weight is 4.1kg, the wall must be able to withstand this
weight.

                                            1.The distance between the
                                            product and the ceiling (and side)
                                            must be ≥30cm.
                                            2. For the various installation
                                            measures of the product, see the
                                            figure.
                                            3. Note: To hook the product, the
                                            screw must be aligned with hole
                                            “A” on the product. After hanging
                                            it, slide the device and hook it
                                            towards the “B”, in order to fix it
                                            firmly.
                                            To remove it, unhook it from “B” to
                                            “A” and then pull it out.

                                                                                19
GB
USAGE
1. Connect to a 220-240 V ~ 50-60 Hz mains socket
2. Insert the plug into the wall socket.
3. Turn on the appliance using the switch
“0” is “OFF”
“I”: is “ON”.
4. Run the fan heater via control buttons
or via remote control.
1. Turn on the device using the
switch. In this way the fan heater
will enter standby mode.
2. On the right side of the appliance
there is a “START / STOP” button,
pressing it the appliance will
start by default in “maximum
heat power”, pressing again, the
appliance will turn off.
3. when the appliance is turned off,
the fan will continue to run for 30
seconds.
4. All available functions are
selectable by remote control
Display symbol description:
Fan
Minimum heat power 1000W
Maximum heat power 2000W
Timer
Weekly Timer
Temperature
If the icon is steady: the chosen
temperature is set between 18-45°C
Flashing: Open window detection
starts.
20GB
REMOTE CONTROL
Pressing “ ” the device can be turned On (fan mode active),
Off (The fan works for another 30 seconds after switching
ON/OFF off)..
Pressing “ ”it is possible to select minimum heat, maximum
heat power, fan mode (room temperature).
Heat
Pressing “ ” it is possible to set the timer for 1H,2H,3H.…
8H. it is not possible to set this kind of timer if it has already
been set the weekly timer.
Timer
Pressing “ ”, the temperature can be set by selecting it
with “+” and “-” between 18-45°C.
Temperature If the chosen temperature is the same as the surrounding
set environment or lower, the appliance will stop producing heat.
If the chosen temperature is 1-2°C higher, the minimum
power heat mode will be activated.
If the selected temperature is higher than 3°C, the maximum
power heat mode will be activated.
To confirm the setting, press OK or wait 5 seconds.
This function can only be activated when the appliance is in
heating mode or when a target temperature has been set (it
cannot start when the appliance is running only the fan).
Open
window Press “ ”, to turn on this function. The icon will start
detection to flash on the display.
The device keeps in memory the measured temperature
1 minute after activating the function, then compares
the actual measured temperatures with this value every 5
minutes. If the current measured temperature is at least 8 ° C
lower than the original measurement, the unit turns off for
energy saving reasons.
The weekly timer can only be used when the appliance is
in heating mode (it cannot be used when only the fan is
running) or in set temperature mode.
Weekly timer
21GB
The first time the timer is set (for example turning
it on after a power failure), the current time must
be set.
Setting method:
a. Set the day of the week: the display shows 01,
Setting press + or - to adjust the current day, from 01
current to 07 (from Monday to Sunday). Press OK to
time confirm the setting.
Weekly timer and day b. Set the operating time: the display shows 00
of the as time, press + or - to adjust the current time,
week from 00H to 23H. Press OK to confirm the
setting.
c. Set the minutes: the display shows 00, press + or
- to adjust the minutes, from 00 to 59. Press OK
to confirm the setting.
Note: Do not press OK within 10 seconds of
setting, otherwise it will be canceled.
P1
Pressing , the display will show P1, push OK
to set mode P1. (If you don’t press OK within 10
seconds, the timer will not be set).
P2
Pressing , the display will show P2, push OK to
set mode P2.
(If you don’t press OK within 10 seconds, the timer
will not be set).
P3
Pressing , the display will show P3, push OK to
Default set mode P3.
Mode (If you don’t press OK within 10 seconds, the timer
Weekly timer will not be set).
P4
Pressing , the display will show P4, push OK to
set mode P4.
(If you don’t press OK within 10 seconds, the timer
will not be set).
P5
Pressing , the display will show P5, push OK to
set mode P5.
(If you don’t press OK within 10 seconds, the timer
will not be set).
22GB
P6
Pressing , , the display will show P6, push OK to
set mode P6.
(If you don’t press OK within 10 seconds, the timer
will not be set).
The display will show as default number 1, push +
or - from 1 to 7 to set the day of the week among
Monday/Sunday.
Flashing 1 (Monday)
Push OK - Start from Monday
a. The display will show 00, press + or – to set the
time from 0H to 24H, press OK to confirm. The
device will turn on at this time.
b. The display will show 00, press + or – to set the
Custo- time from 0H to 24H, press OK to confirm. The
mised device will turn off at this time.
Weekly timer Mode The display will show 2-7 from Tuesday to Sunday
Set the days of the week as done for Monday.
Note
1. Only one on / off cycle can be set each day of
the week.
2. Only hours can bet, not minutes
3. It is necessary to set both the time in which it
turns on and the time in which it turns off
4. To confirm the custom settings, it is necessary to
set every day of the week from 1 to 7, otherwise
the custom timer setting will not be activated.
Once set, the timer will activate and the icon will
appear on the display.
Pre-set Timer scheme
Mode Monday Tuesday Wednesday Thursday Friday Saturday Sunday
P1 8:00-17:00 8:00-17:00 8:00-17:00 8:00-17:00 8:00-17:00 8:00-17:00 8:00-17:00
P2 18:00-7:00 18:00-7:00 18:00-7:00 18:00-7:00 18:00-7:00 18:00-7:00 18:00-7:00
P3 8:00-17:00 8:00-17:00 8:00-17:00 8:00-17:00 8:00-17:00 Off Off
P4 18:00-7:00 18:00-7:00 18:00-7:00 18:00-7:00 18:00-7:00 Off Off
P5 Off Off Off Off Off 00:00-23:59 00:00-23:59
P6 TBD TBD TBD TBD TBD TBD TBD
Note: P2 and P4, it goes off the morning of the following day
23GB
1. 3.When the weekly timer is on, press and 3.to delete
this setting.
Delete 4. When the target temperature is reached, press and
functions to delete this setting.
Automatic The maximum temperature to reach is 51°C, once reached the
safety switch device will turn off.
off
HOW TO REPLACE BATTERIES
Slide the batteries compartment out from the bottom of the remote control.
Remove the old battery and insert the new battery, paying attention to the
polarity. The battery CR2025 is included in the package. Once inserted, place the
battery compartment inside the remote control and dispose of the exhausted
battery in the appropriate containers or separate collection centers.
CLEANING AND MAINTENANCE
1. If you do not use the fan heater for a long time, clean the surface. Wait for
the machine to cool down and unplug it, then clean it. Use a cloth or cleaner.
Never wash directly with water, do not drop water into the machine. Never
use acids, chemical thinners, gasoline, benzene, etc.
2. Before using the machine again, check and make sure that the air outlet has
no obstacles.
24GB
DATA LABEL
This product complies with all the applicable EU directives.
Read carefully the instruction manual.
Do not cover the appliance when in operation to avoid the risk of fire.
Class II insulated electrical appliance.
INFORMATION FOR USERS pursuant to Legislative Decree N ° 49 of 14 March 2014
“Implementation of Directive 2012/19 / EU on waste electrical and electronic
equipment (WEEE)”
The crossed-out bin symbol shown on the equipment indicates that the product at
the end of its useful life must be collected separately from other waste. The user
must, therefore, deliver the equipment complete with the essential components
at the end of its life to the appropriate separate collection centers for electronic and
electrotechnical waste, or return it to the retailer when purchasing new equipment of an
equivalent type, for one to one, or 1 to zero for equipment with a longest side less than 25
cm. Adequate separate collection for the subsequent start-up of the discarded equipment
for recycling, treatment and environmentally compatible disposal helps to avoid possible
negative effects on the environment and health and favors the recycling of the materials
of which the equipment is made. Illegal disposal of the product by the user involves the
application of the administrative sanctions referred to in Legislative Decree no. Legislative
Decree N ° 49 of 14 March 2014.
25GB
INFORMATION FOR ELECTRICAL LOCAL ROOM HEATING
APPLIANCES
The remote control of this appliance works with a CR2025 type battery which falls
under the European directive 2013/56 / EU and which cannot be disposed of with
normal household waste. Find out about local regulations relating to separate
collection of batteries: proper disposal allows you to avoid negative consequences
for the environment and health. Do not throw the batteries into fire.
26GB 27
Innoliving Spa
      Via Merloni, 2/B
     60131 Ancona Italy
      Tel 071 2133550
      www.innoliving.it

      MADE IN CHINA
                          Rev.00_05.2021

28
Puoi anche leggere