SURGICAL PROCEDURES PROTOCOLLI CHIRURGICI - B&B Dental
←
→
Trascrizione del contenuto della pagina
Se il tuo browser non visualizza correttamente la pagina, ti preghiamo di leggere il contenuto della pagina quaggiù

PROTOCOLLI CHIRURGICI
SURGICAL PROCEDURES

INDICE                                                                                              INDEX

Premessa....................................................................................... 3   Introduction................................................................................... 3
CLASSIFICAZIONE DELL’OSSO.................................................. 4                       BONE CLASSIFICATION............................................................. 4

IMPIANTO DURAVIT EVOLUTION............................................. 5                           DURAVIT EVOLUTION IMPLANT................................................. 5
Tecniche di fresaggio - SL ø 3,4................................................... 6               Drilling sequences - SL ø 3,4...................................................... 6
Tecniche di fresaggio - EV ø 4..................................................... 7               Drilling sequences – EV ø 4......................................................... 7
Tecniche di fresaggio - EV ø 4,5.................................................. 8                Drilling sequences – EV ø 4,5...................................................... 8
Tecniche di fresaggio - EV ø 5..................................................... 9               Drilling sequences - EV ø 5.......................................................... 9
IMPIANTO DURAVIT 3P............................................................. 10                 DURAVIT 3P IMPLANT................................................................ 10
Tecniche di fresaggio - 3P ø 3................................................... 11                Drilling sequences - 3P ø 3........................................................ 11
Tecniche di fresaggio - 3P ø 3,5................................................ 12                 Drilling sequences - 3P ø 3,5..................................................... 12
Tecniche di fresaggio - 3P ø 4................................................... 13                Drilling sequences - 3P ø 4........................................................ 13
Tecniche di fresaggio - 3P ø 4,5................................................ 14                 Drilling sequences - 3P ø 4,5..................................................... 14
Tecniche di fresaggio - 3P ø 5................................................... 15                Drilling sequences - 3P ø 5........................................................ 15

INSERIMENTO IMPIANTO                                                                                IMPLANT PLACEMENT
Procedura per osso compatto................................................... 16                   Drilling protocol – dense bone................................................. 16
Procedura per osso spugnoso................................................... 18                   Drilling protocol - soft bone...................................................... 18
Procedura sepolta e transmucosa............................................. 20                     One and two-stage procedures................................................ 20
Livello di posizionamento nell'osso.......................................... 21                    Level of placement inside the bone......................................... 21

PROCEDURE PRE-OPERATORIE.............................................. 22                           PRE-OPERATIVE PROCEDURES............................................... 22
ESAME PRE-OPERATORIO....................................................... 23                      PRE-IMPLANT X-RAY EVALUATION......................................... 23
MISURAZIONE DELL’OSSO....................................................... 25                     MEASUREMENT OF THE BONE.............................................. 25
DIMENSIONE DELL’IMPIANTO................................................ 26                         IMPLANT SIZE............................................................................. 26
DIMENSIONI RACCOMANDATE DELL'IMPIANTO................ 27                                            RECOMMENDED IMPLANT SIZE............................................. 27
KIT CHIRURGICO....................................................................... 28            SURGICAL KIT............................................................................. 28
PULIZIA E CURA DEL CRICCHETTO DINAMOMETRICO...... 32                                                CLEANING AND MAINTENANCE
PULIZIA DEGLI STRUMENTI...................................................... 33                    OF THE TORQUE RATCHET .................................................... 32
STERILIZZAZIONE DEGLI STRUMENTI.................................... 34                              CLEANING OF INSTRUMENTS................................................ 33
                                                                                                    STERILIZING INSTRUMENTS.................................................... 34

2
B&B DENTAL
                                             implant company

PREMESSA                                                   INTRODUCTION

Questo manuale è stato progettato per l'utilizzo da        This manual is designed for being used by clinicians
parte di medici che hanno partecipato ad almeno            who have undergone at least basic surgical and in-
un corso base teorico e pratico di chirurgia presso        clinic implant training. All the information about
uno dei nostri medici referenti. Le informazioni           the Duravit system show to dentists and specialists
contenute, relative al sistema Duravit, illustrano a       essential steps regarding implant planning and
dentisti e specialisti le fasi essenziali riguardanti la   surgical procedures.
pianificazione implantare e le procedure chirurgiche.
                                                           B.& B. Dental has an interest to keep doctors
È interesse primario di B.& B. Dental mantenere            up-dated over the latest trends and treatment
ogni medico al corrente sulle ultime tendenze e sulle      techniques of implants through a continued
tecniche di trattamento degli impianti attraverso un       education. Function, beauty and biology in perfect
programma di formazione continuo.                          harmony.
Funzione, bellezza e biologia in perfetta armonia.         Our aim is to provide you a wide range of implant
Il nostro obiettivo è quello di fornire un’ampia scelta    solutions. We develop products and solutions in
di soluzioni implantari.                                   order to make your job as simple as possible even
Sviluppiamo prodotti e soluzioni per rendere il            in case of complex surgery.
vostro lavoro il più semplice possibile, anche nei
casi di chirurgia complessa.

                                                                                                             3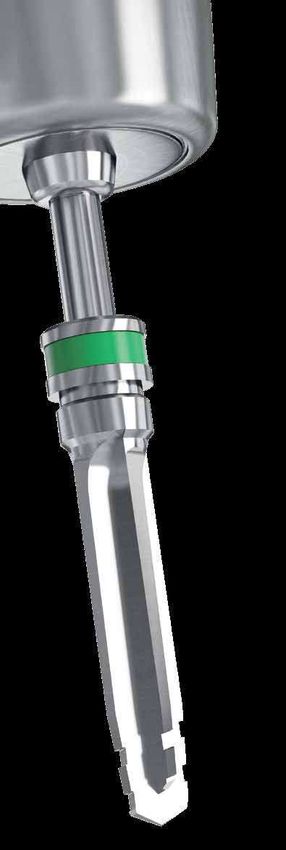
CLASSIFICAZIONE DELL’OSSO
BONE CLASSIFICATION

DENSITÀ OSSEA DESCRIZIONE                                                CHIRURGIA                                             TEMPO DI CARICO
BONE DENSITY DESCRIPTION                                                 SURGERY                                                 LOADING TIME

    TYPE I     D1: da 1000 a 1600 HOUNSFIELD                             - Utilizzare abbondante soluzione salina                      Circa
               D1: l'osso è composto quasi completamente da                sterile pre-raffreddata per il raffreddamento               10/12
               massa ossea corticale. Si trova principalmente nella        dell'osso.                                                settimane
               parte anteriore della mandibola.                          - Piccolo e graduale aumento del diametro
               Questo tipo di osso permette la massima stabilità           delle frese con una velocità intorno ai
               iniziale dell'impianto.                                     800/1000 rpm
               D1: from 1000 to 1600 HOUNSFIELD                          - Use copious amounts of pre cooled sterile                  About
               D1: bone is composed of almost all cortical bone            saline solution for cooling.                               10/12
               mass located primarily in the anterior mandible.          - Small increments in drill diameters combined               weeks
               This type of bone results in the greatest initial           with drill speed around 800/1000 rpm
               implant stability.

    TYPE II    D2: da 600 a 1000 HOUNSFIELD                              - Utilizzare abbondante soluzione salina sterile             Circa
               D2 è composto da uno spesso strato di osso corticale        pre-raffreddata per il raffreddamento dell'osso.             12
               attorno ad un sottile strato di osso trabecolare a        - Piccolo e graduale aumento del diametro delle            settimane
               trabecole spesse. Si trova principalmente nella             frese con una velocità intorno ai 800 rpm
               mandibola posteriore ed anteriore.
                                                                         - Use copious amounts of pre cooled sterile saline
               D2: from 600 to 1000 HOUNSFIELD                             solution for cooling.                                      About
               D2 bone is composed of a thick crestal layer of           - Smaller increments in drill diameter combined               12
               cortical bone and coarse trabecular bone underneath         with drill speeds around 800 rpm.                          weeks
               the cortical bone.
               This type of bone can mostly be found in the anterior
               and posterior mandible.

               D3: da 300 a 600 HOUNSFIELD                               - Utilizzare le frese solo per creare una guida per
    TYPE III   D3 è composto da uno strato poroso di osso corticale        gli strumenti di compattazione.
                                                                                                                                     Circa16
                                                                                                                                    settimane
               con al di sotto osso trabecolare a trabecole sottili.     - I compattatori devono essere utilizzati
               Si trova principalmente nella mascella anteriore e          manualmente in modo da saggiare la resistenza
               posteriore, ma anche nella mandibola posteriore. È          dell'osso e scegliere il giusto impianto.
               consigliabile in questo caso modificare il protocollo
               passando da una procedura di fresaggio ad una di
               compattazione.
               D3: from 300 to 600 HOUNSFIELD                            - Use drills only to create a path for the                   About
               D3 bone is composed of a porous crestal layer of            compactor tools.                                            16
               cortical bone and fine trabecular bone underneath         - Compactors has to be used manually to feel the             weeks
               the cortical bone. This type of bone can mostly be          resistance and choose the right implant.
               found in the anterior and posterior maxilla but also in
               the posterior mandible. It’s advisable to switch from a
               drilling protocol to a compacting manual technique.

               D4: da 100 a 300 HOUNSFIELD                               - Utilizzare le frese solo per creare una guida per
    TYPE IV    D4 è composto principalmente da osso trabecolare            gli strumenti di compattazione.
                                                                                                                                      Circa
                                                                                                                                      16/20
               a trabecole sottili e da una quasi assenza di osso        - I compattatori devono essere utilizzati
               corticale. Si trova principalmente nella mascella                                                                    settimane
                                                                           manualmente in modo da saggiare la resistenza
               posteriore. A causa della quasi mancanza di osso            dell'osso e scegliere il giusto impianto.
               corticale e della sua sottile architettura trabecolare,
               l'osso D4 ha uno scarso contatto con l’ impianto.
                                                                                                                                      About
               D4: from 100 to 300 HOUNSFIELD                            - Use drills only to create a path for the                   16/20
               D4 bone is primarily composed fine trabecular bone          compactor tools.
               and often the absence of cortical bone. This type of                                                                   weeks
                                                                         - Compactors has to be used manually to feel the
               bone can mostly be found in the posterior maxilla.          resistance and choose the right implant.
               Due to the near absence of a cortical bone and its
               fine trabecular architecture D4 bone has a low contact
               between bone and implant.

4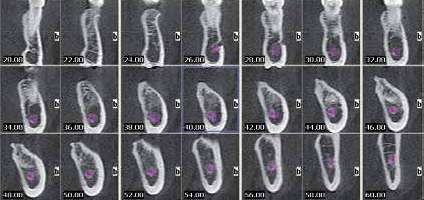
IMPIANTO DURAVIT EVOLUTION
DURAVIT EVOLUTION IMPLANT

                                  COLLARE CON CONICITÀ
                                  INVERSA E MICRO
CONO MORSE &                      SCANALATURA ANULARE
ESAGONO INTERNO                   - Supporto ottimale dei tessuti
                                    molli
MORSE TAPER &                     - Massimo volume dell'osso
INTERNAL HEXAGON                    alveolare
                                  - Minor riassorbimento crestale

                                  BACK-TAPERED
                                  CORONAL DESIGN
                                  WITH MICRO RINGS
SPIRA A DOPPIO FILETTO
                                  - Optimal soft tissue support
- Doppia elica molto tagliente
                                  - Maximum alveolar bone
  per profondità aumentata
                                    volume
  della spira
                                  - Less crestal resorption
- Permette facile inserimento
  e condensazione dell’osso
- Stabilità primaria molto alta   DESIGN ANATOMICO
                                  A STRUTTURA
DOUBLE THREAD BODY                SIMIL RADICOLARE
- Thread of increased depth
  and highly sharp                PERFECT ANATOMICAL
- Easy insertion and bone         DESIGN LIKE A RADICULAR
  condensing                      STRUCTURE
- Higher primary stability

SISTEMA
AUTOMASCHIANTE

SELF TAPPING SYSTEM
- Self tapping
- Self drilling                   APICE PENETRANTE
                                  - Permette all’impianto
                                    di penetrare in siti
                                    sottopreparati
                                  - Ancoraggio ideale

                                  APICAL BLADE
                                  - Penetrate small diameter
                                    preparations
                                  - Optimal anchorage

                                                                  5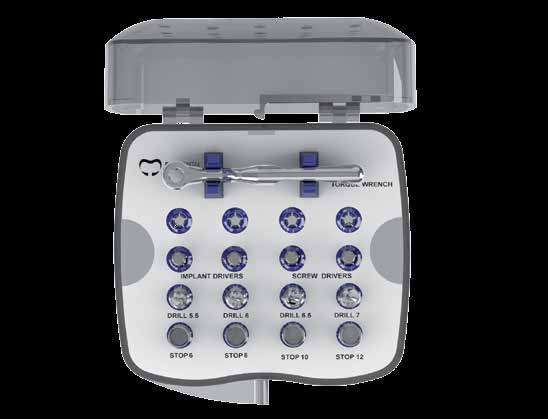
TECNICHE DI FRESAGGIO - SL Ø3,4
          DRILLING SEQUENCES - SL Ø3,4

                ø3,4

PROCEDURA STANDARD
DRILLING PROTOCOL - STANDARD

       ref:           ref:          ref:           ref:
     147-021       00074CUT      00075CUT        SL-3412
                     ø 2,2          ø3          ø 3,4 L 12

PROCEDURA PER OSSO COMPATTO (D1)                               PROCEDURA PER OSSO SPUGNOSO (D4)
DRILLING PROTOCOL - DENSE BONE (D1)                            DRILLING PROTOCOL - SOFT BONE (D4)

                                                                     ref:       ref:      ref:         ref:
                                                                   147-021   00074CUT   281-3P       SL-3412
                                                                               Ø 2,2     Ø3         ø 3,4 L 12

      ref:        ref:       ref:       ref:         ref:
    147-021    00074CUT   00075CUT    NECK-30      SL-3412
                 ø 2,2       ø3         ø3        ø 3,4 L 12

6
TECNICHE DI FRESAGGIO - EV Ø4
            DRILLING SEQUENCES - EV Ø4

                   ø4

PROCEDURA STANDARD
DRILLING PROTOCOL - STANDARD

     ref:          ref:         ref:         ref:         ref:
   147-021      00074CUT     00075CUT     3P-35CUT      EV-4012
                  ø 2,2         ø3          ø 3,5       ø 4 L 12

PROCEDURA PER OSSO COMPATTO (D1/D2)                                 PROCEDURA PER OSSO SPUGNOSO (D3/D4)
DRILLING PROTOCOL - DENSE BONE (D1/D2)                              DRILLING PROTOCOL - SOFT BONE (D3/D4)

                                                                         ref:       ref:      ref:     ref:     ref:
                                                                       147-021   00074CUT   281-3P   331-3P   EV-4012
                                                                                   Ø 2,2     Ø3       Ø 3,5   ø 4 L 12

    ref:        ref:       ref:       ref:      ref:       ref:
  147-021    00074CUT   00075CUT   3P-35CUT   NECK-40    EV-4012
               ø 2,2       ø3        ø 3,5      ø4       ø 4 L 12

                                                                                                                         7
TECNICHE DI FRESAGGIO - EV Ø4,5
               DRILLING SEQUENCES - EV Ø4,5

                      ø4,5

PROCEDURA STANDARD
DRILLING PROTOCOL - STANDARD

       ref:         ref:       ref:       ref:       ref:          ref:
     147-021     00074CUT   00075CUT   3P-35CUT   3P-40CUT      EV-4512
                   ø 2,2       ø3        ø 3,5       ø4        ø 4,5 L 12

PROCEDURA PER OSSO COMPATTO (D1/D2)                                         PROCEDURA PER OSSO SPUGNOSO (D3/D4)
DRILLING PROTOCOL - DENSE BONE (D1/D2)                                      DRILLING PROTOCOL - SOFT BONE (D3/D4)

                                                                                ref:       ref:      ref:     ref:     ref:      ref:
                                                                              147-021   00074CUT   281-3P   331-3P   381-3P    EV-4512
                                                                                          Ø 2,2     Ø3       Ø 3,5    Ø4      ø 4,5 L 12

      ref:        ref:     ref:     ref:     ref:      ref:        ref:
    147-021    00074CUT 00075CUT 3P-35CUT 3P-40CUT   NECK-45    EV-4512
                 ø 2,2     ø3      ø 3,5     ø4       ø 4,5    ø 4,5 L 12

8
TECNICHE DI FRESAGGIO - EV Ø5
            DRILLING SEQUENCES - EV Ø5

                    ø5

PROCEDURA STANDARD
DRILLING PROTOCOL - STANDARD

    ref:       ref:     ref:     ref:     ref:     ref:          ref:
  147-021   00074CUT 00075CUT 3P-35CUT 3P-40CUT 3P-45CUT      EV-5012
              ø 2,2     ø3      ø 3,5     ø4      ø 4,5       ø 5 L 12

PROCEDURA PER OSSO COMPATTO (D1/D2)                                      PROCEDURA PER OSSO SPUGNOSO (D3/D4)
DRILLING PROTOCOL - DENSE BONE (D1/D2)                                   DRILLING PROTOCOL - SOFT BONE (D3/D4)

                                                                             ref:     ref:      ref:     ref:     ref:     ref:      ref:
                                                                           147-021 00074CUT   281-3P   331-3P   381-3P   431-3P   EV-5012
                                                                                     Ø 2,2     Ø3       Ø 3,5    Ø4       Ø 4,5   ø 5 L 12

   ref:     ref:     ref:     ref:     ref:     ref:    ref:     ref:
 147-021 00074CUT 00075CUT 3P-35CUT 3P-40CUT 3P-45CUT NECK-50 EV-5012
           ø 2,2     ø3      ø 3,5     ø4      ø 4,5    ø5    ø 5 L 12

                                                                                                                                             9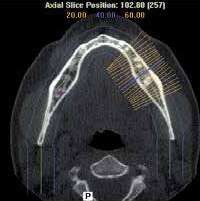
IMPIANTO DURAVIT 3P
DURAVIT 3P IMPLANT

                         MICROFILETTATURA DEL
                         COLLARE
                         - Aumenta la stabilità primaria
CONO MORSE &             - Facilita l’inserimento
ESAGONO INTERNO            dell’ impianto
                         - Riduce il carico protesico
MORSE TAPER &              verticale
INTERNAL HEXAGON         - Facilita la guarigione dei
                           tessuti gengivali

                         MICROGROOWING
                         COLLAR
                         - Primary stability increased
                         - Easy insertion implant
                         - Reduced prosthetic load
                         - Easy gingival tissues healing

SPIRA A TRIPLO FILETTO
                         DESIGN ANATOMICO
TRIPLE THREAD BODY       A STRUTTURA
                         SIMIL RADICOLARE
                         - Macromorfologia innovativa
                           progettata per ottenere una
                           elevata stabilità primaria.

                         PERFECT ANATOMICAL
                         DESIGN LIKE A RADICULAR
                         STRUCTURE
                         - Innovative macromorphology,
SISTEMA                    designed for a primary high
AUTOMASCHIANTE             stability
SELF TAPPING SYSTEM

                         APICE “BONE FRIENDLY”

                         "BONE FRIENDLY" APEX

10
TECNICHE DI FRESAGGIO - 3P Ø3
DRILLING SEQUENCES - 3P Ø3
ø3
PROCEDURA STANDARD OPZIONALE
DRILLING PROTOCOL - STANDARD OPTIONAL
Il maschiatore è The Bone Tap
disponibile come is available as
procedura finale an optional step
della sequenza within the drilling
chirurgica in caso sequence in case
di osso duro (D1). of dense bone
(D1).
Codice colore ø3 Color Code
Diametro Reale ø3 Real diameter
ref: TAP-30
ref: ref: ref: ref:
147-021 00074CUT 00075CUT SP-301
ø 2,2 ø3 ø 3 L 12
PROCEDURA PER OSSO COMPATTO (D1) PROCEDURA PER OSSO SPUGNOSO (D4)
DRILLING PROTOCOL - DENSE BONE (D1) DRILLING PROTOCOL - SOFT BONE (D4)
ref: ref: ref: ref:
147-021 00074CUT 281-3P SP-301
Ø 2,2 Ø3 ø 3 L 12
ref: ref: ref: ref: ref:
147-021 00074CUT 00075CUT NECK-30 SP-301
ø 2,2 ø3 ø3 ø 3 L 12
11TECNICHE DI FRESAGGIO - 3P Ø3,5
DRILLING SEQUENCES - 3P Ø3,5
ø3,5
PROCEDURA STANDARD OPZIONALE
DRILLING PROTOCOL - STANDARD OPTIONAL
Il maschiatore è The Bone Tap
disponibile come is available as
procedura finale an optional step
della sequenza within the drilling
chirurgica in caso sequence in case
di osso duro (D1). of dense bone
(D1).
Codice colore ø 3,5 Color Code
Diametro Reale ø4 Real diameter
ref: TAP-35
ref: ref: ref: ref: ref:
147-021 00074CUT 00075CUT 3P-35CUT 3P-3512
ø 2,2 ø3 ø 3,5 ø 3,5 L 12
PROCEDURA PER OSSO COMPATTO (D1) PROCEDURA PER OSSO SPUGNOSO (D4)
DRILLING PROTOCOL - DENSE BONE (D1) DRILLING PROTOCOL - SOFT BONE (D4)
ref: ref: ref: ref: ref:
147-021 00074CUT 281-3P 331-3P 3P-3512
Ø 2,2 Ø3 Ø 3,5 ø 3,5 L 12
ref: ref: ref: ref: ref: ref:
147-021 00074CUT 00075CUT 3P-35CUT NECK-40 3P-3512
ø 2,2 ø3 ø 3,5 ø4 ø 3,5 L 12
12TECNICHE DI FRESAGGIO - 3P Ø4
DRILLING SEQUENCES - 3P Ø4
ø4
PROCEDURA STANDARD OPZIONALE
DRILLING PROTOCOL - STANDARD OPTIONAL
Il maschiatore è The Bone Tap
disponibile come is available as
procedura finale an optional step
della sequenza within the drilling
chirurgica in caso sequence in case
di osso duro (D1). of dense bone
(D1).
Codice colore ø4 Color Code
Diametro Reale ø4 Real diameter
ref: TAP-40
ref: ref: ref: ref: ref: ref:
147-021 00074CUT 00075CUT 3P-35CUT 3P-40CUT 3P-4012
ø 2,2 ø3 ø 3,5 ø4 ø 4 L 12
PROCEDURA PER OSSO COMPATTO (D1) PROCEDURA PER OSSO SPUGNOSO (D4)
DRILLING PROTOCOL - DENSE BONE (D1) DRILLING PROTOCOL - SOFT BONE (D4)
ref: ref: ref: ref: ref: ref:
147-021 00074CUT 281-3P 331-3P 381-3P 3P-4012
Ø 2,2 Ø3 Ø 3,5 Ø4 ø 4 L 12
ref: ref: ref: ref: ref: ref: ref:
147-021 00074CUT 00075CUT 3P-35CUT 3P-40CUT NECK-45 3P-4012
ø 2,2 ø3 ø 3,5 ø4 ø 4,5 ø 4 L 12
13TECNICHE DI FRESAGGIO - 3P Ø4,5
DRILLING SEQUENCES - 3P Ø4,5
ø4,5
PROCEDURA STANDARD OPZIONALE
DRILLING PROTOCOL - STANDARD OPTIONAL
Il maschiatore è The Bone Tap
disponibile come is available as
procedura finale an optional step
della sequenza within the drilling
chirurgica in caso sequence in case
di osso duro (D1). of dense bone
(D1).
Codice colore ø 4,5 Color Code
Diametro Reale ø 4,5 Real diameter
ref: TAP-45
ref: ref: ref: ref: ref: ref: ref:
147-021 00074CUT 00075CUT 3P-35CUT 3P-40CUT 3P-45CUT 3P-4512
ø 2,2 ø3 ø 3,5 ø4 ø 4,5 ø 4,5 L 12
PROCEDURA PER OSSO COMPATTO (D1) PROCEDURA PER OSSO SPUGNOSO (D4)
DRILLING PROTOCOL - DENSE BONE (D1) DRILLING PROTOCOL - SOFT BONE (D4)
ref: ref: ref: ref: ref: ref: ref:
147-021 00074CUT 281-3P 331-3P 381-3P 431-3P 3P-4512
Ø 2,2 Ø3 Ø 3,5 Ø4 Ø 4,5 ø 4,5 L 12
ref: ref: ref: ref: ref: ref: ref: ref:
147-021 00074CUT 00075CUT 3P-35CUT 3P-40CUT 3P-45CUT NECK-50 3P-4512
ø 2,2 ø3 ø 3,5 ø4 ø 4,5 ø5 ø 4,5 L 12
14TECNICHE DI FRESAGGIO - 3P Ø5
DRILLING SEQUENCES - 3P Ø5
ø5
PROCEDURA STANDARD OPZIONALE
DRILLING PROTOCOL - STANDARD OPTIONAL
Il maschiatore è The Bone Tap
disponibile come is available as
procedura finale an optional step
della sequenza within the drilling
chirurgica in caso sequence in case
di osso duro (D1). of dense bone
(D1).
Codice colore ø5 Color Code
Diametro Reale ø5 Real diameter
ref: TAP-50
ref: ref: ref: ref: ref: ref: ref: ref:
147-021 00074CUT 00075CUT 3P-35CUT 3P-40CUT 3P-45CUT 3P-50CUT 3P-5012
ø 2,2 ø3 ø 3,5 ø4 ø 4,5 ø5 ø 5 L 12
PROCEDURA PER OSSO COMPATTO (D1) PROCEDURA PER OSSO SPUGNOSO (D4)
DRILLING PROTOCOL - DENSE BONE (D1) DRILLING PROTOCOL - SOFT BONE (D4)
ref: ref: ref: ref: ref: ref: ref: ref:
147-021 00074CUT 281-3P 331-3P 381-3P 431-3P 481-3P 3P-5012
Ø 2,2 Ø3 Ø 3,5 Ø4 Ø 4,5 Ø5 Ø 5 L 12
ref: ref: ref: ref: ref: ref: ref: ref: ref:
147-021 00074CUT 00075CUT 3P-35CUT 3P-40CUT 3P-45CUT 3P-50CUT NECK-50 3P-5012
ø 2,2 ø3 ø 3,5 ø4 ø 4,5 ø5 ø5 ø 5 L 12
15INSERIMENTO IMPIANTO
IMPLANT PLACEMENT
PROCEDURA PER OSSO COMPATTO
DRILLING PROTOCOL – DENSE BONE
Un'efficiente e atraumatica preparazione del sito implantare An efficient and atraumatic preparation of the implant site
deve essere realizzata con una procedura progressiva utilizzando must be realized through a step-by-step procedure using
la tecnica di fresaggio graduale. Tutta la fase di perforazione drills of different diameters. All drilling phases of the bone
del tessuto osseo deve essere effettuata sotto abbondante tissue should be carried out under profuse external irrigation
irrigazione esterna con soluzione fisiologica o acqua distillata with saline solution or sterile distilled water and with an
sterile e con una tecnica di foratura intermittente per evitare il intermittent drilling technique to prevent overheating of the
surriscaldamento dell’osso e per creare un effetto di drenaggio bone and to create a draining effect for an efficient removal of
per l’efficace rimozione del tessuto osseo. bone tissue.
Incidere il lembo a tutto spessore fino ad avere una completa
visione dell'inclinazione e dello spessore della cresta ossea.
Utilizzare la FRESA LANCIA per perforare la corticale e
preparare la sede della testa dell'impianto facilitando poi la
successiva perforazione della fresa di profondità ø 2.1.
Cut and open the flap widely enough to have a complete view
of the inclination and width of the bone ridge.
Use the LANCE DRILL to pierce the cortical bone and prepare
the implant head site, facilitating the insertion and the direc-
tion of the following ø 2.1 depth drill.
STOP DI PROFONDITÀ
Inseriti a pressione nelle frese o nei compattatori (ø 2.1/ ø 3/
ø 3.5/ ø 4/ ø 4.5) permettono di raggiungere la profondità
desiderata del foro in modo sicuro e veloce.
Nota: la fresa e il compattatore di ø 5 montano uno stop differente.
Standard Metal stoppers
They are press-fitted in drills or compactors (ø 2.1/ ø 3/ ø
3.5/ ø 4/ ø 4.5), allowing an easy and quick perforation of the
planned implant site.
Note: ø 5 drill and compactor-expander mount a different type of stopper.
Fresa di profondità ø 2.1 e ø 3
Usando lo stop appropriato, fresare facendo attenzione
all’inclinazione della fresa.
Nota: L’ indicatore di direzione può essere inserito nel sito per
facilitare la direzione della successiva perforazione.
Depth drill ø 2.1 and ø 3
By using the proper stopper, drill paying attention only to the
inclination.
Note: Parallel pins can be inserted into the implant site, facilitating
the direction of the subsequent drilling.
16Fresa standard ø 3.5 e ø 4
Continuare la preparazione del sito implantare
raggiungendo profondità e larghezza adeguate.
Standard Drill ø 3.5 and ø 4
Keep drilling the implant site reaching the appropriate depth
and width.
ESTRAZIONE DELL'IMPIANTO
Estrarre l'impianto dal confezionamento con l'apposita chiave
manuale o contrangolo.
Nota Importante: La chiave da utilizzare deve essere provvista di molla.
IMPLANT EXTRACTION
Pull out the implant from the packaging using the specific
driver manual or contra-angle, which can be both manual and
for the universal
contra-angle.
Important Note: The driver shall be provided with the spring.
INSERIMENTO DELL'IMPIANTO
Avvitare l'impianto all'interno del sito implantare utilizzando
l'apposita chiave manuale o contrangolo, e rimuoverla solo
quando si incontra una buona resistenza.
IMPLANT INSERTION
Screw the implant into the prepared site with the specific
driver, until you feel good stability, then remove it.
Insertion torque force INSERIMENTO FINALE DELL'IMPIANTO
35-50 Ncm Cricchetto e chiave implantare sono poi utilizzati per
completare l'inserimento (1-1,5 mm sotto la cresta)
dell’impianto all’interno del sito.
FINAL IMPLANT INSERTION
Ratchet and implant driver will be used in order to
complete the implants placing 1-1,5 mm inside the site.
17INSERIMENTO IMPIANTO
IMPLANT PLACEMENT
PROCEDURA PER OSSO SPUGNOSO
DRILLING PROTOCOL - SOFT BONE
I Compattatori-Espansori del sistema Duravit sono una valida Duravit bone Compactor-Expanders are a good alternative of
alternativa agli osteotomi per l’espansione e la condensazione osteotomes for the expansion and condensation of the bone
dell’osso in particolare nel mascellare, nella preparazione del in particular in the maxilla, during preparation of implant site.
sito implantare. Costituiscono anche una valida alternativa alla They are also an alternative to the Summers maxillary sinus lift
tecnica di rialzo del seno mascellare con tecnica di Summers. I technique. Compactor-Expanders increase implant success
Compattatori-Espansori Duravit aumentano il successo clinico improving primary stability of the implant and maintenance
implantare, migliorando la stabilità primaria ed il mantenimento of bone density, increasing fixation. They are driven into the
della densità ossea. Vengono utilizzati e montati su chiave bone manually with a straight surgical driver or with torque
chirurgica diritta o cricchetto dinamometrico, riducendo il ratchet, decreasing the trauma typical of osteotomes.
trauma tipico degli osteotomi usati a percussione.
Incidere il lembo a tutto spessore fino ad avere una completa
visione dell'inclinazione e dello spessore della cresta ossea.
Utilizzare la FRESA LANCIA per perforare la corticale e
preparare la sede della testa dell'impianto facilitando poi la
successiva perforazione della fresa di profondità ø 2.1.
Cut and open the flap widely enough to have a complete view
of the inclination and width of the bone ridge.
Use the LANCE DRILL to pierce the cortical bone and prepare
the implant head site, facilitating the insertion and the
direction of the following ø 2.1 depth drill.
STOP STANDARD
Inseriti a pressione nelle frese o nei compattatori (ø 2.1/ ø 3/
ø 3.5/ ø 4/ ø 4.5), permettono di raggiungere la profondità
desiderata del foro in modo sicuro e veloce.
Nota: la fresa e il compattatore di ø 5 montano uno stop differente
STANDARD METAL STOPPERS
They are press-fitted in drills or compactors (ø 2.1/ ø 3/ ø
3.5/ ø 4/ ø 4.5), allowing an easy and quick perforation of the
planned implant site.
Note: ø 5 drill and compactors-expander mount a different type of stopper.
FRESA DI PROFONDITÀ Ø 2 E COMPATTATORE Ø 3
Usando lo stop appropriato, fresare facendo attenzione
all’inclinazione della fresa. Proseguire poi con il Compattatore
Espansore ø 3 montato sulla chiave manuale, in modo da
compattare e preparare il sito.
DEPTH DRILL Ø 2 AND COMPACTOR-EXPANDER Ø 3
By using the proper stopper, drill paying attentions only to
the inclination. Then carry on using the Compactor-Expander
ø 3, connected to the manual straight key, compact and
prepare the site.
18COMPATTATORI Ø 3.5 E Ø 4
Continuare la compattazione del sito fino ad
ottenere una buona resistenza dello strumento. Questo
passaggio garantirà una successiva buona stabilità primaria
dell’impianto.
COMPACTOR-EXPANDER Ø 3.5 AND Ø 4
Keep on compacting the implant site until we feel a good
resistance of the tools, in order to guarantee a great primary
stability of the implant.
ESTRAZIONE DELL'IMPIANTO
Inserire l'apposito montatore a cricchetto provvisto di molla
all'interno della chiave manuale e procedere con l'estrazione
dell'impianto dal confezionamento.
IMPLANT EXTRACTION
Insert the ratchet mounter provided with the spring into
the straight manual key and pull out the implant from the
packaging.
INSERIMENTO DELL'IMPIANTO
Avvitare l'impianto all'interno del sito implantare utilizzando
il montatore a cricchetto e la chiave manuale e rimuovere
quest'ultimo solo quando si incontra una buona resistenza.
IMPLANT INSERTION
Screw the implant into the prepared site with the ratchet
mounter connected to the straight manual key and remove it
when you feel good stability.
INSERIMENTO FINALE DELL'IMPIANTO - OPZIONE 1
Cricchetto e chiave implantare sono poi utilizzati per
completare l'inserimento dell’impianto all’interno del sito.
FINAL IMPLANT INSERTION - OPZIONE 1
Ratchet and implant driver will be used in order to
complete the implants placing into the site.
INSERIMENTO FINALE DELL'IMPIANTO - OPZIONE 2
Chiave manuale e chiave implantare sono poi utilizzate per
completare l'inserimento dell’impianto all’interno del sito.
FINAL IMPLANT INSERTION - OPZIONE 2
Straight manual key and implant driver will be used in order to
complete the implants placing into the site.
19PROCEDURA SEPOLTA E TRANSMUCOSA
ONE AND TWO-STAGE PROCEDURES
PROCEDURA
SEPOLTA
TWO-STAGE
PROCEDURE
Prelevare per mezzo della chiave Con una leggera forza delle Riposizionare i lembi
protesica la vite di copertura, dita (5 Ncm), avvitarla all’interno attentamente e ben stretti tra
posta nella parte alta dell’impianto. loro.
del tappo in plastica.
Connect the hex screwdriver Using light finger force (5 Ncm) Suture the flaps carefully and
with the cover screw, placed on seat it inside the implant. tighten them together.
the top of the plastic plug
PROCEDURA
TRANSMUCOSA
ONE-STAGE
PROCEDURE
Prelevare con l’aiuto della chiave Con una leggera forza delle Adattare e suturare attentamente
protesica la vite transmucosa, dita (5 Ncm), avvitarla all’interno i lembi attorno alla vite
posta nella parte bassa del tappo dell’impianto. transmucosa.
in plastica.
Connect the screwdriver with the Using light finger force (5 Ncm) Suture carefully the soft tissue
transmucosal screw placed on seat it inside the implant. flaps around the transmucosal
the bottom of the plastic plug. screw.
20LIVELLO DI POSIZIONAMENTO NELL’OSSO
LEVEL OF PLACEMENT INSIDE THE BONE
SOTTO CRESTA
Si consiglia sempre di posizionare l’impianto di almeno
1 mm sotto cresta:
- favorisce la guarigione del tessuto osseo, riducendo il
rischio di riassorbimento;
- mantiene alti i tessuti molli, assicurando un buon effetto
estetico nel tempo.
UNDER CRESTAL BONE
It is advisable to place always the implant minimum 1 mm
under crestal bone:
- the healing of the bone tissue is facilitated, reducing
the risk of bone loss;
- soft tissues are maintained high in order to guarantee
an optimal esthetic effect for long time.
LIVELLO CRESTALE
È necessario posizionare l’impianto a livello osseo nelle
seguenti condizioni:
- la gengiva è sufficiente per chiudere la platform
switching;
- se inserito nel mascellare inferiore il nervo risulta essere
vicino all’impianto.
BONE LEVEL
It is necessary to place the implant at the bone level in the
following conditions:
- there is enough gingiva for closing the platform
switching;
- whenever it is inserted in mandible and the nerve is very
close to it.
MAI SOPRA IL LIVELLO CRESTALE
Mai posizionare l’impianto oltre il livello osseo perché la
gengiva potrebbe abbassarsi, impedendo l’utilizzo dei
monconi a platform switching.
NEVER OVER THE BONE LEVEL
Never place the implant over the bone level because it
could occur the reduction of the soft tissues, preventing
the use of abutment with platform switching.
21PROCEDURE PRE-OPERATORIE
PRE-OPERATIVE PROCEDURES
FATTIBILITÀ DEL TRATTAMENTO IMPLANTARE IMPLANT TREATMENT FEASIBILITY
questo studio si basa su diversi elementi: this study takes different elements into consideration:
• Un questionario per i pazienti per individuare • A questionnaire for patients to reveal eventual
eventuali problemi di salute/farmaci, che health problems/medications which could
potrebbero avere un impatto sul successo del have an impact on the treatment success,
trattamento, il consumo di alcool, tabacco o alcohol, tobacco or drugs consumption,
droghe, l’igiene generale della bocca... general dental hygiene...
• Un esame orale per valutare l’apertura della • An oral examination which will give details
bocca, il sorriso del paziente (è un sorriso about the mouth opening, the line of the
gengivale?), le altezze coronali, il volume patient’s smile (is it a gingival smile ?) the
osseo disponibile e il tipo d’occlusione... restorative height and the available bone
volume and the occlusion type...
• Prove biologiche (livello di glucosio nel
sangue...) • Biological tests (Glycemy...)
• Un fascicolo radiologico completo per • A complete X-Ray file showing the available
valutare la quantità di osso disponibile. bone volume.
• Modelli di studio completi delle due arcate • Full study models with the two dental arches
in occlusione. in occlusion.
• Un trattamento implantare non potrà essere • An implant treatment procedure cannot be
avviato prima della bonifica integrale di tutti started without a complete cleaning of all the
i casi infettivi del paziente. patient’s infectious cases.
• Importante compilare il consenso informato • Fill in the informed consent with patient.
con il paziente
22ESAME RADIOLOGICO PRE IMPLANTARE
PRE-IMPLANT X-RAY EVALUATION
LA PANORAMICA DENTALE
• Questa lastra presenta un ingrandimento
di 1:25 o 1:3 a seconda dell’apparecchio
utilizzato.
• Grazie al trasparente fornito col kit chirurgico
il chirurgo può individuare facilmente le
lunghezze degli impianti, sovrapponendo
Panoramica dentale
Dental panoramic alla lastra il profilo dell’impianto in scala 1:25.
radiograph
• Consente uno studio dell’altezza del tessuto
osseo della zona edentula, ma non informa
sullo spessore della cresta.
• Questo esame è indispensabile, ma
insufficiente per uno studio pre-implantare.
DENTAL PANORAMIC RADIOGRAPH
• This X-ray plate shows an enlargement of 1:25 or
Scelta dell'impianto
Implant choice 1:3 depending on the device being used.
• Thanks to the template supplied with the surgical
kit the doctors can identify easily implant lengths,
helped by implant profile increased of 25%.
• It enables to study the bone height in the
edentulous zone but it does not indicate the crest
thickness.
• This examination is essential but not sufficient for
a pre-implant evaluation.
Panoramica con impianto inserito
Dental panoramic radiograph with placed implant
23T.C. DENTALSCAN - CONE BEAM C.T. DENTALSCAN - CONE BEAM
• È lo strumento più efficace e il più importante • It is the most performant and the most reliable
nello studio pre-implantare. technique in the preimplant evaluation.
• Esso consente una valutazione anatomica precisa • It enables a precise anatomical study of the
della zona edentula senza alcuna distorsione. edentulous area without any distortion.
• Evidenzia gli ostacoli anatomici (cavità nasale, • It points out anatomical obstacles ( Nasal sockets,
seno mascellare, canale mandibolare) sinus, mandibular canal )
• Consente uno studio morfologico a scala reale • It enables a real size morphological study of
della zona edentula: altezze d’osso disponibile, the toothless area: available bone height, labio-
spessore vestibolo linguale, obliquità del lingual thickness, jaws obliquity.
mascellare. • An analysis of the bone structure is obtained:
• Questo fornisce un'analisi della struttura ossea: condition of the spongy tissue and thickness of
stato del tessuto spugnoso e spessore della the cortical bone
corticale. • The documents are in real scale (ratio 1/1), so it
• I documenti sono a scala reale (rapporto 1/1), is possible to superimpose the implant template
è quindi possibile sovrapporre il lucido degli on real scale section.
impianti dentali nella loro vera dimensione
sull’immagine dentalscan.
Arcata intera Sezione arcata
Full Arch Arch section
24MISURAZIONE DELL’OSSO
MEASUREMENT OF THE BONE
Occorre fare attenzione ad evitare il nervo alveolare inferiore
ed il forame mentoniero nella regione dei premolari, poiché il
nervo mandibolare è spesso inclinato in questa zona.
Occorre identificare con certezza la posizione del seno
mascellare e della mucosa nasale, al fine di evitare l’involontaria
penetrazione con uno strumento o con un impianto.
In generale, almeno 2,0 millimetri di osso dovrebbero separare
l'apice dell'impianto dal canale mandibolare.
Occorre fare attenzione ad evitare la perforazione della fossa
sottomandibolare, situata al di sotto della linea miloioidea, e in
particolare dello spazio sublinguale nella mandibola anteriore
dove è localizzata l’arteria sottolinguale.
2 mm L’involontaria perforazione può essere evitata dirigendo
correttamente la fresa pilota e le frese successive e controllando
la zona col tatto durante la perforazione.
Care must be taken to avoid the inferior alveolar nerve and the
mental foramina in the premolar region, since the mandibular
nerve is often inclined coronally in this area.
The location of the maxillary sinus and nasal floor must be
positively identified to avoid the inadvertent penetration with
a reamer or an implant.
In general, at least 2.0 mm of bone should separate the apex of
the implant from the mandibular canal.
Care must be taken to avoid the penetration of the
submandibular fossa which is located below the mylohyoid line
and particularly the sublingual space in the anterior mandible
where the sublingual artery is located.
Inadvertent penetration of these lingual plates may be avoided
by directing appropriately the pilot bur and reamer burs toward
the buccal and by monitoring the area with digital contact while
drilling.
25DIMENSIONI DELL’IMPIANTO IMPLANT SIZE SCELTA DELLE DIMENSIONI DEGLI IMPIANTI - La scelta della corretta lunghezza e larghezza dell’impianto dipende dalla quantità di osso disponibile e dai carichi occlusali previsti. - In generale, è consigliabile scegliere l’impianto più largo e lungo consentito dall’osso. - Sulla base di radiografie panoramiche e periapicali, come pure di modelli diagnostici e di un esame clinico, si determina la presenza di una distanza mesio-distale ed un’altezza verticale dell’osso sufficienti per inserire in sicurezza e correttamente un impianto Duravit nel sito implantare proposto. - Un righello o un lucido trasparenti con il profilo dell’impianto nelle dimensioni reali e ingrandite al 25% sono utili per selezionare le misure corrette dell’impianto. Poiché le radiografie non sono necessariamente riproduzioni precise, occorre tener conto del grado di distorsione quando vengono usate per determinare la scelta dell’impianto. IMPLANT SIZE SELECTION - The appropriate implant length and width depends upon the available bone and the expected occlusal loads. - In general, choose the widest and the longest implant possible. - Panoramic and periapical radiographs as well as diagnostic models and a clinical examination are used to determine if enough mesio-distal space and vertical bone height exist to place a Duravit implant safely and appropriately in a proposed site. - A transparent template, which depict implant outlines of actual size and 25% of actual size, is helpful in selecting an appropriate implant. Since radiographs are not necessarily precise representations, knowledge of their magnification must be considered while using them to determine an appropriate implant choice. 26
DIMENSIONI RACCOMANDATE DELL'IMPIANTO
RECOMMENDED IMPLANT SIZE

               Ø 4       h: 10/12/14   mm
               Ø 3.5     h: 10/12/14   mm
               Ø 4       h: 10/12/14   mm

               Ø   4     h: 10/12/14   mm
               Ø   4.5   h: 8/10/12    mm
               Ø   4     h: 10/12/14   mm   La tabella contiene solo valori indicativi.
               Ø   4.5   h: 8/10/12    mm
                                            Le condizioni cliniche reali e la valutazione del
               Ø 4.5     h: 8/10/12   mm    paziente da parte dell’implantologo devono
               Ø 5       h: 6/8/10/12 mm    rappresentare i criteri primari per la scelta delle
               Ø 4.5     h: 8/10/12   mm    dimensioni di un impianto per una particolare
               Ø 5       h: 6/8/10/12 mm    area anatomica.

                                            The chart contains indicative values only.
                                            Actual clinical conditions and the clinician’s
                                            assessment of the patient should be the main
                                            criteria for choosing the size of an implant for a
                                            specific area.
               Ø 4.5     h: 8/10/12    mm
               Ø 5       h: 6/8/10/12 mm

               Ø 4.5     h: 8/10/12    mm
               Ø 5       h: 6/8/10/12 mm

               Ø   4     h: 10/12/14
               Ø   4.5   h: 8/10/12
               Ø   4     h: 10/12/14   mm
               Ø   4.5   h: 8/10/12    mm

               Ø 3.5     h: 10/12/14   mm
               Ø 3       h: 10/12/14   mm

                                                                                             27
KIT CHIRURGICI SURGICAL KIT Il box chirurgico garantisce la conservazione e la The surgical organizer is used for the secure storage sterilizzazione ottimali degli strumenti chirurgici. and sterilization of the surgical instruments. È realizzato in materiale termoplastico ad alta It’s made of a highly shock-proof thermoplastic, resistenza agli urti ed è indicato per una frequente suitable for frequent sterilization in the autoclave. sterilizzazione in autoclave. Si consiglia di sterilizzare Autoclaving at a temperature not over 121 °C/250 in autoclave a temperatura non superiore a 121°C. °F is recommended. KIT COMPLETO COMPLETE KIT 28
KIT CHIRURGICO WIDE
WIDE SURGICAL KIT

 PANORAMICA STRUMENTI CHIRURGICI                       OVERVIEW OF SURGICAL INSTRUMENTS

 L’indicatore di direzione viene inserito nel sito     Paralleling pin is inserted into the prepared
 Implantare chirurgicamente preparato con la           implant site after using drill Ø 2.1 or 3,
 fresa ø 2.1 o 3, facilitando l’individuazione della   facilitating the direction of the subsequent
 direzione della successiva perforazione.              drilling.

 Il bisturi mucotomo, utilizzato con il contrangolo    Tissue punch allows to pierce the mucosa
 a bassa velocità, permette di forare la mucosa a      according to the selected implant diameter, if it
 seconda del diametro dell’impianto prescelto.         is used with a contra angle set at a low speed.

 L’allungatore chirurgico aumenta la lunghezza         Extender drill increases operating length of
 di fresaggio della fresa durante l’intervento         the drills during the surgery.
 chirurgico.

 La fresa lancia penetra la corticale ossea creando    Lance drill marks out and creates the
 il punto di inserimento dell’impianto.                insertion point penetrating the cortical
                                                       bone.

                                                                                                           29
KIT CHIRURGICO SURGICAL KIT PANORAMICA STRUMENTI CHIRURGICI OVERVIEW OF SURGICAL INSTRUMENTS Le FRESE STANDARD disponibili in 6 diametri (ø STANDARD DRILLS available in 6 diameters 2.1/ ø 3/ ø 3.5/ ø 4/ ø 4.5/ ø 5) (ø 2.1/ ø 3/ ø 3.5/ ø 4/ ø 4.5/ ø 5) preparano il sito implantare alla profondità e prepare the implant site to the appropriate larghezza adeguata. depth and width. FRESE WIDE disponibili in 4 diametri WIDE DRILLS available in 4 diameters (ø 5.5/ ø 6/ ø 6.5/ ø 7) sono utilizzate (ø 5.5/ ø 6/ ø 6.5/ ø 7) prepare the implant principalmente nelle preparazione di alveoli nei site. Useful for immediate placement in molar post estrattivi delle zone molari. extraction socket. I COMPATTATORI-ESPANSORI del sistema Duravit bone COMPACTOR-EXPANDER are Duravit sono una valida alternativa agli an alternative to osteotomes for the osteotomi per l’espansione e la condensazione expansion and condensation of the atrophic dei mascellari, nella preparazione del sito mandible and maxilla in preparation for dental implantare. I compattatori-espansori sono anche implant insertions. Compactorexpander are also un’alternativa alla tecnica di rialzo del seno an alternative to the Summers maxillary sinus lift mascellare con tecnica di Summers. technique. Le FRESE PER LA PREPARAZIONE CORTICALE COUNTERSINK is used to create a shoulder area sono utilizzate in presenza di osso D1 per for the implant. Indicated especially in hard bone preparare l’osso alla spalla dell’impianto conditions to avoid compression around the facilitandone il successivo l’inserimento. cortical bone. I MASCHIATORI possono essere utilizzati per BONE TAPS may be used to prepare the implant preparare il profilo delle spire implantari all'interno thread profile into the implant site reducing the del sito, diminuendo la pressione ossea. bone pressure. Gli STOP delle frese garantiscono al chirurgo The drill STOPPERS ensure to the surgeon di preparare facilmente e precisamente la simple and accurate depth control, quick and profondità del sito implantare. Sono marcati easy assembling as well. The laser mark number a laser per un’immediata identificazione della identifies the length. lunghezza. La CHIAVE A CONTRANGOLO viene usata CONTRA-ANGLE implant DRIVER connected to per l'inserimento iniziale degli impianti "3P" e the contra-angle is used to the initial placement "WIDE"; raggiunta la resistenza ottimale, terminare of 3P and WIDE implants; reached the optimal l'avvitamento con l'apposito montatore per cricchetto. resistance, screw with the ratched mounters. MONTATORI per cricchetto, inseriti sul cricchetto RATCHET MOUNTERS are connected to the sono utilizzati per l’inserimento finale degli ratchet are used to place the implants impianti “3P” e “WIDE”. Sono disponibili nelle “3P” and “WIDE. versioni lunga e corta. It's available LONG and SHORT. 30
PANORAMICA STRUMENTI CHIRURGICI                        OVERVIEW OF SURGICAL INSTRUMENTS

La CHIAVE A CONTRANGOLO ø3 viene usata                 CONTRA-ANGLE implant DRIVER connected to
per l'inserimento iniziale degli impianti "3P"         the contra-angle is used to the initial placement
e "WIDE"; raggiunta la resistenza ottimale,            of 3P and WIDE implants; reached the optimal
terminare l'avvitamento con l'apposito                 resistance, screw with the ratched mounters.
montatore per cricchetto.

I MONTATORI PER CRICCHETTO, inseriti sul               RATCHET MOUNTERS ø3 are connected to the
cricchetto sono utilizzati per il posizionamento       ratchet and used to place the implants “ø3”.
finale degli impianti “ø3”. Disponibile nelle          Available long and short.
versioni lunga e corta.

Le CHIAVI A CONTRANGOLO ESAGONO                        HANDPIECE DRIVER 1.25 Hexagon connected
1,25 sono utilizzate per avvitare tutte le viti dei    to the contra-angle is used to set all the
componenti protesici quali viti di copertura, viti     components screws such as Cover screw,
di guarigione e viti protesiche.                       Healing screws, Prosthetic screws.

Le CHIAVI MANUALI ESAGONO 1,25 sono                    MANUAL SCREW DRIVERS 1.25 Hexagon
utilizzate per avvitare tutte le viti dei componenti   are used to screw all the prosthetic
protesici come, vite di copertura, viti di             components such as Cover screw,
guarigione e viti protesiche. Disponibile nelle        Healing screws, Prosthetic screws.
versioni lunga e corta.                                Available long and short.

Le CHIAVI A CRICCHETTO ESAGONO 1,25 sono               TORQUE SCREW DRIVERS 1.25 Hexagon,
utilizzate per avvitare con un predefinito torque,     connected to the torque ratchet, is used to set
tutte le viti dei componenti protesici come, vite      with predefined torque force, all the components
di copertura, viti di guarigione e viti protesiche.    screws such as cover screw, healing screws,
Disponibile nelle versioni lunga e corta.              prosthetic abutments. Available long and short.

Il CRICCHETTO DINAMOMETRICO è                          TORQUE RATCHET allows the clinician to apply
consigliato per l’inserimento degli impianti e per     accurately the recommended torque for surgery
il bloccaggio delle viti protesiche con un torque      and prosthetics, adjustable between 0 and 50
predefinito regolabile da 0 a 50 nc2 .                 nc2.

Il CRICCHETTO FISSO è consigliato per                  FIX RATCHET allows the clinician to place the
l’inserimento degli impianti nel sito implantare       implants inside the prepared implant site,
nel caso in cui non sia necessario applicare un        without using any predefined torque force.
torque predefinito.

La CHIAVE MANUALE facilita il chirurgo nella           STRAIGHT MANUAL KEY allows the clinician to
preparazione del sito implantare con la tecnica        prepare the implant site by using the compactor-
dei compattatori e per il successivo inserimento       expander and then to insert the implant. It is
dell’impianto. Utilizzato principalmente nel           especially used in the maxillary.
mascellare.

                                                                                                       31
PULIZIA E CURA DEL CRICCHETTO DINAMOMETRICO CLEANING AND MAINTENANCE OF THE TORQUE RATCHET Per garantire il funzionamento perfetto, il cricchetto For ensuring that the torque ratchet works properly, dinamometrico deve essere smontato e pulito it must be always taken apart and cleaned immediatamente dopo ogni uso e dopo ogni immediately after each surgery. (See picture above) intervento. (vedi figura in alto) Otherwise, if blood penetrates into the instrument, Il sangue penetrato nell’interno dello strumento it will stick the ratchet bolt into the ratchet body, provoca altrimenti l’incollamento del pistone nel which means corrosion! corpo del cricchetto = corrosione! Disinfect, clean, and sterilize as described on the La disinfezione, pulizia e sterilizzazione avvengono following pages. Please treat each component come descritto nelle successive pagine. È importante separately! trattare ogni componente separatamente! After reassembling the torque ratchet, its correct Dopo aver rimontato il cricchetto dinamometrico è working must be checked, using the implant driver. necessario controllarne il corretto funzionamento Holding the driver tightly, the ratchet should turn. usando la chiave di inserimento impianti. The same control must then be carried out for the Tenendo fermo lo strumento di inserimento, ruotare opposite direction. il cricchetto. Effettuare lo stesso controllo per la direzione opposta. NOTA: PLEASE NOTE: Come misura di sicurezza si consiglia di disporre sempre We recommend to keep always at disposal another di un secondo cricchetto per l’intervento. sterilized torque ratchet during the surgery. È indispensabile effettuare una tempestiva prova del Check promptly that instruments work in a correct way funzionamento degli strumenti prima dell’intervento! before the surgery! 32
PULIZIA DEGLI STRUMENTI
CLEANING OF INSTRUMENTS

FASI DELLA PULIZIA                                         CLEANING PHASES

Strumenti    con     elevata    capacità    di   taglio    Instruments with high cutting performance are
rappresentano un requisito essenziale per il buon          a basic requirement for successful implantation.
esito dell’inserimento dell’impianto. Si raccomanda        Therefore the following should be remembered:
pertanto di ricordare quanto segue:                        • Cleansing.
• Detersione.                                              • Dirty instruments should be placed in a bowl with
• Immergere immediatamente dopo l’utilizzo gli               a cleaning solution in order to disinfect them,
  strumenti sporchi in una bacinella di soluzione            avoiding that the residues of blood coagulate.
  detergente in modo da evitare che residui di             • With a brush remove immediately from the
  sangue coagulino.                                          instruments residues of blood, saliva, tissue after
• Con uno spazzolino asportare i residui di sangue,          surgery. If residues adhere to the instruments and
  saliva, tessuti o osso dagli strumenti subito dopo         dry on them, they may lead to corrosion.
  l’intervento chirurgico. I residui che aderiscono        • Disinfection.
  agli strumenti, seccandosi, possono provocarne la        • Clean them accurately using an ultrasonic device
  corrosione.                                                and a disinfectant liquid to avoid the corrosion
• Disinfezione.                                              of the drills. Do not use chlorine-based or
• Per un’accurata pulizia, collocare gli strumenti nella     peracetate disinfectants.
  macchina ad’ultra suoni con il liquido disinfettante     • An accurate rinsing preferably with distilled
  per evitare la corrosione delle frese. Non utilizzare      water and a subsequent drying conclude the
  disinfettanti a base di cloro o di peracetato.             preparation phase for steam sterilization.
• Un accurato risciacquo preferibilmente con acqua
  distillata e una successiva asciugatura concludono
  la fase di preparazione alla sterilizzazione a vapore.

                                                                                                              33
STERILIZZAZIONE DEGLI STRUMENTI
STERILIZING INSTRUMENTS
FASI DI STERILIZZAZIONE STERILIZATION PHASES
Dopo la detersione è necessario sterilizzare tutti gli After cleaning, all surgical instruments must be
strumenti chirurgici: sterilized:
• Gli strumenti disinfettati, puliti ed asciutti • Only when the instruments are cleaned,
vengono disposti ordinatamente nella cassetta disinfected and dryed, they can be sorted into
chirurgica, sigillata in apposite buste sterilizzabili. the surgical organizer, which has to be wrapped
NOTA: le buste sterilizzabili sono facilmente in sterilizable envelopes.
reperibili in commercio. NOTE: The sterilizable envelopes are easily
commercially available.
• Per la lunga durata del box chirurgico la
sterilizzazione deve essere preferibilmente • For a long duration of the surgical organizer
eseguita in autoclave a vapore ad una temperatura sterilization must be preferably performed in steam
di 121 °C. autoclave at a temperature of 121 °C/ 250 F°.
IMPORTANTE: IMPORTANT:
• La sterilizzazione chimica non è consigliata poiché • Chemical sterilization is not recommended since
questa procedura può danneggiare la superficie this procedure can damage the plastic surface.
plastica. • No hot air sterilization since the high
• Non usare la sterilizzazione a secco poiché l’alta temperature (appr. 180 °C) would make the
temperatura (circa 180 °C) potrebbe fondere la plastic cassette melt.
cassetta chirurgica in plastica. • No sterilization in spherical sterilizers
• Non sterilizzare in sterilizzatori con sfere di vetro (temperature up to 300 °C).
(temperatura superiore a 300 °C). • In order to avoid damages to the surgical
• Al fine di evitare danni alla cassetta chirurgica durante cassette during steam sterilization, the surgical
la sterilizzazione a vapore, la cassetta chirurgica deve cassette has to be placed correctly in the
essere posizionata correttamente in autoclave. autoclave.
34REV. 09 DEL 27/06/2016
EN ISO
13485
Via San Benedetto, 1837 - 40018 San Pietro in Casale (BO) Italy Sistema Qualità Certificato
Tel. +39 (0) 51.81.13.75 - Fax +39 (0) 51.666.94.00 CertifiedUNI EN ISO
quality 13485
system
info@bebdental.it - www.bebdental.it UNI EN ISO 13485Puoi anche leggere