MODULO REMOTO WIFI - ETICHETTA NERA DISPLAY BLACKMASK WIFI MODULE - BLACK LABEL DISPLAY BLACKMASK - Per/For App Total Control 2.0 - La Nordica ...
←
→
Trascrizione del contenuto della pagina
Se il tuo browser non visualizza correttamente la pagina, ti preghiamo di leggere il contenuto della pagina quaggiù
IT
                      MODULO REMOTO WIFI - ETICHETTA NERA
                                     DISPLAY BLACKMASK

      UK
                                WIFI MODULE – BLACK LABEL
                                       DISPLAY BLACKMASK
MADE IN ITALY                        Per/For App Total Control 2.0
design & production

                                                  009270590 - Rev.000
2
APP TOTAL CONTROL 2.0

                                  TOTAL CONTROL 2.0 è un applicazione che permette di monitorare e gestire i prodotti a pellet LA NORDICA-
                                  EXTRAFLAME in remoto tramite smartphone in presenza di una connessione ad internet.

ITALIANO..................................................................................................................................................................................... 4

SPECIFICHE TECNICHE MODULO REMOTO WIFI..................................................................................................................... 4
SCHEMA COLLEGAMENTO......................................................................................................................................................... 4
   LOGICA E SIGNIFICATI.................................................................................................................................................................................................... 5
PROCEDURA DI REGISTRAZIONE ACCOUNT ALL’APP TOTAL CONTROL 2.0........................................................................ 6
CREAZIONE DELL’ACCOUNT...................................................................................................................................................... 6
   PROCEDURA DI AGGIUNTA PRODOTTO ALL’APP TOTAL CONTROL 2.0..................................................................................................... 7
   CONFIGURAZIONE STUFA CON WI-FI INTEGRATO NEL DISPLAY.................................................................................................................. 8
PROCEDURA DI INVITO/REVOCA ALLA GESTIONE DEL PRODOTTO..................................................................................11
SOSTITUZIONE ACCESSORIO..................................................................................................................................................13
SOSTITUZIONE DISPLAY..........................................................................................................................................................13
PROBLEMI/RISOLUZIONI MODULO REMOTO WIFI...............................................................................................................14

ENGLISH.....................................................................................................................................................................................15

TECHNICAL SPECIFICATIONS OF REMOTE WI-FI MODULE..................................................................................................15
CONNECTION DIAGRAM..........................................................................................................................................................15
   LOGIC AND MEANINGS................................................................................................................................................................................................16
ACCOUNT REGISTRATION PROCEDURE FOR THE TOTAL CONTROL 2.0 APP......................................................................17
CREATING AN ACCOUNT..........................................................................................................................................................17
   PROCEDURE TO ADD PRODUCT IN THE TOTAL CONTROL 2.0 APP............................................................................................................18
   STOVE CONFIGURATION WITH WI-FI INTEGRATED IN THE DISPLAY.........................................................................................................19
PRODUCT MANAGEMENT INVITATION/REVOCATION PROCEDURE...................................................................................22
ACCESSORY REPLACEMENT....................................................................................................................................................24
DISPLAY REPLACEMENT..........................................................................................................................................................24
TROUBLESHOOTING FOR REMOTE WI-FI MODULE..............................................................................................................25

                                                                                                                                                                                                                      3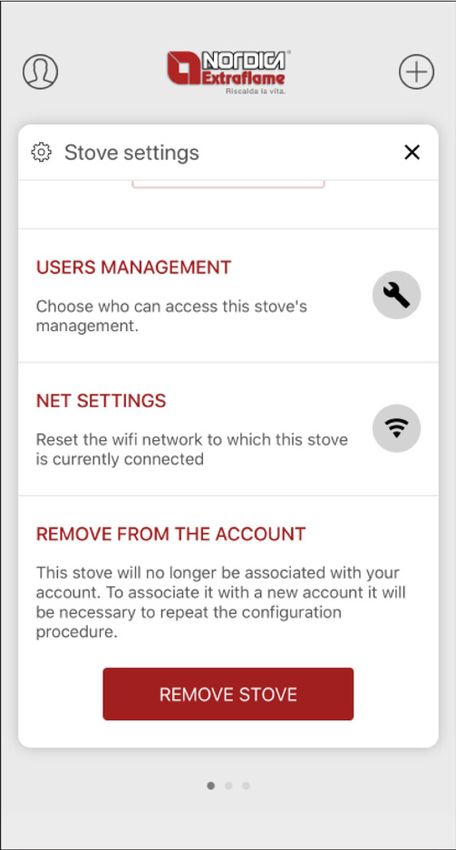
SPECIFICHE TECNICHE MODULO REMOTO WIFI
Frequenza                                                        WiFi (2,4 GHz)
Potenza                                                          17,6 DBm
Dimensioni (L x P x H)                                           94 X 57 X 30 mm
Peso                                                             74 g
Posizione di montaggio                                           Qualsiasi
Grado di protezione in versione con connettore                   IP 21
Tensione di alimentazione                                        12V DC (Tramite alimentatore)
Consumo                                                          0,4W
Seriale standard                                                 TTL
Temperatura ambiente operativa                                   Da 0°C a 50°C
Temperatura di immagazzinamento                                  Da -10°C / +70°C
Umidità relativa massima (senza condensa)                        95%
La rete wi-fi non deve essere di tipo mixed

La confezione e composta da:

                 1 modulo WIFI                          velcro                   1 x cavo seriale          1 x alimentatore*

SCHEMA COLLEGAMENTO

                                                                                                                   Internet
                               Rete elettrica 230V

                                                         Comando stufa

                                                                                  Router Wifi internet

                           Cavo seriale
                                                     Modulo remoto Wifi

                                                                                                         App Total Control 2.0

  4                                                    ITALIANO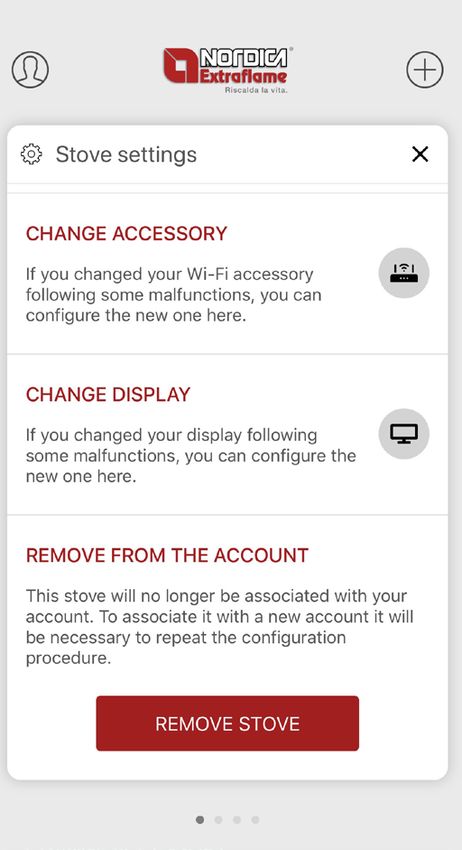
LOGICA E SIGNIFICATI

   1.     Collegamento con la stufa (cavo seriale)

   2.     Ingresso alimentazione

   3.     Pulsante reset configurazione

   4.     Led verde - Power

   5.     Led blu- Access point

   6.     Led arancione - Station

   7.     Led arancione - Cloud

DICHIARAZIONE UE

Il fabbricante MICRONOVA s.r.l. dichiara che il tipo di apparecchiatura radio seguente NAVEL 2.0 è conforme alle seguenti direttive:
RED 201BNTmcr814/53/UE; ROHS 2011/65/CE; RAEE 2012/19/UE
Il testo completo della dichiarazione è disponibile al seguente indirizzo:
https://www.micronovasrl.com/wp-content/uploads/2016/02/T009_datasheet-PT009_XX.pdf

                          * L'alimentatore di supporto (come campione fornito nel kit) deve essere conforme alla direttiva EN 60950-
                          1,ed avere le seguenti caratteristiche:
                          • SELV (Safety Extra-low voltage) bassissima tensione di sicurezza;
                          • protetto contro i cortocircuiti e sovracorrenti;
                          • sorgente a potenza limitata (Low power source LPS);

                                                              ITALIANO                                                             5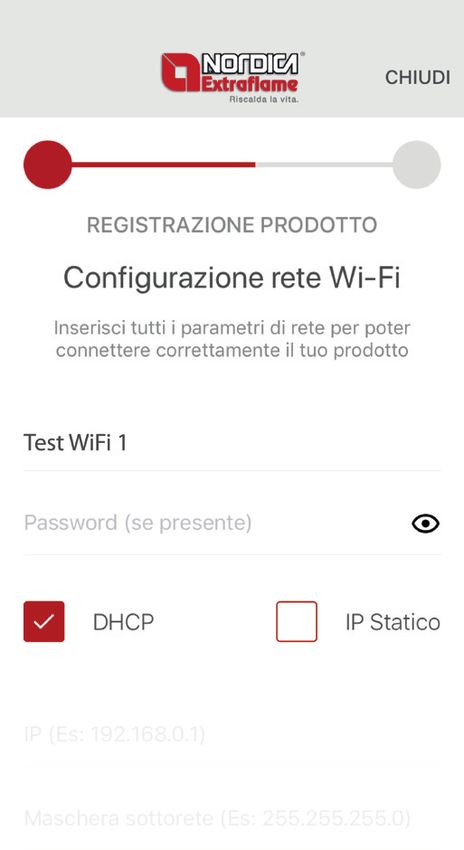
PROCEDURA DI REGISTRAZIONE ACCOUNT ALL’APP TOTAL CONTROL 2.0

Prima di iniziare:
Assicurarsi che lo smartphone abbia accesso ad Internet, sia quindi connesso alla rete cellulare
oppure al router domestico.

NOTA: lo stesso account e quindi credenziali (mail e password) possono essere utilizzate su
più dispositivi e quindi da più persone, purchè vengano usate le stesse credenziali di accesso
(stessa mail e stessa password).

NOTA2: per ragioni di sicurezza non è possibile associare la stessa stufa ad account differenti.
Tuttavia, il primo utilizzatore può garantire la gestione della stufa ad altri account con la
procedura di invito descritta sotto.

Se non si possiede un account, procedere alla registrazione cliccando su “REGISTRATI”.
Alternativamente accedere con un account esistente cliccando su “ACCEDI”

                                                                                                    Avvio dell’app Total Control 2.0:

CREAZIONE DELL’ACCOUNT
                                                                               Inserire

                                                                               • Nome e cognome di riferimento per l’account.
                                                                               • La lingua in utilizzo dall’app (può essere modificata
                                                                               successivamente).

                                                                               Scorrere in basso ed inserire le rimanenti informazioni:

                                                                               • Email, attenzione: per completare la procedura deve
                                                                               essere valida e attiva!
                                                                               • Password rispettando i minimi criteri di sicurezza.
                                                                               La password deve essere lunga almeno 8 caratteri,
                                                                               contenere una lettera maiuscola e minuscola, un
                                                                               numero e un carattere speciale tra questi: @ # $ % !

                                                                               • Confermare i termini e le condizioni generali del
                                                                               servizio cliccando sulla relativa casella.

                                                                               Premere su REGISTRATI, eventuali non conformità dei
                                                                               dati immessi verranno segnalati dall’app!

  6                                                           ITALIANO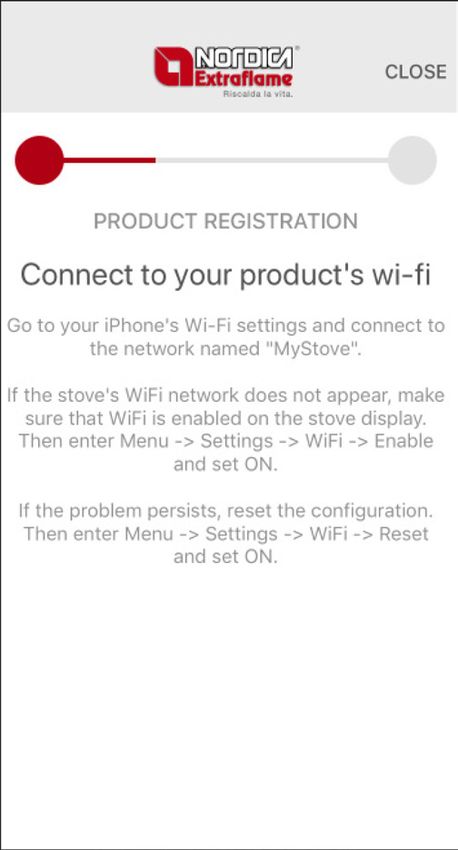
L’app ha confermato l’avvenuta registrazione e ha inviato una email con il link per la conferma di registrazione.

                                                                                Aprire la casella di posta elettronica relativa all’email
                                                                                inserita.

                                                                                Confermare la registrazione cliccando il bottone verde
                                                                                “VERIFICA EMAIL”.

                                                   CIAO MARIO ROSSI             Complimenti, ora puoi procedere con l’aggiunta del
                                                                                prodotto nell’app Total Control 2.0

                                                                                Nota:
                                                                                Potrebbe essere necessario attendere una decina di
                                                                                minuti per l’arrivo dell’email. Se non è arrivata alcuna
                                                                                email, controllare che non sia nella cartella “spam” o che
                                                                                il mittente non sia nella lista dei bloccati.

PROCEDURA DI AGGIUNTA PRODOTTO ALL’APP TOTAL CONTROL 2.0

                                                                                            Dopo essersi loggati con propria email e
                                                                                            password all’account appena registrato,
                                                                                            è possibile inserire un nuovo prodotto da
                                                                                            controllare nell’app Total Control 2.0.

                                                                 ITALIANO                                                            7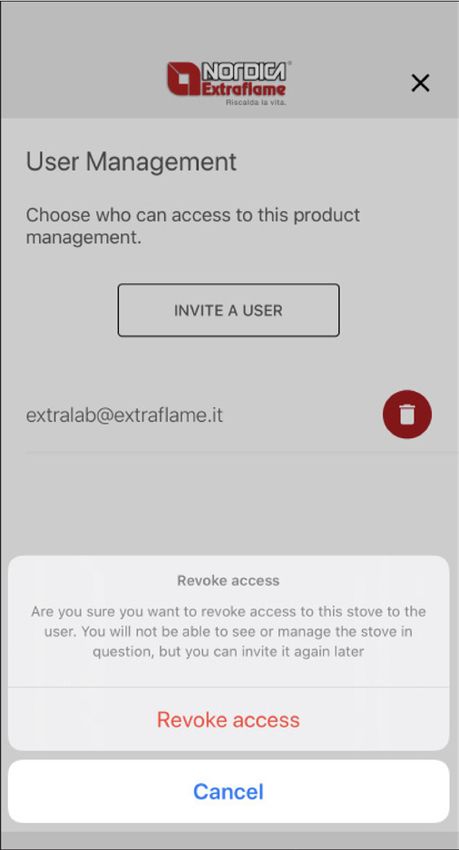
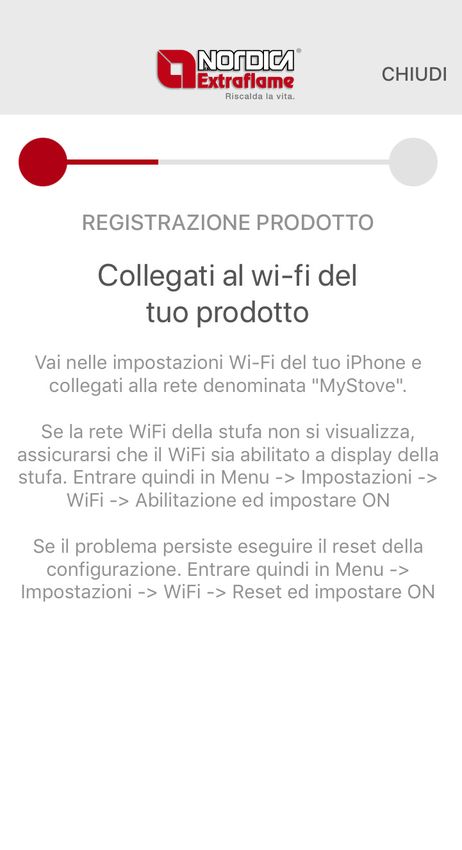
L’app richiede di connettersi alla rete Wi-Fi della stufa. CONFIGURAZIONE STUFA CON WI-FI INTEGRATO NEL DISPLAY Assicurarsi che l’icona Wi-Fi del display lampeggi. Se la spia non si accende o non lampeggia, procedere con il reset del WiFi (dal menù: impostazioni -> WiFi -> Reset ed impostare ON, vedi manuale di uso e manutenzione della stufa) CONFIGURAZIONE CON MODULO WI-FI ESTERNO Assicurarsi che la spia blu “Access Point” sia accesa. Se la spia è spenta, resettare il modulo premendo per 2 secondi il tasto “RESET”. In seguito per entrambe le configurazioni: Senza chiudere l’APP Total Control 2.0, entrare nelle impostazioni Wi-Fi dello smartphone e connettersi alla rete Wi-Fi della stufa; la rete è ad accesso libero e serve solo per l’impostazione del modulo, una volta configurato tale rete sparisce. La rete è individuabile dalla scritta MyStove seguita dal MACADDRESS, riportato nell’etichetta QrCode2. Ad esempio: MyStove_24:0A:C4:8A:A0:24 NB: per dispositivi con sistema operativo Android è consigliabile disattivare la funzionalità Wi-Fi+ qualora sia presente. Disabilitare le seguenti funzioni: Attiva Wi-Fi automaticamente Passa a connessione dati Hotspot 2.0 Dopo aver impostato la rete, riaprire la schermata precedente e attendere qualche secondo. 8 ITALIANO
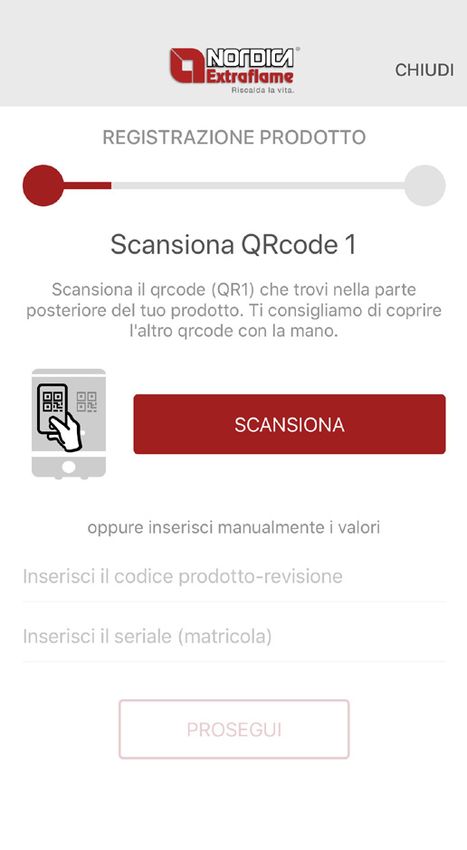
L’app richiede l’immissione di:              QR1 (EXAMPLE)             L’app richiede l’immissione di:                QR2 (EXAMPLE)
   • Codice prodotto • Matricola                                          • MAC Address • Secure Code

                                                Code:                                                                    Mac Address:
                                                xxxxxxxxx-xxx                                                            xx:xx:xx:xx:xx:xx
                                                Serial:                                                                  Secure Code:
                                                xxxxxxxxxx                                                               xxxxxxxx

                                        Queste       informazioni                                               Queste          informazioni
                                        possono            essere                                               possono essere immesse
                                        immesse manualmente                                                     manualmente                o
                                        o       automaticamente                                                 automaticamente ricavate dal
                                        ricavate dal QrCode 1,                                                  QrCode 2, qualora presente,
                                        qualora presente, nella                                                 nella parte posteriore del
                                        parte posteriore del tuo                                                tuo prodotto o a corredo con
                                        prodotto.                                                               l’accessorio modulo Wi-Fi.

                                        Procedere inquadrando
                                        nella    fotocamera      il                                             NB: l’app potrebbe già
                                        QrCode1, posto nel lato                                                 essere in possesso delle
                                        Nota: se l’app richiede                                                 informazioni       necessarie
                                        di avere accesso alla                                                   e quindi non richiedere
                                        fotocamera acconsentire,                                                il QRcode1 o QRcode2
                                        altrimenti sarà necessario                                              all’utente. In questo caso
                                        immettere manualmente                                                   procede automaticamente
                                        le informazioni.                                                        agli step successivi.

L’app visualizza una lista di reti WiFi disponibili: scegliere la propria rete Wi-Fi domestica.

Se non fosse visibile come nel caso di rete nascosta, procedere scorrendo verso destra e immettere a mano il nome della propria rete
WiFi.

                                                                                                  Inserire la password della rete domestica
                                                                                                  selezionata.

                                                                                                  È possibile visualizzare i caratteri immessi
                                                                                                  premendo sul simbolo occhio. Scorrere in
                                                                                                  basso e premere sul pulsante “PROSEGUI”.

                                                                  ITALIANO                                                                   9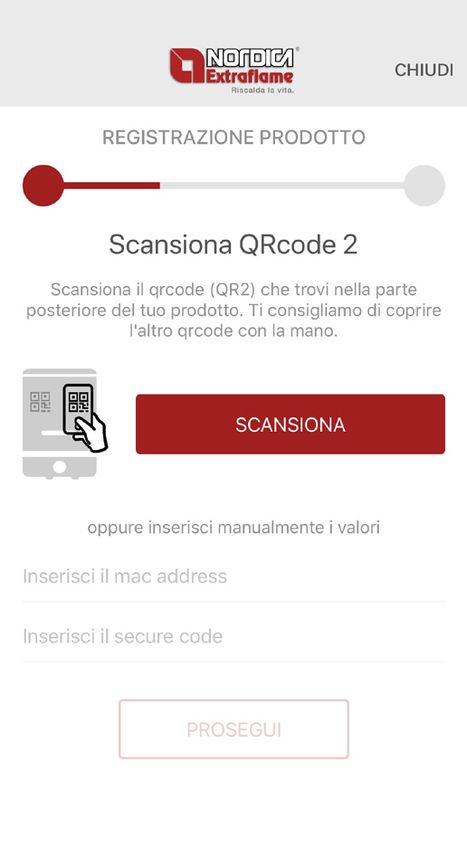
Per un uso avanzato – IP statico                                       Per un uso avanzato – DNS statici

La configurazione di default prevede l’utilizzo della modalità DHCP    La configurazione di default prevede l’utilizzo della modalità
                                        per l’acquisizione dinamica                                          DDNS per l’acquisizione
                                        dell’indirizzo IP.                                                   dinamica degli indirizzi
                                        Tuttavia è possibile                                                 DNS (Domain Name
                                        impostare un IP statico                                              System).
                                        qualora vi siano una
                                        particolari necessità, ad                                            Tuttavia è possibile
                                        esempio:                                                             impostare dei DNS
                                                                                                             statici qualora vi siano
                                       1. Nel proprio modem                                                  particolari necessità, ad
                                       sia stata disabilitata la                                             esempio:
                                       modalità DHCP.
                                       2. Il Firewall abbia delle                                            1. Superare dei blocchi
                                       regole personalizzate.                                                imposti dal proprio
                                                                                                             provider.
                                       Per configurare un IP                                                 2. Prestazioni non
                                       statico procedere come                                                soddisfacenti.
                                       segue:
                                                                                                             Per configurare DNS
                                       • Selezionare la checkbox                                             statici procedere come
                                           IP Statico                                                        segue:
                                       • Impostare l’IP della
                                       stufa,ad             esempio                                          •     Selezionare      la
                                       192.168.1.10                                                          checkbox           DNS
                                       • Impostare la maschera, ad                                           Statici”
                                       esempio 255.255.255.0                                                 • Impostare il DNS 1, ad
                                       • Impostare l’IP del Gateway,                                         esempio 8.8.8.8
                                       ad esempio 192.168.1.1                                                • Impostare il DNS 2, ad
                                                                                                             esempio 8.8.4.4

L’app sta inviando la configurazione della rete Wi-Fi alla stufa.      L’app ha correttamente configurato il prodotto a connettersi
Se la procedura di configurazione va a buon fine, la rete Wi-Fi        con la rete domestica.
generata dal prodotto o accessorio viene spenta.                       Viene richiesto il nome di preferenza del prodotto appena
Se la procedura di configurazione non va a buon fine viene             configurato.
visualizzato un messaggio di errore.                                   Premere su “SALVA”.

                                      Cause comuni possono                                                   Nota:       prima      di
                                      essere:                                                                proseguire è necessario
                                      - Non hai inserito il nome                                             che lo smartphone sia
                                      della rete.                                                            connesso ad internet.
                                      - Hai inserito un nome                                                 Se     lo    smartphone
                                      della rete troppo lungo.                                               non      possiede     una
                                      - La password inserita e                                               connettività alla rete
                                      troppo lunga.                                                          cellulare, è necessario
                                      - La Password inserita non                                             attendere fintanto ché
                                      è corretta.                                                            lo smartphone non
                                                                                                             si connette alla rete
                                      Se l'app non permette                                                  Wi-Fi domestica. In tal
                                      di passare alla schermata                                              caso lo smartphone
                                      successiva, potrebbe essersi
                                                                                                             resterà in attesa della
                                      interrotta la connettività wi-
                                                                                                             connessione       e     al
                                      fi con il display/modulo wifi.
                                                                                                             termine del tempo
                                                                                                             massimo apparirà un
                                      In tal caso:
                                                                                                             messaggio che invita
                                      - Display Blackmask:                                                   l’utente a riprovare.
                                      verificare se il Wi-Fi sia
                                      attivo e premere RESET.

                                      - Modulo WI-Fi: premere
                                      tasto RESET sul Modulo.

 10                                                            ITALIANO
La registrazione del nuovo prodotto è andata a buon fine!
Ora è possibile cliccare su GESTIONE STUFA per controllare la stufa da remoto.
PROCEDURA DI INVITO/REVOCA ALLA GESTIONE DEL PRODOTTO
È possibile permettere ad All’interno di questa
altre persone, aventi account schermata è possibile
diversi, di controllare scegliere chi abbia
il proprio prodotto di accesso alla gestione
riscaldamento Extraflame. del prodotto.
Se si possiedono più prodotti, Per aggiungere un
nella schermata principale account, premere su
spostarsi lateralmente per “INVITA UN UTENTE”.
selezionare il prodotto del
quale condividere la gestione
remota.
Aprire il menu impostazioni
e cliccare su “GESTIONE
UTENTI”.
ITALIANO 11Inserire l’indirizzo email della persona da invitare. La procedura è andata a buon fine: verificare nell’account di
posta elettronica la presenza dell’email. La persona alla quale
Premendo su “INVITA” sarà inviata un’email di invito a scaricare è acconsentito il controllo della stufa deve utilizzare lo stesso
ed installare l’app Total indirizzo email per creare
Control 2.0. un nuovo account.
Inoltre, all’account Total Nota: Potrebbe essere
Control 2.0 avente indirizzo necessario attendere
email inserito, verrà una decina di minuti per
assegnato il prodotto già l’arrivo dell’email. Se non
configurato. è arrivata alcuna email,
Nota: l’email inserita deve controllare che non sia
essere valida e attiva! nella cartella “spam” o
che il mittente non sia
nella lista dei bloccati.
Per rimuovere il permesso di controllo del prodotto, cliccare sull’icona cestino e successivamente su “REVOCA ACCESSO”.
Al termine della procedura, la persona precedentemente invitata alla gestione del prodotto non ne avrà più il controllo remoto.
extralab@extraflame.it
extralab@extraflame.it
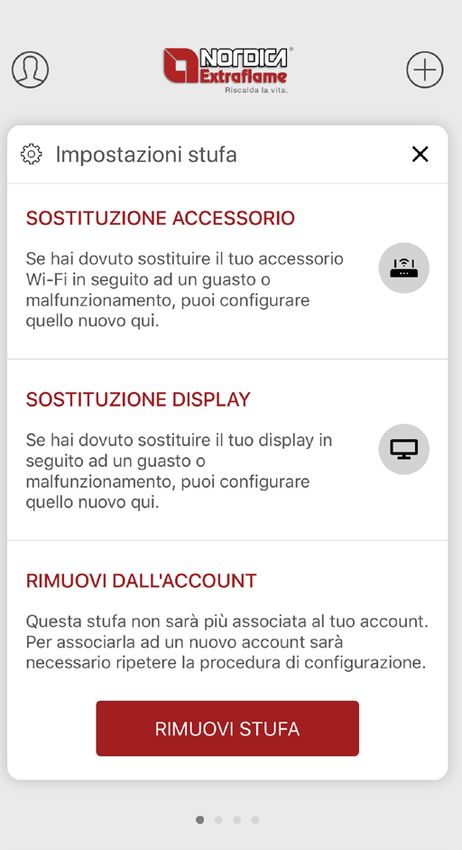
12 ITALIANOSOSTITUZIONE ACCESSORIO
Se hai dovuto sostituire il tuo accessorio Wi-Fi in seguito ad un guasto o malfunzionamento,
puoi configurare quello nuovo qui.
In seguito alla selezione seguire la procedura guidata.
SOSTITUZIONE DISPLAY
Se hai dovuto sostituire il tuo display in seguito ad un guasto o malfunzionamento, puoi
configurare quello nuovo qui.
In seguito alla selezione seguire la procedura guidata .
ITALIANO 13PROBLEMI/RISOLUZIONI MODULO REMOTO WIFI
LED STATO DESCRIZIONE POSSIBILE PROBLEMA RISOLUZIONE
ASSOCIATO
Collegare l'alimentatore esterno
Spento Il modulo non è alimentato. Il modulo non funziona.
in dotazione.
Led accensione
(verde) Lampeggia Il modulo si sta avviando. - -
Il modulo si è avviato
Acceso - -
correttamente.
Premere il pulsante reset per
almeno 3 secondi e rifare
Il modulo è correttamente Si vuole riconfigurare il modulo
Spento nuovamente la procedura di
collegato ad una rete WiFi ad una rete WiFi
configurazione guidata dell'app
Total Control 2.0
Led access point Il modulo sta creando una rete
(blu) Lampeggia wifi per la configurazione alla - -
rete WiFi domestica
Il modulo wifi è pronto per
Acceso essere configurato ad una rete - -
WiFi domestica
Il modulo non è connesso alla
Spento - -
rete WiFi domestica
Premere il pulsante reset per
Se questa situazione persiste
Led station Il modulo si sta connettendo almeno 3 secondi e rilasciare,
per più minuti, significa che
Lampeggia è stata inserita una password avviare nuovamente la procedura
(arancione) alla rete WiFi domestica di configurazione guidata
errata dell'app Total Control 2.0
Il modulo è connesso alla rete
Acceso - -
WiFi domestica
Il modulo non è connesso al
Spento - -
cloud
Se questa situazione persiste Premere il pulsante reset per
per più minuti significa che almeno 3 secondi e rilasciare,
Il modulo si sta connettendo al è stata inserita una matricola
Lampeggia della stufa errata o un avviare nuovamente la procedura
cloud di configurazione guidata
SecureCode del modulo wifi dell'app Total Control 2.0
errato
Il modulo cercherà di aggiornarsi
all'ultima release software
tramite internet (per aggiornare
le compatibilità con i codici
articolo); se il codice articolo
viene trovato il modulo si
riconfigura automaticamente.
Led cloud Lampeggia Il modulo è connesso al è stata inserito un codice Se dopo 15 minuti non si
(arancione) con 2 impulsi cloud ma non comunica articolo della stufa errato o non riconfigura si è inserito un
al secondo correttamente supportato. codice articolo sbagliato o non
compatibile con in modulo in
vosstro possesso.
Assicurarsi di aver scelto
il modello di modulo wifi
compatibile consultando
o https://www.lanordica-
extraflame.com"
Lampeggia Il modulo è connesso al
Problema di configurazione nel
con 3 impulsi cloud ma non comunica Contattare centro assistenza
cloud
al secondo correttamente
Acceso Il modulo si è connesso al cloud - -
ALTRO
• I 4 led si accendono e spengono in sequenza > E’ in corso l’aggiornamento del firmware.
• I 4 led si accendono assieme per 1 secondo > E’ stato eseguito correttamente il reset tramite il relativo pulsante.
14 ITALIANOTECHNICAL SPECIFICATIONS OF REMOTE WI-FI MODULE
Frequency Wi-Fi (2.4 GHz)
Power 17.6 DBm
Dimensions (L x W x H) 94 X 57 X 30 mm
Weight 74 g
Installation position Any
Protection rating in version with connector IP 21
Input voltage 12V DC (via power supply)
Consumption 0.4W
Standard serial TTL
Operational ambient temperature Between 0°C and 50°C
Storage temperature From -10°C / +70°C
Maximum relative humidity (without condensate) 95%
The Wi-Fi network must not be of the mixed type
The package consists of:
1 Wi-Fi module Velcro 1 x serial cable 1 x power supply unit*
CONNECTION DIAGRAM
Internet
230V electrical network
Stove control
Wi-Fi internet router
Serial cable
Remote Wi-Fi module
Total Control 2.0 app
ENGLISH 15LOGIC AND MEANINGS
1. Connection with the stove (serial cable)
2. Power input
3. Configuration reset button
4. Green LED - Power
5. Blue LED - Access point
6. Orange LED - Station
7. Orange LED - Cloud
EU DECLARATION
The manufacturer MICRONOVA s.r.l. declares that the following type of radio equipment NAVEL 2.0 complies with the following
directives:
RED 201BNTmcr814/53/EU; ROHS 2011/65/EC; WEEE 2012/19/EU
The complete text of the declaration is available at the following address:
https://www.micronovasrl.com/wp-content/uploads/2016/02/T009_datasheet-PT009_XX.pdf
* The support power supply (as a sample supplied in the kit) must comply with the EN 60950-1 directive and
have the following characteristics:
• SELV Safety Extra-low voltage;
• protected against short circuits and overcurrents;
• Low power source LPS;
16 ENGLISHACCOUNT REGISTRATION PROCEDURE FOR THE TOTAL CONTROL 2.0 APP
Before starting:
Make sure that the Smartphone has Internet access, either connected to the mobile network
or to the home router.
NOTE: the same account and therefore credentials (email and password) can be used on several
devices and therefore by several people, as long as the same access credentials are used (same
email and same password).
NOTE2: for safety reasons, it is not possible to associate the same stove with different accounts.
However, the first user can guarantee the management of the stove to other accounts using
the invitation procedure described below.
If you do not have an account, create one by clicking on “SIGN UP”.
Alternatively, log in with an existing account by clicking on “SIGN IN”
Total Control 2.0 app home page:
CREATING AN ACCOUNT
Enter
• Reference name and surname for the account.
• The language used by the app (can be changed later).
Scroll down and enter the other information:
• Email, warning: to complete the procedure, it must be
valid and active!
• Password complying with the minimum security
criteria. The password must be at least 8 characters
long, contain an upper and lower case letter, a number
and a special character among the following: @ # $ % !
• Confirm the general terms and conditions of the
service by checking the relative box.
Tap on SIGN UP, if there are any mistakes in the data
entered, the app will warn you!
ENGLISH 17The app has confirmed the successful registration and sent an email with a link to confirm.
Open the mailbox relating to the email address
provided.
Confirm the registration by clicking on the green
button “EMAIL VERIFICATION”.
Congratulations, now you can add the product in the
Total Control 2.0 app
Note:
It may be necessary to wait about ten minutes for the
email to arrive. If no email arrives, check the “spam”
folder and make sure that the sender is not in the
blacklist.
PROCEDURE TO ADD PRODUCT IN THE TOTAL CONTROL 2.0 APP
After using your email and password to
log into the newly registered account, it is
possible to add a new product to control in
the Total Control 2.0 app.
18 ENGLISHThe app requires you to connect to the stove's Wi-Fi network.
STOVE CONFIGURATION WITH WI-FI INTEGRATED IN THE DISPLAY
Make sure that the WI-Fi icon on the display flashes.
If the light does not turn on or does not flash, reset the Wi-Fi (from the menu:
settings -> WiFi -> Reset and set ON, see the use and maintenance manual of the stove)
CONFIGURATION WITH EXTERNAL WI-FI MODULE
Make sure that the blue “Access Point” light is on.
If the light is off, reset the module by pressing the “RESET” key for 2 seconds.
Then, for both configurations:
Without closing the Total Control 2.0 APP, enter the Smartphone's Wi-Fi settings and connect
to the stove’s Wi-Fi network; the network can be accessed freely and is only used to set the
module - once it has been configured, the network disappears.
The network can be identified by the word MyStove followed by the MACADDRESS, shown
on the QrCode2 label. For example: MyStove_24:0A:C4:8A:A0:24
N.B.: for devices with Android operating system, it is advisable to disable the Wi-Fi+
function if present.
Disable the following functions:
Turn on Wi-Fi automatically
Switch to data connection
Hotspot 2.0
After setting the network, go back to the previous page and wait a few seconds.
ENGLISH 19The app will require you to enter: QR1 (EXAMPLE) The app will require you to enter: QR2 (EXAMPLE)
• Product code • Serial number • MAC Address • Secure Code
Code: Mac Address:
xxxxxxxxx-xxx xx:xx:xx:xx:xx:xx
Serial: Secure Code:
xxxxxxxxxx xxxxxxxx
This information can
This information can be entered manually or
be entered manually or automatically obtained
automatically obtained from QrCode 2, if present,
from QrCode 1, if present, on the back of your product
on the back of your or supplied with the Wi-Fi
product. module accessory.
Point your camera at
QrCode1, at the side N.B.: the app may already
Note: if the app asks for have the necessary
permission to access information and therefore
the camera, allow it, it may not ask the user for
otherwise it will be QRcode1 or QRcode2. In
necessary to enter the this case, it automatically
information manually. proceeds to the next steps.
The app displays a list of available Wi-Fi networks: choose your home Wi-Fi network.
If it is not visible, for example if it is hidden, scroll to the right and manually enter the name of your Wi-Fi network.
Enter the password of the selected home
network.
You can view the characters entered by
tapping on the eye symbol. Scroll down and
press the key “CONTINUE”.
20 ENGLISHFor advanced use – Static IP For advanced use – Static DNS
The default configuration provides for the use of the DHCP mode The default configuration provides for the use of the DDNS
for the dynamic acquisition mode for the dynamic
of the IP address. acquisition of the DNS
However, it is possible addresses (Domain
to set a static IP if there Name System).
are particular needs, for
example: However, it is possible
to set static DNS if there
1. DHCP has been disabled are particular needs, for
in your modem. example:
2. The Firewall has
customised rules. 1. Overcome blocks
imposed by your
To configure a static IP, provider.
proceed as follows: 2. Unsatisfactory
performance.
• Select the Static IP
checkbox To configure static DNS,
• Set the IP of the stove, for proceed as follows:
example 192.168.1.10
• Set the window, for • Select the Static
example 255.255.255.0 DNS checkbox”
• Set the Gateway IP, for • Set DNS 1, for example
example 192.168.1.1 8.8.8.8
• Set DNS 2, for example
8.8.4.4
The app is sending the Wi-Fi network configuration to the stove. The app has correctly configured the product to connect to the
If the configuration procedure is successful, the Wi-Fi network home network.
generated by the product or accessory is turned off. The name you wish to give to the newly configured product is
If the configuration procedure is not successful, an error message requested.
is displayed. Press “SAVE”.
Common causes can be: Note: before continuing,
- Did not enter network the Smartphone
name. must be connected
- You entered a too long to the Internet. If the
network name. Smartphone cannot
- Too long password connect to the mobile
entered. network, it is necessary
- The entered password is to wait for it to connect
not correct. to the home Wi-Fi
network. In this case,
If the app does not go the Smartphone will
to the next page, the Wi- wait for the connection
Fi connectivity with the
and, after the maximum
display/Wi-Fi module may
time has elapsed, a
have been interrupted.
message will invite the
user to try again.
In this case:
- Blackmask display: check
that the Wi-Fi is active and
press RESET.
- WI-Fi module: press
RESET on the Module.
ENGLISH 21The registration of the new product was successful!
Now you can click on STOVE MANAGEMENT to control the stove remotely.
PRODUCT MANAGEMENT INVITATION/REVOCATION PROCEDURE
It is possible to allow other On this page, you can
people, with different choose who can access
accounts, to control your the management of the
Extraflame heating product. product.
If you have several products, To add an account, press
move to the side on the main “INVITE A USER”.
screen to select the product
the remote management of
which you want to share.
Open the settings menu
and click on “USERS
MANAGEMENT”.
22 ENGLISHEnter the email address of the person to invite. The procedure was successful: check your mailbox for the
email. The person who is allowed to control the stove must use
Press “INVITE” to send an email inviting the person to download the same email address to create a new account.
and install the Total Control
2.0 app. Note: It may be
necessary to wait about
Also, the configured ten minutes for the
product will be assigned email to arrive. If no
to the Total Control 2.0 email arrives, check the
account with the email “spam” folder and make
address entered. sure that the sender is
Note: the email entered not in the blacklist.
must be valid and active!
To revoke the permission to control the product, click on the trash can icon and then click on “REVOKE ACCESS”.
After this procedure, the person who was previously invited to manage the product will no longer be able to control it remotely.
ENGLISH 23ACCESSORY REPLACEMENT
If you had to replace your Wi-Fi accessory following a fault or malfunction, you can
configure the new one here.
After selecting it, follow the wizard.
DISPLAY REPLACEMENT
If you had to replace your display following a fault or malfunction, you can configure the
new one here.
After selecting it, follow the wizard.
24 ENGLISHTROUBLESHOOTING FOR REMOTE WI-FI MODULE
LED STATUS DESCRIPTION POSSIBLE PROBLEM SOLUTION
ASSOCIATED
Connect the supplied external
Off The module is not powered. The module is not working.
power supply.
Power LED
(green) Flashing The module is starting. - -
The module has started
On - -
successfully.
Press the reset button for at
The module is correctly You want to reconfigure the least 3 seconds and go through
Off
connected to a Wi-Fi network module to a Wi-Fi network the Total Control 2.0 app
configuration wizard again
Access point LED The module is creating a Wi-Fi
(blue) Flashing network for configuration to - -
the home Wi-Fi network
The Wi-Fi module is ready to
On be configured to a home Wi-Fi - -
network
The module is not connected to
Off - -
the home Wi-Fi network
If this situation persists for Press the reset button for at least
Station LED The module is connecting to several minutes, it means that 3 seconds and release, and go
Flashing an incorrect password has been through the Total Control 2.0 app
(orange) the home Wi-Fi network
entered configuration wizard again
The module is connected to the
On - -
home Wi-Fi network
The module is not connected to
Off - -
the cloud
If this situation persists for
several minutes, it means Press the reset button for at least
The module is connecting to that an incorrect stove serial 3 seconds and release, and go
Flashing number or an incorrect Wi-Fi through the Total Control 2.0 app
the cloud
module SecureCode has been configuration wizard again
entered
The module will try to update
to the latest software release
via Internet (to update
the compatibility with the
article codes); if the article
code is found, the module is
Cloud LED Flashing with The module is connected An incorrect or unsupported reconfigured automatically.
If it is not reconfigured after
(orange) 2 pulses per to the cloud but is not stove article code has been 15 minutes, it means that an
second communicating correctly entered. incorrect article code or a code
that is not compatible with your
module has been entered.
Make sure you have chosen
a compatible Wi-Fi module
by consulting https://www.
lanordica-extraflame.com"
Flashing with The module is connected
3 pulses per to the cloud but is not Cloud configuration problem Contact after-sales centre
second communicating correctly
The module is connected to the
On - -
cloud
OTHER
• The 4 LEDs turn on and off in sequence > The firmware is being updated.
• The 4 LEDs light up together for 1 second > The reset has been performed correctly using the relative button.
ENGLISH 2526
27
EXTRAFLAME S.p.A. Via Dell’Artigianato, 12 36030 - MONTECCHIO PRECALCINO (VI) - ITALY
+39.0445.865911 - +39.0445.865912 - info@extraflame.it - www.lanordica-extraflame.com
MADE IN ITALY
design & production
PER CONOSCERE IL CENTRO ASSISTENZA PIÙ VICINO
CONTATTARE IL PROPRIO RIVENDITORE O CONSULTARE
IL SITO WWW.LANORDICA-EXTRAFLAME.COM
TO FIND THE SERVICE CENTRE NEAREST TO YOU
CONTACT YOUR DEALER OR CONSULT
THE SITE WWW.LANORDICA-EXTRAFLAME.COM
Il fabbricante si riserva di variare le caratteristiche e i dati riportate nel presente fascicolo in qualunque
momento e senza preavviso, al fine di migliorare i propri prodotti.
Questo manuale, pertanto, non può essere considerato come un contratto nei confronti di terzi.
The manufacturer reserves the right to vary the characteristics and the data reported in this pamphlet at any
moment and without notice, in order to improve its products.
This manual, therefore, cannot be regarded as a contract towards other parties.
16/01/2020 009270590_000 ISTRUZIONI KIT WIFI 2.0 ET.NERA (EXT)Puoi anche leggere