MANUALE D'USO USER MANUAL - CRG Kart
←
→
Trascrizione del contenuto della pagina
Se il tuo browser non visualizza correttamente la pagina, ti preghiamo di leggere il contenuto della pagina quaggiù
MANUALE D ’USO USER MANUAL
           1
    www.kar tcrg.com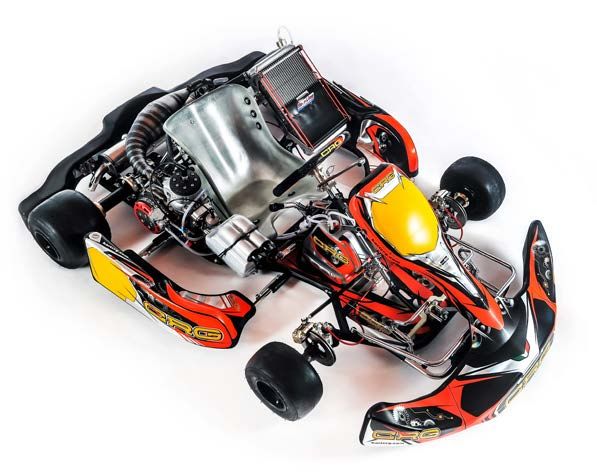
1. Introduzione alla società                                       PAG. 3
2. Passato, presente e futuro                                      PAG. 4
3. Benvenuto in CRG                                                PAG. 5
4. Come arriva il tuo kart CRG                                     PAG. 6
5. Il tuo CRG fuori dalla scatola                                  PAG. 7
6. Misure sedili                                                   PAG. 8
7. Montaggio della carrozzeria                                     PAG. 9 -14
        7.1 Montaggio delle carene laterali                        PAG. 9
        7.2 Montaggio del paraurti anteriore                       PAG. 10
        7.3 Montaggio dello spoiler anteriore                      PAG. 11
        7.4 Montaggio del frontalino                               PAG. 12
        7.5 Montaggio della carena posteriore                      PAG. 13
8. Set-up generale                                                 PAG. 14
9. Sistemazione della parte anteriore                              PAG. 15
10. Durezza dell’assale                                            PAG. 16
11. Spurgare il sistema frenante CRG                               PAG. 17
12. Cambiare le pastiglie freni                                    PAG. 18
13. Serbatoio carburante ESCR                                      PAG. 19
14. Istruzioni per la sicurezza                                    PAG. 20 - 23

1. Introduction to the company                                     PAG. 3
2. Past, present and future                                        PAG. 4
3. Welcome to CRG                                                  PAG. 5
4. How your CRG arrives                                            PAG. 6
5. Getting your CRG out of the box                                 PAG. 7
6. Seat measurements                                               PAG. 8
7. Mounting the bodywork                                           PAG. 9 -14
        7.1 Mounting the side fairing                              PAG. 9
        7.2 Mounting the front bumpers                             PAG. 10
        7.3 Mounting the front spoiler                             PAG. 11
        7.4 Mounting the front fairing                             PAG. 12
        7.5 Mounting the rear bumper                               PAG. 13
8. General set-up                                                  PAG. 14
9. Front and adjustments                                           PAG. 15
10. Rear axle hardness                                             PAG. 16
11. Bleeding the CRG brake system                                  PAG. 17
12. Changing the brake pads                                        PAG. 18
13. Fuel tank ESCR                                                 PAG. 19
14. Safety instructions                                            PAG. 20 - 23

                                                       2
                                                www.kar tcrg.com
1. Introduzione alla società
C.R.G. riassume in tre lettere la storia del karting          È in questo contesto che nasce la C.R.G. L’azienda
internazionale degli ultimi 30 anni. L’azienda nasce          cresce in maniera verticale su tutti i fronti: quello
a Lonato d/G BS, nel 1986 per volere di Giancarlo             produttivo, delle corse, del rental e anche quello
Tinini, Carlo e Roberto Vanaria. I tre, con le iniziali       commerciale.
dei loro nomi, danno vita a una sigla che sarà                L’evoluzione è incessante e nel 2003 Giancarlo
destinata a segnare in maniera indelebile il grande           Tinini, uomo al comando dell’azienda e socio unico,
libro della storia del karting.                               riorganizza l’attività sbocciata nel corso degli anni.

Negli anni Settanta i tre futuri soci animano l’azienda       Il business della società cresce di continuo e richiede
fondata da Calogero Vanaria, uno dei padri di questo          una nuova sede. Così nel 2009 nasce la nuova e
sport: la Kalì-Kart. Ai tempi il karting è uno sport in       avveniristica sede a pochi passi da quella storica. La
forte espansione e continua evoluzione e vive                 struttura è un vero e proprio polo industriale capace di
esattamente quel momento di trasformazione che lo             portare avanti la progettazione, la realizzazione e lo
porterà a passare da divertimento per pochi                   sviluppo dei telai C.R.G. sia Racing che Rental.
appassionati a sport vero e proprio.

1. Introduction to the company
C.R.G. sums up in three letters the history of                It is in this context that C.R.G. arises.
international karting from the last 30 years. The             The company grew in a vertical manner on all fronts:
company was founded in Lonato d/G (BS) in 1986                the productive one, the racing one, the rental and
founded by Giancarlo Tinini, Carlo and Roberto                also the commercial ones.The evolution is constant,
Vanaria. The three, with the initials of their names,         and in 2003 Giancarlo Tinini, the man in charge of
gave life to an acronym to be destined to indelibly           the company and the sole shareholder, reorganizes
mark the great book of the history of karting.                the business blossomed over the years.

In the seventies, the three future members vivify the         The company’s business grows continuously and
company founded by Calogero Vanaria, one of the               requires a new headquarter. So in 2009 the new,
fathers of the sport: Kali-Kart. At the time karting          futuristic location within walking distance to the
was a sport that was expanding rapidly and in                 historical one. The structure is a real industrial hub
continuous evolution, and it lives exactly that               able to carry on the planning, realization and
moment of transformation that led him to switch               development of C.R.G. chassis both Racing and Rental.
from fun for a few enthusiasts to a real sport.
                                                          3
                                               www.kar tcrg.com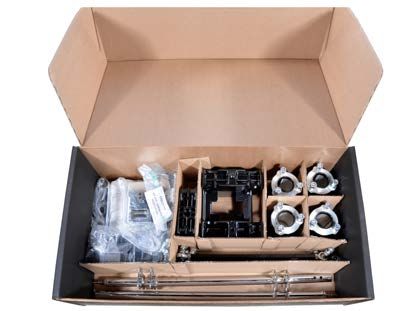
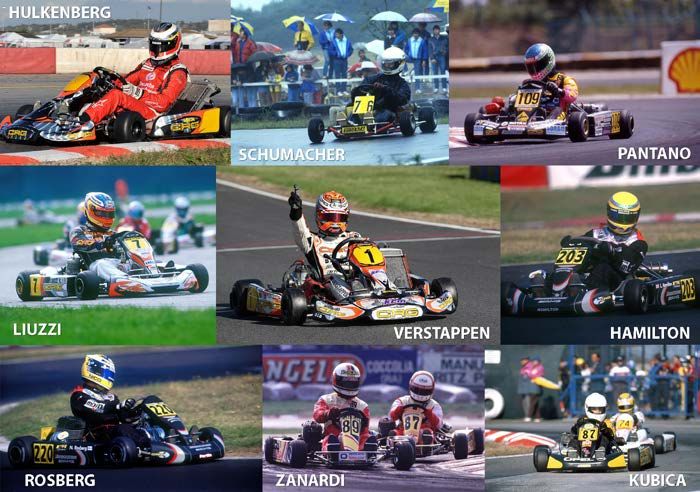
2. Passato, presente e futuro
C.R.G. negli anni è stata e continua ad essere una             L’ultimo nome nella lista è il giovane e molto veloce
vera e propria fabbrica di campioni: ne è la riprova           pilota olandese Max Verstappen che a soli 17 anni
l’alto numero di piloti che grazie alle loro caratteris-       ha raggiunto la Formula 1.
tiche peculiari sono approdati alla Formula 1. Con             L’impegno C.R.G. per il miglioramento tecnico e
C.R.G. hanno corso Michaël Schumacher, Alessandro              qualitativo dei propri prodotti continua costante nel
Zanardi, Ralf Schumacher, Giancarlo Fisichella, Nick           tempo, con la conferma che puntualmente arriva dai
Heidfeld, Jan Magnussen, Jos Verstappen, Giorgio               piloti che ogni anno portano l’azienda ai vertici dei
Pantano, Tonio Liuzzi, Nico Rosberg, Lewis Hamilton,           campionati di tutto il mondo.
Kimi Raikkonen, Robert Kubica, Sébastien Buemi,
Nico Hulkenberg, Pastor Maldonado, Giedo Van der               La passione è sempre la stessa… l’evoluzione
Garde e tanti altri campioni dell’automobilismo.               continua!

2. Past, present and future
C.R.G. has been and still is a real champions breeding         motor-racing champions. The latest name on the list
ground: this is witnessed by the high number of drivers        is the young, very fast Dutch driver Max Verstappen
that, thanks to their special skills went all the way up       who has now reached the ranks of Formula 1 at the
to Formula 1. Some names that have been racing                 age of 17. CRG’s commitment towards technical
with CRG colors are: Michaël Schumacher, Alex                  and quality product improvement is constant over
Zanardi, Ralf Schumacher, Giancarlo Fisichella,                time as confirmed by the drivers that year after year
Nick Heidfeld, Jan Magnussen, Jos Verstappen,                  bring the company on top of the championships all
Giorgio Pantano, Tonio Liuzzi, Nico Rosberg, Lewis             around the world.
Hamilton, Kimi Raikkonen, Robert Kubica, Sébastien
Buemi, Nico Hulkenberg, Pastor Maldonado, Giedo                The passion is always the same... evolution keeps
Van der Garde and many more                                    up!

                                                           4
                                               www.kar tcrg.com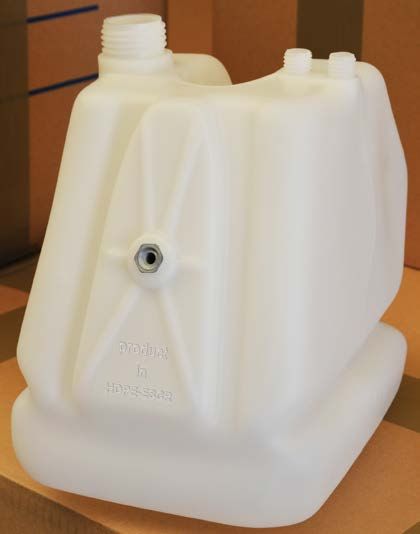
3. Benvenuto in CRG
CRG ti dà il benvenuto nella sua famiglia. La nostra politica è di trattare tutti i nostri clienti come
membri della nostra famiglia e provvedere alla buona qualità dei nostri prodotti in modo che
rispondano ai bisogni di ogni pilota.
In questo manuale troverai alcuni indizi e trucchi su come costruire il tuo nuovo CRG e come mantenerlo
ad uno standard elevato. Sono presenti anche alcune istruzioni per la configurazione base.

3. Welcome to CRG
CRG would like to welcome you to our Family. Our policy is to treat all of our customers like family
and to supply a good quality product that meets the demands of any driver. Inside this manual you
will find some hints and tips about building your new CRG and how to maintain it to a high standard.
Also enclosed are some basic set up instructions.

                 INFO TECNICHE / TECHNICAL INFO: infotecniche@kartcrg.com
                     INFO GENERALI / GENERAL INFO: crg@kartcrg.com

                                                   5
                                          www.kar tcrg.com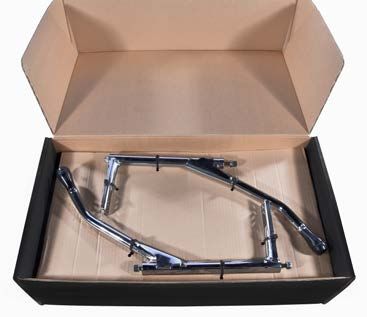
4. Come arriva il tuo CRG   • Scatola accessori
4. How your CRG arrives     • Accessories box

                                   6
                            www.kar tcrg.com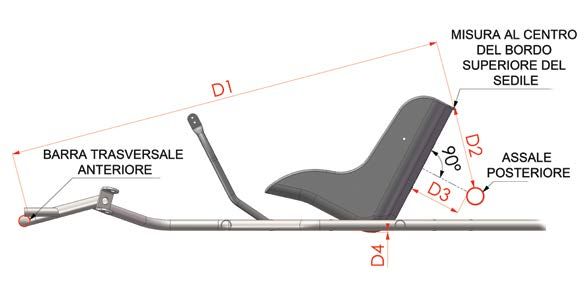
5. Il tuo CRG fuori dalla scatola
5. Getting your CRG out of the box

01.   Spoiler anteriore                                 01.   Front spoiler
02.   Paraurti anteriore                                02.   Front bumper
03.   Frontalino                                        03.   Front fairing
04.   Scocca CRG                                        04.   CRG frame
05.   Volante                                           05.   Steering wheel
06.   Scatola accessori                                 06.   Accessories box
07.   Carenatura laterale sinistra                      07.   Left fairing
08.   Paraurti laterale sinistro                        08.   Left side bumpers
09.   Carenatura laterale destra                        09.   Right fairing
10.   Paraurti laterale destro                          10.   Right side bumpers
11.   Cerchi CRG                                        11.   CRG wheels
12.   Carena posteriore                                 12.   Rear bumper
13.   Sedile CRG                                        13.   CRG seat

                                            7
                                     www.kar tcrg.com
6. Misure sedili
6. Seat measurements

                                                                                      MEASURE
                                                                                   TO THE CENTRE
                                                                                  OF THE TOP EDGE
                                                                                    OF THE SEAT

                FRONT LOOP

                                                                                   REAR AXLE

    MISURE/                          MINI         JUNIOR       SENIOR   SHIFTER         DD2
  MEASUREMENT

             D1                      1075          1240         1265     1285           1285
             D2                       195           195          195      195            195
             D3                       165           150          140      120            125
             D4                        0             0            3        0              5
(Tutte le misure in mm/ All measurements in mm)

                                                           8
                                                  www.kar tcrg.com
7. Montaggio della carrozzeria 7.1 Montaggio delle carene laterali
7. Mounting the bodywork 7.1 Mounting the side fairing
1. Mettere la 1. Place the plastic
carenatura laterale side pod on the
sul paraurti laterale metal side bumper
metallico. bar.
2. Fissarlo con le viti 2. Fix it in place
fornite. with the supplied
screws.
3. Inserire il paraurti 3. Insert the side
laterale nei bumper bar in the
supporti del telaio supports on the
e unirlo con la molla chassis and attach
fissante che viene with the supplied
fornita. fixing spring.
9
www.kar tcrg.com7. Montaggio della carrozzeria 7.2 Montaggio del paraurti anteriore
7. Mounting the bodywork 7.2 Mounting the front bumpers
1. Inserire le due viti M6 con le 1. Insert the two M6 bolts with
loro rondelle. their washers.
2. Stringere le viti in modo che 2. Tighten the bolt so it doesn’t
non possano svitarsi. turn.
3. Collegare il paraurti 3. Attach the top front
anteriore superiore bumper using the M6
usando le viti svasate countersunk bolts and
M6 e rondelle sui due washers on the
punti. two points.
4. Usando le due viti M6 4. Using the two M6 bolts
collegare le due metà attach the two plastic
di plastica del morsetto. halves of the clamp
together.
10
www.kar tcrg.com7. Montaggio della carrozzeria 7.3 Montaggio dello spoiler anteriore
7. Mounting the bodywork 7.3 Mounting the front spoiler
1. Collegare la prima 1. Attach the first fixing
piastra fissaggio alla plate to the plastic
plastica usando le spoiler using the four M6
quattro viti M6. bolts.
2. Collegare la seconda 2. Attach the second fixing
piastra fissaggio allo plate to the plastic
spoiler di plastica spoiler using the
usando le quattro viti remaining four M6 bolts.
M6 rimanenti.
3. Assicurarsi che la piastra 3. Make sure the fixing
fissaggio sia fissata in plate is fixed in the
posizione intermedia. middle position.
4. Posizionare lo spoiler 4. Place the complete
completo tra i due spoiler between the two
paraurti di metallo con metal bumpers with the
i morsetti del paraurti bumper clamps open.
aperti.
5. Chiudere i morsetti del 5. Close the bumper
paraurti e assicurarsi che clamps and make sure
lo spoiler completo non the complete spoiler
si muova. doesn’t move.
11
www.kar tcrg.com7. Montaggio della carrozzeria 7.4 Montaggio del frontalino
7. Mounting the bodywork 7.4 Mounting the front fairing
1. Spingere i tre gommini 1. Push the three rubbers
nei buchi del frontalino in the holes of the front
anteriore. fairing.
2. Collegare le piastre di 2. Attach the front fairing
supporto del frontalino support brackets to the
anteriore al kart usando kart using the supplied
le viti fornite. bolts.
3. Unire i tre perni di 3. Attach the three front
supporto del frontalino fairing pivot supports
anteriore alle piastre. to the brackets.
4. Montare il frontalino 4. Lay the front fairing on
anteriore sulle piastre e the brackets and insert
inserire i perni di supporto the fairing pivot supports
del frontalino nei gommini in the rubbers and then
e mettere le clip “R” di put the fixing ‘R’ clips.
fissaggio.
12
www.kar tcrg.com7. Montaggio della carrozzeria 7.5 Montaggio della carena posteriore
7. Mounting the bodywork 7.5 Mounting the rear bumper
1. Unire le piastre di fissag- 1. Attach the fixing plates
gio ai supporti verticali on the vertical supports
usando le viti M8 fornite, using the M8 bolts
rispettando le direzioni supplied respecting the
destra e sinistra come left and right direction
vengono mostrate nella shown in the picture.
figura.
2. Usando il kit montaggio 2. Using the rear bumper
paraurti posteriore rubber kit supplied for
fornito per il tuo specifico your specific kart mount
kart, montare tutti i the complete supports
supporti sul telaio. on the chassis.
3. Unire il paraurti posteriore 3. Attach the plastic rear
di plastica ai supporti sul bumper to the supports
telaio usando le viti on the chassis using the
svasate M8 e le rondelle M8 countersunk bolts
fornite. and washers supplied.
4. Il paraurti posteriore 4. The rear bumper
quando viene when mounted
montato deve essere should look like the
come l’esempio nella example displayed
figura. in the picture.
13
www.kar tcrg.com8. Set-up generale
8. General set-up
LARGHEZZA ANTERIORE / FRONT WIDTH
senza marce / direct drive 1210mm - con marce / with gear 1245mm
LARGHEZZA POSTERIORE/ REAR WIDTH
1395mm
14
www.kar tcrg.com9. Sistemazione della parte anteriore
9. Front and adjustments
2mm di curvature negative per ogni
lato.
2mm negative camber per side.
4mm di curvature negative in totale
sia a destra che a sinistra all’asciutto.
4mm of negative camber total left
and right in dry conditions.
0mm di curvature da bagnato.
0mm camber in wet conditions.
1 linea di caster positivo per lato
all’asciutto.
1 line of positive caster per side in
dry conditions.
4 linee di caster positivo per lato da
bagnato.
4 lines of positive caster per side in
wet conditions.
Usare il kart nella posizione inferiore
e il fusello in posizione superiore
all’asciutto.
Use the kart in the low position and
the stub axle in the high position in
dry conditions.
Usare il kart in posizione superiore
e il fusello in posizione inferiore da
bagnato.
Use the kart in the high position and
the stub axle in the low position in
wet conditions.
15
www.kar tcrg.com10. Durezza dell’assale
10. Rear axle hardness
Ø 40 ASSALE POSTERIORE / REAR AXLE
TIPO/TYPE DUREZZA/HARDNESS SPESSORE/THICKNESS
SOFT
MT 100-110 3mm
S 120-130 3mm
M 150-160 3mm
HARD
H 180-190 3mm
K 200-210 3mm
Ø 50 ASSALE POSTERIORE / REAR AXLE
TIPO/TYPE DUREZZA/HARDNESS SPESSORE/THICKNESS
S20 60-70 2mm
SOFT
S25 90 2,5mm
T3 90-100 2mm
T6 110 2mm
T1 120 2,5mm
T4 130 2,5mm
T7 140 2mm
M20 (STD) 160-170 2mm
M25 160-170 2,5mm
HARD
T2 200 2mm
T5 230-250 2mm
16
www.kar tcrg.com11. Spurgare il sistema frenante
11. Bleeding the brake system
1. Riempire la pompa freno 1. Fill the master cylinder
con il liquido dei freni with the brake fluid as in-
come indicato dalla dicated by the red arrow.
freccia rossa.
2. Il liquido dei freni nella 2. The brake fluid in the
pompa freno deve master cylinder should
sempre essere al livello always be at the correct
corretto indicato dalla level indicated by the red
freccia rossa. arrow.
3. Per spurgare il freno: 3. To bleed the brake:
il pedale deve sempre The pedal should be
essere premuto gen- pushed down gently so
tilmente cosicché l’olio the oil can pass through
passi attraverso il sis- the system.
tema. Quando il pedale When the pedal is down
è abbassato, aprire you should open the
la valvola di spurgo bleed valve on the caliper
sulla pinza freno, come as shown in the picture
mostrato nella figura, and the air will come out
l’aria uscirà dal tubo of the tube attached to
collegato alla valvola the bleed valve.
di spurgo. Quando il pedale raggiunge la When the pedal reaches the end of its course
fine del suo percorso, la valvola di spurgo the bleed valve should be closed and the pedal
dev’essere chiusa e il pedale deve ritornare return to the normal position.
nella sua posizione normale. Controllare Always check the level of the brake fluid.
sempre il livello del liquido dei freni. Ripetere Then repeat this procedure until the pedal
questa procedura finché la corsa del pedale becomes very hard and its path is as short as
è più corta. possible.
ATTENZIONE WARNING
• C.R.G. raccomanda il liquido freni Xeramic DOT 4 • C.R.G. recommends Xeramic DOT 4 brake fluid for
per il sistema. this system.
• Il liquido dei freni dev’essere cambiato ogni 15 ore. • The brake fluid should be changed every 15 hours.
• Le guarnizioni devono essere cambiate ogni 25 ore. • The seals should be changed every 25 hours.
• Ci dev’essere sempre un gioco dai 3 ai 5 mm sul pedale. • There should always be 3 to 5mm of play on the pedal.
• Controllare l’usura della spina pompa freno (SBN.00202). • Please controll the usury of the master cylinder pin
(SBN.00202). If the diameter of your pin is minor than
Se il diametro è minore di 5 mm, sostituire la spina.
5 mm, please replace it.
17
www.kar tcrg.com12. Cambiare le pastiglie dei freni
12. Changing the brake pads
1. Rimuovere la clip di sicurezza 1. Remove the safety clip from the
dal centro della pinza. center of the caliper.
2. Usando una chiave a brugola 2. Using a 4mm allen key and a
4mm e una chiave inglese 8mm 8mm spanner loosen the fixing
allentare le viti di fissaggio. bolts.
3. Togliere le viti di fissaggio. 3. Take out the fixing bolts.
4. Estrarre le pastiglie del freno 4. Pull out the brake pads and
e cambiarle con le nuove. exchange with the new ones
Riposizionare e serrare le viti di and then put the fixing bolts and
fissaggio.Fissare poi la clip di safety clip back on the caliper.
sicurezza.
ATTENZIONE WARNING
• CRG raccomanda di non usurare le pastiglie del freno • CRG recommends that the brake pad wear doesn’t
oltre i limiti di usura. Ci dev’essere sempre un minimo exceed the minimum 5-7mm of ferodo.
di 5-7mm di composto frenante sulle pastiglie. • The fixing bolts should be fully tightened leaving a
• Le viti di fissaggio devono essere completamente slight tolerance to turn the bolt.
strette lasciando una minima tolleranza di avvitamento. • It is important to use the correct type of brake pad with
• È importante che il giusto tipo di pastiglie per i freni sia the correct type of brake disc.
usato per il tipo corretto di disco dei freni. • Only original brake pads should be used with the CRG
• Solo le pastiglie freno originali devono essere usate brake systems.
con il sistema frenante CRG.
18
www.kar tcrg.com13. Serbatoio carburante ESCR
13. Fuel tank ESCR
1. Nella continua ricerca di miglioramento della 1. In the continuous research for safety im-
sicurezza dei kart rental e racing, C.R.G. provements in rental and racing karts, C.R.G.
utilizza, per i suoi serbatoi carburante, un uses, for its fuel tanks, a new material signed
nuovo materiale siglato ESCR (Enviromental ESCR (Environmental Stress Cracking Re-
Stress Cracking Resistance), conforme, tra sistance), complies, among other things, to
l’altro, alle severe normative americane the strict American automotive regulations.
automotive. I nuovi serbatoi sono stati testati The new tanks have been tested for a long
a lungo dal reparto corse C.R.G. ed utiliz- time by the C.R.G. racing department and
zati nelle condizioni più gravose mostrando have been used in the most demanding con-
altissima resistenza alle vibrazioni ed agli ditions, showing high resistance to vibrations
impatti, anche in condizioni di temperature and impacts, even in very low temperature
ambientali molto basse. conditions.
19
www.kar tcrg.com14. Istruzioni per la sicurezza
Questa guida è stata scritta da C.R.G. per fornire al cliente le procedure di
sicurezza e manutenzione del Kart.
Leggere le istruzioni, le note e gli avvisi sulla sicurezza in questo manuale.
Non attenersi alle regole di sicurezza può portare a serie conseguenze.
Un kart può essere pericoloso se non mantenuto correttamente o usato impropriamente.
Istruzioni generali
• Usare il kart solo su piste specifiche per il karting con un’omologazione o licenza rilasciata
dall’entità governativa.
• Assicurarsi che sulla pista non ci siano residui o tracce di benzina o olio. Evitare di toccare il
motore, le parti rotanti o le parti calde.
• Fare attenzione a non calpestare il cavo acceleratore, i tubi del carburante e le tubazioni freno
quando si entra o si esce dal kart.
• Evitare il contatto con le carene quando si entra o si esce dal kart.
• Assicurarsi quando si fa benzina di evitare la fuoriuscita di carburante. Una fuoriuscita di
carburante può provocare incidenti o perfino incendi.
• Controllare che il cavo acceleratore non sia troppo stretto: perché questo potrebbe far
accelerare il kart quando il pilota è assente.
• Fare attenzione quando si sta in piedi vicino al kart mentre il kart viene rodato sul carrello.
• Pulendo il kart evitare di usare spray oleosi vicino al disco del freno o alle pinze.
• Sostituire i cerchi danneggiati; un cerchio danneggiato può portare alla perdita di pressione
nella gomma e può portare serie conseguenze.
• Non andare in pista con un kart avente parti rotte o mancanti.
• Non andare in pista con gomme danneggiate o usurate: l’esplosione della gomma può portare
a conseguenze molto serie.
• Le gomme fredde hanno una trazione ridotta e aumentano la possibilità di perdere il controllo
del kart sulla pista.
Kart
• Il kart deve sempre rispettare i parametri originali imposti dalla C.R.G.
• Usare solo pezzi di ricambio originali C.R.G.
• Mantenere il kart ad un alto standard.
• Usare una gomma con la giusta presa sulla superficie della pista (se è necessario,
contattare la C.R.G.).
Non usare il kart con pezzi di ricambio originali può portare a serie conseguenze.
20
www.kar tcrg.com14. Safety instructions
This guide is compiled by C.R.G. to provide the user with the procedures
for the safety and maintenance of their Kart.
Carefully read the instructions, notes and safety notices in this manual.
A failure to comply with safety regulations may result in serious consequences.
A Kart can be dangerous if not properly maintained or used improperly.
General Instructions
• Use the Kart only on tracks specified for Karting with an homologation or licence given by the
respected governing bodies.
• Make sure that on the track there aren’t visible residues and traces of petrol or oil.
Avoid touching the engine, rotating and hot parts.
• Be careful not to step on the throttle cable, fuel the lines or the brake pipes when getting in or
out of the kart.
• Avoid contact with the side fairings getting in or out of the kart.
• When re-fueling take care to prevent the spillage of fuel because it can cause accidents or even
fire hazards.
• Check that the throttle cable is not too tight: as this could accelerate the kart without the
presence of the driver.
• Pay attention when standing near the kart while the kart is being warmed up on the kart stand.
While cleaning avoid using oily sprays near the brake disc and calipers.
• Replace damaged rims; a damaged rim may lead to loss of pressure in the tire and may have
serious consequences.
• Never allow a kart to go on track with broken or missing parts.
• Never go on track with worn or damaged tires: the bursting of the rubber can lead to very
serious consequences.
• Cold tires have reduced traction and increase the possibility of losing control of the kart on
track.
Kart
• The karts should respect the original C.R.G. parameters.
• Use only original spare parts from C.R.G.
• Maintain the kart adequately and to a high standard.
• Use a tire with adequate grip to the track surface (if needed, contact C.R.G.).
Not using the original spare parts of the kart can result in serious consequences.
24
www.kar tcrg.comPiloti
• Chiedere informazioni riguardo alle questioni di sicurezza che sono proibite e/o qualunque
restrizione imposta dai proprietari o dall’organizzazione della pista.
• Assicurarsi di capire le restrizioni riguardo alla taglia e/o all’età se al di sotto del minimo
richiesto dalle leggi del singolo paese.
• Sapere il significato dei segnali delle bandiere e seguire le istruzioni dello staff della pista.
• Non devono fuoriuscire dal casco né capelli né vestiario perché potrebbero raggiungere le
parti rotanti del kart ed essere fatali.
• Alcuni problemi di salute, in particolare problemi al cuore, al collo o alla schiena e disturbi
nervosi possono essere pericolosi mentre si guida.
• Essere sotto l’influenza di droghe o alcol è severamente vietato.
• Non è consigliabile guidare con temperature molto basse perché rallenta i sensi e le reazioni
del pilota.
Osservare sempre le norme di sicurezza: il comportamento pericoloso del pilota
mette egli stesso e gli altri in grande pericolo.
Abbigliamento
• Indossare un casco, in base alla taglia della testa del pilota, approvata da normative nazionali o
internazionali, con la chiusura di sicurezza sotto il mento.
• Non usare mollette o cinghie per legare i capelli sotto il casco.
• Indossare scarpe chiuse con lacci corti.
• Usare una tuta da corsa e guanti che si attengano alle normative nazionali/internazionali.
• Indossare protezioni per le costole della taglia corretta (consigliato).
• Usare una protezione per il collo.
È responsabilità dei piloti di assicurarsi che stiano indossando i giusti accessori
e vestiti mentre stanno guidando sulla pista.
Riassunto dei controlli generali prima di andare in pista
• Il freno è un elemento essenziale di sicurezza.
• Non accendere il kart se il sistema frenante è difettoso o se si hanno dubbi. Un sistema
frenante difettoso o che ha tubi freno danneggiati può portare a serie conseguenze.
• Controllare l’usura delle pastiglie freno.
• Controllare che non ci siano perdite d’olio nel sistema frenante.
• Controllare l’integrità dei componenti di sterzo: assicurarsi che tutte le giunzioni a sfera e i
cuscinetti non abbiano un eccessivo gioco.
• Controllare che entrambi i pedali funzionino correttamente.
• Controllare che le ruote siano montate e fissate correttamente al kart.
• Controllare che la catena abbia una tensione corretta e che sia lubrificata.
• Assicurarsi che gli spoiler e la carena siano fissati al kart.
• Controllare che il rivestimento della gomma sia di un giusto standard.
• Gonfiare le gomme secondo l’adeguata pressione consigliata dal costruttore di gomme.
• Il volante deve essere montato sul piantone sterzo con due viti.
• C.R.G. non risponde per nessun reclamo sulla garanzia se le parti del kart non sono
parti originali C.R.G.
22
www.kar tcrg.comDrivers
• Inquire about safety issues that are prohibited and/or any restrictions imposed by the owners or
by the organization of the track.
• Make sure that you understand any restrictions about size and/or age if they are below the
minimum requirements established by the regulation of each country.
• Know the meaning of the flag signals and follow the instructions of the track’s staff.
• Long hair or clothing articles shouldn’t come out of the helmet and reach the rotating parts of
the kart because it could be fatal.
• Having health problems, heart problems, problems related to the neck or back and nervous
disorders can be dangerous while driving.
• Being under the influence of drugs or alcohol is strictly prohibited .
• It isn’t recommended to drive in very cold weather as it slows down the senses and reactions of
the driver.
Always observe the safety regulations: the dangerous behaviour of a driver puts
himself and others at high risk.
Clothing
• Wear a helmet, the correct size for the pilot’s head, approved according to national or
international regulations, with safety closure under the chin.
• Don’t use clips or straps to tie hair under the helmet.
• Wear appropriate closed shoes with short laces.
• Use a race suit and gloves that complies with the national or international regulations.
• Wear a rib protectors that is the correct size (recommended).
• Use neck protection.
It is the drivers responsibility to wear the correct accessories and garments of clothing
while driving on track.
Summary of general checks before going on track
• The brake is an essential element of security.
• Do not start the kart if the brake system is defective or if you have any doubts. A braking system
that is defective or damaged brake hoses can result in serious consequences.
• Check the wear of the brake pads.
• Check that there are no oil leaks in the brake system.
• Check the integrity of steering components: making sure that all ball joints and bearings dont
have excessive play.
• Check that both pedals are functioning correctly.
• Check that the wheels are properly fixed and mounted onto the kart.
• Check that the chain has the correct tension and is lubricated adequately .
• Ensure that spoilers and fairings are properly fixed onto the kart.
• Check tire wear is of a adequate standard.
• It is advised to inflate the tires according to the tire pressure recommended by the tire
manufacturer.
• The steering wheel should be mounted on the steering column with two bolts.
• C.R.G. does not respond to any guarantee claims if the parts fitted are not original
parts of C.R.G.
23
www.kar tcrg.comC.R.G. S.r.l. Via Mantova 4/F - 25017 Lonato del Garda (BS)
Tel. +39 030 9912604 - Fax +39 030 9130714
www.kartcrg.com
24
www.kar tcrg.comPuoi anche leggere