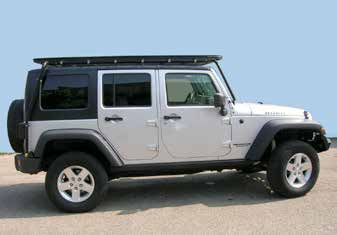
Sistema di fissaggio per Jeep Wrangler JK 4 porte
←
→
Trascrizione del contenuto della pagina
Se il tuo browser non visualizza correttamente la pagina, ti preghiamo di leggere il contenuto della pagina quaggiù
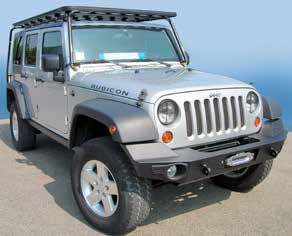
Sistema di fissaggio per Jeep Wrangler JK 4 porte
(63-FKJK4)
Il kit è composto da:
Una parte in supporti in ferro piegati e lavorati
che si fissano al veicolo tramite:
2x piastre anteriori cornice vetro
2x piastre posteriori con attacco al telaio
2x piastre a “C” con boccole in poliuretano

Una parte di tubolari in ferro che creano la
struttura completa esterna così descritti:
2x colonne anteriori per attacco piastra corni-
ce vetro
2x colonne posteriori per attacco piastra a “C”
2x barre longitudinali (lunghe o corte in base
la veicolo 2 o 4 porte)
1x arco anteriore
1x arco posteriore
10x cavallotti zincati per fissaggio porta pacchi (il porta pacchi non è incluso nel kit fissaggio)
Dadi, bulloni, rondelle sono compresi.

Il kit completo si monta in circa 2 ore.

Istruzioni:
- Posizionare il portapacchi a terra o su cavallotti con il fondo rivolto verso l’alto, appoggiare sopra le barre longitudinali (foto 2).

 2

- Inserire sia l’arco posteriore sia l’arco anteriore alle barre longitudinali avvitando e serrando i bulloni (foto 3/4/5).
 3                                                     4                                   5

Il risultato finale è come appare nella foto 6.
 6
-verificare che la struttura del tubolare sia bene centrata ed allineata al portapacchi (foto 7)

 7 7
foto

- Inserire gli inserti rettangolari all’interno delle fessure delle barre del portapacchi. Un inserto all’interno e un inserto all’esterno del
tubolare (foto 8).
 8

- Posizionare lo speciale cavallotto a omega imbullonandolo sugli inserti precedentemente infilati. Prima di serrare definitivamente i
cavallotti al portapacchi, verificare la corretta geometria in modo che tutto sia correttamente allineato (foto 9/10).
 9                                           10

- A questo punto, portapacchi e struttura tubolare sono pronti per essere posizionati sul veicolo. (foto 11)
11

Seconda fase di montaggio

FISSAGGIO PIASTRE ANTERIORI AL VEICOLO
- Svitare i bulloni che sorreggono la cornice del vetro anteriore come indicato in fotografia, dopodiché, utilizzando gli stessi bulloni,
posizionare la piastra anteriore destra e sinistra (foto 12/13/14).
12                                                     13                                    14

     FRONT RIGHT                FRONT LEFT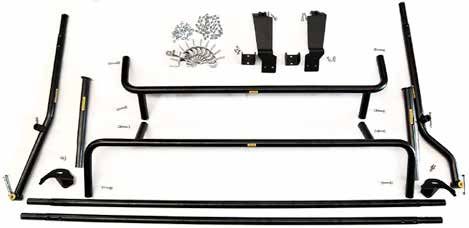
- Montare il tubolare verticale anteriore destro e sinistro utilizzando i bulloni a brugola in dotazione, come da foto 15/16/17.
15 16 17
foto 15 foto 16 foto 17
FRONT LEFT
FRONT RIGHT
FRONT RIGHT FRONT LEFT
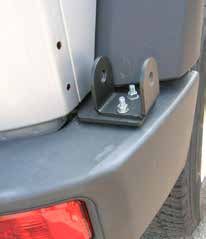
FISSAGGIO PIASTRE POSTERIORI AL VEICOLO
- Svitare i bulloni che sorreggono il paraurti posteriore al telaio, come da fotografia.
- Posizionare i bulloni a testa bombata nelle sede quadrata del supporto ad “S”.
- Inserire il supporto ad “S” e montare con bulloni in dotazione.
foto 18/19/20.
18 19 20
REAR RIGHT
REAR LEFT
REAR LEFT REAR RIGHT
- Fissare il supporto a “C” sulla piastra a “S”(foto 21/22/23).
f21 22 23
REAR RIGHT
MONTAGGIO DEFINITIVO SUL VEICOLO
- Fissare le colonne verticali posteriori all’arco posteriore con i bulloni in dotazione (FOTO 24/25/26)
24 25 26
colonna destra
colonna sinistra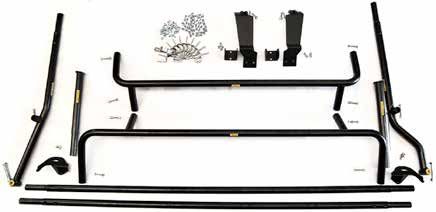
- Facendosi aiutare, portare il portapacchi in posizione sul veicolo (FOTO 27/28/29).
27                                         28                                         29

- Inserire il tubolare ad arco anteriore sul tubolare a colonna precedentemente montato, fissandolo con i bulloni e solo successiva-
mente serrare il bullone a brugola che blocca la struttura alla piastra anteriore come da foto 30/31.
30                           31

- Inserire la colonna posteriore nel supporto a “C” e serrare bullone e dado dati in dotazione (foto 32/33/34/35).
32                                   33                                      34                            35

- A questo punto il portapacchi e la struttura sono montati. Si raccomanda di verificare il corretto serraggio dei bulloni che fissano
tutti i componenti dopo 500 Km e controllare sempre tutto l’assemblaggio, prima di ogni carico.

                                    Il kit comprende, solo per le versioni con
                                    hard top, una coppia di piedi per ridurre le
                                    vibrazioni.
                                    Questi piedi vengono montati diretta-
                                    mente sulla grondaia dell’hard top senza
                                    carico e servono esclusivamente per atte-
                                    nuare l’oscillazione dell’intero sistema.
                                    Si montano solo in abbinamento al porta-
                                    pacchi Upracks.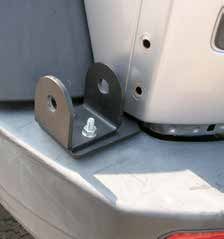
Fitting kit for Jeep Wrangler JK 4 doors (63-FKJK4)
The kit is composed of:
a set of curved iron supports especially designed to be fitted to the vehicle by means of:
2x front plates to be attached to the windshield
2x rear plates to be attached to the frame
2x C-shaped plated with polyurethane bushes

A set of iron tubular profiles that make up the com-
plete external structure, described as follows:
2x front columns to be attached to the plates on the
windshield
2x rear columns to be attached to the C-shaped
plates
2x longitudinal bars (long or short bars according to
2 or 4 doors-vehicle version)
1x front arch
1x rear arch
10x zinc-coated U-bolts to be attached to the ro-
of-rack (the roof-rack is not included in the fitting kit)
Nuts, bolts, and washers are included.

The complete kit can be mounted in 2 hours.

Instructions:
- Place the roof-rack on the floor or upon u-bolts, with its underside facing upwards. Lay the longitudinal bars on top of it (picture 2).

 2

- Fix both the front arch and the rear arch to the longitudinal bars by screwing and tightening the bolts (pictures 3/4/5).
 3                                                       4                              5

The final result is as shown in picture 6.
 6
-Make sure that the tubular profiles assembly is perfectly aligned and centred relative to the roof-rack (picture 7)

 7

- Insert the rectangular inserts inside the slits in the roof-rack bars. One insert should be placed on the right of the tubular profile
and the other one should be placed on the left of the tubular profile (picture 8).
 8

- Position the special omega-bolt and screw it up to the inserts previously inserted. Before finally tightening U-bolts to the roof-rack,
check the correct geometry so that the entire assembly is perfectly aligned (pictures 9/10).
 9                                          10

The roof-rack and the tubular profiles assembly are now ready for being positioned on the vehicle roof. (picture 11)
11

Second mounting step

ATTACHING FRONT PLATES TO THE VEHICLE
- Unscrew the bolts that support the windshield frame as shown in the picture. Then, use the same bolts to position the right and left
front plates (pictures 12/13/14).
12                                                   13                                    14

     FRONT RIGHT               FRONT LEFT
- Mount the right and left front vertical tubular profile by means of the socket head screws provided, as shown in pictures 15/16/17.
15 16 17
foto
FRONT LEFT
FRONT RIGHT
FRONT RIGHT FRONT LEFT
ATTACHING REAR PLATES TO THE VEHICLE
- Unscrew the bolts that support the rear bumper to the frame, as shown in the picture.
- Position the convex head screws in the square seat of the S-shaped support.
- Insert the S-shaped support and fix it by means of the bolts provided.
pictures 18/19/20.
18 19 20
REAR RIGHT
REAR LEFT
REAR LEFT REAR RIGHT
- Attach the C-shaped support to the S-shaped plate (pictures 21/22/23).
f21 22 23
REAR RIGHT
FINAL MOUNTING ON THE VEHICLE
- Attach the rear vertical columns to the rear arch by means of the bolts provided (pictures 24/25/26)
24 25 26
right column
left column- Place the roof-rack in position on the vehicle roof. Carry out this operation with someone’s help (pictures 27/28/29).
27 28 29
- Insert the front arch-shaped tubular profile in the column-shaped tubular profile previously mounted. Fix it with bolts and then
tighten the socket head screw that locks the assembly to the front plate, as shown in pictures 30/31.
30 31
- Insert the rear column in the C-shaped support and tighten the bolt and nut provided (pictures 32/33/34/35).
32 33 34 35
- The roof-rack and the fitting kit are now mounted. We recommend you check the correct tightening of the bolts that fix all the com-
ponents after you have driven 500 Km. Always check the entire assembly, before placing any load on the roof-rack.
Included inside the set there are 2 extra legs
that, if necessary, can be mounted between
a roofrack (sold separately) and the hard top
gutter. This is a NO LOAD leg kit and just
permits less vibrations for all the system.Puoi anche leggere