CONDIZIONATORE PORTATILE - MODELLI: TZAZC5 - MANUALE D'ISTRUZIONI - Termozeta
←
→
Trascrizione del contenuto della pagina
Se il tuo browser non visualizza correttamente la pagina, ti preghiamo di leggere il contenuto della pagina quaggiù
CONDIZIONATORE PORTATILE
                            MODELLI: TZAZC5

                      MANUALE D’ISTRUZIONI
Vi ringraziamo per la preferenza accordata avendo scelto un prodotto Lange distribution.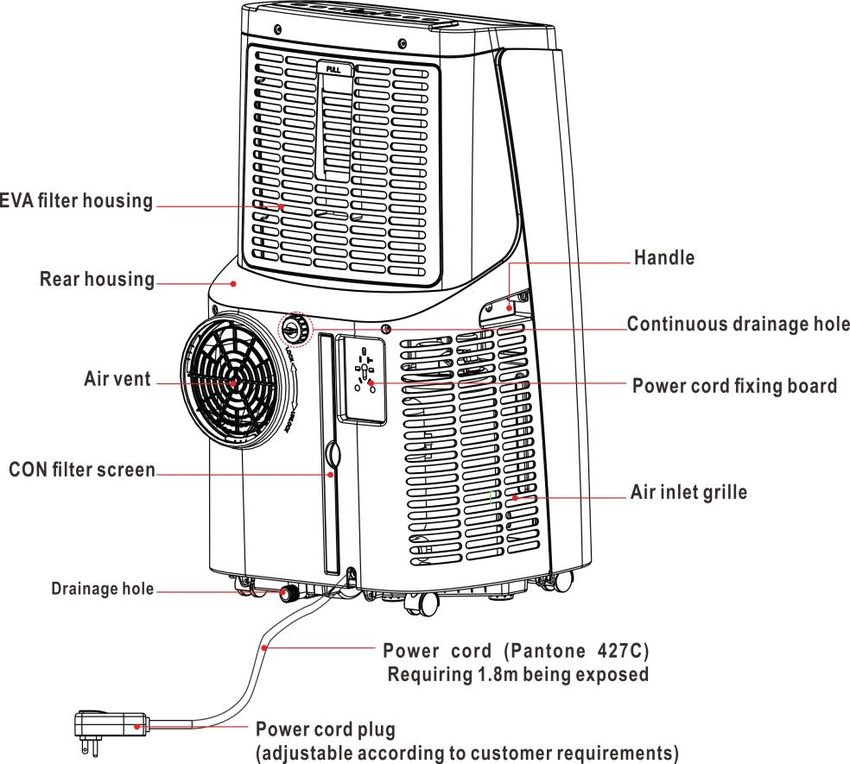
Vi preghiamo di leggere attentamente le informazioni contenute in questo
manuale, in quanto Vi aiuteranno a sfruttare al meglio le caratteristiche di
questo prodotto.
Il presente libretto è parte integrante dell’apparecchio e deve essere letto
attentamente prima dell’utilizzo perché fornisce importanti indicazioni
riguardanti la sicurezza di installazione, d’uso e di manutenzione. Conservare
quindi con cura

Cordialmente
Lange Distribution S.r.L.

 Leggere attentamente questo manuale d’istruzioni poichè all’interno vi sono importanti
informazioni sulla sicurezza, l’uso e la manutenzione dell’elettrodomestico. Conservare il
                            manuale per consultazioni future.

                                            2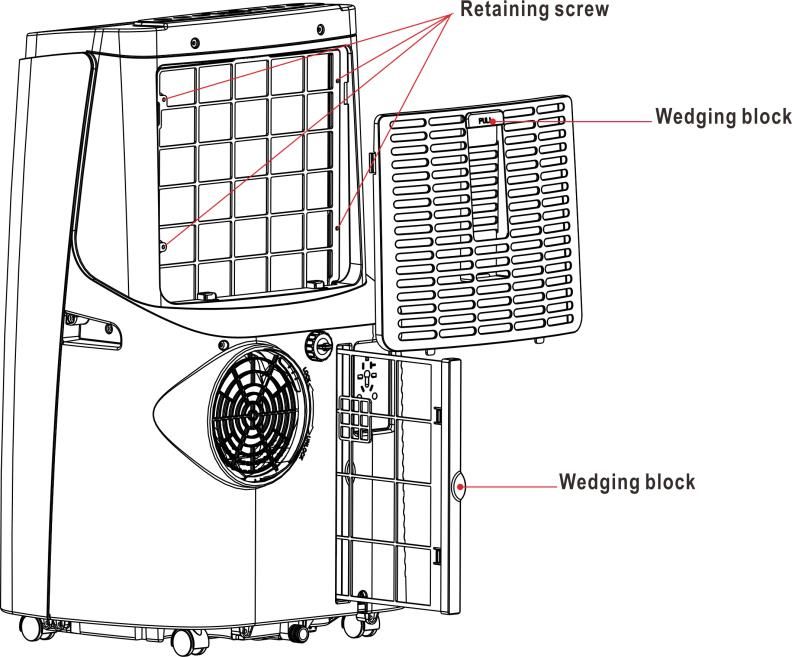
Il gas refrigerante R290 usato in questo prodotto è ecologico,
Questo refrigerante èprivo di odore, e comparato con altri gas ha
uno scarsissimo impatto ambientale.
Leggere le istruzioni prima di utilizzare il prodotto.
Le figure riportate sono indicative.

                      I. AVVERTENZE GENERALI

1. Questo apparecchio può essere utilizzato da bambini dagli 8 anni in
   su e da persone con ridotte capacità        fisiche, sensoriali o mentali
   o con mancanza di esperienza o conoscenza se a loro è stata
   assicurata un’adeguata sorveglianza oppure se hanno ricevuto
   istruzioni circa l’uso in sicurezza dell’apparecchio e hanno compreso
   i pericoli correlati. I bambini non devono giocare con l’apparecchio.
   Le operazioni di pulizia e di manutenzione non devono essere
   effettuate da bambini a meno che non abbiano più di 8 anni e siano
   sorvegliati. Mantenere l’apparecchio e il suo cavo fuori dalla portata
   dei bambini con meno di 8 anni.
2. Tenere gli elementi dell’imballaggio (buste di plastica, gommapiuma,
   viti) lontani dalla portata dei bambini o di persone con capacità
   fisiche o mentali ridotte, poichè ciò potrebbe compromettere la loro
   incolumità .
3. Prima di collegare l’apparecchio, accertateVi che i dati di targa siano
   rispondenti a quelli della rete di distribuzione. In caso di
   incompatibilità tra la presa e la spina dell’apparecchio fate sostituire
   la spina con altra di tipo adatto da personale professionalmente
   qualificato.
4. Questo prodotto è stato concepito per l’esclusivo uso domestico.
5. Eseguire l'installazione elettrica in conformità alle Vigenti Norme di
   sicurezza elettrica.
6. Scollegare dalla presa di corrente prima di spostare l’unità oppure
   prima di intraprendere un nuovo ciclo di pulizia.

                                     3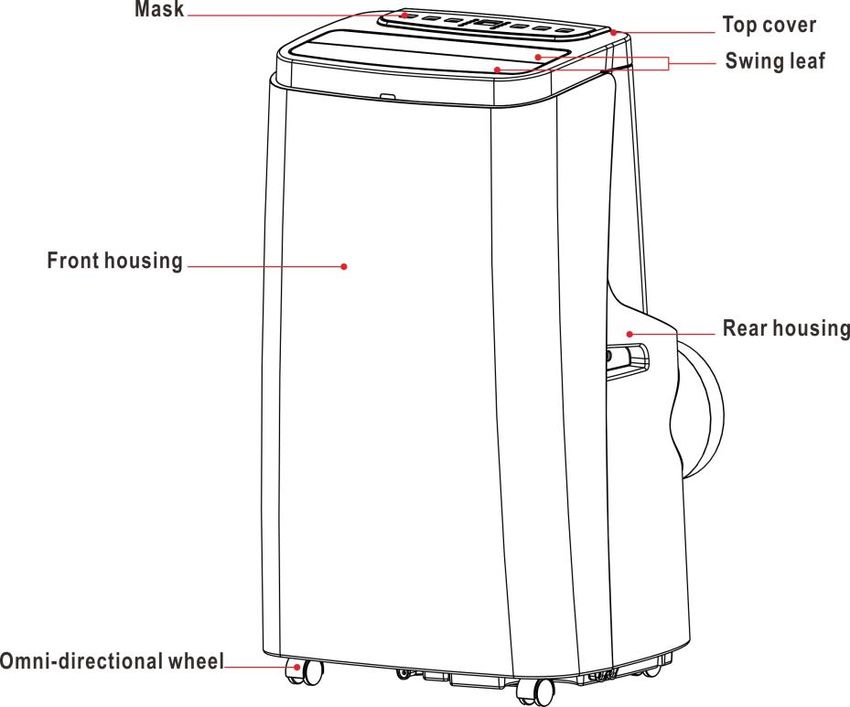
7. Non immergere mai l’unità in acqua. Evitare il contatto diretto con
    qualsiasi liquido.
8. Non posizionare l’unità accanto ad elettrodomestici che erogano
    calore, oppure vicino a fiamme libere o ad oggetti infiammabili o
    pericolosi.
9. Non inserire mai dita o altri oggetti all’interno delle fessure delle
    prese d’aria.
10. Non posizionarsi di fronte all’unità mentre è in uso.
11. Non avviare o spegnere l'apparecchio inserendo o staccando la
    spina di alimentazione elettrica
12. Non lasciare oggetti posizionati sopra l'apparecchio
13. Non salire sull'apparecchio. Non coprirlo.
14. Mantenere sempre il prodotto in posizione eretta, non adagiarlo sul
    fianco.
15. Non inserire alcun oggetto all’interno del prodotto.
16. Al termine dell’utilizzo scollegare il prodotto dall’alimentazione
    elettrica.
17. Non effettuare operazioni di pulizia dell'apparecchio senza averlo
    prima spento, staccato la spina o disinserito l'interruttore dedicato.
18. Non bere l'acqua di condensa
19. Nel caso si avverta odore di bruciato o si veda del fumo fuoriuscire
    dall'apparecchio,togliere l'alimentazione elettrica,aprire le finestre ed
    avvisare l'assistenza tecnica.
20. Assicurare sufficiente aerazione nella stanza in cui + installato
    l'apparecchio se è presente anche un apparecchio di combustione.
21. Se il cavo di alimentazione è danneggiato,esso deve essere
    sostituito dal costruttore o dal suo Servizio di Assistenza Tecnica,o
    comunque da 'personale specializzato.
22. Non utilizzare insetticidi, solventi o detersiti aggressivi per la pulizia
    dell'apparecchio
23. Non utilizzare l'apparecchio per scopi diversi da quello per cui stato
    progettato, cioè come deumidificatore per uso esclusivamente
    domestico. Ogni altro uso è da considerarsi improprio.
24. Non installare nelle vicinanze di bagni, docce o piscine

                                      4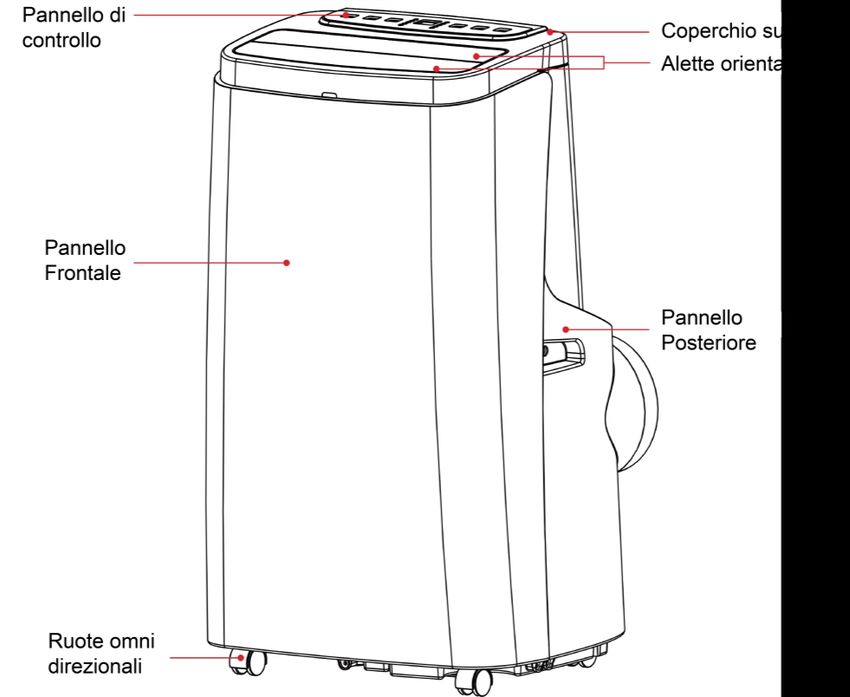
25. Utilizzare solo all'interno, l'apparecchio non deve essere utilizzato
    all'esterno.
26. Non utilizzare prolunghe per alimentare il prodotto.
27. Non utilizzare l'apparecchio su superfici inclinate o instabili
28. Non utilizzare in luoghi ove siano presenti sostanze infiammabili o
    potenzialmente esplosive o in presenza di vapori corrosivi o
    sostanze pericolose,
29. Non fare entrare acqua nella griglia superiore. Non ostacolare il
    flusso dell''aria.
30. Prima di spostare l'apparecchio assicurarsi che la tanica raccolta
    condensa sia vuota.
31. E’ necessario rimuovere l’acqua accumulata all’interno del
    contenitore una volta riempito.
32. Non utilizzare il deumidificatore in ambienti troppo piccoli, potrebbe
    essere pericoloso.
33. Installare il tubo di drenaggio in modo tale che l’acqua condensata
    possa essere espulsa all’interno del contenitore senza problemi e/o
    ostruzioni.
34. Se il cavo di alimentazione dovesse risultare danneggiato, contattare
    un centro assistenza qualificato per la riparazione e/o sostituzione.
35. Non danneggiare/modificare/riscaldare il cavo di alimentazione nè
    appoggiare su di esso oggetti pesanti
36. L’unità deve essere posizionata in modo che la presa sia accessibile.
37. Si prega di tenere una distanza di 50 cm tra l’unità e la parete o altri
    oggetti per garantire la circolazione dell'aria.
38. Il prodotto deve essere installata in conformità con le normative locali
    vigenti.
39. Il prodotto è concepito per un solo per uso interno.
40. Questo apparecchio non è destinato all'uso da parte di persone con
    ridotte capacità fisiche sensoriali o mentali, o mancanza di
    esperienza e conoscenza, a meno che non siano controllati o istruiti
    all'uso dell'apparecchio da una persona responsabile della loro
    sicurezza.
41. I bambini devono essere sorvegliati per assicurarsi che non giochino
    con l'apparecchio.
                                     5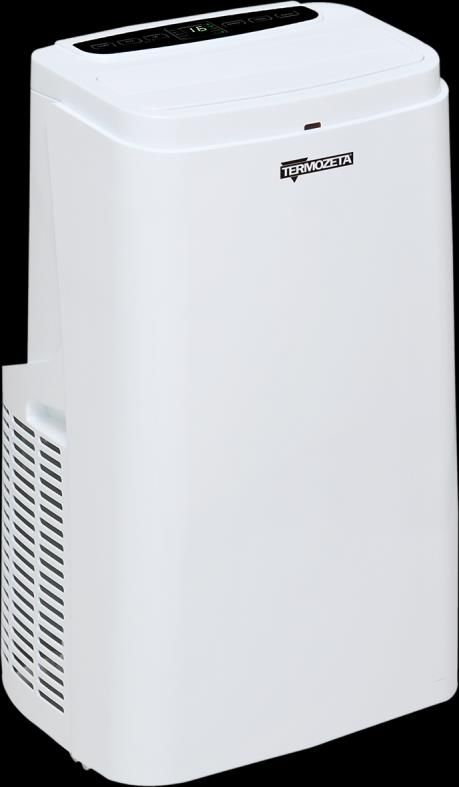
42. Non riparare il prodotto da soli. Non aprire l'apparecchio Per ogni
    problematica, contattare un centro assistenza qualificato.
43. Il prodotto non deve essere utilizzata in lavanderia.
44. Non utilizzare in caso di evidenti anomalie nel funzionamento.
45. Se il cavo di alimentazione è danneggiato, esso deve essere
    sostituito dal costruttore o dal suo servizio assistenza tecnica o
    comunque da una persona con qualifica similare, in modo da
    prevenire ogni rischio.
46. Prima di procedere alla manutenzione e pulizia disconnettere
    l’apparecchio dall’alimentazione.
47. Nel caso in cui si verificassero situazioni anomale spegnere
    immediatamente l’apparecchio e contattare il rivenditore o il servizio
    di assistenza.
48. Non utilizzare prese di corrente volanti oppure cavi danneggiati.
49. Quando si stacca la spina tenerla saldamente per evitare shock
    elettrico, corto circuito o incendio
50. E’ assolutamente vietato smontare o riparare l’apparecchio per
    pericolo di shock elettrico; se necessario rivolgersi al rivenditore o
    centro assistenza.
51. Non usare l’apparecchio nelle vicinanze di una vasca da bagno,
    doccia, piscina.
52. Non inserire oggetti nelle fessure dell’apparecchio
53. Prima di collegare l’apparecchio alla rete elettrica accertarsi che la
    tensione sia corretta secondo quanto riportato sulla targa del prodotto
    e che l’impianto sia conforme alle norme vigenti
54. Pericolo di lesioni: non usare il prodotto per scopi diversi da quelli per
    cui è stato costruito. Non fare uso errato dell’apparecchio
55. Non tirare il cavo di alimentazione per spostare il prodotto.
56. Non lasciare il prodotto incustodito quando collegato all’alimentazione
    elettrica.
57. Al termine dell’utilizzo scollegare il prodotto dall’aliementazione
    elettrica.
58. Questo apparecchio non è destinato ad essere utilizzato da persone
    (bambini compresi) con capacità fisiche, sensoriali o mentali ridotte,
    oppure con mancanza di esperienza e conoscenza, a meno che non
                                      6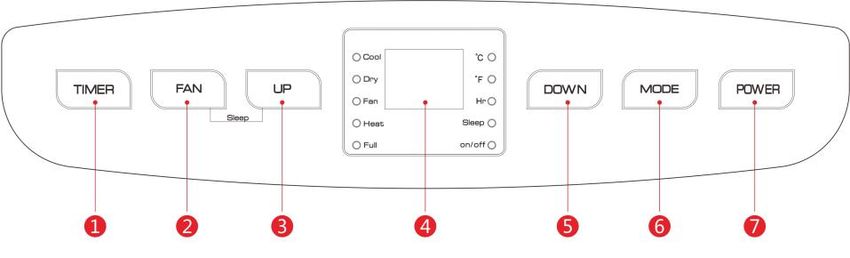
siano controllati o istruiti all'uso dell'apparecchio da una persona
      responsabile della loro sicurezza.
59.   Non utilizzare il prodotto nelle seguenti condizioni:
      a) Vicino a sorgenti di calore;
      b) In aree dove olii o altri composti possono cadere o schizzare;
      c) In prossimità di bagni, docce o piscine
      d) In aree esposte direttamente alla luce solare;
      e) Le operazioni di manutenzione e smaltimento devono essere
            eseguite da personale qualificato.
60.   L’R290 è un gas altamente ecologico, tuttavia il circuito refrigerante
      del prodotto non deve essere perforato. Alla fine della sua vita utile ,
      consegnate il condizionatore presso gli appositi centri di raccolta.
61.   Non utilizzare metodi diversi da quelli racomandati per sbrinare il
      prodotto.
62.   Il condizionatore sarà riposto in una stanza priva di fonti di iniezione
      (fiamme libere, prodotti in funzione alimentati a gas o stufette
      elettriche.Do not use means to accelerate the defrosting process or
      to clean, other than those recommended by the manufacturer.
63.   Non forare il circuito del gas od avvicinarlo al fuoco.
64.   Il gas refrigerante contenuto nel prodotto è privo di odore.
65.   Il condizionatore dovrà essere installato, fatto funzionare e riposte in
      un locale avente area superior almeno a 7mq.
66.   Assicurarsi che le griglie di passaggio aria siano prive di ostruzioni.
67.   Il prodotto dovrà essere riposte in un locale ben ventilato .
68.   I tecnici autorizzati ad operare sul circuito refrigerante dovranno
      essere in possesso di regolare abilitazione e qualifica professionale.
69.   Le operazioni di riparazione dovranno essere effettuate unicamente
      dai Centri di Assistenza autorizzati.
70.   Qunado I tubi di scarico condensa sono installati, assicurarsi che
      siano connessi correttamente e che non siano distorti o piegati.
71.   Quando si sposta il prodotto, assicurarsi che permanga in posizione
      verticale.

                                       7
II. CARATTERISTICHE E COMPONENTI
1. Prodotto è dotato di :
Funzione refrigerazione, deumidificazione, ventilazione e scarico continuo condensa.
Interfaccia kit espulsione aria posta in alto sul prodotto in modo da facilitare il montaggio ed avere
un flusso di aria più lineare.
Pannello di controllo con display a LED e telecomando.
Capacità filtraggio dell’aria.
Funzione Timer
Funzioni di protezione con ripartenza automatic del compressore dopo 3 minuti. Diverse
protezioni disponibili.
Temperatura limite massima in raffreddamento: 35/24° C; in riscaldamento :20/12 ° C.
Intervallo di Temperatura di funzionamento : 7-35° C.
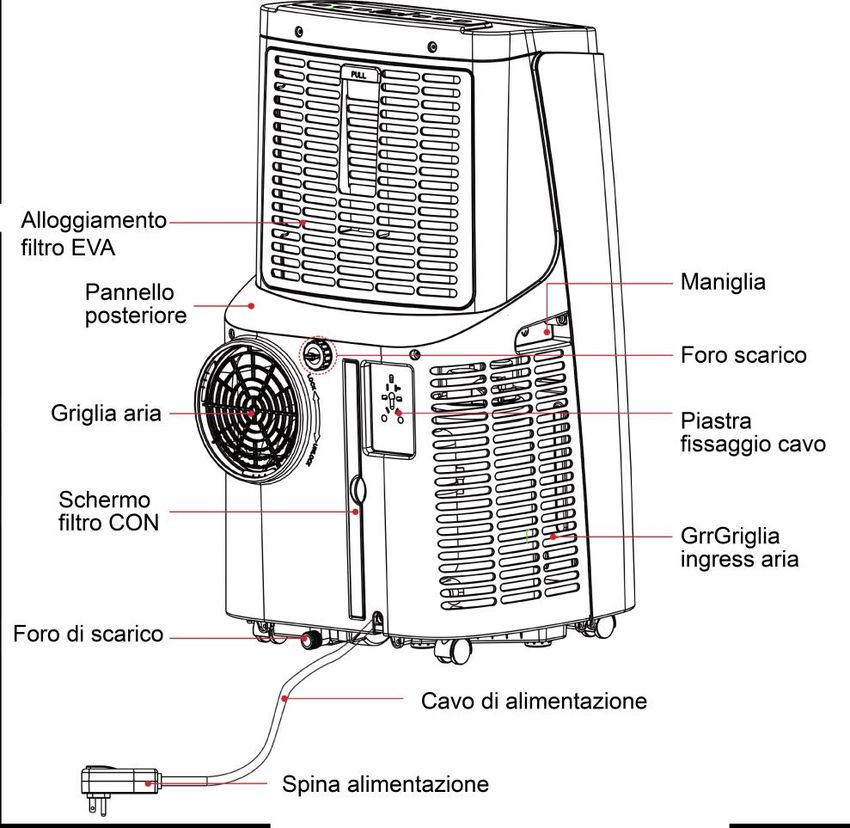
2. Componenti:
8Kit finestra
Assemblaggio kit espulsione
9III. MODALITÀ DI FUNZIONAMENTO
1. Pannello di controllo
1. Timer
2. Tasto selezione velocità
3. Tasto Su
4. Display
5. Tasto giù
6. Selezione modalità funzionamento
7. ON/OFF
1) Quando il prodotto viene alimentato la prima volta, si udirà un suono e il prodotto
entrerà in modalità standby.
2) Tasto accensione/spegnimento: premere questo tasto per spegnere od accendere
il condizionatore
3) Tasto modalità : Quando il prodotto è acceso premere questo tasto per selezionare
le modalità raffreddamento→ventilazione→deumidificazione.
4) Tasti valori su giù : premere questi tasti per cambiare I valori di temperature o del
timer come segue:
Per selezionare la temperature, premere questi tasti per determinare la temperature
desiderate. ( non selezionabili in modalità ventilazione o deumidificazione)
Per selezionare il tempo di funzionamento del timer, premere questi tasti per
determinare il tempo desiderato.
5) Tasto velocità ventola: In modalità raffreddamento e ventilazione, premere questo
tasto per selezionare una velocità bassa, media o alta della ventola.
6) Tasto timer: Quando il prodotto è alimentato la pressione di questo tasto permetterà
di selezionare il tempo del timer. Premere il tasto quando il corrispondente simbolo
lampeggia e determinare il tempo desiderato utilizzando il tasti “maggiore” o
“minore”.
Il tempo può variare da 1 a 24 ore con intervalli di 1ora.
7) Modalità sleep
In modalità raffreddamento, premere il tasto “alto” ed il tasto “Ventilazione”. Il
10prodotto funzionerà in modo economico e silenzioso.
Nota: Non è possibile attivare la modalità sleep in modalità deumidificazione o
ventilazione.
2. Telecomando
Il condizionatore può essere controllato dal telecomando.
Utilizzare due batterie AAA per alimentare il telecomando.
1) Accensione/spegnimento premere questo tasto per
accendere e spegnere il prodotto.
2) Modalità : Quando il prodotto è acceso premere questo
tasto per selezionare le modalità
raffreddamento→ventilazione→deumidificazione
3) Premere questo tasto per aumentare i valori di temperature
o del timer.
4) Premere questo tasto per diminuire i valori di temperature
o del timer.
5) Velocità ventola : In modalità raffreddamento e
ventilazione, premere questo tasto per selezionare una velocità
bassa, media o alta della ventola.
6) Timer : Quando il prodotto è alimentato la pressione di
questo tasto permetterà di selezionare il tempo del timer
raggiunto il quale il prodotto smettrà di funzionare.
7) Oscillazione : Premere questo tasto per scegliere
l’orientamento delle alette di uscita aria
8) Temperatura : Premere questo tasto per determinare la
visualizzazione della temperatura (Celisius o Fahrenheit)
9) Sleep : Premere questo tasto per selezionare la modalità Sleep. Il prodotto
funzionerà con una logica di risparmio energetico e con bassa velocità di ventilazione.
IV. PROTEZIONI
Funzione di protezione dal ghiaccio
In raffreddamento, deumidificazione od in modalità SLEEP, se la temperature
dell’aria all’interno del tubo di esplulsione è troppo bassa, la macchina entrerà
automaticamene in protezione. Quando la temperature sì alza al di sopra di un
determinare valore, essa tornerà utomaticamente a funzionare nuovamente.
Funzione di protezione dalla fuoriuscita di acqua.
Quando l’acqua nel recipient raggiunge un livello di guardia, la macchina emetterà
11un suono di allarme, ed l’indicatore “FULL” inizierà a lampeggiare. Aquesto punto
è necessario scaricare l’acqua in uno scarico dell’acqua od in una tanica.(vedere
Instruzioni per lo scarico alla fine di questo paragrafo). Dopo che l’acqua è stata
evacuate la macchina ritornerà al funzionamento di prima.
Sbrinamento automatico
Il prodotto è dotato della funzione di sbrinamento automatico. Questa funzione si
ottiene con l’inversione del flusso del refrigerante nella valvola 4 vie.
Funzione di protezione del compressore
Per aumentare la vta del compressore, esso si riavvierà con 3 minuti di ritardo
dopo che è stato spento.
V. INSTALLAZIONE
Attenzione: prima di utilizzare il condizionatore, mantenerlo in posizione verticale per almeno 2
ore.
Il prodotto può essere spostato facilemente nel locale. Nel moverlo assicurarsi che premanga in
posizione verticale e che venga posizionato su una superficie stblie e piatta. Non usare il
condizionatore in bagno of in ambienti umidi.
Installazione del tubo di espulsione aria.
Fig 2
12Installazione del kit finestra
A) Aprire leggermente la finestra e posizionare il kit finestra orizzontalmente o verticalmente
come mostrato in Fig 2 e Fig3.
B) Allargare il distanziale in modo da coprire l’intera apertura della finestra.
Fig 2 Fig3
Installazione del prodotto
A) Posizionare il prodotto con installato il tubo di espulsione dell’aria in prossimità della
finestra facendo attenzione di mantenere una distanza fra il prodotto e le pareti o altri
oggetti di almeno 50cm (Fig-4)
Fig.4
B) Allungare il tubo di espulsione dell’aria e collegarlo alla flangia del distanziale del kit
finestra come mostrato in Fig.5 e Fig.6
Nota: Il tubo non deve essere distorto o piegato (limite 45° )
13Assicurarsi che il tubo di espulsione dell’aria non sia bloccato.
Fig.5 Fig.6
Nota
La lunghezza del tubo di espulsione dell’aria varia da 280mm a 1500mm. Non usare tubi diversi
da quello in dotazione. Il tubo non deve essere ostruito, ciò può causare surriscaldamento.
VI. SCARICO DELLA CONSENSA
Scarico manuale
1) Quandi la macchina si ferma poichè il serbatoio è pieno, spegnere il prodotto e scolegarlo
dalla alimentazione elettrica.
Nota: Muovere il prodotto con cura ed attenzione
per non far uscire l’acqua dal recipiente.
2) Mettere una tanica sotto il foro di uscita
laterale posto dietro il prodotto
3) Svitare il coperchio dello scarico, togliere il
tappo. L’acqua inizia automaticamente a
scaricarsi nella tanica predisposta.
Note:
1. Durante lo scarico il corpo del prodotto può
essere leggermente inclinator.
2. Se la tanica non è in grado di contenere tutta
l’aqua , fermare il deflusso di acqua con il
tappo dello scarico, in modo dap revenire la
14fuoriuscita di acqua.
3. Quando l’acqua è stata scaricata, chiudere il foro di scarico con il tappo e riavvitare il
coperchio.
Nota: Riaccendere la macchina per evitare che l’acqua di condensa possa fuoriuscire.
Scarico continuo (Optional) (solo de in modoumidificazione)
1) Svitare il coperchio e togliere il tappo dello scarico.
2) Montare il tubo sul foro di uscita dell’acqua
3) Collegareil tubo l’acqua nella tanica predisposta.
Scarico manuale
1) Quando la macchina si ferma poichè il serbatoio è pieno, spegnere il prodotto e scolegarlo
dalla alimentazione elettrica.
Nota: Muovere il prodotto con cura ed attenzione per non far uscire l’acqua dal recipiente.
2) Mettere una tanica sotto il foro di uscita laterale posto dietro il prodotto
3) Svitare il coperchio dello scarico, togliere il tappo. L’acqua inizia automaticamente a
scaricarsi nella tanica predisposta
Note:
1) Durante lo scarico il corpo del prodotto può essere leggermente inclinator
2) Se la tanica non è in grado di contenere tutta l’aqua , fermare il deflusso di acqua con il
tappo dello scarico, in modo dap revenire la fuoriuscita di acqua.
3) Quando l’acqua è stata scaricata, chiudere il foro di scarico con il tappo e riavvitare il
coperchio.
Nota: Riaccendere la macchina per evitare che l’acqua di condensa possa fuoriuscire.
15Scarico continuo (Optional) (solo in modo raffreddamento e deumidificazione)
1) Svitare il coperchio e togliere il tappo dello scarico.
2) Montare il tubo sul foro di uscita dell’acqua.
3) Scaricare l’acqua nella tanica predisposta.
VII. PULIZIA E MANUTENZIONE
Pulizia: prima di ogni operazione di manutenzione e pulizia disconntere il
prodotto dalla alimentazione elettrica.
1. Pulizia delle superfici
Pulire il rivestimento della macchina con un panno umido e morbido. Non utilizzare prodotti
chimici, come benzene, alcol, gasolio, ecc. Le superfici potrebbero danneggiarsi e anche
l’intero prodotto.
2. Pulizia del filtro
Se il filtro è intasato di polvere, l’efficienza del condizionatore risulta ridotta. Fare in modo di
mantenere pulito il filtro ogni due settimane.
2.1: Pulizia del flitro superiore EVA
1) Rimuovere I fermi per il filtro manualmente. Svitare le 4 viti di fissaggio (vedere FIG)
2) Immergere il filtro EVA in acqua calda con detergente neutro (circa 40° C) e lasciarlo asciugare
Viti fissaggio filtro
Blocco a cuneo
Blocco a cuneo
16VIII. CONSERVAZIONE DEL PRODOTTO
1. Scaricare la macchina dall’acqua.
2. Accendere il prodotto. Selezionare il modo di ventilazione bassa in modo da asciugare il
tubo di scarico e scongiurare l’insorgenza di muffe.
3. Spegnere la macchina, scollegarla dalla alimentazione ed avvolgere il cavo nell’apposita
sede. Rimettere il tappo e il coperchio dello scarico..
4. Togliere il tubo di esplulsione e conservarlo con cura.
5. Ricoprire il prodotto con un sacco di plastic. Riporlo in un luogo asciutto , tenerlo lontano
dalla portata dei bambini e lontano dalla polvere.
6. Rimuovere le batterie dal telecomando e conservarle con cura.
17IX. RISOLUZIONE DEI PROBLEMI
Non riparare o smontare il prodotto. Per ogni evenienza o malfunzionamento rivolgersi
al Centro Assistenza autorizzato.
Problema Possibile motivo Soluzione
Accendere il prodotto e assicirarsi che la
Non c’è elettricità
spina sia inserita correttamente nella presa.
L’indicatore di livello mostra
Scaricare l’acqua dal prodotto
"FL".
La temperature ambiente è L’intervallo di temperatura di funzionamento
Il
troppo bassa o alta. raccomandata per il prodotto è 7-35 ° C
condizionat
Im modo raffreddameno la
ore non
temperatura della stanza è
funziona Cambiare la temperature impostata.
più bassa della temperatura
impostata;
In modo deumidificazione , la
Posizionare il prodotto in una stanza con una
temperature ambiente è
temperature ambiente superior a 17° C.
bassa
Sole diretto sulla macchina Spostare il prodotto od oscurare I raggi solari
Porte e finestra aperte.
L’ambiente è pieno di Chiudere porte e finestre ed aggiungere fonti
Il
persone. Ci sono fonti di di condizionamento
raffreddame
calore.
nto non è
Il filtro è sporco Pulire o sostituire il filtro
efficiente
L’uscita o l’ingresso dell’aria
Rimuovere le ostruzioni
sono ostruiti
Il prodotto non è posizionato
Eccesiva Posizionare il prodotto su una superficie
su una superficie piana e
rumorostà piana stabile e dura.
stabile
Il
Aspettare tre minuti in modo che la
compressor E’ intervenuta la protezione
temperatura si abbassi e far ripartire il
e non termica del compressore
condizionatore.
funziona
La distanza fra telecomando
Il
e prodotto è eccessiva Utilizzare il telecomando vicino al prodotto e
telecomand
Il telecomando non è direzionarlo verso il ricevitore
o non
allineato con il ricevitore
funziona
Le batterie sono scariche Cambiare le batterie
Errore La temperature del tubo Controllare il sensore di temperature del tubo
'E1'. dell’aria è anormale dell’aria ed il circuito elettrico
Errore La temperature nell’ambiente Controllare il sensore si temperatura
'E2' è anormale ambiente ed il circuito elettrico..
18PORTABLE AIR CONDITIONER
MODELS: TZAZC5
INSTRUCTION MANUAL
Please READ and RETAIN for future reference.
19The refrigerant used in mobile air conditioners is the environmentally
friendly hydrocarbon R290.This refrigerant is odorless, and compared to
the alternative refrigerant, the R290 is an ozone-free refrigerant, and its
effect is very low.
Please read the instructions before use and repair.
The drawings provided in this manual may not be the same as the
physical objects. Please refer to the physical objects.
I. SAFETY WARNINNGS
1. Do not use means to accelerate the defrosting process or to
clean, other than those recommended by the manufacturer.
2. The appliance shall be stored in a room without continuously
operating ignition sources (for example: open flames, an
operating gas appliance or an operating electric heater.)
3. Do not pierce or burn.
4. Be aware that refrigerants may not contain an odour.
5. Appliance shall be installed, operated and stored in a room with a
floor area larger than 7 m2.
6. Keep any required ventilation openings clear of obstruction;
7. Servicing shall be performed only as recommended by the
manufacturer.
8. The appliance shall be stored in a well-ventilated area where the
room size corresponds to the room area as specified for
operation.
9. Any person who is involved with working on or breaking into a
refrigerant circuit should hold a current valid certificate from an
industry-accredited assessment authority, which authorises their
competence to handle refrigerants safely in accordance with an
industry recognised assessment specification.
10. Servicing shall only be performed as recommended by the
equipment manufacturer.
11. Maintenance and repair requiring the assistance of other skilled
20personnel shall be carried out under the supervision of the
person competent in the use of flammable refrigerants.
12. All working procedure that affects safety means shall only be
carried by competent persons.
13. The air conditioning is only suitable for indoor use, and is not suitable
for other applications.
14. Follow local grid interconnection rules while installing the air
conditioning and ensure that it is properly grounded. If you have any
question on electrical installation, follow the instructions of the
manufacturer, and if necessary, ask a professional electrician to
install it.
15. Place the machine in a flat and dry place and keep a distance of
above 50cm between the machine and the surrounding objects or
walls.
16. After the air conditioning is installed, ensure that the power plug is
intact and firmly plugged into the power outlet, and place the power
cord orderly to prevent someone from being tripped or pulling out the
plug.
17. Do not put any object into the air inlet and outlet of the air
conditioning. Keep the air inlet and outlet free from obstructions.
18. When drainage pipes are installed, ensure that the drainage pipes
are properly connected, and are not distorted or bended.
While adjusting the upper and lower wind-guide strips of the air outlet,
pluck it with hands gently to avoid damaging wind-guide strips.
19. When moving the machine, make sure that it is in an upright position.
20. The machine should stay away from gasoline, flammable gas, stoves
and other heat sources.
a) Don't disassemble, overhaul and modify the machine arbitrarily,
otherwise it will cause a machine malfunction or even bring harm
to persons and properties. To avoid danger, if a machine failure
occurs, ask the manufacturer or professionals to repair it.
21b) Do not install and use the air conditioning in the bathroom or
other humid environments.
c) Do not pull the plug to turn off the machine.
d) Do not place cups or other objects on the body to prevent water
or other liquids from spilling into the air conditioning.
21. Do not use insecticide sprays or other flammable substances near
the air conditioning.
22. Do not wipe or wash the air conditioning with chemical solvents such
as gasoline and alcohol. When you need to clean the air conditioning,
you must disconnect the power supply, and clean it with a half-wet
soft cloth. If the machine is really dirty, scrub with a mild detergent.
23. The appliance can be used by children aged from 8 years and above
and persons with reduced physical, sensory or mental capabilities if
they have been given supervision or instruction concerning use of
the appliance in a safe way and understand the hazards involved.
Children shall not play with the appliance. Cleaning and maintenance
shall not be made by children without supervision.
24. If the supply cord is damaged, it must be replaced by the
manufacturer, its service agent or similarly qualified persons in order
to avoid a hazard.
25. The appliance shall be installed in accordance with national wiring
regulations.
26. Do not operate your air conditioner in a wet room such as a
bathroom or laundry room.
27. The air conditioning is only suitable for indoor use, and is not suitable
for other applications.
28. Follow local grid interconnection rules while installing the air
conditioning and ensure that it is properly grounded. If you have any
question on electrical installation, follow the instructions of the
manufacturer, and if necessary, ask a professional electrician to
install it.
29. Place the machine in a flat and dry place and keep a distance of
above 50cm between the machine and the surrounding objects or
walls.
30. After the air conditioning is installed, ensure that the power plug is
22intact and firmly plugged into the power outlet, and place the power
cord orderly to prevent someone from being tripped or pulling out the
plug.
31. Do not put any object into the air inlet and outlet of the air
conditioning. Keep the air inlet and outlet free from obstructions.
32. When drainage pipes are installed, ensure that the drainage pipes
are properly connected, and are not distorted or bended.
33. While adjusting the upper and lower wind-guide strips of the air outlet,
pluck it with hands gently to avoid damaging wind-guide strips.
34. When moving the machine, make sure that it is in an upright position.
35. The machine should stay away from gasoline, flammable gas, stoves
and other heat sources.
36. Don't disassemble, overhaul and modify the machine arbitrarily,
otherwise it will cause a machine malfunction or even bring harm to
persons and properties. To avoid danger, if a machine failure occurs,
ask the manufacturer or professionals to repair it.
37. Do not install and use the air conditioning in the bathroom or other
humid environments.
38. Do not pull the plug to turn off the machine.
39. Do not place cups or other objects on the body to prevent water or
other liquids from spilling into the air conditioning.
40. Do not use insecticide sprays or other flammable substances near
the air conditioning.
23II. FEATURES AND COMPONENTS
1. Features
1) Brand new appearance, compact structure, smooth line, simple and generous shape.
2) Functions of refrigeration, dehumidification, air supply and continuous drainage
3) Outdoor interface is set high to facility assembly and keep the smooth flow of the heat pipe.
4) LED displays the control panel, beautiful and fashionable, with high-quality remote control.
It adopts a user-friendly remote control design.
5) Air filtration capability.
6) Timing switch function.
7) Protection function of automatically restarting the compressor after three minutes, a variety
of other protection functions.
The Max operation temperature for the air conditioner Cooling: 35/24° C; heating:20/12 ° C;
Temperature operation range: 7-35° C.
2. Components:
24Exhaust Pipe Assembly
Window Sealing Plate
Asser
25III. CONTROL SETTING
1. Control panel operation instructions
1)operation interface:
1. Timer Key 5. Down Key
2. Wind Speed Selection key 6. Mode Selection Key
3. Up Key 7. Power Key
4. Display Window
1) When the machine is powered on for the first time, the buzzer will play power-on
music, and then the machine will get into standby status.
2) Power Key: press the key to turn on and turn off the machine. In the case of power
on, press the key to turn off the machine; in the case of power off, press the key to
turn on the machine.
3) Mode Selection Key: In the case of power on, press the key to switch between
cooling → fan → dehumidifying mode.
4) Up Key and Down Key: press the two keys to change the setting temperature or
setting time, operate as follows:
While setting temperature, press up key or down key to select the required
temperature (not available in fan or dehumidifying mode).
While setting time, press up key or down key to select the required time.
5) Wind Speed Selection Key:
In cooling and fan mode, press the key to select high, low wind speed operation. But
limited by anti-cold conditions, under certain conditions, it may not run according to
the set wind speed.
In dehumidifying mode, pressing the key is invalid, and the fan will forcibly choose
low wind speed operation.
6) Timing Key:
In the case of power on, press the key to close timing; in the case of power off, press
the key to open timing.
Press the key, when the timing symbol flashes, press up and down key to select the
required timing value.
Timing values can be set in 1-24 hours and the timing value is adjusted up or down
by one hour.
267) Sleep Mode: In the cooling Mode, Press the UP and Fan Key to turn on the sleep
mode, then the unit will work on Energy-Saving and quiet type.
2. Operation instructions of remote control
The remote control Panel is as follows:
Instructions of key operation of the high-quality remote control are as follows:
1) POWER : Press the POWER button to turn the machine on
and off.
2) MODE : Press the MODE button to switch between cooling,
fan, Dehumidify modes. (Heat not supported)
3) UP : press the UP button to increase the desired temperature
and set the duration of the timer.
4) DOWN : press the DOWN button to reduce the desired
temperature and set the duration of the timer.
5) FAN : Press the FAN button to cycle between high, medium
and low fan speeds.
6) TIMER : Press the TIMER button to set the duration of the
power on or power off timer..
7) SWING : Press the swing button to change the orientation
of the louvres to direct the air
8) TEMPERATURE UNIT : Press to switch between
displaying the temperature in Celsius and Fahrenheit.
9) SLEEP MODE : Press to turn on the sleep mode. The unit
will work with energy saving logic and the lowest fan speed.
IV. PROTECTION FUNCTION
Frost Protection Function:
In cooling, dehumidifying or economic power saving mode, if the temperature of the
exhaust pipe is too low, the machine will automatically enter protection status; if the
temperature of the exhaust pipe rises to a certain temperature, it can automatically revert
to normal operation.
Overflow Protection Function:
When water in the water pan exceeds the warning level, the machine will automatically
sound an alarm, and the "FULL" indicator light will flash. At this point, you need to move
the drainage pipe connecting the machine or the water outlet to sewer or other drainage
area to empty the water (details see Drainage Instructions at the end of this chapter). After
the water is emptied, the machine will automatically return to the original state.
27Automatic Defrosting (cooling models have this function):
The machine has automatic defrosting function. Defrosting can be achieved through four -
way valve reversing.
Protection Function of the Compressor
To increase the service life of the compressor, it has a 3-minute delay booting protection
function after the compressor is turned off.
V. INSTALLATION AND ADJUSTMENT
1.Installation
Warning: before using the mobile air conditioning, keep it upright for at least two hours.
The air conditioning can be easily moved in the room. In the moving process, ensure that the air
conditioning is in the upright position and the air conditioning should be placed on a flat surface.
Do not install and use the air conditioning in the bathroom or other humid environments.
1.1 Install the heat pipe assembly (as shown in Fig.1)
\
Figure 1
1) Take out the outer connector assembly and the exhaust pipe assembly, and remove the
plastic bags;
2) Insert the heat pipe assembly (the end of the exhaust joint) into the back panel vent slot
(push to the left) and complete the assembly (as shown in figure 1).
1.2 Installation of window sealing plate components
281) Half open the window,and mount the window sealing plate assembly to the window (as
shown in Fig.2 and Fig.3).Components can be placed in horizontal and vertical direction.
2) Pull various components of the window sealing plate assembly open, adjust their opening
distance to bring both ends of the assembly into contact with the window frame, and fix
various components of the assembly.
1.3 Install the window sealing plate assembly
Notes:
1) The flat end of the exhaust pipe joints must be snapped into place.
2) The pipe cannot be distorted nor has substantial turning (greater than 45 ° ).
Keep the ventilation of the exhaust pipe not blocked.
Figure 2 Figure 3
1.4 Install the body
1) Move the machine with installed heat pipe and fittings before the window, and the
distance between the body and walls or other objects shall be least 50 cm (as shown in
Fig.4).
Figure4
2) Elongate the exhaust pipe and snap the flat end of the exhaust pipe joints into the hole of
29the window sealing plate assembly (as shown in Fig.5 and Fig.6) .
Notes:a). The flat end of the exhaust pipe joints must be snapped into place.
b). The pipe cannot be distorted nor has substantial turning (greater than 45 ° ) Keep
the ventilation of the exhaust pipe not blocked.
Figure 5 Figure6
Important Notice:
The length of the exhaust hose shall be 280~1,500mm, and this length is based on the
specifications of the air conditioning. Do not use extension tubes or replace it with other
different hoses, or this may cause a malfunction. Exhaust host must be not blocked; otherwise it
may cause overheating.
VI. DRAINAGE INSTRUCTIONS
This machine has two drainage methods: manual drainage and continuous drainage.
1.Manual drainage:
1) When the machine stops after the water is full, turn off the machine power and unplug the
power plug.
Notes: Please move the machine carefully, so as not to spill the water in the water pan at the
bottom of the body.
2) Place the water container below the side water outlet behind the body.
3) Unscrew the drainage cover and unplug the water plug, the water will automatically flow
into the water container.
30Notes:1)Keep the drainage cover and the water plug properly.
2)During drainage, the body can be tilted slightly backwards.
3)If the water container cannot hold all the water, before the water container is full,
stuff the water outlet with the water plug as soon as possible to prevent water from
flowing to the floor or the carpet.
4)When the water is discharged, stuff the water plug, and tighten the drainage cover
2. Continuous drainage (Optional) (only applicable to dehumidifying mode), as shown in
figure:
1) Unscrew the drainage cover, and unplug the water plug.
2) Set the drainage pipe into the water outlet.
3) Connect the drainage pipe to the bucket.
31VII. MAINTENANCE
Cleaning: before cleaning and maintenance, turn off the machine and unplug the plug.
1.Clean the surface
Clean with surface of machine with a wet soft cloth. Don't use chemicals, such as benzene,
alcohol, gasoline, etc; otherwise, the surface of the air conditioning will be damaged or even the
whole machine will be damaged.
2.Clean the filter screen
If the filter screen is clogged with dust, and the effectiveness of the air conditioning is reduced, be
sure to clean the filter screen once every two weeks.
3.Clean the upper filter screen frame
1) Unscrew one screw fixed by EVA filter net and back shell with screwdriver, and take out
EVA filter net.
2) Put the EVA filter screen into warm water with neutral detergent (about 40° C / 104℉) and
dry it in the shade after rinsing clean.
32VIII. UNIT STORAGE
1. Unscrew the drainage cover, unplug the water plug, and discharge the water in the water
pan into other water containers or directly tilt the body to discharge the water into other
containers.
2. Turn on the machine, adjust it to low-wind ventilation mode, and maintain this state until
the drainage pipe becomes dry, so as to keep the inside of the body in a dry state and
prevent it from mildewing.
3. Turn off the machine, unplug the power plug, and wrap the power cord around the
wrapping post; install the water plug and the drainage cover.
4. Remove the exhaust pipe and keep it properly.
5. Cover the air conditioning with a plastic bag. Put the air conditioning in a dry place, keep it
out of the reach of children, and take dust control measures.
6. Remove batteries of the remote control and keep them properly.
Note: ensure that the body is placed in a dry place and keep all machine components
properly.
33IX. TROUBLESHOOTING
Do not repair or disassemble the air conditioning by yourself. Unqualified repair will lead to
failure of the warranty card, and may cause damage to users or their properties.
Problems Reasons Solutions
Turn it on after connecting it to a
There is no electricity.
socket with electricity.
The overflow indicator displays
Discharge the water inside.
"FL".
Recommend to use the machine in
The ambient temperature is too at the temperature of 7-35 ° C (44-95
low or too high
The air ℉).
conditioning In cooling mode, the room
does not work. temperature is lower than the
set temperature; in heating Change the set temperature.
mode, the room temperature is
higher than the set temperature.
The machine is placed in a room with
In dehumidification mode, the an ambient temperature of greater
ambient temperature is low.
than 17 ° C (62 ℉).
There is direct sunlight. Pull the Curtain.
Doors or windows are open;
there are a lot of people; or in Close doors and windows, and add
The cooling
cooling mode, there are other new air conditioning.
effect is not
sources of heat.
good
The filter screen is dirty. Clean or replace the filter screen.
The air inlet or outlet is blocked. Clear obstructions.
The air conditioning is not Put the air conditioning on a flat and
Big Noise
placed on a flat surface. hard place (to reduce noise).
Wait for 3 minutes until the
Compressor
Overheat protection starts. temperature is lowered, and then
does not work.
restart the machine.
The distance between the
Let the remote control get close to
machine and the remote control
the air conditioning, and make sure
The remote is too far.
that the remote control directly faces
control does The remote control is not
to the direction of the remote control
not work. aligned with the direction of the
receiver.
remote control receiver.
Batteries are dead. Replace batteries.
Displays 'E1'. The pipe temperature sensor is Check the pipe temperature sensor
abnormal. and related circuitry.
34Displays 'E2' The room temperature sensor is Check the room temperature sensor
abnormal. and related circuitry.
Note: If problems not listed in the table occur or recommended solutions do not work, please
contact the professional service organization
35INFORMAZIONE AGLI UTENTI
Ai sensi del deoreto legislativo 14 marzo 2014,n.49“Attuazione della direttiva
2012/19/UE sui rifiuti di apparecchiature elettriche ed elettroniche(RAAE)”.
1. ll simbolo del cassonetto barrato sull’apparecchiatura indica che il prodotto alla fine
della propria vita deve essere raccolto separatamente dagli altri rifiuti.
2. L’utente dovrà,pertanto,conferire l’apparecchiatura giunta a fine vita agli idonei centri
di raccolta differenziata del rifiuti elettronici ed elettrotecnici,oppure riconsegnarla al
rivenditore al momento dell’acquisto di una nuova apparecchiatura di tipo
equivalente, in ragione di uno a uno.
3. L’adeguata raccolta differenziata per l’avvio successivo dell’apparecchiatura
dismessa al riciclaggio, al trattamento e allo smaltimento ambientalmente
compatibile contribuisce ad evitare possibili effetti negativi sull’ambiente e sulla
salute e favorisce il riciclo dei materiali di cui è composta l’apparecchiatura.
4. Lo smaltimento abusivo del prodotto da parte dell’utente comporta l’applicazione
delle sanzioni amministrative previste della normativa vigente.
Lange Distribution S.r.l. si riserva il diritto di apportare modifiche estetiche
e/o tecniche senza preavviso al fine di migliorare i propri prodotti.
Termozeta is an international trademark. Copyright © 1995. All rights reserved.
Lange Distribution S.r.l. -Via Treviso,35-20127 Milano-Italy
DISPOSAL
Used electric household devices
1. If you do not want to use your electrical appliance any longer, return it
free of charge to a recycling depot for used electric appliances.
2. Used electric devices do not belong in the household garbage (see symbol).
Further disposal instructions
1. Return the electrical appliance in such a condition that its later re-use or recycling is
not adversely affected. Batteries must be removed in advance and the destruction of
parts which contain fluids must be avoided.
2. Electrical appliances can contain harmful substances. Improper handling or damage
to the appliance can lead to health problems or water or ground contamination, when
the appliance is recycled later.
Lange Distribution S.r.l. reserves the right to introduce technical
and/or aesthetic changes to its products intended to improve performances.
Termozeta is an international trademark. Copyright © 1995. All rights reserved.
Lange Distribution S.r.l. -Via Treviso,35-20127 Milano-Italy
Importato da Lange Distribution S.r.l.
Via Treviso, 35
20127, Milano
Tel: +39 02.28506-1
Prodotto in Cina
35Puoi anche leggere


