ULTRA ONE Manuale Breve - porsche design - PORSCHE DESIGN COMPUTING
←
→
Trascrizione del contenuto della pagina
Se il tuo browser non visualizza correttamente la pagina, ti preghiamo di leggere il contenuto della pagina quaggiù
porsche design
     COMPUTING

    ULTR A ONE
     Manuale Breve
    Quick Start Guide
IT - Benvenuto in Porsche Design! Scopri il tuo nuovo PORSCHE DESIGN ULTRA ONE.
EN - Welcome to Porsche Design!
Get to know your new PORSCHE DESIGN ULTRA ONE.
INDEX

IT   ..............................................................................    6
EN   ..............................................................................   22

                                                            4
5
Contenuto
1.    Informazioni sulla guida introduttiva    7
2.    Descrizione dispositivo                  8
2.1   Controlli                                8
2.2 Porte                                     10
2.3 Altre dati tecnici                        13
2.4 Contenuto della confezione                14
3.    Primi passi                             14
3.1 Ricarica del laptop                       14
3.2 Impostazione del laptop                   14
4.    Funzioni di base del core               16
4.1 Accensione e spegnimento del laptop       16
4.2 Schermata iniziale                        16
4.3 L'attivazione di WiFi                     18
4.4 Ripristino del laptop                     19
5.    In caso di problemi tecnici o difetti   20
6.    Copyright e marchi di fabbrica          21

                                       6
1. Informazioni sulla guida introduttiva
La guida di avvio rapido è lì per aiutarti durante l'installazione iniziale del
tuo nuovo laptop. Oltre a ciò, fornisce anche informazioni sulle funzioni di
base del dispositivo.
Si prega di leggere il manuale dell'utente per saperne di più sulle funzioni
e le opzioni del dispositivo e ottenere suggerimenti su come lavorare in
modo produttivo e creativo con il dispositivo.
Su www.porsche-design-computing.com è possibile scaricare e leggere
il manuale utente. Ciò richiede che l'utente sia connesso a Internet.
È importante leggere le istruzioni di sicurezza nella brochure allegata
prima di utilizzare il nuovo laptop. Questo contiene tutte le informazioni
importanti sulla sicurezza del dispositivo.
Il manuale dell'utente in linea, la Guida rapida inclusa e la brochure
"Informazioni importanti sulla sicurezza e informazioni legali" sono parte
integrante del prodotto.
Si prega di leggere attentamente tutti e tre i documenti. Contengono
informazioni importanti in merito alla sicurezza, all'uso e allo smaltimento
del dispositivo.
Conservare questi documenti in un luogo sicuro e trasmetterli per intero
al nuovo proprietario se il dispositivo cambia mano.
7F
2. Descrizione dispositivo
2.1 Controlli
1
2
3
4
9
7
5
6
7
8
1 Microfono
I quattro microfoni digitali vengono utilizzati per la registrazione o
la comunicazione vocale, ad es. per videochiamate o teleconferenze.
2 Touchscreen
Il touchscreen FHD-IPS da 15,6 " offre una risoluzione di 1920 x 1080 pixel
in formato 16: 9.
Il touchscreen mostra i contenuti scelti [film, documenti, siti Web, ecc.]
e consente anche di controllare e selezionare con precisione le app,
spostare gli elementi sul display e utilizzare le dita per ingrandire o
ridurre il contenuto sullo schermo.
3 LED di stato anteriore fotocamera
Il LED indica lo stato della fotocamera anteriore. Quando il LED è acceso,
la parte anteriore la fotocamera è attiva.
84 Fotocamera frontale
La fotocamera frontale ad alta risoluzione con una risoluzione massima di
2 MP viene utilizzata per scattare foto e girare video in qualità HD [1080p]
con proporzioni 4: 3 e chat video online.
5 LED di ricarica
Il LED di ricarica indica lo stato di carica del notebook. Quando il LED di
carica diventa rosso, il notebook si sta caricando. Quando il notebook è
completamente carico, diventa verde. L'alimentatore può essere rimosso.
6 Altoparlanti stereo
Gli altoparlanti stereo 2 x 2 W si trovano sui bordi sinistro e destro sulla
parte superiore della tastiera. Dirigi il suono direttamente all'utente per
offrire una qualità del suono impressionante e di altissimo livello.
Il laptop è dotato di audio di harman/kardon©. Il software AudioEFX
migliora le prestazioni audio e la qualità del suono.
7 LED di stato Caps Lock
Caps Lock è un tasto di commutazione sulla tastiera che fa sì che tutte
le lettere digitate siano in maiuscolo fino a quando non sono disabilitate.
Quando il LED è acceso, il tasto Bloc Maiusc è attivato.
8 Touchpad
Il touchpad sensibile al tatto viene utilizzato al posto del mouse. Offre sia
una funzione sinistra e un clic destro e supporta anche il controllo gestuale
di Windows 10.
Per ulteriori informazioni, vedere "Opzioni di input" - "Uso del touchpad"
nel manuale dell'utente.
9 Pulsante di accensione/spegnimento
Premere il pulsante di accensione/spegnimento per accendere il tuo
laptop. È inoltre possibile utilizzare questo pulsante per mettere il
dispositivo in modalità standby e riattivarlo quando si desidera riprendere
a lavorare su di esso.
Il sensore di impronte digitali integrato offre maggiore sicurezza e
la possibilità di avviare direttamente Windows dopo l’accensione del PC.
92.2 Porte
A
B
C
D
E
F
A Collegamento USB 3.1 Type-C™ con DisplayPort
e funzione di ricarica
Questa interfaccia universale consente di collegare una vasta gamma
1
di periferiche USB [ad esempio mouse, stampante, disco rigido esterno,
adattatore Ethernet, smartphone, ecc.].
2
i3
4 ATTENZIONE
La velocità di trasferimento dati dipende direttamente dall'apparecchiatura
utilizzata [cavo | adattatore, ecc.]
9
10 7Per ulteriori informazioni, consultare "Collegamento di altri dispositivi"
nel manuale dell'utente.
DisplayPort è uno standard di connessione universale per la trasmissione
di segnali video e audio digitali.
In combinazione con l'adattatore di alimentazione USB Type-C™ incluso,
USB Type-C™. La porta fornisce una funzione di ricarica.
Per ulteriori informazioni, vedere "Caricamento del laptop" nel manuale
dell'utente.
B Collegamenti USB 3.1 Type-A
Questa interfaccia universale consente di collegare una vasta gamma
di periferiche USB [ad esempio mouse, stampante, disco rigido esterno,
adattatore Ethernet, smartphone, ecc.].
Per ulteriori informazioni, consultare "Collegamento di altri dispositivi"
nel manuale dell'utente.
C Collegamento HDMI® Type-A
L'interfaccia HDMI® viene utilizzata per la trasmissione di immagini e
audio digitali. Puoi utilizzare questa interfaccia, ad es. per collegare i monitor.
D Slot per schede di memoria
In combinazione con schede microSD[HC/XC] [disponibili separatamente],
lo slot per schede di memoria viene utilizzato per trasferire dati o per
fornire memoria esterna aggiuntiva fino a 2 TB.
E Collegamento USB 3.1 Type-C™ con funzione di ricarica
Questa interfaccia universale consente di collegare una vasta gamma
di periferiche USB [ad esempio mouse, stampante, disco rigido esterno,
adattatore Ethernet, smartphone, ecc.].
i INFORMAZIONI
La velocità di trasferimento dei dati dipende direttamente
dall'apparecchiatura utilizzata [cavo / adattatore, ecc.]
Per ulteriori informazioni, consultare "Collegamento di altri dispositivi"
nel manuale dell'utente.
11In combinazione con l'alimentatore USB Type-C ™ incluso, la porta
USB Type-C ™ fornisce una funzione di ricarica.
Per ulteriori informazioni, consultare "Ricarica del laptop" nel manuale
dell'utente.
F Porta audio
La porta audio da 3,5 mm è un'interfaccia bidirezionale [uscita audio/
ingresso microfono]. Qui è dove si collega un dispositivo audio
[altoparlanti, cuffie, ecc.] Per riprodurre musica o un auricolare dotato
di microfono per partecipare a conferenze telefoniche.
122.3 Altre dati tecnici
Sistema operativo Windows 10 Home 64-bit
Processore* [CPU] 8. Gen Intel® Core™ i5-8200Y
fino a 3,90 GHz, dual core
8. Gen Intel® Core™ i7-8500Y
fino a 4,20 GHz, dual core
Memoria* [RAM] 8 GB LPDDR3
16 GB LPDDR3
Capacità di memoria* 512 GB SSD [PCIe]
in tecnologia flash NAND TLC
1 TB SSD [PCIe]
in tecnologia flash NAND TLC
Processore grafico [GPU] Intel® UHD Graphics 615
Rete WiFi dual-band fino a 867 Mbps
Bluetooth® 4.2
Display wireless
Frequenze WLAN 802.11 abgn+ac 2.4/5 GHz
Batteria** Li-Polymer [45,6 Wh]
Ricarica tramite USB Type-C™
[entrambe le porte]
Dimensioni [L x A x P] ca. 359 x 249,1 x 13,8 mm
Peso ca. 1524 g
Altre caratteristiche Altre Suono di harman/kardon©
design senza ventola
Operatività e stoccaggio Intervallo di temperatura
5° C bis 30° C
Umidità relativa da
30 bis 70 %
* a seconda del modello
** Per le specifiche tecniche dell’alimentatore e batteria consultare le istruzioni per l’uso.
La batteria in questo prodotto non può essere facilmente sostituita dall’utente.
132.4 Contenuto della confezione
• PORSCHE DESIGN ULTRA ONE
• Alimentatore USB TYPE-C™ [100 V - 240 V] | 60 W
• Panno per la pulizia
• Manuale breve
• Indicazioni sulla sicurezza e note legali
Estrarre tutti i componenti dalla confezione e rimuovere completamente
il materiale di imballaggio, comprese le pellicole protettive. Verificare
l’integrità della fornitura.
In caso di danni o componenti mancanti, rivolgersi immediatamente
al servizio clienti.
3. Primi passi
Verrai ora informato sulle funzioni di base del tuo nuovo laptop.
3.1 Ricarica del laptop
Nel primo passaggio, carica completamente il tuo laptop.
1. Collegare il connettore UBS dell'alimentatore in dotazione a
una delle porte USB Type-C ™ sul dispositivo.
2. Collegare l'adattatore di corrente a una presa.
i AVVERTENZA
Dopo aver collegato l'alimentatore a una fonte di alimentazione e al laptop,
il LED sul connettore USB dell'alimentatore si accenderà e apparirà blu.
3.2 Impostazione del laptop
i AVVERTENZA
Non aprire il display più lontano di 125 ° e/o fino a una resistenza evidente,
altrimenti il dispositivo potrebbe essere danneggiato.
14È ora possibile personalizzare le impostazioni del laptop. È possibile
modificare le impostazioni e le preferenze che si configurano ora in futuro.
Per ulteriori informazioni, consultare "Impostazione e personalizzazione
del laptop" nel manuale utente.
1. Premere il pulsante on/off per circa due o tre secondi per accendere
il laptop.
2. Windows ora si avvia e guida l'utente attraverso il processo di
installazione. Segui passo passo l'assistente di configurazione
per configurare il tuo laptop.
i AVVERTENZA
Durante il processo di installazione, ti verrà chiesto di accedere con il tuo
account Microsoft. Se non hai ancora un account Microsoft, impostane
uno a questo punto.
3. Una volta completato il processo di installazione, il dispositivo verrà
configurato in base alle impostazioni effettuate e pronto per l'uso.
i AVVERTENZA
Questo processo potrebbe richiedere del tempo. Sii paziente e non spegnere
il dispositivo fino al completamento del processo di configurazione.
4. Una volta che il dispositivo è pronto per l'uso, una volta completato
il processo di installazione, verrà visualizzata la schermata di blocco.
Trascina la schermata di blocco sul display touch verso l'alto con il
dito o con il tasto sinistro del mouse o sul touchpad per sbloccare
lo schermo.
i AVVERTENZA
Se il dispositivo è protetto da password, è necessario inserire la password.
Per ulteriori informazioni sulla protezione del dispositivo, consultare
"Protezione dei dati personali" nel manuale dell'utente.
154. Funzioni di base del core
Imparerai ora le principali funzioni di base del tuo nuovo laptop.
4.1 Accensione e spegnimento del laptop
Premere il pulsante di accensione/spegnimento per circa due o tre secondi
per accendere il dispositivo. Premere brevemente questo pulsante per
mettere il dispositivo in modalità standby e riattivarlo quando si desidera
riprendere a lavorarci
Per spegnere il dispositivo, aprire il menu Start facendo clic sull'icona di
Windows sul touchscreen o premendo il pulsante Windows su la tastiera.
Tocca e fai clic su "Power" nel menu Start e quindi "Arresta il sistema"
per spegnere il dispositivo.
4.2 Schermata iniziale
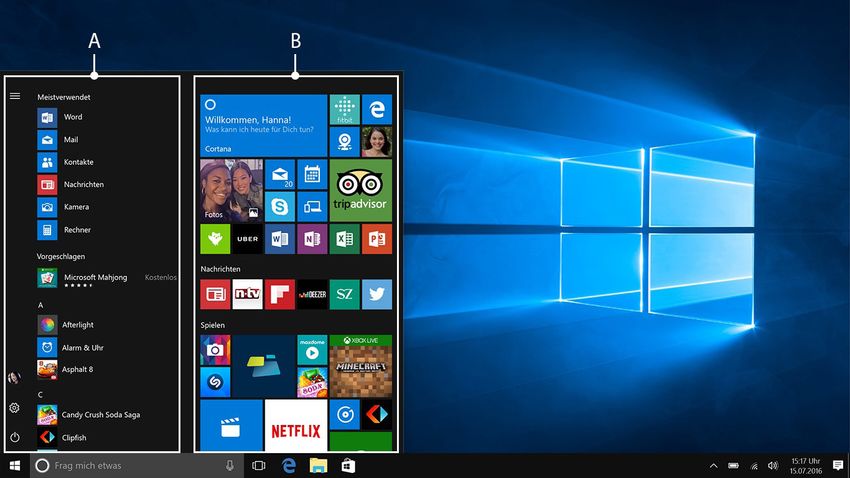
Le icone che si trovano nella barra delle applicazioni nella schermata
iniziale consentono di accedere a numerose funzioni [incluso il menu
di avvio [A | B]
Icona di Windows
Usare l'icona di Windows per aprire e chiudere il menu di avvio [A | B]
[anche sulla tastiera].
16Dal menu di avvio, è possibile accedere a qualsiasi app e programmi
di utilità installati. Il menu di avvio è diviso in due pannelli:
A: Vista "classica" della barra di navigazione
Quando si fa clic su una rispettiva prima lettera viene visualizzato un rapido
accesso alfabetico alla lista di navigazione.
B: Pannello app personalizzabile
Qui è possibile organizzare le app e i preferiti come riquadri animati
nell'ordine preferito.
Cortana
Cortana è il tuo assistente digitale personale [attivato dalla voce]. Ti ricorda
le attività e gli appuntamenti in sospeso e fornisce suggerimenti utili.
Visualizzazione attività
Premere questa icona per abilitare la Vista attività che mostra tutti i
programmi aperti incluso il pulsante "+ Nuovo desktop per la creazione
di desktop virtuali.
Microsoft Edge
Premere questa icona per aprire il browser Internet.
Icona cartella
Premere questa icona per aprire Windows Explorer.
Microsoft Store
Premi questa icona per aprire Microsoft Store, dove puoi scaricare altre app.
i AVVISO
Alcune app devono essere acquistate.
17Indicatore del livello della batteria
Indica il livello della batteria del dispositivo.
Controllo del volume
Utilizzare il cursore del controllo del volume per regolare il volume
al livello desiderato.
Icona Memo
Premere questa icona per aprire il Centro informazioni.
Il Centro informazioni è una barra con collegamenti rapidi ad alcune
delle funzioni importanti del dispositivo che è possibile visualizzare o
nascondere [ad es., "Tutte le impostazioni", ecc.].
i AVVISO
Per aprire il Centro informazioni, scorrere il dito dal bordo destro dello
schermo verso il centro dello schermo.
4.3 L'attivazione di WiFi
Il WiFi deve essere abilitato; ad esempio, per accedere ai contenuti online.
Per abilitare il WiFi, procedere come segue:
1. Seleziona "Tutte le impostazioni" nel Centro informazioni.
2. Fai clic su "Rete e Internet" nel menu delle impostazioni.
3. Seleziona "Wi-Fi" a sinistra nella schermata successiva.
4. Spostare il cursore per Wi-Fi da "Off" a "On".
5. Ora seleziona la rete a cui desideri connetterti dall'elenco delle reti
disponibili mostrate sullo schermo.
6. Immettere la chiave di rete [password] se necessario.
7. Ora conferma l'opzione "Connetti". Il tuo dispositivo ora si connetterà
alla rete selezionata.
184.4 Ripristino del laptop
Se il dispositivo si blocca e non risponde più, è possibile riavviarlo.
Premere e tenere premuto l'interruttore di accensione/spegnimento
per almeno dieci secondi finché il dispositivo non si spegne. Attendere
circa 20 secondi e quindi accendere normalmente il dispositivo.
195. In caso di problemi tecnici o difetti
Per favore immettere le seguenti informazioni nel caso in cui ciò
sia necessario:
Numero di serie _____________________________
Data di acquisto _____________________________
Luogo di acquisto _____________________________
Conservare la prova di acquisto.
Se il tuo dispositivo è difettoso danneggiato, non esitare a contattare il
servizio clienti all'indirizzo: www.porsche-design-computing.com
Per consentirci di fornirti un supporto rapido e ottimale, ti preghiamo
di conservare le suddette informazioni necessarie per identificare il
dispositivo pronte a mano. Se possibile, prendere nota dei messaggi di
errore relativi al problema e attivare il dispositivo prima di contattare il
servizio clienti
Vai su www.porsche-design-computing.com e apri la sezione "Assistenza"
per le ultime notizie e informazioni, consigli utili e driver disponibili e download.
Troverai inoltre informazioni complete sulla garanzia per il tuo laptop.
206. Copyright e marchi di fabbrica
Porsche, lo stemma Porsche, il design Porsche e il logo Porsche Design
sono marchi registrati del dott. Ing. H.C. F. Porsche AG.
Microsoft e Windows 10 sono marchi o marchi registrati di Microsoft
Corporation negli Stati Uniti e/o in altri paesi.
Intel, Intel Logo, Intel Inside, Intel Core e Core Inside sono marchi di
Intel Corporation negli Stati Uniti Stati e/o altri paesi.
Il marchio e i loghi Bluetooth sono marchi registrati di proprietà di
Bluetooth SIG, Inc. e qualsiasi uso di tali marchi è concesso in licenza.
HDMI, il logo HDMI e l'interfaccia multimediale ad alta definizione sono
marchi commerciali o registrati marchi di HDMI Licensing, LLC negli Stati
Uniti e/o in altri paesi.
Harman/kardon© è un marchio registrato di Harman negli Stati Uniti e/o
in altri paesi.
Altri marchi e nomi sono di proprietà dei rispettivi titolari.
© 2019. Tutti i diritti riservati. Alcuni nomi di prodotti o società citati
altrove possono essere marchi o nomi commerciali dei rispettivi
proprietari.
Questo documento contiene le specifiche tecniche e le informazioni
sul prodotto aggiornate al momento della stampa. Tutte le informazioni
contenute in questo documento, inclusi URL e collegamenti a siti Web,
sono soggette a modifiche senza preavviso.
I contenuti individuali possono variare da regione a regione o in base alle
specifiche del dispositivo/software del dispositivo.
Si prega di notare l'avviso di proprietà secondo DIN ISO 16016. La legge sul
copyright vieta la copia, l'utilizzo e la distribuzione del contenuto di questo
documento [illustrazioni, documenti di riferimento, ecc.], in toto o in parte,
senza il permesso del detentore del copyright.
21Table of contents
1. Information About This Quick Start Guide 23
2. Device Description 24
2.1 Controls 24
2.2 Ports 26
2.3 Other technical specifications 29
2.4 Package contents 30
3. First Steps 30
3.1 Charging the laptop 30
3.2 Setting up the laptop 31
4. Core Basic Functions 32
4.1 Switching your laptop on and off 32
4.2 Start screen 32
4.3 Switching on WiFi 34
4.4 Resetting your laptop 34
5. In the Event of Technical Issues or Defects 35
6. Copyright and Trademarks 36
7. Federal Communications Commission Notice [US] 37
221. Information About This Quick Start Guide
The Quick Start Guide is there to help you during the initial setup of your
new laptop. Along with that, it also provides information about the device’s
basic features and functions.
Please read the user’s manual to find out more about the device’s features,
functions, and options as well as get tips on how to work productively and
creatively with the device.
At www.porsche-design-computing.com you can download and read the
user’s manual. This requires that you are connected to the Internet.
It is important that you read the safety instructions in the enclosed
brochure before using your new laptop. This contains all key safety
information on your device.
The online user’s manual, the enclosed Quick Start Guide, and the
companion brochure "Important Safety and Legal Information" are an
integral part of the product.
Please read all three documents carefully. They contain important
information in regard to safety, use, and disposal of the device.
Please keep these documents in a safe place and pass them on in full
to the new owner if the device changes hands.
23F
2. Device Description
2.1 Controls
1
2
3
4
9
7
5
6
7
8
1 Microphone
The four digital microphones are used for voice recording or communication,
e.g. for video calls or phone conferences.
2 Touchscreen
The 15.6" FHD IPS touchscreen delivers a resolution of 1920 x 1080 pixels
at a 16:9 aspect ratio.
The touchscreen shows your chosen content [films, documents, websites, etc.]
and also allows you to precisely control and select apps, move items on the
display, and use your fingers to zoom in or out on content on the screen.
3 Status LED front camera
The LED indicates the status of the front camera. When the LED is lit,
the front camera is active.
244 Front camera
The high-resolution front camera with a resolution of up to 2 MP is used
to take photos and shoot videos in HD quality [1080p] with a 4:3 aspect
ratio, and video chat online.
5 Charging LED
The charging LED indicates the charging status of the notebook. When the
charge LED lits red, the notebook is charging. When the notebook is fully
charged, it lits green. The power supply can be removed.
6 Stereo speakers
The 2 x 2 W stereo speakers are located on the left and right edges on
top of the keyboard. They direct the sound straight to the user to deliver
impressive, top-rate sound quality.
The laptop is equipped with sound by harman/kardon©.
The AudioEFX Software improves audio performance and sound quality.
7 Status LED Caps Lock
Caps Lock is a toggle key on the keyboard that causes all letters typed to
be in uppercase until disabled. When the LED is lit, the Caps Lock key is
activated.
8 Touchpad
The touch-sensitive touchpad is used in place of a mouse. It offers both a
left- and right-click function and also supports Windows 10 gesture control.
For more information, see "Input Options" – "Using the touchpad" in the
user’s manual.
9 On/off button
Press the on/off button to turn on your laptop. You can also use this button
to place your device in standby mode and wake it up when you want to
resume working on it.
The integrated fingerprint sensor provides increased security and
the ability to start directly in Windows after turning on the PC.
252.2 Ports
A
B
C
D
E
F
A USB 3.1 Type-C™ port with DisplayPort
and charging function
This universal interface
1 allows you to connect a variety of USB peripheral
devices [e.g., a mouse, printer, external hard drive, Ethernet adapter,
smartphone, etc.].
2
3
4
i ADVICE
The data transfer rate depends directly on the equipment used
[cable | adapter, etc.].
9
26 7For more information, see "Connecting Other Devices" in the user’s manual.
The DisplayPort is a universal connection standard for the transmission of
digital video and audio signals.
In combination with the enclosed USB Type-C™ power adapter, the
USB Type-C™ port provides a charging function.
For more information, see "Charging the laptop" in the user’s manual.
B USB 3.1 Type-A ports
This universal interface allows you to connect a variety of USB peripheral
devices [e.g., a mouse, printer, external hard drive, Ethernet adapter,
smartphone, etc.].
For more information, see "Connecting Other Devices" in the user’s manual.
C HDMI® Type-A port
The HDMI® interface is used for digital picture and sound transmission.
You can use this interface e.g. to connect monitors.
D Memor y card slot
In combination with microSD-HC/XC cards [available separately], the
memory card slot is used to transfer data or for providing additional
external memory up to 2 TB.
E USB 3.1 Type-C™ port with charging function
This universal interface allows you to connect a variety of USB peripheral
devices [e.g., a mouse, printer, external hard drive, Ethernet adapter,
smartphone, etc.].
i ADVICE
The data transfer rate depends directly on the equipment used
[cable | adapter, etc.].
For more information, see "Connecting Other Devices" in the user’s manual.
In combination with the enclosed USB Type-C™ power adapter, the
USB Type-C™ port provides a charging function.
For more information, see "Charging the Laptop" in the user’s manual.
27F Audio port
The 3.5 mm audio port is a bidirectional interface [audio out/mic in].
This is where you connect an audio device [speakers, headphones, etc.]
to play music or a headset equipped with a microphone to take part in
phone conferences.
282.3 Other technical specifications
Operating system Windows 10 Home 64-bit
Processor* 8. Gen Intel® Core™ i5-8200Y
up to 3,90 GHz, dual core
8. Gen Intel® Core™ i7-8500Y
up to 4,20 GHz, dual core
RAM* 8 GB LPDDR3
16 GB LPDDR3
Storage capacity* 512 GB SSD [PCIe]
in TLC NAND flash technology
1 TB SSD [PCIe]
in TLC NAND flash technology
GPU Intel® UHD Graphics 615
Network Dual-band WiFi up to 867Mbps
Bluetooth® 4.2
Wireless Display
WiFi frequencies 802.11 abgn+ac 2.4/5 GHz
Battery** Li-Polymer [45,6 Wh]
charging via USB Type-C™
[both ports]
Dimensions [W x H x D] ~ 359 x 249.1 x 13.8 mm
Weight ~ 1524 g
More Sound by harman/kardon©
fanless design
Operation and storage Temperature range 5° C to 30° C
Relative humidity 30 % to 70 %
* depending on model
** Refer to the detailed operating instructions for technical specifications on the power adapter and
battery. The battery in this product cannot be easily replaced.
29by users themselves.
by users themselves.
2.4 Package contents
• PORSCHE DESIGN ULTRA ONE
• USB TYPE-C™ power adapter [100 V - 240 V] | 60 W
• Cleaning cloth
• Quick Start Guide
• "Important Safety and Legal Information" brochure
Please check the package contents to ensure nothing is missing or damaged.
To do so, take all of the components listed above out of the box. Remove all
packaging material, including the protective film.
If you discover the device is damaged or parts are missing, please contact
your retailer or customer service immediately.
3. First Steps
You will now learn about the basic functions of your new laptop.
3.1 Charging the laptop
In the first step, fully charge your laptop.
1. Plug in the UBS connector of the enclosed power adapter into one
of the USB Type-C™ ports on the device.
2. Now connect the power adapter to an outlet.
i ADVICE
30Once the power adapter is connected to a power source and to the laptop,
the LED on the power adapter’s USB connector will light up and appear blue.
3.2 Setting up the laptop
i ADVICE
Do not open the display farther than 125 ° and/or to a noticeable resistance,
otherwise the device may be damaged.
You can now customize the settings of your laptop. You can change any of
the settings and preferences you configure now in the future.
For more information, see "Setting Up and Customizing the laptop" in the
user’s manual.
1. Press the on/off button for approximately two to three seconds to
switch on the laptop.
2. Windows now boots up and guides you through the setup process.
Go step-by-step through the setup assistant to configure your laptop.
i ADVICE
During the setup process, you will be prompted to sign in with your
Microsoft account. If you do not yet have a Microsoft account, please set
one up at this point.
3. Once you have fully completed the setup process, your device will be
configured according to the settings you made and is ready for use.
i ADVICE
This process may take a while. Be patient and do not turn off the device
until the configuration process is complete.
4. Once your device is ready for use after the setup process is complete,
you will be shown the lock screen. Drag the lock screen on the touch
display upwards with your fingertip or left-click. on the touchpad to
unlock the screen.
i ADVICE
If your device is password-protected, you must then enter the password.
31For more information on securing your device, see "Protecting Personal Data"
in the user’s manual.
4. Core Basic Functions
You will now learn about the core basic functions of your new laptop.
4.1 Switching your laptop on and off
Press the on/off button for approximately two to three seconds to switch on
your device. Briefly press this button to place your device in standby mode
and wake it up when you want to resume working on it.
To switch off your device, open the Start menu by clicking the Windows
icon on the touch display or by pressing the Windows button on the
keyboard. Tap and click "Power" in the Start menu and then "Shut down"
to power down your device.
4.2 Start screen
The icons located in the task bar on the start screen allow you to access
a number of functions [including start menu [A | B]]:
Windows icon
Use the Windows icon to open and close the start menu [A | B]
[also on the keyboard].
32From the start menu, you can access any of the installed apps and utility
programs. The start menu is divided into two panels:
A: "Classic" view of navigation bar
An alphabetic quick access to the navigation list appears when you click
on a respective first letter.
B: Customizable app panel
You can arrange your apps and favorites as live tiles in the preferred order here.
Cortana
Cortana is your [voice-activated] personal digital assistant. It reminds you
of pending tasks and appointments and gives useful hints and tips.
Task View
Press this icon to enable the Task View that shows all open programs
including the "+ New Desktop" button for creating virtual desktops.
Microsoft Edge
Press this icon to open the Internet browser.
Folder icon
Press this icon to open Windows Explorer.
Microsoft Store
Press this icon to open Microsoft Store, where you can download
additional apps.
i ADVICE
Some apps must be purchased.
Batter y level indicator
This indicates the device’s battery level.
Volume control
33Use the volume control slider to adjust the volume to the desired level.
Memo icon
Press this icon to open the Info Center.
The Info Center is a bar with quick links to some of the important functions
of the device that you can either display or hide [e.g., "All settings", etc.].
i ADVICE
To open the Info Center, swipe your finger from the right edge of the
screen towards the center of the screen.
4.3 Switching on WiFi
WiFi must be enabled; for example, to access online content. To enable
WiFi, proceed as follows:
1. Select "All Settings" in the Info Center.
2. Click "Network & Internet" in the settings menu.
3. Select "Wi-Fi" on the left in the next screen.
4. Move the slider for WiFi from "Off" to "On".
5. Now select the network that you wish to connect to from the list
of available networks shown on the screen.
6. Enter the network key [password] if necessary.
7. Now confirm the "Connect" option. Your device will now connect
to the selected network.
4.4 Resetting your laptop
If your device freezes and no longer responds, you can restart it. Press
and hold down the on/off switch for at least ten seconds until your device
switches off. Wait for about 20 seconds and then turn your device on normally.
345. In the Event of Technical Issues or Defects
Please enter the following information below in case this should be
required:
Serial number _____________________________
Purchase date _____________________________
Place of purchase _____________________________
Keep your proof of purchase.
If your device is faulty or defective, please feel free to contact customer
service at: www.porsche-design-computing.com
In order for us to provide you with fast, optimum support, please keep the
aforementioned information required to identify the device ready at hand. If
at all possible, make note of any error messages that are related to the issue
and have your device switched on before contacting customer service.
Go to www.porsche-design-computing.com and open the "Support"
section for the latest news and information, useful tips, and available
drivers and downloads.
You will also find full and complete information about the warranty for
your laptop.
356. Copyright and Trademarks
Porsche, the Porsche Crest, Porsche Design and the Porsche Design logo
are registered trademarks of Dr. Ing. h.c. F. Porsche AG.
Microsoft and Windows 10 are registered trademarks or trademarks of
the Microsoft Corporation in the U.S. and/or in other countries.
Intel, Intel Logo, Intel Inside, Intel Core and Core Inside are trademarks of
the Intel Corporation in the United States and/or other countries.
The Bluetooth word mark and logos are registered trademarks owned by
Bluetooth SIG, Inc. and any use of such marks is under license.
HDMI, the HDMI logo, and the High-Definition Multimedia Interface are
trademarks or registered trademarks of HDMI Licensing, LLC in the U.S.
and/or in other countries.
Harman/kardon© is a registered trademark of Harman in the United States
and/or other countries.
Other trademarks and names are the property of their respective owners.
Copyright © 2019. All rights reserved. Some product or company names
mentioned elsewhere may be brand names or trade names of the
respective proprietor.
This document contains the technical specifications and product
information current at the time of printing. All information found in this
document, including URLs and links to websites, is subject to change
without prior notification.
Individual content may vary from region to region or based on the device
specifications/software from your device.
Please note the proprietary notice pursuant to DIN ISO 16016. Copyright
law prohibits the copying, utilization, and distribution of the content of this
document [illustrations, reference documents, etc.], as a whole or in part,
without the permission of the copyright holder.
367. Federal Communications Commission
Notice [US]
This equipment has been tested and found to comply with the limits
for a Class B digital device, pursuant to Part 15 of the FCC Rules. These
limits are designed to provide reasonable protection against harmful
interference in a residential installation. This equipment generates, uses,
and can radiate radio frequency energy and, if not installed and used in
accordance with the instructions, may cause harmful interference to radio
communications. However, there is no guarantee that interference will
not occur in a particular installation. If this equipment does cause harmful
interference to radio or television reception, which can be determined by
turning the equipment off and on, the user is encouraged to try to correct
the interference by one or more of the following measures:
• Reorient or relocate the receiving antenna.
• Increase the separation between the equipemnt and receiver.
• Connect the equipment to an outlet on a circuit different from that
to which the receiver is connected.
• Consult the dealer or an experienced radio or television technician
for help.
Modifications
The FCC requires the user to be notified that any changes or modifications
made to this device that are not expressly approved by Porsche Design
may void the user's authority to operate the equipment.
Declaration of Conformity for products marked with the FCC logo
(United States only)
This device complies with Part 15 of the FCC Rules. Operation is subject
to the following 2 conditions:
1. This device may not cause harmful interference.
2. This device must accept any interference received, including interference
that may cause undesired operation.
Contains: FCC-ID: 2ARB5-ULTRAONE
37Il produttore dichiara che il modello di apparecchiatura radio Porsche Design
Ultra One orrisponde alla direttiva 2014/53/UE. Il testo completo della
dichiarazione di conformità UE è disponibile al seguente indirizzo:
www.porsche-design-computing.com
The manufacturer hereby confirms that the Porsche Design Ultra One device
complies with the requirements and other relevant provisions of Directive
2014/53/EU. You can find the full version of the Declaration of Conformity
online at: www.porsche-design-computing.com
Frequency range
BT/BT LE: 2402 - 2480 MHz
WiFi: 2412 - 2472 MHz,
5150-5725 MHz
RF Output Power max.
BT/BT LE: 4.5 dBm (2402 - 2480 MHz)
WiFi: 14.5 dBm (2412 - 2472 MHz),
13,0 dBm (5150 - 5725 MHz)
WiFi 5GHz:
Operations in the 5.15-5.35 GHz band are restricted to indoor usage only.
QG-PD-V1-10-IT-US_EN-190809Puoi anche leggere