TSM04 e anual - Manuale utente ua - Everspring
←
→
Trascrizione del contenuto della pagina
Se il tuo browser non visualizza correttamente la pagina, ti preghiamo di leggere il contenuto della pagina quaggiù

TSM04
e   anual - Manuale utente -   u a e u ua
Maintenance
TSM04 Magnetic Detector 1. Low Battery: When the battery becomes low. The detector will report back to the
gateway. If the door or window is poen the LED will flash to indicate low battery
condition to the user.
General Introduction
2. Open the backplate and use a screwdriver to open the battery cover as below to
The TSM04 Magnetic Detector is used in security or home automation applications insert the battery
to detect opening or closing of doors/windows. It consists of two parts; a Detector
and a Magnet. Opening the protected doors/ windows will remove the magnetic field,
sending an alarm signal to the gateway. Its great compatibility with our U-Net family
security products makes it suitable for smart home cloud based platforms such as
Homesys.
Product Layout
1. Do not insert the plug into an electrical outlet yet.
2. Log into your account from a web browser.
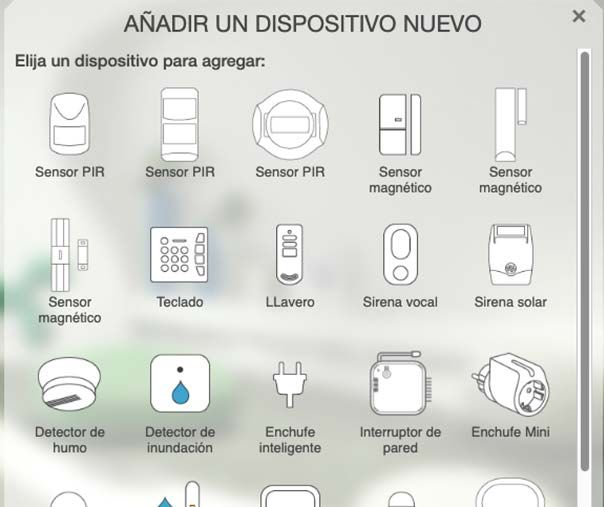
3. Select “System”, then “Add a Device”,
A. Detector G. Mylar hole
B. LED indicator H. Screw mounting hole 4. Select “Add a New Device”, then “Magnetic detector”.
C. Magnet I Slot
D. Battery mylar J Learning button
E. Screw mounting hole K Mylar hole
F. Tamper L Battery
Accessories :
3M rubber Screws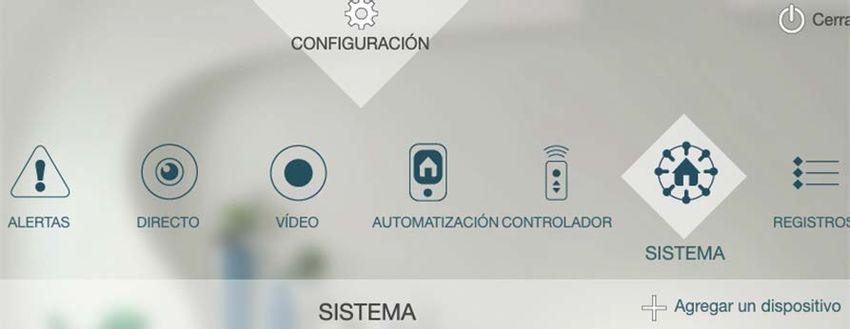
5.
5    The following screen will appear. This means the gateway is entering binding mode.   Installation
                                                                                          1. Mount the Magnetics Detector in dry interior locations only.

                                                                                              Note: Don’t place the unit near combustible substances or any source of heat,
                                                                                              e.g. fires, radiators, boilers etc.
                                                                                              Note: Mounting the detector to a metal frame or within 1 meter of metalwork
                                                                                              (e.g. radiators, water pipes) may affect radio range of the device. Please use
                                                                                              plastic or wooden spacers to separate the detector and metal surface when
                                                                                              required.
                                                                                          2. Fit the magnet on the moving part of the door/window, and vice versa if
                                                                                             necessary. The magnet could be in the detector both side. Use the provided
                                                                                             self-adhesives tape to secure them in place.

6.   At this point, insert the battery with correct polarity into the unit.

                                                                                          3. Make sure the parallel gap between the magnet and detector is less than 20mm
7.   The screen below will appear within 10 seconds if the process is successful.            and that they are aligned from the top. An alarm will be triggered if the gap is
                                                                                             greater than 35mm.

8.   Time-out will occur if the binding process was unsuccessful. Please refer
     to Manual Binding in the Troubleshooting section.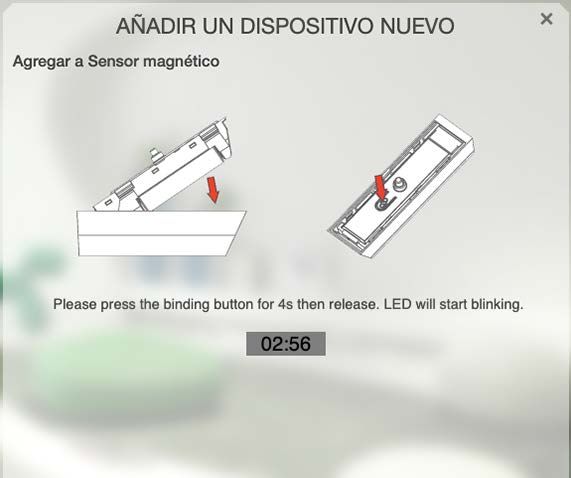
4. Perform the test using the same steps described in Operation & Testing section WARNING:
above to ensure the unit is working properly. Do not dispose of electrical appliances as unsorted municipal waste, use separate collection
facilities. Contact your local government for information regarding the collection systems
available.
Trouble Shooting
If electrical appliances are disposed of in landfills or dumps, hazardous substances can leak
into the groundwater and get into the food chain, damaging your health and well-being.
Symptoms Possible Cause Recommendation
When replacing old appliances with new ones, the retailer is legally obligated to take back
Device does not work, No batteries attached or Check if batteries are your old appliance for disposal free of charge.
LED does not illuminate. no power. attached or replace with
new ones. CAUTION:
LED does illuminate, Binding with gateway did Bind again using manual RISK OF EXPLOSION IF BATTERY IS REPLACED BY AN INCORRECT TYPE. DISPOSE
appliance does not not complete binding OF USED BATTERIES ACCORDING TO THE INSTRUCTIONS
respond successfully. Federal Communication Commission Interference Statement
Disturbed by other radio Please operate later This equipment has been tested and found to comply with the limits for a Class B digital
waves device, pursuant to Part 15 of the FCC Rules. These limits are designed to provide
reasonable protection against harmful interference in a residential installation. This
equipment generates, uses and can
radiate radio frequency energy and, if not installed and used in accordance with the
Reset to Factory Settings instructions, may cause harmful interference to radio communications. However, there is no
guarantee that interference will not occur in a particular installation. If this equipment does
To reset TSM04 back to factory default state: cause harmful interference to radio or television reception, which can be determined by
1. Press and hold the Learning button for 3 seconds until the LED flashes turning the equipment off and on, the user is encouraged to try to correct the interference by
one of the following measures:
moderately then release the button. - Reorient or relocate the receiving antenna.
2. Within 30 seconds, press and hold the Learning button again, this time for more - Increase the separation between the equipment and receiver.
than 6 seconds then release the button. - Connect the equipment into an outlet on a circuit different from that to which the receiver is
connected.
3. Re-insert the batteries, if the LED blinks slowly for 30 seconds this implies the - Consult the dealer or an experienced radio/TV technician for help.
device is reset back to factory mode. This device complies with Part 15 of the FCC Rules. Operation is subject to the following two
conditions: (1) This device may not cause harmful interference, and (2) this device must
Specifications accept any interference received, including interference that may cause undesired operation.
FCC Caution: Any changes or modifications not expressly approved by the party responsible
Operating temperature range 0°C to 40°C for compliance could void the user's authority to operate this equipment.
Operating humidity 85% RH at 30°C This transmitter must not be co-located or operating in conjunction with any other antenna or
Battery type AA alkaline 1.5V *1 transmitter.
RF Frequency 868.30 MHz/923.00MHz
Magnetic OPEN CLOSE >20mm
CLOSEOPEN 200m (Open space) www.everspring.com NewTaipeiCity 236 Taiwan
*Specifications are subject to change without notice.
A501112666R
TSM04                        Sensore contatto
                                                                                       Aggiungere ad Homesys
Introduzione                                                                           1.   Togliere la base posteriore del sensore utilizzando un cacciavite a taglio ed
                                                                                            aprire il sensore come mostrato nell'immagine seguente.
Il sensore a contatto magnetico TSM04 è utilizzato per rilevare apertura o chiusura
di una porta o finestra in ambito di sicurezza o automazione. Il dispositivo è
composto da due parti: Il sensore e un lato magnetico. Aprendo la porta o finestra
dove è stato installato, si separa il campo magnetico delle due parti ed il sensore
invia il segnale alla centrale IPBOX. Il dispositivo funziona nel sistema smart home
basato su cloud Homesys.

Descrizione

                                                                                       2.   Preparare una batteria tipo AA 1.5V. Per il momento non inserire la batteria.
                                                                                       3.   Accedere al proprio sistema Homesys da pagina web.
                                                                                       4.   Selezionare “Sistema” quindi “Aggiungi dispositivo”.

    A.   Sensore                           G.    Foro di apertura                      5.   Selezionare “Sensore contatto”.
    B.   Indicatore LED                    H.    Foro per installazione
    C.   Lato magnetico                    I    Compartimento
    D.   Leva per estrarre batteria        J    Bottone di ricerca
    E.   Foro per installazione            K    Foro di apertura
    F.   Leva anti vandalismo              L     Batteria

Accessori :

                          Adesivi 3M                  Viti / tasselli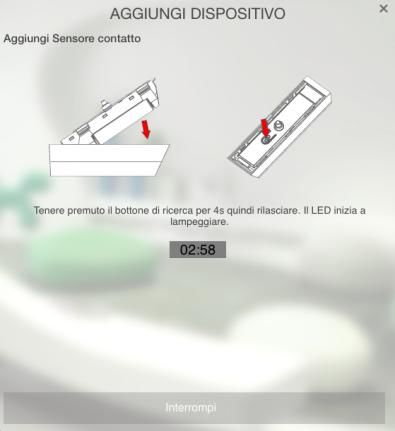
6.   Appare la seguente schermata. Significa che la centrale IPBOX ha iniziato la
     ricerca di dispositivi.
                                                                                     Installazione
                                                                                     1. Il sensore TSM04 è indicato per utilizzo all'interno e in zone asciutte.
                                                                                     2. Non installare il dispositivo vicino a fonti di calore (es: fornelli, caloriferi,
                                                                                        bollitori).

                                                                                          Nota: Installare il sensore sopra superfici di metallo o a mento di 1 metro da
                                                                                          oggetti di metallo (es.caloriferi, tubature) può limitare il segnale radio. Utilizzare
                                                                                          separatori di plastica o di legno tra il sensore e la superficie di metallo.

                                                                                     3. Fissare la parte magnetica alla parte mobile della porta/finestra. Il magnete
                                                                                        funziona sia posto alla sinistra o alla destra del sensore. Usare gli adesivi
                                                                                        inclusi nella confezione per fissare le parti del dispositivo sulla superficie.

7.   A questo punto inserire la batteria con la polaritá corretta nel dispositivo.

                                                                                     4. Assicurarsi che la distanza tra il sensore ed il magnete sia inferiore a 20mm ed
                                                                                        allineati nella parte superiore. Se la distanza supera i 35mm la centrale
                                                                                        considera il sensore aperto.

8.   Se il processo ha successo, entro 10 secondi appare la seguente schermata

                                                                                     5. Per testare il dispositivo armare il sistema ed aprire la porta/finestra.
9.   Se la ricerca non dá esito, dopo un po il conteggio scade. Procedere con la
     procedura di "Ricerca manuale".
Domande frequenti ATTENZIONE:
RISCHIO DI ESPLOSIONE UTILIZZANDO BATTERIE DI TIPO DIVERSO DA QUELLO
Sintomi Possibili cause Soluzioni SPECIFICATO IN QUESTA GUIDA. DISFARSI DELLE BATTERIE SCARICHE SEGUENDO
LE ISTRUZIONI DI QUESTA GUIDA
Il LED non si accende e il Batterie non inserite o Inserire nuove batterie.
dispositivo non risponde. scariche. Dichiarazione della commissione federale sulle interferenze
Questo dispositivo e’ stato testato e valutato come un dispositivo che rispetta i limiti degli
Il LED si accende ma il Il dispositivo non è stato Riprovare la procedura apparecchi digitali di classe A, a norma secondo la Parte 15 del regolamento FCC. Tali limiti
dispositivo non comunica aggiunto correttamente aggiungi ad Homesys sono stati selezionati per offrire una protezione sufficiente contro interferenze dannose
con la centrale. quando questo dispositivo e’ usato in un ambiente residenziale. Questo dispositivo genera,
Interferenza radio Please operate later usa, ed emette onde di frequenza radio, e se non installato o
utilizzato secondo le istruzioni contenute nel manuale, puo causare interferenze alle
comunicazioni radio. Tuttavia, non è possibile garantire che le interferenze non si verifichino
Ripristino a valori iniziali in determinate installazioni. Se il dispositivo crea interferenze alla ricezione radio o televisiva,
cosa che si può verificare accendendo e spegnendo il dispositivo, l'utente è incoraggiato a
correggere l'interferenza seguendo queste istruzioni:
Per ripristinare TSM04 a valori iniziali: - Riorientare o spostare l'antenna di ricezione.
1. Tenere premuto il tasto di ricerca sulla scheda del sensore per 3 o piu secondi, - Aumentare lo spazio tra dispositivo e ricevitore.
il LED inizia a lampeggiare. - Collegare i dispositivi ad una presa diversa alla quale è collegato il ricevitore.
2. Tenere premuto il tasto di ricerca per 6 o piu secondi (ma meno di 30) fino a - Consultare il rivenditore o un tecnico specializzato in radio/TV technician per assistenza.
quando il LED si spegne. Il dispositivo ora è stato resettato a valori iniziali.
3. Re-insert the batteries, if the LED blinks slowly for 30 seconds this implies the Il dispositivo è a norma secondo la Parte 15 del regolamento FCC. L'utilizzo è soggetto a
device is reset back to factory mode. queste due condizioni:
(1) Il dispositivo non può creare interferenze dannose, e (2) il dispositivo deve accettare
eventuali interferenze ricevuto, incluse le interference che possono causare cambi non
desiderati dell'operabilità.
Specifiche tecniche
Temperatura operativa Tra 0°C e 40°C Precauzioni FCC: Qualsiasi cambio o modifica non espressamente approvata dalla parte
responsabile della certificazione può revocare l'autorità dell utente di utilizzare il dispositivo.
Umidità operativa 85% RH a 30°C
Tipo batteria 1 batteria AA alkaline 1.5V Questo trasmettitore non puo essere installato o utilizzato insieme ad altre antenne o
Frequenza wireless 868.30 MHz/923.00MHz trasmettitori.
Distanza di funzionamento magnete APERTO CHIUSO >20mm
CHIUSOAPERTO 200m (Spazio aperto)
*Le specifiche sono soggette a modifiche senza preavviso.
50 Sect. 1 Zhonghua Rd Tucheng
www.everspring.com NewTaipeiCity 236 Taiwan
PRECAUZIONI:
Non gettare dispositivi elettronici come normali rifiuti, utilizzare servizi di raccolta
differenziata.
Contattare il proprio comune per informazioni sul tipo di raccolta differenziata svolto
nella propria zona.
Dispositivi elettronici che vengono gettati in natura, possono rilasciare nelle falde
aquifere sostanze dannose pericolose per la salute di persone e di altri esseri
viventi.
In caso di sostituzione di vecchi dispositivi, il venditore è obbligato a prendere i
vecchi dispositivi e gratuitamente deve farsi carico dello smaltimento..TSM04 Sensor magnético para puerta o ventana
Guía de instalación
Introdución
El detector magnético TSM04 se utiliza para seguridad y automatización de casas
para detectar aperturas y cerraduras de puertas/ventanas. Consiste de dos partes: un Añadir a un sistema Homesys
Detector y un Magneto. Cuando se abre la puerta/ventana el campo magnetico se
abre tambien, enviando un señal a la gateway Homesys. HSM01 es un accesorio de
la serie Homesys smart home. 1. De momento no poner la batería.
2. Ingresar a su cuenta Homesys por navegador internet.
3. Seleccionar “Sistema” y “Agregar un dispositivo”.
Descripción
4. Seleccionar “Detector magnético”.
A. Sensor G. Hueco para apertura
B. Indicador LED H. Hueco para instalación
C. Lado magnetico I Sector magneto
D. Hueco para sacar la batería J Bottone di ricerca
E. Hueco para instalación K Hueco para apertura
F. Botón anti manipulación L Batería
Accessorios :
Tapas adesivas Tornillos / tuercas5. Esta pantalla significa que la central Homesys está buscando dispositivos. Instalación
1. Instalar el magneto en el lado móvil de la puerta / ventana y el detector al lado
opuesto (o vice versa, si necesario). Use the provided self-adhesive tape to secure
them in place.
6. Abrir la caja de la batería in poner una. Revisar que el lado positivo (+)
quede cara arriba.
2. Asegurarse de que la distancia entre el magneto y el detector no sea mas de
20mm y que sean correctamente alineados. Cuando la distancia pasa los 35mm
se activa un alarma.
7. Si dentro de 10 segundos el operación tiene éxito aparece la siguiente pantalla.
3. Seguir el procedimiento en “Utilización y prueba” para comprobar el correcto
funcionamiento.
8. Si el operación de busqueda no tiene éxito. Chequear “preguntas frecuentes”.Restablecimiento a valores de fábrica
Para resetear HSM01 a valores de fábrica:
(1) Presionar y detener el botón anti manipulación por 3 o mas segundos, hasta
cuando el LED parpadea rápido. Soltar el botón. El unidad entra en modo
busqueda por 30-segundos.
(2) Dentro de 30 segundos, presionar y detener el botón anti manipulación por 6 o
Preguntas frecuentes mas segundos hasta que se apaga la luz LED.
(3) Quitar las batería y ponerla otra vez. Si el LED parpadea lento por 30 segundos
En la tabla a seguir estan unas soluciónes de preguntas frecuentes. Si no encuentra significa que el dispositivo a vuelto a valores de fábrica.
una respuesta a su pregunta, chequear su vendedor o el centro de asistencia mas
cercano.
Síntomas Causa Solución
El LED no se En modo Normal, el LED 1. Quitar la caja de la batería Especificaciones
enciende cuando se no se enciende cuando se para ingresar al modo de prueba.
quita el magneto quita el magnetico. Separar el magneto, esta vez el Batería Batería de litio CR2450 3.0V 620mAh
LED debería encenderse. Temperatura operativa -10°C ~ 40°C
En caso contrario, reemplazar la Distancia señal 200m en espacio abierto
batería. Frecuencia radio 868.30 MHz
2. Revisar si se la batería está ** Las especificaciones están sujetas a cambio sin previa notificación.
puesta con la polaridad correcta.
3. Comprobar la distancia entre
el magneto y el detector.
Sin la caja de la 1. Chequear si se añadió 1. Intentar añadir el dispositivo
batería (Modo de con éxito el detector a la utilizando la busqueda
prueba),el LED se gateway Homesys. manual. ATENCION:
enciende pero no hay
respuesta desde la 1. Lugar de instalación 1. Instalar el contacto magnético Le rogamos que haga caso de la normativa local y no deseche los productos viejos
gateway Homesys. demasiado lejos. mas cerca de la gateway junto con la basura doméstica.
Homesys.
Unas sustancias contenidas en el equipo electrónico pueden dañar el ambiente y
dañar la salud humana si están mal empleadas o si no se desechan de la manera
correcta.
Devuelva el dispositivo al vendedor al comprar uno nuevo.Puoi anche leggere