Calypso FL+Table Outdoor - Contardi Italia
←
→
Trascrizione del contenuto della pagina
Se il tuo browser non visualizza correttamente la pagina, ti preghiamo di leggere il contenuto della pagina quaggiù
Calypso FL+Table Outdoor

INSTALLING INSTRUCTIONS                                                       Pag. 1/4   DRAWN BY   N.O.

ALL OPERATIONS MUST BE CARRIED OUT BY QUALIFIED PERSON

     1   Separate the ballast from the base by unscrewing
         the screws.
         ------------------------------------------------------------------
         Separare la zavorra dalla base svitando le viti.

     2   Fix the lamp body to the base, matching
         the threaded pins to the holes and insert
         the cable through the hole of the base.
         --------------------------------------------------------
         Fissare il corpo della lampada alla base,
         facendo corrispondere i perni filettati ai
         fori e facendo passare il cavo attraverso il
         foro della base.

     3   Secure the threaded pins with the nuts.
         Secure the cable using the supplied cable
         clamps.
         ----------------------------------------------------
         Fissare i perni filettati tramite i dadi.
         Fissare il cavo tramite i fermacavi forniti.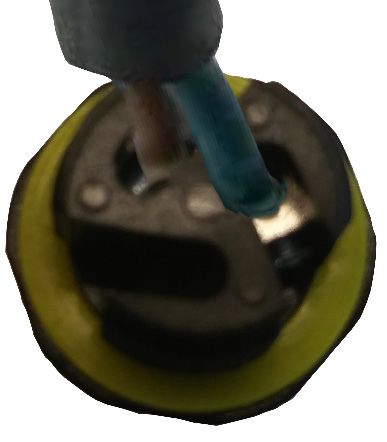
Calypso FL+Table Outdoor

INSTALLING INSTRUCTIONS                                                              Pag. 2/4   DRAWN BY   N.O.

ALL OPERATIONS MUST BE CARRIED OUT BY QUALIFIED PERSON

     4   Fix the ballast to the base using the screws provided.
         -------------------------------------------------------------------------
         Fissare la zavorra alla base tramite le viti fornite.

     5   Fasten the table top to the plate and tighten
         it using the blind nuts.
         ----------------------------------------------------------
         Fissare il piano del tavolo alla piastra e
         serrarlo tramite i tramite i dadi ciechi.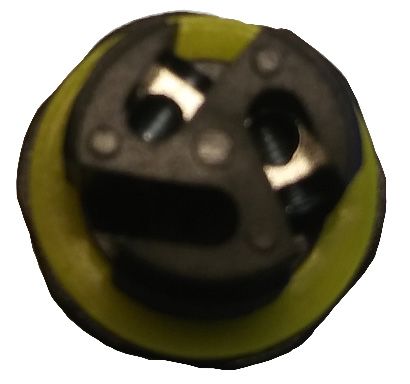
Calypso FL+Table Outdoor

INSTALLING INSTRUCTIONS                                           Pag. 3/4   DRAWN BY   N.O.

ALL OPERATIONS MUST BE CARRIED OUT BY QUALIFIED PERSON

     6   Set the glass on the bulb.
         --------------------------------------------------
         Posizionare il vetro sopra alla lampadina.

     !   During the assembly, or when replacing
         a bulb, verify the presence of the gasket
         (o-ring), between the ring nut and the
         glass.
         Insert the glass until insert it up to the
         bottom.
         Warning! Thread the glass by applying
         pressure and not rotating it.
         If the glass or the gasket are damaged,
         do not connect the power unit and
         replace them.
         ------------------------------------------------------
         Nel montaggio o nella sostituzione della
         lampadina, verificare sempre la
         presenza della guarnizione (o-ring), tra
         ghiera e vetro.
         Inserire il vetro fino ad infilarlo fino in
         fondo.
         Attenzione! Infilare il vetro applicando
         una pressione e non ruotandolo.
         Se il vetro o la guarnizione risultano
         danneggiati, non collegare
         l'alimentazione e sostituirli.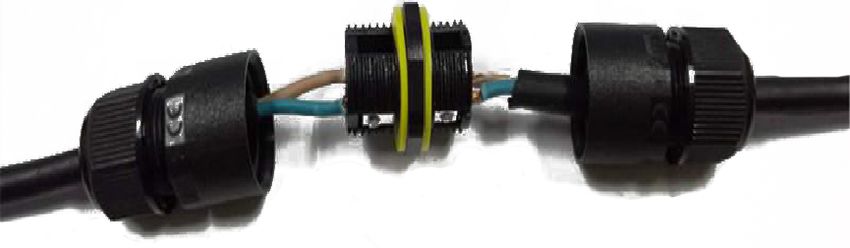
Calypso FL+Table Outdoor

INSTALLING INSTRUCTIONS                                      Pag. 4/4   DRAWN BY   N.O.

ALL OPERATIONS MUST BE CARRIED OUT BY QUALIFIED PERSON

     7   Fix the lampshade to the plate using
         the screws provided.
         -------------------------------------------------
         Fissare il paralume al piatto
         utilizzando le viti fornite.

     8   Connect the lamp cable to the IP 68
         connector.
         -------------------------------------------------
         Collegare il cavo della lampada al
         connettore IP 68.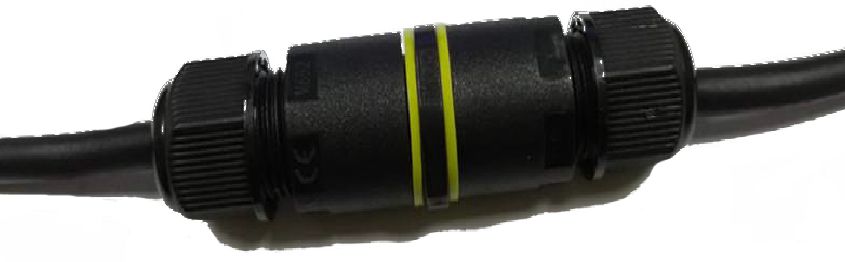
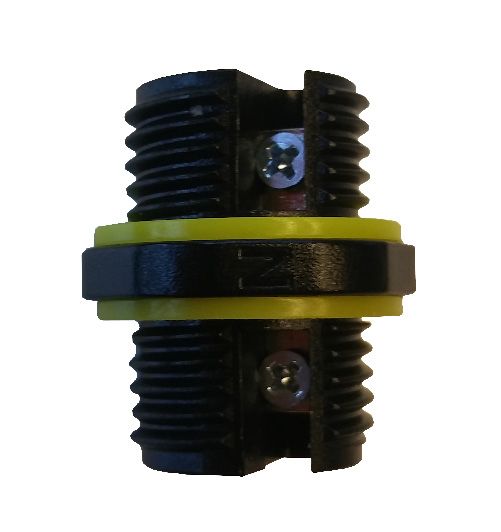
M682-B IP68 Waterproof Connector
Connettore impermeabile M682-B IP68

INSTALLING INSTRUCTIONS                                                                                                     Pag. 1/2       DRAWN BY   N.O.

ALL OPERATIONS MUST BE CARRIED OUT BY QUALIFIED PERSON

                                                                                  50mm [2"]

                                                                                            15mm [0,5"]

       1   Prepare terminal connector and two wires, wires need split 2” and remove 1/2” of jacket.
           ---------------------------------------------------------------------------------------------------------------------------------
           Preparare il connettore terminale e i due fili, i fili devono essere scoperti 50mm circa e rimuovere
           15mm dal rivestimento dei cavi.

       2   Back out the screws in terminal block a little to ensure following easy connection.
           --------------------------------------------------------------------------------------------------------------
           Allentare leggermente le viti nella morsettiera per garantire una facile connessione.
M682-B IP68 Waterproof Connector
Connettore impermeabile M682-B IP68
INSTALLING INSTRUCTIONS Pag. 2/2 DRAWN BY N.O.
ALL OPERATIONS MUST BE CARRIED OUT BY QUALIFIED PERSON
3 Plug the wires into the terminal block and screw tighten, please make sure the color of wires
matches the picture.
---------------------------------------------------------------------------------------------------------------------------------
Inserire i fili nella morsettiera e serrare a fondo, assicurarsi che il colore dei fili sia corrispondente
all’immagine.
4 Twist and tighten the cable glands.
-----------------------------------------------
Serrare i fermacavi.Puoi anche leggere