DRINK TOWER IT EN - Pan Atlantic
←
→
Trascrizione del contenuto della pagina
Se il tuo browser non visualizza correttamente la pagina, ti preghiamo di leggere il contenuto della pagina quaggiù
DRINK TOWER
IT   Installazione, uso e manutenzione

EN Installation, use and maintenance handbook

                                                  COD: 5561480
                                                    Rev.0:1014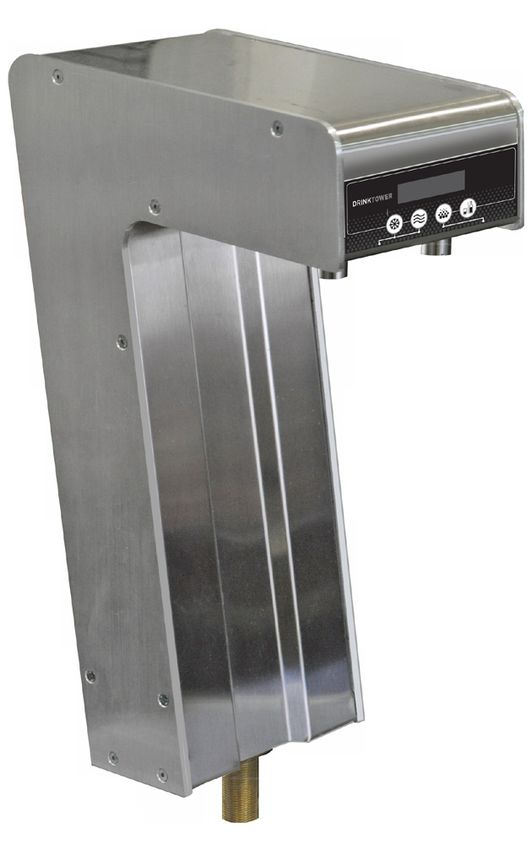
MARCATURA
                                                                      6                                               DELL’APPARECCHIO
                                                                                                                       1     Modello
                            MANUFACTURER                                                                               2     Tensione di alimentazione
                                                                                                                       3     Quantità di gas refrigerante
                            WATER COOLERS                                                                              4     Classe
                  1                                                                                                    5     Assorbimento totale
                             Mod. ..................                                                                   6     Frequenza
                                                                                            5
                  2                                                                                                    7     Numero di matricola
                             ..........V      ..........Hz   ..........W   ..........A                                 8     Anno-mese di costruzione
                             Freon R134a kg.............                   Classe T         4
                             				                                          MADE IN ITALY
                                                                                                                       APPLIANCE DATA PLATE
                                                                                                                       1     Model
                  3                                                                                                    2     Supply voltage
                                                                                                                       3     Quantity of cooling gas
                                                       000100 0102                                                     4     Class
                                                                                                                       5     Total absorption
                                                                                                                       6     Frequency
                               7                                                            8                          7     Serial number
                                                                                                                       8     Construction year-month

                                   DICHIARAZIONE                                                                                 CONFORMANCE
                                   DI CONFORMITÀ’                                                                                 STATEMENT
 Questo apparecchio è realizzato con materiali idonei per il contatto con acqua potabile.       This appliance has been manufactured with suitable materials for use with drinking water.

 Questo prodotto è stato concepito, costruito e immesso sul mercato rispettando                 This product was designed, made and put on the market respecting the
 le seguenti conformità:                                                                        following conformities:
 • Requisiti di sicurezza della Direttiva “Bassa Tensione” 2006/95/CEE;                         • Following EC requirements safety objectives of the “Low Voltage”
                                                                                                  2006/95/CEE;
 • requisiti di protezione della Direttiva “EMC” 2004/108 CEE.
                                                                                                • protection requisites of “EMC” 2004/108/ CEE

  IT     1      PRIMA DI USARE L’APPARECCHIO
1.1 AVVERTENZE                                                                                  1.2 PRECAUZIONE E SUGGERIMENTI GENERALI

        Per utilizzare al meglio il vostro apparecchio, raccomandia-                                     Prima di qualsiasi operazione di manutenzione o pulizia, di-
        mo di leggere attentamente le istruzioni per l’uso.                                              sinserite la spina dalla presa di corrente.

• Conservate questo libretto per future consultazioni.                                          • Non tirate il cavo di alimentazione per staccare la spina dalla presa di
• Dopo aver disimballato l’apparecchio, accertatevi che non sia dan-                              corrente.
  neggiato. Eventuali danni devono essere comunicati al vettore entro                           • Dopo l’installazione, accertatevi che l’apparecchio non poggi sul cavo
  24 ore.                                                                                         di alimentazione.

• Accertatevi che l’installazione ed il collegamento elettrico siano effet-                              I dati e le caratteristiche indicati nel presente manuale non
  tuati da un tecnico qualificato, secondo le istruzioni del fabbricante e                               impegnano la ditta costruttrice che si riserva il diritto di ap-
  le norme locali in vigore. L’impianto elettrico deve essere munito  di un                              portare tutte le modifiche ritenute opportune, senza obbligo
  efficace presa di terra, a norma di legge (46/90).                                                     di preavviso o di sostituzione.

 EN      1      BEFORE USING THE APPLIANCE
1.1 WARNINGS
                                                                                                1.2 GENERAL PRECAUTIONS AND SUGGESTIONS

        In order to use your appliance to its best, we advise reading                                    Before carrying out any maintenance or cleaning operation,
        these instructions carefully as they contain useful information.                                 remove the plug from the mains socket.
• Keep this book for later use.                                                                 • Do not pull on the supply cable in order to remove the plug from the
• When you have removed the packaging, make sure that the appliance                               socket.
  is not damaged. Any damage must be reported to your carrier within                            • When the appliance has been installed, make sure it is not resting on
  24 hours.                                                                                       the mains supply cable.

• Make sure that installation and electrical wiring are carried out by a                                 The data and characteristics indicated in this manual do not
  qualified technician according to the manufacturer’s instructions and                                  bind the manufacturer, who reserves the right to make all the
  to the local norms in force. The electrical system must be equipped                                    modifications deemed necessary, without having to give prior
  with an effective earth according to the law (46/90).                                                  notice or replacement.

                                                                                            2                                                                                      0:5561480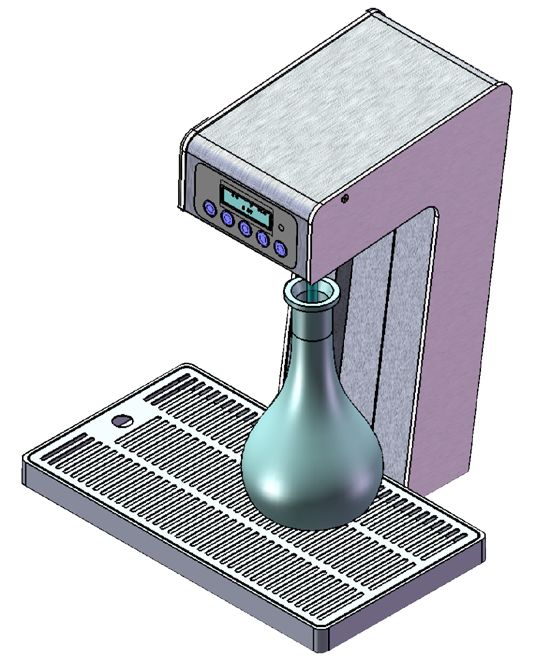
IT       1    PRIMA DI USARE L’APPARECCHIO

            l’inosservanza di una qualsiasi norma di sicurezza potreb-
            be causare incendi, scosse elettriche o danneggiare la mac-            Avvertenze generali
            china                                                                  • Tenere asciutta e pulita la zona su cui è posta la macchina.
Luogo di installazione                                                             • Non installate altre apparecchiature elettriche vicino alla macchina.
• Non collocare la macchina nelle vicinanze di solventi infiammabili               • Chiudere il rubinetto generale dell’acqua di rete se la macchina non è
  come alcool o diluenti.                                                            utilizzata per un lungo periodo.
• Non installare la macchina in luoghi eccessivamente umidi e polve-               • La connessione della macchina alla rete idrica deve avvenire tenendo
  rosi, esposti alla luce diretta del sole, all’esterno o nelle vicinanze di         in considerazione le normative nazionali del luogo di installazione.
  fonti di calore.                                                                 • Se il kit di installazione (e il gruppo di raccordi) è danneggiato, questo
  L’installazione della macchina in questi luoghi potrebbe causare in-               deve essere sostituito dal costruttore o dal suo servizio di assistenza
  cendi o scosse elettriche.                                                         tecnica e comunque da una persona qualificata in modo da prevenire
• L’apparecchio non è idoneo per l’uso all’esterno e inoltre è sconsiglia-           qualsiasi rischio.
  ta la sua installazione in ambienti molto umidi.                                 • Periodicamente, scollegare la macchina dalla presa di corrente e, con
                                                                                     un panno asciutto, pulire la spina e la presa di corrente.
Alimentazione elettrica                                                              Se la macchina è collegata in un luogo esposto a polvere, fumo o
• Non collocare o scollegare la macchina dalla presa di corrente con le              alta umidità, la polvere accumulatasi sulla presa assorbe umidità e
  mani bagnate.                                                                      potrtebbe alterare  l’isolamento e innescare un incendio.
• Inserire saldamente la spina nella presa a muro.                                 • La macchina non deve essere installata in zone in cui si puo’ generare
• Non danneggiare, modificare, allungare, piegare o attorcigliare il cavo            un getto d’acqua.
  di alimentazione. Non appoggiare oggetti pesanti sul cavo di aliman-             • Non dirigere spruzzi d’acqua sull’apparecchio, questi potrebbero cau-
  tazione.                                                                           sare scosse elettriche o incendi.
• Se il cavo di alimentazione è danneggiato, esso deve essere sostitu-             • Utilizzare un panno inumidito per pulire la macchina. Non utilizzare
  ito dal costruttore o dal suo servizio assistenza tecnica o comunque               solventi infiammabili quali alcol, benzene, o diluenti. Se delle sostan-
  da una persona con qualifica similare, in modo da prevenire ogni ri-               ze infiammabili dovessero entrare in contatto con i componenti elet-
  schio.                                                                             trici all’interno della macchina, potrebbero causare incendi o scosse
• Non collegare la macchina ad una presa di corrente cui sono collega-               elettriche.
  te altre apparecchiature (prolunghe, adattatori a 2 o 3 attacchi, ecc.)            Non utilizzare mai un getto d’acqua per pulire la macchina.
• Non utilizzare la macchina se il cavo di alimentazione è legato o pre-           • Prima di pulire la macchina, spegnerla e scollegarla dalla presa di cor-
  senta dei nodi.                                                                    rente. Il mancato spegnimento o l’accidentale accensione durante la
• Se si notano fumo, odori insoliti o rumori strani provenire dalla mac-             pulizia potrebbe causare lesioni alle persone o danni alla macchina.
  china, scollegare immediatamente la macchina dalla presa di corren-              • L’apparecchio non è destinato ad essere usato da persone (bambini
  te e contattare il locale rivenditore o il servizio di assistenza tecnica.         compresi) le cui capacità fisiche, sensoriali o mentali siano ridotte,
  L’utilizzo della macchina in queste condizioni potrebbe causare incen-             oppure con mancanza di esperienza o di conoscenza, a meno che
  di o scosse elettriche.                                                            esse abbiano potuto beneficiare, attraverso l’intermediazione di una
• Prima di pulire la macchina ed effettuare operazioni di manutenzione               persona responsabile della loro sicurezza, di una sorveglianza o di
  (incluso cambio bombola CO2), spegnere la macchina e scollegare                    istruzioni riguardanti l’uso dell’apparecchio.
  la presa di corrente elettrica. Il mancato spegnimento o l’accidentale             I bambini devono essere sorvegliati per sincerarsi che non giochino
  accensione durante tali operazioni potrebbe causare lesioni alle per-              con l’apparecchio.
  sone o danni alla macchina.

   EN        1    BEFORE USING THE APPLIANCE

                                                                                   General warning.
            Failure to comply with any of these safety regulations could           • Keep the area surrounding the machine clean and dry.
            cause fires, electric shocks or damage the machine                     • Do not install other electrical equipment near the machine.
                                                                                   • Close the main water tap if the machine is not going to be used for a
Place of installation                                                                long period of time.
• Do not place the machine near inflammable solvents such as alcohol               • The machine’s connection to the mains water supply must be carried
  or diluents.                                                                       out in full compliance with the national laws in the machine’s country
• Do not install the machine in excessively damp and dusty places,                   of installation.
  exposed to direct sunlight, outdoors or near to heat sources.                    • In the event that the installation kit (and the group of connections)
  Machine installation in these places could cause fires or electric                 is damaged, it must be replaced by the manufacturer, an authorized
  shocks.                                                                            technical assistance service or by another a qualified individual   in
• The appliance is not suitable for outdoor use and it is also not recom-            order to avoid any risks.
  mended to install it in very damp rooms.                                         • Periodically disconnect the machine from the socket and clean the
                                                                                     plug and socket with a dry cloth.
Electric power supply                                                                If the machine is connected in a place exposed to dust, smoke or high
• Do not connect or disconnect the machine from the socket with wet                  humidity, the dust accumulated on the plug will absorb humidity and
    hands.                                                                           this could alter the insulation and trigger a fire.
• Insert the plug into the wall socket firmly.                                     • The appliance must not be installed where water jets can be gener-
• Do not damage, modify, stretch, bend or twist the power cable.                     ated.
    Do not place heavy objects on the power cable.                                 • Do not spray water on the device; this could cause electric shocks or
• If the power cable is damaged, it must be replaced by a qualified                  fires.
    operator, authorized by the manufacturer of thje appliance.                    • Use a damp cloth to clean the machine. Do not use inflammable sol-
• Do not connect the machine to a socket to which other equipment is                 vents such as alcohol, benzene or diluents. If inflammable substances
    connected (extensions, 2 or 3 plug adaptors, etc.)                               come in contact with the electrical components inside the machine,
• Do not use the machine if the power cable is tied or knotted.                      they can cause fires or electric shocks.
• If smoke, unusual smells or strange noises are found coming from the               Never use water jets to clean the machine.
    machine, disconnect it immediately from the socket and contact the             • Before cleaning the machine, switch it off and disconnect it from the
    local retailer or technical service assistance.                                  socket. Not being switched off or accidental switching on during clean-
    Use of the machine in these conditions could cause fires or electric             ing could cause injuries to persons or damages to the machine.
    shocks.                                                                        • The appliance is not intended for use by person (including children)
• Before cleaning the machine and before maintenance operations (In-                 with reduced physical, sensory or mental capabilities, or lack of ex-
    cluding CO2 cylinder replacement), switch it off and disconnect it from          perience and knowledge, unless they have been given the supervi-
    the socket. Not being switched off or accidental switching on during             sion on instruction concerning the use of the appliance by a person
    cleaning could cause injuries to persons or damages to the machine.              responsible for their safety.
                                                                                     Children should be supervised to ensure that they do not play with the
                                                                                     appliance.

0:5561480
                                                                               3
1

  IT     2     DISIMBALLO
• Ponete l’apparecchio nel punto d’installazione (cap. 5- INSTALLA-
  ZIONE).                                                                            Prodotto
• Eliminate subito i sacchi in plastica e i polistiroli i quali possono rap-         Questo apparecchio è contrassegnato in conformità alla Direttiva Euro-
  presentare pericolo per i bambini.                                                 pea 2002/96/EC, Waste Electrical and Electronic Equipment (WEEE).
                                                                                     Assicurandosi che questo prodotto sia smaltito in modo corretto, l’u-
                                                                                     tente contribuisce a prevenire le potenziali conseguenze negative per
2.1 CONSIGLI PER LA SALVAGUARDIA DELL’AMBIENTE
                                                                                     l’ambiente e la salute.
Imballo
                                                                                           Il simbolo presente sull’apparecchio o sulla documentazione indi-
Il materiale di imballo è riciclabile al 100%. Per lo smaltimento seguite
                                                                                           ca che il prodotto non deve essere trattato come rifiuto domestico
le normative locali. Il materiale di imballaggio (sacchetti di plastica, parti
                                                                                           ma deve essere consegnato presso un idoneo centro di raccolta
in polistirolo, ecc.) deve essere tenuto fuori dalla portata dei bambini in
                                                                                           per il riciclaggio di apparecchiatute elettriche ed elettroniche.
quanto potenziale fonte di pericolo.

                                                                                     Lo smaltimento deve avvenire seguendo le normative locali per lo
                                                                                     smaltimento dei rifiuti. Per ulteriori informazioni sul trattamento, recupero
                                                                                     e riciclaggio di questo prodotto, contattate l’idoneo ufficio locale, il servi-
                                                                                     zio di raccolta dei rifiuti domestici o il negozio presso il quale il prodotto
                                                                                     è stato acquistato.

  EN     2     REMOVAL OF PACKAGING
• Place the appliance in its installation site (chap. 5 - INSTALLATION).             Produkt
• Do away with plastic bags and polystyrene immediately as they are a                This appliance is marked according to the European directive 2002/96/EC
  danger for children.                                                               on Waste Electrical and Electronic Equipment (WEEE).By ensuring this
                                                                                     product is disposed of correctly, you will help prevent potential negative
2.1 ADVICE ON HOW TO PROTECT THE ENVIRONMENT                                         consequences for the environment and human health, which could other-
Packaging                                                                            wise be caused by inappropriate waste handling of this product.
Packaging material is 100% recyclable.                                                      The symbol  on the product, or on the documents accompanying
For its disposal follow your local regulations.                                             the product, indicates that this appliance may not be treated as
The packaging material (plastic bags, polystyrene parts etc.) must be kept                  household waste. Instead it shall be handed over to the applica-
out of children’s reach as it could be dangerous.                                           ble collection point for the recycling of electrical and electronic
                                                                                            equipment.
                                                                                     Disposal must be carried out in accordance with local environmental
                                                                                     regulations for waste disposal.For more detailed information about treat-
                                                                                     ment, recovery and recycling of this product, please contact your local
                                                                                     city office, your household waste disposal service or the shop where you
                                                                                     purchased the product.

                                                                                 4                                                                            0:5561480
2

    IT      3   DESCRIZIONE DELL’APPARECCHIO
Questo prodotto è stato studiato per servire grandi quantità di acqua                La presa di corrente deve essere posta in posizione acces-
fredda, liscia e gassata.                                                            sibile. In caso di guasto o malfunzionamento dell’apparec-
E’ di facile uso e realizzato con materiali di elevata qualità, per offrire la       chio, l’utente non deve mai aprire o manomettere le chiu-
massima igiene e semplicità di manutenzione.                                         sure e i coperchi della macchina per verificare il problema,
                                                                                     ma deve essere contattato il servizio di assistenza tecnica
Deve essere sempre collegato ad una rete idrica di acqua potabile e può              autorizzato.
essere equipaggiato con speciali kit filtranti.
                                                                                     Attenzione! Se il cavo di alimentazione è danneggiato, esso
                                                                                     deve essere sostituito dal costruttore o dal suo servizio as-
Può essere installato in vari ambienti come bar, ristoranti, mense, ospe-            sistenza tecnica o comunque da una persona con qualifica
dali, locali pubblici, uffici e ambienti domestici; l’installazione è prevista       similare, in modo da prevenire ogni rischio
sempre al coperto e in condizioni ambientali come descritto nel capitolo
“caratteristiche tecniche”.

   EN       3   DESCRIPTION OF THE APPLIANCE
This appliance is designed to provide large quantities of still and carbo-
nated cold water.                                                                    The electrical power outlet must be in an accessible loca-
It’s  easy to use and manufactured using top quality materials, offering             tion. In the event of any device failures or malfunctions,
                                                                                     never attempt to determine the problem by opening or tam-
the utmost hygiene and ease of maintenance.                                          pering with the machine’s closures and lids. Contact the
                                                                                     manufacturer’s technical assistance service.
It should always be connected to a mains drinking water supply and can
be fitted with special filtering kits.                                               Warning! If the power cable is damaged, it must be replaced
                                                                                     by the manufacturer, by an authorized technical assistance
It can be used in various settings, ranging from cafés, restaurants, can-            provider or else by an individual with similar qualifications,
teens, hospitals, public places, offices and domestic environments; they             in order to prevent any risks
should always be installed indoors and in the environmental conditions
described under the “technical features” heading

0:5561480
                                                                                 5
3

                                                                                             13
                                                             6.2

                                                             6.1                 14

    7

        5                                                8   9                      10         11      12

16                                                                                                    16

                                                     4                 15
        1
                             2                       3

    IT         3    DESCRIZIONE DELL’APPARECCHIO
3.1 VISTA GENERALE

1           Cavo di alimentazione                                      8    Pulsante acqua fredda
2           Tubo Acqua Ambiente (AMBIENT)                              9    Pulsante acqua a temperatura ambiente
3           Tubo Acqua FREDDA (WATER)                                  10   Pulsante acqua gassata
4           Tubo Acqua GASSATA (SODA)                                  11   Tasto Selezione dosi - Menu programmazione
5           Tubi filettato                                             12   Interruttore generale ON/OFF
            6.1 Beccuccio di erogazione AMBIENTE + FREDDA              13   Targa dati
            6.2 Beccuccio di erogazione GASSATA                        14   Display
7           Struttura                                                  15   Kit di installazione
                                                                       16   Guarnizione per piano di appoggio

    EN         3    DESCRIPTION OF THE APPLIANCE

3.1 GENERAL VIEW

1           Power supply cable                                         8    Button for water at room temperature
2           AMBIENT water pipe                                         9    Button for cold water
3           COLD WATER pipe                                            10   Button for sparkling water
4           Sparkling water pipe (SODA)                                11   Shift button - Programming Menu
5           Threaded pipe                                              12   Main ON/OFF switch
            6.1 Ambient and Cold nozzle                                13   Data plates
            6.1 Sparkling water nozzle                                 14   Display
7           Structure                                                  15   Installation kit
                                                                       16   Countertop gasket

                                                                   6                                                     0:5561480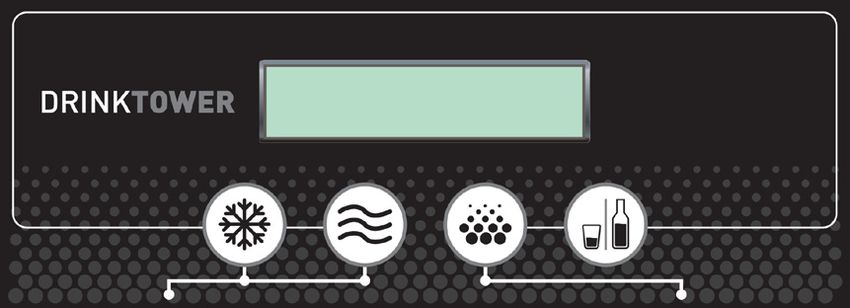
IT      4   CARATTERISTICHE TECNICHE
   EN       4   TECHNICAL CHARACTERISTICS

     4

                                                      269,6                                                   176
                        85,8

                                       37,6
                                                                                                              100

                                                                                                                                Dimensioni

                                                                                       496,6
                                                                                 458
                                                                                                                                Dimensions
                                                                                                                                   (mm)
                     351,9

                               338,6

                                              85,8
                                                        42,1
                                               MAX

                                                                          38,6
                                              27

                                                               3/4                                       88         88

                                                     ø28

                         Alimentazione                          Volt/Hz                 Vedi dati di targa
                         Supply                                                         See data plate
                         Assorbimento                           Watt                    Vedi dati di targa
                         Rated input                                                    See data plate
                         Peso netto                             kg                      5,5
                         Net weight                             Ibs                     12
                         Peso con imballo                       kg                      6,0
                         weight with package                    Ibs                     13

4.1 CONDIZIONI AMBIENTALI                                              Temperatura ambiente                   Min        10°C
4.1 CONDITIONS OF THE SURROUNDINGS
                                                                       Room temperature                       Max        43°C

0:5561480
                                                                                 7
IT 5 AVVIAMENTO
5
1 Tasto acqua fredda - Indietro (-)*
2 Tasto Ambiente - Avanti (+)*
ENJOY 3 Tasto Gassata - Conferma *
4 Tasto Menù - Seleziona *
5 Messaggio di inizio
(*) In modalità programmazione
1 2 3 4
GESTIONE MACCHINA
SELEZIONE DOSI SETUP DOSI MODALITA’
LARGE / SMALL LARGE / SMALL PROGRAMMAZIONE
AVANZATA
come come come
attivarla? attivarla? attivarla?
Premere questo tasto Premere questo Mantenere
per un istante tasto a lungo e premuto questo
rilasciarlo quan- tasto per alme-
do compare la lettera “D” no 12 secondi e non rila-
che segnala l’avvenuto sciarlo neanche quando
ingresso nel menu “SE- compare la lettera “D”
TUP DOSI”
se compare la freccia in basso a destra Seguire le successive istruzioni Viene mostrato il messaggio di benve-
sul display si stà attivando la dose nuto o dell’ultima funzione impostata,
LARGE questo indica l’avvenuto accesso al
menu di programmazione avanzata
se non compare la freccia in basso a Seguire le istruzioni sul manuale
destra sul display si stà attivando la allegato “PROGRAMMAZIONE
dose SMALL AVANZATA”
SETUP DOSI LARGE / SMALL
Per impostare dosi SMALL Per impostare dosi LARGE
Per ogni tipologia di Premere questo tasto per un istante Premere questo tasto per un istante
acqua; fredda, am- NB: non deve comparire la fraccia in basso NB: deve comparire la fraccia in basso a
biente, gassata, si può a destra. destra
settare la dose LARGE
oppure SMALL.
• Posizionare il contenitore piccolo • Posizionare il contenitore grande dell’acqua
La macchina fornisce dell’acqua “SMALL” sull’uscita dell’acqua “LARGE” sull’uscita dell’acqua fredda.
dosi già impostate: fredda. • Premere il tasto
SMALL= 0,5 litri • Premere il tasto • Premere ancora per fermare l’erogazione
LARGE= 1 litro • Premere ancora per fermare l’eroga- alla quantità desiderata
zione alla quantità desiderata
Procedere come de-
scritto per modificare
le dosi (per applicare la funzione EXTRA CC all’erogazione LAR-
GE GASSATA, occorre impostare una quantità inferiore al
volume del recipiente; la quantità rimanente sarà dispensa-
ta dalla funzione EXTRA CC. (vedi PROGRAMMAZIONE
AVANZATA)
Ripetere la procedura per le uscite acqua AMBIENTE e GASSATA (oppure II° FREDDA) posizionando il conteni-
tore sull’uscita voluta e premendo il tasto corrispondente.
come Il menu SETUP DOSI rimane attivo anche Premere questo tasto per tornare alla
tornare alla videata non compiendo alcuna operazione. videata iniziale
iniziale?
8 0:5561480IT 5 STARTING
5
1 Button Chilled - Back (-)*
2 Button Room temp - Next (+)*
ENJOY 3 Button Sparkling - Confirm *
4 Button Menù - Select *
5 Starting message
(*) In program mode
1 2 3 4
WATER COOLER OPERATION
SELECT LARGE/SMALL ADVANCED PROGRAMMING
LARGE/SMALL DOSES DOSES SETUP MODE
How How How
to access to access to access
Press this button briefly Press and hold Press and hold
this button until this button for
the letter “D” at least 12
appears, meaning that seconds - Do not release
you have accessed the even when the letter “D”
“DOSES SETUP” menu appears
If an arrow appears in the bottom right Follow the instructions below The display will show the welcome
corner, LARGE doses is selected. message or the last setting made,
meaning that you have accessed
If no arrow appears in the bottom right the Advanced Programming menu.
corner, SMALL doses is selected. Follow the instructions in the attached
“ADVANCED PROGRAMMING” guide.
LARGE/SMALL DOSES SETUP
Setting SMALL doses Setting LARGE doses
You can select LARGE Press this button briefly. NOTE: No arrow Press this button briefly
or SMALL doses for should appear in the bottom right corner NOTE: An arrow should appear in the bottom right
any kind of water – corner
cold, room temperatu-
re or carbonated.
• Place the “SMALL” water container under • Place the “LARGE” water container under the
The default dose the cold water nozzle cold water nozzle.
settings are: • Press • Press
SMALL= 0.5 litres • When the required amount of water has • When the required amount of water has been
LARGE= 1 litre been delivered press again to stop delivered press again to stop
To change the doses
proceed as follows
(to apply the EXTRA CC function to LARGE CARBONATED
doses, the quantity set should be less than the container’s
capacity; the remaining quantity will be delivered by the
EXTRA CC function (see ADVANCED PROGRAMMING)
Repeat the procedure for ROOM TEMPERATURE and CARBONATED water (or COLD II), placing the container
under the relative nozzle and pressing the corresponding button
The DOSES SETUP menu will remain open Press this button to go back to the STAR-
How to return if no further action is taken.
to the startup screen TUP SCREEN
0:5561480
9Riservato ad operatori qualificati - Reserved to qualified operators - Für qualifizierte Betrieben - Resérvé aux personnel qualifié - Reservado a técnicos calificados
TIPO DI ALLARME SOLUZIONE ALLARM MESSAGE SOLUTION
- Replace the UV lamp and reset
- Sostituire la lampada UV e azze- the hour counter in “Advanced
rare il conteggio delle ore andan- Displayed when the UV lamp (if in- Programming” (Sect. 7.9).
Segnala l’esaurimento della lampa- do in “Programmazione avanza- stalled) is almost worn out. The lamp alarm does not prevent
da UV, se installata. ta 7.9” . Starts flashing at 90% of lamp’s the distribution of water.
Inizia a lampeggiare al 90% della L’allarme lampada non inibisce preset lifetime.
durata impostata della lampada nessuna erogazione di acqua
- Sostituire il filtro e azzerare il con- - Replace the filter and reset the
teggio dei litri parziali andando subtotal litre counter in “Advan-
in “Programmazione avanzata Displayed when the filter (if instal- ced Programming” (Sect. 7.10).
Segnala l’esaurimento di un even- 7.10” . led) is almost worn out. The filter alarm does not prevent
tuale filtro, se installato. Starts flashing 90% of filter’s preset the distribution of water
Inizia a lampeggiare al 90% della L’allarme filtro non inibisce nessu- total capacity
capacità totale impostata del filtro na erogazione di acqua
5
IT 6 MANUTENZIONE ORDINARIA
Pulizia esterna - Pulite la parte esterna con un panno umido, non usate solventi o de-
tersivi abrasivi.
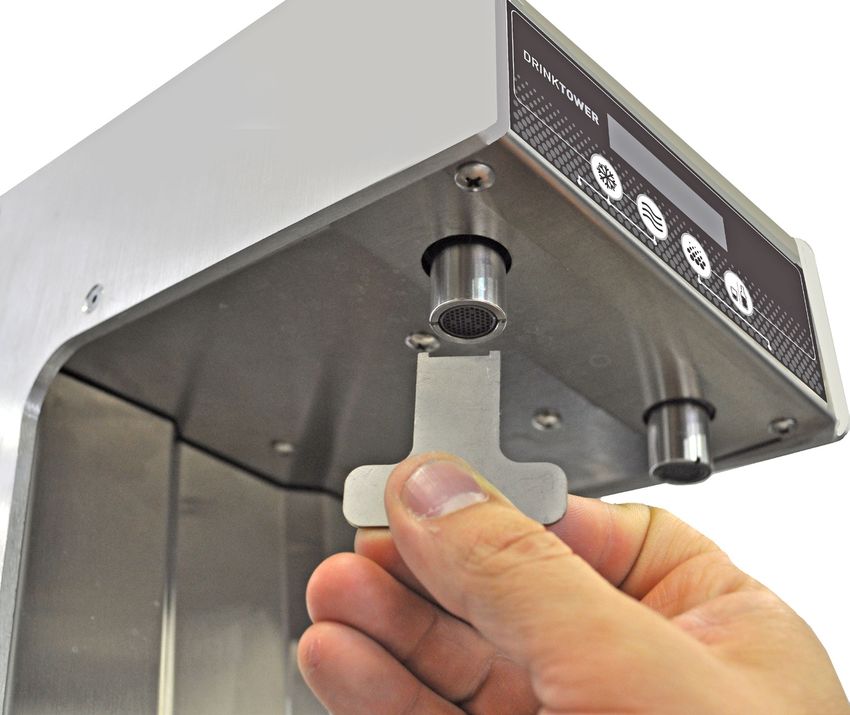
Pulizia beccucci erogatori - Rimuovete il beccuccio inox usando l’apposita chiave ed eliminate il calcare In funzione della durezza dell’ac-
tramite una soluzione disincrostante per uso alimentare qua di rete
EN 7 ROUTINE MAINTENANCE
Cleaning the outside - Clean the external part with a damp cloth, do not use solvents or abrasive detergents
of the appliance
Cleaning the water dispensing - Remove the steel nozzle nozzle using the appropriate spanner and Depending on the hardness of the
spouts eliminate all the limestone with a food descaling solution (fig.21.1 - 21.2). water from the mains
10 0:5561480MANUALE PARTE II
Riservato ad operatori qualificati
HANDBOOK SECTION II
Reserved to qualified operators
HANDBUCH – 2. TEIL
Für qualifizierte Betrieben
MANUEL PARTIE II
Resérvé aux personnel qualifié
MANUAL - PARTE II
Reservado a técnicos calificados
0:5561480
11Riservato ad operatori qualificati - Reserved to qualified operators - Für qualifizierte Betrieben - Resérvé aux personnel qualifié - Reservado a técnicos calificados
6
3
2
1
4
28
IT 7 INSTALLAZIONE
5.1 POSA DELL’APPARECCHIO
Per l’installazione del refrigeratore fate rferimento allo spe-
cifico manuale di istruzioni
Ponete l’apparecchio nel punto di installazione, lontano da fonti di calore e 1 Forate il piano di appoggio ø 28mm e fissate il dispositivo avvitando la
protetto dai raggi diretti del sole. ghiera filettata.
2 Posizionate la guarnizione
L’apparecchio non è idoneo per l’uso all’esterno e inoltre è sconsigliata la 3 Fissate il dispositivo avvitando la ghiera filettata
sua installazione in ambienti molto umidi. 4 Controllate il corretto orientamento del dispositivo e quindi serrate la
ghiera.
EN 7 INSTALLATION
5.1 POSITIONING THE APPLIANCE
For the cooler installation see its own instruction manual
Position the appliance in the point of installation, away from sources of 1 Drill the countertop , the hole must be 28 mm ( 1,10 inchs).
heat and direct sunlight. Fix the appliance with the threaded locking ring.
The appliance is not suitable for outdoor use and it is also not recom- 2 Check the correct appliance position and tighten the nut.
mended to install it in very damp rooms. 3 Fix the appliance with the threaded locking ring
4 Check the correct appliance position and tighten the nut.
12 0:5561480Riservato ad operatori qualificati - Reserved to qualified operators - Für qualifizierte Betrieben - Resérvé aux personnel qualifié - Reservado a técnicos calificados
7
4
3
1
2
OUT AMB
OUT WATER OUT AMBIENT
OUT SODA OUT WATER
OUT SODA
IT
5.2 COLLEGAMENTO IDRICO
• Collegate i tubi dell’acqua 1 al refrigeratore 2 ponendo attenzione alle
etichette che troverete apposte sui tubi stessi con le seguenti diciture:
- Per OUT AMB (acqua a temperatura ambiente) e OUT WATER (acqua
fredda), usare i raccordi semplici di giunzione 3.
Se necessario usare le riduzioni da 8-6mm.
- Per OUT SODA (acqua gassata) connettere il riduttore di flusso 4 e la
riduzione 8-6 se necessario.
• Esercitate la dovuta pressione per innestare i tubi.
• Controllare che non ci sia alcuna perdita di acqua.
EN
5.2 TUBES AND HYDRAULIC CONNECTIONS
• Connect water pipes 1 to the cooler 2, taking care to labels on the tubes,
following the markings:
- For OUT AMBIENT (Water at Room temperature) and OUT WATER (Cold
Water) use the simple straight connectors 3. Use the reduction 8-6mm if
necessary.
- For OUT SODA connect the flow regulator 4 and the reduction 8-6mm
if necessary.
• Properly push fittings and tubes for a good connection. Check if there
isn’t any water leak.
0:5561480
13Riservato ad operatori qualificati - Reserved to qualified operators - Für qualifizierte Betrieben - Resérvé aux personnel qualifié - Reservado a técnicos calificados
8
I
0
8.1
IT
5.3 COLLEGAMENTO ELETTRICO
Il dispositivo è fornito con cavo elettrico spellato. Dotarsi di spi- Attenzione!
na elettrica da montare sul cavo seguendo le norme di sicurezza Se il cavo di alimentazione è danneggiato, esso deve essere
e di montaggio prescritte. sostituito dal costruttore o dal suo servizio assistenza tec-
nica o comunque da una persona con qualifica similare, in
Il collegamento alla rete elettrica avviene collegando la spina ad una presa modo da prevenire ogni rischio.
di rete.
La presa di corrente predisposta deve essere munita di efficiente presa L’interruttore generale ON/OFF permette una facile discon-
di terra e deve essere dimensionata al carico dell’apparecchio (vedi nessione dell’apparecchio dalla rete elettrica.
caratteristiche tecniche).
La presa di corrente deve essere posta in posizione acces-
sibile.
Verificate che la tensione di rete corrisponda con quanto specificato nella
targa dati. 5.4 AVVIO E REGOLAZIONE FLUSSO ACQUA GASSATA
Assicuratevi che a monte della presa vi sia un interruttore omnipolare con In funzione della pompa di cui è dotato il refrigeratore, per ottimizzare il
distanza minima dei contatti di 3 mm protetto da fusibili di amperaggio livello di gasatura, impostare il flusso dell’acqua gassata agendo sulla
adeguato all’assorbimento dell’apparecchio stesso (vedi caratteristiche vite del regolatore (Fig. 8.1) in modo da ottenere:
tecniche e dati di targa).
- 1 litro di gassata in 20 secondi per refrigeratori professionali tipo NIA-
Collegate la macchina ad una rete di alimentazione elettrica protetta da GARA.
un interruttore differenziale con una sensibilità non superiore a 30 mA. - 1 litro di gassata in 35-40 secondi per altri refrigeratori tipo J-class,
H2OMY o NIVES.
EN
5.3 ELECTRICITY CONNECTION
The plug is not included with the appliance. Provide an electric Warning!
plug and install in respect to safety and assembling rules If the power cable is damaged, it must be replaced by the
manufacturer, by an authorized technical assistance provi-
Connection to the mains electricity supply is carried out by connecting the plug der or else by an individual with similar qualifications, in
to a mains socket. order to prevent any risks.
The supply socket must be equipped with an efficient earth plate and it must The main ON/OFF switch, allows the easy disconnection of
be sized for the load of the appliance (see technical characteristics). the appliance from the mains electricity supply.
Make sure that the mains voltage corresponds with what is specified on the data The electrical power outlet must be in an accessible location.
plate.
Make sure that there is an omnipolar switch above the socket with a mi- 5.4 STARTING AND SETTING OF SPARKLING WATER FLOW
nimum contact break of 3 mm protected by fuses of suitable amperage Depending from the pump installed inside the cooler, set the sparkling
for the absorption of the appliance itself (see technical characteristics water on the flow regulator (fig. 8.1) , to obtain:
and data plate).
- 1 liter of sparkling water in 20 seconds, for professional NIAGARA
Connect the machine to a mains electrical network protected by a circuit coolers.
breaker with a sensitivity equal to or less than 30 mA. - 1 liter of sparkling water in 35-40 seconds for other models: J-class,
H2OMY and NIVES.
14 0:5561480Riservato ad operatori qualificati - Reserved to qualified operators - Für qualifizierte Betrieben - Resérvé aux personnel qualifié - Reservado a técnicos calificados
IT 7 PROGRAMMAZIONE AVANZATA
Questa sezione è riservata esclusivamente a operatori qua-
lificati. Attenzione!
E’ possibile disabilitare l’accesso al menu di programma- Se la macchina non è un modello WG, per dare conferma,
zione avanzata. Per questa operazione contattare il servizio invece di premere il tasto occorre premere il tasto
di assistenza tecnica. centrale.
Come si arriva al menu di Come tornare
programmazione avanzata alla videata iniziale
Mantenere premuto il tasto per al- Da qualsiasi fase di programmazione premere questo
meno 12 sec. tasto fino alla ricomparsa della videata iniziale, oppure
12 sec
non premere alcun tasto per almeno 30 sec.
La prima funzione del menu di programmazione avanzata è la possibilità di
7.1 ENJOY cambiare il messaggio di benvenuto sulla riga inferiore (15 caratteri max). Di
default è preimpostata in fabbrica la scritta “ENJOY”
Volete cambiare il messag- SI
gio di benvenuto? Compare il cursore lampeggiante
NO
Tasti 1 e 2 per selezionare i caratteri
Tasto per far scorrere il cursore sul carattere successivo
Per cancellare un carattere non voluto far scorrere il cursore sul carattere non
voluto (tasto 3) e scrivere il carattere desiderato; il carattere vuoto si trova dopo la
Z minuscola)
Premere questo tasto per pas-
sare alla videata successiva Una volta scelta la frase premere questo tasto a lungo per confermare,
fino alla scomparsa del cursore lampeggiante
?
La macchina è in grado di gestire la comunicazione con l’utente in tre lingue:
7.2 LINGUA ITALIANO (0) - INGLESE (1) - TEDESCO (2)
Di default è preimpostata la lingua Italiana.
Volete cambiare SI
la lingua corrente? Tasti 1-2 per scegliere la lingua: Italiano (0) - Inglese (1) - Tedesco (2)
NO Premere questo tasto per confermare
Premere questo tasto per pas-
sare alla videata successiva
0:5561480
15Riservato ad operatori qualificati - Reserved to qualified operators - Für qualifizierte Betrieben - Resérvé aux personnel qualifié - Reservado a técnicos calificados
IT 7 PROGRAMMAZIONE AVANZATA
Offre la possibilità di avere erogazioni con dosi LARGE/SMALL preimpostate
?
(valore 0) oppure a impulso, ovvero con pressione sui tasti di erogazione (valore
7.3 TIPO DI EROGAZIONE 1). Di default è preimpostato il valore (0).
Se si passa a erogazioni a impulso (valore 1) le funzioni di dosaggio SMALL e
LARGE vengono interdette ma le dosi rimangono memorizzate.
SI Tasti 1-2 per scegliere il tipo di erogazione:
Volete cambiare (0) Per erogazioni secondo dosi impostate
l’impostazione? (1) Per erogazioni mediante pressione dei tasti
NO
Premere questo tasto per confermare
Premere questo tasto per pas-
sare alla videata successiva
E’ una funzione di rabbocco da utilizzare solo per la dose GASSATA LARGE
per evitare la tracimazione dovuta alle bollicine. Al termine dell’erogazione pro-
7.4 EXTRA CC
? grammata avviene una pausa di un secondo e poi viene completata la dose con
la quantità (ml) programmata in questo passo del menù.
Di default è preimpostato il valore 0 ml.
Volete cambiare SI
l’impostazione? Tasti 1-2 per scegliere il tvalore di ESTRA CC (variabile da 0 a 300 ml)
NO
Premere questo tasto per confermare
Premere questo tasto per pas-
sare alla videata successiva
E’ una funzione che permette di fare un lavaggio del circuito idraulico. Questa
funzione è applicabile solo ad apparecchi dotati di un efficiente scarico dal la-
7.5 ORE LAVAGGIO
? vello. Prima di impostare questa funzione si raccomanda di far defluire almeno
18 litri in continuo per verificare l’efficienza dello scarico.
Il valore è settabile da 1 a 240 ore ed è l’intervallo di tempo fra un lavaggio e il
successivo.
Per effettuare il lavaggio si abilita l’apertura delle tre elettrovalvole di erogazione
per due minuti ciascuna, in sequenza. Uno specifico messaggio viene mostrato
sul display.
Di default il lavaggio non è preimpostato.
Volete cambiare SI
l’impostazione? Tasti 1-2 per scegliere l’intervallo in ore tra un lavaggio e il successivo
NO
Premere questo tasto per confermare
Premere questo tasto per pas-
sare alla videata successiva
16 0:5561480Riservato ad operatori qualificati - Reserved to qualified operators - Für qualifizierte Betrieben - Resérvé aux personnel qualifié - Reservado a técnicos calificados
IT 7 PROGRAMMAZIONE AVANZATA
E’ una segnalazione di esaurimento della lampada UV nella zona erogazione
7.6 ALLARME LAMPADA UV ? oppure della lampada UV del filtro in ingresso (se installato).
Di default è preimpostato il valore (0) ovvero non viene generato alcun mes-
saggio di allarme.
Per attivare l’allarme “LAMPADA UV” il timer può essere settato da 0 a 2000
giorni (tenere conto che la lampada UV in erogazione (optional) ha media-
mente una durata di 250 giorni (6000 ore). Un messaggio di avvertimento di
sostituire la lampada compare già al 90% del tempo impostato di vita della
lampada stessa.
Volete cambiare SI Tasti 1-2 per scegliere l’intervallo in ore tra un cambio lampada e il
l’impostazione? successivo.
NO
Premere questo tasto per confermare
Attenzione! per completare l’operazione occorre azzerare il conta-
tore come descritto nella videata 7.9
Premere questo tasto per pas-
sare alla videata successiva
E’ una segnalazione di esaurimento di un filtro (se installato)
Di default è preimpostato il valore 0 litri, ovvero non viene generato alcun mes-
?
saggio di allarme.
7.7 ALLARME FILTRO Per attivare l’allarme “FILTRO” il contatore può essere settato da 0 a 20000
litri. Un messaggio di avvertimento di sostituire il filtro compare già al 90% della
capacità di filtrazione impostata.
Volete cambiare SI Tasti 1-2 per scegliere la quantità di acqua erogata, espressa il litri, tra
l’impostazione? un cambio filtro e il successivo
NO
Premere questo tasto per confermare
Attenzione! per completare l’operazione occorre azzerare il conta-
tore come descritto nella videata 7.9
Premere questo tasto per pas-
sare alla videata successiva
?
E’ il contatore dei giorni di funzionamento della lampada UV, utile per sapere
quante ore mancano al messaggio di allarme per la sostituzione.
7.8 GIORNI LAMPADA ON Questo contatore è azzerabile.
SI
Volete azzerare
il contatore? Mantenere premuto il tasto a lungo
NO
Premere questo tasto per pas-
sare alla videata successiva
0:5561480
17Riservato ad operatori qualificati - Reserved to qualified operators - Für qualifizierte Betrieben - Resérvé aux personnel qualifié - Reservado a técnicos calificados
IT 7 PROGRAMMAZIONE AVANZATA
Si arriva a una serie di videate che segnalano quanta acqua è stata consumata per ogni tipologia e per ogni dose; i valori non sono azzerabili.
Viene anche contata l’acqua erogata a impulsi
Premere questo tasto per pas-
sare alla videata successiva
?
E’ il contatore in litri della somma delle dosi erogate da tutte le uscite.
LITRI PARZIALI Viene denominato contatore parziale perché è azzerabile.
7.9
Volete azzerare SI Mantenere premuto il tasto a lungo
il contatore?
NO
Premere questo tasto per pas-
sare alla videata successiva
7.10 LITRI TOTALI
? E’ il contatore dei litri totali erogati dalla macchina dalla data della
sua fabbricazione; il contatore non è azzerabile
Premere questo tasto per pas- Si ritorna al messaggio di benvenuto, vedi 7.1
sare alla videata successiva
18 0:5561480Riservato ad operatori qualificati - Reserved to qualified operators - Für qualifizierte Betrieben - Resérvé aux personnel qualifié - Reservado a técnicos calificados
IT 7 ADVANCED PROGRAMMING
This section is reserved for qualified operators only.
Access to the Advanced Programming menu can be disa- Attention!
bled. Contact our Customer Service for details. if the water-cooler is not a WG model, to confirm press the
central button and not the button .
How to open the Advanced Program- How to return
ming menu to the startup screen
Press and hold the button for at le- From any part of Advanced Programming, press this
ast 12 sec. button until the startup screen appears, or do not
press any button for at least 30 sec.
The first function in the Advanced Programming menu lets you change the
7.1 ENJOY welcome message that appears on the bottom line (max. 15 characters). The
default message is “ENJOY”
How to change the welco- YES
me message A blinking cursor will appear
NO
Button 1 -2 for selecting characters
Button for moving the cursor to the next characters characters
To cancel a character place the cursor on the next character (button 3) and enter
the new character; the space character is after the lowercase Z.
Press this button to go to the Once you have entered the message, press and hold this button to
next screen confirm (until the blinking cursor disappears)
?
The water cooler can communicate with users in three languages: ITALIAN (0)
7.2 LANGUAGES - ENGLISH (1) - GERMAN (2) The default language is Italian.
How to change YES Buttons 1-2 for choosing the language: Italian (0) - English (1) - Ger-
the language man (2)
NO
Press this button to confirm.
Press this button to go to the
next screen
0:5561480
19Riservato ad operatori qualificati - Reserved to qualified operators - Für qualifizierte Betrieben - Resérvé aux personnel qualifié - Reservado a técnicos calificados
IT 7 ADVANCED PROGRAMMING
Lets you choose water dispensing mode by preset LARGE/SMALL doses (value
?
0) or by pulse dispensing or by pressing the dispensing buttons (value 1). The
7.3 DISPENSING TYPE factory-set value is (0).
If pulse dispensing is selected (value 1), SMALL and LARGE dose settings are
disabled (although the dose settings remain stored in the system’s memory).
YES Buttons 1-2 for choosing the dispensing mode:
How to change (0) Dispensing by preset doses
the setting (1) Dispensing by pressing the buttons
NO
Press this button to confirm.
Press this button to go to the
next screen
This is a topping-up function designed to be used only for CARBONATED LAR-
GE doses to prevent water from overflowing because of the bubbles. Dispen-
7.4 EXTRA CC
? sing is suspended for a second near the end, and then resumed to complete the
preset dose with the amount of water (ml) entered here.
The factory-set value is 0 ml.
How to change YES
Buttons 1-2 for choosing the value for ESTRA CC (from 0 to 300 ml
the setting
NO
Press this button to confirm.
Press this button to go to the
next screen
This function instructs the water cooler on when to wash the hydraulic circuit.
It should be used only on coolers that are provided with an efficient drainage
7.5 WASHING HOURS
? system connected to a sink. Test the drain by discharging at least 18 litres of
water before you use this function.
The setting represents the number of hours between two successive washes,
and accepts values from 1 to 240 hours.
Washing requires enabling the three dispensing solenoid valves to open for two
minutes each, one after the other. A specific message will appear on the display.
The water cooler is delivered with washing not enabled.
How to change YES
the setting Buttons 1-2 for setting the interval (in hours) between washes
NO
Press this button to confirm.
Press this button to go to the
next screen
20 0:5561480Riservato ad operatori qualificati - Reserved to qualified operators - Für qualifizierte Betrieben - Resérvé aux personnel qualifié - Reservado a técnicos calificados
IT 7 ADVANCED PROGRAMMING
This is a warning that appears when the UV lamp in the dispensing area (or the
7.6 UV LAMP. ALARM ? UV lamp on the inlet filter, if installed) is almost worn out.
The factory-set value is (0), i.e., no alarm message is displayed.
To enable the “UV LAMP” alarm enter a value on the timer from 0 to 2000
days. Consider that the UV lamp in the dispensing area (optional) has an ave-
rage lifetime of 250 days (6000 hours). A warning message informing that the
lamp will soon need replacement appears when 90% of its preset lifetime has
lapsed.
How to change YES Buttons 1-2 for setting the interval (in hours) between lamp replace-
the setting ments.
NO
Press this button to confirm.
Warning! To complete the operation you must reset the counter as
described in screen 7.11
Press this button to go to the
next screen
This is a warning that appears when the filter (if installed) is almost worn out
The factory-set value is 0 litres, i.e., no alarm message is displayed.
?
To enable the “FILTER” alarm set the counter to a value from 0 to 20000 litres.
7.7 FILTER ALARM A warning message informing that the filter will soon need replacement appears
when 90% of its preset filtering capacity has lapsed.
How to change YES Buttons 1-2 for setting the quantity of supplied water (litres) between
the setting filter replacement.
NO
Press this button to confirm.
Warning! To complete the operation you must reset the subtotal litre
counter as described in screen 7.13
Press this button to go to the
next screen
?
This is the counter for the days of operation of the UV lamp, and can be used to
determine how many hours are left before the replacement warning is displayed.
7.8 DAYS LAMP ON This counter can be reset.
YES
How to reset Press and hold the button
the counter
NO
Press this button to go to the
next screen
0:5561480
21Riservato ad operatori qualificati - Reserved to qualified operators - Für qualifizierte Betrieben - Resérvé aux personnel qualifié - Reservado a técnicos calificados
IT 7 ADVANCED PROGRAMMING
A series of screens appears showing how much water has been consumed for each type and dose; these values cannot be reset.
Pulse-dispensed water is also counted
Press this button to go to the
next screen
?
This counter shows the number of litres dispensed in doses from all the noz-
7.9 PARTIAL LITERS zles.
It is called subtotal counter because it can be reset to zero.
How to reset YES Press and hold the button
the counter
NO
Press this button to go to the
next screen
7.10
TOTAL LITERS
? This counter shows the total number of litres dispensed by the water cooler
from the date of construction; the counter cannot be reset
Press this button to go to the The display returns to the welcome message (see Sect. 7.1)
next screen
22 0:55614800:5561480
23Servizio di assistenza - Qualified operator service - Kundendiest - Service d’assistance - Servicio de asistencia
Le distributeur / installateur doit apposer son
Il distributore / Installatore deve apporre il cachet pour fournir le service d’assistance
timbro per fornire il servizio di assistenza
The dealer / Installator has to mark this El distribuidor / Instalador debe poner
aquare for the service su sello para proporcionar el servicio de
asistencia
Der Händler / Installateur muss dieses Feld
zum Kundendienst abstempelnPuoi anche leggere