VM024 - Phonocar Web Catalogue
←
→
Trascrizione del contenuto della pagina
Se il tuo browser non visualizza correttamente la pagina, ti preghiamo di leggere il contenuto della pagina quaggiù
con
          ANTENNA
             DAB+

                                                 VM024
                      AUTORADIO DAB+ con LETTORE CD, USB, SD CARD,
                                FRONTALINO ESTRAIBILE E BLUETOOTH
                        DAB+ CAR RADIO with CD, USB, SD CARD PLAYER,
                                 DETACHABLE PANEL AND BLUETOOTH
                     AUTORADIO DAB+ avec LECTEUR CD, USB, CARTE SD,
                                  FAÇADE DETACHABLE et BLUETOOTH
                       DAB+ AUTORADIO mit CD, USB, SD-KARTE PLAYER,
                           ABNEHMBARES BEDIENTEIL und BLUETOOTH
                           AUTORRADIO DAB+ con LECTOR CD, USB, SD
                                     y PANEL FRONTAL DESMONTABLE

                                            MANUALE ISTRUZIONI   IT

                                          INSTRUCTIONS MANUAL    EN

                                 NOTICE DE MONTAGE ET D’EMPLOI   FR

                                       GEBRAUCHSANWEISUNGEN      DE

                                      MANUAL DE INSTRUCCIONES    ES
06/2020
Precauzioni IT
Per l’installazione rivolgersi al personale tecnico qualificato. • Usare solo con impianto elettrico a 24V DC con
negativo a massa. • Scollegare il terminale negativo della batteria del veicolo quando si effettuano le connessioni
dell’apparecchio. • Quando si sostituisce il fusibile, utilizzarne uno con lo stesso valore di amperaggio. • Non aprire
l’unità e non tentare di ripararla, consultare il proprio rivenditore o personale tecnico qualificato. • Assicurarsi
che oggetti estranei non entrino all’interno dell’apparecchio, potrebbero causare malfunzionamenti, generare
cortocircuiti elettrici o un’esposizione rischiosa ai raggi laser se presenti. • Accendere l’apparecchio solo quando la
temperatura dell’abitacolo è nella norma. • Mantenere un volume di ascolto che permetta di udire i suoni provenienti
dall’esterno del veicolo (clacson, sirene, etc…) • Non collegare alcun cavo in luoghi dove potrebbe ostacolare il
funzionamento dei dispositivi di sicurezza dell’auto.
Connessioni
USCITE
PREMPLIFICATE
ANTENNA ANTENNA MICROFONO
DAB FM-AM
4 - ALTOPARLANTI
VERDE/NERO
POSTERIORE
SINISTRO VERDE
BIANCO/NERO
ANTERIORE
SINISTRO BIANCO
GRIGIO/NERO
ANTERIORE
DESTRO GRIGIO
VIOLA/NERO
POSTERIORE
DESTRO VIOLA
NEGATIVO (NERO)
+12V SOTTO CHIAVE(ROSSO)
AMPLI ON/ ANTENNA (BLU)
+12V PERMANENTE (GIALLO)
2Funzioni IT
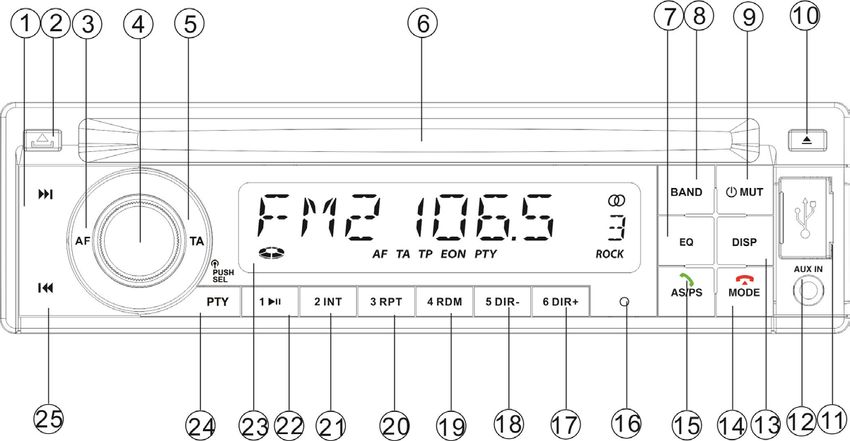
1. Traccia/Stazione avanti 15. Rispondi/ AS-PS
2. Sgancio frontalino 16. Microfono
3. AF - Frequenza Alternativa RDS 17. Memoria 6 - Directory +
4. Volume/Selezione 18. Memoria 5 - Directory -
5. TA - Annuncio traffico 19. Memoria 4 - Casuale
6. Feritoia Disco 20. Memoria 3 - Ripetizione
7. Equalizzatore 21. Memoria 2 - Intro brani
8. Banda radio 22. Memoria 1 - Play/Pausa
9. Accensione/Spegnimento/Mute 23. LCD
10. Espulsione disco 24. PTY
11. Porta USB 25. Traccia/Stazione indietro
12. Ingresso AUX 26. Reset
13. Visualizzazione Display 27. Slot SD CARD
14. Chiude conversazione/MODE
3Regolazioni IT
AUDIO
Premere brevemente la MANOPOLA DEL VOLUME (4) per accedere al menù dei settaggi audio e ripremere breve-
mente Il pomello (4) per scorrere la lista dei settaggi audio disponibili:
BASS-TRE (regolazione toni alti/bassi)
BAL L-R (bilanciamento)
FAD F-R (fader)
LOUD ON/OFF (loudness)
EQ (EQ OFF, ROCK, FLAT, CLASS, POP)
Per regolare ruotare il pomello fino al valore desiderato.
SETTAGGI GENERICI
Premere per 3 secondi il pomello (4) per accedere al menù dei settaggi generici e ripremere brevemente il pomello
(4) per scorrere la lista dei settaggi generici disponibili:
COLOUR (auto/blu/verde/rosso/azzurro/giallo/viola/bianco)
BEEP (on/off)
CLOCK (24/12)
P VOL (volume base preimpostato)
LOC (on/off - local/distance)
STEREO/MONO.
Per regolare l’impostazione desiderata ruotare la MANOPOLA DEL VOLUME (4) fino al valore desiderato.
CLOCK 24/12
Imposta l’orario in versione 24 ore o 12 ore
OROLOGIO
Premere il tasto DISP/0 (13) più volte fino alla visualizzazione dell’orario sul display.
Premere il tasto DISP/0 (10) per 3 secondi, il valore dell’orario inizierà a lampeggiare. Impostare l’ora desiderata
ruotando il pomello MANOPOLA DEL VOLUME (4) del volume, successi-vamente premere brevemente il pomello
MANOPOLA DEL VOLUME (4) e ruotare per regolare i minuti, ripremere per confermare. Quando i valori smetteran-
no di lampeggiare il settaggio sarà completato.
P.VOL
Questa funzione imposta il livello del volume all’accensione.
DX/LOC (Distanti/Locali):
LOC ON: Riduce la sensibilità della ricezione radio nella ricerca delle stazioni, in questo modo vengono trovate solo
le stazioni con un buon segnale.
LOC OFF: La sensibilità della ricezione radio è al massimo e in questo modo verranno trovate tutte le stazioni, sia
con segnale buono che scarso.
4Funzioni Radio e DAB+ IT
SELEZIONARE SORGENTE RADIO
Premere brevemente il tasto “BAND” (8) per selezionare: FM1 – FM2 – FM3 – MW1 – MW2.
Premere i tasti (1)-(25) brevemente per avviare la ricerca automatica della stazione precedente ( ) (1)
o successiva ( ) (25).
Premere i tasti (1)-(25) per due secondi per avviare la ricerca manuale stazione precedente ( ) (1)
o successiva ( ) (25).
Premere rispettivamente per 3 secondi i tasti da 1 a 6 per memorizzare la stazione su una delle 6 memorie disponibili.
Selezionare sorgente DAB.
Alla prima installazione, la scannerizzazione dei canali DAB disponibili partirà in automatico.
Premere il tasto AS/PS (15) per iniziare una scannerizzazi-one automatica dei canali quando lo si desidera.
Premere brevemente il tasto “ BAND” (8) per selezionare: DAB1, DAB2, DAB3.
Premere i tasti brevemente per selezionare la stazione precedente ( ) o successiva ( ).
Premere rispettivamente per 3 secondi i tasti da 1 a 6 per memorizzare la stazione su una delle 6 memorie disponibili.
Funzioni USB - SD Card
All’inserimento di una USB o SD CARD partirà in automatico la riproduzione delle tracce audio presenti sulla perife-
rica inserita.
Premere i tasti brevemente per passare alla traccia precedente / successiva. Tenere premuti i tasti .
per le funzioni REWIND e FOWARD.
Premere brevemente il tasto 1/ (22) per mettere in pausa una traccia, e ripremerlo per farla ripartire.
Premere brevemente il tasto 2/INT (21) per attivare / disatti-vare l’introduzione traccia.
Premere brevemente il tasto 3/RPT (20) per attivare / disatti-vare la ripetizione automatica traccia.
Premere brevemente il tasto 4/RDM (19) per attivare / disatti-vare la funzione della riproduzione casuale.
Tenere premuti i tasti 5/DIR- – 6/DIR+ (18-17) per passare alla cartella precedente / successiva.
Funzioni AUX-IN
Il VM024 permette il collegamento nell’ingresso (12) di sorgenti audio esterne tramite un cavo jack da 3,5 mm. Il
controllo delle tracce audio si effettua dalla sorgente esterna.
Bluetooth telefono
Attivare il Bluetooth sul telefono, selezionare il dispositivo denominato CARKIT inserire la password 0000 e confer-
mare.
Per rispondere ad una telefonata premere il tasto (15) e per chiudere la chiamata premere il tasto (14)
Tenere premuto il tasto (14) per:
• Visualizzare le chiamate ricevute, perse, rifiutate. *
• Impostare la connessione automatica o manuale.*
• Impostare AUDIO BT.
*Queste funzioni non sono compatibili con tutti i modelli di smartphone.
Bluetooth audio
Per l’ascolto di file audio verificare se il telefono utilizzato sia compatibile con il protocollo A2DP. Selezionare la
sorgente
BT MUSIC.
Per iniziare la riproduzione della lista dei file in memoria sul telefono premere il tasto 1/ (22).
Premere i tasti (1)-(25)brevemente per passare alla traccia precedente/successiva.
Tenere premuti i tasti (1)-(25)per le funzioni REWIND e FORWARD.
Premere brevemente il tasto 1/ (22) per mettere in pausa una traccia, e ripremerlo per farla ripartire.
5Caratteristiche tecniche IT
Frontalino estraibile
Sintonizzatore Radio FM - AM - RDS PLL EON
Stazioni memorizzabili 18 FM 12 AM
Slot SD Card Max 16 GB
Porta USB anteriore Max 32 GB
Bluetooth musica A2DP
Bluetooth VIVAVOCE
Memorizzazione dell’ultima posizione
Memorizzazione volume
Controllo funzioni Encode
Visualizza Titolo brano / Artista / Album sul display ID3 TAG
DSP Effetti sonori Classic - Rock - Pop - Flat
Protezione elettronica contro le vibrazioni
Ricevitore IR
Uscita stereo preamplificata 1
Uscite amplificate 4 x 40 W
Ingresso audio ausiliario frontale 1
Connessione iPOD via AUX-IN
Alimentazione 24V
Dimensioni 180 x 106 x 50 mm
6Warnings EN
Installation to be carried out by trained technical personnel • Make sure you have 24V DC, with negative-pole to
mass • First disconnect negative-pole of the car-battery, then effect car-radio connections • When replacing fuse,
always use fuse with same Ampere-value • Never open the unit, nor try to repair yourself. Always ask your Retailer
or authorized technical staff • Make sure that no foreign objects fall into the unit, they would cause malfunctions,
short-circuits or exposure to dangerous laser-rays • When switching-on, make sure that temperate inside passenger-
compartment is at a normal level • Choose a listening-Volume which will allow you to hear external noises (car-horn,
sirens etc.) • When placing the cables, keep away from all car security-devices.
Connections
PRE-AMPLIFIED
OUTPUT
DAB FM-AM MICROPHONE
ANTENNA ANTENNA
4 - LOUDSPEAKERS
GREEN-BLACK
REAR LEFT GREEN
WHITE/BLACK
FRONT LEFT WHITE
GREY/BLACK
FRONT RIGHT GREY
PURPLE/BLACK
REAR RIGHT PURPLE
NEGATIVE (BLACK)
+12V IGNITION KEY (RED)
AMPLI ON/ ANTENNA (BLUE)
+12V PERMANENT (YELLOW)
7Functions EN
1. Track/Station forward 15. Answer / AS-PS
2. Front panel release 16. Microphone
3. Alternative Frequency 17. Memory 6 - Directory +
4. Volume/Selection 18. Memory 5 - Directory -
5. TA- Traffic Ad 19. Memory 4 - Random
6. Disk slot 20. Memory 3 - Repeat
7. Equalizer 21. Memory 2 - Tracks intro
8. Radio band 22. Memory 1 - Play/Pause
9. Accensione/Spegnimento/Mute 23. LCD
10. Disk release 24. PTY
11. USB port 25. Track/station backward
12. AUX Input 26. Reset
13. Display visualization 27. SD CARD slot
14. End conversation/MODE
8Settings EN
AUDIO
Briefly press the VOLUME KNOB (4) to enter the menu of audio settings and briefly press again.
the knob (4) to scroll through the list of available audio settings:
BASS-TRE (high/low tone adjustment)
BAL L-R (balancing)
FAD F-R (fader)
LOUD ON/OFF (loudness)
EQ (EQ OFF, ROCK, FLAT, CLASS, POP)
To adjust, turn the knob to the requested value.
GENERAL SETTINGS
Press the knob (4) for 3 seconds to enter the menu of generic settings and briefly press the knob (4) again to
scroll through the list of available generic settings:
COLOUR (auto/blue/green/red/light blue/yellow/violet/white)
BEEP (on/off)
CLOCK (24/12)
P VOL (default base volume)
LOC (on/off - local/distance)
STEREO/MONO.
To adjust the wished setting, turn the VOLUME KNOB (4) to the requested value.
CLOCK 24/12
Set the time in 24-h or 12-h version
CLOCK
Press the DISP/0 (13) key several times until the time is shown on the display.
Press the DISP/0 (10 key for 3 seconds, the time will begin to flash. Set the desired time by rotating the VOLUME
KNOB (4), then briefly press the volume knob (6) and turn it to adjust the minutes, then press again to confirm.
When the time stop flashing, the setting is complete.
P.VOL
This function sets the volume level at the power on.
DX/LOC (Distant/local)
LOC ON: Reduces the sensitivity of radio reception when searching for stations, so only stations with a good signal
are found.
LOC OFF: The sensitivity of the radio reception is at its highest level and all the stations will be found, both with
good and poor signal.
9Radio e DAB+ functions EN
SELECT RADIO SOURCE
Briefly press the “BAND” key (8) to select: FM1 - FM2 - FM3 - MW1 - MW2.
Press the (1)-(25) keys briefly to start the automatic search for the previous station ( ) (1) or for the next
one ( ) (25). Press the (1)-(25) key for two seconds to start the previous station manual search ( ) (1) or
the next one ( ) (25).
Press keys 1 to 6 for 3 seconds respectively for storing the station on one of the 6 available memories.
Select DAB source.
The first time you install the device,the scanning of the available DAB channels will start automatically.
Press the AS/PS (15) key to start an automatic channel scan whenever you want.
Briefly press the “ BAND” (8) key to select: DAB1, DAB2, DAB3.
Briefly press the keys to select the previous ( ) or next ( ) station
Press keys 1 to 6 for 3 seconds respectively for storing the station in one of the 6 memories available.
USB - SD Card functions
When a USB or SD CARD is introduced, the audio tracks playback of the device in, will start automatically.
Press the keys ( ) briefly to switch to the previous / next track . Press and hold the keys ( ) for the
REWIND and FOWARD functions.
Briefly press the 1/ (22) key to pause a track, and press it again to restart it-
Briefly press the 2/INT (21) key to enable/disable track input.
Briefly press the 3/RPT (20) key to enable/disable the automatic track replaying.
Briefly press the /RDM (19) key to enable/disable the random playback function.
Press and hold the 5/DIR- – 6/DIR+ (18-17) keys to switch between to the previous / next folder.
AUX-IN functions
The VM024 allows external audio sources to be connected to the input (12) via a 3.5 mm jack cable.
Audio tracks are managed from the external source.
Telephone Bluetooth
Enable the Bluetooth on your phone, select the device named CARKIT enter the password 0000 and confirm.
To answer a call, press the key (15) and to end the call, press the key (14).
Press and hold the (14) key to:
- Display received, missed, rejected calls. *
- Set the automatic or manual connection.*
- Set AUDIO BT.
*These functions are not compatible with all smartphone models.
Audio Bluetooth
For listening to audio files, check whether your phone is compatible with A2DP protocol. Select the source BT
MUSIC.
To start playing the file list in memory on your phone, press the1/ (22) key.
Press the (1)-(25) keys briefly to switch to the previous/next track.
Press and hold (1)-(25) keys for functions REWIND and FORWARD.
Briefly press the 1/ (22) key to pause a track, and press it again to restart it.
10Technical Data EN
Detachable panel
Tuner FM - AM - RDS PLL EON
Stations for memorization 18 FM 12 AM
SD Card slot Max 16 GB
Front USB port Max 32 GB
Music Bluetooth A2DP
Bluetooth HANDS-FREE
Last position memory function
Volume memory
Function control Encode
Shows Song title / Singer / Album on display ID3 TAG
Sound effect Classic - Rock - Pop - Flat
Electronic shock protection system
IR receiver
Pre-amplified output 1
Amplified output 4 x 40 W
Auxiliary front audio input 1
iPOD connection by AUX-IN input
Power 24V
Dimensions 180 x 106 x 50 mm
11Avertissements FR
Se servir du personnel technique qualifié pour l’installation. • Utiliser uniquement dans des installations électriques
à 24V DC avec négatif à masse. • Débrancher le terminal négatif de la batterie lorsqu’on fait les connexions de
l’appareil. • Quand on remplace un fusible, se servir d’un autre ayant le même ampérage. • Ne pas ouvrir l’appareil
pour essayer de le réparer, contacter votre revendeur ou un personnel technique qualifié • Eviter que des corps
étrangers entrent dans l’appareil, car ils peuvent provoquer des mauvais fonctionnements, des courts circuits;
éviter aussi l’exposition risquée aux rayons laser si présents. • Allumer l’appareil seulement lorsque la température
interne du véhicule est dans la norme • Tenir le volume à un niveau permettant d’écouter les sons en provenance
de l’extérieur du véhicule (Klaxon, sirène etc.…) • Ne brancher aucun câble dans des endroits pouvant causer les
obstacles au fonctionnement des dispositifs de sécurité du véhicule.
Branchements
SORTIE
PRÉ-AMPLIFIÉE
ANTENNE ANTENNE MICROPHONE
DAB FM-AM
4 - HAUT-PARLEURS
VERT / NOIR
ARRIÈRE GAUCHE VERT
BLANC / NOIR
AVANT GAUCHE BLANC
GRIS / NOIR
AVANT DROIT GRIS
VIOLET / NOIR
ARRIÈRE DROIT VIOLET
NÉGATIF (NOIR)
+12V APRÈS CONTACT (ROUGE)
ALLUMAGE AMPLIFICATEUR / ANTENNE (BLEU)
+12V PERMANENT (JAUNE)
12Fonctions FR
1. Trace / Station suivante 15. Réponds / AS - PS
2. Décroche façade 16. Microphone
3. AF - Fréquence Alternative RDS 17. Mémoire 6 - Directory +
4. Volume / Sélection 18. Mémoire 5 - Directory -
5. TA - Annonce Traffic routier 19. Mémoire 4 - Casuelle
6. Fente CD 20. Mémoire 3 - Répétition
7. Egaliseur 21. Mémoire 2 - Intro Chansons
8. Bande radio 22. Mémoire 1 - Play / Pause
9. Allumage / Extinction / Mute 23. LCD
10. Expulsion CD 24. PTY
11. Port USB 25. Trace / Station précédente
12. Entrée AUX 26. Reset
13. Visualisation afficheur 27. Slot Carte SD
14. Termine la conversation / MODE
13Réglages - Paramétrages FR
AUDIO
Appuyer brièvement le bouton du volume (4) pour accéder au menu des réglages audio et rappuyer brièvement le
bouton (4) pour parcourir la liste des réglages audio disponibles:
BASS-TRE (réglage tons hauts/bas)
BAL L-R (équilibrage)
FAD F-R (fader)
LOUD ON/OFF (loudness)
EQ (EQ OFF, ROCK, FLAT, CLASS, POP)
pour régler, tourner le bouton jusqu’à la valeur désirée).
RÉGLAGES GÉNÉRAUX
Appuyer pendant 3 secondes le bouton (6) pour accéder au menu des réglages généraux et rappuyer brièvement
le bouton (6) pour parcourir la liste des réglages généraux disponibles:
COULOUR (auto/ Bleu / Vert / Rouge / Bleue ciel / Jaune / Violet / Blanc)
BEEP (on / off)
CLOCK (24/12)
P.VOL (volume base pré-réglé)
LOC (on / off - local / distance)
STEREO / MONO.
Pour régler la fonction désirée, tourner le bouton du volume (6) jusqu’à la valeur désirée.
CLOCK 24/12
Règle l’heure selon la forme 24 heure ou 12 heures
HORLOGE
Appuyer la touche DISP/0 (13) plusieurs fois jusqu’à la vision de l’heure sur l’afficheur.
Appuyer la touche DISP/0 (10) pendant 3 secondes, la valeur de l’heure commencera à clignoter. paramétrer
l’heure désirée en tournant le bouton du volume (6), ensuite appuyer brièvement le bouton du volume (6) et
tourner pour régler les minutes, rappuyer pour valider. Le réglage est complet lorsque les valeurs arretent de
clignoter.
P.VOL
Cette fonction règle le niveau du volume à l’allumage
DX / LOC (Distants / Locaux)
LOC ON: Réduit la sensibilité de la réception radio pendant la recherche des stations, ceci permet de trouver uni-
quement les stations qui ont un bon signal de réception.
LOC OFF: La sensibité de la réception radio est au maximum et ceci permettra de trouver toutes les stations radio:
tant celles avec un bon signal que celles avec un faible signal
14Fonctions Radio et DAB+ FR
SÉLECTION SOURCE RADIO
Appuyer brièvement la touche “BAND” (8) pour sélectionner: FM1 - FM2 - FM3 - MW1 - MW2.
Appuyer les touches (1)-(25) brièvement pour lancer la recherche automatique de la station précédente
( ) (1) ou suivante ( ) (25). Appuyer les touches (1)-(25) pendant 2 secondes pour la lancer la recherche
manuelle de la station précédente ) (1) ou suivante (1)-(25).
Appuyer respectivement pendant 3 secondes les touches de 1 à 6 pour mémoriser la station sur une parmi les 6
mémoires disponibles.
Sélection source DAB. à la première installation , le scanning des chaines DAB disponibles se fera automatique-
ment.
Appuyer la touche AS/PS (15) pour commencer le scanning automatique des chaines quand désiré.
Appuyer brièvement la touche “BAND”(8) pour sélectionner: DAB1, DAB2, DAB3.
Appuyer les les touches brièvement pour sélectionner la station précédente ( ) ou suivante ( ).
Appuyer respectitvement pendant 3 secondes les touches de 1 à 6 pour mémoriser la station sur une parmi les 6
mémoires disponibles.
Fonctions USB - Carte SD
Dès l’insertion d’une clé USB ou Carte SD la reproduction des fichiers audio disponibles se fera automatiquement.
Appuyer les touches ( ) brièvement pour aller de trace précédente/Suivante. Faire pression sur les touches
( ) pour les fonctions REWIND (Revient) et FOWARD (Avance).
Appuyer brièvement la touche1/ (22) pour pause et rappuyer pour reprendre.
Appuyer brièvement la touche 2/INT (21) pour activer /désactiver l’introduction trace.
Appuyer brièvement la touche 3/RPT (20) pour activer / désactiver la répétition automatique
Appuyer brièvement la touche 4/RDM (19) pour activer / désactiver la fonction de reproduction casuelle.
Faire pression sur les touches 5/DIR- - 6/DIR+ (18-17) pour aller au dossier précédent / suivant
Fonctions AUX-IN
Le VM024 permet le branchement à l’entrée (12) des sources audio externes via le cable jack de 3,5 mm.
La gestion des traces audio se fait à partir de la source externe.
Bluetooth Téléphone
Activer le bluetooth sur le portable, sélectionner le dispositif nommé CARKIT, insérer le mot de passe 0000 et
valider.
Pour répondre à l’appel, appuyer la touche (15) et pour terminer, appuyer la touche (14)
Faire pression sur la touche (14) pour:
· Afficher les appels reçus, perdus ou refusés*
· Paramétrer la connexion automatique ou manuelle*
· Paramétrer AUDIO BT.
* Ces fonctions ne sont pas compatibles avec tous les modèles de smartphone
Bluetooth Audio
Pour écouter les fichiers audio, vérifier la compatibilité du téléphone avec le protocole A2DP.
Sélectionner la source BT MUSIC.
Pour commencer la reproduction de la liste des fichiers dans la mémoire du portable, appuyer la touche 1/ (22).
Appuyer les touches (1)-(25) brièvement pour la trace précédente / suivante.
Faire pression sur les touches (1)-(25) pour les fonctions de REWIND (Revient) et FOWARD (Avance).
Appuyer brièvement la touche 1/ (22) pour pause et rappuyer pour reprendre.
15Caractéristiques techniques: FR
Façade détachable
Tuner Radio FM - AM - RDS - PLL EON
Stations mémorisables 18 FM 12 AM
Slot Carte SD Max 16 GB
Port USB avant Max 32 GB
Bluetooth musique A2DP
Bluetooth MAINS LIBRES
Mémorisation dernière position
Mémorisation volume
Controle fonctions Encode
Affichage titre Chanson /Artiste / Album ID3 TAG
DSP effets sonores Classique-Rock-Pop-Flat
Protection électronique contre les vibrations
Récepteur IR
Sortie stéréo Pré-amplifiée 1
Sorties amplifiées 4 x 40W
Entrée audio auxilliaire avant 1
Connexion I-Pod via AUX-IN
Alimentation 24V
Dimensions 180 x 106 x 50 mm
16Warnungen DE
Die Installation muss durch technische Fachkräfte vorgenommen werden • Nur bei 24V DC verwenden, mit Negativ-
Pol zur Masse • Erst den Negativ-Pol der Auto-Batterie abtrennen, dann die Radio-Anschlüsse herstellen • Beim
Auswechseln, immer Sicherungen derselben Ampere-Stärke verwenden • Nie versuchen, das Gerät zu öffnen oder
eigenhändig zu reparieren. Immer den Händler bzw. technische Fachkräfte zu Rate ziehen • Sicherstellen, dass
keinerlei Fremdkörper in das Gerät eindringen können. Diese würden Betriebsstörungen, Kurzschlüsse oder die
Entfaltung gefährlicher Laser-Strahlen verursachen • Gerät nur dann einschalten, wenn die Temperatur im Wagen-
Innenraum auf normalem Niveau ist • Lautstärke so einstellen, dass externe Geräusche (Hupe, Sirenen etc.) noch
hörbar sind • Kabel fernhalten von allen Sicherheits-Geräten des Wagens.
Anschluss
VORVERSTÄRKTER
AUSGANG
DAB FM-AM MIKRO
ANTENNE ANTENNE
4 - LAUTSPRECHER
GRÜN/SCHWARZ
HINTEN LINKS GRÜN
WEISS/ SCHWARZ
VORNE LINKS WEISS
GRAU/SCHWARZ
VORNE RECHTS GRAU
VIOLETT/SCHWARZ
HINTEN RECHTS VIOLETT
NEGATIV (SCHWARZ)
+12V ZÜNDPLUS (ROT)
VERSTÄRKER-EINSCHALTUNG/ ANTENNE (BLAU)
+12V PERMANENT (GELB)
17Functions DE
1. Titel/Sender vorwärts 15. Antworten / AS-PS
2. Bedienteil-Freigabe 16. Mikrofon
3. AF - Alternative Frequenz RDS 17. Speicher 6 - Directory + Directory +
4. Lautstärke/Auswahl 18. Speicher 5 - Directory - Directory -
5. TA - Verkehrsinformation 19. Speicher 4 - Zufällig
6. CD-Slot 20. Speicher 3 - Wiederholung
7. Equalizer 21. Speicher 2 - Titel-Einführung
8. Frequenzband 22. Speicher 1 - Wiedergabe/Pause
9. Ein-/Ausschalten/Stummschalten 23. LCD
10. Disk-Auswurf 24. PTY
11. USB-Anschluss 25. Titel/ vorheriger Sender
12. AUX-Eingang 26. Zurücksetzen
13. Display-Anzeige 27. SD-Kartensteckplatz
14. Gespräch beenden/MODE
18Einstellungs-Anpassungen DE
AUDIO
Drücken Sie kurz den Lautstärke-Knopf (4), um in das Menü der Audioeinstellungen zu gelangen, und drücken Sie
erneut kurz den Knopf (4), um durch die Liste der verfügbaren Audioeinstellungen zu scrollen:
BASS-TRE (Hoch/Tief-Ton-Einstellung)
BAL L-R (Balancing)
FAD F-R (Fader)
LOUD ON/OFF (Lautstärke)
EQ (EQ OFF, ROCK, FLAT, CLASS, POP)
Um die Einstellungen vorzunehmen, drehen Sie den Knopf auf den gewünschten Wert.
ALLGEMEINE EINSTELLUNGEN
Drücken Sie den Knopf (6) 3 Sekunden lang, um in das Menü der allgemeinen Einstellungen zu gelangen, und
drücken Sie den Knopf (6) erneut kurz, um durch die Liste der verfügbaren allgemeinen Einstellungen zu scrollen:
FARBE (auto/blau/grün/rot/hellblau/gelb/violett/weiß)
Piep (ein/aus)
UHRZEIT (24/12)
P VOL (Standard-Lautstärke)
LOC (on/off-local distance)
STEREO/MONO.
Um die gewünschte Einstellung anzupassen, drehen Sie den VOLUMENKNOPF (6) auf den gewünschten Wert.
CLOCK 24/12
Stellen Sie die Zeit in der 24-Stunden- oder 12-Stunden-Version ein.
UHRZEIT
Drücken Sie die Taste DISP/0 (13) mehrmals, bis die Uhrzeit auf dem Display angezeigt wird.
Drücken Sie die Taste DISP/0 (10) für 3 Sekunden, die Uhrzeit beginnt zu blinken. Stellen Sie die gewünschte Zeit
durch Drehen des Lautstärkeknopfes (6) ein, drücken Sie dann kurz den Lautstärkeknopf (6) und drehen Sie ihn,
um die Minuten einzustellen, und drücken Sie ihn dann zum Bestätigen erneut. Wenn die Uhrzeit nicht mehr
blinkt, ist die Einstellung abgeschlossen.
P.VOL
Diese Funktion stellt die Lautstärke beim Einschalten ein.
DX/LOC (distance/local)
LOC ON: Reduziert die Empfindlichkeit des Radioempfangs bei der Suche nach Sendern, so dass nur Sender mit
einem guten Signal gefunden werden.
LOC OFF: Die Empfindlichkeit des Radioempfangs ist auf den höchsten Wert eingestellt und alle Sender werden
gefunden, sowohl mit gutem als auch mit schwachem Signal.
19Radio & DAB+ Funktionen DE
RADIO-QUELLE AUSWÄHLEN
kurz die Taste “BAND” (8) drücken zur Auswahl von: FM1 - FM2 - FM3 - MW1 - MW1 - MW2.
Drücken Sie kurz die Tasten (1)-(25), um die automatische Suche nach dem vorherigen Sender ( ) (1)
oder nach dem nächsten Sender zu starten ( ) (25) Drücken Sie die (1)-(25)-Taste für
zwei Sekunden, um die manuelle Suche der vorherigen Station ( ) (1) oder der nächsten ( ) (25) zu starten.
Drücken Sie die Tasten 1 bis 6 für jeweils 3 Sekunden, um den Sender auf einem der 6 verfügbaren Speicher zu
speichern.
DAB-Quelle auswählen. Bei der ersten Installation des Geräts beginnt das Scannen der verfügbaren DAB-Sender
automatisch.
Drücken Sie die Taste AS/PS (15), um einen automatischen Sendersuchlauf zu starten, wann immer Sie möchten.
Drücken Sie kurz die Taste “ BAND” (8), um auszuwählen: DAB1, DAB2, DAB3.
Drücken Sie kurz die Tasten, ( ) um die Option vorherige ( ) oder nächste ( ) Station auszuwählen
Drücken Sie die Tasten 1 bis 6 für jeweils 3 Sekunden, um den Sender in einem der 6 verfügbaren Speicher zu
speichern.
USB-SD Card Funktionen
Wenn eine USB- oder SD-Karte eingeführt wird, wird die Wiedergabe der Audiodateien automatisch gestartet, die
sich auf der eingelegten Quelle befinden.
Drücken Sie die Tasten ( ) kurz, um zum vorherigen / nächsten Titel zu wechseln. Drücken und halten Sie die
Tasten ( ) für die Funktionen REWIND und FORWARD.
Drücken Sie kurz die Taste 1/ (22), um einen Titel anzuhalten, und drücken Sie ihn erneut, um ihn neu zu starten.
Drücken Sie kurz die Taste 2/INT (21), um die Titel- Einführung zu aktivieren/deaktivieren.
Drücken Sie kurz die Taste 3/RPT (20), um die automatische Titelwiedergabe ein- und auszuschalten.
Drücken Sie kurz die Taste 4/RDM (19), um die Zufallswiedergabefunktion ein- und auszuschalten.
Halten Sie die Tasten 5/DIR- - 6/DIR+ (18-17) gedrückt, um zwischen dem vorherigen / nächsten Ordner zu we-
chseln.
AUX-IN Funktionen
Das VM024 ermöglicht den Anschluss externer Audioquellen an den Eingang (12) über ein 3,5-mm-Klinkenkabel.
Audio-Titel werden von externen Quellen aus verwaltet.
Bluetooth-Telefon
Aktivieren Sie das Bluetooth auf Ihrem Handy, wählen Sie das Gerät mit dem Namen
CARKIT Geben Sie das Passwort 0000 ein und bestätigen Sie.
Um einen Anruf anzunehmen, drücken Sie die Taste (15) und um den Anruf zu beenden, drücken Sie die Taste (14).
Halten Sie die (14) Taste gedrückt:
- Anzeige von empfangenen, verpassten und abgewiesenen Anrufen. *
- Stellen Sie die automatische oder manuelle Verbindung ein.*
- Stellen Sie AUDIO BT ein.
*Diese Funktionen sind nicht mit allen Smartphone-Modellen kompatibel.
Audio Bluetooth
Um Audiodateien anzuhören, überprüfen Sie, ob Ihr Telefon mit dem A2DP-Protokoll kompatibel ist. Wählen Sie die
Quelle BT MUSIC.
Um die Wiedergabe der auf Ihrem Telefon gespeicherten Dateiliste zu starten, drücken Sie die Taste 1/ (22).
Drücken Sie kurz die (1)-(25)-Tasten, um zum
vorigen/nächsten Titel zu wechseln.
Halten Sie die Tasten (1)-(25)für die Funktionen REWIND und FORWARD gedrückt.
Drücken Sie kurz die Taste 1/ (22), um einen Titel anzuhalten, und drücken Sie ihn erneut, um ihn neu zu starten.
20Technische Daten DE
Abnehmbares Bedienteil
Tuner FM - AM - RDS PLL EON
Speicherbare Sender 18 FM 12 AM
SD-Karte Anschluss Max 16 GB
Front USB port Max 32 GB
Musik Bluetooth A2DP
Bluetooth HANDS-FREE
Speicherung der letzten Position
Speicherung der Lautstärke
Encode Fuktion Bedienung Encode
Zeigt Songtitel/Sänger/Album auf dem Display an. ID3 TAG
Klang-Effekt Classic - Rock - Pop - Flat
Elektronisches Stoßsicherungssystem.
IR
Vorverstärkter Ausgang 1
Verstärkter Ausgang 4 x 40 W
AUX-IN 1
I-Pod Anschluss via AUX-IN
Stromversorgung 24V
Abmessung 180 x 106 x 50 mm
21Precauciones ES
Para la instalación, contactar exclusivamente con empresas especializadas y personal técnicamente calificados.
• Usar solo en vehículos con alimentación de 24V DC y negativo a masa. • Desconectar el terminal negativo de
la batería del vehículo cuando se efectúan las conexiones del aparato.• Cuando se sustituye el fusible, utilizar
exclusivamente fusibles con el mismo amperaje. • Non abrir la unidad y no tentar de repararla, consultar al
revendedor o personal técnico calificado. • Asegurarse de que no entren objetos extraños en su interior, podrían
causar malfuncionamientos, generar cortocircuitos eléctricos, además se corre el riesgo de una exposición muy
perjudicial a los rayos laser, si están presente • Encender el aparato solo cuando la temperatura del habitáculo
se haya normalizado. • Mantener un volumen de escucha tal que nos permita escuchar los sonidos del ambiente
circunstante. (Claxon, sirenas) • No conectar ningún cable en lugares que podría obstacular el funcionamiento de
los dispositivos de seguridad del coche.
Conexiones
SALIDA
PRE AMPLIFICADA
ANTENA ANTENA MICRÓFONO
DAB FM-AM
4 - ALTAVOCES
VERDE/ NERO
POSTERIOR
IZQUIERDO VERDE
BLANCO /NEGRO
ANTERIOR
IZQUIERDO BLANCO
GRIS /NEGRO
ANTERIOR
DESTRO GRIS
VIOLA /NEGRO
POSTERIOR
DESTRO VIOLA
Negativo ((NEGRO)
+12 V Bajo llave (ROJO)
Encendido amplificador /Antena (AZUL)
+12 voltios Permanente (AMARILLO)
22Funciones ES
1. Pista / emisora adelante 15. Contestar / AS-PS
2. Desenganche panel frontal 16. Micrófono
3. AF - Frecuencia alternativa RDS 17. Memoria 6 - Directorio +
4. Volumen / Selección 18. Memoria 5 - Directorio -
5. TA - Anuncio de tráfico 19. Memoria 4 - Aleatoria
6. Ranura Disco 20. Memoria 3 - Repetición
7. Ecualizador 21. Memoria 2 - Pistas intro
8. Banda de radio 22. Memoria 1 - Reproducir / Pausa
9. Encendido / apagado / silencio 23. LCD
10. Expulsión del disco 24. PTY
11. Puerto USB 25. Pista / Emisora atrás
12. Entrada AUX 26. Reset
13. Visualización Display 27. Ranura tarjeta SD
14. Cerrar Conversación / MODO
23Ajustes ES
AUDIO
Presione brevemente el MANDO DE VOLUMEN (4)
para acceder al menù de los ajustes de audio y volver a pulsar brevemente el mando (4) para desplazarse en el
listado de los ajustes de audio disponibles:
BASS-TRE (ajuste agudos/graves)
BAL L-R (balance)
FAD F-R (fader)
LOUD ON/OFF (loudness)
EQ (EQ OFF, ROCK, FLAT, CLASS, POP)
Para ajustar girar el mando hasta el valor deseado
AJUSTES GENÉRICOS
Presione el mando (6) durante 3 segundos para acceder al menú de las configuraciones genéricas y presione
brevemente el mando (6) nuevamente para
desplazarse en la lista de configuraciones genéricas disponibles:
COLOR (automático / azul / verde / rojo / azul / amarillo / morado / blanco)
BEEP (activar / desactivar)
RELOJ (24/12)
P VOL (volumen de base preestablecido)
LOC (activar / desactivar - local / distante)
STEREO / MONO.
Para ajustar la configuración deseada, gire el MANDO DEL VOLUMEN (6) hasta al valor deseado.
RELOJ 24/12
Configure la hora en versión 24 /12 horas
RELOJ
Presione el botón DISP / 0 (13) varias veces hasta que la hora aparezca en la pantalla.
Presione el botón DISP / 0 (10) durante 3 segundos, el valor de la hora comenzará a parpadear. Establezca la hora
deseada girando el
MANDO (6) del volumen, luego presione brevemente el MANDO del VOLUMEN (6) y gire para ajustar los minutos,
presione nuevamente para confirmar. Cuando los valores dejan de parpadear
se se ha completado la configuración.
P.VOL
Esta función establece el nivel de volumen al encender el aparato.
DX / LOC (distante / local):
LOC ON: reduce la sensibilidad de la recepción de radio en la búsqueda de emisoras, de esta forma solo se encuen-
tran emisoras
Con una buena señal.
LOC OFF: la sensibilidad de la recepción de radio es máxima y de esta manera se encontrarán todas las estaciones,
sea como sea la señal
24Funciones Radio y DAB + ES
SELECCIONAR FUENTE DE RADIO
Presione brevemente la tecla “BAND” (8) para seleccionar: FM1 - F M2 - FM3 - MW1 - MW2.
Presione las teclas (1)-(25) brevemente para iniciar el búsqueda automática de la emisora anterior ( ) (1)
o siguiente ( ) (25).
Presione las teclas (1)-(25) durante dos segundos para comenzar la búsqueda manual de la emisora ante-
rior ( ) (1) o posterior ( ) (25).
Presione las teclas de 1 a 6 durante 3 segundos para memorizar la emisora en una de las 6 memorias disponibles.
Seleccione la fuente DAB. En la primera instalación, el escaneo de los canales DAB disponibles se iniciará automáti-
camente.
Presione el botón AS / PS (15) para iniciar un escaneo automático de canales cuando se desee.
Presione brevemente la tecla “BAND” (8) para seleccionar: DAB1, DAB2, DAB3.
Presione las teclas brevemente para seleccionar la emisora anterior ( ) o siguiente ( ).
Presione las teclas de 1 a 6 durante 3 segundos para memorizar la emisora en una de las memorias disponibles.
Funciones USB-SD Card
Cuando se introduce una USB o tarjeta SD, se iniciará automáticamente la reproducción de pistas de audio pre-
sentes en el dispositivo introducido.
Presione las teclas brevemente para cambiar a la pista anterior / siguiente.
Mantenga presionadas las teclas . para las funciones REWIND y FOWARD.
Presione brevemente el botón 1/ (22) para pausar una pista y presione nuevamente para reiniciar.
Presione brevemente el botón 2 / INT (21) para activar / desactivar el seguimiento de la pista.
Presione brevemente el botón 3 / RPT (20) para activar / desactivar la repetición automática de pistas.
Presione brevemente la tecla 4 / RDM (19) para activar / desactivar la función de reproducción aleatoria.
Mantenga presionadas las teclas 5 / DIR- - 6 / DIR + (18-17) para cambiar a la carpeta anterior / siguiente.
Funciones AUX-IN
El VM024 permite la conexión en la entrada (12) de Fuentes de audio externas a través de un cable Jack de 3,5 mm.
El control de las pistas de audio se realiza desde la fuente externa.
Bluetooth telefono
Active el Bluetooth en el teléfono, seleccione el dispositivo nombrado
CARKIT introducir la contraseña 0000 y confirme.
Para contestar una llamada, presione la tecla (15) y
para finalizar la llamada presione la tecla (14) Mantenga presionada la tecla (14) para:
• Ver las llamadas recibidas, perdidas, rechazadas. *
• Configurar la conexión automática o manual. *
• Configurar AUDIO BT.
* Estas características no son compatibles con todos los modelos de Smartphone.
Bluetooth audio
Para escuchar archivos de audio, verifique si el teléfono utilizado es compatible con el protocolo A2DP. Selecciona
la fuente BT MUSIC.
Para comenzar a reproducir la lista de archivos en memoria en el Smartphone presione el botón 1/ (22).
Presione las teclas (1) - (25) brevemente para cambiar a pista anterior / siguiente.
Mantenga presionadas las teclas (1) - (25) para las funciones Rebobinar y avanzar. Presione brevemente el
botón 1/ (22) para pausar una pista y presione nuevamente para reiniciarla.
25Características técnicas ES
Panel frontal extraíble.
Sintonizador de radio FM - AM - RDS PLL EON
Estaciones memorables 18 FM 12 AM
Ranura para tarjeta SD Max 16 GB
Puerto USB frontal Max 32 GB
Bluetooth musica A2DP
Bluetooth VIVAVOCE
Memoria última posición
Memorización Volumen de inicio
Control funciones Encode
Muestra el título de la canción / cantante / ID3 TAG
álbum en la pantalla
Efectos de sonido DSP Classic - Rock - Pop - Flat
Protección electrónica contra vibraciones
Receptor IR
Salida estéreo pre-amplificada 1
Salidas amplificadas 4 x 40 W
Entrada de audio auxiliar frontal 1
Conexión I-Pod a través de AUX-IN
Alimentacion 24V
Dimensiones 180 x 106 x 50 mm
26Il prodotto non deve essere smaltito con i rifiuti domestici. Per ulteriori informazioni consultare il sito www.phonocar.it
This Product must NOT be treated as a domestic waste. For further information, please read homepage www.phonocar.it
PHONOCAR S.P.A. - Via F.lli Cervi, 167/C • 42124 Reggio Emilia (Italy) • Tel. +39 0522 941621 • e-mail:info@phonocar.it • www.phonocar.comPuoi anche leggere