PURIFICATORE ARIA AIR PURIFIER PROFESSIONAL ULTRA - INN-558 MANUALE D'USO USER MANUAL
←
→
Trascrizione del contenuto della pagina
Se il tuo browser non visualizza correttamente la pagina, ti preghiamo di leggere il contenuto della pagina quaggiù
PURIFICATORE ARIA
        AIR PURIFIER
PROFESSIONAL ULTRA

             INN-558
         MANUALE D’USO
          USER MANUAL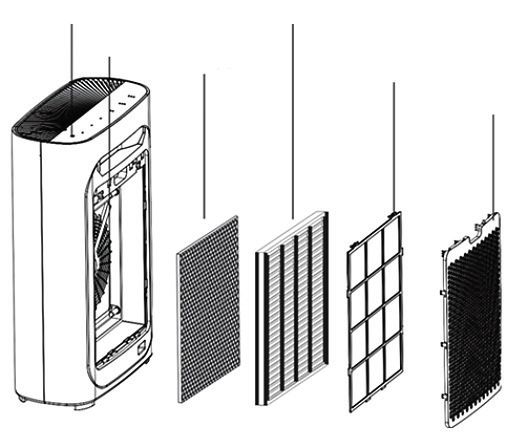
2
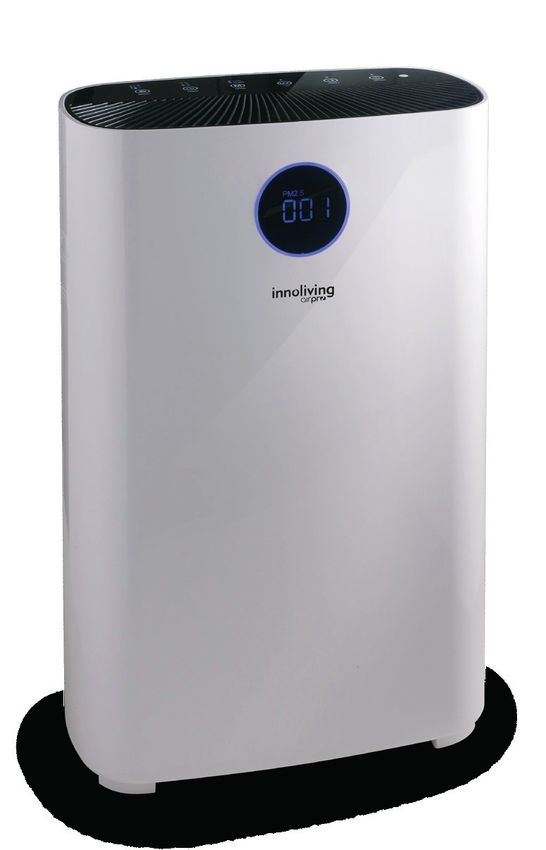
PURIFICATORE ARIA                                                                           I

Grazie per aver acquistato il purificatore d’aria Innoliving INN-558, in grado di garantire e
offrire un ambiente di vita sano e confortevole.
Il problema dell’inquinamento dell’aria negli spazi interni è grave e deriva principalmente
dall’inquinamento naturale dell’aria, polline, acari della polvere, gas nocivi (formaldeide,
fumo passivo, odore corporeo, sudore e altre sostanze e odori).
A causa dell’esistenza di queste fonti di inquinamento, le persone hanno spesso reazioni
avverse come vertigini, sonnolenza, tosse e nausea. La qualità dell’aria della stanza è
importante per la salute.
Usando il purificatore d’aria, si avrà un ambiente più sano e più confortevole in cui vivere.

Prima dell’uso leggere attentamente il seguente manuale di istruzioni e
conservarlo per future consultazioni.
Prima di utilizzare l’apparecchio, leggere attentamente le istruzioni per l’uso e in particolare
le avvertenze sulla sicurezza, attenendosi ad esse. Conservare il presente manuale, per l’intera
vita utile dell’apparecchio, a scopo di consultazione. La mancata osservanza delle istruzioni
potrebbe essere causa di incidenti e rendere nulla la garanzia, sollevando il fabbricante da
ogni responsabilità.

IMPORTANTI NORME DI SICUREZZA
• Gli elementi di imballaggio (sacchetti di plastica, cartone, polistirolo ecc.)
   non devono essere lasciati alla portata dei bambini in quanto potenziali
   fonti di pericolo e devono essere smaltiti secondo quanto previsto dalle
   normative vigenti.
• Prima di inserire la spina nella presa di corrente verificare attentamente
   che la tensione della vostra rete domestica corrisponda a quello indicato
   sull’apparecchio e che la presa di corrente e la linea di alimentazione
   siano dimensionate al carico richiesto.
• Prima dell’uso, verificare che il cavo di alimentazione e la spina non
   presentino danni visibili. Se il cavo di alimentazione è danneggiato,
   esso deve essere sostituito dal costruttore o dal suo servizio di assistenza
   tecnica o comunque da una persona con qualifica similare, in modo da
   prevenire ogni rischio.
• L’apparecchio può essere utilizzato da bambini di età non inferiore a 8
   anni e da persone con ridotte capacità fisiche, sensoriali o mentali, o prive
   di esperienza o della necessaria conoscenza, purché sotto sorveglianza
                                                                                            3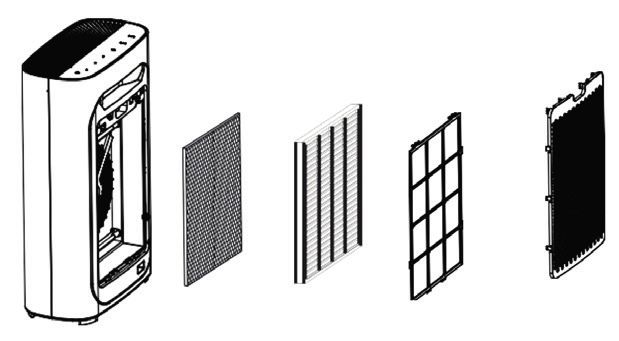
I

   oppure dopo che le stesse abbiano ricevuto istruzioni relative all’uso
   sicuro dell’apparecchio e alla comprensione dei pericoli ad esso inerenti.
   I bambini non devono giocare con l’apparecchio. La pulizia e la
   manutenzione destinata ad essere effettuata dall’utilizzatore non deve
   essere effettuata da bambini senza sorveglianza. Tenere l’apparecchio e il
   suo cavo fuori dalla portata dei bambini con età inferiore agli 8 anni.
• Assicurarsi che i bambini non giochino con l’apparecchio.
• Per staccare la spina dalla presa di corrente, è necessario tirare sempre per
   la spina e mai per il cavo.
• Non toccare la spina e il dispositivo con mani bagnate.
• Rimuovere la spina dalla rete elettrica quando l’apparecchio non è in uso.
• Assicurarsi sempre che la spina sia completamente inserita nella presa
   elettrica prima di accendere il prodotto.
• Utilizzare il prodotto posizionandolo solo su superfici piane e stabili.
• Non utilizzare il dispositivo all’aperto o in prossimità di vasche, piscine,
   docce ecc.
• Non inserire corpi estranei all’interno del dispositivo.
• Non ostruire l’entrata e la fuoriuscita d’aria in qualunque modo.
• Non aggiungere prodotti chimici o metallici all’interno del prodotto.
   Questi componenti possono infatti arrecare danni al prodotto e
   comprometterne il corretto funzionamento.
• Non lasciare l’apparecchio esposto alla luce diretta del sole per un lungo
   periodo di tempo.
• Non utilizzare detergenti aggressivi per pulire il prodotto.
• Non lasciare che l’apparecchio e/o il cavo entri a contatto con superfici
   incandescenti.
• Non usare il prodotto se è caduto a terra, se ci sono visibili segni di
   danneggiamento o perdite. Evitare urti e cadute.
 4
I

• In caso di guasto o di cattivo funzionamento dell’apparecchio, spegnere
    il dispositivo, scollegarlo la spina dalla corrente elettrica e non
    manometterlo. Per l’eventuale riparazione rivolgersi esclusivamente ad
    un centro di assistenza tecnica autorizzato.
• Utilizzare l’apparecchio in una zona ben ventilata. Durante l’utilizzo,
    l’apparecchio deve essere tenuto ad una distanza di almeno 10 cm
    dalle pareti per garantire il corretto funzionamento delle prese d’aria.
    L’apparecchio non deve essere posto immediatamente sotto o dietro una
    tenda o simili. Non coprire l’apparecchio con coperte o simili, durante l’uso.
• Assicurarsi che il prodotto sia spento e scollegato dalla presa prima di
    procedere con qualsiasi operazione di pulizia e manutenzione.
• Utilizzare una presa facilmente raggiungibile in caso di pericolo.
ATTENZIONE: contiene una lampada UV, non fissare la sorgente luminosa.
• Ogni uso scorretto dell’apparecchio o eventuali danni all’alloggiamento
   della lampada possono provocare la fuga di radiazioni UV pericolose. Le
   radiazioni UV-C possono, anche a piccole dosi, causare danni agli occhi e
   alla pelle.
• Non usare l’apparecchio se è danneggiato
• Nel caso fosse necessaria la sostituzione della lampada UV rivolgersi ad un
   centro specializzato, non tentare di farlo in autonomia, potrebbe essere
   pericoloso.
Il presente apparecchio deve essere utilizzato unicamente per lo scopo per
cui è stato progettato, ovvero come purificatore d’aria per uso domestico e
in negozi, uffici e altri luoghi di lavoro similari, in aziende agricole o similari,
da clienti di alberghi, motel e altri ambienti di tipo residenziale, in ambienti
del tipo bed and breakfast. Qualsiasi altro utilizzo è considerato non
conforme e pertanto pericoloso.
                                                                                 5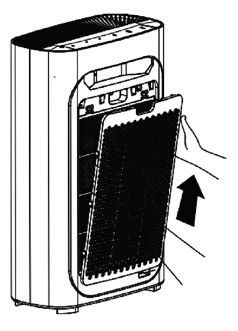
I

IMBALLAGGIO
Rimuovere accuratamente il materiale di imballaggio facendo attenzione a non rovinare il
corpo in plastica.

PARTI DELL’APPARECCHIO
                                         Uscita aria

                               Indicatore                                              Maniglia
                               qualità aria
                                                                                       Sensore
                                                                                       qualità aria

                                              Ingresso aria
                                                                                       Coperchio
                                                                                       posteriore

                                                                                    Collegamento cavo
                                                                                    alimentazione

Spia accensione                          Filtro Hepa
                  Lampada UV
                         Filtro a carbone              Pre filtro
                                    attivo                              Pannello
                                                                    ingresso aria

  6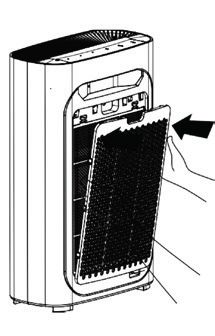
I

PANNELLO DI CONTROLLO

Il pannello di controllo è touch screen a sfioro e premendo le icone è possibile impostare e
cambiare le modalità di funzionamento.

                       Pulsante Timer              Pulsante UV               Tasto accensione
Regolazione velocità ventole      Pulsante Modalità              Pulsante Reset
                                 Auto o Silent + Wifi

         Indicatore della qualità dell’aria
                    (PM2.5=0~50)         Perfetta
      Blu
                                                                                  Indicatore della
                  (PM2.5=50~100)          Buona                                   qualità dell’aria
      Verde
                 (PM2.5=100~150)         Normale
      Viola
                    (PM2.5=150~)          Scarsa
      Rosso
    Avviso: premere il pulsante di ripristino,
    se si desidera spegnere l’indicatore della
                 qualità dell’aria

                                                SMONTAGGIO E INSTALLAZIONE DEL
                                                PANNELLO POSTERIORE
                                                Afferrare la maniglia posta sul retro del
                                                purificatore (pannello di ingresso dell’aria) e
                                                sollevarlo delicatamente.

                                                                                                      7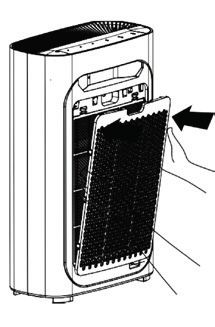
I
Per rimontare il pannello, allinearlo alle fessure e inserirlo nelle
scanalature in basso, poi spingerlo delicatamente verso l’alto.
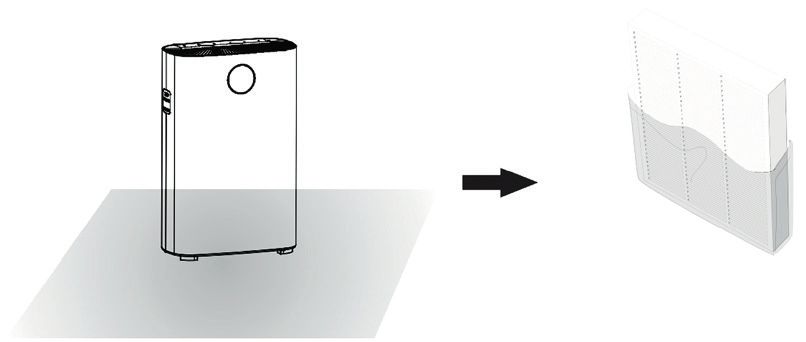
POSIZIONARE IL PURIFICATORE D’ARIA
Per fare in modo che l’aria della stanza fluisca bene in entrambi i lati del purificatore, assi-
curarsi che lo spazio tra l’ingresso dell’aria e la parete sia di almeno 50 cm, l’uscita dell’aria
di almeno 10 cm. Tenere lontano 1 metro da televisione, radio, ecc. Non inserire la spina
di alimentazione insieme al televisore, alla radio e ad altre spine di alimentazione elettrica
inserite nella stessa presa (altrimenti potrebbero verificarsi disturbi dello schermo e generare
rumore). Il posizionamento a lungo termine negli stessi siti potrebbe sporcare le pareti.
Per garantire che la macchina abbia una ventilazione
adeguata e la massima efficienza, non bloccare l’uscita
e l’ingresso dell’aria.
INSTALLAZIONE FILTRO
1. Spegnere l’apparecchio e scollegare la spina, rimuovere il pannello
posteriore.
2. Estrarre i filtri.
8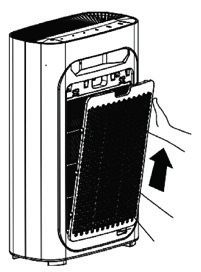
I

3. Rimuovere gli imballi e posizionare il purificatore su un terreno asciutto, stabile e
orizzontale.

4. Installare tutti i filtri in ordine.

5. Ricordarsi di installare il prefiltro come parte finale.

6. Installare nuovamente il pannello di ingresso dell’aria: allineare e inserirlo nelle
scanalature, quindi spingerlo delicatamente.

                                                                                           9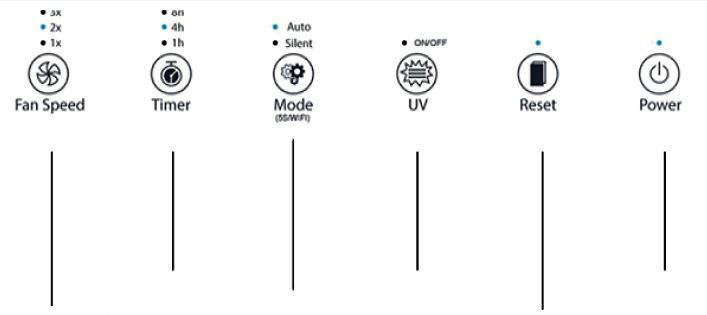
I
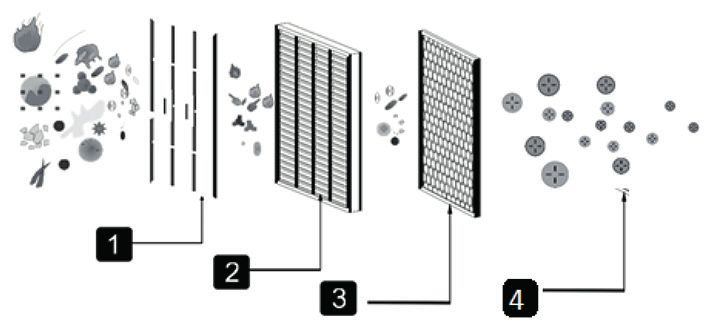
FILTRI E FUNZIONALITÀ
Questo purificatore funziona tramite un sistema di purificazione a 4 punti, in grado di
purificare efficacemente l’aria e rendere la vita più sana.
1) Pre filtro
2) Filtro HEPA
3) Filtro a carbone attivo + filtro
fotocatalitico
4) Lampada UV
Pre filtro
È un filtro a maglia molto fitta (unità di misura micron), che blocca efficacemente il
particolato fibroso da 2,5 mm.
Tasso di efficacia > 99,9%. Può essere pulito facilmente per decine di migliaia di volte.
Trattiene anche particelle più grandi come peli di animali domestici, peli e polvere
grossolana, ecc. essendo molto resistente, può aumentare la durata degli altri filtri.
Filtro HEPA
Filtro super efficace: il raggio di rimozione delle particelle minori da 0 a 0,3 micron portate
dal flusso d’aria può arrivare fino al 99,9%. Blocca la diffusione di allergeni e batteri nel
flusso d’aria, come polline, smog e virus.
Filtro a carboni attivi + Filtro fotocatalitico
Questo filtro trattiene composti organici volatili, come ad esempio fumo passivo e alcuni tipi
di gas inquinanti. L’aria viene depurata e le molecole inquinanti, ossidate completamente
tramite il processo di fotocatalisi.
Lampada UV
La lampada UV elimina efficacemente una gran varietà di batteri e virus comuni e ne
inibisce la produzione, agisce sui filtri aiutandoli ad eliminare la sporcizia su di essi.
UTILIZZO
Collegare l’alimentatore alla rete elettrica: il purificatore emetterà un suono e tutte le
spie lampeggeranno 3 volte, per poi entrare in modalità standby, lasciando solo la spia di
accensione in rosso.
Premere il pulsante di accensione. All’avvio della
macchina, la modalità di default è Auto. All’accensione
del purificatore si accende automaticamente la funzione
Ioni negativi.
10I
Modalità automatica
Scegliendo la modalità Auto il purificatore inizierà a
rilevare la qualità dell’aria dopo il preriscaldamento
di 5 secondi. La modalità automatica rileverà
automaticamente la qualità dell’aria e imposterà
i parametri di funzionamento a seconda di essa.
Scegliendo la modalità automatica, si avrà la velocità
della ventola più appropriata.
Modalità Silent
La modalità Silent permette di oscurare l’indicatore di qualità dell’aria e impostare la
velocità delle ventole al minimo, in modo da non produrre rumore e creare un ambiente
silenzioso.
Funzione Wifi
Tenere premuto per 5 secondi il tasto Mode per attivare la funzione Wifi entro 5 secondi
dall’accensione della macchina
Regolazione velocità ventole
La velocità delle ventole può essere selezionata a 3 livelli
differenti, a seconda della potenza desiderata.
Timer
Premendo il tasto Timer si possono scegliere 3 modalità
di funzionamento: 1h, 4h e 8h, o altrimenti non
impostare il timer per avere un funzionamento continuo.
Funzione UV (funzione ioni negativi)
Premere il pulsante UV per attivare la lampada UV.
Tenere premuto per 5 secondi per disattivare la
funzione ionizzatore (la funzione ionizzatore si apre
automaticamente all’accensione della macchina)
11I
Reset
Questa funzione si attiva solamente quando il
purificatore ha raggiunto il limite massimo di utilizzo dei
filtri (1600 ore). Una volta sostituiti, premere Reset per
riattivare il purificatore.
CURA E MANUTENZIONE
PULIRE IL SENSORE DI QUALITÀ DELL’ARIA
Pulire il sensore di qualità dell’aria ogni due mesi per assicurarsi che il purificatore funzioni
al massimo delle sue prestazioni. Se il purificatore viene utilizzato in ambienti polverosi,
pulirlo più spesso
Spegnere il purificatore d’aria ed estrarre la spina prima di effettuare operazioni di pulizia e
manutenzione.
Ricordarsi che solo il pre filtro può essere pulito, gli altri filtri no.
1. Utilizzare un pennellino per pulire l’ingresso / l’uscita del
sensore della qualità dell’aria.
2. Rimuovere il coperchio protettivo del sensore di qualità dell’aria.
3. Pulire delicatamente il sensore, l’ingresso e l’uscita della qualità
dell’aria con un bastoncino di cotone bagnato e asciugarlo con dei
bastoncini di cotone asciutti.
12I
4. Rimontare il coperchio protettivo.
Per ottenere le migliori prestazioni, pulire il pre filtro ogni due mesi (circa 480 ore) dall’inizio
all’uso.
In base alla frequenza media di 8 ore al giorno, 7 giorni alla settimana.
Manutenzione parti esterne: utilizzare un panno umido (o detergente delicato) per
pulire la superficie così da evitare l’accumulo di polvere.
PULIRE IL PRE FILTRO
1. Spegnere e scollegare il purificatore dall’alimentazione
elettrica.
2. Rimuovere il pannello posteriore
3. Per rimuovere il filtro, aiutarsi con le linguette di garza
poste sul prefiltro.
4. Utilizzare una spazzola morbida o un’aspirapolvere
per rimuovere le particelle, utilizzare acqua per pulire
il filtro e riposizionarlo nella macchina quando è
completamente asciutto.
5. Reinserire il prefiltro nel purificatore e reinstallare la
piastra posteriore
6. Collegare e accendere l’alimentazione e avviare il purificatore d’aria.
13I
SOSTITUZIONE DEI FILTRI
Quando l’icona del Reset lampeggia in rosso, significa che le ore di funzionamento totale
dei filtri di 1600 ore stanno terminando; i filtri vanno sostituiti.
1. Spegnere e scollegare il purificatore
dall’alimentazione.
2. Rimuovere il pannello posteriore del purificatore.
3. Rimuovere tutti i filtri all’interno.
4. Rimuovere gli imballi dei filtri e inserirli
nel purificatore insieme al pre filtro.
5. Reinstallare il pannello anteriore,
mantenere l’allineamento e inserito
nella scanalatura fissa, quindi spingerlo
delicatamente verso l’alto.
6. Dopo aver sostituito il filtro, collegare l’alimentazione, tenere premuto il pulsante di
ripristino per 5 secondi, quindi la macchina si ripristina.
RISOLUZIONE PROBLEMI
Problema Causa Soluzione
La macchina non si Il pannello potrebbe non Rimuovere e installare il
accende essere installato. pannello per sistemarlo.
La spina di alimentazione Inserire la spina nella
non è inserita nella presa. presa.
La spina o il cavo di Contattare il servizio
alimentazione sono dan- assistenza.
neggiati.
Il purificatore non fun- La macchina non è accesa. Inserire presa e accendere
ziona nuovamente la macchina.
L’imballaggio di plastica di Prima dell’uso, rimuovere
ciascun filtro non è stato l’imballaggio di plastica di
rimosso. ciascun filtro.
La macchina è posizionata Posizionare la macchina
in modo irregolare. su una superficie piana.
14I
Il filtro è sporco. Pulire il filtro.
Le prestazioni di purifica-
Il filtro non è stato sosti- Sostituire il filtro.
zione sono scarse.
tuito.
L’ingresso o l’uscita Contattare il servizio
della macchina sono stati assistenza.
bloccati.
L’imballaggio di plastica di Prima dell’uso, rimuovere
ciascun filtro non è stato l’imballaggio di plastica di
rimosso. ciascun filtro.
Lo spazio attorno alla Garantire uno spazio
macchina non è suffi- libero di almeno 50 cm
ciente. su entrambi i lati della
presa d’aria e dell’uscita
sul retro della macchina di
almeno 10 cm.
ISTRUZIONI COLLEGAMENTO SMART
TUYA APP
1. Download e registrazione
• Inquadrare il codice QR per scaricare l’APP “Tuya”. È possibile
anche trovare l’app “Tuya” nell’APP store o in Google Play e
installarla.
• Aprire l’APP “Tuya”, premere “Registra” per registrare un
account “Tuya” con il proprio numero di telefono o e-mail.
Quindi procedere con il log in.
2. Aggiungere dispositivi in Easy Mode (consigliato)
• Assicurarsi che il purificatore sia alimentato e lo smartphone sia connesso alla rete WiFi:
premere il pulsante Mode per 4 secondi, attendere il “beep” e quindi rilasciarlo: ciò significa
che il dispositivo è pronto per l’abbinamento con lo smartphone.
• Aprire l’APP “Tuya” e premere “+” in alto a destra nell’APP. Selezionare il tipo di
dispositivo che si vuole collegare, premere “Piccoli elettrodomestici” e premere “Purificatore
d’aria”, di seguito inserire la password della rete WiFi a cui è collegato lo smartphone
e impostare la connessione a 2,4 GHz. Quindi premere “Avanti” per connettersi al
purificatore.
• Quando, finito il processo di abbinamento, viene mostrato il messaggio “Aggiunta di 1
dispositivo riuscita”, significa che la connessione è completa e il dispositivo verrà elencato
nella lista dei dispositivi associati con l’APP.
3. Aggiungere dispositivi in Access Point Mode
In caso di collegamento non riuscito in Easy Mode, è possibile aggiungere il purificatore in
AP mode.
15I
• Premere il pulsante Mode per 5 secondi fino a quando il purificatore non emette un
“beep” e la spia dell’indicatore WiFi inizia a lampeggiare velocemente, premere quindi il
pulsante Mode per 5 secondi fino a quando viene emesso un altro “beep” e l’indicatore
luminoso inizia a lampeggiare lentamente, ciò significa che il purificatore è pronto per la
configurazione in modalità AP.
• Premere “+” in alto a destra nell’APP. Selezionare “Piccolo elettrodomestico”. Quindi
inserire password della rete internet (2,4 GHZ) e selezionare “Modalità AP” in alto a
destra, premere “Connetti ora” per accedere all’interfaccia delle impostazioni WLAN nello
smartphone e selezionare la rete WiFi denominata “Tuya_XXXX” e collegarsi a questa.
• Tornare all’APP “Tuya”, la connessione inizierà automaticamente.
• Quando viene visualizzato “Aggiunto 1 dispositivo con successo”, significa che la
connessione è stata completata e il dispositivo verrà elencato nell’elenco delle APP.
Ora è possibile controllare il purificatore tramite l’APP sempre e ovunque (assicurarsi che
lo smartphone e il purificatore siano entrambi collegati alla rete internet). È possibile
condividere i dispositivi con amici o familiari dopo averli aggiunti correttamente. Inoltre
è possibile cambiare il nome del dispositivo con una frase o parola riconoscibile come per
esempio “purificatore Innoliving”.
4. Domande e Risposte
Perché non è stato possibile aggiungere il purificatore?
a. Assicurarsi che il purificatore sia acceso e vicino allo smartphone durante il processo di
connessione tra i dispositivi.
b. Assicurarsi che lo smartphone sia connesso alla rete WiFi e che il router WiFi stia
correttamente funzionando.
c. Assicurarsi che il purificatore sia pronto per la configurazione. Fare riferimento alle
istruzioni del prodotto “Aggiungere dispositivi in Easy Mode” o “Aggiungi dispositivi in
Access Point mode” per i dettagli.
d. Assicurarsi che i dispositivi collegati non abbiano raggiunto il numero massimo di router
WiFi. In caso contrario, scollegare la rete di alcuni dispositivi.
e. Assicurarsi che la password della rete WiFi sia corretta quando si aggiunge un nuovo
purificatore.
f. Assicurarsi di non aver utilizzato caratteri cinesi per nominare la rete WiFi.
È possibile controllare un purificatore con una rete 2G / 3G / 4G / 5G?
Quando si aggiunge un purificatore per la prima volta, è necessario che lo smartphone
e il purificatore siano connessi alla stessa rete WiFi. Dopo aver aggiunto correttamente il
purificatore, il purificatore si può controllare a distanza con la rete 2G / 3G / 4G / 5G.
Come si può condividere il controllo del purificatore con altri?
Aprire l’APP Tuya, selezionare purificatore e premere il pulsante nell’angolo in alto
a destra. Premere “Condivisione dei dispositivi” e “Aggiungere condivisione”, quindi
selezionare il “paese / regione” a cui appartiene l’account e inserire il “Numero account”
(un numero di telefono o un indirizzo e-mail) con cui si desidera condividere il purificatore.
16I
(Assicurarsi che il numero di telefono o l’e-mail siano registrati.)
Come si può gestire il purificatore condiviso da altri?
Aprire Tuya e scegliere il purificatore premendo l’icona del prodotto nella sezione
“Dispositivi condivisi” nella home page.
Come si può rimuovere il purificatore?
Aprire l’APP “Tuya”, selezionare il purificatore e premere il pulsante nell’angolo in
alto a destra. Premere “Altro”. Quindi premere “Rimuovi purificatore” in basso: la spia
dell’indicatore WiFi inizierà a lampeggiare di nuovo rapidamente.
Echo APP
1. Cosa serve per iniziare
Prima di utilizzare Echo per controllare il purificatore, assicurarsi di soddisfare le seguenti
condizioni.
• Possedere un dispositivo Echo come Echo, Echo Tap o Echo Dot.
• Possedere un account Amazon.
• Aver scaricato l’App “Tuya” e possedere un account correlato.
• Possedere un purificatore.
2. Aggiungere dispositivi nell’app “Tuya” (fare riferimento alle istruzioni dell’app)
3. Configurare Amazon Echo e abilitare la Skill Tuya
L’utente può configurare Echo tramite il web o l’app Alexa.
Per il collegamento alla configurazione Web: http://alexa.amazon.com/spa/index.html
Cercare “Amazon Alexa” in App Store o Google Play per installare l’app.
Di seguito un esempio tramite configurazione dell’app: (la configurazione tramite web e
app sono fondamentalmente le stesse).
4. Collegare l’account Tuya ad Alexa
• Premere “Skill e giochi” nel menu e cercare “Tuya”. Selezionare “Tuya” e premere
“ABILITA” per abilitare la Skill.
• Si verrà reindirizzati alla pagina di collegamento dell’account “Tuya”. Fare il log in con il
proprio account Tuya e la password,
senza dimenticare di selezionare il paese / regione a cui appartiene il proprio account.
Quindi premere “Collega ora” per collegare il proprio account “Tuya”.
5. Controllo tramite comandi vocali
Ora è possibile controllare i proprio dispositivi tramite Echo. È possibile utilizzare i
seguenti comandi:
> Alexa, accendi / spegni il purificatore
> Alexa, imposta il purificatore su “modalità uno”
> Alexa, imposta il purificatore su “modalità due”
> Alexa, imposta il purificatore su “modalità tre”
Avviso: Alexa potrebbe supportare solo la funzione di accensione / spegnimento o la
velocità delle ventole.
17I
ETICHETTA DATI
Innoliving Spa
Via Merloni 9 - 60131 Ancona - Italy
INN-558 PURIFICATORE ARIA
AIR PURIFIER
220-240V~50/60Hz 33W
MADE IN CHINA Lot n.
Rev.00_10.2020
Questo prodotto è conforme a tutte le direttive europee applicabili.
Leggere attentamente le istruzioni per l’uso
Classe di isolamento II
INFORMAZIONI AGLI UTENTI ai sensi del Decreto Legislativo N° 49 del 14 Marzo 2014
“Attuazione della Direttiva 2012/19/UE sui rifiuti di apparecchiature elettriche ed
elettroniche (RAEE)”
Il simbolo del cassonetto barrato riportato sull’apparecchiatura indica che il prodotto alla
fine della propria vita utile deve essere raccolto separatamente dagli altri rifiuti.
L’utente dovrà, pertanto, conferire l’apparecchiatura integra dei componenti essenziali
giunta a fine vita agli idonei centri di raccolta differenziata dei rifiuti elettronici ed
elettrotecnici, oppure riconsegnarla al rivenditore al momento dell’acquisto di nuova apparecchiatura
di tipo equivalente, in ragione di uno a uno, oppure 1 a zero per le apparecchiature aventi lato
maggiore inferiore a 25cm. L’adeguata raccolta differenziata per l’avvio successivo dell’apparecchiatura
dimessa al riciclaggio, al trattamento e allo smaltimento ambientale compatibile contribuisce ad evitare
possibili effetti negativi sull’ambiente e sulla salute e favorisce il riciclo dei materiali di cui è composta
l’apparecchiatura. Lo smaltimento abusivo del prodotto da parte dell’utente comporta l’applicazione
delle sanzioni amministrative di cui al D.Lgs n. Decreto Legislativo N° 49 del 14 Marzo 2014.
ATTENZIONE: Tensioni pericolose
Il fabbricante Innoliving S.p.a., dichiara che il purificatore d’aria INN-558 è conforme alla direttiva
2014/53/UE.
Il testo completo della dichiarazione di conformità UE è disponibile al seguente indirizzo Internet:
https://www.innoliving.it/prodotti/inn-558-purificatore-daria-2/
Potenza massima: 17.52 dBm
Banda di frequenza: 2412MHz a 2472MHz
18AIR PURIFIER GB
Thank you for purchasing Innoliving air purifier INN-558, able to give healthy and comfortable
living environment.
The problem of indoor air pollution is serious, and indoor air pollution mainly comes from
natural air pollution, pollen, dust mites, harmful gases (formaldehyde, second-hand smoke,
sweaty body odor and other substances and odors.)
Because of the existence of these sources of pollution, people often have adverse reactions
such as dizziness, drowsiness, cough, and nausea. Air quality of the room is important
to health. Using the Air Purifier, there will be a healthier and more comfortable living
environment.
Before use read carefully this manual and keep it safe for future references.
Before using the appliance, carefully read the instructions for use and in particular the
safety warnings and follow them. Keep this manual safe for the entire life of the appliance
for future references. Failure to follow the instructions could cause accidents and void the
warranty, relieving the manufacturer of all responsibility.
IMPORTANT SAFETY NORMS
• Keep all packing material (plastic bags, cardboard, polystyrene, etc.) out
of reach of children, since they are potential sources of danger and must
be disposed of as provided by law.
• Make sure that the voltage indicated on the rating label matches the
mains voltage before plugging in the appliance. Please verify also that
the socket and the power supply are correct for the required load.
• Before use, check that the power cord and plug are not visibly damaged.
If the cord or plug is damaged, it must be replaced by the manufacturer
or by an authorized technical assistance service or by a personal with
similar skill and qualification, in order to prevent any risk.
• The appliance can be used by children under the age of 8 and by people
with reduced physical, sensory or mental abilities, or without experience
or the necessary knowledge, as long as they are under supervision or
after they have received instructions relating to safe use of the appliance
and an understanding of the inherent dangers. Children must not play
19GB with the appliance. Cleaning and maintenance intended to be carried out by the user must not be carried out by unsupervised children. Keep the device far from children less than 8 years age. • Make sure children do not play with the appliance. • To unplug the power cord, always pull the plug and never the cord. • Do not touch the plug or the power cord with wet hands. • Disconnect the plug from the mains when the product is not in use. • Make sure the plug has been inserted fully into the electrical socket before turning on the appliance. • Always place the product on a flat and stable surface. • Do not use the product outdoors or near bath tub, swimming pools, showers etc. • Do not insert foreign objects into the device. • Do not obstruct the entry and exit of air in any way. • Do not add chemicals or metals inside the appliance. These components can cause damage to the product and compromise its correct functioning • Do not leave the unit exposed to direct sunlight for a long period of time. • Do not use aggressive detergents to clean the product. • Do not allow the appliance and / or the cord to come into contact with hot surfaces. • Do not use the product if it has fallen to the ground, if there are visible signs of damage or loss. Avoid bumps and falls. • In case of failure or malfunction of the appliance, switch it off, unplug and do not try to tamper with it. For repairs, contact only the authorized after sales service. 20
GB

• Use the appliance in a well-ventilated area. During use, the appliance
  must be kept at a distance of at least 10 cm from the walls to guarantee
  correct operation of the air intakes. The appliance must not be placed
  immediately under or behind a curtain or similar. Do not cover the
  appliance with blankets or similar, during use.
• Make sure the appliance is off or unplugged during care and
  maintenance operations.
• Use an easily reachable plug in case of danger.

ATTENTION: contains a UV lamp, do not stare into the light source.
• Any incorrect use of the equipment or any damage to the lamp housing
can cause the escape of dangerous UV radiation. UV-C radiation can, even
in small doses, cause damage to the eyes and skin.
• Do not use the appliance if it is damaged
• If it is necessary to replace the UV lamp, contact a specialized center, do
not try to do it independently, it could be dangerous

This appliance must be used only for the purpose for which it was designed,
i.e. as an air purifier for domestic use and in shops, offices and other similar
workplaces, on farms or similar, by customers of hotels, motels and other
residential type environments, in bed and breakfast type environments. Any
other use is considered non-compliant and therefore dangerous.
PACKAGING
Remove the packing material carefully, taking care not to damage the plastic body of the
appliance.

                                                                                       21
GB
COMPONENTS
Air outlet
Air Quality Handle
indicator
Air Quality
sensor
Air inlet
Back cover
Power cord hole
Power light HEPA filter
UV lamp
Activated carbon Pre-filter
filter
Air inlet panel
22GB
CONTROL PANEL
The control panel is touch screen and pushing the icons is possible to set and change the
functioning modes
Timer UV button ON/OFF button
Fan speed Auto and Silent Reset button
mode + wifi
Air quality indicator
Air quality indicator
(PM2.5=0~50) Perfect
Blue
(PM2.5=50~100) Good
Green
(PM2.5=100~150) Normal
Purple
(PM2.5=150~) Bad
Red
Advice: push the reset button if you want
turn the air quality indicator off.
REMOVE AND INSTALL THE BACK COVER
Keep the back handle of the purifier (air inlet)
and lift it up gently.
23GB
To reinstall the cover, align it with the holes and insert it the grooves
below, then gently push it up.
PLACE THE AIR PURIFIER
In order to make the air flowing correctly through the room and in the both sides of the
purifier, make sure the space between the inlet of the air and the wall is at least 50 cm and
the outlet of the air of at least 10 cm. TKeep the television, radio etc. 1 meter far.
Don’t plug the purifier together with television, radio and other plugs in the same socket
(screen defects and noise can be generated)
Placing the purifier in the same place for a long time can dirt the near walls.
To guarantee a good ventilation and maximum effi-
ciency to the machine, don’t block the inlet and outlet
of the air.
FILTER INSTALLATION
1. Turn off the appliance and disconnect the plug, remove the rear
panel.
2.Remove the filters
24GB
3. Remove the packaging and place the purifier on a dry, stable and horizontal ground.
4. Install all the filters in order.
5. Remember to install the pre filter as the final one.
6. Install again the inlet air panel: align it and insert it in the grooves, then push it gently.
25GB
FILTERS AND FUNCTIONS
This purifier works through a 4 phases purification system, able to purify efficiently the air
and make life healthier.
1) Pre filter
2) HEPA filter
3) Active carbons filter + photocatalyst
filter
4) UV lamp
Pre filter
It is a very tightly meshed filter (micron unit of measure), which effectively blocks 2.5mm
fibrous particulate matter.
Effectiveness rate> 99.9%. It can be easily cleaned for tens of thousands of times.
It also traps larger particles such as pet hair, dander and coarse dust, etc. being very resistant,
it can increase the life of the other filters.
HEPA filter
Super-efficient filter: the range of removal of minor particles from 0 to 0.3 microns carried
by the air flow can reach up to 99.9%. Stops the spread of allergens and bacteria in the air
stream, such as pollen, smog and viruses.
Activated carbon filter + Photocatalytic filter
This filter retains volatile organic compounds, such as secondhand smoke and some types
of polluting gases. The air is purified and the polluting molecules are completely oxidized
through the photocatalysis process.
UV lamp
The UV lamp effectively eliminates a large variety of common bacteria and viruses and
inhibits their production, acts on the filters helping them to eliminate the dirt on them.
USAGE
Plug the air purifier: it will emit a sound and all the icons will light up for 3 times and then
the machine will enter the standby mode, leaving only the power indicator in red.
Press the power button. When starting the machine, the
default mode is Auto. When the purifier is turned on,
the Negative Ion function automatically turns on
26GB
Auto Mode
Choosing the Auto mode, the purifier will start
detecting the air quality after preheating for 5 seconds.
The automatic mode will automatically detect the air
quality and set the operating parameters according to
it. Choosing automatic mode, you will have the most
appropriate fan speed.
Silent Mode
The Silent Mode allows to darken the air quality indicator and set the fan speed at the
minimum level, avoiding to produce noise and create a quiet environment.
Wifi function
Press and hold the Mode button for 5 seconds to activate the Wifi function within the first 5
seconds in which the machine is turning on.
Fan speed setting
The speed of the fans can be selected at 3 different
levels, depending on the desired power.
the fan speeds can be set among 3 different levels,
according to the required power.
Timer
Pressing the Timer Button is possible to chose 3 differen
time functioning: 1h, 4h and 8h, or otherwise not setting
it the machine will work continuously.
UV function (negative ions function)
Push the UV button to activate the UV lamp. Keep it
pushed for 5 seconds to turn the ions function OFF (this
function turns automatically ON when the machine starts
to work)
27GB
Reset
This function is activated only when the purifier has
reached the maximum limit of use of the filters (1600
hours). Once replaced, press Reset to reactivate the
purifier.
CARE AND MAINTENANCE
CLEAN THE AIR QUALITY SENSOR
Clean the air quality sensor every two months to make sure the purifier is operating at best
performance. If the purifier is used in dusty environments, clean it more often.
Turn off the air purifier and pull out the plug before cleaning and maintenance.
Remember that only the pre-filter can be cleaned, the other filters cannot.
1. Use a small brush to clean the air quality sensor inlet / outlet
2. Remove the protective cover of the air quality sensor.
3. Clean gently the sensor, the inlet and outlet of the air with a wet
cotton swab and dry with wet cotton swabs
4. Reinstall the protective cover.
28GB
For best performance, clean the pre filter every two months (approximately 480 hours) from
start to use.
This is based on the average frequency of 8 hours a day, 7 days a week.
External parts maintenance: use a damp cloth (or mild detergent) to clean the surface to
avoid the accumulation of dust.
CLEAN THE PRE-FILTER
1. Turn off and unplug the air purifier.
2. Remove the back cover
3. To remove the filter, help with the small labels on the
pre filter.
4. Use a soft brush or a vacuum cleaner to remove
particles, use water to clean the filter and reinstall it in
the machines when it’s completely dry
5. Reinstall the filter in the air purifier and reinstall the
back part.
6. Plug, turn the air purifier on and start to work.
29GB
FILTER REPLACEMENT.
When the Reset icon flashes red, it means that the total operating hours of the 1600-hour
filters are ending; the filters must be replaced.
1.Turn off and unplug the air purifier.
2.Remove the back panel from the purifier.
3. Remove all the filters.
4. Remove all the packaging and install the
filters inside the purifier together with the
pre filter.
5. Reinstall the cover, keep the alignment
and insert it in the fix groove, then push it
gently inside.
6. After rpelacing it, plug the machine and keepinh pushed the Reset button for 5 seconds
to reset the machine.
FAULT HANDLING
Problem Cause Solution
The machine doesn’t turn The panel could be not Remove and install
on. installed. the panel to solve this
problem.
The plug is not inserted in Insert the plug in the
the socket. socket.
The plug or the cable are Contact the customer
damaged. care.
The machine is not turned Insert the plug and turn
The machine doesn’t on. again the machine.
work.
The plastic packaging of Before the use, remove
each filter has not been the plastic packaging of
removed. each filter.
The machine is placed Place the machine on a
wrongly. plan surface.
30GB
The filter is dirty. Clean the filter.
The purification perfor-
The filter has not been Replace the filter.
mance is bad.
replaced.
The inlet and the outlet Contact the customer
are blocked. care.
The plastic packaging of Before the use, remove
each filter has not been the plastic packaging of
removed. each filter.
The space between the Maintain a free space of
machine is not enough. at least 50 cm on both
sides of the air inlets and
10 cm on the back for the
outlets.
SMART OPERATION INSTRUCTION
TUYA APP
1. Download & Registration
• Scan the QR code to download the “Tuya” APP. You can also
find the “Tuya” app in the APP store or Google Play and install it.
• Open the “Tuya” APP, press “Register” to register a “Tuya”
account with your phone number or e-mail. Then proceed with
the log in.
2. Add Devices in Easy Mode (Recommended)
• Make sure that the purifier is powered and the smartphone is
connected to the WiFi network:
press the Mode button for 4 seconds, wait for the “beep” and then release it: this means
that the device is ready to pair with the smartphone.
• Open the “Tuya” APP and press “+” at the top right of the APP. Select the type of device
you want to connect, press “Small appliances” and press “Air purifier”, then enter the
password of the WiFi network to which the smartphone is connected and set the connection
to 2.4 GHz. Then press “Next” to connect to the purifier.
• When, after the pairing process, the message “Adding 1 device successful” is shown, it
means that the connection is complete and the device will be listed in the list of devices
associated with the APP.
3. Add Devices in AP Mode
If failed in Easy Mode, users could also add devices in AP Mode.
• Press the Mode button for at least 5 seconds until the purifier emits a “beep” and the WiFi
indicator light starts flashing quickly, then press the Mode button for at least 5 seconds until
another “beep” sounds “and the indicator light starts flashing slowly, this means that the
31GB purifier is ready for configuration in AP mode. • Press “+” at the top right of the APP. Select “Small Appliance”. Then enter the password of the internet network (2.4GHZ) and select “AP Mode” at the top right, press “Connect now” to enter the WLAN settings interface in the smartphone and select the WiFi network named “Tuya_XXXX” and connect to this. • Go back to the “Tuya” APP, the connection will start automatically. • When “Added 1 device successfully” is displayed, it means the connection is completed and the device will be listed in the APP list. Now you can control the purifier via the APP anytime and anywhere (make sure your smartphone and purifier are both connected to the internet). You can share devices with friends or family after they are successfully added. It is also possible to change the device name with a recognizable phrase or word such as “Innoliving purifier” 4. Q&A Why was not possible to add the purifier? a. Make sure the purifier is turned on and close to your smartphone during the connection process between devices. b. Make sure your smartphone is connected to the WiFi network and that the WiFi router is working properly. c. Make sure the purifier is ready for setup. Refer to the product instructions “Add devices in Easy Mode” or “Add devices in Access Point mode” for details. d. Make sure that the connected devices have not reached the maximum number of WiFi routers. If not, disconnect the network of some devices. e. Make sure the WiFi network password is correct when adding a new purifier. f. Make sure you haven’t used Chinese characters to name the WiFi network. Is it possible to manage a purifier with a 2G / 3G / 4G / 5G network? When adding a purifier for the first time, your smartphone and purifier must be connected to the same WiFi network. After successfully adding the purifier, the purifier can be remotely controlled with the 2G / 3G / 4G / 5G network. How can I share the control of the purifier with others? Open the Tuya APP, select the purifier and press the icon in the upper right corner. Press “Device Sharing” and “Add Share”, then select the “country / region” to which the account belongs and enter the “Account Number” (a phone number or email address) with which you want to share the purifier. (Make sure the phone number or email is registered.) How can I manage the purifier shared by others? Open Tuya and choose the purifier by pressing the product icon in the “Shared devices” section on the home page. How can the purifier be removed? Open the “Tuya” APP, select the purifier and press the button in the upper right corner. Press “More”. Then press “Remove Purifier” at the bottom: the WiFi indicator light will start 32
GB

flashing rapidly again.

Echo APP
1. What you need to get started
   Before using Echo to control your purifier, make sure you meet the following conditions.
   • Have an Echo device like Echo, Echo Tap, or Echo Dot.
   • Have an Amazon account.
   • Having downloaded the “Tuya” App and have a related account.
   • Have a purifier.
2. Add devices in the “Tuya” app (refer to the app instructions)
3. Set Amazon Echo and enable Tuya Skill
   User can set up Echo via web or the Alexa app.
   For the web configuration: http://alexa.amazon.com/spa/index.html
   Search for “Amazon Alexa” in the App Store or Google Play to install the app.
   Below is an example via app configuration: (web and app configuration are basically the same).
4. Link the Tuya account to Alexa
   • Press “Skills and Games” in the menu and search for “Tuya”. Select “Tuya” and press
     “ENABLE” to enable the skill.
   • You will be redirected to the “Tuya” account link page. Log in with your Tuya account
     and password, without forgetting to select the country / region to which your account
     belongs. Then press “Connect Now” to link your “Tuya” account.
5. Control by voice commands
   Now you can control your devices via Echo. You can use the following commands:
   > Alexa, turn on / off the purifier
   > Alexa, set the purifier to “mode one”
   > Alexa, set the purifier to “mode two”
   > Alexa, set the purifier to “mode three”

Notice: Alexa may only support on / off function or fan speed

                                                                                             33
GB
RATING LABEL
Innoliving Spa
Via Merloni 9 - 60131 Ancona - Italy
INN-558 PURIFICATORE ARIA
AIR PURIFIER
220-240V~50/60Hz 33W
MADE IN CHINA Lot n.
Rev.00_10.2020
This product complies with all the applicable European directives.
Read carefully instructions manual.
Class II insulation
INFORMATION TO USERS according to Legislative Decree No. 49 of March 14, 2014
“2012/19/UE Implementation of the Directive on Waste Electrical and Electronic
Equipment (WEEE)“
The crossed-out dustbin symbol indicates that the product at the end of its life
must be collected separately from other waste. The user should, therefore, take
the equipment with the essential components at the end of its useful life to the
separate collection center of electronic and electrical waste, or return it to the retailer when
purchasing new equipment of equivalent type, in ratio of one to one, or one to zero for
devices with larger side less than 25 CM. The separate collection for the decommissioned
equipment for recycling, treatment and environmentally compatible disposal contributes
to avoid possible negative effects on the environment and human health and promotes
recycling of the materials. Improper disposal of the product by the user entails the application
of administrative sanctions according to Legislative Decree No. 49 of 14 March 2014
CAUTION:dangerous voltage
34The manufacturer Innoliving S.p.a. declares that the INN-558 air purifier complies with
Directive 2014/53 / EU.
The full text of the EU declaration of conformity is available at the following internet address:
https://www.innoliving.it/prodotti/inn-558-purificatore-daria-2/
Maximum transmission band: 17.52 dBm
Frequency band: 2412MHz a 2472MHz
35Innoliving Spa
Via Merloni, 9
60131 Ancona Italy
Tel 071 2133550
www.innoliving.it
MADE IN CHINA
Rev.00_10.2020
36Puoi anche leggere