LEOLUX NV - Automatic Dispenser - Fast & Fluid
←
→
Trascrizione del contenuto della pagina
Se il tuo browser non visualizza correttamente la pagina, ti preghiamo di leggere il contenuto della pagina quaggiù
FAST & FLUID MANAGEMENT srl
A Unit of Idex Corporation

              LEOLUX NV – Automatic Dispenser

                                                                 MANUALE OPERATIVO
                                                                 USER’S MANUAL

FAST & FLUID MANAGEMENT Srl
A Unit of IDEX Corporation
Via Pelizza da Volpedo, n° 109/111
20092 Cinisello Balsamo (MI)
ITALY
Tel. : +39 02 66091.1
Fax : +39 02 66091550
Web : http://www.fast-fluid.com/

                                     1155495A-it,en - 24/05/07                       1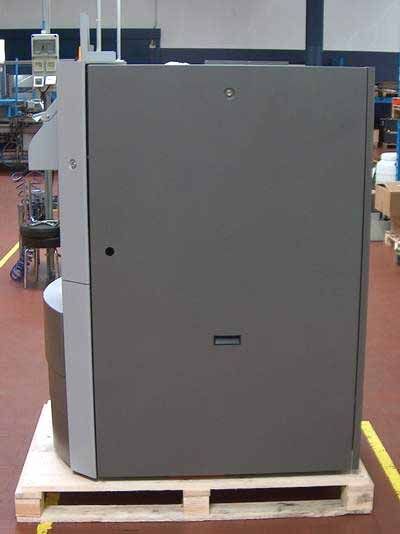
FAST & FLUID MANAGEMENT srl
A Unit of Idex Corporation

INDICE                                                                  Pagina

INFORMAZIONI GENERALI                                     ……………………………     3
LEGENDA DISPENSER                                         ……………………………     4
COME SCARICARE IL DISPENSER DAL PALLET                    ……………………………     4
COME SBLOCCARE LA TAVOLA ROTANTE                          ……………………………     5
INSTALLAZIONE COMPUTER                                    ……………………………     6
COLLEGAMENTO CAVI COMPUTER-DISPENSER                      ……………………………     6
INSTALLAZIONE PERIFERICHE COMMERCIALI                     ……………………………     7
INSTALLAZIONE/RIMOZIONE CANESTRI                          ……………………………     9
CONTROLLO E POSIZIONAMENTO POMPA E VALVOLA                ……………………………    12
SPECIFICHE PRODOTTO                                       ……………………………    13

CONTENTS                                                                Page

GENERAL INFORMATION                                       ……………………………    14
DISPENSER LEGEND                                          ……………………………    15
UNLOADING DISPENSER FROM PALLET                           ……………………………    15
UNLOCKING ROTATING TABLE                                  ……………………………    16
COMPUTER POSITIONING                                      ……………………………    17
COMPUTER-DISPENSER CABLE CONNECTIONS                      ……………………………    17
COMMERCIAL PERIPHERALS INSTALLATION                       ……………………………    18
CANISTER CLICK-IN / CLICK-OUT                             ……………………………    20
PUMP AND VALVE POSITIONING CONTROL                        ……………………………    23
PRODUCT SPECIFICATIONS                                    ……………………………    24

                              1155495A-it,en - 24/05/07                          2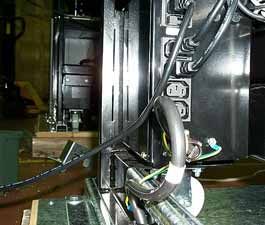
FAST & FLUID MANAGEMENT srl
A Unit of Idex Corporation

                                                ITALIANO

INFORMAZIONI GENERALI
Questo manuale spiega come installare il dispenser automatico F&FM e fornisce tutte le informazioni
necessarie per il suo utilizzo e la buona manutenzione.

Si raccomanda di leggere il presente manuale nella sua totalità e con attenzione prima di
svolgere qualsiasi operazione sul dispenser, al fine di utilizzarlo in condizioni ottimali.

Il dispenser effettua il dosaggio sequenziale delle paste coloranti per la produzione di vernici nelle
tonalità richieste.

Per garantire il buon funzionamento della macchina si raccomanda di eseguire le poche operazioni di
manutenzione necessarie nei tempi indicati. Queste dovranno essere effettuate solo ed
esclusivamente da tecnici autorizzati.
Il buon funzionamento del dispenser è garantito se esso è installato in un luogo con le seguenti
caratteristiche:

   •   Temperatura ambientale: 10÷40°C

   •   Umidità relativa: 30÷90%

           È assolutamente necessario che la linea elettrica alla quale sarà
           collegato il dispenser abbia un’efficace messa a terra

           Per garantire la massima accuratezza del dosaggio, dopo le operazioni
           di installazione e carico è consigliabile effettuare 3 dosaggi a tutta
           corsa. Il colorante dosato può essere versato nuovamente nel
           canestro.

La garanzia non è valida in caso di mancato rispetto dei criteri di cui sopra

In caso di problemi tecnici, contattare il servizio di Assistenza Tecnica del vostro rivenditore.

Copyright 2001 – FAST & FLUID MANAGEMENT S.r.l. – Milano – Italy
All rights reserved

                                         1155495A-it,en - 24/05/07                                  3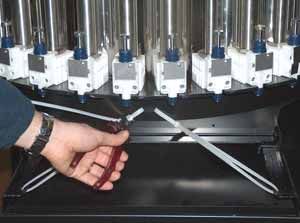
FAST & FLUID MANAGEMENT srl
A Unit of Idex Corporation

LEGENDA DISPENSER

        2                                   4

    3
                                                     1        1     Pulsante Accensione Dispenser

    5                                                         2     Pulsante Attivazione Agitazione

                                                              3     Interruttore Elevatore barattolo

                                                              4     Pulsante arresto di emergenza
                                                                    Tappo in plastica (Oppure Switch
                                                              5     Elevatore Barattolo/Elevatore di
    6                                                               Macchina)
                                                 7            6     Porta accesso al Personal Computer

                                                              7     Elevatore barattolo

COME SCARICARE IL DISPENSER DAL PALLET

                                                          •       Rimuovere i due pannelli laterali.

                                             (Fig.1)

                                                                                   (Fig.2)

                                                          •       Svitare le viti che fissano i blocchi
                                                                  ( distinguibili dal colore rosso ) al pallet su
                                                                  entrambi I lati (fig. 2)
•   Togliere le viti e liberare la scatola dal
    coperchio (fig.1).

                                           1155495A-it,en - 24/05/07                                            4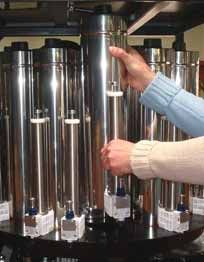
FAST & FLUID MANAGEMENT srl
A Unit of Idex Corporation

                                                           ATTENZIONE
                                                  Posizionare le rampe sul retro
                                                  del pallet (retro del dispenser)

                                                           ATTENZIONE
                                                  Scaricare il dispenser dal retro

                                                          ATTENZIONE
                                                 Scaricare il dispenser prestando
                                                 la massima attenzione durante
                                                 il   compimento        di    tale
                                                 operazione.

COME SBLOCCARE LA TAVOLA ROTANTE

                     ATTENZIONE
           Prima di accendere il dispenser
           è necessario tagliare le due
           fascette sul retro del dispenser
           (fig. 3).

                                                                        (Fig.3)

                                    1155495A-it,en - 24/05/07                        5
FAST & FLUID MANAGEMENT srl
A Unit of Idex Corporation

INSTALLAZIONE COMPUTER

                                                Posizionare la CPU del computer nella sede dedicata,
      (Fig.4)                                   sopra l’elevatore (fig. 4).

COLLEGAMENTO CAVI COMPUTER – DISPENSER
1. Collegare il cavo seriale (contrassegnato
   “PLC”) alla porta seriale predefinita
   COM1(“a” – fig. 5).

2. Collegare     il cavo dati stampante
   (contrassegnato “Printer”) alla porta seriale                                               (Fig.5)
   predefinita COM3 (“b” – fig. 5).

3. Collegare il cavo tastiera, il cavo mouse e il
   cavo monitor al computer

                                                      c

                                                      d

                 (Fig.6)

Il computer è alimentato da una delle quattro “c”. Unità di entrata alimentazione principale
prese presenti sul power box,installato sul lato “d”. Unità di uscita alimentazione pc
sinistro della macchina (fig. 6).

Collegare il cavo elettrico del dispenser alla presa (c) sul power box, ma non inserire la
spina nella presa a muro.
                                         1155495A-it,en - 24/05/07                                  6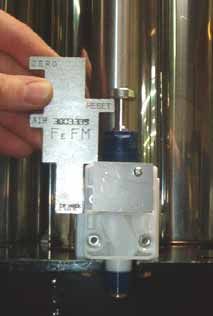
FAST & FLUID MANAGEMENT srl
A Unit of Idex Corporation

INSTALLAZIONE PERIFERICHE COMMERCIALI

                                   (Fig.7)

                                      1

                                                 2      3    4       5

                                   1Æ     Cavo   alimentazione LCD
                                   2Æ     Cavo   USB per stampante
                                   3Æ     Cavo   alimentazione stampante 12V
                                   4Æ     Cavo   PS/2 tastiera
                                   5Æ     Cavo   PS/2 Mouse

                               6

                                                                 1

             (Fig.10)                                                                  (Fig.12)
                                                      (Fig.11)            Fissare l’LCD alla piastra mediante
Per installare l’ LCD, passare il cavo Collegare il cavo di alimentazione 4 viti a brugola della lunghezza
VGA (6) attraverso la staffa porta LCD (1) come mostrato in figura
                                                                          opportuna utilizzando la chiave a
monitor come mostrato in figura 10     11                                 brugola misura 3 o 2.5

                                             3                                     6       8       7

                          7

                                                                         2

             (Fig.13)                                 (Fig.14)                         (Fig.15)
Per installare la tastiera far passare Collegare la stampante con il cavo Posizionare il Mouse e portare i
il   cavo     PS/2     dalla   fessura alimentazione (3) ed il cavo USB cavo VGA (6), cavo tastiera (7) e
rettangolare come mostrato in (2) come mostrato in figura 14              cavo Mouse (8) dal passacavo
figura 13                                                                 posto sotto il porta-tastiera

                                             1155495A-it,en - 24/05/07                                      7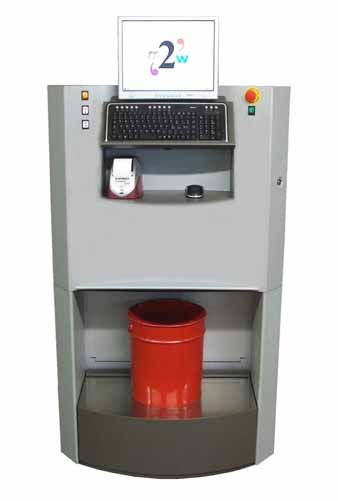
FAST & FLUID MANAGEMENT srl
A Unit of Idex Corporation

                             4

                                                                                                                 7
                                                                     7

       7
                                 5

              (Fig.16)

Connettere il cavo del Mouse al                                                            (Fig.18)
                                                     (Fig.17)
cavo (4), ed il cavo della tastiera al                                      Il cavo   VGA  (7) segue il fascio di
                                       Passare il cavo VGA (7) dal foro
cavo (5) come mostrato in figura                                            cavi  del  cablaggio come mostrato
                                       superiore del box elettronica e
16
                                       farlo uscire dal foro inferiore come in figura 18
                                       mostrato in figura 17

               7                                                                       9

                                                       (Fig.20)
              (Fig.19)                  Se si vuole installare una stampante                  (Fig.21)
Collegare il cavo VGA (7) al cavo       che non supporta la tensione 12V o       Il cavo alimentazione (9) segue il
prolunga come mostrato in figura        il connettore in dotazione, utilizzare   fascio di cavi del cablaggio come
19                                      l’ alimentatore esterno in dotazione     mostrato in figura 21
                                        con la stampante come mostrato in
                                        figura 20

                         9                                                                               9

                                                9

                                                                                                             2

                                                                                              (Fig.24)
                                                                          Connettere il cavo alimentazione
               (Fig.22)                               (Fig.23)            (9) ed il cavo USB (2) alla
Passare il cavo alimentazione (9) dal   Passare il cavo alimentazione (9) stampante come mostrato in figura
foro inferiore del box elettronica e    attraverso il passacavo come 24
farlo uscire dal foro superiore come    mostrato in figura 23
mostrato in figura 22

                                              1155495A-it,en - 24/05/07                                              8
FAST & FLUID MANAGEMENT srl
A Unit of Idex Corporation

INSTALLAZIONE/RIMOZIONE CANESTRI

•   RIMOZIONE CANESTRO 3 LITRI
Canestri posti sul perimetro esterno della tavola rotante)

     (Fig.25)    A     B C D

Canestri con capacità di 3 litri
(C – D fig. 25) o 5 litri per la
versione Large.                                    (Fig.26)                        (Fig.27)

                                    Svitare i dadi autobloccanti del Afferrare il gruppo pompa-
                                    gruppo pompa-valvola (fig. 26). valvola con una mano e il
                                                                     canestro con l’altra e tirare
                                                                     verso l’esterno con cautela
                                                                     (fig. 27).

         (Fig.28)                                                                 (Fig.29)

     Sollevare il canestro fino allo sblocco del         Sganciare il canestro tirandolo verso il
     dispositivo di fissaggio (fig. 28).                 lato esterno della tavola rotante
                                                         (fig. 29).

                                        1155495A-it,en - 24/05/07                                   9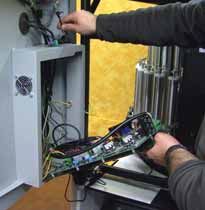
FAST & FLUID MANAGEMENT srl
A Unit of Idex Corporation

•   INTERNI da 1,5 , 5 , 10 LITRI

Operazioni di rimozione canestri da 1,5 , 5 e 10 litri

                                      Canestro 5 litri       (”A” – fig. 30)
                                      Canestro 1,5 litri     (”B” – fig. 30)
                                      Canestri 3 litri       (”C” - ”D” – fig. 30)

     (Fig.30)     A      B C D

•   Prima di rimuovere un canestro da 5 litri (A) è bene rimuovere il canestro esterno che si trova
    esattamente alla sua destra sulla fila esterna di canestri (fig. 30).
•   Prima di rimuovere uno dei canestri da 1,5 litri (B) sulle tavole a 32 canestri è bene rimuovere il
    canestro da 3 litri (D), che si trova esattamente alla sua destra sulla fila esterna di canestri (fig.
    30).
•   A questo punto è possibile rimuovere uno dei canestri interni seguendo la procedura descritta
    sotto.

RIMOZIONE CANESTRO INTERNO

       (Fig.31)                 (Fig.32)                                               (Fig.34)
                                                             (Fig.33)
Ruotare la valvola       …alla posizione di                                     ed estrarre il gruppo
d’arresto in senso       chiusura (fig. 32); in Svitare       i          dadi pompa – valvola (fig.34).
anti-orario,    dalla    tal modo sarà possibile autobloccanti           della
posizione di apertura    sbloccare il gruppo     pompa (fig. 33)
(vedi fig. 31)…          valvola - pompa senza
                         fuoriuscite di
                         colorante.

                                           1155495A-it,en - 24/05/07                                   10
FAST & FLUID MANAGEMENT srl
A Unit of Idex Corporation
(Fig.35) (Fig.36)
Rimuovere il coperchio del canestro e Ruotare l’attrezzo in senso antiorario
posizionare sulla sommità del canestro fino a sbloccare il canestro (fig. 36).
da rimuovere l’apposito attrezzo - vedi
fig.35.
Sollevare il canestro fino a sbloccare il
dispositivo di chiusura e a tal punto
staccarlo (fig.37) dalla tavola rotante
(fig. 38).
(Fig.37) (Fig.38)
Per reinstallare i canestri eseguire le medesime operazioni nella sequenza inversa, avendo cura di
muovere l’albero agitatore dalla sommità, in modo da centrare la base dell’albero nel foro
corrispondente sulla tavola rotante.
Per rimuovere il gruppo pompa – valvola di un canestro interno:
Rivedere le figure 31, 32, 33, 34, con relative istruzioni.
1155495A-it,en - 24/05/07 11FAST & FLUID MANAGEMENT srl
A Unit of Idex Corporation
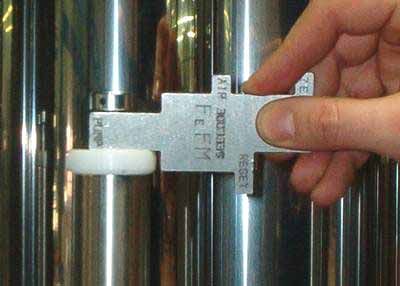
CONTROLLO E POSIZIONAMENTO POMPA E VALVOLA
Il calibro in dotazione deve essere utilizzato Utilizzare l’ indicatore di livello “RESET” per
per verificare il posizionamento dello spillo controllare la giusta posizione di lavoro dello
valvola e pompa. spillo valvola.
Utilizzare l’ indicatore di livello “PUMP” per
verificare l’ altezza dello spillo pompa dopo il
Se necessario utilizzare l’ indicatore di livello comando di Reset.
“ZERO” per controllare l’ apertura minima della
valvola. Se la posizione risultasse errata , sarà
necessario modificare il parametro “Trim”.
1155495A-it,en - 24/05/07 12FAST & FLUID MANAGEMENT srl
A Unit of Idex Corporation
SPECIFICHE PRODOTTO
Descrizione: Dispenser automatico LEOLUX NV
Volume canestro……3, 5, 10 litri
Esempi di Configurazione………13x3 litri + 6x5 litri + 2x10 litri
Capacità:
18x5 litri
32x3 litri
Ogni canestro è dotato di una pompa automatica.
Pompe:
Le pompe sono in acciaio inox con pistoni in acciaio inox e Guarnizioni in PTFE
Velocità pompe: Variabile; da impostare in funzione delle caratteristiche del colorante e/o ambientali.
Valvole a saracinesca: La pompa dosatrice di ciascun canestro interno è dotata di valvola di intercettazione.
Pulitura ugelli: Sistema di pulitura automatica a cinghia. Totalmente a secco.
Capacità minima di
1/8 shot = 1/384 Oz
dosaggio:
Tutti i canestri sono dotati di sistema di agitazione e di pale regolabili in due differenti
Motori agitatore:
posizioni
I canestri sono alloggiati su una tavola rotante.
Tavola canestri: La tavola ruota automaticamente ed inizia il processo di dosatura a partire dal primo
canestro fino all’esaurimento della formula
L’elevatore barattoli può alloggiare qualsiasi recipiente compreso tra gli 0,5 e i 20 litri.
Elevatore barattoli: Altezza massima recipienti : 430 mm.
Altezza minima recipienti : 90 mm.
Rilevamento barattoli: Sensore a fotocellula con raggio d’azione di circa 8 cm.
La macchina funziona ai seguenti voltaggi:
• 220 - 230 - 240 V 50 Hz
Elettricità: • 220 V 60 Hz
• 110 V 60 Hz
• 100 V 60 Hz
Inferiore a:
• 2,5 Ampere 220 - 240V
Consumo elettrico:
• 5 Ampere 100 - 110V
• circa 400 - 500 Watt
Altezza…………mm 1460÷1660
Larghezza…….mm 850
Dimensioni:
Profondità…….mm 1200
Peso…………….Kg 365
Posizionamento
Orizzontale, in posizione stabile
dosatore:
Collegamento
Via porta seriale RS 232
Computer-dispenser
Computer: (Opzionale) IBM PC LG300 o altro modello compatibile
Dimensione imballaggio (mm):
Distribuzione:
1290 x 890 x 1870 (altezza)
Ricambi: I pezzi di ricambio consigliati sono elencati nel catalogo.
1155495A-it,en - 24/05/07 13FAST & FLUID MANAGEMENT srl
A Unit of Idex Corporation
ENGLISH
GENERAL INFORMATION
This Manual explains how to install the FAST automatic color dispenser and gives all the information
to ensure easy use and good maintenance.
It is very important to read this manual completely and carefully before you do any
operation on the dispenser in order to start operating with the dispenser in perfect
condition for use.
The dispenser provides the sequential dosing of the coloring pastes for the production of paints in
the requested color.
In order to assure a good operation of the device, the few required maintenance operations must be
carried out in the recommended times and only by authorized technicians.
Dispenser good working is guaranteed if it is installed in a place with the following criteria:
• ambient air temperature: 10÷40°C
• elative humidity: 30÷90%
It is necessary that the electric power where the dispenser is connected
has an efficient grounding.
To ensure the best accuracy in dosing, after machine installation and
filling operations, 3 full stroke dosages should be performed. The
dispensed colorant can be poured into its canister again.
If anything in this criteria is not respected it will make the dispenser warranty lost.
For the technical assistance, call the Technical Service of the dispenser’s seller.
Copyright 2001 – FAST & FLUID MANAGEMENT S.r.l. – Milano – Italy
All rights reserved
1155495A-it,en - 24/05/07 14FAST & FLUID MANAGEMENT srl
A Unit of Idex Corporation
DISPENSER LEGEND
2 4
3
1 1 Dispenser ON/OFF button
5 2 Stirring ON/OFF button
3 Can Elevator Switch
4 Emergency Stop
Plastic cap (In case of presence of
5 Machine Elevator, it is replaced by Can
6 Elevator/Machine Elevator Switch)
7 6 Computer Door
7 Can Elevator
UNLOADING DISPENSER FROM PALLET
• Take out the two side panels.
(Fig.1)
(Fig.2)
• Undo the screws fixing the brackets to the
pallet on both sides (fig. 2).
Cut all bindings and take off the cardboard box
upwards (fig. 1).
1155495A-it,en - 24/05/07 15FAST & FLUID MANAGEMENT srl
A Unit of Idex Corporation
WARNING
Place the slopes in the backside
of the pallet (back side of
dispenser).
WARNING
Unload the dispenser from the
backside.
WARNING
Unload the dispenser carefully.
UNLOCKING THE ROTATING TABLE
WARNING
Before switching on the
dispenser, cut off the two
collars. They are located in the
rear internal part of the
dispenser (fig. 3).
(Fig.3)
1155495A-it,en - 24/05/07 16FAST & FLUID MANAGEMENT srl
A Unit of Idex Corporation
COMPUTER POSITIONING
Place the computer onto its seat (fig. 4).
(Fig.4)
COMPUTER – DISPENSER CABLE CONNECTION
1. Connect the serial cable (marked ”PLC”) to
the computer serial port COM1 (“a” – fig.
5).
2. Connect the printer data cable (labelled (Fig.5)
“PRINTER”) to the computer port COM3
(“b” – fig. 5).
3. Connect the keyboard cable, mouse cable
and monitor cable to the computer.
c
d
(Fig.6)
The computer gets power supply from one of the “c”. Main power input;
four sockets present on the machine power box “d”. PC power output;
installed on the left side of the machine (fig. 6).
Connect the dispenser power supply cord to the socket (c) on electrical box
but do not connect the cord to the power.
1155495A-it,en - 24/05/07 17FAST & FLUID MANAGEMENT srl
A Unit of Idex Corporation
COMMERCIAL PERIPHERALS INSTALLATION
(Fig.7)
1
2 3 4 5
1Æ LCD Power Supply
2Æ Printer USB cable
3Æ Printer Power Supply 12V
4Æ Keyboard PS/2 cable
5Æ Mouse PS/2 cable
6
1
(Fig.12)
(Fig.10) (Fig.11) Fix the LCD by the 4 Allen screws or
button-head screws (depending on
To install the LCD, make the VGA Connect the LCD power supply
the right threaded length) by means
cable (6) pass through the bracket cable (1) of an Allen wrench dim. 3 or 2.5
3 6 8 7
7
2
(Fig.13) (Fig.14) (Fig.15)
Place the Mouse and make the VGA
To install the keyboard, make the Connect the printer to the power cable (6), the keyboard (7) and
PS/2 cable pass through the supply and the USB cable Mouse cable (8) pass through the
bracket rectangular pocket diaphragm hole behind the keyboard
1155495A-it,en - 24/05/07 18FAST & FLUID MANAGEMENT srl
A Unit of Idex Corporation
4
7
7
7
5
(Fig.16)
Connect the Mouse cable to the
cable (4), the keyboard cable to (Fig.18)
the cable (5) (Fig.17) The VGA cable (7) should follow
Make the VGA cable (7) pass the cables bundle as depicted
through the electronic frame upper above
and lower hole
7
9
(Fig.20)
(Fig.19) In case the printer does not (Fig.21)
Connect the VGA cable (7) to the support 12V or the cable (3), use The power supply cable (9) should
VGA extension the power supply provided along follow the cable bundles as
with the printer showed above
9 9
9
2
(Fig.24)
Connect the power supply cable
(Fig.22) (Fig.23) (9) and the USB cable (2) to the
Make the cable (9) pass through Make the cable (9) pass through printer
the electronic frame lower and the diaphragm hole
upper hole
1155495A-it,en - 24/05/07 19FAST & FLUID MANAGEMENT srl
A Unit of Idex Corporation
CANISTER CLICK-IN / CLICK-OUT
• 3 LITERS CANISTER CLICK-OUT
(Canisters placed on the external periphery of the rotating table).
(Fig.25) A B C D
3 litres canisters (C – D fig. 25).
(Fig.26) (Fig.27)
Unscrew the locking nuts of the Hold the pump and valve
pump and valve group (fig. 26). group with one hand and the
canister with the other one
and extract to the external side
moving slightly (fig. 27).
(Fig.28) (Fig.29)
Move up the canister until the canister Release the canister moving it to the
fattener will be disengaged (fig. 28). external side of the rotating table
(fig. 29).
1155495A-it,en - 24/05/07 20FAST & FLUID MANAGEMENT srl
A Unit of Idex Corporation
• 1, 5 , 5, 10 LITERS CANISTER CLICK-OUT
1,5 , 5, 10 litres canister removal operations
5 litres canister (”A” – fig. 30)
1,5 litre canister (”B” – fig. 30)
3 litres canisters (”C” - ”D” – fig. 30)
(Fig.30) A B C D
• If you want to remove a 5 litres canister (A) you should remove first the 3 litres canister (C)
placed immediately at its right side on the external row of canisters (fig. 15).
• If you want to remove one of the 1,5 litres canister (B) you should remove first the 3 litres
canister (D) immediately at its right side on the external row of canisters (fig. 15).
• After that, to remove one of the 1,5 or 5 litres canister follow the next procedure.
CLICK-OUT INTERNAL CANISTER
(Fig.31) (Fig.32)
(Fig.33) (Fig.34)
Turn the cut-off cock …to the close position
in clockwise direction (fig. 32); in this way it Unscrew the locking and keep out the entire
from the open position will be possible to nuts of the pump pump & valve group
(see picture fig. 31)… release the entire valve (fig. 33) (fig. 34).
& pump group without
any colorant leakage..
1155495A-it,en - 24/05/07 21FAST & FLUID MANAGEMENT srl
A Unit of Idex Corporation
(Fig.35) (Fig.36)
Remove the canister lid and place the
proper tool, shown on enclosed picture Turn the tool in anticlockwise direction
(fig. 35), on the top of the canister to be until the canister is released (fig. 36).
removed.
Move up the canister until the canister
fasteners will be disengaged and
extract it (fig. 37) out from the rotating
table (fig. 38).
(Fig.37) (Fig.38)
To insert again the canisters in its position, proceed with inverse operating sequence having care
to move the stirring shaft from the top part, in order to centre the bottom part of the stirring
shaft into the relative hole of the rotating table.
To remove the internal canister valve - pump group:
To check the pictures 31, 32, 33, 34, with specifically instructions.
1155495A-it,en - 24/05/07 22FAST & FLUID MANAGEMENT srl
A Unit of Idex Corporation
PUMP AND VALVE POSITIONING CONTROL
Use the side of the gauge marked “RESET” to
The shown tool should be used to verify the control the right working position of the valve
positioning of the valve and pump needle. needle.
Use the side of the gauge marked “PUMP” to
If necessary use the side of the gauge marked control the height of the pump rod after the
“ZERO” to control valves minimum opening. “Reset” command.
If the position would be wrong , will be
necessary modify the “Trim” parameter.
1155495A-it,en - 24/05/07 23FAST & FLUID MANAGEMENT srl
A Unit of Idex Corporation
PRODUCT SPECIFICATIONS
Description: Automatic Dispenser LEOLUX NV
Canister Sizes……3, 5, 10 litri
Examples of Configuration………13x3 litri + 6x5 litri + 2x10 litri
Capacity:
18x5 litri
32x3 litri
Each canister is fitted with one pump, which is automatically driven.
Pumps:
Pumps are made of stainless steel with pistons resistant to waterborne pastes.
Pumps speed: Variable and to be set to meet environmental conditions.
Gate valves: The dispensing pump valve on each canister is fitted with a nozzle closer.
Cleanness of the
Automatic dry belt cleaning device.
nozzle:
Dispense gauge: 1/8 shot = 1/384 Oz.
All canisters have a stirrer mechanism. The stirring mechanism is constructed through
Stirrer motors:
the bottom of the canister without inclusion of air.
The canisters are fitted on a rotating table
Canisters table: The table turns automatically and starts the dispensing in sequence from the first
required canister and works off the colour recipe.
Movable can table has the capacity to take all cans between 0,5 and 20 litres.
Can table capacity: Maximum cans height: 430 mm.
Minimum cans height: 90 mm.
Can detection: Sensor with a range of 8 cm about.
The equipment can be used in countries with the following electrical requirements:
• 220 - 230 - 240 V 50 Hz
Electricity: • 220 V 60 Hz
• 110 V 60 Hz
• 100 V 60 Hz
less than:
• 2,5 Ampere 220 - 240V
Electrical consumption:
• 5 Ampere 100 - 110V
• about 400 - 500 Watt
Height ……mm 1460÷1660
Width …… mm 850
Dimensions:
Depth …… mm 1200
Weight ……Kg 365
Dispenser positioning: Horizontal, in stable position.
Computer - dispenser
Serial port RS 232
connection:
Computer: IBM PC LG300 or any compatible
Packaging size (mm):
Distribution:
1290 x 890 x 1870 (h)
Spare parts: Recommended spare parts are listed in the catalogue.
1155495A-it,en - 24/05/07 24Puoi anche leggere