JUNIOR ( VJ-1P-1E) MANUALE DI ISTRUZIONI INSTRUCTIONS FOR USE BEDIENUNGSANLEITUNG - Royal Falcon Enterprises
←
→
Trascrizione del contenuto della pagina
Se il tuo browser non visualizza correttamente la pagina, ti preghiamo di leggere il contenuto della pagina quaggiù

MANUALE DI ISTRUZIONI
INSTRUCTIONS FOR USE
BEDIENUNGSANLEITUNG

JUNIOR ( VJ-1P-1E)
 OPTION
   CAPPUCCINATORE NERO
   BLACK CAPPUCCINO MAKER
   CAPPUCCINO - SCHÄUMER SCHWARZ
   ATTACCO A RETE IDRICA
   DIRECT WATER CONNECT
   ZUSATZ FÜR DEN DIREKTEN WASSERANSCHLUSS
   ADATTATORE CIALDE
   POD ADAPTER
   ADAPTER FÜR KAFFEEPADS
                                             1213_Rev005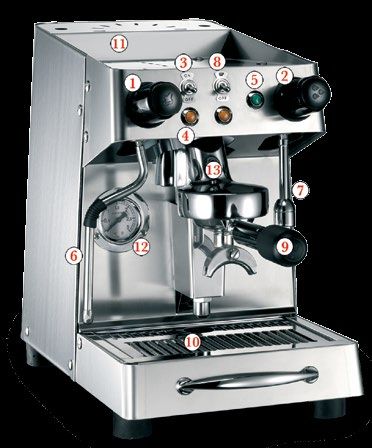
IL PRODOTTO NON PUO’ ESSERE AVVIATO ALLO SMALTI-
MENTO NEL NORMALE CICLO DI RACCOLTA RIFIUTI, MA
SMALTITO NEI CENTRI AUTORIZZATI.

THE PRODUCT CANNOT BE DISPOSED OF AS NORMAL WASTE,
BUT MUST BE TAKEN TO AN AUTHORIZED DISPOSAL CENTRE.

DAS PRODUKT DARF NICHT DEM NORMALEN ABFALLKREIS-
LAUF ZUGEFÜHRT WERDEN, SONDERN IST IN AUTORISIER-
TEN ZENTREN ZU ENTSORGEN.

INDICE / INDEX
ITALIANO ______________________________________________ 1-9
      Avvertenze di sicurezza
      Controindicazione d’uso
      Presentazione
      Accessori in dotazione
      Installazione
      Macchina con allacciamento a rete idrica
      Accensione macchina
      Erogazione caffè
      Erogazione vapore e acqua calda
      Istruzioni dosatura elettronica
      Manutenzione
      Mini addolcitore a resine
      Informazioni pratiche e suggerimenti
      Dichiarazione di conformità
ENGLISH ______________________________________________ 10-18
      Safety warnings
      Precautionary measures
      Introduction
      Accessories supplied
      Installation
      Machine with connection to the mains water supply
      Machine ignition
      Coffee delivery
      Steam and hot water delivery
      Instructions for electronic dosing
      Maintenance
      Mini resin water softener
      Practical information and suggestions
      Declaration of conformity
DEUTSCH _____________________________________________ 19-27
      Sicherheitshinweise
      Unzweckmäßiger Gebrauch
      Einleitung
      Mitgeliefertes Zubehör
      Installation
      Kaffeemaschine mit Zusatz für den direkten Wasseranschluss
      Einschaltung der Maschine
      Kaffeezubereitung
      Dampfausgabe und Wasserausgabe
      Anweisungen zur elektronischen Dosierung
      Wartung
      Mini-Enthärter
      Praktische hinweise und Anregungen
      Konformitätserklärung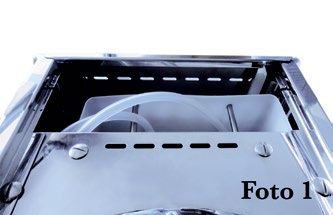
MACCHINE PER CAFFÈ ESPRESSO
                           MANUALE di ISTRUZIONE
                              1. AVVERTENZE DI SICUREZZA
    ◆ Prima di collegare la macchina accertarsi che i dati di targa siano rispondenti a quelli della rete di
       distribuzione elettrica. Collegare l’apparecchio solo a impianto e prese di corrente aventi portata
       minima di 10 A e dotate di efficiente messa a terra e salvavita.
    ◆ In caso di incompatibilità tra la presa e la spina dell’apparecchio, fare sostituire la presa con un’altra
       di tipo adatto da personale professionalmente qualificato.
    ◆ È vietato l’uso di adattatori, prese multiple e/o prolunghe.
    ◆ In caso di dubbio o di incertezza far controllare da personale qualificato l’impianto di alimentazione
        elettrica, che deve rispondere ai requisiti disposti dalle normative di sicurezza vigenti, fra i quali:
         - efficace messa a terra;
         - sezione dei conduttori sufficiente alla potenza di assorbimento;
         - dispositivo salvavita efficiente.
    ◆ L’apparecchio deve essere installato solo in luoghi ove il suo impiego e il suo mantenimento sono
       riservati a personale qualificato.
    ◆ L’apparecchio non deve essere usato da bambini o da persone con capacità fisiche, sensoriali o men-
       tali ridotte o privi di esperienza e conoscenza dell’apparecchio, salvo che non siano sorvegliati o che
        non siano stati opportunamente istruiti.
    ◆ I bambini devono essere supervisionati per assicurarsi che non giochino con l’apparecchio.
    ◆ Non esporre la macchina a intemperie o installarla in ambienti a elevata umidità come locali da
       bagno ecc... Non tirare il cavo di alimentazione o l’apparecchio con mani o piedi bagnati o umidi. Non
       lasciare l’apparecchio contenente acqua in ambienti a temperatura inferiore o uguale a 0°C.
       La macchina non può essere installata in un ambiente all’aperto, non protetto da eventi atmosferici
       o comunque con temperatura inferiore a 5 °C.
    ◆ Prima di qualsiasi operazione di manutenzione interna, mettere l’interruttore generale nella posizione
        OFF o staccare la spina dalla presa di alimentazione. A macchina elettricamente collegata, non in-
        trodurre mai le mani o altri oggetti all’interno della stessa.
    ◆ Durante la pulizia dell’apparecchio non immergerlo in acqua.
        Non mettere mai l’apparecchio sotto il rubinetto per aggiungere l’acqua nel serbatoio.
    ◆ Non ostruire le griglie di aspirazione o di dissipazione, in particolare non coprire con panni o altro il
        piano scaldatazze.
    ◆ L’apparecchio non deve essere spostato durante il funzionamento.
    ◆ Utilizzare solo accessori e ricambi autorizzati dal produttore. Questo significa garanzia di sicuro fun-
        zionamento privo di inconvenienti.
    ◆ In caso di emergenza, come principio d’incendio, rumorosità anomala, surriscaldamento, ecc... interve-
       nire immediatamente a staccare l’alimentazione elettrica di rete, chiudere i rubinetti del gas e dell’acqua.
    ◆ In caso di guasto e/o cattivo funzionamento dell’apparecchio, spegnerlo e non manometterlo. Per
        eventuali riparazioni rivolgersi solamente ad un centro assistenza autorizzato dal costruttore e richiede-
         re l’utilizzo di ricambi originali. Il cavo di alimentazione di questo apparecchio non deve essere sosti-
        tuito dall’utente. Se il cavo è danneggiato o deve essere sostituito, rivolgersi ad un centro autorizzato.
    ◆ Conservare con cura questo libretto per ogni ulteriore consultazione. Per operazioni diverse da quelle
        descritte in questo manuale, consultare il nostro centro assistenza.
                    Il mancato rispetto di queste avvertenze può compromettere la sicurezza
                    dell’apparecchio. Un’errata installazione puó causare danni a persone e
                    cose per i quali il costruttore non può considerarsi responsabile.

1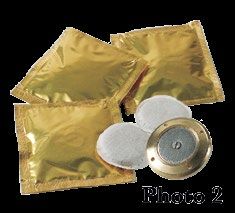
2. CONTROINDICAZIONE D’USO
Le macchine sono destinate ad uso esclusivamente alimentare per cui é vietato l’impiego di liquidi o
materiali di altro genere che possano generare pericoli e inquinare gli erogatori.
Questo apparecchio è destinato all’uso domestico e applicazioni simili, ad esempio: aree di ristoro per
il personale di uffici, negozi e/o altri ambienti di lavoro; aziende agricole; utilizzo da parte di clienti di
alberghi, motel o altri ambienti a carattere residenziali; negli ambienti tipo bed and breakfast.
Il costruttore declina ogni responsabilità per danni a persone o cose dovuti ad uso improprio, errato o
irragionevole e a riparazioni effettuate da personale non qualificato.

                                     3. PRESENTAZIONE
Questo libretto costituisce una guida rapida e semplice alla manutenzione ed uso delle macchine per
caffè. Leggere attentamente quanto riportato nelle sezioni che compongono questo manuale.
La ditta assicura, nel caso vi fossero problemi e mal funzionamenti, la sua più ampia collaborazione
tramite i suoi centri assistenza. Fate controllare almeno una volta all’anno la Vostra mac-
china per caffè da personale qualificato. Questa costante attenzione, renderà la macchina più
efficiente e sicura. Le macchine sono state progettate e costruite nel rispetto di tutte le caratteristiche
che contraddistinguono le tradizionali macchine per caffè espresso da bar: materiali nobili quali rame
e acciaio e componenti affidabili, rendono le macchine costruite dalla ditta, sicure, affidabili e funzio-
nali.L’eventuale diverso utilizzo non contemplato nelle riportate istruzioni, solleva la ditta da qualsiasi
responsabilità per eventuali danni a persone o cose.

                                                                           Junior Plus pulsante

                                                                            Junior elettronica

                        Junior ELA                                            Junior pulsante
      Manopola erogazione vapore                             Interruttore/Pulsantiera erogazione caffè
      Manopola/Interruttore erogazione acqua                 Portafiltro
      Interruttore generale ON/OFF                           Vaschetta raccogligocce
      Spia rossa alimentazione                               Griglia superiore portatazze
      Spia verde resistenza                                  Manometro pressione caldaia (0-3 bar)
      Lancia vapore                                          Gruppo erogatore caffè
      Lancia acqua
                                                                                                                 2
4. ACCESSORI IN DOTAZIONE

    Filtro una tazza                   Filtro cieco

    Filtro due tazze                   2 Molle fermafiltro

    Baccuccio una tazza                Beccuccio due tazze

    Mini addolcitore                   Pressino

    2 Portafiltri

    Spazzolino di pulizia

    Cucchiaino dosatore

3
5. INSTALLAZIONE
Prima di azionare l’interruttore di accensione generale ON/OFF (3) in posizione ON, si
raccomanda di caricare con acqua la tanica posteriore posta sotto la griglia portatazze (11).
1) Togliere l’imballo, verificando all’istante l’integrità della macchinae che non abbia subito danni.
2) Posizionare l’apparecchio sopra un tavolo o bancone robusto ed in piano, vicino ai punti di colle-
gamento elettrico ed idraulico. È necessario che la superficie più alta dell’apparecchio sia ad almeno
1,5 m da terra. La macchina deve essere installata in posizione orizzontale. L’inclinazione del piano di
appoggio non deve essere maggiore di 1°. Per garantire il normale esercizio, l’apparecchio deve essere
installato in luoghi in cui la temperatura ambiente sia compresa tra una temperatura +5°C ÷ +32°C
e l’umidità non superi il 70%. Non usare getti d’acqua, né installare in luoghi dove vengano usati getti
d’acqua. Accertarsi che la tensione della rete elettrica corrisponda a quella indicata nelle caratteristiche
tecniche.
3) Togliere la griglia superiore (11), estrarre il conteni-
tore dell’acqua posto all’interno della macchina e sciac-
quarlo (Foto 1).
4) Riempire con circa 3 litri di acqua pulita la tanica,
posizionarla nuovamente nella sua sede e inserirvi i tubi
di silicone con addolcitore collegato. Richiudere la gri-
glia superiore (11) della macchina.
5) Prima della messa in funzione, l’installatore deve ve-
rificare che la macchina sia stata collegata correttamen-
te all’impianto elettrico utilizzatore e all’impianto di terra, verificando l’efficienza della protezione dai
contatti indiretti. In Europa collegare alla rete elettrica il cavo omologato H05VV-F 3G 1,5 mm con
spina Schuco. In Usa-Canada collegare alla rete elettrica il cavo omologato Type SJTO, rated 3x14
AWG, 300 V, 105°C con SPINA NEMA 5x15P.
È VIETATO UTILIZZARE LA MACCHINA IN ASSENZA DI UN EFFICACE E
SICURO COLLEGAMENTO DI MESSA A TERRA.
5a. MACCHINA CON ALLACCIAMENTO A RETE IDRICA
Nel caso la macchina sia stata acquistata con allacciamento a rete idrica, chiamare un tecnico spe-
cializzato. Il tecnico dovrà collegare, tramite tuboflex in dotazione (3/8’’), il raccordo di carico della
macchina al sistema di trattamento dell’acqua destinata al consumo umano (o potabile) (non previsto
in dotazione) (usare solo tubi idonei al contatto con acqua destinata al consumo umano secondo legi-
slazione del paese di utilizzo del prodotto). È necessario installare un riduttore di pressione.
Infine mettere l’addolcitore in fase di lavoro e verificare che non ci siano delle perdite.
6. ACCENSIONE MACCHINA
Prima dell’accensione della macchina, si consiglia di controllare la presenza di acqua nella
tanica posteriore posta sotto la griglia portatazze (11).
1) Azionare l’interruttore generale ON/OFF (3) in posizione ON. La spia rossa (4) si accenderà.
2) All’accensione della macchina la scheda elettronica controlla lo stato del livello di acqua in caldaia e
dopo circa 3 secondi avviene il riempimento tramite l’abilitazione della pompa e della elettrovalvola di
carico. La macchina inizierà a riempirsi di acqua automaticamente sino al raggiungimento del livello
impostato (sonda autolivello in caldaia).
NB: Le macchine con tanica interna a innesto rapido incorporano un sistema di sicurezza di livello.
Se entro 180’’ la sonda non rileva l’acqua in caldaia, parte un segnale acustico intermittente con
frequenza di ripetizione elevata. Per resettare l’allarme spegnere e riaccendere la macchina. In caso il
4problema persista, verificare eventuali anomalie nella tanica e nei tubi di silicone di entrata dell’acqua.
3) Al raggiungimento del livello, la pompa si ferma. La spia verde resistenza (5) si accende e inizia il
riscaldamento dell’acqua.
Si consiglia di far uscire acqua dal gruppo di erogazione (13) per 5 secondi in modo da eliminare
eventuali bolle d’aria nel circuito termosifonico e permetterne una migliore termocompensazione.
4) Attendere circa 15-20 minuti per permettere alla macchina di raggiungere la temperatura di lavoro.
5) Lo spegnimento della spia verde (5) segnala che la macchina ha raggiunto la pressione prestabilita.
La spia rossa (4) rimarrà sempre accesa per segnare la tensione di alimentazione.
NB: In caso di primo utilizzo mantenere la macchina in temperatura (senza erogare acqua e caffè) per
circa 2 ore. Si consiglia di aprire il rubinetto dell’acqua (2) e di erogare in un bricco almeno 0,5 litri
di acqua per consentirne il recircolo. Far uscire acqua dal gruppo di erogazione (13) per 30 secondi e
aprire il rubinetto del vapore (1) per 10 secondi.
6) La mancanza di acqua nella tanica posteriore sarà avvisata da un segnale acustico. La macchina ar-
resterà tutte le funzioni elettriche e idrauliche, pur mantenendo la spia rossa (4) accesa. Riempiendola
di acqua, il micro interruttore o il sensore elettronico di livello della tanica riattiverà tutte le funzioni
nuovamente.
7) Il manometro (12), posto frontalmente, rileva in ogni momento la pressione interna della caldaia
(0,9-1,1 bar).
NB: Nelle macchine provviste di un secondo manometro, questo rileva in ogni momento la pressione
di erogazione del caffè (8-10 bar).
8) Visionare abbastanza frequentemente il manometro (12) per controllare la pressione in caldaia.
La macchina è dotata di dispositivi di sicurezza che intervengono in caso di anomalie alla pressione
interna alla caldaia.
7. EROGAZIONE CAFFÈ
1) Per erogare caffè dal gruppo, dosare la giusta quantità di caffè MACINATO BAR (circa 7 grammi
pari ad 1 cucchiaino dosatore), nel portafiltro (9) con uscita singola.
2) Pressare il caffè con l’apposito pressino.
3) Inserire il portafiltro (9) nel gruppo erogatore caffè (13) ruotandolo
da sinistra a destra sino al bloccaggio dello stesso.
4) Posizionare una tazza sotto il portafiltro (9).
5) Avviare l’erogazione tramite interruttore (8) o tramite pulsantiera
elettronica (vedere cap. 9).
6) Al raggiungimento della quantità di caffè desiderata, fermare l’e-
rogazione azionando l’interruttore (8) verso OFF.
7) Se si desidera fare altri caffè, togliere il portafiltro (9) ruotandolo
da destra a sinistra e vuotare i fondi di caffè. Ripetere poi le operazioni sopra elencate.
8) Per ottenere due caffè, utilizzare il portafiltro (9) a due uscite con due dosi del cucchiaino dosatore.
9) Acquistando l’apposito adattatore (option), è possibile utilizzare anche la cialda di caffè preconfezio-
nata da 7 grammi o 14 grammi, rispettivamente per una o due tazze di caffè (Foto 2).
Ricordarsi di pulire sempre accuratamente i filtri nel cambio da macinato a cialda preconfezionata.
Fare attenzione nella messa in funzione della macchina per caffè. Le temperature elevate
del tubo vapore (6), del tubo acqua (7) e del gruppo erogazione cromato (13) possono
provocare scottature. Non sganciare per nessun motivo il portafiltro dal gruppo, durante
l’erogazione del caffè. PERICOLO SCOTTATURE.
8. EROGAZIONE VAPORE E ACQUA CALDA
1) Per erogare vapore, operare sulla manopola laterale sinistra (1).
52) Per erogare acqua calda, operare sula manopola o azionare l’interruttore (2).
Vapore ed acqua calda sono in pressione. PERICOLO USTIONI.
9. ISTRUZIONI DOSATURA ELETTRONICA
Si rimanda al libretto dell’utilizzatore specifico per ogni modello.
10. MANUTENZIONE
◆ L’accesso alla zona di servizio è limitata alle persone che hanno la conoscenza e l’esperienza pratica
dell’apparecchio, specialmente quando si tratta di sicurezza e di igiene.
◆ Qualsiasi manutenzione dell’apparecchio deve essere effettuata in un ambiente in cui la temperatura
sia compresa tra una temperatura +5°C ÷ +32°C.
◆ Con un panno pulito o carta pulita ad uso alimentare pulire la lancia del vapore dopo ogni utilizzo
per evitare le incrostazioni e l’otturazione dei fori di uscita vapore.
◆ Vuotare e pulire i filtri del caffè tutte le sere; togliere il filtro e pulire con l’apposito spazzolino l’in-
terno; immergerli in acqua calda al fine di dissolvere i grassi del caffè.
◆ Pulire la vaschetta raccogligocce da residui del caffè che si vanno depositando sul fondo per evitarne
l’incrostazione.
◆ Con l’apposito filtro cieco in dotazione, eseguire il lavaggio del gruppo erogazione utilizzando un
specifico detergente (da richiedere ai nostri centri assistenza). Procedere come segue:
1- Inserire il filtro cieco nel portafiltro e aggiungere il detergente secondo le dosi indicate nella con-
fezione.
2- Inserire il portafiltro nel gruppo erogatore.
3- Accendere l’erogazione per 10 secondi. Fermare per 10 secondi. Ripetere per 5 volte.
Dell’acqua mista a schiuma uscirà dalla valvola di scarico dentro la vaschetta raccogligocce.
4- Rimuovere il portafiltro. Accendere l’erogazione e risciacquare il portafiltro con l’acqua calda che
esce dal gruppo erogatore. Fermare l’erogazione.
5- Inserire il portafiltro nel gruppo erogatore. Per risciacquare ripetere il punto 3 senza detergente.
6- Sostituire il filtro cieco nel portafiltro con il filtro corretto e fare un espresso da eliminare.
◆ Le parti esterne della macchina devono essere pulite con un panno umido e non utilizzare mai de-
tersivi o sostanze abrasive. Non pulire la macchina con getti d’acqua.
◆ Per pulire il portafiltro ed i cestelli del filtro, preparare in un contenitore di plastica o acciaio inox
6una soluzione con acqua calda e detergente, ed immergerli nella soluzione per almeno 30 minuti.
Sciacquarli con acqua pulita. Una frequente pulizia consentirà di ottenere un caffè dolce, oltre a pro-
lungare la durata della vostra macchina per caffè.
◆ Non utilizzare mai accessori metallici, spugne metalliche o abrasivi per la pulizia del portafiltro.
◆ Verificare periodicamente il buono stato dei componenti d’uso comune (portafiltri, filtri, guarnizioni,
doccette). Richiedere i componenti originali ad un centro assistenza.
11. MINI ADDOLCITORE A RESINE
◆ Calcio e magnesio determinano la durezza dell’acqua e provocano la formazione di quello che noi
chiamiamo semplicemente calcare. Da 30 °f a 40 °f l’acqua è dura; da 40 °f in su è considerata molto
dura. La misurazione avviene tramite appositi semplici test che si possono acquistare presso qualsiasi
centro assistenza.
◆ All’interno del serbatoio immerso in acqua, si trova un piccolo addolcitore a resine (uno è anche in
dotazione), che va sostituito o rigenerato ogni 20-30 litri di acqua utilizzata.
La rigenerazione avviene immergendo il piccolo addolcitore in una soluzione di acqua e sale da cucina
(un cucchiaio - NaCl Cloruro di sodio) per un tempo di circa 48 ore. Sciacquare con acqua pulita più
volte e riposizionare il piccolo addolcitore, collegato al tubo di silicone, all’interno del serbatoio.
12. INFORMAZIONI PRATICHE E SUGGERIMENTI
Si raccomanda una durezza dell’acqua compresa tra 15 e 30 gradi francesi
(verificare con il proprio centro assistenza). In presenza di un valore inferiore o
superiore ai parametri consigliati, sono necessari dei controlli periodici e una apposita
pulizia dei circuiti idraulici da parte di tecnici specializzati.
In funzione del luogo geografico e di un eventuale periodo di inattività, si raccomandano
delle pulizie specifiche del circuito idraulico da parte di personale qualificato.
◆ Per ottenere il massimo risultato dovete utilizzare caffè macinato ad uso bar, corrispondente ad una
grossezza di macinatura ben definita. Al vostro Torrefattore o negozio pertanto oltre la vostra miscela
preferita darete questa indicazione di macinatura.
◆ Acquistando l’apposito adattatore (option), è possibile utilizzare anche la cialda di caffè preconfe-
zionata. L’uso del caffè in cialda offrirà molti vantaggi: la libertà di scelta tra le numerose marche
presenti sul mercato, un espresso costantemente buono indipendentemente dalla esperienza di chi
prepara il caffè, una estrema facilità d’uso, ed infine una minor manutenzione in quanto la macchina
resta costantemente pulita.
◆ Per gustare un ottimo caffè:
- acquistare una buona miscela di caffè in grani.
- conservare il caffè in grani in un luogo asciutto.
- macinare il caffè in grani tutte le volte che si desidera un caffè.
- dosare e pressare leggermente la macinatura per renderla più omogenea.
◆ Per ottenere un caffè bollente:
- lasciare sempre inserito il portafiltro, con relativo filtro vuoto, nel gruppo erogatore caffè.
- sciaquare il portafiltro ed il filtro con acqua bollente premendo l’interruttore caffè.
7- con la stessa acqua bollente pre-riscaldare le tazze.
◆ Per ottenere un buon cappuccino:
- utilizzare un recipiente alto e stretto riempito per circa metà di latte.
- immergere la lancia vapore per 1 cm.
- aprire il rubinetto vapore con la manopola.
◆ Per scaldare solamente il latte:
- immergere la lancia vapore sino in fondo al recipiente.
- aprire il rubinetto vapore con la manopola.
- chiudere il rubinetto vapore una volta raggiunta la temperatura desiderata.
DICHIARAZIONE DI CONFORMITÀ
Prodotto :
◆ Macchine per caffè espresso
Modello :
◆ 1 GR VJ-1P-1E
B.F.C. srl dichiara sotto la propria responsabilità, che il prodotto soddisfa per progettazione e costru-
zione i requisiti della direttiva:
1) DIRETTIVA BASSA TENSIONE
2014/35/UE (ex 2006/95/CE)
La conformità è stata verificata con l’ausilio delle seguenti norme armonizzate:
EN 60335-1 / EN 60335-2-15 / EN 60335-1 (EN 62233)
2) DIRETTIVA COMPATIBILITA’ ELETTROMAGNETICA
2014/30/UE (ex 2004/108/CE)
La conformità è stata verificata con l’ausilio delle seguenti norme armonizzate:
EN 55014-1 / EN 55014-1 (EN 61000-3-2) / EN 55014-1 (EN 61000-3-3)
EN 55014-2 (EN 61000-4-2) / EN 55014-2 (EN 61000-4-4) / EN 55014-2 (EN 61000-4-5)
EN 55014-2 (EN 61000-4-11) / EN 55014-2 (EN 61000-4-6) / EN 55014-2 (EN 61000-4-3)
◆ 2011/65/UE (ex 2002/95/CE RoHS)
2002/96/CE RoHS
2003/108/CE RoHS
Sulla base delle nostre conoscenze, i nostri fornitori di materiali non utilizzano nella fabbricazione
dei loro prodotti, le sostanze pericolose che sono elencate nelle Direttive CEE sopramenzionate.
◆ REGOLAMENTO (CE) N. 1935/2004 DEL PARLAMENTO EUROPEO E DEL
CONSIGLIO del 27 ottobre 2004 riguardante i materiali e gli oggetti destinati a venire a
contatto con i prodotti alimentari.
◆ REGOLAMENTO (CE) N. 2023/2006 DELLA COMMISSIONE del 22 dicembre
2006 sulle buone pratiche di fabbricazione dei materiali e degli oggetti destinati a venire
a contatto con prodotti alimentari.
◆ REGOLAMENTO (UE) N. 10/2011 DELLA COMMISSIONE del 14 gennaio 2011
riguardante i materiali e gli oggetti di materia plastica destinati a venire a contatto con i
prodotti alimentari.
8◆ Decreto Ministeriale del 21/03/1973, Disciplina igienica degli imballaggi, recipienti,
utensili, destinati a venire in contatto con le sostanze alimentari o con sostanze d’uso
personale.
◆ Metals and alloys used in food contact materials and articles, European Directorate for
the Quality of Medicines & HealthCare of the Council of Europe (EDQM), Council of
Europe, 2013.
◆ UNI EN 16889:2016
Igiene degli alimenti - Produzione ed erogazione di bevande calde da apparecchi per bevande calde
- Requisiti di igiene, prove di migrazione.
L’amministratore delegato
Brutti Marco
9ESPRESSO COFFEE MACHINES
INSTRUCTIONS for USE
1. SAFETY WARNINGS
◆ Check that the data on the machine corresponds to that of the electrical supply network, before
connecting the equipment. Only connect the appliance to an efficiently earthed power socket having
a minimum capacity of 10A, and fitted with an RCD.
◆ If the plug supplied is unsuitable for your power socket, have the plug replaced by a qualified elec-
trician.
◆ Adaptors, multiple sockets and /or extensionsmust not be used.
◆ When in doubt, request a detailed diagram of the supplied power from a qualified electrician.
The power supply must be provided with the following safety devices:
- efficient earthing connection;
- section of conductors suitable for absorption capacity;
- efficient earthing leakage protection circuit breaker.
◆ The appliance is only to be installed in locations where its use and maintenance is restricted to
trained personnel.
◆ The appliance is not to be used by children or persons with reduced physical, sensory or mental capa-
bilities, or lack of experience and knowledge, unless they have been given supervision or instruction.
◆ Children should be supervised to ensure that they do not play with the appliance.
◆ Do not leave the machine exposed to environmental elements or place them in damp rooms such
as bathrooms... Do not touch the power cord or the appliances when hands or feet are wet or damp.
Do not leave water inside the appliance in environments where the temperature is equal to or less
than 0°C. The machine must not be installed in an outdoor setting, in a place not protected from
weathering or in any case at a temperature below 5°C.
◆ Always press the main switch to OFF or disconnect the coffee machine from the mains before any
internal maintenance. Never put your hands or any object into the machine when it is connected
to the mains.
◆ Do not immerse the appliance in water when cleaning it.
Never add water to the tank by putting the appliance under the tap.
◆ Do not obstruct the suction or dispersion grilles and do not cover with cloths, etc.
◆ The appliance must not be moved while in operation.
◆ Only use original spare parts in order to avoid compromising the safety and proper functioning of
the machine.
◆ In an emergency, such as fire, unusual noise, overheating, etc., take immediate action, disconnect the
power and close gas and water taps.
◆ If the appliance does not seem to be working correctly, switch it off and do not tamper with
it. Return it only to an aftersales service centre authorised by the manufacturer for repair and request
original spare parts.
The power cord of this appliance must not be replaced by the user. If the cord is damaged or needs
to be replaced, take it to an authorised after-sales service only.
◆ Carefully keep this booklet for future reference. Contact our Repair Service for any maintenance
that is not described in this leaflet.
Failure to comply with these warnings could jeopardise the safety of the
appliance. Improper installation can cause damage to people, animals and
things for which the manufacturer cannot be considered responsible.
102. PRECAUTIONARY MEASURES
This machine may only be used with foodstuffs. It cannot be used for liquids or any other kind of
product that could damage and pollute it.
This appliance is intended to be used in household and similar applications such as: staff kitchen areas
in shops, offices and other working environments; farm houses; by clients in hotels, motels and other
residential type environments; bed and breakfast type environments.
The manufacturer cannot be held responsible for damage to people or things caused by unsuitable,
erroneous or irrational use and by unauthorised repair.
3. INTRODUCTION
This booklet is a guide to rapid and easy use and maintenance of coffee machines.
Please read these instructions carefully. The company garantees that should any defect or problem
occur, it will provide its support through its Repair Service points.
Have your coffee machine inspected by qualified personnel at least once a year. This con-
stant care will make your machine safer and more efficient. Our coffee machines have been designed
and manufacured in complicance with all specifications that distinguish traditional espresso coffee
machines: noble materials such as copper and steel and reliable components make alla machines made
by the company safe, reliable and funciontal. No liability can be accepted by the company for any
damage to persons or things caused by non-compliance with these instructions.
Junior Plus pulsante
Junior elettronica
Junior ELA Junior pulsante
Steam knob Coffee dispensing switch/keyboard
Water knob/switch Filter holder
ON/OFF Power switch Drip tray
Power on red indicator light Upper cover grid
Heating element operation green indicator light Boiler pressure gauge (0-3 bar)
Steam nozzle Coffee distribution unit
Hot water nozzle
114. ACCESSORIES SUPPLIED
One - cup filter Blind filter
Two - cups filter 2 Filter - retaining springs
One - cup spout Two - cups spout
Mini water softener Coffee tamper
2 Filter holders
Cleaning brush
Measuring spoon
125. INSTALLATION
Before putting the main ON/OFF switch (3) to ON fill the rear water tank under the
cup shelf (11).
1) Remove the coffee machine from its parcking and check that it has not been damaged.
2) Place the appliance on a stable top, close to the mains sockets and water line connections. The
machine’s uppermost surface must be at least 1,5 m off the ground. The machine must be installed in
a horizontal position. The inclination of the support surface must not be greater than 1°. To ensure
normal operation, the machine must be installed in places where the ambient temperature is between
+5°C and +32°C and humidity does not exceed 70%. Do not use water jets or install in places where
water jets are used. Check that the voltage of your mains supply corresponds to that indicated in the
technical specifications.
3) Remove the upper cover grid (11), take out the water
tank (located inside the machine) and rinse it (Photo 1).
4) Fill the tank with approx. 3 litres clean water, put it
back, connect the water softener and insert the small
silicone tubes. Close the upper cover grid (11) on the
machine.
5) Before start-up the fitter must make sure the ma-
chine has been properly connected to the electrical and
earthing systems involved and check the efficiency of
protection from direct contact.
In Europe connect the approved cord H05VV-F 3G 1.5 mm with the Schuko plug to the electricity
supply.
In USA-Canada connect the approved cord Type SJTO, rated 3x14 AWG, 300 V, 105°C with the
NEMA 5x15P plug to the electricity supply.
IT IS STRICTLY FORBIDDEN TO USE THE MACHINE WITHOUT EFFEC-
TIVE SAFE EARTHING.
5a. MACHINE WITH CONNECTION TO THE MAINS
WATER SUPPLY
If your machine is to be connected to the mains water supply call a specialized technician. Using the
supplied tuboflex (3/8”), the technician will connect the machine filling connector to the system used
to treat water intended for human consumption (or potable) (not provided) (use only tubes suitable for
contact with water intended for human consumption in accordance with legislation in the country
where the product is used). A pressure reducer must be installed. Switch on the water softener and
check for any leaks.
6. MACHINE IGNITION
Before turning on the machine it is advisable that you check that there is water inside the
rear tank under the cup shelf (11).
1) Put the ON/OFF power switch (3) to ON. The red indicator light (4) comes on.
2) When the machine is switched on, the electronic card checks water level inside the boiler. After
approx. 3 seconds, the filling pump and solenoid valve are enabled for filling.
The coffee machine will automatically be filled with water up to the pre-set level (level probe inside
the boiler).
NB: The machines with internal tank quick coupling incorporate a safety system level. If the probe
does not detect water in the boiler within 180”, it starts the sound of a buzzer with high repetition
13rate. To reset the alarm turn the machine off then on again. If the problem remains, check for any
abnormalities into the tank or in the water inlet silicon pipes.
3) When the set level is reached, the pump stops. The green warning light (5) comes on and the heating
element starts heating the water.
It is advisable that you dispense water (13) for 5 seconds so as to eliminate any air bubbles from the
thermosyphon circuit and for better thermal compensation.
4) Wait approximately 15-20 minutes to allow the machine to reach its operating temperature.
5) When the green warning light (5) goes out the set machine pressure has been reached. The red
indicator light (4) will be always light (tension on the electrical circuit).
NB: If being used for the first time, maintain the machine temperature (without dispensing water and
coffee) for about 2 hours. It is advisable that you let the water circulate through the system: turn the
water knob (2) and fill a jug with at least 0.5 litres water. Dispense water (13) for 30 seconds and turn
the steam knob (1) for 10 seconds.
6) If there is no water in the rear tank, it will be signaled by a beep. All the electrical and water func-
tions of the machine will stop, while the red indicator light (4) remains on.
Upon filling the tank with water, the micro switch or the electronic lever sensor in the tank will re-ac-
tivate all the functions.
7) Pressure gauge (12) on the front show internal boiler pressure (0.9-1.1 bar) at all times.
NB: In the machines that have two pressure gauges, the second constantly measures coffee delivery
pressure (8 - 10 bar).
8) Look at the pressure gauge (12) fairly frequently to check the boiler pressure. The appliance is fitted
with a safety device, which trips if the pressure inside the boiler is abnormal.
7. COFFEE DELIVERY
1) To make coffee, put the right amount of BAR GROUND coffee (approx. 7 grams equivalent to 1
measuring spoon) into the 1 - cup filter holder (9).
2) Press the coffee with the coffee tamper.
3) Fit the filter holder (9) in the coffee distribution unit (13) and twist
from left to right to block it in place.
4) Place one cup under the filter holder (9).
5) Start the coffee dispensing using the switch (8) or the electronic
keyboard (refer to chapter 9).
6) When the desired quantity of coffee has been dispensed put the
switch (8) to OFF to cut off delivery.
7) If you want to make more coffee remove the filter holder (9) by
turning it from right to left and empty out the used grounds. Repeat the above operations.
8) To obtain 2 coffees, use the 2-cup filter holder (9) with two measuring spoonfuls.
9) If the optional adapter is fitted, you can also use pre-packaged coffee pods (7gr or 14 gr), which
make one cup and two cups of coffee respectively (Photo 2).
Always remember to clean the filters thoroughly when changing from ground to pod coffee.
Take care when using the coffee maker. The high temperatures of the steam nozzle (6), hot
water nozzle (7) and chromed filtering unit (13) could cause burns.
Under no circumstances remove the filter holder from the filtering head during dispensing
of coffee. DANGER OF SCALDING.
8. STEAM AND HOT WATER DELIVERY
1) To dispense steam, use the knob to the side left (1).
142) To dispense hot water, use the knob or the switch (2).
Steam and water are under pressure. SCALD HAZARD.
9. INSTRUCTIONS FOR ELECTRONIC DOSING
See the special user’s manual for each model.
10. MAINTENANCE
◆ The access to the service area is restricted to persons having knowledge and practical experience of
the applliance, in particular as far as safety and hygiene are concerned.
◆ Any maintenance must be carried out in an environment where the temperature is between +5°C
and +32°C.
◆ Using a clean cloth or food-grade paper, clean the steam wand after each use to prevent the forma-
tion of scaling and the clogging of the steam outlet holes.
◆ Empty and clean the coffee filters every evening; remove the filter and brush the inside with a suita-
ble brush; soak the filters in hot water in order to dissolve coffee greases.
◆ Clean the drip tray of residues of coffee on the bottom to prevent encrustation.
◆ The power cord of this appliance must not be replaced by the user. If the cord is damaged or needs
to be replaced, take it to an authorised after-sales service only.
Proceed as follows:
1- Insert the blind filter in the filter holder and add the amount of detergent indicated on the pack.
2- Insert the filter holder into the group head.
3- Start brew cycle for 10 seconds and stop for 10 seconds. Repeat this operation for 5 times.
Mixed water and foam will flow out the drain valve into the drip tray.
4- Remove the filter holder from group head. Start brew cycle and rinse the filter holder with the
boiling water from group head. Stop cycle.
5- Insert the filter holder into group head and repeat step 3 to rinse without detergent.
6- Replace the blind filter in the filter holder with the correct filter and make and discard an espresso.
◆ Clean the external parts of the machine with a damp cloth. Never use detergents or abrasive sub-
stances. Do not use jets of water to clean the machine.
◆ To clean the filter holder and the filters, leave them to soak for at least 30 minutes in a solution of
15hot water and detergent prepared in a plastic or stainless steel container. Rinse them with clean water.
Frequent cleaning allows a smooth coffee to be obtained as well as prolonging the life of your coffee
maker.
◆ Never use metal accessories, wire or abrasive sponges to clean the filter housing.
◆ Periodically check that the parts subject to wear are intact (filter housing, filters, gaskets, shower
heads). Order original parts to a customer support centre.
11. MINI RESIN WATER SOFTENER
◆ Calcium and magnesium determine the hardness of the water and cause the formation of what we
simply call scale. Water is hard from 30 °f to 40 °f; it is considered very hard from 40 °f upwards. The
hardness can be measured by simple test kits, which may be purchased at any service centre.
◆ There is a small resin water softener (plus one in the accessories kit) inside the water tank, which
should be replaced or regenerated once every 20-30 litres of water that are used.
The small water softener can be regenerated by putting it in salt water (0,5 litres and one spoonful of
NaCl, sodium chloride) for approx. 48 hours. Thoroughly rinse with clean water and put the small
water softener connected to the silicone tube back inside the tank.
12. PRACTICAL INFORMATION AND SUGGESTIONS
We recommend water hardness between 15 and 30 French degrees (check
with your help centre). If the value is greater than or less than the recommended
parameters, periodic checks and a special cleaning of the hydraulic circuits by specialized
technicians are required.
Depending on the geographical location and a possible period of inactivity, it’s recom-
mended a specific cleaning of the hydraulic circuit by qualified personnel.
◆ For best results, use ground coffee for bar use, which has a well-defined coarseness of grinding. Give
this grinding indication to your coffee roaster or shop when asking for your favourite blend.
◆ If the optional adapter is fitted, you can also use pre-packaged coffee pods. The use of coffee pods
offers many advantages: the freedom to choose from among the many brands on the market, a con-
stantly good espresso irrespective of the experience of whoever is making it, extremely easy to use and
lastly, less maintenance because the appliance remains constantly clean.
◆ To enjoy excellent coffee:
- purchase a good brand of coffee in beans.
- keep the coffee in beans in a dry place.
- grind the coffee beans fresh when you make coffee.
- measure and press the ground cofffe slightly to pack it more uniformly.
◆ For boiling hot cofffe:
- leave the filter holder with the empty empty filter in the coffee distribution unit at all times.
- rinse the filter holder and filter with boiling hot water by pressing the coffee switch.
- use the same boiling water to pre-heat the cups.
16◆ For a delicious cappuccino:
- use a tall narrow milk pitcher half full.
- immerse the steam nozzle 1 cm into the milk.
- open the steam tap with the knob.
◆ If you just want to heat the milk:
- immerse the steam nozzle all the way into the milk.
- open the steam tap with the knob.
- close the steam tap when the milk is hot enough.
DICHIARAZIONE DI CONFORMITÀ
Prodotto :
◆ Macchine per caffè espresso
Modello :
◆ 1 GR VJ-1P-1E
B.F.C. srl dichiara sotto la propria responsabilità, che il prodotto soddisfa per progettazione e costru-
zione i requisiti della direttiva:
1) LOW VOLTAGE DIRECTIVE
2014/35/UE (ex 2006/95/CE)
Confromity has been controlled with the aid of the following harmonized standards:
EN 60335-1 / EN 60335-2-15 / EN 60335-1 (EN 62233)
2) ELECTROMAGNETIC COMPATIBILITY
2014/30/UE (ex 2004/108/CE)
Confromity has been controlled with the aid of the following harmonized standards:
EN 55014-1 / EN 55014-1 (EN 61000-3-2) / EN 55014-1 (EN 61000-3-3)
EN 55014-2 (EN 61000-4-2) / EN 55014-2 (EN 61000-4-4) / EN 55014-2 (EN 61000-4-5)
EN 55014-2 (EN 61000-4-11) / EN 55014-2 (EN 61000-4-6) / EN 55014-2 (EN 61000-4-3)
◆ 2011/65/UE (ex 2002/95/CE RoHS)
2002/96/CE RoHS
2003/108/CE RoHS
To the best of our knowledge, our material suppliers do not use in the manufacturer of their prod-
ucts the hazardous substances which are listed in the above mentioned EU Directives.
◆ REGULATION (EC) No. 1935/2004 OF THE EUROPEAN PARLIAMENT AND
COUNCIL of 27th October 2004 regulating materials and articles intended to come into
contact with food.
◆ COMMISSION REGULATION (EC) No. 2023/2006 of 22nd December 2006 on good
manufacturing practices for materials and articles intended to come into contact with
food.
◆ COMMISSION REGULATION (EU) No. 10/2011 of 14th January 2011 on plastic
materials and articles intended to come into contact with food.
◆ Ministerial Decree of 21/03/1973, concerning the hygiene requirements of packages,
containers and tools intended to come into contact with food or substances for personal
17use.
◆ Metals and alloys used in food contact materials and articles, European Directorate for
the Quality of Medicines & HealthCare of the Council of Europe (EDQM), Council of
Europe, 2013.
◆ UNI EN 16889:2016
Food hygiene - Production and dispense of hot beverages from hot beverage appliances - Hygiene
requirements, migration test.
CEO
Brutti Marco
18ESPRESSOMASCHINEN
BEDIENUNGSANLEITUNG
1. SICHERHEITSHINWEISE
◆ Vor Anschluss der Espressomaschine überzeugen Sie sich bitte davon, dass die auf dem Typenschild
angegebenen Daten mit denen des am Aufstellungsort verfügbaren Stromnetzes übereinstimmen.
Das Gerät nur an eine Netzsteckdose anschließen, welche eine Mindeststromstärke von 10A besitzt,
und mit einer funktionstüchtigen Erdung ausgerüstet und einem Schutzschalter abgesichert ist.
◆ Sollten Steckdose und Gerätestecker nicht zusammenpassen, ist der Gerätestecker nur von Fach-
personal gegen einen anderen Typ auszutauschen.
◆ Der Einsatz von Adaptern, Mehrfachsteckdosen und/oder Verlängerungskabeln ist nicht zulässig.
◆ Im Zweifelsfall die elektrische Anlage von einem Fachmann überprüfen lassen. Die Anlage muss den
gültigen Sicherheitsvorschriften entsprechen, diese umfassen unter anderem:
- Sicherheitserdung;
- einen für die Leistung angemessenen Kabeldurchmesser;
- Schutzschalter.
◆ Das Gerät darf nur an Orten installiert werden, an denen seine Verwendung und Wartung dem
Fachpersonal vorbehalten ist.
◆ Die Maschine darf nicht von Kindern oder von Geistig beeinträchtigten Personen, die die Maschine nicht
kennen, bedient werden; es sei denn, dass dies unter Aufsicht oder nach vorheriger Einweisung erfolgt.
◆ Bitte Kinder beaufsichtigen, damit sie nicht mit dem Gerät spielen.
◆ Die Espressomaschine keinen Witterungseinflüssen aussetzen und nicht in feuchten Räumen wie
z.B. Badezimmer, etc., installieren. Das Netzkabel des Geräts nicht mit nassen oder feuchten Händen
oder Füssen aus der Steckdose ziehen. Das mit Wasser befüllte Gerät vor Frost schützen (Tempera-
turen unter oder gleich 0°C). Die Maschine darf nicht im Freien, nicht gegen Witterungseinflüsse
geschützt installiert und bei Temperaturen unter 5 °C betrieben werden.
◆ Vor Beginn jeglicher Wartungsarbeit im Innern der Espressomaschine den Hauptschalter auf Position
OFF stellen oder den Netzstecker ziehen. Ist das Gerät an das Stromnetz angeschlossen, nie die
Hände oder leitende Gegenstände ins Geräteinnere bringen.
◆ Das Gerät zum Reinigen nicht in Wasser tauchen.
Das Gerät zum Füllen des Tanks mit Wasser niemals unter einen Wasserhahn stellen.
◆ Die Belüftungsgitter nicht verstopfen und die Oberfläche, die zur Erwärmung der Kaffeetassen
gedacht ist, nicht mit Tüchern oder anderem abdecken.
◆ Das Gerät darf während des Betriebs nicht bewegt werden.
◆ Zum Austausch von defekten Teilen nur vom Hersteller zulässige Ersatzteile verwenden. Dies
gewährleistet die Funktionstüchtigkeit ohne Störungen.
◆ Im Störungsfall, falls die Espressomaschine Feuer fangen sollte, merkwürdige Geräusche macht,
sich überhitzt, etc., sofort den Netzstecker ziehen und eventuell in der Nähe befindliche Gas- und
Wasserhähne abdrehen.
◆ Im Falle von Störungen und/oder fehlerhafter Funktion das Gerät ausschalten und nicht ma-
nipulieren. Für eventuelle Reparaturen wenden Sie sich bitte ausschließlich an ein autorisiertes
Kundendienstzentrum des Herstellers und verlangen den Einsatz von Originalersatzteilen. Sollte
das Netzkabel des Geräts beschädigt sein oder ausgetauscht werden müssen, darf dies nicht durch
den Benutzer erfolgen. Wenden Sie sich an ein autorisiertes Kundendienstzentrum.
◆ Diese Bedienungsanleitung als Referenz sorgfältig aufbewahren. Sollen andere, als die hier be-
schriebenen Vorgänge ausgeführt werden, wenden Sie sich an eine unserer Kundendienststellen.
Die Nichtbeachtung dieser Sicherheitshinweise beeinträchtigt die Gerätesi-
cherheit. Eine nicht fachgerechte Installation kann zu Personen- und Sach-
schäden führen, für die der Hersteller keine Haftung übernehmen kann.
192. UNZWECKMÄSSIGER GEBRAUCH
Die Espressomaschine darf nur für den bestimmungsgemäßen Gebrauch eingesetzt werden, es ist ver-
boten andere Flüssigkeiten zu verwenden, durch die Gefahren entstehen und welche die Auslässe kon-
taminieren können. Dieses Gerät ist für den Einsatz in häuslichen und vergleichbaren Umgebungen
bestimmt wie: Personalküchen in Geschäften, Büros und sonstige Arbeitsbereiche; Bauernhöfe; Ver-
wendung durch Hotel- und Motelkunden sowie in sonstigen Wohnbereichen; Beherbergungsbetriebe
(z.B. Bed & Breakfast). Der Hersteller übernimmt für eventuelle Schäden, die durch unzweckmäßigen,
falschen oder unvernünftigen Gebrauch des Geräts oder durch nicht sachkundige Reparaturen von
Seiten des Benutzers hervorgerufen worden sind, keinerlei Haftung.
3. EINLEITUNG
Diese Bedienungsanleitung liefert Ihnen einfache und schnelle Hinweise bezüglich Wartung und Ge-
brauch der Espressomaschine. Lesen Sie die einzelnen Abschnitte dieses Handbuchs sorgfältig durch.
Die Firma sichert Ihnen im Fall von Problemen und Betriebsstörungen die uneingeschränkte Hilfe
durch ihre Kundendienstzentren zu. Lassen Sie Ihre Espressomaschine mindestens einmal
pro Jahr durch einen Fachmann kontrollieren. So bleibt Ihre Maschine stets leistungsfähig und
sicher. Das Gerät wurden unter Einhaltung aller Eigenschaften der traditionellen Espressomaschinen
für den Barbetrieb entwickelt und konstruiert: Edelmaterialien wie Kupfer und Stahl, sowie zuver-
lässige Komponenten, machen die von der Firma konstruierten Maschinen sicher, zuverlässig und
funktionell. Ein von der Anleitung abweichender Gebrauch enthebt die Firma von jeglicher Haftung
für eventuelle Schäden an Personen oder Dingen.
Junior Plus pulsante
Junior elettronica
Junior ELA Junior pulsante
Drehknopf Dampfabgabe Schalter/Tastatur für Kaffeeabgabe
Wasserabgabe Drehknopf /Schalter Siebträger
ON/OFF Hauptschalter Tropfeschale
Kontrollleuchte rot für Betrieb Warmhaltefläche für Tassen
Kontrollleuchte grün für Heizer Manometer Kesseldruck (0-3 bar)
Dampflanze Kaffee-Brühgruppe
Wasserlanze
204. MITGELIEFERTES ZUBEHÖR
Sieb für eine Tasse Blindsieb
Sieb für zwei Tassen 2 Klemmfedern
Auslauf für eine Tasse Auslauf für zwei Tassen
Granulatfilter Pressstempel
2 Siebträgern
Reinigungsbürste
Messlöffel
215. INSTALLATION
Vor dem ersten Betätigen des Hauptschalters ON/OFF (3) in Position ON, empfehlen wir,
den Tank, der sich unter dem Warmhaltefach für die Tassen (11) befindet, mit Wasser zu
befüllen.
1) Entfernen Sie die Verpackung und kontrollieren Sie umgehend die Unversehrtheit des Gerätes.
2) Positionieren Sie das Gerät auf einer ebenen und tragfähigen Fläche, in der Nähe der Stromquelle
bzw. eines Wasseranschlusses. Die oberste Fläche des Gerätes muss mindestens 1,5 m über dem Boden
liegen. Die Maschine muss in einer horizontalen Position installiert werden.
Die Neigung der Auflagefläche darf 1° nicht überschreiten. Um den normalen Betrieb garantieren zu
können, muss das Gerät in einer Umgebung installiert werden, in der die Temperatur zwischen +5°C
÷ +32°C und die Feuchtigkeit nicht über 70% liegt. Weder dürfen Wasserstrahlen verwendet werden,
noch darf das Gerät in einer Umgebung installiert werden, in der Wasserstrahlen verwendet werden.
Vergewissern Sie sich, dass die Netzspannung mit der in den technischen Eigenschaften angegeben
übereinstimmt.
3) Die obere Abdeckung, Warmhaltefach für Tassen
(11), abnehmen, den Wasserbehälter herausnehmen
und mit Wasser reinigen (Foto 1).
4) Den Tank mit zirka 3 Liter klarem Wasser füllen,
dann wieder in sein Fach stellen und die beiden Silikon-
schläuche, einer mit und einer ohne den Granulatfilter,
einhängen. Schließen Sie das Warmhaltefach für Tas-
sen (11) der Espressomaschine.
5) Vor der ersten Inbetriebnahme müssen Sie den kor-
rekten Anschluss der Maschine am benutzten Stromnetz inklusive Erdung kontrollieren. Stellen Sie
sicher, dass der Schutzschalter funktioniert. In Europa das zugelassene Kabel H05VV-F 3G 1,5 mm
mit Schukostecker an das Stromnetz anschließen. In den USA und Kanada das zugelassene Kabel
Typ SJTO, rated 3x14 AWG, 300 V, 105°C mit NEMA Stecker 5x15P an das Stromnetz anschließen.
ES IST VERBOTEN DIE MASCHINE OHNE AUSREICHENDE ERDUNG ZU
BENUTZEN.
5a. KAFFEEMASCHINE MIT ZUSATZ FÜR DEN DIREKTEN
WASSERANSCHLUSS
Ist Ihre Maschine mit einem Wasseranschluss ausgerüstet, so wenden Sie sich bitte an einen Techniker
aus dem Fachhandel. Der Techniker mus mit dem im Lieferumfang enthaltenen Schlauch (3/8”) den
Ablauf der Maschine an das Wasseraufbereitungssystem für den menschlichen Verzehr (oder Trinkwas-
ser) (nicht in der Ausstattung der Maschine vorgesehen) anschließen (nur für den Kontakt mit Trink-
wasser geeignete Schläuche entsprechend der Gesetzgebung im Land, in dem das Produkt genutzt wird,
verwenden). Es ist nötig eine Druckmindere hinzuzufügen. Zuletzt den Wasserkreislauf öffnen und
sich vergewissern, daß kein Wasser an den Verbindungsstellen austritt.
6. EINSCHALTUNG DER MASCHINE
Vor Inbetriebnahme der Maschine empfehlen wir sicherzustellen, dass der Tank unter
dem Warmhaltefach für Tassen (11) mit ausreichend Wasser befüllt ist.
1) Den ON/OFF Hauptschalter (3) auf Position ON umlegen. Die rote Kontrollleuchte für Betrieb
(4) schaltet sich ein.
2) Beim Einschalten der Maschine wird der Wasserfüllstand im Heizkessel elektronisch kontrolliert
und nach etwa 3 Sekunden erfolgt das Auffüllen der Maschine durch die Pumpe und das Füllrohr.
22Die Maschine beginnt mit dem automatischen Füllvorgang bis der nötige Wasserstand im Kessel
erreicht ist (autom. Füllstandsonde im Heizkessel).
HINWEIS: Bei den Maschinen mit internem Tank Schnellkupplung iist eine automatische Blockier-
vorrichtung eingebaut. Wenn der Sensor nicht innerhalb von 180 Sekunden Wasser im Kessel detek-
tiert, der Klang einer Hupe mit hoher Wiederholrate. Um den Alarm zurückzusetzen, die Maschine
aus - und wieder einschalten. Bleibt das Problem bestehen, für irgendwelche Anomalien im Tank und
in den Leitungen Silikon Wassereintritt überprüfen.
3) Ist der Wasserstand erreicht schaltet sich die Pumpe aus. Die grüne Heizer-Kontrollleuchte (5) geht
an und die Erwärmung des Wassers beginnt.
Wir empfehlen für 5 Sekunden Wasser aus der Kaffee-Brühgruppe (13) fließen lassen um mögliche
Luftblasen aus dem Thermosiphon zu entfernen und somit eine bessere Aufheizung zu erhalten.
4) Warten Sie etwa 15-20 Minuten ab, damit die Maschine ihre Betriebstemperatur erreichen kann.
5) Das Erlöschen der grünen Kontrollleuchte (5) bedeutet, dass die Maschine die nötige Betriebsdruck
erreicht hat. Die rote Kontrollleuchte (4) leuchtet konstant, um die Betriebsbereitschaft des Geräts
anzuzeigen.
HINWEIS: Bei der ersten Verwendung ist die Temperatur der Maschine gut 2 Stunden aufrecht zu
erhalten (ohne Wasser oder Kaffee auszugeben). Wir empfehlen den Wasserhahn zu öffnen (2) und
den Tank mit ca. 0,5 Liter Wasser zu füllen um das System kurz durchspülen zu lassen. Lassen Sie für
30 Sekunden Wasser aus der Kaffee-Brühgruppe (13) fließen und das Dampfhahn (1) für 10 Sekunden
öffnen.
6) Das Fehlen von Wasser im hinteren Tank wird es durch einen Signalton angezeigt werden.
Die Maschine stoppt alle elektrischen und hydraulischen Funktionen, die rote Kontrollleuchte (4)
bleibt trotzdem eingeschaltet. Bei Befüllung mit Wasser wird der Elektroschalter oder das elektroni-
sche Füllstandssensor im Tank aktiviert und alle Funktionen werden erneut freigeben.
7) Das Manometer (12), das sich an der Frontseite befindet, zeigt jederzeit den Druck des Heizkessels
(0,9-1,1 bar).
HINWEIS: Bei Maschinen mit einem zweiten Druckmesser ausgestattet ist, erkennt dies zu allen
Zeiten den Druck des Kaffeeauslauf (8-10 bar).
8) Prüfen Sie des öfteren den Kesseldruck mittels eines Blickes auf das Manometer (12). Die Maschine
ist mit Sicherheitsvorrichtungen ausgerüstet, die im Falle von Störungen des Innendrucks des Kessels
ansprechen.
7. KAFFEEZUBEREITUNG
1) Für die Kaffeeabgabe aus der Kaffee-Brühgruppe die richtige Menge GEMAHLENEN BARKAF-
FEE (ca. 7 Gramm, entsprechend 1 Dosierlöffel) in den Siebträger (9)
mit Einzelauslauf dosieren.
2) Den Kaffee mit dem geeigneten Pressstempel anpressen.
3) Den Siebträger (9) in die Kaffee-Brühgruppe (13) von links nach
rechts drehend bis zur Arretierung desselben einsetzen.
4) Eine Tasse unter den Siebträger (9) stellen.
5) Starten Sie die Versorgungsspannung über einen Schalter (8) oder
durch elektronische Tastatur (siehe Kap. 9).
6) Nach dem Erreichen der gewünschten Kaffee Menge, die Dosie-
rung aufhören beim betrieben des Schalter (8) auf OFF.
7) Um weiteren Kaffee zuzubereiten, den Siebträger (9) von rechts nach links drehen und die Kaffee-
reste entsorgen. Wiederholung der oben aufgeführten Vorgänge.
8) Für die Abgabe von 2 Kaffee den Siebträger (9) mit 2 Ausläufen mit zwei Dosierlöffeln gefüllt
benutzen.
9) Beim Kauf eines geeigneten Adapters (optional), ist es möglich auch Kaffeepads von 7 oder 14
23Gramm zu benutzen, jeweils für eine oder zwei Tassen Kaffee (Foto 2). Denken Sie stets beim Wechsel
von gemahlenem Kaffee zu vorverpackten Kaffeepads daran, die Filter sorgfältig zu reinigen.
Bei der ersten Inbetriebnahme der Kaffeemaschine vorsichtig vorgehen. Die hohen Tem-
peraturen der Dampflanze (6), der Wasserlanze (7) und der verchromten Kaffee-Brüh-
gruppe (13) können Verbrennungen verursachen. Während der Kaffeeabgabe auf keinen
Fall den Filterhalter aus der Gruppe lösen. VERBRENNUNGSGEFAHR.
8. DAMPFAUSGABE UND WASSERAUSGABE
1) Um die Dampflanze zu verwenden, den linksseitigen Drehknopf aufdrehen (1).
2) Um Heißwasser zu beziehen, den rechtseitigen Drehknopf aufdrehen (2).
Dampf und heißes Wasser stehen unter Druck. VERBRÜHUNGSGEFAHR.
9. ANWEISUNGEN ZUR ELEKTRONISCHEN DOSIERUNG
Bitte beachten Sie die Bedienungsanleitung des spezifischen model.
10. WARTUNG
◆ Der Zugang zum Servicebereich ist Fachpersonal vorbehalten, das über Kenntnisse und praktische
Erfahrungen mit dem Gerät verfügen, insbesondere in Bezug auf Sicherheit und Hygiene.
◆ Jegliche Art von Wartung am Gerät muss in einer Umgebung durchgeführt werden, in der die Tem-
peratur zwischen +5°C ÷ +32°C liegt.
◆ Mit einem sauberen Tuch oder Küchenpapier die Dampfdüse nach jeder Verwendung reinigen, um
Verkrustungen oder Verstopfungen an den Ausgängen zu vermeiden.
◆ Die Kaffeesiebe allabendlich entleeren und reinigen; das Sieb herausnehmen und im Inneren mit
der mitgelieferten Bürste reinigen; in warmes Wasser tauchen, damit sich das Kaffeefett lösen kann.
◆ Die Tropfenschale von Kaffeeresten reinigen, die sich auf dem Boden ablagern, um so Verkrustun-
gen zu vermeiden.
◆ Reinigen Sie die Kaffee-Brühgruppe (13) mit dem mitgelieferten Blindsieb und unter Verwendung
eines spezifischen Reinigungsmittels (erfragen Sie dies in unseren Kundendienststellen).
Wie folgt vorgehen:
1- Das Blindsieb in den Siebträger einsetzen und das Reinigungsmittel, in der auf der Packung ange-
gebenen Dosis, hinzufügen.
2- Den Siebträger in die Kaffee-Brühgruppe (13) einrasten.
3- Aktivieren Sie, wie bei der Kaffeezubreitung, die Abgabe für 10 Sekunden, danach für 10 Sekun-
den schließen. Fünfmal wiederholen. Wasser mit Schaum vermischt wird aus dem Auslassventil in die
Tropfschale freigesetzt.
4- Den Siebträger herausnehmen. Die Kaffee-Brühgruppe (13) einschalten und den Siebträger mit
dem warmen Wasser aus der Kaffee-Brühgruppe (13) ausspülen. Abgabe beenden.
5- Den Siebträger wieder in die Kaffee-Brühgruppe (13) einrasten. Zum Spülen den Vorgang unter
24Puoi anche leggere