Istruzioni di montaggio Tekno - Oikos

Pagina creata da Andrea Porcu
 
CONTINUA A LEGGERE
Istruzioni di montaggio Tekno - Oikos
istruzioni di
                                montaggio
                                     Tekno

MONTAGGIO TEKNO IT EN.indd 1             08/01/13 11.59
Istruzioni di montaggio Tekno - Oikos
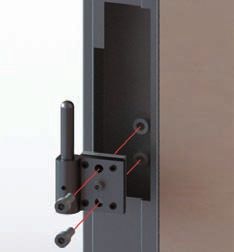
MONTAGGIO TEKNO IT EN.indd 2   08/01/13 11.59
1   Premessa                                     4
                                   1.1 Caratteristiche prestazionali                4
                                   1.2 Disposizioni generali per la
                                       movimentazione e lo stoccaggio               5
                                   1.3 Sballaggio                                   6

                                   2     Fornitura standard                         6

                                   3     Attrezzatura                               7

                                                                                            italiano
                                   4   Caratteristiche del cantiere
                                       e controlli preliminari                      8
                                   4.1 Controlli preliminari telaio porta Tekno     8

                                   5     Sequenza di montaggio
                                         e regolazione                            11
                                   5.1   Fissaggio cerniere con perno
                                         su telaio porta                          12
                                   5.2   Montaggio coperture telaio               12
                                   5.3   Fissaggio anta porta                     15
                                   5.4   Finiture e regolazioni                   17

                               3

MONTAGGIO TEKNO IT EN.indd 3                                                      08/01/13 11.59
1       Premessa                                                1.1 Caratteristiche
  Il seguente manuale, vuole essere un valido aiuto                   prestazionali
  per facilitare l’installazione di una porta blindata
                                                                  Tekno è una linea di portoncini blindati con elevate
  Tekno e dare delle indicazioni per risolvere le
                                                                  caratteristiche prestazionali.
  più comuni problematiche tecniche. Il rispetto
  di tutte le indicazioni fornite nel presente
                                                                           Resistenza Antieffrazione
  manuale è condizione indispensabile per
                                                                           Classe 3
  il mantenimento di tutte le caratteristiche
  prestazionali del prodotto. Per evidenziare                              Abbattimento Accustico 43 dB
  alcune parti di testo di rilevante importanza, sono
  stati adottati alcuni simboli il cui significato viene di
  seguito descritto.                                                       Resistenza al fuoco EI 90

            Importante
            Indica informazioni tecniche di particolare                    Aria
            importanza da non trascurare.

  Per ogni eventuale problema o caso particolare                           Acqua
  non descritto nel presente manuale, rivolgersi al
  rivenditore di zona.
                                                                           Vento

                                                              4

MONTAGGIO TEKNO IT EN.indd 4                                                                                 08/01/13 11.59
In base al modello, al tipo di dotazione standard
  e ad eventuali kit aggiuntivi le caratteristiche              1.2 Disposizioni generali
  sopra elencate possono subire variazioni da                       per la movimentazione
  portoncino a portoncino. Il mantenimento delle
  elevate caratteristiche prestazionali è direttamente              e lo stoccaggio
  collegato alla corretta posa in opera e regolazione
  del prodotto in rispetto delle istruzioni di seguito          • Per garantire l’incolumità e la sicurezza,
  riportate ed a una corretta manutenzione nel                  predisporre      adatti   sistemi     di   trasporto,
  tempo.                                                        movimentazione e stoccaggio tenendo ben

                                                                                                                         italiano
                                                                presente l’incidenza dovuta al peso della porta
                                                                (circa 50 kg/mq).
        Importante                                              • Non esporre il prodotto alle intemperie.
  Tutte le caratteristiche prestazionali sono state             • Evitare l’esposizione del prodotto ai raggi solari
  misurate in laboratorio, quindi in condizioni ottimali        ed all’eccessivo calore. Possono causare l’adesione
  di installazione e regolazione. Tali prestazioni              dell’imballo al prodotto ed il “rinvenimento” dei film
  possono non raggiungere gli stessi risultati                  di vernice.
  nei prodotti installati in cantiere a causa delle             • Il prodotto deve essere appoggiato in verticale,
  molteplici varianti di installazione, regolazione, tipo       rispettando il senso alto - basso.
  di muratura, tipo di costruzione, etc.                        • Evitare qualsiasi tipo di urto anche ad anta
                                                                imballata.
                                                                • Prima di aprire l’imballo assicurarsi di poter
        Importante                                              procedere con il montaggio.
  La movimentazione e l’installazione di una                    • Eventuali pellicole protettive su pannelli di
  porta di sicurezza Tekno deve essere effettuata               rivestimento o altro devono essere rimosse solo ad
  esclusivamente      da    personale    tecnico                operazioni di installazione concluse.
  specializzato.
                                                            5

MONTAGGIO TEKNO IT EN.indd 5                                                                                 08/01/13 11.59
1.3 Sballaggio                                               2      Fornitura standard
  Le operazioni di sballaggio del prodotto devono              La porta viene fornita normalmente con:
  essere eseguite con la massima attenzione per                • scatola contenente gli accessori;
  evitare di ammaccare, graffiare, rovinare il prodotto.       • tubo contenente profili copertura telaio;
  Non utilizzare cutter o altri utensili taglienti per         • anta imballata.
  l’apertura dell’imballo. Il materiale di imballaggio
  deve essere smaltito avendo cura di rispettare le
  disposizioni locali in materia di conferimento dei
  rifiuti sulla base delle indicazioni seguenti riguardo
  ai materiali impiegati.

   Polistirolo espanso            riciclabile   plastica

   Film in polifrene (ovattina)   riciclabile   plastica

   Film in pluriball              riciclabile   plastica       3      Attrezzatura
   Cartone                        riciclabile    carta         Per l’installazione di Tekno è necessaria della
                                                               comune attrezzatura normalmente in dotazione
   Reggette                       riciclabile   plastica       agli installatori.
                                                               - Matita e metro
                                                               - Staggia
                                                               - Livella
                                                               - Filo a piombo

                                                           6

MONTAGGIO TEKNO IT EN.indd 6                                                                                 08/01/13 11.59
- Squadra
  - Scopa e paletta                                         4      Caratteristiche del
  -
  -
    Cinghie per la movimentazione
    Scala a 4 gradini
                                                                   cantiere e controlli
  - Scatola/e con minuteria varia e viti                           preliminari
  - Coperta o panno per appoggiare gli attrezzi
  - Spatole e spazzole
  - Trapano
  - Avvitatore con frizione                                 4.1 Controlli preliminari
                                                                telaio porta Tekno

                                                                                                                  italiano
  - Pistola silicone
  - Prolunghe per cavi elettrici
  - Kit punte per foratura metallo                          Per assicurare una corretta installazione di Tekno
  - Kit punte per foratura muratura                         è fondamentale verificare che il telaio sia stato
  - Kit punte per foratura legno                            murato perfettamente. Un corretto controllo e
  - Kit inserti per avvitatore PH1, PH2, PH3                verifica delle misure del telaio eseguito prima di
  - Kit Chiavi a “T” a testa esagonale                      procedere all’installazione permette di ottenere il
  - Kit cacciaviti a croce ed a taglio                      miglior risultato finale.
  - Lubrificante spray (tipo WD-40)
  - Silicone neutro (tipo Fischer SNF)
  - Silicone acrilico (tipo Fischer SA)                     Fase 1
  - Assortimento vario di stucchi, sigillanti, cere,        Verificare il corretto posizionamento riferito al
    pennarelli per ritocco, etc.                            filo muro interno in funzione della tipologia di
  - Cuscinetti ad aria                                      montaggio scelta (rasomuro interno, rasomuro
  - Chiave a “crik” per la regolazione delle cerniere       interno con boiserie, complanare con cornice).

                                                        7

MONTAGGIO TEKNO IT EN.indd 7                                                                          08/01/13 11.59
MONTAGGIO MONTAGGIO                                                                                                  MONTAGGIO MONTAGGIO
                         RASOMURO INTERNO
              RASOMURO INTERNO                                                                                                                RASOMURO INTERNO
                                                                                                                                   RASOMURO INTERNO
                Montaggio rasomuro interno                                                                                         Montaggio
                                                                                                                                       CON SWS
                                                                                                                                              rasomuro  interno
                                                                                                                                                  CON SWS
                                                                                                                                   con SWS

   RASARE CARTONGESSO  RASARE CARTONGESSO
                                                                                                                                      RASARE INTONACO     RASARE INTONACO
                      A FILO CON RIFERIMENTO
  A FILO CON RIFERIMENTO                                                                                                                                                                                                                         AF
                                                                                                                                                       A FILO CON RIFERIMENTO
                                                                                                                                   A FILO CON RIFERIMENTO

                           Pannello in     Pannello in
                           cartongesso     cartongesso
                           da 12mm.        da 12mm.                                                                                                                    Nastro            Nastro
                                                                                                                                                                       Adesivo           Adesivo
rno              Interno

                                                                                                                                     Interno                 Interno

                                                 Riferimento                            Riferimento
                                                 Metallico 1                            Metallico 1                                            Riferimento                 Riferimento
                                                                                                                                               Metallico 3                 Metallico 3   Riferimento                               Riferimento
                                                                                                                                                                                         Metallico 1                               Metallico 1

                            Telaio             Telaio
                                                                                                                                                                       Telaio            Telaio

                                                                                                      A FILO CON RIFERIMENTO
                                                               A FILO CON RIFERIMENTO

                                                                                                                                                                                                          A FILO CON RIFERIMENTO
                                                                                                         RASARE INTONACO
                                                                  RASARE INTONACO

                                                                                                                                                                                                             RASARE INTONACO
       MURO                MURO                                                                                                                MURO                        MURO

erno             Esterno                                                                                                             Esterno                 Esterno

                    MONTAGGIO MONTAGGIO                                                                                                           MONTAGGIO MONTAGGIO
                COMPLANARE COMPLANARE
                           INTERNO    INTERNO                                                                                                             RASOMURO ESTERNO
                                                                                                                                               RASOMURO ESTERNO
                   CON CORNICE CON CORNICE
SARE INTONACO    RASARE INTONACO                                                                                               8                         RASARE CARTONGESSO
                                                                                                                                     RASARE CARTONGESSO
              A FILO CON RIFERIMENTO
 CON RIFERIMENTO                                                                                                                                        A FILO CON RIFERIMENTO
                                                                                                                                    A FILO CON RIFERIMENTO

              MONTAGGIO TEKNO IT EN.indd 8                                                                                                                             Pannello in                 08/01/13 11.59
                                                                                                                                                                                         Pannello in
                                                                                                                                                                       cartongesso       cartongesso
A FILO
                                                                                                                     A FIL
                                                                                             A FI

                                                                                                                        R

                                                                                                                                                                                                                                                    RA
            Esterno                                                                                                                                         Esterno             Esterno
                                   Esterno

                                  Montaggio complanare interno                                                                                    Montaggio rasomuro
                                                                                                                                                             MONTAGGIOesterno
                                                                                                                                                                     MONTAGGIO
                                       MONTAGGIOMONTAGGIO
                                  con cornice
                                   COMPLANARE INTERNO INTERNO
                                            COMPLANARE
                                                                                                                                                                      RASOMURORASOMURO
                                                                                                                                                                               ESTERNO ESTERNO
                                              CON CORNICE
                                                       CON CORNICE
      RASARE INTONACO RASARE INTONACO                                                                                                                   RASARE CARTONGESSO
                                                                                                                                                                        RASARE CARTONGESSO
     FILO CON RIFERIMENTO
                   A FILO CON RIFERIMENTO                                                                                                              A FILO CON RIFERIMENTO
                                                                                                                                                                       A FILO CON RIFERIMENTO

                                                                                                                                                                                             Pannello in
                                                                                                                                                                                                                     Pannello in
                                                                                                                                                                                             cartongesso
                                               Nastro                                                                                                                                                                cartongesso
                                                          Nastro                                                                                                                             da 12mm.
                                                                                                                                                                                                                     da 12mm.
                                               Adesivo
                                                          Adesivo                                                                                 Interno             Interno
             Interno

                                                                                                                                                                                                                                                italiano
                                   Interno

                                                                                                                                                                                                                                  Riferimento
                                                                                                                                                                                                                                                      Riferimento
                                                                                                                                                                                                                                  Metallico 2
                                                                                                                                                                                                                                                      Metallico 2
                                                                    Riferimento
                                                                                                       Riferimento
                                                                    Metallico 1
                                                                                                       Metallico 1
                                               Telaio      Telaio                                                                                                                                Telaio                  Telaio
                                                                                  A FILO CON RIFERIMENTO

                                                                                                                     A FILO CON RIFERIMENTO
                                                                                     RASARE INTONACO

                                                                                                                                                      MURO
A FILO CON RIFERIMENTO

                                                                                                                        RASARE INTONACO
                                                                                                                                                                          MURO
   RASARE INTONACO

                                                                                                                                                  Esterno             Esterno
                         MURO          MURO                                                                                                                                        Pannello in
                                                                                                                                                                                                           Pannello in
                                                                                                                                                                                   cartongesso
                                                                                                                                                                                                           cartongesso
                                                                                                                                                                                   da 12mm.
                                                                                                                                                                                                           da 12mm.

                 Esterno            Esterno                                                                                                                                RASARE CARTONGESSO
                                                                                                                                                                                           RASARE CARTONGESSO
                                                                                                                                                                          A FILO CON RIFERIMENTO
                                                                                                                                                                                          A FILO CON RIFERIMENTO

                                                         Rimuovere i riferimenti metallici
                                                                         Rimuovere          prima di
                                                                                    i riferimenti    montare
                                                                                                  metallici    la porta.
                                                                                                            prima  di montare la porta.

                                                                                                                                              9

                                MONTAGGIO TEKNO IT EN.indd 9                                                                                                                                                                      08/01/13 11.59
Fase 2                                                    Fase 3
  Controllare la misura in larghezza avendo cura di         Controllare la misura
  verificare la quota almeno su 3 punti (in alto, in        in altezza avendo cura
  basso ed in centro).                                      di verificare la quota
                                                            sui due angoli almeno.
  Dovrà essere rispettata la misura nominale di Luce        Dovrà essere rispettata
  Foro con telleranza di ± 1 mm.                            la misura nominale
                                                            di Luce Foro con
                                                            tolleranza di ± 1 mm.

                                                            Fase 4
                                                            Verificare la piombatura
                                                            dei      montanti      del
                                                            telaio       confrontando
                                                            l’allineamento rispetto
                                                            al filo a piombo avendo
                                                            cura di verificare la
                                                            quota su almeno 3 punti
                                                            (in alto, in basso ed al
                                                            centro) con tolleranza di
                                                            ± 1 mm.

                                                       10

MONTAGGIO TEKNO IT EN.indd 10                                                08/01/13 11.59
Inoltre effettuare la verifica dei montanti anche
  con l’ausilio della livella che dovrà risultare            5      Sequenza di montaggio
  perfettamente “in bolla”.
                                                                    e regolazione
                                                             La sequenza di installazione di Tekno è molto
                                                             semplice e determinata da fasi ben distinte ed
                                                             obbligate. Seguendo l’ordine delle operazioni di
                                                             seguito descritto si porterà a termine l’installazione
                                                             in modo facile sicuro. Una particolare attenzione

                                                                                                                      italiano
                                                             dovrà essere riservata alle operazioni di regolazione
                                                             in modo da poter ottenere il perfetto allineamento
                                                             di anta e telaio ed il miglior risultato estetico e
                                                             funzionale.
  Fase 5
  Con l’ausilio della livella controllare il traverso        Fase 1
  superiore del telaio. Dovrà risultare perfettamente        Sballare anta e profili avendo cura di smaltire
  “in bolla”.                                                correttamente il materiale da imballo. Verificare
                                                                                       corrispondenza         con
                                                                                       il telaio delle misure e
                                                                                       senso di apertura anta.
                                                                                       Verificare      che      le
                                                                                       guarnizioni siano inserite
                                                                                       nelle    apposite      sedi
                                                                                       ricavate nei rivestimenti
                                                                                       in alluminio (1 orizzontale
                                                                                       + 2 verticali).
                                                        11

MONTAGGIO TEKNO IT EN.indd 11                                                                             08/01/13 11.59
5.1 Fissaggio cerniere con                                       Importante
                                                             Una volta fissate le cerniere al telaio rimuovere la
      perno su telaio porta                                  vite centrale.

  Posizionare correttamente le cerniere sulle
  apposite sedi di fissaggio situate sul telaio e con
  le viti in dotazione procedere all’ancoraggio delle
  stesse.                                                    5.2 Montaggio coperture
                                                                 telaio:

                                                             Rasomuro interno con cartongesso
                                                             Rasomuro interno con cartongesso
                                                                                                     Interno

                                                                                                     Esterno

                                                        12

MONTAGGIO TEKNO IT EN.indd 12                                Rasomuro interno con SWS                   08/01/13 11.59
Rasomuro interno con SWS
   Rasomuro interno con SWS                      Rasomuro esterno con cartongesso
  Rasomuro interno con SWS                       Rasomuro esterno con cartongesso
                                Interno
                                Interno                                     Interno

                                Esterno

                                                                                         italiano
                                Esterno
                                                                            Esterno

   Complanare con cornicie        (90x12)
   Complanare con cornicie        (90x12)
  Complanare con cornice (90x12)
                                Interno
                                Interno

                                Esterno
                                Esterno

                                            13

   Rasomuro esterno con cartongesso
MONTAGGIO TEKNO IT EN.indd 13                                                  08/01/13 11.59
Fase 1                                                                                    Fase 3
  Per fissare le coperture al telaio utilizzare le apposite                                 Posizionare e fissare
  viti autoforanti e clip in dotazione.                                                     la copertura sul
                                                                                            lato cerniere, con le
                                                                                            apposite clip e viti di
                                                                                            dotazione.
                                                                                            Successivamente
                                                                                            posizionare e fissare
                                                                                            al telaio la copertura in
                                                                                            alluminio lato serratura.

  Fase 2
  Posizionare la copertura in alluminio del traverso
  superiore.

                                                                         Importante
                                                                   Far aderire gli angoli a 45° delle guarnizioni di
                                                                   battuta in modo da evitare eventuali spostamenti
                                                                   nel    tempo      eventualmente      bloccandole
                                                                   “schiacciando” la sede di fissaggio.

                                                              14

MONTAGGIO TEKNO IT EN.indd 14                                                                                08/01/13 11.59
5.3 Fissaggio anta porta
  Fase 1
  Posizionare l’anta perpendicolarmente alla Luce
  Foro ed avvicinarla al telaio in corrispondenza dei
                              fori cerniera.

                                                                                                                     italiano
                                                             Fase 2
                                                             Sollevare la porta utilizzando degli spessori
                                                             (consigliamo l’utilizzo di cuscinetti ad aria) ed
                                                             una volta portata all’altezza corretta spostarla
                                                             permettendo alle cerniere di inserirsi nelle apposite
                                                             sedi.

                                                        15

MONTAGGIO TEKNO IT EN.indd 15                                                                            08/01/13 11.59
Fase 3                                                        Fase 5
  Chiudere la porta e verificare che l’anta sia centrata        Regolazione larghezza porta. Agire su ancoraggi
  rispetto alla luce telaio. Correggere eventuali                                            di fissaggio cerniere
  differenze agendo sui punti di regolazione.                                                a telaio, allentando
                                                                                             di due giri le viti di
                                                                                             tenuta con una chiave
                                                                                             esagonale da 6mm.;
                                                                                             successivamente
                                                                                             regolare   le   quattro
                                                                                             viti di posizione con
                                                                                             una chiave esagonale
                                                                da 3mm.; avvitando si sposta l’anta verso il lato
                                                                serratura, svitando verso il lato cerniere; (ad ogni
                                                                rotazione di 360° si effettua uno spostamento
                                                                di 1mm). Effettuate le regolazioni procedere al
  Fase 4                                                        serraggio delle viti di tenuta.
  Regolazione altezza porta. Agire su viti di
                       registro poste sulla                     Fase 6
                       parte superiore delle                                               Inserire sulle apposite
                       cerniere; svitando e                                                sedi le coperture delle
                       avvitando con una                                                   cerniere.
                       chiave esagonale da
                       6mm.      si     possono
                       correggere       eventuali
                       differenze in altezza.

                                                           16

MONTAGGIO TEKNO IT EN.indd 16                                                                              08/01/13 12.00
5.4        Finiture e regolazioni                               Fase 2
                                                                  Applicare i tappi di
                                                                  alloggio catenacci e
  Fase 1                                                          deviatori vaschette foro
  Applicare i piatti coprivite in alluminio (iniziando dal        cerniere inserendoli
  traverso superiore) montandoli a scatto sulle clip              a pressione sui
  di fissaggio.                                                   fori predisposti nei
                                                                  rivestimenti in alluminio
                                                                  utilizzando un martello

                                                                                              italiano
                                                                  di gomma.

                                                                  Attenzione: il primo
                                                                  elemento da inserire
                                                                  e fissare è l’elemento
                                                                  di regolazione dello
                                                                  scrocco e di seguito gli
                                                                  altri tappi.

                                                             17

MONTAGGIO TEKNO IT EN.indd 17                                                     08/01/13 12.00
Fase 3                                                         Fase 4
  Se necessario, regolare la lama parafreddo.                    Montaggio maniglia.
  Utilizzando una chiave esagonale da 3 mm, agire
  sul pistoncino accessibile a porta aperta dalla
  battuta sul lato cerniere. Avvitando o svitando
  si aumenta o diminuisce la corsa della lama
  parafreddo. E’ importante verificare a porta chiusa
  la posizione più adatta per la migliore chiusura della
  luce sotto alla porta.

        Importante
  La lama parafreddo ottiene la sua massima efficacia
  su soglie perfettamente lisce e piane (es.: marmo).
  Ciò non avviene se la soglia è in pietra o cotto oppure        Fase 5
  se presenta eccessive deformazioni, in questo caso             Per effettuare la regolazione della piastrina di
  la guarnizione del parafreddo non potrà chiudere               riscontro dello scrocco, si dovrà allentare la
  correttamente e tenderà a rovinarsi velocemente.               vite centrale. Spostare la piastrina fino al punto
                                                                                           desiderato       agendo
                                                                                           sulla vite laterale di
                                                                                           regolazione con una
                                                                                           chiave esagonale da
                                                                                           2,5 mm (avvitando si
                                                                                           aumenta il “tiro” dello
                                                                                           scrocco, svitando si
                                                                                           diminuisce),       quindi

                                                            18

MONTAGGIO TEKNO IT EN.indd 18                                                                              08/01/13 12.00
bloccare avvitando nuovamente fino al completo
                                     serraggio della vite centrale di tenuta.

                                     Fase 6
                                     Verificare apertura e chiusura.

                                                                                               italiano
                                                                100°

                                                               PORTA APERTA A 100°

                                19

MONTAGGIO TEKNO IT EN.indd 19                                                        08/01/13 12.00
Tekno
                                           Fitting
                                     Instructions

                                20

MONTAGGIO TEKNO IT EN.indd 20                  08/01/13 12.00
1   Introduction                           22
                                 1.1 Performance characteristics            22
                                 1.2 General provisions for handling
                                     and storage                            23
                                 1.3 Unpacking                              24

                                 2     Standard supply                      24

                                 3     Equipment                            24

                                                                                      english
                                 4   Building site features
                                     and preliminary checks              25
                                 4.1 Tekno door frame preliminary checks 25

                                 5     Fitting and adjustment sequence      29
                                 5.1   Pin hinge fastening on door frame    30
                                 5.2   Fitting of frame covering profiles   30
                                 5.3   Door leaf fastening                  33
                                 5.4   Finishing touches and adjustments    35

                                21

MONTAGGIO TEKNO IT EN.indd 21                                               08/01/13 12.00
1       Introduction                                          1.1 Performance
                                                                    characteristics
  This manual aims at being an helpful support for
  easing the installation of a Tekno safety door, as
                                                                Tekno is a line of safety doors with high performance
  well as at providing hints for solving the most
                                                                characteristics.
  common technical issues. The observance of
  all instructions herein provided is an essential
                                                                          Break-in resistance
  requirement for assuring the attainment of
                                                                          Class 3
  all product performance characteristics. To
  highlight some particularly relevant parts of the text                  Acoustic insulation 43 dB
  symbols are used, whose meaning is described
  here below.
                                                                          Fire resistance EI 90
           Important
           It  highlights   particularly   relevant
           technical information that shall not be                        Air
           neglected.

  For any problem or if a specific case is not                            Water
  described in this manual, refer to your area dealer.

                                                                          Wind

                                                           22

MONTAGGIO TEKNO IT EN.indd 22                                                                               08/01/13 12.00
According to the model, type of standard
  equipment and the use of any additional kits, the          1.2 General provisions for
  features listed above may change from door to              handling and storage
  door. The attainment of these high performance
  characteristics is directly linked to the proper
  installation and adjustment of the product in              • To assure the security and safety, provide for
  compliance with the instructions given here below,         suitable transport and handling systems carefully
  as well as to a proper maintenance along the time.         considering the incidence of the door weight
                                                             (about 50 kg/sqm).

                                                                                                                    english
                                                             • Do not expose the product to bad weather.
        Important                                            • Avoid exposing the product to sunlight and
  All performance characteristics were laboratory            excessive heat. They may cause the adhesion of
  measured; therefore, they were measured under              the package to the product and the “raising” of the
  optimal installation and adjustment conditions.            paint layer.
  These performance results may be different in              • The product has to rest vertically, observing the
  the products installed at the building site due to         up - down orientation.
  several possible types of installation, adjustment,        • Avoid any type of bump even when the leaf is still
  existing masonry, construction, etc.                       packaged.
                                                             • Before opening the package make sure to be
                                                             able to proceed with the fitting.
        Important                                            • Any protective films on facing panels or any other
  The handling and installation of a Tekno safety            item shall be removed only once the installation
  door shall be performed by specialized technical           procedure is completed.
  personnel.

                                                        23

MONTAGGIO TEKNO IT EN.indd 23                                                                           08/01/13 12.00
1.3 Unpacking                                              2      Standard supply
  The procedure to unpack the product shall be               The door is usually supplied with:
  carried out with utmost care to avoid denting,             • box containing the accessories;
  scratching and spoiling the product. Do not use any        • tube containing the frame covering profiles;
  cutters or other cutting tools to open the package.        • packaged leaf.
  The packaging material has to be disposed
  observing the local regulations on waste disposal,
  based on the following information concerning the
  materials used.

   Expanded polystyrene        recyclable   plastic

   Polyphrene film (padding)   recyclable   plastic

   Bubble wrap film            recyclable   plastic

   Cardboard                   recyclable   paper
                                                             3      Equipment
   Straps                      recyclable   plastic          To install Tekno, it is necessary to use common
                                                             equipment usually included in the standard one
                                                             that installers use.
                                                             - Pencil and yardstick
                                                             - Straight edge

                                                        24

MONTAGGIO TEKNO IT EN.indd 24                                                                           08/01/13 12.00
- Spirit level
  - Plumb-bob                                             4       Building site features
  -
  -
    Square
    Broom and pan
                                                                  and preliminary
  - Handling straps                                               checks
  - 4-rungs-ladder
  - Box(es) with various small hardware and screws
  - Blanket or cloth to lean tools on it                  4.1 Tekno door frame
  - Spatulas and brushes
                                                              preliminary checks

                                                                                                                     english
  - Drill
  - Clutch screw gun
  - Silicone gun                                          To assure a proper installation of Tekno it is essential
  - Extensions of electric cables                         to verify that the frame has been properly walled
  - Set of bits for drilling metals                       up. A careful check and verification of the frame
  - Set of bits for drilling masonry                      measures carried out before proceeding with the
  - Set of bits for drilling wood                         installation allows obtaining the best final result.
  - Set of inserts for screw gun PH1, PH2, PH3
  - Set of “T”-wrenches with hexagonal head
  - Set of cross and flat screwdrivers                    Step 1
  - Spray lubricant (type WD-40)                          Verify the correct positioning with reference to
  - Neutral silicone (type Fischer SNF)                   the internal wall alignment according to the type
  - Acrylic silicone (type Fischer SA)                    of selected fitting (flush with internal wall, flush
  - Miscellaneous assortment of fillers, sealants,        with internal wall with wall system, coplanar with
    waxes, retouching felt-tip pens, etc.                 surrounding frame).
  - Air bearings
  - Ratchet for adjusting the hinges

                                                     25

MONTAGGIO TEKNO IT EN.indd 25                                                                           08/01/13 12.00
MONTAGGIO MONTAGGIO                                                                                     MONTAGGIO MONTAGGIO
                          RASOMURO INTERNO
               RASOMURO INTERNO
                 Fitting flush with internal wall                                                                     Fitting flushRASOMURO
                                                                                                                      RASOMURO INTERNO
                                                                                                                            CON SWS
                                                                                                                                    withCON  INTERNO
                                                                                                                                         internal
                                                                                                                                            SWS
                                                                                                                          wall with SWS

                  TRIM PLASTERBOARD FLUSH
TRIM PLASTERBOARD FLUSH                                                                                                                                                                                                             TR
                                                                                                                            TRIM PLASTER FLUSH TRIM PLASTER FLUSH
     WITH REFERENCE    WITH REFERENCE
                                                                                                                              WITH REFERENCE     WITH REFERENCE

                            12 mm          12 mm
                            plasterboard   plasterboard
                            panel          panel                                                                                                               Adhesive          Adhesive
                                                                                                                                                               tape              tape
de                Inside

                                                                                                                             Inside                  Inside

                                               Metal                              Metal
                                               reference 1                        reference 1                                          Metal                       Metal
                                                                                                                                       reference 3                 reference 3   Metal                                Metal
                                                                                                                                                                                 reference 1                          reference 1

                             Frame          Frame
                                                                                                                                                               Frame             Frame

                                                                                                TRIM PLASTER FLUSH
                                                             TRIM PLASTER FLUSH

                                                                                                  WITH REFERENCE
                                                               WITH REFERENCE

                                                                                                                                                                                                 TRIM PLASTER FLUSH
                                                                                                                                                                                                   WITH REFERENCE
        WALL                WALL                                                                                                       WALL                        WALL

tside             Outside                                                                                                    Outside                 Outside

                     MONTAGGIO MONTAGGIO                                                                                                  MONTAGGIO MONTAGGIO
                 COMPLANARE COMPLANARE
                            INTERNO    INTERNO                                                                                                    RASOMURO ESTERNO
                                                                                                                                       RASOMURO ESTERNO
                    CON CORNICE CON CORNICE
 PLASTER FLUSH TRIM PLASTER FLUSH                                                                                    26                     TRIM PLASTERBOARD FLUSH
                                                                                                                          TRIM PLASTERBOARD FLUSH
TH REFERENCE     WITH REFERENCE
                                                                                                                               WITH REFERENCE    WITH REFERENCE

               MONTAGGIO TEKNO IT EN.indd 26                                                                                                                  12 mm              12 mm    08/01/13 12.00
                                                                                                                                                              plasterboard       plasterboard
WI
                                                                                                               TRI
                                                                                T

                                                                                                                                                                                                                                        TRI
          Outside                                                                                                                                 Outside            Outside
                               Outside

                              Fitting coplanar internally                                                                                Fitting flush with external
                                                                                                                                                       MONTAGGIO     wall
                                                                                                                                                                MONTAGGIO
                                     MONTAGGIOMONTAGGIO
                              with  surrounding
                                COMPLANARE       frame
                                            INTERNO
                                         COMPLANARE  INTERNO
                                                                                                                                                            RASOMURORASOMURO
                                                                                                                                                                     ESTERNO ESTERNO
                                          CON CORNICE
                                                   CON CORNICE
   TRIM PLASTER FLUSH
                  TRIM PLASTER FLUSH                                                                                                        TRIM PLASTERBOARD
                                                                                                                                                           TRIMFLUSH
                                                                                                                                                                PLASTERBOARD FLUSH
     WITH REFERENCEWITH REFERENCE
                                                                                                                                                 WITH REFERENCEWITH REFERENCE

                                                                                                                                                                                   12 mm
                                                                                                                                                                                                             12 mm
                                                                                                                                                                                   plasterboard
                                           Adhesive                                                                                                                                                          plasterboard
                                                       Adhesive                                                                                                                    panel
                                                                                                                                                                                                             panel
                                           tape
                                                       tape                                                                              Inside             Inside
          Inside

                                                                                                                                                                                                                                       english
                               Inside

                                                                                                                                                                                                                         Metal
                                                                                                                                                                                                                                            Metal
                                                                                                                                                                                                                         reference 2
                                                                                                                                                                                                                                            reference 2
                                                                  Metal
                                                                                                 Metal
                                                                  reference 1
                                                                                                 reference 1
                                           Frame        Frame                                                                                                                          Frame                     Frame
                                                                                TRIM PLASTER FLUSH

                                                                                                               TRIM PLASTER FLUSH
                                                                                                                                             WALL
                                                                                  WITH REFERENCE

                                                                                                                                                                WALL

                                                                                                                 WITH REFERENCE
TRIM PLASTER FLUSH
  WITH REFERENCE

                                                                                                                                         Outside            Outside
                     WALL          WALL                                                                                                                                 12 mm
                                                                                                                                                                                                  12 mm
                                                                                                                                                                        plasterboard
                                                                                                                                                                                                  plasterboard
                                                                                                                                                                        panel
                                                                                                                                                                                                  panel

              Outside           Outside                                                                                                                     TRIM PLASTERBOARD
                                                                                                                                                                           TRIMFLUSH
                                                                                                                                                                                PLASTERBOARD FLUSH
                                                                                                                                                                 WITH REFERENCEWITH REFERENCE

                                                      Rimuovere i riferimenti metallici
                                                                      Rimuovere          prima di
                                                                                 i riferimenti    montare
                                                                                               metallici    la porta.
                                                                                                         prima  di montare la porta.

                                                                                                                                    27

                            MONTAGGIO TEKNO IT EN.indd 27                                                                                                                                                                08/01/13 12.00
Step 2                                                   Step 3
  Check the width measure paying attention to              Check      the   height
  check it at least on 3 points (on the top, on the        measure, verifying the
  bottom and in the center).                               measure on at least two
                                                           angles. It is necessary
  It is necessary to observe the rated Hole Opening        to observe the rated
  measure with ± 1 mm tolerance.                           Hole Opening measure
                                                           with ± 1 mm tolerance.

                                                           Step 4
                                                           Verify the leveling of the
                                                           frame jambs comparing
                                                           the alignment with
                                                           reference to the plumb-
                                                           bob, carefully checking
                                                           the measure on at least
                                                           3 points (on the top, on
                                                           the bottom and in the
                                                           middle) with ± 1 mm
                                                           tolerance.

                                                      28

MONTAGGIO TEKNO IT EN.indd 28                                               08/01/13 12.00
Moreover, check the jambs also using the spirit
  level that has to show a perfect leveling.               5      Fitting and adjustment
                                                                  sequence
                                                           Tekno installation sequence is very easy and
                                                           develops through well defined and compulsory
                                                           steps. Following the order of the operations
                                                           described here below, it will be possible to complete
                                                           the installation safely and easily. Special attention

                                                                                                                   english
                                                           has to be paid to the adjustment operations in oder
                                                           to obtain the perfect alignment of leaf and frame,
                                                           as well as the best aesthetic and functional result.

  Step 5                                                   Step 1
  Using the spirit level check the upper transom of        Unpack the leaf and the profiles, disposing the
  the frame. It should be perfectly leveled.               packing material properly. Verify the matching of
                                                           the frame with the measurements done and the
                                                                                     leaf opening direction.
                                                                                     Verify that the sealing
                                                                                     strips are inserted in the
                                                                                     suitable seats present in
                                                                                     the aluminum facings (1
                                                                                     horizontal + 2 vertical).

                                                      29

MONTAGGIO TEKNO IT EN.indd 29                                                                          08/01/13 12.00
5.1 Pin hinge fastening                                         Important
                                                             After having fastened the hinges to the frame,
      on door frame                                          remove the central screw.

  Properly place the hinges on the suitable fastening
  seats located on the frame and anchor them using
  the supplied screws.
                                                             5.2 Fitting of frame
                                                             covering profiles

                                                             Rasomuro interno con cartongesso
                                                             Flush with internal wall
                                                             with plasterboard
                                                                                                 Interno
                                                                                                internal

                                                                                                Esterno
                                                                                                external

                                                        30

MONTAGGIO TEKNO IT EN.indd 30                                Rasomuro interno con SWS              08/01/13 12.00
Rasomuro interno con SWS
   Rasomuro interno con SWS                      Rasomuro esterno con cartongesso
  Flush with internal wall with SWS              Flush with external wall
                                Interno
                                 Interno
                                internal         with plasterboard           Interno
                                                                            internal

                                Esterno

                                                                                         english
                                Esterno
                                external
                                                                            Esterno
                                                                            external

   Complanare con cornicie        (90x12)
  Coplanar with
   Complanare consurrounding
                  cornicie   frame
                                (90x12)
  (90x12)
                                 Interno
                                internal
                                Interno

                                external
                                Esterno
                                Esterno

                                            31

   Rasomuro esterno con cartongesso
MONTAGGIO TEKNO IT EN.indd 31                                                  08/01/13 12.00
Step 1                                                                                Step 3
  To fasten the covering profiles to the frame use the                                  Place and fasten the
  suitable standard supplied self-threading screws                                      covering profile on
  and clips.                                                                            the hinge side using
                                                                                        the suitable standard
                                                                                        supplied clips and
                                                                                        screws.
                                                                                        Then, position and
                                                                                        tighten to the frame
                                                                                        the aluminum covering
                                                                                        profile on the lock side.

  Step 2
  Place the aluminum covering profile of the upper
  transom.

                                                                    Important
                                                              Let the 45° angles of the frame sealing strips
                                                              adhere in order to avoid any shifts along the time,
                                                              if necessary, blocking them by “squeezing” the
                                                              fastening seat.

                                                         32

MONTAGGIO TEKNO IT EN.indd 32                                                                            08/01/13 12.00
5.3 Door leaf fastening
  Step 1
  Place the leaf perpendicularly to the Hole Opening
  and move it close to the frame matching the hinge
                             holes.

                                                                                                                english
                                                            Step 2
                                                            Lift the door using the spacers (the use of air
                                                            bearings is recommended) and once it has reached
                                                            the proper height, move it letting the hinges get
                                                            into their proper seats.

                                                       33

MONTAGGIO TEKNO IT EN.indd 33                                                                        08/01/13 12.00
Step 3                                                     Step 5
  Close the door and verify that the leaf is centered        Door width adjustment. Act on the anchoring
  with reference to the frame opening. Correct any                                     elements fastening the
  differences by acting on the adjustment points.                                      hinges to the frame,
                                                                                       by loosening the fixing
                                                                                       screws by two turns
                                                                                       with a 6 mm Allen
                                                                                       wrench; then, adjust the
                                                                                       four positioning screws
                                                                                       using a 3 mm Allen
                                                                                       wrench. By screwing
                                                             them up, the leaf moves to the lock side; by
                                                             unscrewing them, it moves to the hinge side. (One
                                                             360° rotation corresponds to 1 mm shift). Once the
                                                             adjustments have been made, tighten the fixing
  Step 4                                                     screws.
  Door height adjustment. Act on the adjustment
                        screw positioned on
                        the upper part of the
                        hinges; unscrewing and                                         Step 6
                        screwing them with an                                          Insert the hinge covering
                        6 mm Allen wrench it is                                        elements in their seats.
                        possible to correct any
                        height misalignment.

                                                        34

MONTAGGIO TEKNO IT EN.indd 34                                                                          08/01/13 12.01
5.4        Finishing touches                              Step 2
                                                            Fit the plugs housing
  		         and adjustments                                the dead bolts and
                                                            hinge hole tray
  Step 1                                                    switchlocks by pressing
  Fit the aluminum screw cover plates (starting from        them into the arranged
  the upper transom) by snap mounting them on the           holes in the aluminum
  fixing clips.                                             facings.

                                                                                      english
                                                            Caution: The first
                                                            element to be inserted
                                                            and fastened is the
                                                            latch adjustment
                                                            element; then proceed
                                                            with the other plugs.

                                                       35

MONTAGGIO TEKNO IT EN.indd 35                                              08/01/13 12.01
Step 3                                                         Step 4
  If necessary, adjust the draught excluder. Using a             Handle fitting.
  3 mm Allen wrench act on the small piston that is
  accessible from the strike plate on the hinge side with
  open door. By screwing and unscrewing it is possible
  to respectively increase or decrease the stroke of the
  draught excluder. With closed door, it is important to
  check which is the most suitable position to attain the
  best closing of the opening under the door.

        Important
  The draught excluder attains it maximum
  effectiveness on perfectly smooth and flat
  surfaces (e.g. marble). This does not occur if the
                                                                 Step 5
  threshold is made of stone or terracotta tiles, or             To adjust the latch strike plate, loosen the central
  if is excessively warped; in this case, the draught            screw. Shift the plate to the wished point, acting
  excluder sealing strip cannot close properly and               on the side adjustment screw with a 2.5 mm Allen
  will tend to become worn quickly.                              wrench (by screwing, it the latch stroke is increased;
                                                                                             by unscrewing it, it
                                                                                             is decreased). Then,
                                                                                             block it screwing it up
                                                                                             again until the complete
                                                                                             tightening of the central
                                                                                             screw is reached.

                                                            36

MONTAGGIO TEKNO IT EN.indd 36                                                                                 08/01/13 12.01
Step 6
                                     Verify the opening and closing.

                                                                                       english
                                                                100°

                                                              100°  OPENA 100°
                                                              PORTA APERTA DOOR

                                37

MONTAGGIO TEKNO IT EN.indd 37                                                08/01/13 12.01
MONTAGGIO TEKNO IT EN.indd 38   08/01/13 12.01
progetto Ikebeo Graphic Link     Ikebeo Graphic Link Project
  PH Ikebeo Graphic Link           PH Ikebeo Graphic Link
  Stampa Centrooffset Master Srl   Printing Centrooffset Master Srl
  Gennaio 2013                     January 2013

MONTAGGIO TEKNO IT EN.indd 39                                         08/01/13 12.01
MONTAGGIO TEKNO IT EN.indd 40   08/01/13 12.01
Puoi anche leggere