VM046 - Phonocar Web Catalogue
←
→
Trascrizione del contenuto della pagina
Se il tuo browser non visualizza correttamente la pagina, ti preghiamo di leggere il contenuto della pagina quaggiù

Works with
          Apple CarPlay

                                               VM046
 MEDIASTATION DAB+ 1 DIN con MONITOR HD TFT/LCD 6.75” TOUCH SCREEN
MEDIASTATION DAB+ 1 DIN with TOUCH SCREEN MONITOR HD TFT/LCD 6.75”
         MEDIASTATION DAB + 1 DIN avec ÉCRAN TACTILE HD TFT/LCD 6.75
            MEDIASTATION DAB+ 1 DIN mit BERÜHRUNGSEMPFINDLICHEM
                                         BILDSCHIRM HD TFT/LCD 6,75”
MEDIASTATION DAB+ 1 DIN con MONITOR HD TFT/LCD 6.75” PANTALLA TÁCIL

                                             Manuale istruzioni   IT

                                           Instructions manual    EN

                                Notice de montage et d’emploi     FR

                                       Gebrauchsanweisungen       DE

                                       Manual de instrucciones    ES

01/2021

Precauzioni • Warnings • Précautions • Vorsicht • Precauciones
IT
• Per l’installazione rivolgersi a personale tecnico qualificato.
• Usare solo con impianto elettrico a 12V DC con negativo a massa.
• Scollegare il terminale negativo della batteria del veicolo quando si effettuano le connessioni dell’apparecchio.
• Quando si sostituisce il fusibile, utilizzarne uno con lo stesso valore di amperaggio.
• Non aprire l’unità e non tentare di ripararla, consultare il proprio rivenditore o personale tecnico qualificato.
• Mantenere un volume di ascolto che permetta di udire i suoni provenienti dall’esterno del veicolo (clacson, si-
rene, etc…
• Non collegare alcun cavo in luoghi dove potrebbe ostacolare il funzionamento dei dispositivi di sicurezza
dell’auto.
EN
• Installation to be carried out by trained technical personnel
• Make sure you have 12V DC, with negative-pole to mass
• First disconnect negative-pole of the car-battery, then effect car-radio connections
• When replacing fuse, always use fuse with same Ampere-value
• Never open the unit, nor try to repair yourself. Always ask your Retailer or authorized technical staff
• Choose a listening-Volume which will allow you to hear external noises (car-horn, sirens etc.)
• When placing the cables, keep away from all car security-devices.
FR
• Se servir du personnel technique qualifié pour l’installation.
• Utiliser uniquement dans des installations électriques à 12V DC avec négatif à masse.
• Débrancher le terminal négatif de la batterie lorsqu’on fait les connexions de l’appareil.
• Quand on remplace un fusible, se servir d’un autre ayant le même ampérage.
• Ne pas ouvrir l’appareil pour essayer de le réparer, contacter votre revendeur ou un personnel technique qualifié
• Tenir le volume à un niveau permettant d’écouter les sons en provenance de l’extérieur du véhicule (Klaxon,
sirène etc.…)
• Ne brancher aucun câble dans des endroits pouvant causer les obstacles au fonctionnement des dispositifs de
sécurité du véhicule.

DE
• Die Installation muss durch technische Fachkräfte vorgenommen werden
• Nur bei 12V DC verwenden, mit Negativ-Pol zur Masse
• Erst den Negativ-Pol der Auto-Batterie abtrennen, dann die Radio-Anschlüsse herstellen
• Beim Auswechseln, immer Sicherungen derselben Ampere-Stärke verwenden
• Nie versuchen, das Gerät zu öffnen oder eigenhändig zu reparieren. Immer den Händler bzw. technische Fa-
chkräfte zu Rate ziehen
• Lautstärke so einstellen, dass externe Geräusche (Hupe, Sirenen etc.) noch hörbar sind
• Kabel fernhalten von allen Sicherheits-Geräten des Wagens.

ES
• Para la instalación, contactar exclusivamente con empresas especializadas y personal técnicamente calificados.
• Usar solo en vehículos con alimentación de 12V DC y negativo a masa.
• Desconectar el terminal negativo de la batería del vehículo cuando se efectúan las conexiones del aparato.
• Cuando se sustituye el fusible, utilizar exclusivamente fusibles con el mismo amperaje.
• Non abrir la unidad y no tentar de repararla, consultar al revendedor o personal técnico calificado.
• Mantener un volumen de escucha tal que nos permita escuchar los sonidos del ambiente circunstante. (Claxon,
sirenas)
• No conectar ningún cable en lugares que podría obstacular el funcionamiento de los dispositivos de seguridad
del coche.
Attenzione • Warning • Attention • Warnung • Precaución
       Works with
       Apple CarPlay
IT
Se si esegue il reset di fabbrica verrà automaticamente eliminata la funzione Apple CarPlay e rimossa l’icona dal
menù principale.
Per recuperare le funzioni eseguire i seguenti passaggi:
1) Accedere alle impostazioni dal menù principale premendo l’icona
2) Premere velocemente in successione le icone GENERALI - VOLUME - GENERALI - VOLUME - SISTEMA. Nella scher-
mata SISTEMA comparirà l’icona PASSWORD.
3) Selezionare l’icona PASSWORD e inserire “1234” e confermare.
La funzione Apple CarPlay sarà riattivata automaticamente.

EN
Performing a factory reset will automatically delete the Apple CarPlay functions and remove the icon from the
main menu.
To recover these functions, please perform the following steps:
1) Access the settings from the main menu by pressing the icon
2) Quickly press the icons GENERAL - VOLUME - GENERAL - VOLUME - SYSTEM in succession. The PASSWORD icon
will be displayed on the SYSTEM screen.
3) Select the PASSWORD icon and enter “1234” , then confirm.
The Apple CarPlay functions will be automatically reactivated.

FR
La réinitialisation d’usine supprime automatiquement les fonctions Apple CarPlay et l’icône du menu principal sera
supprimée.
Pour récupérer ces fonctions, suivre les instructions suivantes:
1) Accéder aux réglages à partir du menu principal en appuyant sur l’icône
2) Appuyer rapidement et successivement les icônes GENERAL - VOLUME - GENERAL - VOLUME - SYSTÈME.
L’icône MOT DE PASSE apparaitra dans la page-Ecran SYSTÈME.
3) Sélectionner l’icône MOT DE PASSE et taper “1234”, e valider.
Les fonctions Apple CarPlay seront automatiquement réactivées.

DE
Durch einen Werksreset werden die Funktionen Apple CarPlay automatisch gelöscht und das Symbol aus dem
Hauptmenü entfernt.
Um diese Funktionen wiederherzustellen, führen Sie bitte die folgenden Schritte aus:
1) Zugriff auf die Einstellungen aus dem Hauptmenü durch Drücken des Symbols
2) Drücken Sie kurz nacheinander die Symbole GENERAL - VOLUME - GENERAL - VOLUME - SYSTEM. Das PAS-
SWORT-Symbol wird auf dem SYSTEM-Bildschirm angezeigt.
3) Wählen Sie das PASSWORT-Symbol und geben Sie “1234” ein, dann bestätigen Sie.
Die Funktionen Apple CarPlay werden automatisch wieder aktiviert.

ES
En el caso de ejecutar el Reset de fábrica serán eliminados automáticamente las funciones Apple CarPlay y se eli-
minará el icono del menú principal.
Para recuperar las funciones realizar los siguientes pasos:
1) Acceder a los ajustes desde el menú principal pulsando el icono
2) Pulsar rápidamente y sucesivamente los iconos GENERALES - VOLUMEN - GENERALES - VOLUMEN – SISTEMA. . El
icono PASSWORD aparecerá en la pantalla SYSTEM.
3) Seleccionar el icono PASSWORD y digitar “1234” y a continuación confirmar.
Las funciones Apple CarPlay se reactivaran automáticamente.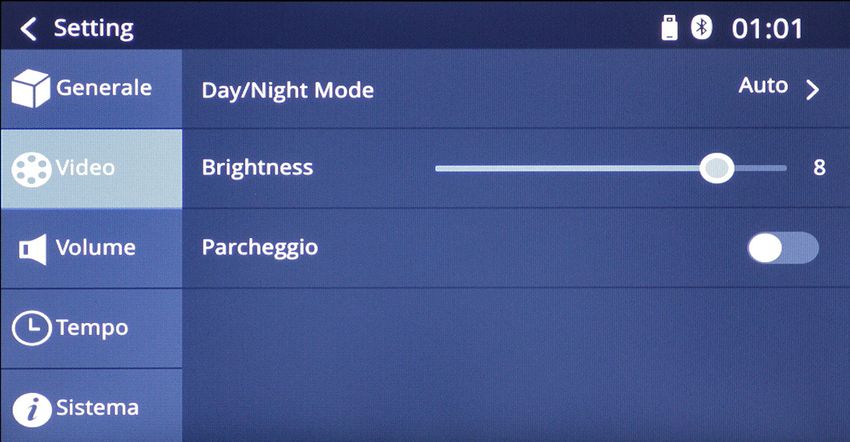
VM046

        IT
        EN
CONNESSIONI • CONNECTIONS		                                                                                 IT/EN

IT - Durante l’avviamento dell’auto il VM046 potrebbe spegnersi per poi riaccendersi. Per evitare questo inconve-
niente collegare lo stabilizzatore di tensione 05146.
EN - The VM046 could turn-out and turn-on again, when the ignition-key gets activated. You can avoid such incon-
venience, by connecting the tension stabilizer 05146.

                      1

                            2              3                                                  4

                                                     R USB   PORTA USB / USB PORT
 1
                                                             USCITA VIDEO 2 / VIDEO OUT 2

 2                                                                DAB                               AERIAL

 3                  BIANCO/WHITE
                    ROSSO/RED
                                                FRONT OUT L USCITA AUDIO ANTERIORE SX - LEFT FRONT AUDIO OUTPUT
                    BIANCO/WHITE
                                                FRONT OUT R USCITA AUDIO ANTERIORE DX - RIGHT FRONT AUDIO OUPUT
                                                REAR OUT L USCITA AUDIO POSTERIORE SX - LEFT REAR AUDIO OUTPUT
                    ROSSO/RED
                                                REAR OUT R USCITA AUDIO POSTERIORE DX - RIGHT REAR AUDIO OUTPUT
                    ROSSO/RED
                    BIANCO/WHITE
                                                AUX IN R      INGRESSO AUDIO DX - RIGHT AUDIO INPUT
                                                AUX IN L      INGRESSO AUDIO SX - LEFT AUDIO INPUT
                    MARRONE / BROWN
                                                SUB 1         USCITA SUBWOOFER 1 / SUB-WOOFER OUTPUT 1
                    MARRONE / BROWN
                                                SUB 2         USCITA SUBWOOFER 2 / SUB-WOOFER OUTPUT 2
                    GIALLO / YELLOW
                                                AUX 2 VIDEO IN
                    GIALLO / YELLOW
                    GIALLO / YELLOW
                                                CAMERA
                                                VIDEO OUT
                                                BRAKE
                                                              ATTIVAZIONE RETROCAMERA
                                                REVERSE       REAR-CAMERA ACTIVATION
                                                P.CONT
                                                RADIO ANTENNA
                                                MICROPHONE
                                                SWC

                                                        6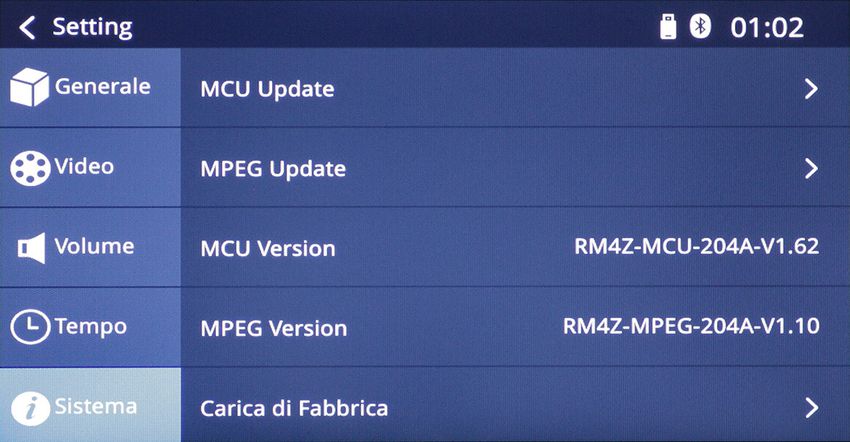
CONNESSIONI • CONNECTIONS		                                                                     IT/EN

4
USCITE ALTOPARLANTI
                                         GRIGIO/GRAY
SPEAKERS OUTPUT                                                      FRONT R +     ANTERIORE DESTRO
                                         GRIGIO-NERO/GRAY-BLACK
                                                                     FRONT R -     FRONT RIGHT
                                         BIANCO/WHITE
                                                                     FRONT L +     ANTERIORE SINISTRO
                                         BIANCO-NERO/WHITE-BLACK
                                                                     FRONT L -     FRONT LEFT
                                         VIOLA/PURPLE
                                                                     REAR R +      POSTERIORE DESTRO
                                         VIOLA-NERO/PURPLE-BLACK
                                                                     REAR R -      REAR RIGHT
                                         VERDE/GREEN
                                                                     REAR L +      POSTERIORE SINISTRO
                                         VERDE-NERO/GREEN-BLACK
                                                                     REAR L -      REAR LEFT

ALIMENTAZIONE
POWER-SUPPLY
                      ROSSO/RED
                                         ACC +12V       +12V SOTTOCHIAVE         +12V INJECTION-KEY
                      GIALLO/YELLOW
                                         BATT +12V      +12V POSITIVO BATTERIA   +12V BATTERY-POSITIVE
                      NERO/BLACK
                                         GND            MASSA                    GROUND
                      ARANCIONE/ORANGE
                                         DIMMER         ILLUMINAZIONE / DIMMER   ILLUMINATION / DIMMER
                      BLU/BLUE
                                         POWER          ALIMENTAZIONE ANTENNA    ANTENNA POWER
                                         ANTENNA

                                           7
FUNZIONI • FUNCTIONS                                                                            IT/EN

                                                                                             5

     1                                                                                              6
     3
                                                                                                    7
 2

                              4                                                 9        8

IT                                                        EN

1. SIRI Tasto dedicato ai Comandi Vocali per iPhone       1. Voice control (Siri iOS )
2. Tasto sgancio frontalino                               2. Front panel release button

3. Avanti/Rispondi chiamata                               3. Forward/Answer Call
   Indietro/Chiusura Chiamata                                Back/End Call

4. Encoder del volume                                     4. Volume

5. Espulsione CD/DVD                                      5. CD/DVD Eject

6. Apertura/ Chiusura schermo motorizzato                 6. Motorised screen opening/closing

7. AV-IN                                                  7. AV-IN

8. Sportellino porta USB                                  8. Sportellino porta USB

9. Ingresso CD/DVD                                        9. Ingresso CD/DVD

                                                      8
MENU PRINCIPALE • MAIN MENU IT/EN
IT - All’accensione dell’autoradio compare il MENU principale, premere l’icona corrispondente alla funzione
desiderata.
EN - When switching-on the car-radio, the Main Menu will appear. Now press icon related to the requested
function.
IMPOSTAZIONI • SETUP
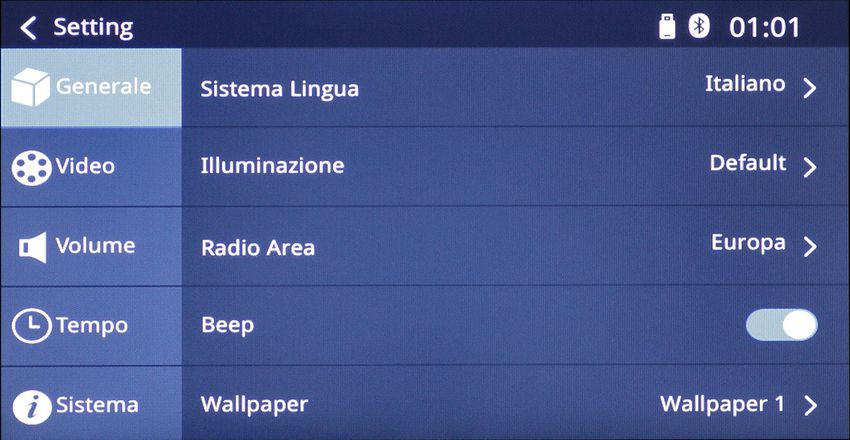
IT - Premere l’icona sul pannello del menù principale per modificare: Generali, Video, Volume, Tempo, Sistema.
EN - Press Setup-icon on the Main-Menu-interface, to change: General, Video, Volume, Time, System.
IT - GENERALE IT - VIDEO
SISTEMA LINGUA Selezionare lingua. DAY/NIGHT MODE Imposta illuminazione automatica
ILLUMINAZIONE Regola colore tasti led (Bianco-Rosso). Modalità giorno / Modalità notte.
RADIO AREA Seleziona regione radio. BRIGHTNESS Regola la luminosità dello schermo.
BEEP Suono tasti. Attiva / Disattiva. PARCHEGGIO Attiva / Disattiva la visione in movimento
WALLPAPER Imposta immagine di sfondo. dei filmati.
Attenzione l’utilizzo di questa funzione è regolata dalla
legge vigente nel paese di utilizzo.
EN - GENERAL EN - VIDEO
LANGUAGE SYSTEM Selects the language. DAY/NIGHT MODE Sets automatic illumination
ILLUMINATION Adjusts LED key color (White-Red). Day mode / Night mode.
RADIO AREA Selects radio region. BRIGHTNESS Adjusts the brightness of the screen.
BEEP Key sound. Enable / Disable. PARKING Turns video playback on / off, when moving.
Warning : The use of this function is governed by the laws
of the country , where it is used.
9
IMPOSTAZIONI • SETUP                                                                                      IT/EN

IT - VOLUME Regola il volume di: RADIO - MULTIMEDIA        IT - TEMPO Imposta data orario e formato (AM-PM - 24H)
- BT A2DP - BT CONVERSAZIONE - CARPLAY - AUTO
EQ Accedi a equalizzatore.                                 EN - TIME Set date, time and format (AM-PM - 24H)

EN - VOLUME Adjusts the volume of: RADIO - MULTIMEDIA
- BT A2DP - BT CONVERSATION - CARPLAY - CAR
EQ Access to equalizer.

IT - SISTEMA Informazioni software e di sistema.
ATTENZIONE: Tutte le funzioni di update sono
vincolate alla casa madre, non sono quindi funzioni
abilitate.
CARICA DI FABBRICA Riporta il sistema alle imposta-
zioni iniziali (Attenzione vedi pag.3).

EN - SYSTEM Software and system information.
CAUTION: All update functions are bound to their
related company and are therefore not enabled.
LOAD FACTORY Returns the system to its initial settings
(Warning , see page 3).

                                                          10
RADIO IT/EN
Schermata principale
Main screen
Schermata 2 Schermata 3
Screen 2 Screen 3
IT - FUNZIONI RADIO schermata principale EN - RADIO FUNCTIONS
Torna al menù principale. Back to main menu.
Lista frequenze radio memorizzate. List stored radio frequencies
Seleziona FM/AM. Select FM/AM.
Ricerca manuale stazioni, indietro. Manual stations search, back
Ricerca manuale stazioni, avanti. Manual stations search, forward
Scansione e memorizzazione automatica Scanning and automatic storage major
emittenti principali. broadcasters
87.50 Indica la frequenza in ascolto. 87.50 Sets the listening frequency
Selettore manuale della frequenza. Manual frequency search
... Passa alla seconda schermata impostazioni
radio.
... Switch to the second radio settings menu
Screen 2
schermata 2
Per accedere alla seconda schermata premere il tasto ... To access the second screen, press the key ...
Band selection
Selezione bande
Equalization
Equalizzazione Setup
Impostazioni
Screen 2
schermata 3 To access the third screen, press
Per accedere alla terza schermata premere TA on/off
TA on/off AF on/off
AF on/off PTY Selects the radio program
PTY Seleziona il programma radio Back to screen 2
Torna alla schermata 2
11FUNZIONI • FUNCTIONS DAB+ RADIO IT/EN
IT - FUNZIONI RADIO DAB+ IT - FUNZIONI RADIO DAB+
Visualizza lista dei servizi DAB+ disponibili. ON Attiva / Disattiva DAB link
Menu principale Ricerca stazioni per tipologia di programma.
Visualizzazione informazioni radio.
01:30 Orario del sistema. TA Attiva / Disattiva informazioni sul traffico.
SERVICE
Passa al secondo menu. LINK Disattiva collegamento servizio DAB+
Ricerca manuale.
EN - DAB+ RADIO FUNCTIONS
Ricerca automatica delle stazioni con auto
memorizzazione. ON Activate / Deactivate Band L
Stations-Research according to program-type.
EN - DAB+ RADIO FUNCTIONS
TA Activate / Deactivate Traffic-Information.
Visualize list of available DAB+ services.
SERVICE
LINK Activate / Deactivate connection to DAB+ service.
Main Menu.
Visualize radio-information.
01:30 System-Time.
Go to Second Menu.
Manual Research.
Automatic Stations-Research through
auto-memorization.
12RIPRODUZIONE DA USB • USB PLAYBACK IT/EN
IT - FUNZIONI USB IT - FUNZIONI USB - Riproduzione musica
All’inserimento del supporto USB verrà visualizzato il Torna all’elenco file audio.
contenuto sullo schermo. In presenza di brani musicali Traccia precedente o successiva.
la riproduzione partirà in automatico. Selezionare il Avvia riproduzione o mette in pausa.
tipo di file da riprodurre tramite l’icona relativa. Ripeti un brano o cartella.
MUSICA Riproduzione casuale.
...
VIDEO EQ Equalizzatore.
Seconda schermata
IMMAGINI
Torna al menù principale.
USB1 USB1/USB2
Torna al menù principale. EN - USB FUNCTIONS - Playing Music
Back to the audio files list.
EN - USB FUNCTIONS Previous or next track.
By entering the USB support, the content will be Start or pause playback.
displayed on the screen. If music tracks are available, Repeat a track or a folder.
the playback will start automatically. Select the type of Random playback.
file to be played via the related icon.
... EQ Equalizer.
MUSIC Second Screen
VIDEO Returns to the main menu.
IMAGES
USB1 USB1/USB2
Back to main menu.
13RIPRODUZIONE DA USB • USB PLAYBACK IT/EN
IT - FUNZIONI USB - Riproduzione video IT - FUNZIONI USB - Riproduzione immagine
Toccare lo schermo durante la riproduzione per aprire Toccare lo schermo quando l’immagine è in riproduzio-
il menù video. ne per aprire il menù video.
Torna all’elenco file video. Ingrandisce l’immagine (Zoom)
Traccia precedente o successiva. Traccia precedente o successiva.
Avvia riproduzione o mette in pausa. Avvia riproduzione.
Ripeti un brano o cartella. Ferma riproduzione
Riproduzione casuale. Ruota immagine.
EQ Equalizzatore. Torna all’elenco file immagine.
Torna al menù principale. Torna al menù principale.
EN - USB FUNCTIONS - Video playback EN - USB FUNCTIONS - Image playback
Touch the screen during the playback to open the Touch the screen when the image is displayed, in order
video menu. to open the video menu.
Back to the video files. Maximize the image (Zoom)
Previous or next track. Previous or next track.
Start or pause playback. Start playback.
Repeat a track or a folder. Stop playback
Random Playback. Rotate the image.
EQ Equalizer. Returns to the image file list.
Returns to the main menu. Returns to the main menu.
14BLUETOOTH IT/EN
IT - ACCOPPIAMENO DAL TELEFONO IT - SINCRONIZZAZIONE RUBRICA
• Attivare la funzione bluetooth sul telefono e ricercare Premere per sincronizzazione rubrica.
nuovi dispositivi. REGISTRO CHIAMATE Visualizza l’elenco chiamate.
• Selezionare PHONOCAR ad accoppiamento avvenuto DIGITA Tastierino numerico.
sul dispositivo comparirà il nome del telefono. DISCONNETTI Smartphone connesso.
ACCOPPIAMENTO DAL VM046 SETTING Connessione automatica: on/off.
Premere l’icona Scan, selezionare il proprio telefono Risposta automatica: on/off.
cellulare quando viene rilevato. Accettare l’accoppiamento Rubrica sincronizzata: sincronizzazione.
dal telefono cellulare.
EN - PHONEBOOK SYNCHRONIZATION
EN - PAIRING BY PHONE Press for phonebook synchronization.
• Enable the Bluetooth function on your phone and CALL LOG Displays the call list.
search for new devices. DIAL Numeric keypad.
• Once the pairing has been carried out, select DISCONNECT connected Smartphone
PHONOCAR. The name of the phone will be displayed SETTING Automatic connection: on/off.
on the screen. Automatic answer on/off.
PAIRING FROM VM046 Synchronized Phonebook : synchronization
Press the search icon Scan, select your phone when
it is detected. Confirm the pairing from the mobile
phone.
15BLUETOOTH IT/EN
IT - EFFETTUARE/RICEVERE UNA CHIAMATA IT - Sullo schermo compare il numero del chiamante o il
Digitare il numero telefonico e premere . nome indicato in rubrica. Premere l’icona per accettare
Termina chiamata. e rispondere alla chiamata oppure per rifiutarla.
CONTATTO Chiamata dalla rubrica, .
EN - The screen displays the caller’s number or the name
EN - MAKE / RECEIVING A CALL listed in the phone book. Press the icon to accept and
Enter the phone number and press . answer the call or to reject it.
Stop calling.
CONTACT Call from the phonebook .
IT - Per accedere al menù A2DP selezionare l’icona EN - To access the A2DP menu, select the icon from
dal menù principale. the main menu.
Se il telefono connesso supporta il profilo A2DP è possibile If the connected phone supports A2DP profile, you can
ascoltare i brani musicali.
listen to music tracks.
Se il dispositivo supporta AVRCP sarà possibile controllare i
If your device supports AVRCP you can control your music
brani musicali direttamente dal touch screen.
directly from the touch screen.
Traccia precedente o successiva. Previous or next track.
Avvia o interrompe riproduzione. Starts or stops the playback.
16AUX IN • NAVIGAZIONE • RETROCAMERA / AUX IN • NAVIGATION • REAR CAMERA IT/EN
IT - INGRESSI AUX IN IT - RETROCAMERA
E’ possibile visualizzare la riproduzione di due sorgenti E’ possibile collegare una retrocamera all’ingresso
audio esterna collegata all’ ingresso AUX IN L/R. Preme- specifico CAMERA (posteriore).
re l’icona AUX 1/2 corrispondente sul menù principale. Il VM046 visualizza automaticamente l’immagine della
retrocamera collegandosi con la luce di retromarcia.
EN - AUX-IN INPUTS (vedi pagina 6 REVERSE)
The playback of two external audio sources connected Torna al menù principale.
to AUX IN L / R can be displayed.
Press the related AUX 1/2 icon on the main menu. EN - REAR-CAMERA
You can connect a rear-camera on the specific CAMERA-
input (on the back). The VM046 offers the possibility of
automatically visualizing the rear-camera, if you connect
the camera to the reverse-gear-lights; in such case, the
screen will show the rear-camera-pictures each time you
put the reverse-gear.
(See pag. 6 REVERSE)
Go to the main menu.
IT - VIDEO OUT
È possibile condividere la visualizzazione del monitor
principale con due monitor esterni (ad esempio moni-
tor da poggiatesta posteriori) in ogni sua schermata.
NB: l’uscita dei due segnali video, non è gestibile
singolarmente.
Le due uscite riproducono l’immagine che si ha sullo
schermo della mediastation.
EN - VIDEO OUT
It is possible to share the display of the main monitor
with two external monitors e.g. (rear headrests moni-
tors).
Note: the output of the two video signals cannot be
managed separately.
The two outputs play the same image of the screen of
the mediastation.
17CAN-BUS PROTOCOL IT/EN
CONNESSIONI E SINCRONIZZAZIONE DELL’ INTERFACCIA COMANDI AL VOLANTE
CONNECTING AND SYNCHRONIZING OF THE INTERFACE FOR STEERING-WHEEL CONTROLS
9
NERO / BLACK GND NERO/BLACK
04070 - 04073
ARANCIO-BIANCO / ORANGE-WHITE KEY 1 VIOLA/PURPLE
MARRONE-BIANCO / BROWN-WHITE KEY 2 MARRONE/BROWN
IT - SINCRONIZZAZIONE LINEA CAN-BUS
Effettuare i collegamenti con le interfacce 04070 o 04073.
Alimentando l’interfaccia il led lampeggerà con colore verde, un programma ad auto apprendimento eseguirà in automa-
tico la sincronizzazione e la selezione del corretto protocollo CAN-BUS per comandi al volante e servizi.
MEMORIZZAZIONE PROFILO AUTORADIO
A sincronizzazione avvenuta, il led lampeggerà con colore verde e continuerà a lampeggiare fino a quando non si selezio-
nerà il profilo autoradio Phonocar VM069 / VM001D.
La selezione avverrà premendo 6 volte il tasto Volume+ ed il Led eseguirà 7 lampeggi verdi. Premere SEEK+ per memoriz-
zare. Il LED dell’interfaccia diventa verde fisso.
NB. Se il LED diventa rosso: ricontrollare i collegamenti della linea CAN.
RESET INTERFACCIA
Senza togliere il circuito dall’alimentazione, premere il tasto PRG fino a quando led verde non si spegne. Il led lampeggerà
di color Rosso per pochi secondi, poi diventerà colore verde in attesa della selezione del nuovo modello di radio.
EN - SYNCHRONIZING THE CAN-BUS-LINE
Effect connections with interfaces 04070 or 04073. When Interface receives current-supply, LED will flash green and a
self-learning program will automatically start synchronizing the Steering-wheel and Services commands with the related
correct CAN-BUS-protocol.
MEMORIZING CAR-RADIO PROFILE
When synchronization has taken place, Led will flash Green.
It will continue flashing until you select the radio-profile Phonocar VM069 / VM001D.
Selection takes place by pressing 6 times the key Volume+. Led will flash 7times Green. Press SEEK+ to memorize.
The LED on the interface turns steady green.
N.B. If the LED turns red: check the CAN line connections again.
RESET INTERFACE
Without separating the circuit from the current-supply, press PRG-key until the Green Led switches-off. LED will then flash
for some seconds Red, then turn Green, until you select the model of the new car-radio.
IT Per scaricare le istruzioni delle interfacce:
EN To download the instructions for the interfaces:
- andare sul sito www.phonocar.it - go to the website www.phonocar.com
- nel Menù principale andare alla voce SUPPORTO - In the main menu, go to SUPPORT
e selezionare “Manuali” and select “Manuals”.
- inserire il codice che si sta cercando - enter the code you are looking for
in “Search for Manuals”
nella barra “Ricerca Manuali”
18RESISTIVE PROTOCOL IT/EN
CONNESSIONI E SINCRONIZZAZIONE DELL’ INTERFACCIA COMANDI AL VOLANTE
CONNECTING AND SYNCHRONIZING OF THE INTERFACE FOR STEERING-WHEEL CONTROLS
9
NERO / BLACK GND VERDE / GREEN
04083
ARANCIO-BIANCO / ORANGE-WHITE KEY 1 ROSA / PINK
MARRONE-BIANCO / BROWN-WHITE KEY 2 GRIGIO / GREY
IT - La mediastation VM046 è dotata di Comandi al Volante Resistivi.
In caso di incompatibilità, utilizzare le interfacce 04083. Per i collegamenti ai connettori originali dell’auto seguire gli sche-
mi presenti sul manuale connessioni interfacce.
MEMORIZZAZONE DEI TASTI SUL VOLANTE Effettuare i collegamenti. Memorizzare le funzioni dei comandi al volante
seguendo il manuale delle interfacce.
MEMORIZZAZIONE PROFILO AUTORADIO A sincronizzazione avvenuta, il led lampeggerà con colore verde e conti-
nuerà a lampeggiare fino a quando non si selezionerà il profilo autoradio Phonocar VM069 / VM001D.
La selezione avverrà premendo 4 volte il tasto Volume+ ed il Led eseguirà 5 lampeggi verdi.
Premere SEEK+ per memorizzare. Il LED diventa verde fisso.
RESET INTERFACCIA Staccare il connettore dalla centralina e tenendo premuto il tasto PRG, reinserire il connettore. Il LED
della centralina inizierà a lampeggiare lentamente poi velocemente a questo punto togliere la pressione dal tasto PRG.
L’avvenuto RESET sarà confermato con un solo lampeggio di colore rosso del LED.
EN - The VM046 is fitted with Resistive Steering-wheel Commands. In case of incompatibility, use interfaces 04083.
To connect to the Original car-connecters, stick to the schemes shown on the Interface Connections-Manual.
MEMORIZING THE STEERING-WHEEL KEYS Effect the connections. Memorize the steering-wheel functions as
stated on the Interface-Manual.
MEMORIZING THE CAR-RADIO PROFILE When synchronization has taken place, Led will flash Green. It will
continue flashing until you select the radio-profile Phonocar VM069 / VM001D. Selection takes place by pressing
4times the key Volume+. Led will flash 5times Green. Press SEEK+ to memorize. The LED turns steady green.
RESET INTERFACE Separate the connector from the central-unit. Keep PRG-key pressed and re-introduce the
connector. LED of central-unit will start flashing slowly and then rapidly. At this point, lift finger from the PRG-key.
RESET has successfully been carried out when LED flashes only one time Red.
IT Per scaricare le istruzioni delle interfacce:
EN To download the instructions for the interfaces:
- andare sul sito www.phonocar.it - go to the website www.phonocar.it
- nel Menù principale andare alla voce SUPPORTO - In the main menu, go to SUPPORT
e selezionare “Manuali” and select “Instructions”.
- inserire il codice che si sta cercando - enter the code you are looking for
in “Search for Manuals”
nella barra “Ricerca Manuali”
19COMANDI AL VOLANTE • STEERING WHEEL CONTROLS IT/EN
PROGRAMMAZIONE • PROGRAMMING
IT - La programmazione è uguale sia per i comandi EN - Programming is the same for both controls RESISTIVE
RESISTIVI, con o senza inerfaccia, che con i comandi (with or without interfaces) and CAN-BUS
CAN-BUS. Press the SWC icon in the main menu and 6 functions
Premere l’icona SWC nel menù principale e verranno max. will be saved.
memorizate massimo 6 funzioni. Premere i tasti nume- Press the numeric keys and pair each key with the function
rici ed accoppiare ad ogni tasto la funzione che si vuole you want to memorize.
memorizzare. Press Match to start storing the controls, by pressing the keys
Premere Match per iniziare a memorizzare i comandi on the steering wheel. When programming is complete,
premendo i tasti sul volante. Al termine della program- press confirmation key to save.
mazione premere conferma per memorizzare.
20FUNZIONI • FUNCTIONS APPLE CARPLAY IT/EN
IT - Collegare il proprio telefono con il cavo LIGHTING IT - Per uscire dalla funzione CARPLAY premere l’icona
APPLE originale all’ingresso USB CARPLAY del dispositi- e confermare l’uscita “CAR HOME” o scollegare lo
vo e si avvierà automaticamente la funzione CARPLAY. smartphone.
EN - Connect your phone via the original LIGHTING EN - To exit the CARPLAY function, press the icon
APPLE cable, to the CARPLAY USB input of the device. VEHICLE and confirm the exit from the DRIVE MODE.
The CARPLAY function will automatically start.
IT - ATTENZIONE: All’avvio della funzione APPLE CARE PLAY e PhoneLINK verranno visualizzate solo le applica-
zioni compatibili. Le applicazioni non visualizzate sono da considerare non compatibili.
EN - WARNING: When APPLE CAR PLAY and PhoneLINK is started, only compatible applications will be displayed.
Applications that are not displayed are considered to be incompatible.
21FUNZIONI • FUNCTIONS PhoneLINK IT/EN
IT - La funzione PhoneLINK è compatibile solo con IT - Per uscire dalla funzione PhoneLINK premere il
smartphone con sistema operativo Android 4.2 o tasto e confermare l’uscita.
superiore.
• Selezionare sul telefono il menù FUNZIONI SVILUPPA- EN - To exit the PhonoLINK function, press the button
TORE (seguire le istruzioni del proprio telefono). and confirm the exit.
• Attivare la funzione DEBUG USB e collegare il telefono,
con l’apposito cavo USB/Mini USB in dotazione al
proprio telefono, all’ingresso USB del dispositivo (non è
necessario scaricare nessuna applicazione).
EN - The PhoneLINK function is only compatible with
smartphones running Android 4.2 or later models.
• Select the menu DEVELOPER’S FUNCTIONS on the
phone (follow the instructions of your phone)
• Enable the DEBUG USB function and connect your
phone, using the supplied special USB / Mini USB cable
to your phone, to the USB input of the device (no appli-
cation download required).
IT - ATTENZIONE: All’avvio della funzione APPLE CARE PLAY e PhoneLINK verranno visualizzate solo le applica-
zioni compatibili. Le applicazioni non visualizzate sono da considerare non compatibili.
EN - WARNING: When APPLE CAR PLAY and PhoneLINK is started, only compatible applications will be displayed.
Applications that are not displayed are considered to be incompatible.
22VM046
FR
DECONNEXIONS • ANSCHLÜSSE FR/DE
FR - Sur certaines voitures, pendant l’allumage, le VM046 peut s’éteindre avant de se rallumer. Pour éviter cet
inconvénient, brancher le temporisateur d’allumage 05146.
DE - Auf einigen Wagen-Modellen kann es vorkommen, dass beim Anlassen des Motors, der VM046 sich von selbst
ausschaltet und dann wieder einschaltet. Diesen Umstand kann man verhindern, indem man den Zeitgeber 05146.
1
2 3 4
R USB USB PORT
1
VIDEO OUT 2
2 DAB AERIAL
3 WHITE
RED
FRONT OUT L LEFT FRONT AUDIO OUTPUT
WHITE
FRONT OUT R RIGHT FRONT AUDIO OUPUT
REAR OUT L LEFT REAR AUDIO OUTPUT
RED
REAR OUT R RIGHT REAR AUDIO OUTPUT
RED
WHITE
AUX IN R RIGHT AUDIO INPUT
AUX IN L LEFT AUDIO INPUT
BROWN
SUB 1 SUB-WOOFER OUTPUT 1
BROWN
SUB 2 SUB-WOOFER OUTPUT 2
YELLOW
AUX 2 VIDEO IN
YELLOW
YELLOW
CAMERA
VIDEO OUT
BRAKE
REAR-CAMERA ACTIVATION
REVERSE
P.CONT
RADIO ANTENNA
MICROPHONE
SWC
24FONCTIONS • FUNKTIONEN FR/DE
4
SORTIES HAUTS-PARLEURS
GRAY
LAUTSPRECHER-AUSGÄNGE FRONT R +
GRAY-BLACK FRONT RIGHT
FRONT R -
WHITE
FRONT L +
WHITE-BLACK FRONT LEFT
FRONT L -
PURPLE
REAR R +
PURPLE-BLACK REAR RIGHT
REAR R -
GREEN
REAR L +
GREEN-BLACK REAR LEFT
REAR L -
ALIMENTATION
STROM-ZUFUHR
RED
ACC +12V +12V INJECTION-KEY
YELLOW
BATT +12V +12V BATTERY-POSITIVE
BLACK
GND GROUND
ORANGE
DIMMER ILLUMINATION / DIMMER
BLUE
POWER ANTENNA POWER
ANTENNA
25MENU PRINCIPAL • HAUPT-MENÜ FR/DE
5
1 6
3
7
2
4 9 8
FR DE
1. Commandes vocales (Siri iOS) 1. Sprachbefehle (Siri iOS )
2. Bouton de dévérouillage façade 2. Bedienteil abnehmen
3. Suivant/ Répondre à un appel 3. Davor/ Anruf beantworten
Précédent/Raccrocher Danach/ Anruf beenden
4. Volume 4. Lautstärke
5. Ejecte CD/DVD 5. CD/DVD-Auswurf
6. Ouverture/Fermeture écran motorisé 6. Öffnen und Schließen des motorisierten Monitors
7. AV-IN 7. AV-IN
8. USB 8. USB
9. CD/DVD 9. CD/DVD
26REGLAGES • EINSTELLUNGEN FR/DE
FR - À l’allumage de l’autoradio, le MENU principal apparaît. Avec les icônes sur l’écran on sélectionne la source ou
la fonction désirée.
DE - Beim Einschalten des Geräts erscheint das Haupt-MENÜ. Mit den Ikonen auf dem Bildschirm wählt man die
gewünschte Quelle und Funktionen.
REGLAGES • EINSTELLUNGEN
FR - Appuyer l’icône sur le panneau du menu principal pour modifier les réglages suivants: Généraux,
Video, Volume, Temps, Système.
DE - Auf dem Hauptmenü, die Ikone wählen, um folgende Einstellungen zu ändern: Allgemein, Video,
Lautstärke, Zeit, System.
FR - GÉNÉRAL FR - VIDÉO
SYSTÈME LANGUE Sélectionner la langue. DAY/NIGHT MODE Règle l’éclairage automatique.
ÉCLAIRAGE Règle la couleur des touches LED Mode Jour / Mode Nuit.
(blanc-rouge) . LUMINOSITÉ Règle la luminosité de l’écran.
ZONE RADIO Sélectionne la région radio. PARKING Active / désactive la reproduction des vidéos
BEEP Son des touches. Active / Désactive. en mouvement
WALLPAPER règle l’image du fond d’écran. Avertissement : l’usage de cette fonction est discipliné
par les lois du Pays d’utilisation.
DE - ALLGEMEIN DE - VIDEO
LANGUAGE SYSTEM Wählt die Sprache aus. DAY/NIGHT MODE Stellt die automatische Beleuchtung
HELLIGKEIT Stellt die LED-Tastenfarbe ein (Weiß-Rot) . ein. Tag-Modus / Nacht-Modus.
RADIO AREA Wählt die Radio-Region aus. HELLIGKEIT Stellt die Helligkeit des Bildschirms ein.
BEEP Tasten-Ton. Aktivieren / Deaktivieren. PARKING Schaltet die Videowiedergabe ein / aus, wenn
WALLPAPER Legt das Hintergrundbild fest. Sie sich bewegen.
Warnung: Die Verwendung dieser Funktion unterliegt den
Gesetzen des Landes, in dem sie verwendet wird.
27REGLAGES • EINSTELLUNGEN FR/DE
FR - VOLUME Règle le volume de : FR - HEURE Réglage de la date, de l’heure et du
RADIO - MULTIMÉDIA - BT A2DP - BT CONVERSATION - format (AM-PM - 24H).
CARPLAY - CARPLAY - AUTO
EQ Pour accéder à l’égaliseur. DE - TIME Datum, Uhrzeit und Format einstellen
(AM-PM - 24H).
DE - VOLUME Stellt die Lautstärke von:
RADIO - MULTIMÉDIA - BT A2DP - BT CONVERSATION -
CARPLAY - CARPLAY - AUTO ein
EQ Zugang zum Equalizer.
FR - SYSTEM Informations sur le logiciel et du système. DE - SYSTEM Software und Systeminformationen.
ATTENTION: Toutes les fonctions de mise à jour sont WARNUNG: Alle Update-Funktionen sind von der,
liées à la société de production et ne sont donc pas dafür zuständigen, Gesellschaft abhängig und
activées. daher nicht aktiviert.
RESET D’USINE Ramène le système à ses réglages LOAD FACTORY Setzt das System auf seine ursprüngli-
d’origine (Attention, voir page 3). chen Einstellungen zurück (Warnung, siehe Seite 3).
28RADIO FONCTIONS • FUNKTIONEN RADIO AM/FM FR/DE
Page principale
Hauptbildschirm
page 2 page 3
Bildschirm 2 Bildschirm 3
FR - FONCTIONS RADIO AM/FM DE - RADIO-FUNKTIONEN AM/FM
Retour au menu principal. Zurück zum Hauptmenü.
Liste des fréquences radio mémorisées. Liste gespeicherten Radiofrequenzen.
Sélectionne FM / AM. FM / AM auswählen
Recherche manuelle, revient Manuelle Sendersuche, zurück.
Recherche manuelle, avance Manuelle Sendersuche, weiter.
Balayage et mémorisation automatique Scannen und automatische Einspeicherung
émetteurs principaux Wichtigste Sender
87.50 Indique la fréquence d’écoute 87.50 Zeigt den Frequenzbereich an.
Sélecteur de fréquence manuel Manueller Frequenzwähler
... Passez au deuxième menu des paramètres radio ... Gehe zum zweiten Radio-Einstellungsmenü
page 2 Bildschirm 2
...
Pour accéder à la deuxième page, Um den Bildschirm 2 aufzurufen,
appuyez sur le bouton drücken Sie die Taste ...
Sélectionne bande Band-Auswahl
Egalisation Equalizer
Réglages Einstellungen
page 3 Bildschirm 3
Pour accéder à la troisième page appuyez sur Um den Bildschirm 3 aufzurufen, drücken Sie
TA Allumage / Extinction TA Ein - Aus
AF Allumage / Extinction AF Ein - Aus
PTY Sélectionne le programme radio PTY Wählt das Radioprogramm aus.
Retour à la page 2 Zurück zu Bildschirm 2
29FONCTIONS • FUNKTIONEN DAB+ RADIO FR/DE
FR - FONCTIONS RADIO DAB + FR - FONCTIONS RADIO DAB +
Afficher la liste des services DAB + disponibles. ON Activer / Désactiver le lien DAB
Menu principal Recherchez des stations par type de program-
Affichage informations radio. me.
01:30 Heure du système TA Activer / désactiver les informations sur le trafic.
Passer au deuxième menu SERVICE
LINK Désactiver la connexion au service DAB +
Recherche manuelle
Recherche automatique des stations avec DE - RADIO DAB+ FUNKTIONEN
mémorisation automatique. ON Aktivieren / Deaktivieren der DAB-Verbindung
Sender nach Programmtyp suchen.
DE - RADIO DAB+ FUNKTIONEN
TA Verkehrsinformationen aktivieren / deaktivieren.
Anzeige der Liste der verfügbaren DAB+ Service.
SERVICE
LINK Deaktivieren Sie die DAB + -Dienstverbindung
Hauptmenü
Anzeige der Radioinformationen.
01:30 Uhrzeit des Systems.
Übergang zum zweiten Menü.
Manuelles Laden.
Automatische Stationssuche mit automatischer
Speicherung.
30REPRODUCTION • WIEDERGABE USB FR/DE
FR - FONCTIONS USB FR - FONCTIONS USB - Lecture musique
Une fois le support USB inséré, le contenu sera Retour à la liste des fichiers audio.
affiché sur l’écran. Si des chansons sont déjà Trace précédente ou suivante.
présentes, la reproduction de la musique démarre Lance la lecture ou les pauses.
automatiquement. Sélectionner le type de fichier à
reproduire moyennant l’icône correspondante. Répète une trace ou un dossier.
MUSIQUE Lecture casuelle.
...
VIDEO EQ Egaliseur.
IMAGES Deuxième page-écran
USB1 USB1/USB2 Retour au menu principal.
Retour au menu principal. DE - USB - FUNKTIONEN - Wiedergabe von Musik
Zurück zur Audio-Dateien Liste.
DE - USB - FUNKTIONEN
Vorherige oder nächste Musik.
Durch die Eingabe der USB wird der Inhalt auf dem
Bildschirm gezeigt. Wenn Musikstücke zur Verfügung Wiedergabe starten oder stoppen.
stehen, wird die Wiedergabe automatisch gestartet. Ein Musikstück oder einen Ordner öffnen.
Wählen Sie den Dateityp aus, die Sie spielen möchten, Zufallswiedergabe.
über das zugehörige Symbol.
MUSIK ... EQ Equalizer.
Zweiter Bildschirm
VIDEO Zurück zum Hauptmenü.
BILDER
USB1 USB1/USB2
Zurück zum Hauptmenü.
31REPRODUCTION • WIEDERGABE USB FR/DE
FR - FONCTIONS USB - Lecture vidéo FR - FONCTIONS USB - Lecture image
Toucher l’écran pendant la lecture pour ouvrir le menu Toucher l’écran lorsque l’image est en cours de lecture
vidéo. pour ouvrir le menu vidéo.
Retour à la liste des fichiers vidéo. Agrandit l’image (Zoom)
Piste précédente ou suivante. Trace précédente ou suivante.
Démarre la lecture ou les pauses. Lance la lecture.
Répète une piste ou un dossier. Arrête la lecture.
Lecture casuelle. Rotation image.
EQ Egaliseur. Retourne à la liste des fichiers image.
Retour au menu principal. Retour au menu principal.
DE - USB - FUNKTIONEN Video-Wiedergabe DE - USB - FUNKTIONEN - Bildwiedergabe
Während der Wiedergabe berühren Sie den Bildschirm, Wenn das Bild angezeigt wird, berühren Sie den Bild-
um das Video-Menü zu öffnen. schirm, um das Video-Menü zu öffnen.
Zurück zu den Videodateien. Maximieren Sie das Bild (Zoom)
Vorheriges oder nächstes Musikstück. Vorheriges oder nächstes Musikstück.
Wiedergabe starten oder stoppen. Wiedergabe starten.
Wiederholen eines Musikstücks oder eines Wiedergabe stoppen.
Ordners. Das Bild drehen.
Zufallswiedergabe. Kehrt zur Liste der Bilddateien zurück.
EQ Equalizer. Torna al menù principale.
Kehrt zum Hauptmenü zurück.
32BLUETOOTH FR/DE
FR - PARAMÉTRAGE PAR TÉLÉPHONE FR - SYNCHRONISATION DU RÉPERTOIRE TÉLÉPHONIQUE
• Activer la fonction Bluetooth sur votre téléphone et Appuyez sur pour synchroniser le répertoire.
rechercher de nouveaux appareils. LISTE DES APPELS Affiche la liste des appels.
•Une fois le paramétrage effectué, sélectionner VM046.
Le nom du téléphone sera affiché sur l’appareil. COMPOSER Clavier numérique.
DÉCONNECTER Smartphone connecté
PARAMÉTRAGE DU VM046 CONFIGURATION Connexion automatique : on/off.
Appuyer sur l’icône Recherche, sélectionner votre Réponse automatique on/off
téléphone lorsqu’ il est détecté. Accepter le pa- Répertoire synchronisé:
ramétrage à partir du téléphone mobile. synchronisation
DE - VERBINDUNG DURCH HANDY DE - TELEFONBUCHSYNCHRONISATION
• Die Bluetooth-Funktion auf Ihrem Handy aktivieren Drücken zur Synchronisation des Telefonbuchs.
und nach neuen Geräten suchen. ANRUFLISTE Zeigt die Anrufliste an.
• Sobald die Verbindung hergestellt wird, VM046
auswählen. Der Name des Telefons wird auf dem Bild- WÄHLEN Numerische Tastatur.
schirm angezeigt. TRENNEN angeschlossenes Smartphone
EINSTELLUNG Automatische Verbindung: ein/aus.
VERBINDUNG VOM VM046 Automatische Antwort ein/aus.
Drücken Sie auf das Suchsymbol und wählen Sie Synchronisiertes Telefonbuch:
Ihr Telefon aus, sobald dieses erkannt wird. Bestätigen Synchronisation
Sie die Verbindung aus dem Mobiltelefon.
33BLUETOOTH FR/DE
FR - EFFECTUER / RECEVOIR UN APPEL FR - L’écran affiche le numéro de l’appelant ou le nom
Taper le numéro de téléphone et appuyer sur . figurant dans le répertoire. Appuyer sur l’icône pour
Terminer l’appel. accepter et répondre à l’appel ou appuyer sur
CONTACT Appeler à partir du répertoire . pour le rejeter.
DE - TELEFON-ANRUFE TÄTIGEN ODER DE - Der Bildschirm zeigt entweder die Nummer des
EMPFANGEN Anrufers oder den im Telefonbuch angegebenen Na-
Telefonnummer eingeben und drücken . men. Das Symbol drücken um den Anruf entgegen
Telefonanruf anhalten zunehmen. Das Symbol drücken um den Anruf
KONTAKT Aus Telefonbuch anrufen . abzulehnen.
FR - Pour accéder au menu A2DP, sélectionnez DE - Um das A2DP-Menü aufzurufen, wählen Sie das
l’icône dans le menu principal. Symbol aus dem Hauptmenü.
Si le téléphone connecté supporte le profil A2DP, il est Wenn das angeschlossene Telefon, A2DP-Profil unter-
possible d’écouter de la musique. stützt, können Musikstücke gehört werden.
Si votre appareil prend supporte AVRCP, vous pouvez Wenn Ihr Gerät, AVRCP unterstützt, kann die Musik
contrôler votre musique directement à partir de l’écran direkt vom Touch screen bedient werden.
tactile. Vorheriges oder nächstes Musikstück.
Trace précédente ou suivante. Wiedergabe wird gestartet oder angehalten.
Lance ou arrête la lecture.
34AUX IN • NAVIGATION • CAMERA DE RECUL • RÜCKFAHR-KAMERA FR/DE
FR - ENTRÉES AUX IN FR - CAMERA DE RECUL
La reproduction d’une source externe branchée à C’est possible brancher une caméra de recul à l’entrée
l’entrée AUX IN L / R peut être visible. prédisposée CAMERA (postérieure).
Appuyer sur l’icône AUX correspondante, dans le menu Le VM046 a la possibilité de visualiser automatiquement la
principal. caméra de recul en se branchant sur la lumière de marche
arrière (Voir branchements pag. 24)
DE - AUX-IN-Eingänge Retourne au menu principal.
Die Wiedergabe einer externen Audioquelle, die an
AUX IN L / R angeschlossen ist, kann angezeigt werden. DE - RÜCKFAHR-KAMERA
Die entsprechende AUX-Ikone im Hauptmenü drücken. Anschluss-Möglichkeit einer Rückfahr-Kamera an den
spezifischen KAMERA-Eingang (rückwärtig). Der VM046
ist an den Rückwärtsgang-Lichtern angeschlossen
(siehe Anschluss-Anweisungen auf Seite 24).
Zurück zum Hauptmenü.
FR - SORTIE VIDEO
Vous pouvez partager la vision de la page principale avec deux
écrans externes (exemple: les écrans appuis-tête arrière).
N.B: La sortie des 2 signaux vidéos n’est pas gérable singulièrement.
Les 2 sorties reproduisent l’image de la mediastation.
DE - VIDEO-AUSGANG
Sie können die Bildschirmansicht mit zwei externen
Bildschirmen teilen (z.B. mit den Bildschirmen der
hinteren Kopfstützen).
N.B: Der Ausgang der 2 Videosignale ist nicht einzeln
bedienbar.
Die beiden Ausgänge geben das Bild auf dem
Bildschirm der Mediastation wieder.
35CAN-BUS PROTOCOL FR/DE
CONNEXIONS ET SYNCHRONISATION INTERFACE COMMANDES AU VOLANTE
ANSCHLUSS u. SYNCHRONISIERUNG der LENKRAD-STEUERUNGS-INTERFACE
9
NOIR / SCHWARZ GND NOIR / SCHWARZ
04070 - 04073
GRIS / GRAU KEY 1 VIOLA
GRIS-BLANCHE / GRAU-WEISS KEY 2 MARRON/BRAUN
FR - SYNCHRONISATION LIGNE CAN-BUS Faire les branchements avec les interfaces 04070 ou 04073. En Alimen-
tant l’interface, le led clignotera avec la couleur vert, un programme d’auto apprentissage fera automatiquement la
synchronisation et la sélection du correct protocole CAN-BUS pour les commandes au volant et services.
MEMORISATION PROFIL AUTORADIO Lorsque la synchronisation est faite, le led clignote avec la couleur verte et
continuera à clignoter jusqu’à la sélection du profil autoradio Phonocar VM069 / VM001D.
La sélection se fera en appuyant 6 fois la touche Volume+ et le Led fera 7 clignotements verts. Appuyer SEEK+ pour
mémoriser.
Le voyant de l’interface devient vert fixe.
NB. Si le voyant devient rouge, veuillez récontrôler les branchements de la ligne CAN.
RESET INTERFACE Sans enlever le circuit d’alimentation, appuyer la touche PRG jusqu’à l’extinction du led vert. Le
led clignotera avec la couleur Rouge pour quelques secondes, et ensuite deviendra de couleur verte en attente de
la sélection du nouveau modèle de radio.
DE - CAN-BUS-SYNCRONISIERUNG Anschlüsse mit der Interface 04070 oder 04073 herstellen. Interface an den
Strom anschließen, so dass das Led Grün blinken wird. Ein selbst-lernendes Programm wird nun die Synchronisie-
rung und Wahl des CAN-BUS-Protokolls (für Lenkradsteuerungen und Betriebsfunktionen) automatisch vorneh-
men.
EINSPEICHERUNG DES AUTORADIO-PROFILS.
Sobald die Synchronisierung beendet ist, beginnt das Led GRÜN zu blinken, und hört erst dann auf, wenn man das
Autoradio-Profil VM069 / VM001D gewählt hat. Dazu muss man 6 Mal die Taste Volume+ drücken, worauf das Led
7 Mal GRÜN blinkt. SEEK+ drücken, um die Einspeicherung vorzunehmen.
Die LED des Interfaces leuchtet grün.
Wenn die LED rot leuchtet, müssen die Anschlüsse der CAN-Leitung erneut überprüft werden.
INTERFACE-RESET Ohne den Kreislauf vom Strom zu trennen, PRG so lange gedrückt halten, bis das GRÜNE Led
erlischt. Nun wird das Led, für ein paar Sekunden, ROT blinken, dann auf GRÜN schalten, bis man das neue Autora-
dio-Modell wählt.
FR
Pour télécharger les instructions de l’interface :
- Scannez le code QR pour accéder directement à la section catalogue du site web Phonocar
- Tapez le code du produit dans la barre de recherche
- Sélectionnez le produit en cliquant sur l’image
- La notice se trouve sous “DOCUMENTS”.
- Téléchargez le fichier “Instructions Manual”
36RESISTIVE PROTOCOL FR/DE
CONNEXIONS ET SYNCHRONISATION INTERFACE COMMANDES AU VOLANTE
ANSCHLUSS U. SYNCHRONISIERUNG DER LENKRAD-STEUERUNGS-INTERFACE
9
NOIR / SCHWARZ GND VERT / GRÜN
04083
GRIS / GRAU KEY 1 ROSE / ROSA
GRIS-BLANCHE / GRAU-WEISS KEY 2 GRIS / GRAU
FR - Le VM046 est intégré des commandes au volant Résistives. En cas d’incompatibilité, utiliser les interfaces
04083. Pour les branchements aux connecteurs originaux de la voiture, suivre les schémas présents sur les instruc-
tions de connexion des interfaces.
MEMORISATION DES TOUCHES SUR LE VOLANT Faire les branchements. Mémoriser les fonctions des com-
mandes au volant en suivant la notice des interfaces.
MEMORISATION PROFIL AUTORADIO Lorsque la synchronisation est faite, le led clignote avec la couleur verte
et continuera à clignoter jusqu’à la sélection du profil autoradio Phonocar VM069 / VM001D. La sélection se fera
en appuyant 4 fois la touche Volume+ et le Led fera 5 clignotements verts.
Appuyer SEEK+ pour mémoriser. Le voyant devient vert fixe.
RESET INTERFACE Enlever le connecteur du boîtier et faire pression sur la touche PRG, réinsérer le connecteur.
Le LED du boîtier commencera à clignoter lentement et ensuite rapidement; à ce point,
enlever la pression sur la touche PRG. Le RESET effectué est confirmé par un clignotement de couleur rouge du
LED.
DE - Der VM046 verfügt über Widerstands-Lenkrad-Steuerungen. Falls nicht kompatibel, Interface-Modelle 04083
verwenden. Die Anschlüsse an die Original-Stecker des Wagens, bitte lt. Schema der Interface-Betriebsanleitung/
Connections durchführen.
EINSPEICHERUNG DER LENKRAD-TASTEN Anschlüsse herstellen. Die Lenkrad-Steuerungsfunktionen lt. Interface
-Betriebsanleitung einspeichern.
EINSPEICHERUN DES AUTORADIO-PROFILS Sobald die Synchronisierung abgeschlossen ist,
beginnt das Led GRÜN zu blinken, so lange, bis das Autoradio-Profil VM069 / VM001D eingegeben wird.
Dies bewirkt man durch 4 Mal Drücken auf Volume+. Das Led blinkt danach 5 Mal GRÜN.
SEEK+ drücken, um die Einspeicherung vorzunehmen. Die LED leuchtet dauerhaft grün.
INTERFACE-RESET Stecker aus der Zentral-Einheit herausziehen. Dann PRG-Taste drücken und Stecker wieder
einstecken. Das LED der Zentral-Einheit beginnt nun, langsam zu blinken und dann schneller. An dieser Stelle
angelangt, die PRG-Taste loslassen. Bei erfolgtem RESET blinkt das LED nur 1 Mal ROT.
DE
Anweisungen zum Herunterladen der Interface-Bedienungsanleitungen:
- Scannen Sie den QR-Code, um den Katalog der Phonocar Website aufzurufen
- Geben Sie den Produktcode in die Suchleiste ein
- Wählen Sie das Produkt durch Anklicken des Bildes
- Die Bedienungsanleitung finden Sie unter “DOKUMENTE”.
- Laden Sie die Datei “Instructions manual” herunter.
37COMMANDES AU VOLANTE • LENKRAD-STEUERUNGS FR/DE
FR - La programmation est la même, soit pour les com- DE - Die Programmierung ist für beide Lenkradsteue-
mandes RESISTIVES (avec ou sans interface), que pour rungen, egal ob
les commandes CAN-BUS. RESISTIVE - mit oder ohne Interfaces - oder mit
Appuyez sur l’icône SWC dans le menu principal, maxi- CAN-BUS.
mum 6 fonctions seront mémorisées. Drücken Sie das SWC-Symbol im Hauptmenü, es wer-
Appuyez sur les touches numériques et associez à cha- den max. 6 Funktionen gespeichert.
que touche la fonction que vous voulez mémoriser. Drücken Sie die numerischen Ttasten und verbinden
Appuyez sur Match pour commencer à mémoriser les Sie jede Taste mit der Funktion, die Sie speichern
commandes en appuyant sur les touches du volant. möchten.
Lorsque la programmation est terminée, appuyez sur la Drücken Sie Match um mit dem Speichern der Steue-
touche de confirmation pour sauvegarder. rungen zu beginnen, indem Sie die Tasten am Lenkrad
drücken. Wenn die Programmierung abgeschlossen ist,
drücken Sie zum Speichern die Bestätigungstaste.
38FONCTIONS • FUNKTIONEN APPLE CARPLAY FR/DE
FR - Connecter votre téléphone à travers le câble FR - Pour quitter la fonction CARPLAY, appuyer sur le
USB LIGHTING APPLE original, à l’entrée USB carplay l’icône VEHICLE et confirmer la sortie du DRIVE MODE.
de l’appareil. La fonction carplay va se lancera
automatiquement.
DE - Um die Carplay Funktion zu verlassen, die Ikone
DE - Ihr Telefon über das originale LIGHTING APPLE Ka- VEHICLE und das Verlassen des DRIVE MODUS bestäti-
bel zum originale CARPLAY USB - Eingang des Gerätes gen.
verbinden. Die Carplay Funktion wird automatisch
gestartet.
FR - ATTENTION: Lorsque Apple CarPlay ou PhoneLINK est démarrée, seulement les applications compatibles
seront affichées. Les applications qui ne sont pas affichées sont considérées incompatibles.
DE - WARNUNG: Wenn Apple CarPlay oder PhoneLINK gestartet wird, werden nur kompatible Anwendungen
angezeigt. Anwendungen, die nicht angezeigt werden, gelten als inkompatibel.
39FONCTIONS • FUNKTIONEN PhoneLINK FR/DE
FR - La fonction PhoneLINK est uniquement compati- FR - Pour quitter la fonction PhoneLINK, appuyer sur
ble avec les smartphones fonctionnant sous Android le bouton carplay et confirmer de quitter le DRIVE
4.2 ou sur des modèles supérieurs. MODUS.
• Sélectionner sur le téléphone le menu FONCTIONS
DU DÉVELOPPEUR (suivre les instructions de votre
téléphone). DE - Um die PhoneLINK-Funktion zu verlassen, die
• Activer la fonction DEBUG USB et connecter votre Taste drücken und aus dem DRIVE MODE bestäti-
téléphone, en utilisant le câble USB Mini/USB fourni gen.
avec votre téléphone, à l’entrée carplay USB de l’appa-
reil (n’a besoin d’aucune application supplémentaire).
DE - Die PhoneLINK-Funktion ist nur mit Smartphones
mit 4.2 oder mit deren Folgemodellen kompatibel.
• Das Menü Funktionen des Entwicklers auf dem
Telefon auswählen (die Anweisungen Ihres Telefons
befolgen)
DEBUG - USB Funktion aktivieren und Ihr Telefon,
durch das mitgelieferte USB / Mini - USB-Kabel zum
Carplay USB-Eingang des Gerätes verbinden (Keine
weitere App wird benötigt).
FR - ATTENTION: Lorsque Apple CarPlay ou PhoneLINK est démarrée, seulement les applications compatibles
seront affichées. Les applications qui ne sont pas affichées sont considérées incompatibles.
DE - WARNUNG: Wenn Apple CarPlay oder PhoneLINK gestartet wird, werden nur kompatible Anwendungen
angezeigt. Anwendungen, die nicht angezeigt werden, gelten als inkompatibel.
40Puoi anche leggere