Manuale d'uso - IT User Manual - ENG Bedienungsanleitung - DE - TRINITY T2 SLIM
←
→
Trascrizione del contenuto della pagina
Se il tuo browser non visualizza correttamente la pagina, ti preghiamo di leggere il contenuto della pagina quaggiù
Manuale d’uso - IT
      User Manual - ENG
Bedienungsanleitung - DE

         TRINITY T2 SLIM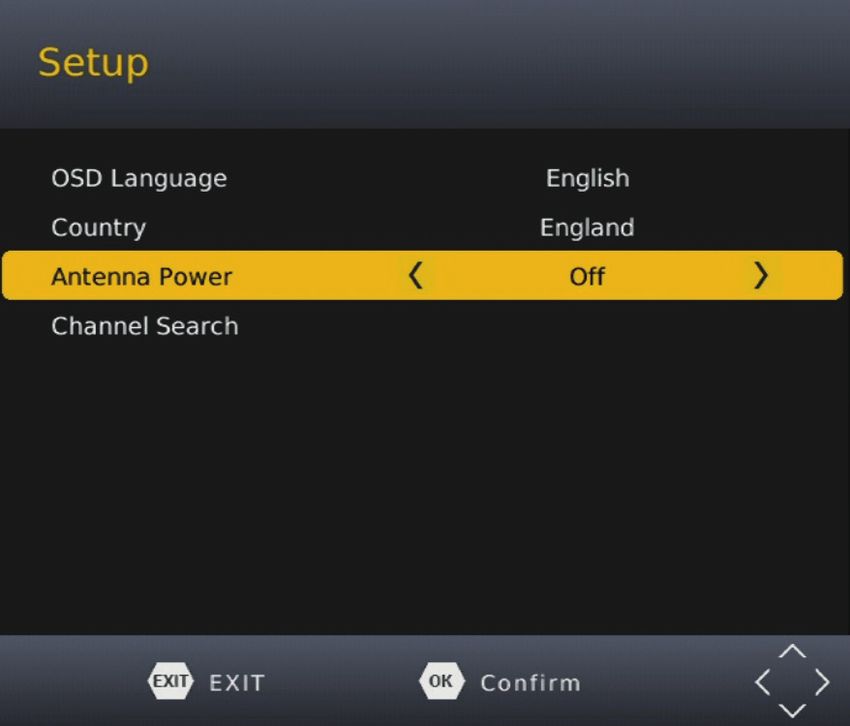
Istruzioni di sicurezza
Il flash con un simbolo freccia all’interno di un triangolo equilatero avverte l’utente della
presenza di non isolata “tensione pericolosa” all’interno del prodotto che può essere di
intensità sufficiente a costituire un rischio di folgorazione per le persone.
Il punto esclamativo all’interno di un triangolo equilatero avverte l’utente della presenza
di importanti istruzioni operative e di manutenzione (assistenza) nella literature allegato
al prodotto.

Manuale d’uso
•    Tutta la sicurezza e istruzioni per l’uso devono essere lette prima di usare il
     prodotto.
•    Conservare il Manuale - La sicurezza e istruzioni per l’uso devono essere conservate per future
     consultazioni.
•    Tutte le avvertenze sul prodotto e nelle istruzioni per l’uso devono essere rispettate.
•    Tutte le istruzioni di uso devono essere seguite.

Alimentazione elettrica
•    Non toccare mai la spina con le mani bagnate.
•    Se si vuole staccare la spina nella presa di collegamento, tirare sempre direttamente la spina.
     Mai tirare il cavo perché si potrebbe strappare.
•    Assicurarsi che il cavo di alimentazione non sia piegato, incastrato o schiacciato e che non venga
     a contatto con fonti di calore.
•    Assicurarsi che il cavo di alimentazione non sia avvolto intorno al dispositivo durante il funziona-
     mento.
•    Non posizionare la macchina sul cavo di alimentazione mentre è in funzione.
•    Utilizzare solo prolunghe che sono progettati per il livello di consumo di potenza della macchina.
•    Azionare la macchina solo se la tensione elettrica indicata sulla targhetta sotto della macchina
     corrisponda alla tensione sulla presa. La tensione sbagliata può distruggere la macchina.
•    Non aprire l’apparecchio.
•    Estrarre la spina se l’apparecchio non deve essere utilizzato per un periodo di tempo più lungo.
•    Fare attenzione a che nessuno possa inciampare nel cavo di alimentazione.
•    Per scollegare completamente il dispositivo dalla rete, l’adattatore di rete deve essere scollegato
     dalla presa di corrente.

Funzionamento e posizione
•    Non collegare gli accessori del ricevitore che non sono definiti dal produttore.
•    Non collocare questo prodotto su un carrello instabile, supporto, cavalletto, staffa o tavolo. Il pro-
     dotto potrebbe cadere, provocando gravi lesioni a bambini o adulti e gravi danni al prodotto.
•    Il dispositivo è in grado di mostrare un fermo immagine sullo schermo del televisore o monitor
     per un periodo di tempo illimitato. Ciò può causare danni allo schermo. Si consiglia pertanto di
     attivare lo screen saver. O spegnere il ricevitore, se il dispositivo non è in uso.
•    Non aumentare il volume quando il ricevitore sta riproducendo programmi molto silenziosi. Que-
     sto potrebbe danneggiare l’altoparlante se passa improvvisamente a programmi molto rumorosi.
•    Staccare la spina di alimentazione durante i temporali.
•    Le fessure e le aperture del cabinet servono per la ventilazione e per assicurare un funzionamen-
     to affidabile del prodotto e per proteggerlo dal surriscaldamento, queste aperture non devono
     essere bloccate o coperte.
•    Le aperture non devono mai essere ostruite collocando il prodotto su un letto, un divano, un
     tappeto o altre superfici simili.
•    Non appoggiare vasi ecc sull’apparecchio. Acqua potrebbe penetrare all’interno dell’apparecchio.
•    Questo prodotto non deve essere collocato ad incasso in mobili come librerie o scaffali, a meno
     che una corretta ventilazione o le istruzioni del produttore sono state rispettate.
•    Proteggere il dispositivo da agenti atmosferici, ed umidità e alta temperatura.
•    Non versare liquidi di alcun tipo sul prodotto.

                                                  IT 2
Istruzioni di sicurezza
•    Non esporre il dispositivo e il telecomando alla luce solare diretta.
•    Questo prodotto non è progettato per uso esterno.
•    Questo prodotto è progettato per l’uso in abitazioni private.
•    Questo prodotto non è destinato ad essere utilizzato dai bambini.

Batterie nel telecomando
•    Rimuovere le batterie vecchie come perdite potrebbero danneggiare il telecomando.
•    In caso di perdita della batteria rimuovere il liquido con un panno e fare attenzione a evitare il
     contatto con la pelle.
•    Nel caso in cui il contenuto della batteria siano ingeriti, bere acqua per diluire il materiale della
     batteria e cercare immediatamente soccorso medico.
•    Se gli occhi o la pelle entrano in contatto con queste sostanze Lavare immediatamente con
     acqua e consultare immediatamente un medico.
•    Tenere le batterie e il telecomando lontano dai bambini.

Assistenza e riparazione
•   Non effettuare riparazioni e installazioni da soli. Per l’assistenza rivolgersi a personale qualificato.
•   Contattare il servizio di riparazione qualora si verifichino i seguenti errori:
•   a. Se l’unità cavo di alimentazione o di alimentazione è difettoso.
•   b. Se gli oggetti sono caduti nel dispositivo.
•   c. Se esposto ad acqua o altri liquidi.
•   d. Se non funziona normalmente quando si seguono le istruzioni per l’uso.
•   e. Se il dispositivo è caduto o presenta forti fluttuazioni in termini di prestazioni.
•   L’esposizione al fumo di tabacco può danneggiare l’elettronica del dispositivo. La garanzia non -
    copre i danni causati dal fumo di tabacco.
•   Utilizzare solo ricambi originali. Ricambi errati o difettosi possono causare danni, funzionamento
    errato o un guasto completo, oltre a compromettere la sicurezza.

Riciclaggio di dispositivi elettronici
Questo prodotto è stato progettato e realizzato con materiali e componenti di alta qualità
che possono essere riciclati e riutilizzati. Questo simbolo significa che le apparecchiature
elettriche ed elettroniche, al termine della loro vita, deve essere smaltito separatamente
dai rifiuti domestici. Per disfarsi di questo apparecchio si prega di rivolgersi ai vostri centri
di raccolta locali od ai centri di riciclaggio. Nell’Unione Europea ci sono sistemi di raccolta
differenziata per i prodotti elettrici ed elettronici usati.

Batterie
Questo simbolo sul prodotto o sulla confezione indica che la
pila con questo prodotto non deve essere smaltito come rifiuto
domestico. Su alcuni tipi di pile questo simbolo potrebbe essere
utilizzato in combinazione con un simbolo chimico. Viene aggiun-
to il simbolo chimico del piombo (Pb) se la batteria contiene più
di 0,004% di piombo. Consegnare la batteria verso il centro di
raccolta per il riciclo dei rifiuti di pile.

Dichiarazione CE
Con la presente WWIO Elektronik GmbH dichiara che le seguenti attrezzature:

•    WWIO TRINITY T2 SLIM (DVB-T2 Ricevitore HD)

è in conformità alla Direttiva 2014/53 / UE. Il testo integrale della dichiarazione di
conformità UE è disponibile al seguente indirizzo internet: www.wwio.de/support

                                                  IT 3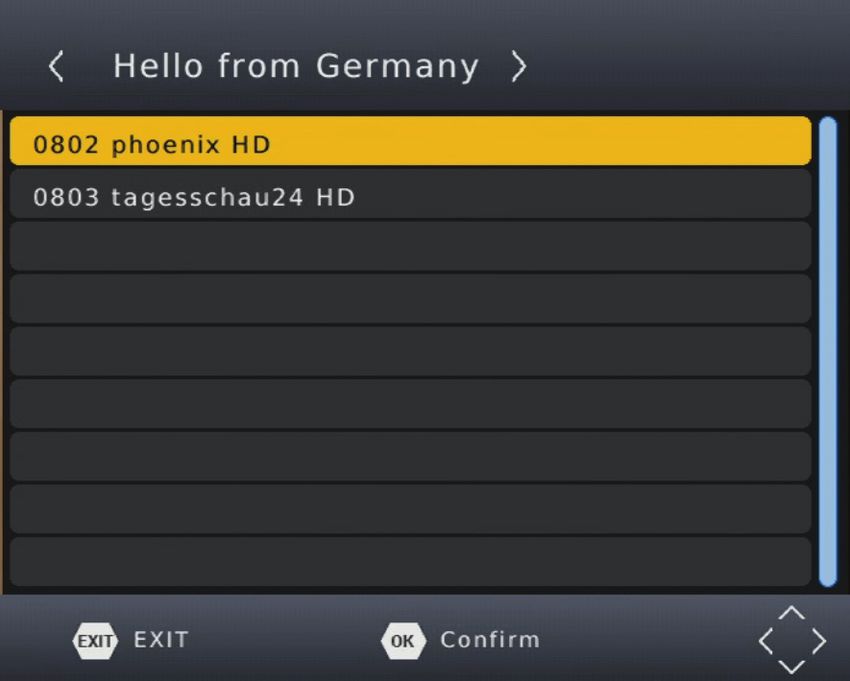
Istruzioni di sicurezza
Requisiti di ecodesign per alimentatori esterni conformi alla Direttiva 2009/125/EU

 Nome o marchio del fabbricante, numero         Marchio: WWIO
 di iscrizione nel registro delle imprese e     Fabbricante: WWIO Elektronik GmbH
 indirizzo del fabbricante
                                                Theodor Heuss Str. 14 C
                                                21629 Neu Wulmstorf
                                                Germania

                                                Handelsregister Amtsgericht Tostedt HRB 204740
 Identificativo del modello                     JY-05120
 Tensione di ingresso                           100-240V
 Frequenza di ingresso CA                       50/60Hz
 Tensione di uscita                             5,0V DC
 Corrente di uscita                             1,2A
 Potenza di uscita                              6,0W
 Rendimento medio in modo attivo                76,0%
 Rendimento a basso carico (10 %)*              -
 Potenza assorbita nella condizione a vuoto     0,08W

* Gli alimentatori esterni a potenza di uscita nominale uguale o inferiore a 10 W sono esentati dalla
specifica.

                                               IT 4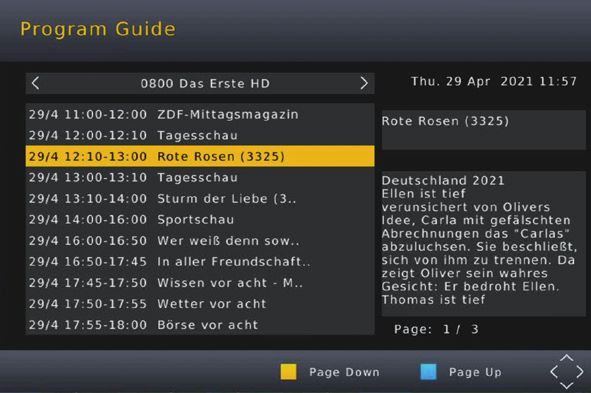
Contenuto della confezione - Panoramica
Contenuto del pacco
I seguenti componenti vengono forniti:

•      Ricevitore WWIO
•      Telecomando
•      Manuale d’uso
•      Alimentatore

Nota:
•   Il dispositivo deve essere utilizzato solo con gli accessori originali
•   Se uno qualsiasi di questi elementi sono mancanti, si prega di contattare il rivenditore al più pre-
    sto possibile. Conservare l‘imballo originale nel caso in cui l‘unità debba essere restituita al
    rivenditore.

Panoramica

    Posizione   Etichetta                                   Descrizione
       1                     LED di alimentazione
                             Rosso: Standby
                             Verde: acceso
       2                     Porta USB 2.0
                             Dispositivi supportati: Dispositivi di archiviazione di massa USB
                             File system: FAT32 / NTFS (MBR partizioni solo)
                             Dimensione massima: 2TB
       3         RF-IN       Collegare l’antenna a questa porta. La tensione di alimentazione (+ 5V)
                             per un’antenna attiva può essere attivato durante la prima installazione
                             o nel menu di ricerca canali.
       4         HDMI        Questa porta consente di collegare televisori con ingresso HDMI.

                                                IT 5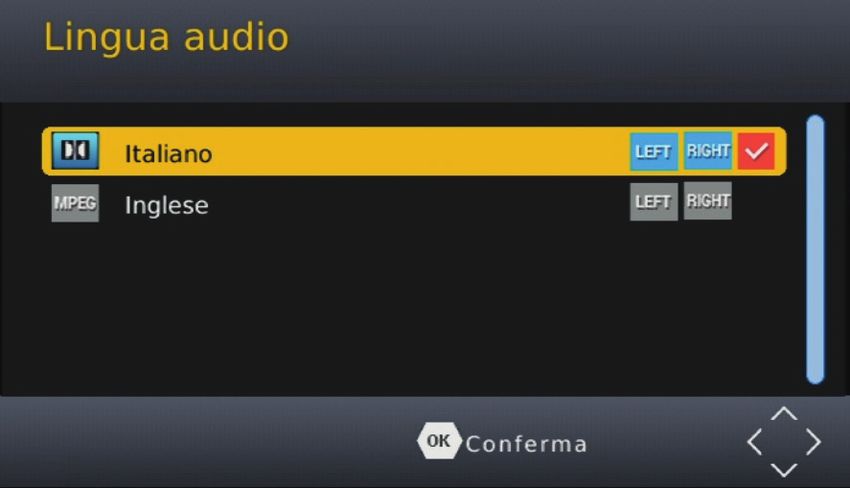
Panoramica - Telecomando
    Posizione       Etichetta                                      Descrizione
          5            LAN        Porta Ethernet
                                  Hai solo bisogno di stabilire una connessione di rete, se si desidera
                                  utilizzare le applicazioni che sono installati sul ricevitore. Per guardare
                                  solo la TV non è necessaria la connessione di rete.
          6          SCART        Questa porta consente di collegare televisori con un ingresso SCART.
          7            5V=        Porta per l’alimentatore in dotazione.

Telecomando
•         Inserire le batterie (1,5V formato AAA) nel vano sul retro del teleco-
          mando. Inserire le batterie, avendo cura di rispettarne la polarità, come
          indicato nel vano batterie e sulle batterie.
•         Chiudere il coperchio
•         Se il ricevitore non è in uso per un periodo di tempo più lungo, rimuo-
          vere le batterie dal telecomando.

        Pulsante                                              Descrizione
                       Tasti programmabili per la funzione 2in1

    VOL-/+
    SET
                       Accensione / spegnimento (standby)

                       Mute. Girare uscita audio off / on

    SUB-T              Selezionare tra i sottotitoli disponibili
    AUDIO              Selezionare tra le tracce audio disponibili
    ◄◄ ►►              Avanzamento / Indietro veloce
    ►||                Iniziare o continuare la riproduzione.
                       Riproduzione in pausa.
    ■                  Fine riproduzione.
    ROSSO              Pulsante funzione rosso in diversi menu.
    V-FORMAT/          La risoluzione HDMI cambia ogni volta che si preme questo tasto durante la visio-
    VERDE              ne in diretta TV.
                       Pulsante funzione verde in diversi menu.
    ASPECT/            Il formato TV cambia ogni volta che si preme questo tasto mentre si guarda la TV
    GIALLO             in diretta.
                       Pulsante funzione giallo in diversi menu.

                                                       IT 6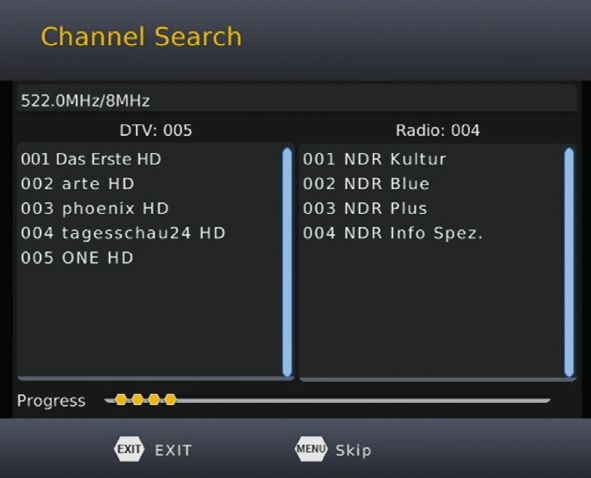
Telecomando
    Pulsante                                        Descrizione
TIMER/BLU      Timer-List La lista delle programmazioni viene visualizzata se si preme questo
               tasto mentre si guarda la TV in diretta.
               Pulsante funzione blu in diversi menu.
MENU           Apre il menu principale che permette di modificare tutte le impostazioni del ricevi-
               tore.
EXIT           Chiude i menu e gli altri messaggi sullo schermo.
◄ ▲▼ ►         Utilizzare questi pulsanti per selezionare le voci e modificare le impostazioni di
               menu, le liste e EPG.
               ▲ ▼ può essere utilizzato anche per cambiare canale.
OK | LIST      La lista dei canali viene visualizzata se si preme questo tasto mentre si guarda la
               TV in diretta. Questo pulsante
               viene utilizzato anche per confermare le impostazioni nel menu e altri messaggi
               sullo schermo.
i              Premendo questo pulsante vengono visualizzate diverse informazioni. Il tipo di
               informazione varia a seconda della modalità di funzionamento del ricevitore.
               a seconda della modalità di funzionamento del ricevitore.
               Questo pulsante passa al canale TV precedentemente guardato (RECALL).

VOL +/-        Utilizzare questo pulsante per aumentare o diminuire il volume.
               Questo pulsante potrebbe non avere nessuna funzione se l’uscita RAW-Audio è
               abilitata.
EPG            La guida elettronica dei programmi viene visualizzata se si preme questo tasto
               durante la visione in diretta TV.
TXT            Il Televideo viene visualizzato se si preme questo tasto mentre si guarda la TV in
               diretta.
0-9            Utilizzare i tasti numerici per selezionare i canali, le pagine del Televideo e inserire
               i numeri nei menu sullo schermo On Screen Menu
TV/Radio       Premere questo pulsante per commutare tra canali TV e Radio.
FAV            Questo pulsante apre il menu dei canali preferiti. Per popolare questa lista è ne-
               cessario contrassegnare i canali preferiti nel menu di modifica del programma.

                                             IT 7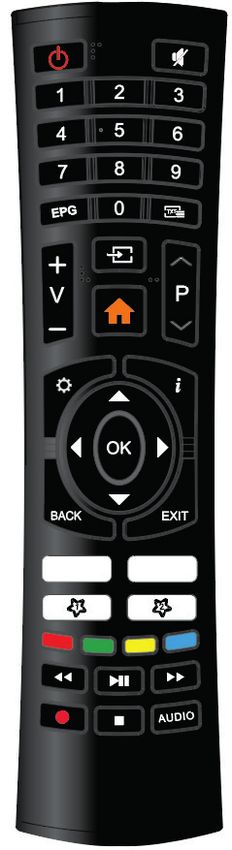
Telecomando
Programmare il telecomando
I tasti della sezione TV CONTROL (eccezione il tasto SET) possono essere programmati con un tele-
comando originale a scelta. In questo modo è possibile programmare i funzioni principali del televisore
sul telecomando universale e quindi usare solamente un telecomando.

1.   Tenete premuto il tasto SET, nel riquadro TV CONTROL, per 3
     secondi circa sino a quando la luce rossa diventa più intensa; il
     telecomando è entrato nella modalità di programmazione.

2.   Premete il tasto della funzione da programmare, la luce lampeg-
     gerà.

3.   Prendete il telecomando della televisione e puntatelo al telecoman-
     do ad una distanza di 3/5 cm.

4.   Premete il tasto della funzione da programmare, se la programmazione è avvenuta correttamen-
     te, la luce lampeggerà 3 volte.

5.   Ripetete la programmazione per tutti i tasti nel riquadro TV CONTROL.

6.   Premete il tasto SET per terminare la programmazione, la luce
     rossa si spegnerà.

                                                IT 8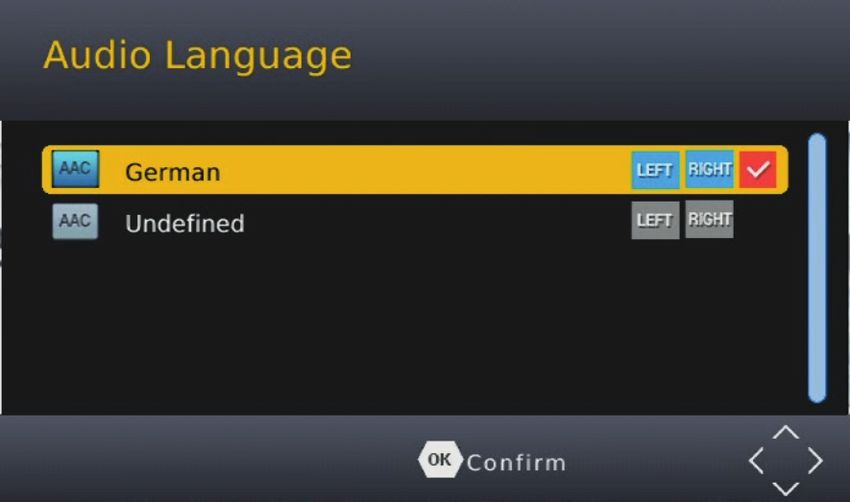
Prima installazione
• Collegare il ricevitore al televisore ed all’antenna.
• Collegare il ricevitore all’alimentatore.
• Collegare l’alimentatore ad una presa di corrente.
• Accendere il televisore e selezionare la sorgente del segnale corretta (HDMI o SCART) con la
telecomando del televisore. Si prega di consultare il manuale d’uso del televisore.
• Una volta che il ricevitore è acceso l’avviamento del processo richiede 15-20 secondi.
Se tutto è collegato correttamente, si vedrà la Guida d’installazione sullo schermo del televisore.
Utilizzare i tasti freccia ▲/▼ per navigare tra le voci del
menu. Se una voce del menu viene evidenziata è possibile
utilizzare i tasti ◄/► per apportare modifiche.
Lingua OSD
Impostare la lingua OSD.
Paese
Selezionare il paese in cui il ricevitore deve essere fatto
funzionare.
Alimentazione antenna
Nel caso in cui l’antenna abbia bisogno di essere alimentata (ad esempio, un’antenna interna con un
amplificatore, ma senza alimentatore) dal ricevitore è necessario attivare questa funzione nel menu.
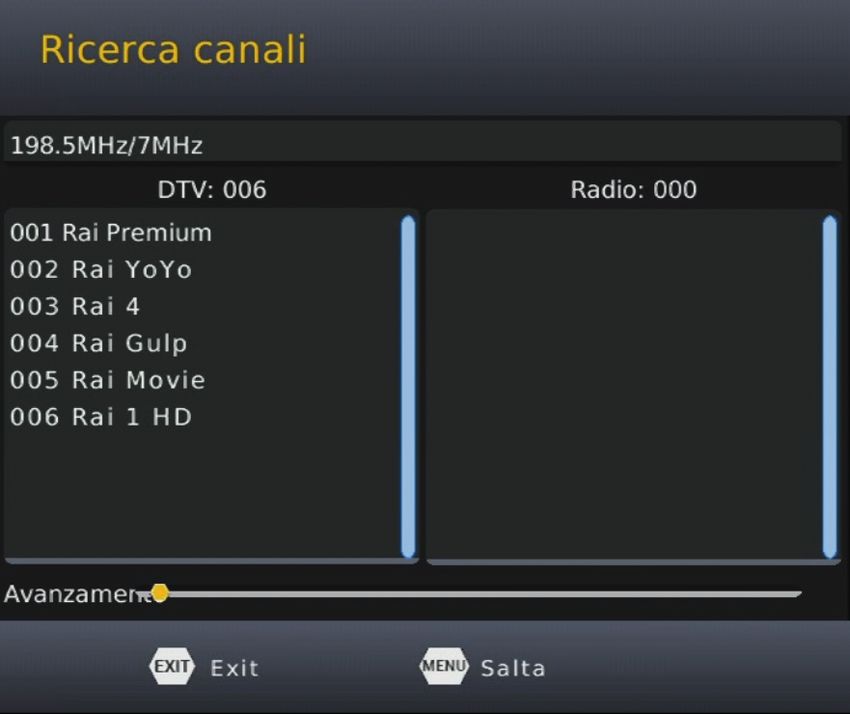
Ricerca canali
Avviare la scansione del canale premendo il tasto OK.
Possono essere necessari un paio di minuti per completare
la scansione.
Nel caso in cui non tutti i canali vengono visualizzati nell‘e-
lenco dopo la scansione è necessario regolare l‘antenna o
utilizzare un‘antenna più potente e ripetere la modalità di
scansione.
Nota:
• Non ci sono canali Radio disponibili in alcuni paesi.
• Dopo essersi spostati in un’altra zona è necessario
ripetere la scansione dei canali.
IT 9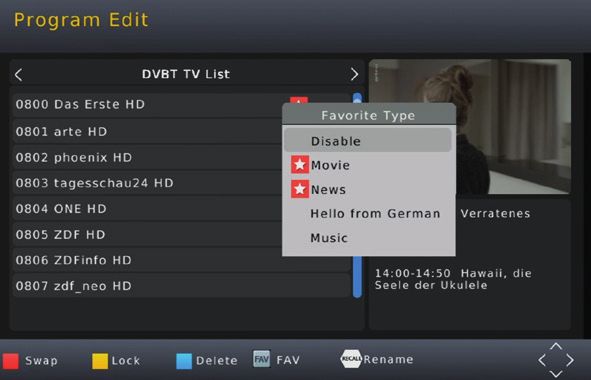
Attività giornaliera
Cambio canali
È possibile passare da un canale all’altro utilizzando i tasti CH ▲ / CH ▼ Tramite i tasti numerici 0-9 si
può andare a uno specifico canale direttamente.

Elenco canali
Si apre la lista dei canali premendo il tasto OK.

 ▲/▼          Selezionare il canale.
 OK           Passare a un canale selezionato.
 PAGE         Scorrere una lista pagina per pagina.
 ◄/►          Passare da lista dei canali radio e a lista dei
              canali TV.
 EXIT         Chiudere la lista dei canali.

TV/Radio
Per passare dai canali TV ai canali radio premere il tasto TV/RADIO.

Gruppi preferiti
Se è stata specificato un gruppo di preferiti, è possibile
accedervi premendo il tasto FAV.

 ◄/►          Seleziona gruppo preferito.
 ▲/▼          Selezionare il canale.
 OK           Passare a un canale selezionato.
 EXIT         Chiudere la lista dei gruppi preferiti.

Sottotitoli / Tracce Audio
Tramite i tasti SUB-T e AUDIO si possono attivare e cambia-
re i sottotitoli e traccie audio diverse da quella standard.

Televideo
Il televideo si attiva tramite il tasto TXT. Utilizzare i tasti nu-
merici 0-9 per l’inserimento della pagina teletext desiderata.
È possibile lasciare il televideo premendo il tasto EXIT.

Guida elettronica dei programmi e Timer
Premere il tasto EPG per aprire la guida ai programmi.

 ▲/▼          Seleziona evento
 ◄/►          Cambio canale
 EXIT         Chiudi EPG
 OK           Programmazione
 i            Mostra la lista delle programmazioni

                                                    IT 10
Impostazioni (Programma)
Aprire il menu principale del ricevitore premendo il tasto
MENU.
Modifica programma
Il menu è accessibile solo inserendo una password. La pas-
sword di default è 000000. Se hai dimenticato la password,
utilizzare la password master 888888.
Le impostazioni verranno salvate automaticamente quando
si esce dal menu.
Spostare
• Usare i tasti ▲/▼ per evidenziare un canale che si
desidera passare a un numero di canale diverso.
• Premere il tasto ROSSO per contrassegnare il canale
da spostare.
• Usare i tasti ▲/▼ per selezionare il nuovo numero di
canale per il canale contrassegnato.
• Confermare l’azione premendo il tasto OK, il canale
sarà ora spostato nel nuovo numero di canale nella
lista.
Elimina
• Usare i tasti ▲/▼ per evidenziare un canale che si desidera eliminare.
• Premere il tasto BLU per contrassegnare il canale per l’eliminazione. Viene visualizzata una
richiesta di conferma.
• Confermare l’azione premendo il tasto OK, il canale selezionato viene cancellato.
Blocca/sblocca
Il ricevitore richiede la password prima di mostrare un canale bloccato.
• Usare i tasti ▲/▼ per evidenziare un canale che si desidera bloccare.
• Premere il tasto GIALLO per segnalare il canale come bloccato.
• Premere il tasto GIALLO ancora una volta per sbloccare il canale.
Gruppi preferiti
Il ricevitore ha 4 gruppi preferiti. È possibile assegnare
qualsiasi canale a qualsiasi gruppo. Un canale può essere
assegnato a diversi gruppi.
• Usare i tasti ▲/▼ per selezionare un canale che si
desidera aggiungere a un gruppo preferito.
• Aprire il menu gruppi preferiti premendo il tasto FAV.
• Usare i tasti ▲/▼ per evidenziare il gruppo che si desi-
dera assegnare il canale.
• Dopo aver premuto il tasto OK compare un simbolo sul
fronte del rispettivo gruppo preferito.
Nota:
• È possibile selezionare diversi gruppi preferiti a questo punto. Disattivare cancellerà l’asse-
gnazione a tutti i gruppi.
• Usare il tasto RECALL per cambiare il nome del gruppo preferito selezionato.
IT 11Impostazioni (Programma / Immagini)
Rinominare il canale
Utilizzare i tasti ▲ / ▼ per evidenziare il canale che si desidera rinominare e premere il tasto RE-
CALL. Apparirà una tastiera sullo schermo. Utilizzare i tasti ◄/►/▲/▼ per evidenziare le lettere giu-
ste e confermare la scelta premendo il tasto OK. Dopo aver completato la modifica passare al campo
OK e premere il tasto OK. Il nuovo nome è stato ora assegnato al canale.
Disponi
Con questa opzione è possibile ordinare i canali in base a diversi parametri (LCN, ONID, nome ecc)
all’interno di una lista. L’ordinamento iniziale sarà sovrascritto nel processo.
LCN (numerazione logica dei canali)
Settare LCN su Accessa/o se si desidera utilizzare lo schema di numerazione del canale definito dal
gestore di DVB-T / T2.
Settare LCN su Spenta/o se non si desidera utilizzare lo schema automatico dei gestori.
Rapporto schermo
Questa impostazione determina il rapporto di aspetto che viene utilizzato sul televisore. Contenuti con
differenti rapporti di aspetto saranno adattati dal ricevitore e visualizzato sullo schermo del televisore
di conseguenza.
4:3 Pan & Scan Il contenuto di proporzioni differenti verrà visualizzato a schermo intero,
senza distorsione ma con il degrado.
4:3 Letterbox Il contenuto di proporzioni differenti disarà visualizzata senza distorsione,
ma può essere visualizzato con barre nere.
16:9 Pillar Box Il contenuto di proporzioni differenti verrà visualizzato senza distorsione ma
può essere visualizzate con barre nere.
16:9 Pan & Scan Le trasmissioni 16/9 saranno visualizzate a schermo intero, senza distor-
sione. Le trasmissioni 4/3 verranno visualizzate allargate senza distorsione.
Questa impostazione è specialmente applicabile per trasmissioni 4/3 “letter-
box” al fine di evitare bande nere sullo schermo.
Auto Solo per televisori collegati tramite SCART verrà rilevato il rapporto di aspet-
to controllando il livello di tensione di PIN8.
Risoluzione
Qui è possibile impostare la risoluzione distribuita sulla usci-
ta HDMI (risoluzioni disponibili: 576i PAL / 480i NTSC / 576p
PAL / 480p NTSC / 720p / 1080i / 1080p).
Vedere il manuale della televisione per i dettagli riguardanti
la risoluzione ottimale.
Formato TV
Determina il sistema di colore per l’uscita SCART (PAL o
NTSC) e il frame rate per l’uscita HDMI (50 Hz o 60 Hz).
IT 12Impostazioni (Immagine / Ricerca canali / Ora)
Durata banner
Questa impostazione determina il tempo di visualizzazione delle informazioni (nome del canale, nume-
ro, ecc) dopo il passaggio ad un altro canale.
Ricerca automatica
Quando questa funzione viene attivata immediatamente inizia una nuova scansione dei canali (vedere
capitolo Prima installazione per i dettagli).
Ricerca manuale
È possibile cercare specifiche stazioni televisive manual-
mente. Per questo è necessario conoscere alcuni parametri
tecnici (come la frequenza o il canale) della stazione. La
visualizzazione della barra nella parte inferiore dello scher-
mo indica se è possibile ricevere un segnale con i parametri
impostati. È inoltre possibile utilizzare la visualizzazione
della barra per direzionare l’antenna.
Alimentazione antenna
Nel caso in cui l’antenna abbia bisogno di essere alimentata (ad esempio, un’antenna interna con un
amplificatore, ma senza alimentatore) dal ricevitore è necessario attivare questa funzione nel menu.
Potrebbe essere necessario ripetere la modalità di scansione dopo aver attivato la funzione.
Paese
Selezionare il paese in cui il ricevitore deve essere fatto funzionare.
Servizi internet
Quando questa funzione è attivata, il ricevitore non memorizza le stazioni Internet durante la scansio-
ne dei canali.
Nota:
Questa funzione non è supportata da tutti gli operatori di piattaforme DVB.
Canali criptati
In caso questa funzione venga attivata il ricevitore non salvare le stazioni criptate durante l’esecuzione
della modalità di scansione. Il ricevitore non può trasmettere nessuna stazione criptata.
Impostazioni ora
Il ricevitore imposta il proprio orologio interno automaticamente non appena riceve un canale che
trasmette l’ora corrente. Affinché il ricevitore possa impostare correttamente l’ora è necessario specifi-
care il fuso orario corretto.
Auto Il ricevitore determina il fuso orario automaticamente
Manuale È possibile specificare il fuso orario individualmente
Auto-Standby
Risparmio energetico in conformità con una direttiva UE (EuP). Il ricevitore passa in standby dopo il
tempo predefinito se non viene rilevata alcuna attività dell’utente.
IT 13Impostazioni (Opzioni / Sistema)
Lingua OSD
Impostare la lingua per tutti i menu su schermo.
Lingua dei sottotitoli
Impostare la lingua preferita per i sottotitoli.
Lingua audio
Impostare la lingua preferita per le tracce audio.
Digital Audio
Con questa opzione è possibile specificare il formato del segnale audio dall’uscita HDMI:
PCM Suono stereo digitale
RAW Se un programma TV ha una traccia audio multicanale verrà distribuito questo formato
audio tramite l’uscita HDMI.
• Se il televisore non dispone di uscita audio attivare l’impostazione PCM.
• Si prega di utilizzare il tasto AUDIO per selezionare una traccia audio multi canale di un program-
ma televisivo, se disponibile.
• Nel caso si usi il HDMI come interfaccia per i formati surround il volume non può essere control-
lato tramite il telecomando del ricevitore.
Descrizione audio
Alcune stazioni televisive trasmettono una traccia audio separata per gli spettatori ipovedenti (descri-
zione audio). Questa impostazione determina il volume al quale il televisore mixa la descrizione audio
nella traccia audio principale.
Controllo parentale
Se si desidera bloccare i programmi in base all’età, attivare
il controllo parentale e impostare l‘opzione limite di età per
l‘età desiderata. Questa password proteggerà tutti i conte-
nuti entro l’età definita solo dopo che la password corretta è
sarà stata inserita.
Cambio PIN
Dopo aver attivato questa opzione è necessario inserire
la vecchia password. La password di default è 000000. Il
cursore si sposterà sul campo di inserimento successivo automaticamente dopo l‘immissione della
password. Immettere la nuova password, un numero di sei cifre. È necessario confermare la nuova
password per ripeterlo.
Se si dimentica la password è necessario inserire la password principale al fine di definire una nuova
password. Master-Password: 888888
Reset di fabbrica
Hai la possibilità di ripristinare tutte le impostazioni e le modifiche apportate caricando le impostazioni
di fabbrica. Per attivare l‘impostazione è necessario inserire la password e confermare con OK.
Tutte le impostazioni verranno impostate le impostazioni originali di fabbrica. Tutti i canali verranno
cancellati dalla lista dei canali.
IT 14Impostazioni (Sistema / USB)
Informazione
È possibile accedere alle informazioni per quanto riguarda il software e l’hardware tramite questa
opzione.
Aggiornamento software
Se necessario, un nuovo firmware, nonché un manuale di installazione saranno disponibili presso
www.wwio.de
Non installare il software da altre fonti o siti web.
Impostazione di rete
Questo menù permette di impostare manualmente gli indirizzi IP.
Queste impostazioni devono essere modificate solo da utenti esperti. Gli utenti non devono modificare
queste impostazioni, perché il ricevitore imposterà automaticamente gli indirizzi IP è nella maggior
parte dei casi. Impostazioni errate possono anche danneggiare altri dispositivi nella stessa rete.
Multimedia
Questa voce di menu apre il lettore multimediale USB. Controllare il Sommario del capitolo sui dispo-
sitivi USB supportati. Seguire le istruzioni sullo schermo e del Capitolo telecomando per utilizzare il
lettore multimediale.
Video codec Risoluzione Profilo Contenitore
MPEG1 1080P@30fps MP@HL MPEG, MPG, TS
MPEG2
MP4 1080P@30fps Simple Profile, Advanced Simple Profile AVI, MKV
@Level5
Xvid 1080P@30fps AVI
H.264 1080P@30fps Main Profile, High Profile @Level 4.2 AVI, MKV, MP4, TS
HEVC H.265 1080P@60fps Main10 Profile, High Tier @Level4.1 TS, MKV
• GMC non è supportato
• Aspect Ratio: 4/3, 16/9
Supportati Formato MP3
file audio
Supportato Foto JPEG, BMP, PNG (consigliato
Formato file Risoluzione: 1920x1080 pixel)
Impostazioni Foto
Durata Foto
Questa impostazione definisce per quanto tempo l’immagine viene visualizzata prima che l’immagine
‘immagine successiva venga mostrata automaticamente.
Modalità Foto
Questa impostazione permette di selezionare il tipo di animazione che verrà utilizzato durante la tran-
sizione alla foto successiva.
IT 15Impostazioni (USB)
Rapporto schermo
Questa impostazione definisce se le immagini devono essere adattate allo schermo intero o se debba
essere mantenuto il rapporto di aspetto.
Impostazioni Film
In questo menu è possibile modificare l’aspetto (dimensione / colore) dei sottotitoli.
Questa impostazione ha effetto solo su alcuni sottotitoli in modalità media player. I sottotitoli dei canali
televisivi non sono interessati.
Applicazioni rete
Il Ricevitore viene spedito con App preinstallate. Seguire le istruzioni sullo schermo per utilizzare le
App. Non è possibile installare applicazioni aggiuntive.
Nota: Per poter utilizzare queste funzioni, il ricevitore deve essere collegato a una rete con accesso a
Internet.
IT 16Safety instructions
The flash with an arrowhead symbol within an equilateral triangle is intended to alert
the user of the presence of un-insulated “dangerous voltage” within the product’s
enclosure that may be of sufficient magnitude to constitute a risk of electric shock to
persons. The exclamation point within an equilateral triangle is intended to alert the
user of the presence of important operating and maintenance (servicing) instructions in
the literature accompanying the appliance.
User Manual
• All the safety and operating instructions shall be read before the product is operat-
ed.
• Retain the Manual - The safety and operating instructions should be retained for future reference.
• All warnings on the product and in the operating instructions should be adhered to.
• All operating and use instructions should be followed.
Power Supply
• Never touch the mains plug with wet hands.
• If you want to pull the plug out of the mains socket, always pull directly on the plug. Never pull on
the cable as it could tear.
• Make sure that the power cable is not bent, caught or run over and that it does not come into
contact with heat sources.
• Make sure that the power cable is not wound around the device while in operation.
• Never place the machine on the power cable while it is being operated.
• Only use extension cables that are designed for the power consumption level of the machine.
• Only operate the machine if the electrical voltage stated on the type plate beneath the machine
agrees with the voltage on your plug socket. The wrong voltage can destroy the machine.
• Do not open the appliance.
• Pull out the mains plug if the appliance is not to be used over a longer period of time.
• Take care that nobody can trip over the power supply cable.
• To disconnect the receiver completely from the mains, pull the power supply unit out of the sock-
et.
Operation and Position
• Do not connect accessories on the receiver which are not defined by the manufacture.
• Do not place this product on an unstable cart, stand, tripod, bracket, or table. The product may
fall, causing serious injury to a child or adult, and serious damage to the product.
• The device is able to show a still image on the TV screen or monitor over an unlimited period of
time. This can cause damage to the screen. It is therefore advisable to activate the screen saver.
Or switch the receiver off, if the device is not in use.
• Do not increase the volume when the receiver is just playing very quiet sections. This cold dam-
age the speaker if very loud passages starts all of a sudden after the quiet section.
• Disconnect the main plug during thunderstorms.
• Slots and openings in the cabinet are provided for ventilation and to ensure reliable operation
of the product and to protect it from overheating, and these openings must not be blocked or
covered.
• The openings should never be blocked by placing the product on a bed, sofa, rug, or other similar
surface.
• Do not stand vases etc. on the appliance. Water could seep into the appliance.
• This product should not be placed in a built-in installation such as a bookcase or rack unless
proper ventilation is provided or the manufacturer’s instructions have been adhered to.
• Protect the device against weather influences, moistures and high temperature.
• Never spill liquid of any kind on the product.
• Do not expose the device and the remote control to direct sunlight.
• This product is not designed for outdoor usage.
ENG 2Safety instructions
• This product is designed for use in private households.
• This product is not intended to be used by children.
Batteries in the remote control
• Remove old batteries as leakage may damage the remote control.
• In case of battery leakage use a cloth to remove the battery fluid be careful to avoid skin contact.
• In case the battery’s contents are ingested, drink water to dilute the battery material and seek im-
mediate medical attention.
• If the eyes or skin come into contact with these substances immediately flush with water
and seek immediate medical attention.
• Keep batteries and remote control away from children.
Service and Repair
• Never perform repairs and installations yourself. Refer all servicing to qualified service personnel.
• Contact the repair service if the following errors occur:
• a. If the power cord or power supply unit is defective.
• b. If objects have fallen into the device.
• c. If exposed to water or other liquids.
• d. If it does not operate normally when you follow the operating instructions.
• e. If the device has been dropped or exhibits strong fluctuations in performance.
• Exposure to tobacco smoke may damage the device electronics. The warranty does not cov-
er damage caused by tobacco smoke.
• Use original spare parts only. Incorrect or defective spare parts can cause damage, incorrect
functioning or complete failure, as well as affecting the safety.
Recycling of electronic devices
This product is designed and manufactured with high quality materials and components which can be
recycled and reused. This symbol means that electrical and electronic equipment, at their
end-of-life, should be disposed of separately from your household waste. Please, dis-
pose of this equipment at your local community waste collection/recycling centre. In the
European Union there are separate collection systems for used electrical and electronic
products.
Batteries
This symbol on the battery or on the packaging indicates that the battery provided
with this product shall not be treated as household waste. On
certain batteries this symbol might be used in combination with
a chemical symbol. The chemical symbol for lead (Pb) is added
if the battery contains more than 0.004 % lead. Hand the battery
over to the appropriate collection point for the recycling of waste
batteries.
EC Declaration
Hereby WWIO Elektronik GmbH declares that the following Equipment:
• WWIO TRINITY T2 SLIM (HD DVB-T2 Receiver)
is in compliance with Directive 2014/53/EU. The full text of the EU declaration of
conformity is available at the following internet address:
www.wwio.de/support
ENG 3Ecodesign requirements for external power supplies
Information on ecodesign requirements for external power supplies pursuant to
Directive 2009/125/EC
Manufacturer’s name or trade mark, com- Marchio: WWIO
mercial registration number and address Fabbricante: WWIO Elektronik GmbH
Theodor Heuss Str. 14 C
21629 Neu Wulmstorf
Germany
Handelsregister Amtsgericht Tostedt HRB 204740
Model identifier JY-05120
Input voltage 100 - 240 V
Input AC frequency 50 Hz / 60 Hz
Output voltage 5.0 V DC
Output current 1.2 A
Output power 6.0 W
Average active efficiency 76,0%
Efficiency at low load (10 %)* -
No-load power consumption 0.08 W
* External power supplies with a nameplate output power of 10 W or less shall be exempted from this
requirement.
ENG 4Package content - Overview
Package content
The following components are supplied :
• WWIO Receiver
• Remote Control
• User Manual
• Power Supply Unit
Note:
• The device should only be used with original accessories
• If any of these items are missing, please contact your dealer as soon as possible. Keep the origi-
nal packaging in the event that the unit must be returned to the dealer.
Overview
Position Label Description
1 Power LED
Red: Standby
Green: Power on
2 USB 2.0 Port
Supported Devices: USB Mass Storage Devices
File System: FAT32/NTFS (MBR Partitions only)
Max Size: 2TB
3 RF-IN Connect your antenna to this port. Supply Voltage (+5V) for an
active Antenna can be enabled during first time installation and in
Channel Search Menu.
4 HDMI This port allows to connect TVs with a HDMI-Input. Resolution can
be selected in Picture Menu or using the V-FORMAT Button.
ENG 5Overview - Remote Control
Position Label Description
5 LAN Ethernet Port
You only need to establish a Network Connection if you want to
use the Apps that are installed on the receiver. To just watch TV a
Network connection is not required.
6 SCART This port allows to connect TVs with a SCART-Input.
7 5V= Connect the power supply unit to this port.
Remote Control
• Insert the batteries (1,5V size AAA) in the compartment on the
back of the remote control. Insert the batteries, taking care to
match the polarity, as indicated in the battery compartment and on
the batteries.
• Close the lit
• If the receiver is not in use for a longer period of time, remove the
batteries from the remote control.
Button Description
Buttons for the learning function.
VOL-/+
SET
Power on/off (Standby)
Mute. Turn audio output off/on
SUB-T Select between available Subtitles
AUDIO Select between available Audio Tracks
◄◄ ►► Fast Forward/Backward
►|| Start or continue Playback
■ Stop Playback.
RED Red Function Button in several Menus.
V-FORMAT/ HDMI Resolution changes every time this Button is pressed while watching live
GREEN TV.
Green Function Button in several Menus.
ASPECT/YEL- TV Format changes every time this Button is pressed while watching live TV.
LOW Yellow Function Button in several Menus.
TIMER/BLUE Timer-List is shown if this Button is pressed while watching live TV.
Blue Function Button in several Menus.
ENG 6Remote Control
Button Description
MENU Opens the Main Menu that allows to change all Receivers settings
EXIT Closes Menus and other On Screen Messages
◄ ▲▼ ► Use this buttons to select items and change settings in Menus, Lists and EPG.
▲▼ can also be used to switch between channels.
OK LIST Channel list is shown if this Button is pressed while watching live TV. This Button
is also used to confirm settings in Menu and other On Screen Messages.
i Various information are shown if this button is pressed. Type of Information varies
depending on the operation mode of the receiver.
This button switches to the previously watched TV Channel (RECALL).
VOL +/- Use this button to increase or decrease the Volume.
This button may have no function if RAW-Audio output is enabled.
EPG Electronic Program Guide is shown if this Button is pressed while watching live
TV.
TXT Teletext is shown if this Button is pressed while watching live TV.
0-9 Use the numeric buttons to select Channels, Teletext Pages and input numbers in
On Screen Menus.
TV/Radio Press this button to switch between TV and Radio Channel list.
FAV This Button open Favourite Channel Menu. You need to mark you favourite
Channels in Program Edit Menu in order to populate this list.
ENG 7Remote Control
Learning function
The buttons in the TV CONTROL section (except the SET button) can learn button functions from oth-
er remote controls. This means that you can copy important key functions from your TV remote control
to the receiver remote control and only need one remote control to watch TV with the receiver.
1. Press and hold the SET button for about 3 seconds until the red
light becomes brighter. The remote control has entered program-
ming mode.
2. Press the button for the function to be programmed, the light will
flash.
3. Take the TV remote control and point it at the remote control unit at
a distance of 3 to 5 cm.
4. Press the button of the function to be programmed. If the program-
ming was successful, the light will flash 3 times.
5. Repeat the programming for all the buttons in the TV CONTROL
section.
6. Press the SET button to finish programming, the red light will turn
off.
ENG 8First Time Installation
• Connect the Receiver to your TV and your Antenna.
• Connect the power supply unit to the receiver.
• Connect the power supply unit to a mains socket.
• Power On your TV and select the correct signal source (HDMI or SCART) with the Remote Con-
troller of your TV. Please consult the User Manual of your TV.
• Once the receiver is powered the booting up process takes 15-20 seconds.
If everything is connected properly, you will see the Setup
on the TV screen.
Use the arrow keys ▲/▼ to navigate among menu items.
If a menu item is highlighted you can use the ◄/► keys to
make changes.
OSD Language
Set the OSD language.
Country
Select the country in which the receiver is to be operated.
Antenna Power
In case your antenna needs to be supplied with power (e.g. an indoor antenna with an amplifier but no
power supply unit) by your receiver you need to activate this function in the menu.
Channel Search
Initiate the Channel Scan by pressing OK. It can take a couple of minutes to complete the scan.
In case not all channels appear in the list after the scan you need to readjust the antenna or use a
more powerful antenna and repeat the scan mode.
Note:
• There are no Radio Channels available in certain
countries.
• After moving to another region you have to repeat the
channel scan.
ENG 9Daily operation
Switching Channels
You can switch between channels using the CH▲/CH▼ keys. Via the numerical keys 0-9 you can go
to a specific channel directly.
Channel List
Open the channel list by pressing the OK button.
▲/▼ Select channel
OK Switch to a selected channel
PAGE Scroll through a list page by page
◄/► Switch among radio and TV channel list
EXIT Close channel list
TV/Radio
For switching from TV to radio channels press the TV/RADIO key.
Favourite groups
If you have specified any favourite groups, you can access
them by pressing the FAV key.
◄/► Select favourite group
▲/▼ Select channel
OK Switch to a selected channel
EXIT Close list of favourite groups
Select Sound track and Subtitle Language
The SUB-T and AUDIO buttons can be used to activate and
change subtitles and audio tracks other than the standard
one.
Teletext
The teletext is activated via the TXT key. Use the numerical
keys 0-9 for entering the desired teletext page. You can
leave the teletext by pressing the EXIT key.
Electronic program guide and Timer
Press the EPG key to open the program guide.
▲/▼ Select event
◄/► Switch channel
EXIT Close EPG
OK Schedule Timer
INFO Display Timer-List
ENG 10Settings (Program)
Open the main menu of the receiver by pressing the MENU
key.
Program Edit
The menu can only be accessed by entering a password.
The default password is 000000.
If you have forgotten your password, use the Super-PIN
888888
Your settings will be saved automatically when leaving the
menu.
Move
• Use the ▲/▼ keys to highlight a channel you want to
move to a different channel number.
• Press the RED key to flag the channel for moving it.
• Use the ▲/▼ to select the new channel number for the
flagged channel.
• Confirm the action by pressing OK, the channel will
now be moved to the new channel number in the list.
Delete
• Use the ▲/▼ keys to highlight a channel you want to delete.
• Press the BLUE key to flag the channel for deletion. A confirmation request appears.
• Confirm the action by pressing OK, the selected channel will now be deleted.
Lock/unlock
The receiver asks for the password before showing a locked channel.
• Use the ▲/▼ keys to highlight a channel you want to lock.
• Press the YELLOW key to flag the channel as locked
• Press the YELLOW key once more to unlock the channel.
Favourite groups
The receiver has 4 favourite groups. You can assign any
channel to any group. A channel can be assigned to several
groups.
• Use the ▲/▼ keys to select a channel you want to add
to a favourite group.
• Open the favourite groups menu by pressing the FAV
key.
• Use the ▲/▼ keys to highlight the group you want to
assign the channel to.
• After pressing the OK key a symbol appears on front of the respective favourite group.
• It is possible select several favourite groups at this point. Disable will clear the assignment to all
groups.
• Press the RECALL Button to rename a favourite group.
ENG 11Settings (Program/Picture)
Rename channel
Use the ▲/▼ keys to highlight the channel you want to rename and press the
RECALL key. An on-screen-keyboard will appear. Use the ◄/►/▲/▼ keys to highlight the right letters
and confirm your selection by pressing the OK key. After completing the name move to the OK field
and press the OK key. The new name has now been assigned to the channel.
Sort
With this option you can sort channels by different parameters (LCN, ONID, name etc.) within a list.
The initial sorting will be overwritten in the process.
LCN
Some DVB-T/T2 Operators transmit LCN-information. This enables the provider to generate a
pre-sorted channel list. In case LCN is activated you cannot edit the channel list freely.
Aspect ratio
This setting determines what aspect ratio is used on your television. Content with different aspect ratio
will be adapted by the receiver and displayed on the television screen accordingly.
4:3 Pan & Scan Content with different aspect ratio will be displayed full screen, without distor-
tion but with degradation.
4:3 Letterbox Content with different aspect ratio will be displayed without distortion but may
be displayed with black bars.
16:9 Pillar Box Content with different aspect ratio will be displayed without distortion but may
be displayed with black bars.
16:9 Pan & Scan 16/9 Transmissions will be displayed full screen, without distortion. 4/3 trans-
missions will be displayed enlarged without distortion. This setting is especially
applicable for 4/3 “Letterbox” transmissions in order to avoid black bars on
screen.
Auto Only for TVs connected via SCART that can detected the Aspect Ratio by
checking the Voltage Level of PIN8
Resolution
Here you can set the resolution output over the HDMI port
(available resolutions: 576i (PAL) / 480i (NTSC) /576p (PAL)
/ 480p (NTSC) / 720p /1080i/1080p).
Check the television manual for details concerning the
optimal resolution.
TV Format
Determines the colour system for the SCART output (PAL
or NTSC) and the frame rate for the HDMI output (50Hz or
60Hz).
ENG 12Settings (Picture/Channel Search/Time)
Info Timeout
This setting determines how long the information display (channel name, number etc.) remains visible
after switching to another channel.
Auto Search
When this function is activated a new automatic channel scan
starts immediately (see Chapter First Time Installation for
details).
Manual Search
You can search for specific TV stations manually. For that you
need to know certain technical parameters (such as frequency
or channel) of the station. The bar display at the bottom of
the screen indicates whether it is possible to receive a signal
with the set parameters. You can also use the bar display for
directing the antenna.
Country
Select the country in which the receiver is to be operated.
Antenna Power
In case your antenna needs to be supplied with power (e.g. an indoor antenna with an amplifier but no
power supply unit) by your receiver you need to activate this function in the menu. You may have to
repeat the scan mode after activating the function.
Filter Internet Service
When this function is enabled, the TV will not store internet channels during the channel scan.
Note:
Some DVB platform operators do not flag internet services.
Filter scrambled channels
In case this function is activated the receiver will not save any scrambled stations while executing the
scan mode. The receiver cannot transmit any scrambled stations.
Time Offset
The receiver sets its internal clock automatically as soon as it receives a channel that transmits the
current time. In order for the receiver to set the time correctly it is necessary to specify the correct time
zone.
Auto The receiver determines the time zone automatically
Manual You can specify the time zone individually
Auto-Standby
Energy saving in accordance with an EU directive (EuP). The Receiver will switch to Standby after the
predefined time if no user activity is detected.
ENG 13Settings (Option/System)
OSD Language
Set the language for all on screen menus.
Subtitle language
Set the preferred language for subtitles.
Audio Language
Set the preferred language for audio tracks.
Digital Audio
With this option you can specify the format of the audio signal output by the HDMI output:
PCM digital stereo sound
RAW If a TV program has a multi channel audio track this audio format will be distributed over
the HDMI output
• If the television has no sound output activate the setting PCM.
• Please use the AUDIO key to select a multi channel audio track of a TV program if available.
• In case you are using the HDMI output as bit stream raw interface for surround sound formats the
volume cannot be controlled via the receiver‘s remote control.
Audio Description
Some television channels broadcast a separate audio track
for visually impaired viewers (audio description). This setting
determines the volume at which the TV mixes the audio de-
scription into the main audio track
Parental guidance
If you wish to block age rated programs, activate the parental
control and set the age limit option to the desired age. This will
password protect all age rated content to only play after the right password has been entered.
No information regarding age rating of broadcasted programs is transmitted in some countries.
Set Password
After activating this option you have to enter the old password. The default password is 000000. The
cursor will move to the next entry field automatically when entering the password. Enter your new six
digit number password. You need to confirm your new password by repeating it.
If you forget your password you need to enter the super PIN in order to define a new password. Su-
per-PIN: 888888
Restore factory default
You have the option to reset all settings and changes made by loading the factory settings. To activate
the setting you need to enter your password and confirm with OK.
All settings will be set to the original factory settings. All Channels will be deleted from Channel List.
Information
You can access information regarding the software and hardware via this option.
ENG 14Settings (System/USB)
Software update
If required new firmware as well as an installation manual will be available at www.wwio.de
Do not install software from other sources or websites.
Network Setting
This Menu allows to manually set IP Addresses.
This settings shall be changed by advanced users only. Must users don’t need to change this settings
because the Receiver will automatically set IP Addresses is most cases. Wrong settings may also
harm other devices in the same Network.
Multimedia
This Menu Item opens the USB Media Player. Check the Chapter Overview about supported USB
Devices. Follow the Instruction on Screen and the Chapter Remote Control to use the Media Player.
The Playback of the following video files is supported:
Video Codec Resolution Profile Container
MPEG1 1080P@30fps MP@HL MPEG, MPG, TS
MPEG2
MP4 1080P@30fps Simple Profile, Advanced Simple Profile AVI, MKV
@Level5
Xvid 1080P@30fps AVI
H.264 1080P@30fps Main Profile, High Profile @Level 4.2 AVI, MKV, MP4, TS
HEVC H.265 1080P@60fps Main10 Profile, High Tier @Level4.1 TS, MKV
• GMC is not supported
• Aspect Ratio: 4/3, 16/9
Supported Audio File Format MP3
Supported Photo File Format JPEG, BMP, PNG (Rec-
ommended Resolution:
1920x1080 Pixel)
Photo Configure
Slide Time
This Settings defines how long a picture is displayed before the next picture will be shown automati-
cally.
Slide Mode
This Settings allows to selects the kind of animation that will be used during the transition to the next
picture.
ENG 15Settings (USB)
Aspect Ratio
This setting defines if images shall be stretched to full screen or aspect ratio shall be kept.
Movie Configure
In this menu you can change the appearance (Size/Colour) of subtitles.
This settings only affects certain subtitles in media player mode. Subtitles from TV Channels are not
affected.
Apps
The Receiver is shipped with pre-installed Apps. Please follow the instruction on screen to use the
Apps. It is not possible to install additional Apps.
The Apps require a working Internet Connection.
ENG 16Sicherheitshinweise
Das Blitzsymbol im Dreieck weist den Benutzer auf gefährliche Spannungen an eini-
gen freiliegenden Bauteilen im Inneren des Gerätes hin.
Das Ausrufezeichen im Dreieck weist den Benutzer auf wichtige Bedienungs- und War-
tungsanweisungen (Service) in diesem Handbuch hin, die unbedingt befolgt werden
sollten.
Sicherheitshinweise
• Fassen Sie das Gerät niemals mit feuchten oder nassen Händen an.
• Das Gerät darf nur mit der auf der Rückseite beschriebenen Spannung betrieben
werden. Sollten Sie die Netzspannung nicht kennen, fragen Sie einen Elektriker.
• Dieses Gerät darf nicht in der Nähe von Feuchtigkeit und Wasser positioniert werden.
• Ziehen Sie für die Reinigung den Netzstecker aus der Steckdose.
• Benutzen Sie keine Flüssigreiniger oder Reinigungssprays. Das Gerät darf nur mit einem feuch-
ten Tuch gereinigt werden.
• Das Kabel ist ummantelt und isoliert den Strom. Stellen Sie keine Gegenstände auf das Kabel,
da dadurch die Schutzfunktion verloren gehen könnte. Vermeiden Sie große Belastungen des
Kabels, insbesondere an Buchsen und Steckern.
• Wenn Sie den Netzstecker aus der Steckdose herausziehen wollen, ziehen Sie immer am Ste-
cker und nicht am Kabel. Das Kabel könnte ansonsten reißen.
• Das Gerät hat einen Überlastungsschutz. Dieser darf nur vom einem Fachmann ausgetauscht
werden.
• Für zusätzlichen Schutz des Gerätes während eines Gewitters oder wenn es längere Zeit un-
beaufsichtigt ist: Ziehen Sie den Netzstecker aus der Steckdose und den Antennenstecker aus
der Antennen-/Kabel-Anschlussbuchse. Dies verhindert Schäden aufgrund von Blitzschlag/Über-
spannung.
• Eine Außenantenne darf nicht in der Nähe von Stromleitungen oder sonstigen Stromkreisen an-
gebracht werden. Beim Anbringen solcher Antennen ist extreme Vorsicht geboten, da der Kontakt
mit solchen Leitungen tödlich enden kann.
• Überlasten Sie keine Steckdosen, Verlängerungskabel oder sonstige Leitungen, da dies zu Brän-
den oder elektrischen Schocks führen kann.
• In die Öffnungen des Gerätes dürfen keine Gegenstände eingeführt werden, da an einigen Stel-
len Strom fließt und der Kontakt Feuer oder einen Stromschlag hervorrufen kann.
• Schließen Sie keine Zusatzgeräte an, die nicht vom Hersteller empfohlen sind.
• Stellen Sie das Gerät nicht auf eine instabile Fläche. Das Gerät könnte beschädigt oder Per-
sonen verletzt werden. Jegliche Befestigungen sollten nur nach den Herstellerinformationen
angebracht werden oder von dem Hersteller bezogen werden.
• Das Gerät kann auf unbeschränkte Zeit ein Standbild auf dem Bildschirm bzw. auf dem Fernse-
her anzeigen. Hierbei können Schäden am Bildschirm entstehen.
• Plasma/OLED/LCD-TV: Betreiben Sie das Gerät nie permanent im 4:3 Modus (Pillar Box). Dies
könnte bei längerer Benutzung zu Schäden am Bildschirm führen. Beachten Sie dazu das Hand-
buch des Fernsehers.
• Erhöhen Sie nicht die Lautstärke, wenn gerade eine leise Passage abgespielt wird. Dies könnte
zu Schäden an den Lautsprechern führen, wenn eine laute Passage kommt.
• Die Öffnungen des Gehäuses dienen der Lüftung, damit das Gerät nicht überhitzt. Diese müssen
immer frei gehalten werden.
• Das Gerät darf nicht in der Nähe von Hitzequellen, wie z.B. Öfen, Heizungen positioniert werden.
• Vermeiden Sie Hitzestau am Gerät.
• Schützen Sie das Gerät vor Feuchtigkeit und Witterungseinflüssen.
• Stellen Sie keine Gefäße mit Flüssigkeiten auf das Gerät.
• Setzen Sie das Gerät und die Fernbedienung nicht direkter Sonnenstrahlung aus. Dies beein-
trächtigt die Funktion und könnte zu Schädigungen führen.
• Das Gerät erwärmt sich während des Betriebs. Stellen Sie es nicht auf Wärmeempfindlichen
Oberflächen.
DE 2Puoi anche leggere