CARWASH - Bieffe Farinelli
←
→
Trascrizione del contenuto della pagina
Se il tuo browser non visualizza correttamente la pagina, ti preghiamo di leggere il contenuto della pagina quaggiù
MANUALE USO E MANUTENZIONE                      USE AND MAINTENANCE MANUAL

                                   CARWASH
                                     COD. BF310
   Generatore di vapore per la pulizia e        Steam generator for cleaning and sanitizing
sanificazione degli interni degli autoveicoli            the interior of vehicles
    BREVETTO N.BO2005A000507                          PATENT N.BO2005A000507

   Bieffe è promotore dell’iniziativa             Bieffe is promoter of the initiative
        PERCHÉ BUTTARE?®                        PERCHÉ BUTTARE?® (Why throwing
che incentiva il ricondizionamento come         away?) that encourages reconditioning
        alternativa al consumo                      as alternative to consumption

        VIDEO ASSISTENZA                                   VIDEO PRODOTTI
   TECHNICAL ASSISTANCE VIDEOS                            PRODUCTS VIDEOS
CARWASH                                                         ISTRUZIONI ORIGINALI

1. CONTENUTO DELL’IMBALLO
La macchina CARWASH BF310, insieme ai suoi accessori di serie, viene imballata e spedita in
un unico collo di cartone. Al ricevimento della merce, controllare che il collo sia integro e non
deteriorato, e verificare che l’etichetta-prodotto a lato del cartone e il contenuto qualitativo e

                                                                                                         ITALIANO
quantitativo dell’imballo corrispondano con quanto indicato nella bolla di accompagnamento.
Contenuto dell’imballo:
• n.1 Corpo macchina completo di carrello e cestello
• n.1 Fusto inox
• n.1 Coperchio porta galleggiante per fusto inox
• n.22 Accessori standard
• n.1 Manuale d’uso

In caso di mancata corrispondenza, è necessario comunicarlo immediatamente a Bieffe srl.
Per qualsiasi contatto con Bieffe srl, con i suoi Centri di Assistenza o Rivenditori, citare sempre il
tipo di macchina, il numero di matricola (es. Mod CAR-WASH Cod BF310 n.matricola…) applicata
sul retro della macchina.

                             ACCESSORI STANDARD INCLUSI
                     CVK21                                              CVK20
                     IMPUGNATURA PRATIKA                                BOCCHETTA PRATIKA
                     INIEZ/ESTR. 4MT                                    INIEZ/ESTR.

                     CVAC                                               CVG1
                     BOCCHETTA CHEWING-                                 BOCCHETTA INIEZ/ESTRAZ.
                     GUM INIEZ/ESTR.                                    150MM

                     CVG2                                               CVG3
                     TELAIO TERGIVETRO                                  TELAIO SETOLE PVC
                     PER CVG1                                           PER CVG1

                     CVG3B                                              CVE
                     TELAIO SETOLE DURE PVC                             LANCIA ASPIRAZIONE
                     PER CVG1

                     CVEB                                               CVC
                     LANCIA INIEZ/ESTR. 280                             BOCCHETTA ASPIRAZIONE
                     MM                                                 140MM, 2 PEZZI

                     MGK04N                                             MGLN
                     LANCIA VAPORE PER                                  SPAZZOLINO D.26 PVC
                     PISTOLA VAPORE                                     PER MGK04N

                                                  3
CARWASH
RIP5154 CVK53
SPAZZOLINO SET. NATU-
NEBULIZZATORE ARIA
RALI Ø20 PER MGK04N
ITALIANO
EMF CVK55
FILTRO ASPIRAZIONE
PORTA-FLACONI
POLVERE
COF5502 (X2) KIT5006
BARRA REGGITUBO CRO- KIT O-RING:
MATA 127CM MGOR X4 + CVPOR X4
CVK10 CVK32
TUBO FLEX GETTO ARIA SACCO ASCIUGA SEDILE
CALDA 3,5MT
4CARWASH
OPTIONALS DISPONIBILI
MGK04NC MGLNC
LANCIA VAPORE CURVA SPAZZOLINO IN SETOLE
ITALIANO
NATURALI Ø28
RIP6002 CVK36N
LAMPADA LED LUCE NEBULIZZATORE A
PULIZIA ABITACOLO VAPORE
14W
RIP6001 CVG4
PANNO IN MICROFIBRA SPAZZOLA RETT. SE-
TOLE IN OTTONE PER
RIMOZIONE DI PELI DI
ANIMALI
DETERGENTI DISPONIBILI
RIP1453 RIP1452
PULIMOTORI PLUS 5KG DETERGENTE PAVIMEN-
TI 5KG “ALL SUPER”
RIP1501 RIP1502
DETERGENTE PRELA- DETERGENTE LAVAG-
VAGGIO ESTERNO E GIO MOTO 5KG
CERCHI 5KG
RIP1503 RIP1504
LUCIDANTE PROTETTI- DETERGENTE SIGILLAN-
VO CRUSCOTTI/PELLE TE PROTETTIVO ULTRA-
5KG BRILLANTE CARROZZE-
RIA 5KG
RIP1505 RIP1506
DETERGENTE SPECIALE DETERGENTE IGIENIZ-
INTERNI ENZIMATICO ZANTE ENIZIMATICO
5KG 5KG
RIP1434 RIP1433
DETERGENTE PER TAP- DETERGENTE PER RI-
PEZZERIA 5KG “SPECIA- MUOVERE LA GOMMA
LE INTERNI” DA MASTICARE
5CARWASH
2. ISTRUZIONI OPERATIVE E PER LA SICUREZZA
ATTENZIONE
Vi invitiamo a leggere con attenzione tutte le avvertenze e le
ITALIANO
istruzioni incluse nel presente manuale relative alla sicurezza ed
al funzionamento dell’apparecchio prima del suo utilizzo. CON-
SERVARE IL PRESENTE MANUALE IN VISTA DI CONSULTAZIONI
FUTURE
1. Questo apparecchio è destinato solo ed esclusivamente all’uso
per il quale è stato concepito ed il costruttore non può essere
ritenuto responsabile per eventuali danni determinati di un uso
improprio.
2. L’uso conforme del macchinario è unicamente quello descritto
nel presente manuale di istruzioni.
3. Dopo aver eliminato l’imballaggio assicurarsi che il prodotto non
sia danneggiato. Eventuali danni devono essere immediata-
mente segnalati al rivenditore.
4. Questo apparecchio non è destinato all’impiego in ambienti
esterni e/o in ambienti a rischio di congelamento.
5. L’apparecchiatura deve essere utilizzata e riposta su superficie
piana e stabile.
6. Prima di utilizzare l‘apparecchio, controllare che non vi siano
danni visibili. Non mettere mai in funzione l’apparecchio se
danneggiato e/o se si notano delle perdite di acqua e/o se lo
stesso è caduto a terra: nel caso è necessario indirizzarlo presso
l’apposito centro di assistenza in quanto potrebbe venir meno
la sicurezza dell’uso ed essere fonte di pericolo.
7. Questo apparecchio non deve essere utilizzato da bambini o da
persone che non siano in grado di comprendere i rischi connes-
si all’utilizzo dello stesso.
8. Non lasciare l’apparecchio incustodito quando bambini e/o per-
sone che non sono in grado di comprenderne i rischi e/o ani-
6CARWASH
mali si trovano nei pressi dallo stesso.
9. Impedire l’uso dell’imballaggio e di sue parti da parte di bambini
e/o persone che non sono in grado di comprenderne i rischi e/o
ITALIANO
animali in quanto potenziali fonti di pericolo di soffocamento.
10. Non lasciare il macchinario inutilmente alimentato perché può
diventare fonte di pericolo ma, una volta ultimatone l’uso, spe-
gnere gli interruttori e staccare la spina.
11. Collegare il macchinario a prese elettriche compatibili con la
spina in dotazione, accertandosi che la stessa sia in buono sta-
to. Utilizzare, in caso di necessità, solo spine e/o prolunghe
elettriche appositamente ammesse e contrassegnate da mar-
chio CE in base alle direttive europee e/o opportunamente di-
mensionate e con impianto di messa a terra.
12. Qualsiasi tipo di manipolazione e/o di pulizia deve essere ese-
guita a macchinario spento e raffreddato con la spina del cavo
di alimentazione staccata dalla presa di corrente.
13. Utilizzare esclusivamente pezzi di ricambio ed accessori origi-
nali.
14. Far eseguire installazione, manutenzione, riparazione solo da
personale qualificato e autorizzato dal fabbricante.
15. Prima di collegare l’apparecchio assicurarsi che la tensione
di rete corrisponda ai dati riportati sull’etichetta applicata sul
macchinario; se non si è certi del tipo di corrente del proprio
impianto elettrico, contattare personale specializzato.
16. L’impianto elettrico al quale la macchina deve essere allacciata
deve essere munito di interruttore differenziale (impianto sal-
vavita) e di conduttore di protezione (messa a terra) obbligatori
a termini di legge. Assicurarsi che questi requisiti fondamentali
per la sicurezza siano presenti ed, in caso di dubbio, far control-
lare l’impianto da un tecnico specializzato. Il fabbricante decli-
na ogni responsabilità per eventuali danni a persone e/o a cose
derivanti dall’assenza o dal malfunzionamento dell’interruttore
7CARWASH
differenziale e/o del conduttore di protezione.
17. Il funzionamento sicuro della macchina è garantito solo se vie-
ne allacciata alla rete elettrica pubblica, con una spina a 3 poli
ITALIANO
(non con un allacciamento fisso). Una volta allacciata alla rete,
la presa deve rimanere accessibile in modo da poter essere
staccata in caso di necessità.
18. I dati di allacciamento (protezione, frequenza e tensione) in-
dicati sulla targhetta presente nella macchina, devono assolu-
tamente corrispondere a quelli della rete elettrica alla quale si
collegherà la macchina affinché questa non subisca danneggia-
menti. In caso di dubbi rivolgersi a un tecnico qualificato.
19. È importante sostituire il cavo di alimentazione con un cavo
dello stesso tipo (disponibile presso l’assistenza tecnica auto-
rizzata) non appena presenti segni di danneggiamento anche
lieve. La sostituzione può essere eseguita solo dal personale
autorizzato o dall’assistenza tecnica autorizzata dal fabbricante.
20. Il tappo/valvola di sicurezza va sostituito ogni 3 anni dalla pri-
ma accensione.
21. Con alcune delle nostre apparecchiature, è possibile anche
erogare detergente. Si raccomanda, in questi macchinari, di
non versare detergenti schiumogeni all’interno del serbatoio
dedicato, in quanto la schiuma potrebbe entrare direttamente
nel motore di aspirazione e causarne la rottura.
22. In tutti i modelli, non versare detergenti, sostanze chimiche,
acidi, solventi, sostanze corrosive, tossiche, profumi, ecc. all’in-
terno della caldaia, ma utilizzare esclusivamente acqua, assi-
curandosi di aver prima staccato l’apparecchio dalla fonte di
alimentazione elettrica.
23. Non usare l’apparecchiatura per aspirare polveri o liquidi cor-
rosivi (acidi o basici), infiammabili e/o esplosivi.
24. Non lavare l’apparecchiatura con getti d’acqua, non immergere
in acqua ma utilizzare esclusivamente un panno umido ad ap-
8CARWASH
parecchio scollegato e raffreddato. Non utilizzare detergenti di
alcun tipo.
25. Non toccare mai l’apparecchio collegato al cavo di alimentazio-
ITALIANO
ne con mani umide o bagnate e/o a piedi scalzi.
26. Non utilizzare l’apparecchio vicino ad acqua (lavandini, piscine,
vasche da bagno, recipienti, ecc.) o in luoghi in cui può essere
sussistente pericolo di esplosione o in presenza di sostanze tos-
siche e/o infiammabili.
27. Non dirigere eventuali getti di vapore verso persone e/o ani-
mali, apparecchiature elettriche e/o elettroniche collegate a
rete elettrica.
28. Non spingere o tirare l’apparecchiatura dal fusto inox. Per spo-
stare la macchina utilizzare l’apposito maniglione.
29. Non tirare il tubo della pistola vapore/acqua per spostare la
macchina.
30. Qualsiasi intervento di manutenzione, riparazione, pulizia deve
essere effettuato a macchina fredda con pressione “zero”.
31. Al termine di ogni sessione di lavoro svuotare e pulire il fusto
inox di raccolta sporco dopo aver scollegato l’apparecchio dal
cavo di alimentazione. È necessario effettuare lo svuotamen-
to/pulizia della caldaia almeno una volta al mese. Prima di ef-
fettuare tale operazione è necessario scollegare il macchinario
dalla rete elettrica, attendere il raffreddamento dello stesso e
svitare delicatamente di mezzo giro la valvola di sicurezza per
togliere la eventuale pressione residua ancora presente all’in-
terno della caldaia. Solo quando non è più presente vapore
all’interno della caldaia, posizionare un contenitore alla base
del macchinario, aprire con cautela il rubinetto di scarico così
da permettere la fuoriuscita dell’acqua residua. Se l’acqua non
esce controllare l’uscita non sia ostruita dal calcare. In caso di
formazione di calcare all’interno della caldaia è possibile in-
serire all’interno della stessa un bicchiere di acqua miscelata
9CARWASH
con dell’aceto. Successivamente scuotere e svuotare la caldaia
risciacquando con sola acqua. Si raccomanda di non inserire
alcun prodotto anticalcare.
ITALIANO
32. Durante l’uso il tappo/valvola di sicurezza non deve essere ri-
mosso, ma al termine dell’utilizzo è necessario svitare con cau-
tela il tappo (di circa un giro) per togliere pressione alla caldaia.
33. Non rimuovere mai i dispositivi e le protezioni di sicurezza.
34. Prima di riempire la caldaia (nel caso di modello con ricarica
manuale) staccare la spina dalla presa di corrente. Non utilizza-
re acqua distillata o demineralizzata.
35. In caso di anomalia nel malfunzionamento (motore troppo ru-
moroso, pompa non funzionante, eccessivo riscaldamento o
altri segnali sospetti), spegnere la macchina, scollegare la spina
di alimentazione e consultare la sezione “RISOLUZIONE GUA-
STI” del manuale.
36. In caso di lunghi periodi di inattività, disinserita la spina di ali-
mentazione, svuotare la caldaia e riporre la macchina in un luo-
go asciutto.
37. Conservare l’imballaggio originale per l’eventuale trasporto al
servizio di assistenza tecnica autorizzata.
BIEFFE DECLINA OGNI RESPONSABILITÀ IN CASO DI DANNI DI-
RETTI E/O INDIRETTI A PERSONE, COSE O ANIMALI DOVUTE AL
MANCATO RISPETTO DI TUTTE LE PRESCRIZIONI CONTENUTE
NEL PRESENTE LIBRETTO.
10CARWASH
2.1 SMALTIMENTO APPARECCHIO
Questo prodotto BIEFFE è soggetto alla direttiva 2002/96/EC del Parlamento europeo e del Con-
siglio dell’Unione europea sui rifiuti di apparecchiature elettriche ed elettroniche (RAEE): Il sim-
bolo del cestino barrato, presente sulla macchina, indica l’obbligo di non smaltirla come rifiuto
ITALIANO
urbano ma di consegnarla in un centro di raccolta differenziata per apparecchiature elettriche ed
elettroniche oppure di renderla al rivenditore all’atto dell’acquisto di nuova apparecchiatura equi-
valente. La raccolta differenziata per l’avvio successivo dell’apparecchio al riciclaggio ed allo smal-
timento compatibile con le esigenze ambientali, contribuisce ad evitare effetti negativi sull’am-
biente e sulla salute umana dovuti alla presenza di sostanze pericolose o ad un uso improprio
delle stesse o di parti di esse. Per informazioni dettagliate inerenti i sistemi di raccolta disponibili
rivolgersi al servizio locale di smaltimento rifiuti o presso il rivenditore. Chiunque smaltisca abu-
sivamente questo prodotto è soggetto alle sanzioni previste dalla normativa vigente in materia.
RAEE raccolta differenziata,
affisso sulla scatola di imballaggio.
11CARWASH
2.2 TARGHE E PITTOGRAMMI
2 3
ITALIANO
1 7
4
5 6
1. Non smaltire tra i rifiuti domestici
2. Rischio di scossa elettrica
3. Rischio di ustioni
4. Prestare attenzione durante l'uso
5. Controllare la presenza di messa a terra
6. Leggere le istruzioni prima dell'uso
7. Spruzzo di vapore. Non dirigere il getto verso il corpo
2.3 TARGA DI IDENTIFICAZIONE (FACSIMILE)
Model: BF310 "CARWASH"
Product type: STEAM CLEANER FOR VEHICLES
Voltage 220/240V - 50/60Hz
Boiler power 1000W+1000W+1000W
Boiler pressure 6 bar
Vacuum power 1200W
Dimensions 52x80x110h cm
Weight 48 kg
Bieffe srl
Strada Costa di Fagnano 3
61122 Pesaro (PU) Italy
+39 0721281857 | info@bieffeitalia.it
2020 Made in Italy
12CARWASH
3. CONDIZIONI DI GARANZIA
L’apparecchio acquistato è coperto da garanzia legale dalla data di acquisto per difetti di con-
formità presenti al momento della consegna del macchinario. Se l’acquirente è da considerarsi
quale consumatore ai sensi della normativa vigente, la garanzia sarà estesa per un periodo di
ITALIANO
24 mesi dall’acquisto. Per coloro che acquisiscono i macchinari tramite partita IVA il prodotto
è garantito un anno per difetti già presenti dalla data di acquisto. La presente garanzia è valida
nei Paesi che hanno recepito la direttiva Europea 99/44/CE, per gli altri valgono le normative vi-
genti in tema di garanzia. Per ottenere tale intervento in garanzia la data di acquisto deve essere
comprovata da un documento valido agli effetti fiscali rilasciato dal venditore ed in difetto di tale
allegazione gli interventi saranno effettuati a carico dell’acquirente. Il macchinario dovrà essere
fatto pervenire, nell’imballo originale, a cura dell’utente presso un centro di assistenza tecnica o
rivenditore autorizzato dal costruttore. La garanzia non si applica qualora:
1. I guasti derivino da caso fortuito o da fatto imputabile a terzi o siano causati dal Cliente;
2. I difetti o danni siano stati provocati dal trasporto;
3. Ci si riferisca a parti danneggiate dal consumo e sottoposte a normale usura (ad es. parti
verniciate o smaltate, manopole, maniglie, parti in plastica mobili ed asportabili, lampade,
parti in vetro, tubi di gomma, cavi elettrici esterni, motori, ventole, impugnature, guarnizio-
ni, valvole, accessori, ecc.);
4. Il macchinario sia stato installato e/o regolato in maniera erronea e/o ne sia stato fatto un
uso non conforme alle indicazioni e a qualunque avvertenza o disposizione contenuta nel
presente libretto;
5. Siano presenti anomalie dell’impianto elettrico o insufficiente portata dello stesso;
6. Vi sia stata trascuratezza e negligenza della manutenzione e/o pulizia del macchinario;
7. Vi siano state manomissioni di personale non autorizzato; uso improprio del macchinario;
utilizzo di componenti non originali;
8. Vi sia stata manomissione del sigillo che impedisce l’accesso alle parti interne dell’apparec-
chio;
9. Vi sia stato un utilizzo non appropriato e non conforme alle istruzioni;
10. In caso di guasti e/o vizi non imputabili ad un difetto di produzione.
13CARWASH
4. DATI TECNICI
230/220V 50/60 Hz (nei modelli BF310 e BF310Z)
Alimentazione
380V 50/60 Hz (nei modelli BF310PL e BF310PLZ)
ITALIANO
Caldaia 3,5lt
Potenza caldaia 1000W+1000W+1000W
Pressione vapore 5 bar
Potenza aspiratore 1400W
Potenza aria calda 1400W
Fusto inox 20lt
Tanica acqua 10lt+10lt
Ozonizzazione (nei modelli BF310Z e BF310PLZ)
Peso 55kg
Dimensioni imballo 83x59xh95cm
5. DESCRIZIONE DELLA MACCHINA
Vapore
Aspirazione liquidi/solidi
Acqua calda/detergente 40°c
Aria calda per asciugatura sedili 50°c
Ricarica automatica
Ozonizzazione ( versioni BF310Z, BF310PLZ)
DISPOSITIVI DI PROTEZIONE:
Valvola di non-ritorno applicata all’uscita della presa-vapore.
Tappo/valvola di sicurezza meccanica per la pressione.
Gabbia di protezione del TAPPO DI SICUREZZA.
1 pressostato e 3 termostati per la sicurezza della caldaia in pressione.
Termostato di sicurezza dell’aria calda.
Termostati di protezione delle pompe.
Galleggiante di protezione del motore di aspirazione.
Segnale acustico di fine acqua.
14CARWASH
6. MANUTENZIONE PERIODICA: SVUOTAMENTO E PULIZIA DELLA
CALDAIA
ATTENZIONE: PRIMA DI SVUOTARE L’ACQUA DELLA CALDAIA, SCOLLEGARE LA MACCHINA
ITALIANO
DALLA RETE ELETTRICA E SVITARE DI MEZZO GIRO IL TAPPO DI SICUREZZA PER TOGLIERE
PRESSIONE E CALORE DALL’INTERNO DELLA CALDAIA.
Quando la caldaia si è raffreddata e il manometro segnala 0 bar, posizionare un contenitore alla
base della caldaia e aprire con cautela il rubinetto di scarico posizionato sotto la caldaia permet-
tendo l’uscita dell’acqua. Il rubinetto di scarico si apre agendo sulla manopola/leva posizionata
a fronte macchina.
Rubinetto di
scarico
Manopola/leva di apertura
rubinetto
È importante spruzzare del grasso spray sugli innesti delle impugnature, sulla spina vapore/ac-
qua della pistola e sulla presa vapore/acqua sulla macchina (questo per proteggere le guarnizio-
ni, o-ring).
Per eseguire una pulizia straordinaria della caldaia è possibile inserire all’interno di questa un
bicchiere di aceto e acqua. Successivamente scuotere il generatore di vapore e svuotare la calda-
ia risciacquando con sola acqua. Non inserire alcun prodotto anticalcare.
L’OPERAZIONE DI SVUOTAMENTO/PULIZIA DEVE ESSERE EFFETTUATA PERIODICAMENTE SE-
CONDO L’USO DELLA MACCHINA, ALMENO UNA VOLTA AL MESE. PENA IL DECADIMENTO
DELLA GARANZIA.
15CARWASH
7. INSTALLAZIONE E ATTIVAZIONE
LEGENDA
1 Fusto Inox 16 Interruttore aspirazione
ITALIANO
2 Coperchio 21 Tappo di sicurezza
3 Tubo aspirazione 22 Interruttore generale
4 Asta supporto pistole 23 Interruttore 2a resistenza
5 Tanica caldaia 24 Spia pronto vapore
6 Tanica acqua calda 25 Manometro
7 Manicotto aspirazione 26 Leva vapore/acqua
8 Bochettone aspirazione 27 Interruttore acqua
9 Spina vapore/acqua 28 Interruttore aspiratore
10 Presa vapore/acqua 31 Manicotto tubo flex
11 Rubinetto scarico 32 Bocchettone aria calda
12 Cavo alimentazione 33 Terminale tubo flex
13 Pistola vapore 34 Bocchettone ozono
14 Rubinetto pistola vapore 35 Timer ozono
15 Leva vapore/acqua
1. Posizionare il fusto (1) sulla macchina
3 nell’apposito alloggio. Chiudere il fusto con
il coperchio con galleggiante (2), bloccare il
coperchio con i due ganci.
2
4
2. Inserire il tubo aspirazione (3) nel manicot-
to sul coperchio (2). Inserire l’asta supporto
pistole (4) nell’apposito alloggio sul manico.
L’impugnatura CVK21 deve passare attraverso
l’asta supporto pistole (4) per evitare che il
8
1 tubo si attorcigli e che l’innesto subisca sforzi.
16CARWASH
3. Aprire lo sportello sul retro della macchi-
3
na. Riempire se vuote le taniche (5) e (6) di
acqua.
ITALIANO
ATTENZIONE: NON USARE ACQUA DISTIL-
LATA. I SENSORI DI RILEVAMENTO ACQUA
NON FUNZIONANO CON ACQUA PRIVA DI
SALI MINERALI.
5 6
Fare attenzione che i relativi tubi di ricarica
siano inseriti nelle rispettive taniche a
contatto con l’acqua. Chiudere lo sportello.
Se una delle taniche è vuota oppure uno
dei tubi non è a contatto con l’acqua, la
macchina non funziona.
4. Collegare alla macchina il tubo iniezione/
estrazione Pratika cod. CVK21. Inserire il
manicotto aspirazione (7) al bocchettone di
aspirazione (8). Inserire la spina vapore/acqua
calda (9) alla presa vapore/acqua calda (10).
5. Prima di collegare la macchina alla rete elettrica
assicurarsi che il rubinetto di scarico (11) e il tappo
16 di sicurezza (21) sono chiusi e che tutti gli interrut-
tori siano disattivati. L’interruttore generale (22)
deve essere posizionato su “0”.
15 6. Collegare il cavo di alimentazione (12) ad una
presa elettrica.
7. Girare l’interruttore generale (22) sulla posizione
9 “2”. Se la caldaia è vuota una pompa provvederà
7 a caricare la caldaia di acqua. Quando la caldaia
è piena, ovvero la pompa di caricamento non è
Cod.CVK21 Impugnatura Pratika iniez/estr. attiva, per una maggiore durata e qualità del vapore
4mt azionare la seconda resistenza attivando l’interrut-
tore (23).
NON AZIONARE LA SECONDA RESISTENZA
QUANDO LA CALDAIA NON È PIENA.
13
8. Attendere che la spia pronto vapore (24) sia
attiva e/o che il manometro (25) raggiunga 4 ATM.
per iniziare a lavorare.
9. Per erogare vapore con la pistola vapore (13),
aprire il rubinetto (14) e premere il pulsante nella
pistola. Al termine dell’utilizzo della pistola vapore
chiudere il rubinetto (14) e premere il pulsante sulla
pistola vapore per scaricare la pressione all’interno
del tubo.
17CARWASH
10. Per erogare vapore con il tubo Pratika girare la
leva (26) a destra sulla posizione “vapore” e preme-
re la leva (15).
11. Per erogare acqua calda con il tubo Pratika
girare la leva (26) a sinistra sulla posizione “acqua
ITALIANO
calda”, attivare l’interruttore (27) sul pannello
comandi e premere la leva (15).
12. Per aspirare con il tubo Pratika premere l’inter-
ruttore (16).
ATTENZIONE:
10 durante l’utilizzo come ASPIRALIQUIDI,
RIMUOVERE il filtro EMF all’interno del
fusto inox. SE BAGNATO, IL FILTRO POTREB-
14
BE DANNEGGIARE IL MOTORE. Lasciare il
12 filtro quando si utilizza la macchina come
13 aspirapolvere.
13. Per un buon risultato si consiglia di sciogliere
lo sporco con getti di vapore. Aspirare poi i residui.
Tutto lo sporco finirà nel fusto inox.
Per una migliore resa e durata del motore
di aspirazione non tenere sotto sforzo per
25
26 periodi continuativi per più di 15 minuti.
21 Si consiglia, se si vuole lasciare la macchina
22 sempre accesa ( solo nella sua versione
28 monofase 230V), di posizionare l’interrut-
27 tore generale su 1 per lasciare la macchina
in stand-by: Carwash si manterrà calda e in
23 pressione riducendo il consumo elettrico e
24
PANNELLO DI COMANDO l’usura della macchina stessa.
18CARWASH
8. ASCIUGATURA SEDILE
1. Coprire il sedile con il sacco asciuga sedile
31 CVK32.
2. Inserire il manicotto (31) del tubo getto aria
ITALIANO
calda CVK10, nell’uscita aria calda (32).
32
3. Girare l’interruttore generale (22) sulla
posizione “1”.
4. Inserire il terminale (33) del tubo getto aria
calda CVK10 nel sacco CVK32.
5. Attivare l’interruttore (28) per azionare il
getto di aria calda, oppure premere l’inter-
ruttore aspirazione (15) sulla impugnatura
Pratika CVK21.
Per una maggiore durata e per evitare che il
motori si surriscaldi, non fare cicli di asciuga-
tura superiori a 15 minuti.
9. NEBULIZZAZIONE DETERGENTE
31
CON ARIA CALDA
33 1. La nebulizzazione detergente con aria calda
Cod.CVK10 Tubo
è il modo migliore per detergere i tessuti pri-
Flex getto aria
ma di essere lavati con vapore e acqua calda.
calda 3,5mt
2. Inserire il manicotto (31) del tubo getto aria
calda CVK10 nell’uscita aria calda (32).
3. Girare l’interruttore generale (22) sulla
posizione “1”.
4. Riempire il nebulizzatore aria CVK53 con
CVK53 una soluzione di deter-gente.
Nebulizzatore aria 5. Inserire il terminale (33) del tubo getto aria
calda CVK10 nel nebulizzatore CVK53.
6. Attivare l’interruttore (28) per azionare il
getto di aria calda.
7. Lasciare agire il detergente sui tessuti pri-
ma di lavarli con vapore e acqua calda.
19CARWASH
10. OZONIZZAZIONE
1. L'interruttore generale (22) può essere
settato in posizione "1","2" oppure "0".
ITALIANO
IL GENERATORE DI OZONO FUNZIONA
35 ANCHE A MACCHINA SPENTA, CON CAVO
DI ALIMENTAZIONE COLLEGATO.
31 2. Inserire il manicotto (31) del tubo getto aria
calda CVK10, nell’uscita ozono (34).
3. Inserire il terminale del tubo getto aria
calda (33) all’interno dell’autoveicolo.
34 4. Regolare il timer ozono (35) secondo le
dimensioni del veicolo (36).
36
SCHEDA DI SICUREZZA OZONO:
https://www.ilo.org/dyn/icsc/showcard.display?p_card_id=0068&p_edit=&p_version=2&p_lang=it
PUBBLICAZIONE DEL MINISTERO DELLA SALUTE:
http://www.salute.gov.it/imgs/C_17_pubblicazioni_1514_allegato.pdf
ATTENZIONE
NON RESPIRARE OZONO. RESPIRARE OZONO AD ALTA CONCENTRAZIONE (>10 PPM) PUÒ
ESSERE LETALE E PROVOCARE LA MORTE DI PERSONE E ANIMALI.
È SEVERAMENTE VIETATO RESPIRARE, INALARE L’OZONO PRODOTTO DALL’APPARECCHIA-
TURA, ANCHE PER BREVI PERIODI. L’UTILIZZO DI QUESTA FUNZIONE È CONSENTITO SOLO
IN AMBIENTI CHIUSI ED ISOLATI SENZA LA PRESENZA DI PERSONE E/O ANIMALI. TENERE
CHIUSO L’ABITACOLO DURANTE IL TRATTAMENTO AD OZONO, AFFINCHÈ NESSUNO POSSA
ENTRARVI.
------------------------------------------------------------------------------------------------
ATTENZIONE: NON rientrare nell’ambiente ozonizzato una volta terminato il trattamento, in
quanto possono persistere i residui di ozono nell’aria. Dopo un tempo di attesa di almeno
15 minuti, areare l’abitacolo e attendere prima di accedervi.
------------------------------------------------------------------------------------------------
20CARWASH
11. MANUTENZIONE: PULIZIA DELLA POMPA
Al termine di ogni sessione di lavoro pulire la pompa detergente facendo scorrere acqua al suo
interno. Inserire il tubo di ricarica detergente nella tanica contenente acqua, attivare l’interrut-
tore acqua calda e premere la leva (15) dell’impugnatura CVK21.
ITALIANO
12. MANUTENZIONE PERIODICA: SVUOTAMENTO E PULIZIA DELLA
CALDAIA
ATTENZIONE: PRIMA DI SVUOTARE L’ACQUA DELLA CALDAIA, SCOLLEGARE LA MACCHINA
DALLA RETE ELETTRICA E SVITARE DI MEZZO GIRO IL TAPPO DI SICUREZZA PER TOGLIERE
PRESSIONE E CALORE DALL’INTERNO DELLA CALDAIA.
Quando la caldaia si è raffreddata e il manometro segnala 0 bar, posizionare un contenitore
alla base della caldaia e aprire con cautela il rubinetto di scarico posizionato sotto la caldaia
permettendo l’uscita dell’acqua. Il rubinetto di scarico si apre agendo sulla manopola/leva
posizionata a fronte macchina.
Rubinetto di scarico
Manopola/leva di apertura rubinetto
È importante spruzzare del grasso spray sugli innesti delle impugnature, sulla spina vapore/ac-
qua della pistola e sulla presa vapore/acqua sulla macchina (questo per proteggere le guarni-
zioni, o-ring).
Per eseguire una pulizia straordinaria della caldaia è possibile inserire all’interno di questa un
bicchiere di aceto e acqua. Successivamente scuotere il generatore di vapore e svuotare la
caldaia risciacquando con sola acqua. Non inserire alcun prodotto anticalcare.
L’OPERAZIONE DI SVUOTAMENTO/PULIZIA DEVE ESSERE EFFETTUATA PERIODICAMENTE
SECONDO L’USO DELLA MACCHINA, ALMENO UNA VOLTA AL MESE. PENA IL DECADIMENTO
DELLA GARANZIA.
13. AL TERMINE DEL LAVORO
Spegnere tutti gli interruttori, disinserire la spina di alimentazione. Chiudere il rubinetto (14),
posizionare la leva (26) su “STOP”. Scaricare la pressione dei tubi e riporre la macchina in un
luogo pulito ed asciutto.
ATTENZIONE: SPOSTARE LA MACCHINA AGENDO ESCLUSIVAMENTE SULL’APPOSITO MANI-
GLIONE. NON TIRARE IL TUBO DELLA PISTOLA VAPORE OPPURE L’IMPUGNATURA PRATICA
PER SPOSTARE LA MACCHINA
21CARWASH
14. RISOLUZIONE INCOVENIENTI
TIPO GUASTO POSSIBILI CAUSE SOLUZIONI
Il rubinetto di sicurezza (11) Posizionare il rubinetto sulla
ITALIANO
è chiuso posizione aperto
Non esce vapore dalla pistola Attendere che il manometro
Manca pressione alla caldaia
vapore (13) raggiunga almeno i 4 BAR
La valvola vapore Contattare un centro
nell’impugnatura è rotta assistenza
Attendere che il manometro
Manca pressione alla caldaia
raggiunga almeno i 4BAR
Non esce vapore dalla pistola La leva (26) non indica la Girare la leva (26) sulla
Pratika CVK21 posizione “vapore” posizione “vapore”
La valvola vapore Contattare un centro
nell’impugnatura è rotta assistenza
Dalla pistola vapore (13) Chiudere il rubinetto di
La valvola vapore
esce vapore senza premere il sicurezza (14) e contattare un
nell’impugnatura è rotta
pulsante centro assistenza
Il motore dell’aspiratore
L’acqua nel Fusto Inox (1) Disattivare la macchina e
cambia rumore oppure inizia
supera il livello massimo svuotare il Fusto Inox (1)
a vibrare
Inserire un cacciavite nel
Non esce acqua dal rubinetto Il rubinetto è intasato dal
rubinetto liberandolo dalle
di scarico sotto la macchina calcare
impurità
Spina vapore/acqua inserita Sistemare e bloccare la spina
Ci sono delle perdite nella male vapore/acqua
spina vapore/acqua (9)
Guarnizioni OR consumate Sostituire le guarnizioni OR
Attivando l’interruttore
Spina vapore/acqua inserita Sistemare e bloccare la spina
(16) sulla pistola, il motore
male vapore/acqua
aspiratore non si accende
Non esce aria calda Termostato fuori uso Rivolgersi al centro assistenza
222
L
1
3
4
6 IN3
N
5
7 schema elettrico
8 CARWASH
COD.BF310Z
10 IN1
PE
9 bieffe srl
11 giugno 2017
CARWASH
12
TM 14 rif. descrizione
13 I1 INTERRUTTORE GENERALE
SP rif. Descrizione
15 I2 INTERRUTTORE ASPIRAZIONE
1 2 I1 INTERRUTTORE GENERALE
16
15. SCHEMA ELETTRICO
1 2 TR4 TR3 TR2 TR1 I3 INTERRUTTORE II RESISTENZA
I2 INTERRUTTORE ASPIRAZIONE
I4 INTERRUTTORE ACQUA
I3 INTERRUTTORE II RESISTENZA
LM LAMPADA OZONO
I4 INTERRUTTORE ACQUA
MT1 MT1 VENTOLA PER OZONO
MT2 RS4 RS3 RS2 RS1
LM LAMPADA OZONO
MT2 MOTORE ASPIRATORE
21 22 VENTOLA PER OZONO
MT3
MT1 POMPA CALDAIA
11 14
MT4 MOTORE
MT2 POMPA ASPIRATORE
DETERGENTE
RL PR1 POMPA
MT3 PRESA CALDAIA
ELETTRICA ASPIRAZIONE
RT
A1 A2 MT3 PR2
MT4 PRESSOSTATO CALDAIA 5 BAR
POMPA DETERGENTE
23
PR3
PR1 PRESSOSTATO
PRESA ELETTRICA BAR
POMPA 6ASPIRAZIONE
RL RELE'
PR2 PRESSOSTATO CALDAIA 5 BAR
PR2
P RS1 PRIMA RESISTENZA 1000W
PR3 PRESSOSTATO POMPA 6 BAR
RS2 SECONDA RESISTENZA 1000W
RL RELE'
RS5 RS3 TERZA RESISTENZA 1000W
SC1 K6 RS1 PRIMA RESISTENZA 1000W
RS4 RESISTENZA 1400W
RS2 SECONDA RESISTENZA 1000W
K7 K2 RS5 RESISTENZA 22K 1/4W
RS3 TERZA RESISTENZA 1000W
RT REATTORE
RS6 RS4 RESISTENZA 1400W
K3 K1 SC1 SCHEDA ALIMENTAZIONE 12V
SC2 RESISTENZA
RS5 SCHEDA 22K 1/4W
CONTROLLO ACQUA
SC2
SD1 REATTORE
RT SONDA LIVELLO CALDAIA
SD2 SCHEDA
SC1 SONDA TUBOALIMENTAZIONE 12V
RICARICA CALDAIA
K9 K11 K10 K8 K7 K13 K14 K12 SD3
SC2 SONDA
SCHEDA DETERGENTE
TUBOCONTROLLO ACQUA
IN4
SP
SD1 SEGNALATORE LUMINOSO
SONDA LIVELLO CALDAIA
TM TEMPORIZZATORE
SD2 SONDA TUBO RICARICA
TR1 TERMOSTATO
CALDAIA I RESISTENZA
IN2 TR2 SONDA TUBO
SD3 TERMOSTATO DETERGENTE
II RESISTENZA
K2 K1 K4 K3 K5 K6
TR3 SEGNALATORE
SP TERMOSTATO LUMINOSO
III RESISTENZA
LM PR3
P TM TEMPORIZZATORE
MT4
TR1 TERMOSTATO I RESISTENZA
SD1
PR1 SD2 SD3 TR2 TERMOSTATO II RESISTENZA
TR3 TERMOSTATO III RESISTENZA
ITALIANOCARWASH
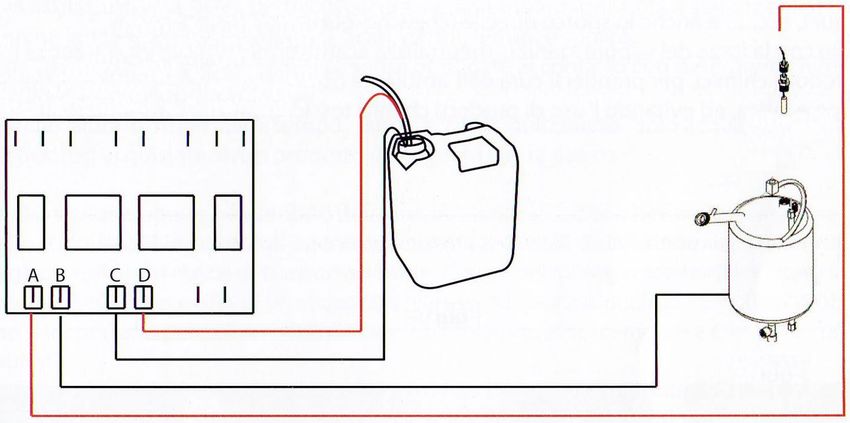
16. SCHEMA DI RICARICA AUTOMATICA DELLA CALDAIA
LEGENDA
SONDA CALDAIA + ROSSO
ITALIANO
MASSA CALDAIA – NERO
TUBO RICARICA – NERO
TUBO RICARICA + ROSSO
SONDA H
SERBATOIO
CALDAIA
24CARWASH TRANSLATION OF THE ORIGINAL
1. CONTENTS OF THE PACKAGE
The machine CARWASH cod.BF310 is packed together with its standard accessories in a single
carton box. Upon receipt of the goods, check that the package is intact and not damaged.
Verify that the product-label on the side of the box and the contents of the package match with
quality and quantity as indicated in the delivery note.
Once riceived the package, check for the following parts:
• n.1 Machine body complete with trolley and basket
• n.1 Steel drum
• n.1 Cover steel drum complete with floating
• n.22 Standard accessories
• n.1 User’s Manual
ENGLISH
In case of mismatch, you must immediately inform Bieffe srl. For any contact with Bieffe srl,
with its service centers or dealers, please refer to the type of machine, serial number (eg Mod.
CARWASH Cod.BF310 n.serial ...) applied to the back of the machine.
INCLUDED STANDARD ACCESORIES
CVK21 CVK20
PRATIKA HANDLE 4MT PRATIKA NOZZLE
INJECT/EXTRAC. INJECT/EXTRAC.
CVAC CVG1
CHEWING-GUM NOZZLE INJECT/EXTRACT NOZZLE
INJECT/EXTRAC. 150 mm
CVG2 CVG3
RUBBER INSERT FOR PVC BRISTLED INSERT FOR
CVG1 CVG1
CVG3B CVE
PVC STIFF BRISTLED EXTRACTION LANCE
INSERT FOR CVG1
CVEB CVC
INJECT/EXTRACT LANCE EXTRACTION NOZZLE
280 mm 140MM 2 PCS
MGK04N MGLN
KONFORT STEAM LANCE BRUSH D.26 PVC
FOR STEAM GUN FOR MGK04N
25CARWASH
RIP5154 CVK53
BRUSH d20 FOR MGK04N
AIR NEBULIZER
- NATURAL BRISTLES
EMF CVK55
DUST SUCTIONING FILTER BOTTLE HOLDER
COF5502 (X2) KIT5006
ENGLISH
CHROMED HOSE HOL- O-RING KIT:
DING ROD d6 127cm MGOR x4 + CVPOR x4
CVK10 CVK32
HOT AIR FLEX HOSE 3.5 SEAT DRY BAG
mt
26CARWASH
AVAILABLE ACCESSORIES
MGK04NC MGLNC
CURVED STEAM LANCE BRUSH D28MM NATU-
RAL BRISTLES
RIP6002 CVK36N
14W LED LIGHT FOR STEAM NEBULIZER
INTERIOR CLEANING
RIP6001 CVG4
ENGLISH
MICROFIBER CLOTH RECTANGULAR BRUSH
WITH BRASS BRISTLES
TO REMOVE ANIMAL
HAIR
DETERGENTI DISPONIBILI
RIP1453 RIP1452
PULIMOTORI PLUS 5KG FLOOR DETERGENT 5KG
(FOR ENGINES) “ALL SUPER”
RIP1501 RIP1502
EXTERNAL PRETREA- MOTO WASHING DE-
TING DETERGENT AND TERGENT 5KG (FOR
WHEELS 5KG BIKES)
RIP1503 RIP1504
DASHBOARD/LEATHER ULTRA BRIGHT SHINY
PROTECTIVE POLISH PROTECTIVE SEALANT
5KG FOR CARBODY 5KG
RIP1505 RIP1506
SPECIAL INTERNAL EN-
ENZYME SANITIZING
ZYMATIC DETERGENT
DETERGENT 5KG
5KG
RIP1434 RIP1433
UPHOLSTERY DETER-
CHEWING GUM REMO-
GENT 5KG “SPECIALE
VING DETERGENT
INTERNI”
27CARWASH
2. OPERATING AND SAFETY INSTRUCTIONS
ATTENTION: Before using the machine, please read carefully all
the safety and operating instructions as described in this ma-
nual. KEEP THESE INSTRUCTIONS FOR FUTURE REFERENCE.
1. This appliance is intended for the solely use it is designed for,
the manufacturer cannot be held responsible for eventual da-
mages for improper use.
ENGLISH
2. The fair use of this appliance is exclusively the one described in
this instruction manual.
3. After the removal of the package make sure of the appliance’s
integrity. Eventual damages must be reported immediately to
the seller.
4. This appliance is not intended for outdoor use or for enviromen-
ts with freezing risks.
5. This appliance must be placed and used on a flat stable surface
6. Before the use, check for visible damanges. Never put the ma-
chine into operation in case of damages and/or water loss and/
or fall. In this case the machine must be sent to the proper ser-
vice centre: the security standards could be compromised and
the use could be dangerous.
7. The use of this machine is forbidden to children and anyone not
aware of the risks connected to its use.
8. Do not leave the machine unattended when children or anyone
not aware of the risks or animals are around.
9. Children or anyone not aware of the risks are forbidden to use
the packaging or any of its parts: risk of choking.
10. Do not leave the machine powered when not necessary, once
ended the usage, turn off the switches and unplug the machi-
ne.
11. Connect the machine to an electric outlet compatible with the
plug included, checking its integrity. Only if necessary, use only
28CARWASH
CE branded plugs/extension cables in compliance with europe-
an norms and/or properly set and with a grounding system.
12. Any type of maintenance and/or cleaning must be performed
with the machine off, cooled and unplugged.
13. Use only original spare parts and accessories.
14. Installation, maintenance and repairing must be performed by
qualified personnel authorized by the manufacturer.
15. Before connecting the appliance verify that the line voltage
ENGLISH
matches with the data written on the label on the back; if you
are not sure of your line voltage, apply to qualified personnel.
16. The electrical system to which the appliance will be connected
must be wired and supplied with a residual current device (life-
line wiring) and an earthed conductor lead, mandated by law.
Make sure of these security basic requirements, and if in doubt,
contact a qualified technician. The manufacturer is not respon-
sible for eventual damages to persons and/or things caused by
absence or malfunction of the residual current device or the
earthed conductor lead.
17. Safe functioning is guaranteed only when the appliance is con-
nected to the public power grid, with a 3 poles plug (no fixed
connection). Once connected, the plug must be accessible so it
can be unplugged in case of need.
18. To avoid damages, the connection data on the machine plate
(protection, frequency, voltage) must match with the ones of
the power grid to which the machine will be connected. In case
of doubt apply to a qualified technician.
19. When showing even small signs of damage, replace the power
cable with one of the same type (available to the authorized
technical assistance). The replacement must be done only by
authorized personnel or the technical assistance authorized by
the manufacturer.
20. The security stopper/security valve must be replaced every 3
29CARWASH
years from the first ignition.
21. With some of our machines, it is possible to dispense detergen-
ts as well. It is recommended not to pour foaming detergents
inside the dedicated tank, the foam might get into the vacuum
motor breaking it up.
22. For all models, do not pour detergents, chemicals, acids, sol-
vents, corrosive or toxic substances, perfumes etc.inside the
boiler, pour only water. Before this operation verify the machi-
ENGLISH
ne is off and unplugged.
23. Do not use the machine to remove dust or corrosive liquids
(acids or bases), inflammable and/or explosives.
24. Do not clean the machine by water spraying, do not dip into
water, use only a wet cloth with the machine off, unplugged
and cooled. Do not use any type of detergents.
25. Never touch the machine while plugged with wet hands and/
or barefoot.
26. Do not use the machine next to water (sinks, pools, bathtubs,
containers, etc.), in places with a certain danger of explosion or
presence of toxic/inflammable substances.
27. Do not run steam jet towards people and/or animals and
electrical or electronic plugged equipment.
28. Do not push or pull the machine from the steel drum. To move
it use the dedicated handle.
29. Do not pull the steam/water gun hose to move the machine.
30. To perform any maintenance, repair, cleaning work the machi-
ne must be unplugged, cool, and the boiler at “zero” pressure.
31. At the end of every working session unplug the machine then
empty and clean the dirt-gathering steel drum. The emptying
and cleaning of the boiler must be done at least once a month.
Before doing it, unplug the machine, let it cool and gently un-
screw half-round the security valve to remove eventual residual
pressure inside the boiler. When the boiler is empty, place a
30CARWASH
container at the feet of the machine and open gently the drain
valve to let the residual water get out. If no water comes out
check the output for limescale. In case of limescale inside the
boiler, it is possible to pour inside it a glass of water mixed with
vinegar. Then shake and empty the boiler, then rinse with wa-
ter. It is recommended not to use any anti-limescale products.
32. While using the machine, the stopper/security valve must
never be removed. At the end of the usage it is necessary to
ENGLISH
unscrew with caution the security valve (one turn) to remove
pressure from the boiler.
33. Never remove security and protection devices.
34. Before filling the boiler (manual loading models) unplug the
machine. Do not use distilled or demineralized water.
35. In case of anomalies while working (too noisy motor, not wor-
king pump, excessive heating or other suspicious signals), turn
off the machine, unplug the power cable and see the chapter
”TROUBLESHOOTING”.
36. In case of long periods of inactivity, unplug the machine, empty
the boiler and keep the machine in a dry place.
37. Keep the packaging also for the eventual transport to the au-
thorized technical assistance service.
BIEFFE IS NOT RESPONSBILE FOR DIRECT OR INDIRECT DAMA-
GES TO PEOPLE, THINGS OR ANIMALS FOLLOWING THE DISRE-
GARD OF THE REQUIRENMENTS INCLUDED IN THIS MANUAL.
31CARWASH
2.1 DISPOSAL OF THE DEVICE
This BIEFFE product is subject to the 2002/96/EC Directive of the European Parliament and
of the Council of the European Union concerning the waste of electrical and electronic equip-
ment (WEEE). Use the appropriate local collection facilities WEEE for the disposal of this pro-
duct or comply with current regulations. The strikethrough waste bin icon on the machine,
means the obligation not to dispose the machine as urban waste, but to deliver it to a cen-
tre for separate collection of electrical and electronic equipment, or to exchange it buying a
new similar equipment to the seller. The separate waste collection take the waste for being
recycled and properly disposed in accordance with the environment’s needs. It helps to pre-
vent negative effects on the environment and human health, caused by dangerous substan-
ces or their improper use. For detailed information about the available waste collection
ENGLISH
systems address to your local waste disposal service or to the seller. Anyone who illegal-
ly disposes this products is subject to the penalties as prescribed by applicable regulations.
WEEE separate collection,
posted on the packaging box.
32CARWASH
2.2 PLAQUES AND PICTOGRAMS
2 3
1 7
4
5 6
ENGLISH
1. Do not dispose as household waste
2. Risk of electric shock
3. Burning risks
4. Pay attention during the use
5. Check the grounding
6. Read the instructions before the use
7. Spray of steam. Do not direct the jet towards the body
2.3 IDENTIFICATION PLATE (MODEL)
Model: BF310 "CARWASH"
Product type: STEAM CLEANER FOR VEHICLES
Voltage 220/240V - 50/60Hz
Boiler power 1000W+1000W+1000W
Boiler pressure 6 bar
Vacuum power 1200W
Dimensions 52x80x110h cm
Weight 48 kg
Bieffe srl
Strada Costa di Fagnano 3
61122 Pesaro (PU) Italy
+39 0721281857 | info@bieffeitalia.it
2020 Made in Italy
33CARWASH
3. WARRANTY TERMS AND CONDITIONS
The purchased appliance is covered by a legal warranty from the day of purchase in matter
of lack of conformity present at the moment of delivery. If the buyer is to be considered as
consumer in accordance with current legislation, the warranty will be extended to 24 months
from the purchase. For those who buy the machinery using VAT the product is guaranteed one
year for defects already present at the date of purchase. This warranty is valid in the countries
that follow the European directive 99/44/CE, the other countries will apply their current laws
in matter of warranty. Warranty claims are only accepted when the date of purchase is proven
by a valid document, fiscally effective, issued from the seller. Without this document the in-
terventions are entirely borne by the purchaser. The machine must be returned in the original
package by the user, to a technical service centre or a seller authorized by the manufacturer.
ENGLISH
The guarantee will not be applied in the following cases:
1. Failures are caused by fortuitous events, caused by a third party or by the Customer;
2. Failures or damages are due to the transport.
3. The parts for which the guarantee is requested are damaged by the consumption and
subjected to normal wear and tear (e.g painted o enamelled parts, knobs, handles, mo-
vable or removable plastic parts, lamps, glass parts, rubber hoses, external electric cables,
engines, fans, handles, gaskets, valves, accessories, ecc.);
4. The machine has been incorrectly installed and/or set and/or it is not used in conformity
with the instructions or norms contained in this manual;
5. Failures or anomalies of the electrical system or its limited range;
6. Neglect and carelessness in maintenance and/or cleaning of the machine;
7. Tampering caused by unauthorized personnel; improper use of the machine; use of
non-original parts;
8. Breakup of the seal that prevents the access to the internal parts;
9. Inappropriate use and not in compliance with the instructions;
10. Failures and/or faults not caused by manufacturing faults.
34CARWASH
4. TECHNICAL DATA
230/220V 50/60 Hz (models BF310 and BF310Z)
Power supply 380V 50/60 Hz (models BF310PL and BF310PLZ)
Boiler capacity 3,5lt
Boiler power 1000W+1000W+1000W
Boiler pressure 5 bar
Vacuum power 1400W
Warm air power 1400W
Steel drum 20lt
ENGLISH
Water tank 10lt+10lt
Ozonation (in models BF310Z and BF310PLZ)
Weight 55kg
Dimensions 83x59xh95cm
5. MACHINE DESCRIPTION
Steam
Liquid/solid vacuum
Hot water/detergent 40°
Hot air for drying seats up to 50°
Automatic refill system
Ozonation ( versions BF310Z, BF310PLZ)
PROTECTION EQUIPMENT:
Non-return valve applied to the output of the steam outlet.
Mechanical security tap/valve for pressure.
SAFETY TAP with protective cage.
3 thermostats and 1 pressurestat for the safety of the boiler.
Safety thermostat for hot air.
Protection thermostats for pumps.
Vacuum engine protection float.
Sound alarm for low water.
35CARWASH
6. REGULAR MAINTENANCE: EMPTYING/CLEANING OF THE BOILER
ATTENTION: BEFORE DRAINING THE WATER FROM THE BOILER, UNPLUG THE MACHINE
AND UNSCREW BY HALF A TURN THE SACURITY TAP TO RELEASE THE REMAINING PRESSU-
RE AND HEATH FROM THE BOILER.
Wait for the boiler to be cool and the pressure gauge to show “0”, place a container under the
boiler and open with caution the drain valve placed under the boiler letting the water out.
Open the draining tap use the handle/lever places on the front side of machine.
ENGLISH
Draining tap
Handle/lever to open the draining tap
In order to protect gaskets, o-rings, it is important to spray grease on the handle couplings, on
the steam/water plug on the gun and on the steam/water socket on the machine.
To carry out an extraordinary cleaning, it is possible to pour into the boiler a glass of vinegar
and water. Then shake the steam generator and empty the boiler and rinse with only water. Do
not use any antiscale product.
THIS OPERATION MUST BE DONE DEPENDING ON THE USE OF THE MACHINE, AT LEAST
ONCE A MONTH. IF NOT, THE GUARANTEE WILL DECAY.
36CARWASH
7. INSTALLATION AND ACTIVATION
LEGENDA
1 Steel drum 16 Vacuum switch
2 Cover floatholder 21 Safety cap
3 Vacuum hose 22 General power switch
4 Gun support 23 2nd heater switch
5 Boiler tank 24 Steam ready lamp
6 Hot water tank 25 Pressure gauge
ENGLISH
7 Vacuum inlet 26 Steam/water lever
8 Vacuum outlet 27 Water switch
9 Steam/water inlet 28 Vacuum switch
10 Steam/water outlet 31 Flex hose inlet
11 Draining tap 32 Hot air outlet
12 Power cord 33 Flex hose terminal
13 Steam gun 34 Ozone outlet
14 Steam gun tap 35 Ozone timer
15 Steam/water lever
1. Place the steel drum (1) in its housing on
3 the machine. Close the steel drum with the
cover floatholder (2), lock the cover with the
two hooks.
2
4
2. Insert the vacuum hose (3) into the cover
(2). Insert the gun support (4) in its housing
on the handle. The CVK21 handle must pass
through the gun support (4) to avoid the hose
to be twisted and that the outlet to undergo
8
1 mechanical stress.
37CARWASH
3. Open the door on the back of the machine.
3
Fill the tanks (5) and (6) of water.
WARNING: DO NOT USE DISTILLED WATER.
The WATER SENSORS DO NOT WORK WITH
WATER FREE OF MINERALS.
5 6 Make sure that the charging hoses are in
their tanks in contact with water. Close the
door. If one of the tanks is empty or one of
ENGLISH
the tubes is not in contact with water, the
machine does not work.
4. Connect the injection/extraction Pratika
handle cod.CVK21 to the machine. Insert the
vacuum inlet (7) to the vacuum outlet (8).
Insert the steam/water inlet (9) to the steam/
water outlet (10).
5. Before plugging the machine check that
the drain valve (11) and the stopper/security
valve (21) are both closed, and that all the
switches are off. The general switch must be
16 on “0” position.
6. Connect the power cable (12) to the plug.
15 7. Turn the power switch (22) the “2”. If the
boiler is empty a pump starts to load the
boiler with water from the tank (5). When the
9 boiler is full and the pump does not work, you
7 can turn on the second heater switch (23) to
CVK21 PRATIKA HANDLE INJECT/EXTRACT get a better and long lasting steam perfor-
4mt mance.
DO NOT RUN THE SECOND HEATER WHEN
THE BOILER IS NOT FULL.
13 8. Wait until the steam ready lamp (24) is active
and/or the pressure gauge (25) reaches 4 ATM. to
start working.
9. To get steam with the steam gun (13), check that
the tap (14) is open. Press the button on the gun.
When finished using the gun, close the steam gun
tap (14) and press the button on the gun to remove
the pressure inside the hose.
38CARWASH
10. To get steam with the Pratika Handle turn the
lever (26) left to the “steam” position and press the
lever (15).
11. To dispense hot water with the tube Pratika
turn the lever (26) right to the “hot”, turn on the
switch (27) on the control panel and press the lever
(15).
12. On Pratika handle press the switch (16) to ope-
rate the exhauster.
ATTENTION:
10 While using the as wet vacuum claner, ple-
ENGLISH
ase REMOVE the EMF filter placed inside
the steel drum. WHEN WET, THE FILTER
14
MIGHT DAMAGE THE ENGINE. Leave the
12 filter inside the steel drum while using as
13 vacuum cleaner.
13. For a better result dissolve the dirt with steam,
then suck the remaining dirt. All the dirt will go into
the steel drum
For better results and an improved engine
durability do not keep under load for pe-
25
26 riods longer than 15 min.
21 Only for single phase version 230V
22 if you need the machine to be always on,
28 set the general switch on “1” to leave the
27 machine in stand-by mode: the appliance
will remain hot and in pressure, reducing
23 wear and electrical consumption.
24
COMMAND PANEL
39CARWASH
8. SEAT DRYING
1. Cover the seat with the seat dry bag
31 CVK32.
2. Insert the inlet (31) of the flex hose hot air
CVK10, in the hot air outlet (32).
32
3. Turn the power switch (22) to position “1”.
4. Insert the hot air hose terminal (33) in the
bag CVK32.
5. Turn on the switch (28) to operate the hot
air, or turn on the switch (15) on the Pratika
handle CVK21.
ENGLISH
For better results and an improved engine
durability do not operate drying cycles longer
than 15 min.
9. DETERGENT NEBULIZATION
WITH HOT AIR
31 1. The detergent nebulization with hot air is
33 the best way to cleanse the tissues before
CVK10 Flex hose being washed with hot water and steam.
for hot air 3.5 mt 2. Insert the inlet (31) of the flex hose hot air
CVK10, in the hot air outlet (32).
3. Turn the power switch (22) to position “1”.
4. Fill the air nebulizer CVK53 with a deter-
gent solution.
5. Insert the terminal (33) in the air nebulizer
CVK53 CVK53 .
Air nebulizer 6. Turn on the switch (28) to operate the hot
air, or turn on the switch (15) on the Pratika
handle CVK21.
7. Allow the cleaning agent to work on the
fabrics before washing with hot water and
steam.
40CARWASH
10. OZONATION
1. The general switch (22) can be
switched in position "1","2" or "0".
THE OZONE GENERATOR WORKS ALSO
WHILE THE MACHINE IS OFF WITH THE
35 POWER CABLE CONNECTED.
2. Insert the hot air hose CVK10 (31) into the
ozone outlet (34).
31 3. Insert the terminal of the hot air hose (33)
inside the vehicle.
4. Set the timer (35) according to the dimen-
ENGLISH
sions of the vehicle (36).
34
36
OZONE SAFETY DATA SHEET:
https://www.ilo.org/dyn/icsc/showcard.display?p_card_id=0068&p_edit=&p_version=2&p_
lang=en
MINISTRY OF HEALTH PUBLICATION:
http://www.salute.gov.it/imgs/C_17_pubblicazioni_1514_allegato.pdf
ATTENTION
DO NOT INHALE OZONE. INHALING OZONE AT A HIGH CONCENTRATION (>10 PPM) CAN BE
LETHAL AND CAUSE DEATH OF PEOPLE AND ANIMALS.
IT IS STRICTLY PROHIBITED INHALING, BREATHIN THE OZONE PRODUCED BY THIS GENERA-
TOR, EVEN FOR SHORT PERIODS. THE USE OF OZONE IS ONLY ALLOWED IN CLOSED AND
ISOLATED ENVIRONMENTS, NEAR PEOPLE AND ANIMALS ARE NOT ALLOWED. DURING THE
TREATMENT, KEEP THE VEHICLE LOCKED TO AVOID ANYONE TO GET IN.
------------------------------------------------------------------------------------------------
ATTENTION: DO NOT get into the treated environment once ended, residual of ozone may
persist in the air. Wait at least 15 minutes, ventilate the cockpit and wait before getting in.
------------------------------------------------------------------------------------------------
41CARWASH
11. MAINTENANCE: CLEANING THE PUMP
At the end of each working session clean the detergent pump running water inside it. Insert
the detergent loading hose in the water tank, turn on the hot water switch and press the lever
(15) of the handle CVK21.
12. REGULAR MAINTENANCE: EMPTYING/CLEANING OF THE BOILER
ATTENTION: BEFORE DRAINING THE WATER FROM THE BOILER, UNPLUG THE MACHINE
AND UNSCREW BY HALF A TURN THE SACURITY TAP TO RELEASE THE REMAINING PRESSU-
RE AND HEATH FROM THE BOILER.
ENGLISH
1. Wait for the boiler to be cool and the pressure gauge to show “0”, place a container under
the boiler and open with caution the drain valve placed under the boiler letting the water out.
Open the draining tap use the handle/lever places on the front side of machine.
Draining tap
Handle/lever to open the
draining tap
In order to protect gaskets, o-rings, it is important to spray grease on the handle couplings, on
the steam/water plug on the gun and on the steam/water socket on the machine.
To carry out an extraordinary cleaning, it is possible to pour into the boiler a glass of vinegar
and water. Then shake the steam generator and empty the boiler and rinse with only water. Do
not use any antiscale product.
THIS OPERATION MUST BE DONE DEPENDING ON THE USE OF THE MACHINE, AT LEAST
ONCE A MONTH. IF NOT, THE GUARANTEE WILL DECAY.
13. AT THE END OF THE JOB
Turn off all the switches and unplug the machine.
Close the drain valve (14), put the lever (26) on STOP position.
Remove the hose pressure and put the machine in a clean and dry place.
ATTENTION: MOVE THE MACHINE ONLY USING THE PROPER HANDLE. DO NOT PULL THE
HOSE OF THE STEAM GUN OR THE PRATIKA HANDLE TO MOVE THE MACHINE.
42CARWASH
14. TROUBLESHOOTING
MALFUNCTION CAUSE SOLUTION
The safety tap (13) is closed Turn the tap to open position
No steam from the steam Wait for the gauge to reach
No pressure in the boiler
gun (13) at least 4bar
The steam valve on the Get in touch with a service
handle is broken centre
Wait for the gauge to reach
No pressure in the boiler
at least 4bar
ENGLISH
No steam from the Pratika The lever (26) is not in Turn the lever (26) on
gun CVK21 “steam” position “steam” position
The steam valve on the Get in touch with a service
handle is broken centre
Steam comes out from the Close the safety tap (14) and
The steam valve on the
steam gun (13) without get in touch with a service
handle is broken
pushing the button centre
The water inside the steel
The motor vibrates or Turn off the machine and
drum (1) has exceeded the
changes its noise empty the steel drum (1)
max level
No water comes out from Insert a screwdriver into the
The drain valve is clogged up
the drain valve placed under drain valve to clear it from
with limestone
the machine limestone
The steam/water inlet is not Fix then lock the steam/
Leaks from the steam/water properly connected water inlet
inlet (9) The o-ring seals are
Replace the o-ring seals
consumed
Switching on the gun (16),
The steam/water inlet is not Fix then lock the steam/
the vacuum motor does not
properly connected water inlet
start
Get in touch with a service
No hot air comes out Thermostat is broken
centre
43Puoi anche leggere