Libretto Istruzioni Instruction Manual - Termozeta
←
→
Trascrizione del contenuto della pagina
Se il tuo browser non visualizza correttamente la pagina, ti preghiamo di leggere il contenuto della pagina quaggiù
Libretto Istruzioni
Instruction Manual

         1
DATI TECNICI
TECHNICAL DATA

MYLIBERA 22
Aspirapolvere ricaricabile
Type 311003
Batteria/Battery: Li-Ion 22,2 V, 2200 mAh
Adattatore/Adapter: 27 Vdc, 500 mA
Utilizzare solo l’adattatore/Use only the adapter:
TYGSDC2700500

                          2
DESCRIZIONE                                DESCRIPTION
1. Pulsante accensione /                   1. On-Off / power setting button
    regolazione potenza                    2. Dust bin release button
2. Tasto di sgancio contenitore            3. Handle
    polvere                                4. Battery charge LED indicators
3. Impugnatura                             5. Dust bin
4. LED Indicatori di carica batteria       6. Accessory release button
5. Contenitore polvere                     7. Extensible tube
6. Tasto sgancio accessori                 8. Tube release button
7. Tubo di prolunga                        9. Motorized brush with LED
8. Tasto sgancio tubo                      10. 2in1 Nozzle with brush for furniture
9. Spazzola motorizzata con LED            and upholstered
10. 2in1 Bocchetta con spazzola            11. Connector for battery charger
pennello per mobili e imbottiti            12. Wall support
11. Connettore per caricabatterie          13. Battery charger
12. Supporto a muro                        14. Crevice tool
13. Caricabatteria                         15. Motorized mini brush. (provided
14. Bocchetta a lancia                     only with article 72143S)
15. Mini spazzola motorizzata. (in         16. Battery pack removal button
dotazione solo all'articolo 72143S)        17. Battery pack
16. Tasto sgancio pacco batterie
17. Pacco batterie

                                       3
ITALIANO
PRESCRIZIONI DI SICUREZZA
Questo manuale è parte integrante del vostro
apparecchio e deve essere letto con attenzione
perché fornisce importanti indicazioni ed avvertenze
sulla sicurezza, l’uso e la manutenzione del vostro apparecchio.
Conservate con cura questo manuale.
In caso di dubbi, non inventare ma contattare il nostro
centro assistenza al Numero Verde 800-200899
• Dopo aver tolto l’imballaggio assicurarsi dell’integrità
dell’apparecchio. In caso di dubbio non utilizzarlo e rivolgersi al
nostro centro assistenza al Numero Verde 800-200899
• Non lasciare gli elementi dell’imballaggio (sacchetti in plastica,
polistirolo espanso, chiodi, ecc.) alla portata di bambini o persone con
capacità mentali ridotte in quanto potenziali fonti di pericolo.
• Prima di collegare l’alimentatore alla presa di corrente verificare che
la tensione di funzionamento dell’apparecchio corrisponda a quella
della propria abitazione. In caso di dubbio, rivolgersi a personale
professionalmente qualificato.
• L’apparecchio può essere utilizzato da bambini con età superiore a
8 anni e/o da persone con capacità fisiche, sensoriali o mentali ridotte,
oppure con mancanza di esperienza o di conoscenza, solo se sotto
la diretta supervisione di un adulto istruito sulle modalità d'uso sicuro
dell'apparecchio e consapevole dei rischi correlati all'uso
dell'apparecchio stesso.
• I bambini non devono mai giocare con l'apparecchio.
• Le operazioni di pulizia e manutenzione non devono mai essere
effettuate da bambini.
• Non usare l’apparecchio se ha subito cadute o se presenta segni di
danneggiamento o difetti che ne alterano il funzionamento.
• In caso di guasto e/o di cattivo funzionamento dell’apparecchio,
spegnerlo e non manometterlo; non smontare l’apparecchio per
nessuna ragione; per l’eventuale riparazione rivolgersi a un centro
assistenza autorizzato contattando il nostro Numero Verde 800-
200899
4ITALIANO
• In caso di dubbi e per evitare pericoli, fate ispezionare l'apparecchio
da un centro assistenza autorizzato contattando il nostro Numero
Verde 800-200899
• Un errato collegamento elettrico può essere pericolosissimo, può
causare danni irreversibili e, comunque, invalidare la garanzia.
• Se si utilizzano prolunghe, assicurarsi che siano integre e certificate
per l'uso previsto.
• Se l’alimentatore è danneggiato non utilizzarlo. In caso di necessità
rivolgetevi a un centro autorizzato contattando il nostro Numero
Verde 800-200899
• Non tirare mai il cavo dell’alimentatore per scollegarlo dalla presa di
corrente.
• Non immergere mai l’apparecchio o l’alimentatore in acqua o altri
liquidi.
• Non usare mai l’apparecchio a piedi nudi e con mani o piedi bagnati
• Non lasciare mai l’apparecchio esposto ad agenti atmosferici (sole,
pioggia, ecc.)
• Non mettere mai l’apparecchio direttamente sotto acqua corrente.
• Non lavare il prodotto o le sue parti in lavastoviglie.
• Tenete lontano l'apparecchio da gas o sostanze facilmente
infiammabili.
ATTENZIONE! PACCO BATTERIE AL LITIO! NON
SMONTARE, NON MANOMETTERE, NON INCENERIRE,
NON SCHIACCIARE, NON ESPORRE A TEMPERATURE
SUPERIORI A 60°C, PERICOLO DI INCENDIO E/O USTIONI E/O
LESIONI!
• Questo apparecchio è conforme alle norme di sicurezza europee in
vigore applicabili.
• L’apparecchio è destinato esclusivamente all’aspirazione di
polvere in ambiente domestico.
• L’apparecchio deve essere usato esclusivamente per la pulizia di
pavimenti duri, planari e normalmente sporchi, tappeti a pelo corto o
accessori in grado di sopportare senza danni i carichi della spazzola
rotante
5ITALIANO
ATTENZIONE!!!
• Non aspirare materiale esplosivo o infiammabile, sigarette accese
o ceneri prodotte da combustione (caminetti o stufe).
• Non utilizzare l’apparecchio su superfici umide o bagnate.
• Non aspirare acqua o altre sostanze liquide.
• Non ostruire le feritoie di uscita dell’aria poste nella parte laterale
dell’apparecchio.
• Non aspirare oggetti appuntiti, quali frantumi di vetro e chiodi.
• Non aspirare calcinacci.
• Mantenere il prodotto lontano da superfici calde, non farlo entrare
in contatto con spigoli taglienti e non farlo scorrere su superfici abra-
sive.
• Non utilizzare l’apparecchio su parti del corpo di persone o animali.
• Per evitare pericolosi surriscaldamenti si raccomanda: di verificare
che i filtri non siano intasati e che il condotto di aspirazione non sia
intasato.
• Non usate l’apparecchio privo dei filtri.
• Prima di procedere alla pulizia o alla manutenzione dell’apparec-
chio assicurarsi che l’apparecchio sia spento e non sotto carica.
• Fare attenzione a non tenere mai alcuna parte del corpo sotto al
rullo a spazzola.
• Non aspirare mai vicino a cavi, condutture e frange lunghe. Sussiste
il rischio sia di danneggiare l’isolamento del cavo, sia che tali oggetti
s’impiglino nel rullo a spazzola danneggiando l’apparecchio.
• In caso di utilizzo commerciale, o inappropriato, o illegale, o irragio-
nevole o di mancato rispetto delle prescrizioni e istruzioni, LANGE
DISTRIBUTION declina ogni responsabilità e decade ogni garanzia.
6ITALIANO
CONSERVATE CON CURA
QUESTO LIBRETTO ISTRUZIONI!
Importante!
Tutte le operazioni di montaggio, smontaggio e pulizia devono
essere effettuate ad apparecchio spento, freddo.
1 - PRIMA DELL'USO
• Rimuovere imballaggi, etichette e quant'altro è stato messo a protezione del
vostro apparecchio, e riporli in un posto sicuro lontano dalla portata di bambini.
• Leggere tutto il presente manuale perché contiene informazioni importanti per
la sicurezza nonché il modo per garantire al vostro apparecchio una vita lunga
e proficua.
2 – MONTAGGIO DELL’APPARECCHIO
Montaggio supporto a parete (12)
1. Mantenere il supporto a parete allineato orizzontalmente alla parete.
2. Marcare i fori con una matita.
3. Forare i fori (ca. 6 mm Ø).
4. Inserire i tasselli forniti in dotazione nei fori.
5. Fissare il supporto a parete con le viti fornite in dotazione.
NOTA: affinchè la scopa possa essere correttamente agganciata anche
quando il tubo prolunga (7) e la spazzola motorizzata (9) sono assemblati, i
fori dovranno essere praticati ad un’altezza di almeno 115 cm dal pavimento.
Tubo di prolunga (7)
All’interno della confezione è presente un tubo rigido di prolunga che vi
permetterà di aspirare senza fatica pavimenti e tappeti utilizzando la spazzola
motorizzata (9), raggiungere gli angoli più difficili quando viene assemblata la
bocchetta a lancia (14) oppure pulire i vostri mobili e imbottiti con la bocchetta
2in1 (10) o la mini spazzola motorizzata (15). (in dotazione solo all'articolo
72143S).
7ITALIANO
L’inserimento del tubo di
prolunga (7) avviene
semplicemente insetendo lo
stesso sul connettore
presente sul corpo
apparecchio fino a sentire il
“click” di innesto del blocco.
Per rimuovere il tubo è
sufficiente premere il
pulsante di sgancio (6)
presente sul corpo
apparecchio ed estrarre il
tubo.
Spazzola motorizzata (9)
La spazzola motorizzata vi permetterà di aspirare i vostri pavimenti e tappeti
in modo efficace. In aggiunta la luce frontale LED vi aiuterà a identificare lo
sporco negli angoli bui della casa e sotto i vostri mobili.
Inserire la spazzola prestando attenzione all’accoppiamento tra i terminali elet-
tici presenti nella parte inferiore di connettore e innesto spazzola fino quando
udirete il “click” che eviden-
zierà l’avvenuto aggancio
del sistema di blocco. Per ri-
muoverla premere il tasto di
sgancio (6), se la stessa è
stata collegata direttamente
sul corpo apparecchio, op-
pure il tasto di sgancio (8)
se è stata collegata al tubo
prolunga.
Attenzione! Pericolo di
caduta dell’apparecchio.
L’apparecchio, una volta
montato con tubo di
prolunga (7) e spazzola (9)
non può rimanere in piedi sulla spazzola in posizione vericale.
Bocchetta 2 in 1 (10), Bocchetta a lancia (14)
8ITALIANO
La bocchetta 2in1 (10), con la sua spazzola retraibile, vi permetterà di rimuo-
vere la polvere e lo sporco da mobili e tessuti. La bocchetta a lancia (14) è
efficace per la pulizia di fessure o passaggi stretti difficilmente raggiungibili.
È possibile utilizzare le due bocchette sia inserendole direttamente sul con-
nettore presente sul corpo apparecchio che connettendole all’estremità del
tubo estensibile (7). La bocchetta risulterà completamente inserita quando udi-
rete il “click” che evidenzierà l’avvenuto aggancio del sistema di blocco. Per
rimuoverla premere il tasto di sgancio (6), se la stessa è stata collegata diret-
tamente sul corpo apparecchio, oppure il tasto di sgancio (8) se è stata colle-
gata al tubo prolunga.
Mini spazzola motorizzata (15) (in dotazione solo all'articolo 72143S)
La spazzola elettrica vi permetterà anche di aspirare divani, poltrone, mate-
rassi e rimuovere facilmente i peli dei vostri animali domestici.
3 – CARICA DELLA BATTERIA
Prima di collegare il caricabatteria (13) alla rete di alimentazione controllare
che la tensione indicata sulla targhetta posta al di sotto del caricabatteria
corrisponda a quella della rete locale.
Questo apparecchio si ricarica solo con il carica batterie in dotazione.
Attenzione!
Prima di usare l’apparecchio per la prima volta eseguire un ciclo completo di
ricarica della durata di 5 ore.
Collegare il cavo del caricabatteria nell’ingresso (11) sul corpo apparecchio.
Inserire il caricabatteria nella presa di corrente.
L’indicatore di carica della batteria (4) si accende di colore blu e lampeggia.
Quando l’indicatore di carica della batteria rimane acceso continuo, la batteria
è completamente carica.
Scollegare il caricabatteria dalla presa di corrente.
Il tempo necessario per effettuare la carica completa della batteria è di circa 5
ore.
9ITALIANO
4 – COME UTILIZZARE L’APPARECCHIO
Assicurarsi che il prodotto sia correttamente assemblato.
Premere il pulsante di accensione (1). L’apparecchio inizia a funzionare alla
potenza minima. Per utilizzare l’apparecchio alla potenza massima è
sufficiente premere nuovamente il pulsante (1).
Per spegnere l’aspirapolvere agire nuovamente sul pulsante accensione (1).
Indicatore dello stato della batteria (4)
L'indicatore di carica della batteria è composto da 4 luci per indicare la carica
della batteria:
4 luci blu: carica della batteria > 75%
3 luci blu: carica della batteria 50% ~ 75%
2 luci blu: carica della batteria 25% ~ 50%
1 luce blu: carica della batteria < 25%,
Quando la carica della batteria non è più sufficiente a garantire la
funzionalità dell’apparecchio la spia di stato della batteria inizia a
lampeggiare.
5 – DOPO L’USO
Spegnere l’apparecchio. Svuotare il contenitore della polvere e pulire i filtri
presenti all’interno dello stesso.
È possibile svuotare il contenitore polvere in
modo rapido e senza sporcarsi le mani.
Posizionatevi sopra il cestino dei rifiuti e agite sul
pulsante di sgancio presente nella parte inferiore
del contenitore (5). Lo sportello posto sul fondo
del contenitore si aprirà permettendo al
contenuto di fuoriuscire.
Per rimuovere il contenitore polvere (5) dal corpo apparecchio ed effettuare
una pulizia completa del contenitore procedere come segue:
10ITALIANO
1. Premere il pulsante di sgancio (2) e rimuovere il contenitore dal corpo
motore dell’aspirapolvere come mostrato qui di seguito.
2. Ruotare quindi il coperchio superiore del
contenitore della polvere verso il
contrassegno "sblocco" ed estrarre il
coperchio superiore.
3. Estrarre il filtro HEPA e il filtro a ciclone in
plastica semplicemente sollevandoli. Quindi lavare il
filtro HEPA e il filtro a ciclone in plastica con acqua
fredda. Dopo aver asciugato completamente il filtro
HEPA e il filtro a ciclone in plastica, inserirli nel
contenitore (5). L’inserimento del filtro ciclonico è
univoco: fare coincidere le tre linguette presenti nella
parte superiore con le cave presenti sul contenitore (5).
Non lavare il gruppo filtro polvere in lavatrice. Non
usare un asciugacapelli per asciugarlo. Asciugare solo
con aria fredda.
Non utilizzare MAI l'aspirapolvere senza il gruppo filtro polvere in
posizione.
4. Riposizionare il coperchio sul contenitore e assemblare il contenitore
al corpo motore.
11ITALIANO
6 – GUIDA ALLA RISOLUZIONE DEI PROBLEMI
PROBLEMA POSSIBILE CAUSA POSSIBILE SOLUZIONE
L’aspirapolvere non 1. batterie scariche. 1. Caricare le batterie.
funziona 2. la batteria non mantiene la 2. Sostituire il pacco batterie,
carica. ricambio art. n°: RBAT72143
3. il connettore tra l'unità e il 3. Pulire lo sporco dal
caricabatterie è sporco. connettore.
4. nessuna alimentazione nella 4. Controllare l’interruttore
presa elettrica che alimenta il generale della rete domestica
caricabatterie. 5. Inserire il caricabatterie nella
5. il caricabatterie è staccato presa di corrente.
dalla presa. 6. Sostituire il caricabatterie,
6. il caricabatterie è rotto. ricambio art. n° RCAR72143
L’aspirapolvere non 1. Il contenitore raccogli 1. Svuotare il contenitore
aspira o la Potenza polvere è pieno. raccogli polvere
aspirante diventa 2. Il filtro polvere è sporco o 2. Rimuovere il gruppo filtri
debole. deve essere sostituito. controllando l’eventuale
3. La carica della batteria è presenza di sporco, pulirlo
quasi esaurita. accuratamente o sostituirli.
3. Caricare la batteria.
Perdita di polvere 1. Il contenitore raccogli 1. Svuotare il contenitore
dall’aspirapolvere polvere è pieno. raccogli polvere
2. Il contenitore raccogli 2. Controllare la corretta
polvere non è montato installazione del contenitore.
correttamente. 3. Cambiare il filtro polvere
3. Il filtro presenta dei buchi o
è danneggiato.
La batteria non si 1. il caricabatterie è staccato 1. Inserire il caricabatterie nella
carica dalla presa. presa di corrente.
2. il caricabatterie è rotto. 2. sostituire il caricabatterie,
3. La batteria ha raggiunto la ricambio art. n° RCAR72143
fine del suo ciclo di vita 3. Sostituire il pacco batterie,
ricambio art. n°: RBAT72143
SI sente un rumore Controllare se la spazzola da Interrompere l’uso
12ITALIANO
anomalo quando pavimento e il filtro antipolvere dell’aspirapolvere; pulire il
l’aspirapolvere è in sono ostruiti da grosse polveri; gruppo filtro polvere e la
funzione controllare se il contenitore spazzola per pavimenti,
della polvere è pieno. svuotare il contenitore della
polvere. Se il problema non
scompare, chiamare il servizio
clienti
NOTA: sono disponibili come ricambio, anche la spazzola motorizzata (9), ricambio art. n°
RSPA72143, e la spazzola per la rimozione dei peli animali, ricambio art. n° RSIMB72143.
Per la disponibilità dei ricambi summenzionati, rivolgersi al proprio negoziante o al
Numero Verde 800-200899.
7 – PULIZIA E MANUTENZIONE
ATTENZIONE!
Staccare il prodotto dal caricabatteria e il caricabatteria dalla
presa di corrente prima di effettuare qualsiasi operazione di pulizia e/o
manutenzione.
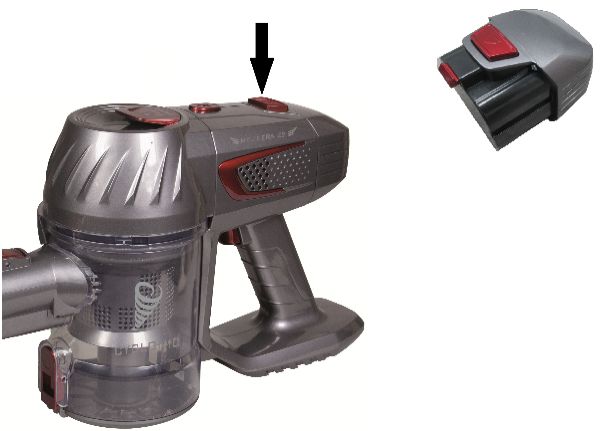
Pulizia della spazzola motorizzata (9)
Per procedere alla pulizia della spazzola motorizzata (9)
è possibile procedere come segue:
1. Scollegare la spazzola dall’aspirapolvere.
2. Capovolgere la spazzola
3. Spostare il blocco verso l’esterno.
4. Estrarre quindi la spazzola e rimuovere eventuali fili,
capelli rimasti incastrati nelle setole.
5. Riposizionare la spazzola rotante assicurandosi di
azionare il blocco.
Pulizia della mini spazzola motorizzata per rimozione peli animali, imbottiti
(15)(in dotazione solo all'articolo 72143S)
Per procedere alla pulizia della mini spazzola motorizzata (15) è
necessario procedere come segue:
13ITALIANO
1. Scollegare la spazzola dall’aspirapolvere.
2. Ruotare il blocco presente sul lato sinistro
della spazzola in senso orario, come
indicato dalla freccia.
3. Estrarre quindi la spazzola e rimuovere
eventuali fili, capelli rimasti incastrati nelle
setole.
4. Riposizionare la spazzola rotante
assicurandosi di azionare il blocco
Pulizia corpo apparecchio
• Pulire il corpo motore dell’aspirapolvere solo con un panno leggermente
umido.
• Non lavate nessun accessorio in lavastoviglie.
• Non immergete mai il corpo motore in acqua o in altri liquidi.
• Non usate prodotti chimici o abrasivi.
NOTA: la maggior parte dei guasti negli
aspirapolvere è causata da intasamenti non rilevati
nelle prolunghe, nelle teste, nei beccucci e nei filtri!
E’ quindi raccomandato di pulire frequentemente la
vostra scopa elettrica.
14ITALIANO
8 – MESSA FUORI SERVIZIO
PROTEGGI L’AMBIANTE
Questo apparecchio contiene numerosi materiali riutilizzabili o riciclabili.
Al termine del ciclo di vita,
svuotare il contenitore della
polvere, togliere il pacco batteria,
isolare la zona contatti con un
pezzo di nastro adesivo e seguire
scrupolosamente quanto indicato
nei riquadri sottostanti.
Per la rimozione del pacco batterie
(17) dall’apparecchio è sufficiente
premere il pulsante di sblocco (16)
ed estrarre il pacco tirandolo
Riciclaggio della batteria: L'apparecchio è dotato di una batteria
ricaricabile al litio 22.2V 2200mAh non riparabile. Provvedere a rimuovere il
modulo batteria dall'apparecchio prima di smaltire l'apparecchio. La batteria non
deve essere gettata nella spazzatura, ma conferita a un centro di raccolta
autorizzato in modo che possa essere riciclata secondo normativa vigente.
Per lo smaltimento attenersi alle norme in vigore nel proprio luogo di residenza.
15ITALIANO
Lange Distribution S.r.l. si riserva il diritto di apportare modifiche estetiche e/o tecniche senza
preavviso al fine di migliorare i propri prodotti.
Termozeta is an international trademark. Copyright © 1995. All rights reserved.
Lange Distribution S.r.l. - Via Treviso, 35 - 20127 Milano – Italy
16ENGLISH
SAFETY PRECAUTIONS
This manual forms an integral part of your appliance
and must be read carefully, as it provides important
instructions and warnings regarding safety and the
use and maintenance of your appliance. Keep this manual safe.
If you have any doubts, do not rely on guesswork:
contact our support centre at the Freephone Number 800-
200899
• After removing the packaging, check the integrity of the appliance.
If you have any doubts, do not use the appliance and call our support
centre at the Freephone Number 800-200899
• Do not leave parts of the packaging (plastic bags, polystyrene foam,
nails, etc.) within the reach of children or people with reduced mental
faculties, as these objects are potential sources of danger.
• Before connecting the battery charger into the electrical socket,
ensure that the operating voltage of the appliance corresponds to that
of your home. In the case of any doubt, consult a qualified
professional.
• The appliance can be used by children over 8 years of age and/or
by people with reduced physical, sensory or mental faculties, or those
who lack experience or knowledge, only under the direct supervision
of an adult who has been instructed in the safe use of the appliance
and understands the dangers involved in its use.
• Children must never play with the appliance.
• Cleaning and maintenance operations must never be carried out by
children.
• Do not use the appliance if it has been dropped or if it shows signs
of damage or defects that may affect its operation.
• In the event of breakdown and/or poor operation, turn off the
appliance. Do not tamper with the appliance or take it apart for any
reason. For repairs, if necessary, find an authorised service centre by
contacting our Freephone Number 800-200899.
• If you have any doubts, or to avoid risks, have the appliance
checked by an authorised service centre by contacting our
17ENGLISH
Freephone Number 800-200899.
• Incorrect electrical connections can be extremely dangerous. They
may cause irreversible damage and, in any case, void the warranty.
• If extension cords are used, ensure that they are intact and certified
for the intended use.
• If the battery charger is damaged, do not use it. If necessary, find
an authorised service centre by contacting our Freephone Number
800-200899.
• Never pull the cord of the battery charger to disconnect the battery
charger from the electrical socket.
• Never immerse the appliance or the power cord in water or other
liquids.
• Never use the appliance when barefoot or with wet hands or feet.
• Never leave the appliance exposed to weather conditions (sun, rain,
etc.).
• Never place the appliance directly under running water.
• Do not wash the product or its parts in the dishwasher.
• Keep the appliance away from gases and highly flammable
substances.
WARNING! LITHIUM BATTERY PACK! DO NOT
DISASSEMBLE, DO NOT TAMPER, DO NOT INCINERATE,
DO NOT CRUSH, DO NOT EXPOSE TO TEMPERATURES
EXCEEDING 60°C/140°F, DANGER OF FIRE AND/OR BURNS
AND/OR INJURIES!
• This appliance complies with the applicable European safety
regulations currently in force.
• The appliance is intended to be used exclusively for vacuuming
dust in a domestic environment.
• The appliance must only be used to clean hard, level floors with a
normal amount of dirt, short pile carpets, or accessories which are
able to bear the load of the rotary brush without sustaining damage.
18ENGLISH
ATTENTION!!!
• Do not vacuum explosive or flammable materials lit cigarettes or
ashes produced by combustion (in hearths or ovens).
• Do not use the appliance on damp or wet surfaces.
• Do not vacuum water or other liquid substances.
• Do not obstruct the air outlet slots at the side of the appliance.
• Do not vacuum sharp objects, such as shards of glass or nails.
• Do not vacuum rubble or building detritus.
• Keep the product away from hot surfaces, do not place it in contact
with sharp corners and do not run it over abrasive surfaces.
• Do not use the appliance on the body parts of people or animals.
• To prevent dangerous overheating, it is recommended that you
check that the filters and the suction pipe are not blocked.
• Do not use the appliance without any filter
• Before carrying out cleaning or maintenance on the appliance, en-
sure that it is switched off and that it is not charging.
• Be careful never to allow any body part to pass below the rotary
bush.
• Never vacuum close to cables, wires and trailing fringes. This cre-
ates a risk of damage to the cable insulation, or of such objects be-
coming caught in the rotary brush and damaging the appliance.
• In the event of commercial, inappropriate, illegal or unreasonable
use, or of a failure to respect the requirements and instructions,
LANGE DISTRIBUTION accepts no responsibility and all warranties
are voided.
19ENGLISH
KEEP THIS INSTRUCTION
MANUAL SAFE!
Important!
All assembly, disassembly and cleaning operations must be
performed when the appliance is turned off, it has cooled down and
disconnected from battery charger.
1 - BEFORE USING
• Remove packaging, stickers and any anything else used for the protection of
your appliance, and put them in a safe place out of the reach of children.
• Read this entire manual, as it contains important information on safety as well
as how to ensure that your appliance has a long and useful life.
2 – ASSEMBLING THE APLIANCE
Assembling the wall support (12)
1. Hold the wall support horizontally parallel to the wall.
2. Mark where the holes are using a pencil.
3. Drill the holes (approx. 6 mm Ø).
4. Place the threaded inserts which come with the product into the holes.
5. Mount the support to the wall using the screws supplied.
NOTE: in order to allow the vacuum cleaner to be docked correctly even when
the extensible tube (7) and the motorised brush (9) are attached, the holes
must be made at a height of at least 115 cm from the floor.
Extensible tube (7)
The package contains a rigid extensible tube, which allows you to vacuum
floors and carpets easily using the motorised brush (9), can reach even the
most difficult angles when the crevice nozzle (14) or clear your furniture and
upholstered with the 2in1 nozzle (10) or the mini motorised brush (15) are as-
sembled.
20ENGLISH
To attach the extensible tube
(7), simply insert it into the
connection point on the body
of the appliance until you
hear the “click” made when
the lock has engaged.
To remove the tube, just
press the accessory release
button (6) located on the
body of the appliance and
extract the tube.
Motorised brush (9)
The motorised brush allows you to vacuum your floors and carpets efficiently.
Moreover, the LED light on the front will help you to spot dirt in dark corners of
your house and underneath furniture.
Insert the brush, making sure to match up the electrical terminals located at
the bottom of the connector and the brush wand, until you hear the “click” that
means the locking system
has been engaged. To re-
move it, press the accessory
release button (6) if it is at-
tached directly to the body of
the appliance, or the tube re-
lease button (8) if it has been
attached to the extensible
tube.
Attention! Danger of the
appliance falling.
Once the appliance has been
fitted with the extensible tube
(7) and the brush (9), it can-
not stand in a vertical posi-
tion supported by the brush
2 in 1 Nozzle (10), crevice nozzle (14)
The nozzle attachment with brush head is effective for cleaning crevices or
narrow, hard-to-reach areas. The retractable brush will allow you to remove
dust and dirt from furniture and fabrics.
21ENGLISH
The nozzle can be used either by attaching it directly to the connection point
on the body of the appliance, or by connecting it to the end of the extensible
tube (7). The nozzle is fully inserted when you hear the “click” that means the
locking system has been engaged. To remove it, press the accessory release
button (6) if it is attached directly to the body of the appliance, or the tube
release button (8) if it has been attached to the extensible tube.
Mini electric brush (15) (provided only with article 72143S)
The mini electric brush will allow you to vacuum sofas, armchairs, mattresses
and easily remove the hair of your pets.
3 – CHARGING THE BATTERY
Before connecting the battery charger (13) to the power supply, ensure that
the voltage indicated on the rating label located at the bottom of the charger,
corresponds to that of your home mains voltage.
This appliance battery can only be recharged using the supplied battery
charger.
Attention!
Before using the appliance for the first time, charge it fully for a period of 5
hours.
Insert the cable of the battery charger into the opening (11) on the body of the
appliance.
Plug the battery charger into the electrical socket.
The battery charge indicator (4) will light up with a flashing blue colour. When
the battery charge indicator remains on without flashing, the battery is fully
charged.
Remove the battery charger from the electrical socket.
It takes approximately 5 hours for the battery to charge fully.
22ENGLISH
4 – HOW TO USE THE APPLIANCE
Ensure that the product has been assembled correctly.
Press the power-on button (1). The appliance will begin to operate at the
lowest power setting. To use the appliance at the highest power setting, just
press the button (1) again.
To switch the vacuum cleaner off, use the power button (1) again.
Battery status indicator (4)
The battery charge indicator consists of 4 lights to indicate the level of
battery charge:
4 blue lights: battery charge > 75%
3 blue lights: battery charge 50%~ 75%
2 blue lights: battery charge 25%~ 50%
1 blue light: battery charge < 25%
The battery status indicator light will begin to flash when the battery no
longer has a sufficient charge.
5 - AFTER USE
Switch the appliance off. Empty the dust bin and clean the filters which are
inside it.
It is possible to empty the dust bin quickly and
without getting your hands dirty. Hold it over the
waste bin and press the release button located at
the bottom of the dust container (5). The opening
at the bottom of the dust bin will open, allowing its
contents to be released.
To remove the dust bin (5) from the body of the appliance and clean it fully,
proceed as follows:
1. Press the release button (2) and remove the dust bin from the motor body
of the vacuum cleaner, as shown in the accompanying figure
23ENGLISH
2. Next, twist the upper lid of the dust bin in
the direction of the “unlocked” symbol,
and remove the lid. Then, remove the
dust filter group.
3. Remove the HEPA filter and plastic cyclone filter by
simply lifting them. Then wash the HEPA filter and the
plastic cyclone filter with cold water. After the HEPA filter
and the plastic cyclone filter have dried completely,
place them in the container (5). The insertion of the
cyclone filter is unique: make the three tabs in the upper
part coincide with the slots on the container (5).
Do not wash the dust filter assembly in the washing
machine. Do not use a hairdryer to dry it. Dry with cold
air only.
NEVER use the vacuum cleaner unless the dust filter group is in
place.
4. Put the lid back onto the dust bin and attach the dust bin to the motor
body.
24ENGLISH
6 – TROUBLESHOOTING GUIDE
PROBLEM POSSIBLE CAUSE POSSIBLE SOLUTION
The vacuum 1. dead batteries. 1. Charge the battery.
cleaner is not 2. the battery does not keep 2. Replace the battery pack,
working the charge. spare part art. no. RBAT72143
3. the connector between the 3. Clean the dirt off the
unit and the charger is dirty. connector.
4. no power in the electrical 4. Check the home mains circuit
outlet that powers the charger. breaker
5. the charger is disconnected 5. Plug the charger into the
from the mains socket. power socket.
6. the charger is broken. 6. replace the battery charger,
spare part art. no. RCAR72143
There is no suction 1. The dust bin is full. 1. Empty the dust bin.
or weak suction 2. The dust filter is dirty or 2. Remove the filter group,
from the vacuum must be replaced. check for any dirt, and clean it
cleaner. 3. The battery is almost dead. thoroughly or replace it.
3. Charge the battery.
Dust is being 1. The dust bin is full. 1. Empty the dust bin.
emitted from the 2. The dust bin is not 2. Check that the dust bin has
vacuum cleaner assembled correctly. been attached correctly.
3. There are holes in the filter 3. Change the dust filter
or it has been damaged.
The battery will not 1. the charger is disconnected 1. Plug the charger into the
charge from the socket. mains socket.
2. the charger is broken. 2. replace the battery charger,
3. The battery has reached the spare part art. no. RCAR72143
end of its life 3. Replace the battery pack,
spare part art. no. RBAT72143
An abnormal noise Check whether the floor brush Stop using the vacuum cleaner,
can be heard when or the dust filter are obstructed clean the dust filter group and
the vacuum cleaner by large bodies of dust, or the floor brush, empty the dust
is in use whether the dust bin is full. bin. If the problem persists, call
customer services
NOTE: also the following spare parts are available: the motorized brush (9), spare part art.
no. RSPA72143, and the brush for removing animal hair, spare part art. no. RSIMB72143.
For availability and purchase of the aforementioned spare parts, contact your dealer or dial
the toll-free number 800-200899.
25ENGLISH
7 - CLEANING AND MAINTENANCE
ATTENTION!
Unplug the product from the battery charger and the electrical
socket before carrying out any cleaning and/or maintenance operations.
Cleaning the motorised brush (9)
The motorised brush (9) can be cleaned as follows:
1. Detach the brush from the vacuum cleaner.
2. Turn the brush upside-down
3. Move the locking lever outwards.
4. Next, take the brush out and remove any threads or
hairs which have become caught in the bristles.
5. Put the rotary brush back in its place, making sure to
engage the locking mechanism.
Cleaning the mini motorised brush (15) (provided only with article 72143S)
To clean to mini motorised brush (15) it is necessary to proceed as follows:
1. Disconnect the brush from the vacuum
cleaner.
2. Turn the lock on the left side of the brush
clockwise, as indicated by the arrow.
3. Then pull out the brush and remove any
strands, hair that has become stuck in the
bristles.
4. Reposition the rotating brush making sure
to activate the lock.
26ENGLISH
Cleaning the body of the appliance
• Only clean the motor body of the vacuum cleaner with a slightly damp
cloth.
• Do not wash any of the accessories in the dishwasher.
• Never immerse the motor body in water or other liquids.
• Do not use chemical or abrasive products.
NOTE: The most frequent faults in vacuum cleaners
are caused by obstructions not detected in
extensions, heads, crevices and filters! It is therefore
recommended to clean your electric broom
frequently.
8 – APPLIANCE DISPOSAL
PROTECT THE ENVIRONMENT!
This appliance contains many reusable or recyclable materials.
At the end of its life cycle, empty the dust container, remove the battery
pack, isolate the contact
area with a piece of adhesive tape
and carefully follow what is
indicated below.
In order to remove the battery pack
(17) from the appliance, simply
press the release button (16) and
pull the battery pack out.
27ENGLISH
Battery recycling: The appliance is equipped with a non-repairable
22.2V 2200mAh lithium battery. Please remove the battery module from the
appliance before disposal. The battery must not be thrown in the trash, but given
to an authorized collection center so that it can be recycled according to current
regulations in force.
For disposal, follow the regulations in force in your place of residence.
Lange Distribution S.r.l. reserves the right to introduce technical and/or aesthetic changes to its
products intended to improve performances.
Termozeta is an international trademark. Copyright © 1995. All rights reserved.
Lange Distribution S.r.l. - Via Treviso, 35 - 20127 Milano – Italy
2829
Puoi anche leggere