IT. Istruzioni per l'uso EN. Instruction for use - Tippy
←
→
Trascrizione del contenuto della pagina
Se il tuo browser non visualizza correttamente la pagina, ti preghiamo di leggere il contenuto della pagina quaggiù

IT. Istruzioni per l’uso
EN. Instruction for use
ITALIANO - Istruzioni per l’uso. . . . . . . . . 4

1. Informazioni sul prodotto. . . . . . . . . . . . . . . . . . . . . . . . 4

1.1. Avvertenze generali.. . . . . . . . . . . . . . . . . . . . . . . . . . . . . . . . . . . . 4

1.2. Contenuto confezione................ . . . . . . . . . . . . . . . . . 4

1.3. Caratteristiche tecniche.......... . . . . . . . . . . . . . . . . . . . . . 4

1.4. Dichiarazione di conformità....... . . . . . . . . . . . . . . . . . . . 6

1.5. Garanzia.............. ... . . . . . . . . . . . . . . . . . . . . . . . . . . . . . . . . . . .7

2. Installazione del Tippy sul seggiolino. . . . . . 7

3. Funzioni fornite dall’App mobile. . . . . . . . . . . . . 9

3.1. Download applicazione Android / iOS. . . . . . . . . . . . 9

3.2. Procedura di registrazione al servizio.. . . . . . . . . . . . 9

3.3. Associazione del Tippy allo smarthphone.... . .10

3.4. Impostazioni...... ... . . . . . . . . . . . . . . . . . . . . . . . . . . . . . . . . . . .14

4. Manutenzione del prodotto....... . . . . . . . . . . . . . 15

5. Assistenza....................................... . . . . . . . . . . . . . 15

2
ENGLISH – Instruction for use. . . . . . . . . 16

1. About the product.. . . . . . . . . . . . . . .. . . . . . . . . . . . . . . . . . . 16

1.1. General warnings..... . . . . . . . . . . . . . . . . . . . . . . . . . . . . . . . . . .16

1.2. Contents of packaging. . .. . . . . . . . .. . . . . . . . . . . . . . . . . . . .16

1.3. Technical specifications.. . . . . . .. . . . . . . . . . . . . . . . . . . . . 16

1.4. Declaration of compliance. .. . . . . . . . . . . . . . . . . . . . . . . . .18

1.5. Warranty................ . . . . . . . . . . . . . . . . . . . . . . . . . . . . . . . . . .18

2. Installation of Tippy on child seat. . . . . . . . . . . 19

3. Functions of mobile application. . . . . . . . . . . . . 20

3.1. Download Android/iOS application. . . . . . . . . . . . . . 20

3.2. Sign up procedure.. . . . . . . . . . . . . . . . . . . . . . . . . . . . . . . . . . . 20

3.3. Connecting Tippy to the smartphone. . . . . . . . . . . 21

3.4. Settings................. . . . . . . . . . . . . . . . . . . . . . . . . . . . . . . . . . 25

4. Product maintenance................... . . . . . . . . . . . . 26

5. Customer Service................... . . . . . . . . . . . . . . . . . . 26

                                                                                                 3
ITALIANO -                              1.1. Avvertenze generali
Istruzioni per                          1. Gli elementi dell’imballaggio
l’uso                                   (sacchetti in plastica, scatole di
                                        cartone, ecc.) non devono esse-
                                        re lasciati alla portata dei bam-
                                        bini in quanto potenziali fonti di
1. Informazioni sul                     pericolo;
prodotto
                                        2. Prima di utilizzare l’apparec-
Tippy è un dispositivo in grado         chio verificare che il prodotto
di supportare l’attività di controllo   e tutti i suoi componenti non si
dei genitori/tutori su bambini di       presentino danneggiati. In caso
età inferiore ai 12 anni e di altez-    contrario non utilizzare l’appa-
za inferiore ai 150 cm.                 recchio ma rivolgersi a personale
Tippy viene poggiato sul seg-           qualificato o al rivenditore;
giolino in auto e riesce a rileva-
re la presenza del bambino su           3. Per evitare il rischio di surri-
di esso. Grazie all’applicazione        scaldamento, tenere Tippy lonta-
disponibile su App Store e Play         no da fonti di calore, come per
Store, il genitore viene avvertito      esempio caloriferi, stufe, fornelli,
tramite una notifica di allarme nel     ecc.;
caso in cui si allontani dall’auto
lasciando il bambino seduto sul         4. Non porre in corto circuito i
seggiolino. Inoltre, nel caso in        morsetti di alimentazione.
cui il genitore non intervenga,
viene inoltrato un SMS di allar-        1.2. Contenuto
me ad una lista predefinita di          confezione
contatti contenente la posizione
dell’auto.                              1. Una Unità Tippy;
Tippy è stato progettato come           2. Un manuale d’istruzioni.
un dispositivo di supporto alla
supervisione dei genitori e, in         1.3. Caratteristiche
quanto tale, non la sostituisce.        tecniche

4                                 Tippy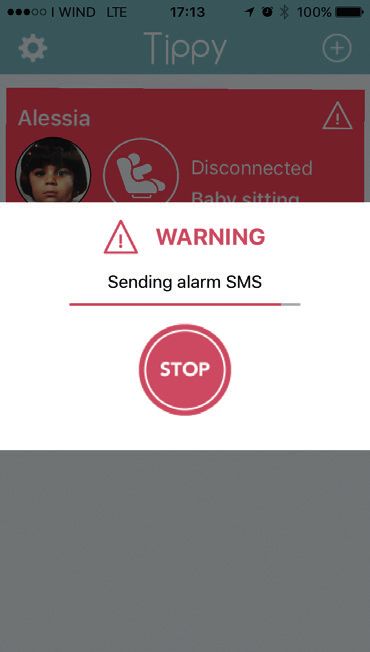
1. Requisiti di sistema per siste-                 QUESTO PRODOTTO
mi operativi Android: compatibi-                    È CONFORME ALLA
lità con sistema operativo 5.0 e               DIRETTIVA EU 2012/19/CE.
successivi;
                                        Il simbolo del cestino barrato ri-
2. Requisiti di sistema per siste-      portato sull’apparecchio indica
mi operativi iOs: compatibilità         che il prodotto, alla fine della
con sistema operativo 10.0 e            propria vita utile, dovendo es-
successivi;                             sere trattato separatamente dai
                                        rifiuti domestici, deve essere
Si consiglia comunque di veri-          conferito in un centro di raccolta
ficare preventivamente la com-          differenziata per apparecchiatu-
patibilità del dispositivo utilizzato   re elettriche ed elettroniche op-
con la versione dell’App dispo-         pure riconsegnato al rivenditore
nibile.                                 al momento dell’acquisto di una
                                        nuova apparecchiatura equiva-
3. Tecnologia di Comunicazione:         lente.
Bluetooth® Low Energy;                  L’utente è responsabile del con-
                                        ferimento dell’apparecchio a fine
4. Banda di frequenza:                  vita alle appropriate strutture di
2.4 - 2.485GHz;                         raccolta. L’adeguata raccolta
                                        differenziata per l’avvio succes-
5. Potenza di trasmissione:             sivo dell’apparecchio dismesso
2.51 mW;                                al riciclaggio, al trattamento e
                                        allo smaltimento ecologicamen-
6. Alimentazione: batteria CR           te compatibile contribuisce ad
2430 non sostituibile;                  evitare possibili effetti negativi
                                        sull’ambiente e sulla salute e fa-
7. Temperatura di funzionamen-          vorisce il riciclo dei materiali di
to: -20°C +60°C.                        cui è composto il prodotto.
                                        Lo smaltimento abusivo del pro-
                                        dotto da parte dell’utente com-
                                        porta delle sanzioni amministra-
                                        tive di cui al D.Lgs. n. 22/1997

                                 Italiano                                 5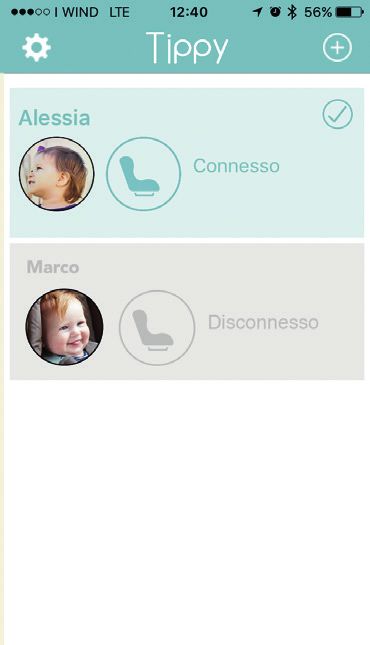
(art.50 e seguenti del D.Lgs          za contenuta nella pila, Hg =
22/97).                               Mercurio, Cd = Cadmio, Pb =
Per informazioni più dettaglia-       Piombo.
te inerenti i sistemi di raccolta     L’utente è responsabile del con-
disponibili, rivolgersi al servizio   ferimento delle pile a fine vita alle
locale di smaltimento rifiuti, o al   appropriate strutture di raccolta
negozio in cui è stato effettuato     al fine di agevolare il trattamento
l’acquisto.                           e il riciclaggio.
                                      L’adeguata raccolta differenzia-
                                      ta per l’avvio successivo delle
                                      pile esauste al riciclaggio, al
                                      trattamento e allo smaltimento
                                      ecologicamente         compatibile
CONFORMITA’ ALLA DIRETTIVA            contribuisce ad evitare possibili
EU 2006/66/CE E SUCCESSIVE            effetti negativi sull’ambiente e
MODIFICHE.                            sulla salute umana e favorisce il
                                      riciclo delle sostanze di cui sono
Il simbolo del cestino barrato        composte le pile.
riportato sulle pile o sulla con-     Lo smaltimento abusivo del pro-
fezione del prodotto, indica che      dotto da parte dell’utente com-
le stesse, alla fine della propria    porta danni all’ambiente e alla
vita utile, dovendo essere trattate   salute umana.
separatamente dai rifiuti dome-       Per informazioni più dettaglia-
stici, non devono essere smaltite     te inerenti i sistemi di raccolta
come rifiuto urbano, ma devono        disponibili, rivolgersi al servizio
essere conferite in un centro di      locale di smaltimento rifiuti, o al
raccolta differenziata oppure         negozio in cui è stato effettuato
riconsegnate al rivenditore al        l’acquisto.
momento dell’acquisto di pile ri-
caricabili e non ricaricabili nuove   1.4. Dichiarazione di
equivalenti.                          conformità
L’eventuale simbolo chimico Hg,
Cd, Pb, posto sotto al cestino        Con la presente Digicom di-
barrato indica il tipo di sostan-     chiara che Tippy è conforme ai

6                                Tippy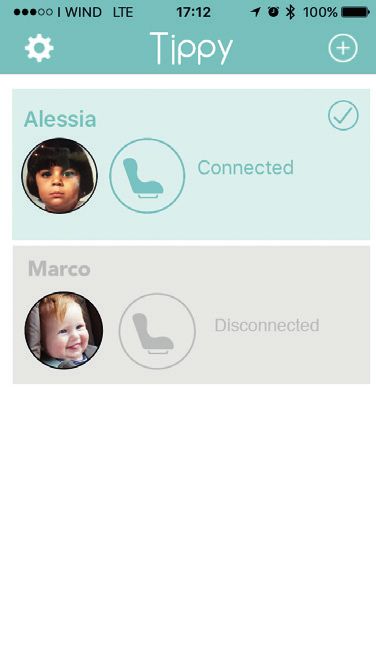
requisiti essenziali ed alle altre    quanto previsto dalle istruzioni
disposizioni pertinenti stabilite     d’uso. La garanzia non sarà ap-
dalla direttiva 2014/53/UE.           plicata, dunque, in caso di danni
Copia della dichiarazione di con-     derivanti da un uso improprio,
formità completa è consultabile       usura o eventi accidentali.
all’indirizzo: www.tippyonboard.      Per la durata della garanzia sui
com.                                  difetti di conformità si rinvia alle
In accordo alla decisione             specifiche previsioni delle nor-
della Commissione Europea             mative nazionali applicabili nel-
N°2000/299/CE del 06/04/2000          paese d’acquisto, dove previste.
la banda di frequenza utilizzata
da questo prodotto è armoniz-
zata in tutti i Paesi EU pertanto     2. Installazione del
questo è un prodotto di clas-         Tippy sul seggiolino
se 1 e può essere liberamente
utilizzato in tutti i Paesi della     1. Installa il Tippy sul seggiolino
Comunità Europea. Digicom si          (come mostrato nella Figura 1)
riserva il diritto di modificare in   facendo passare l’ancoraggio
qualsiasi momento e senza pre-        della cintura di sicurezza (mo-
avviso quanto descritto nel pre-      strato con un cerchio rosso) at-
sente manuale di istruzioni. La       traverso la fessura orizzontale
riproduzione, la trasmissione, la     del Tippy (mostrato nella Figura
trascrizione nonché la traduzio-      2 con un cerchio verde).
ne in altra lingua anche parziale
in qualsiasi forma di questo ma-
nuale sono assolutamente vieta-
te senza la previa autorizzazione
scritta da parte di Digicom.

1.5. Garanzia

Il prodotto è garantito contro ogni
difetto di conformità in normali
condizioni di utilizzo secondo

                               Italiano                                 7
Fase 1.

Figura 1. Corretta installazione
del Tippy sul seggiolino.

Figura 2. Fessura orizzontale del      Fase 2.
Tippy.

8                              Tippy
3. Funzioni fornite
dall’App mobile
3.1. Download
applicazione Android/
/iOS.
1. Scarica l’applicazione “Tippy”
tramite App Store o Play Store.
3.2. Procedura di regi-
strazione al servizio
Fase 3.
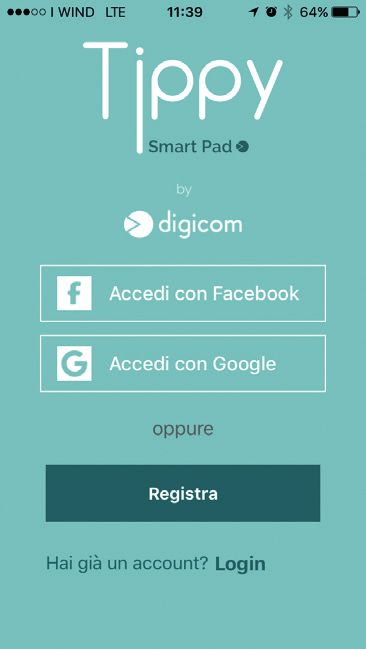
2. Registrarsi al servizio cliccan-
do su “Registrati” oppure effet-
tuando il login tramite un account
Facebook o Google (Figura 3).
Fase 4.
Italiano 9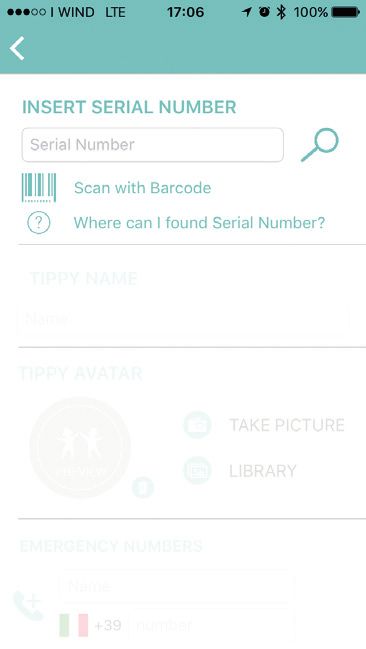
non è attivo l’applicazione richie-
                                     de di attivarlo. Per associare il
                                     Tippy allo smartphone cliccare
                                     sul simbolo .

             Smart Pad

               by                                 Smart Pad

                                                     by

Figura 3. Registrazione al ser-
vizio.

3.3. Associazione del
Tippy allo smartphone                Figura 4. Schermata iniziale.

3. All’apertura l’applicazione mo-
stra la schermata iniziale (Figura   4. A seguito del click sul simbolo
4). Se il Bluetooth del telefono         verrà mostrata la schermata

10                              Tippy
di associazione (Figura 5). giolino”), schiacciare la parte
centrale del Tippy (Figura 6) e
avvicinarsi ad esso con lo smar-
tphone.
Smart Pad
by
Figura 6. Parte centrale del
Tippy.
5. Dopo aver schiacciato la par-
te centrale del Tippy, inserire
il Serial Number digitandolo o
Figura 5. Schermata di associa- usando il lettore bar-code e clic-
zione. care sul simbolo . Puoi trova-
re il bar-code alla fine di questo
manuale oppure all’interno del
Dopo aver installato corretta- Tippy aprendo la zip.
mente il Tippy sul seggiolino
(come mostrato nel Paragrafo 6. Una volta associato il disposi-
“Installazione del Tippy sul seg- tivo allo smartphone procedere
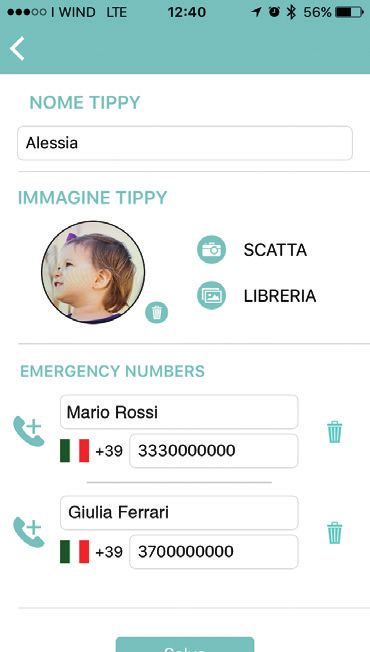
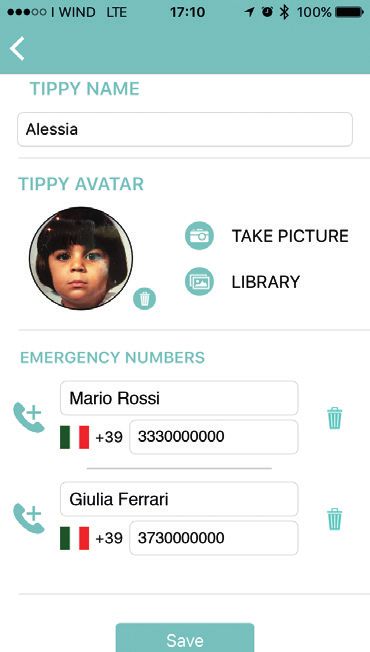
Italiano 11inserendo il nome del bambino zione - Inserimento dei dati profi-
che occupa il seggiolino e i nu- lo e dei numeri d’emergenza.
meri di emergenza a cui viene
inoltrato l’SMS di emergenza 7. Salvare i dati cliccando su
(Figura 7). E’ necessario inserire “Salva”.
un minimo di 1 e un massimo di 2
numeri di emergenza. 8. A ciascuno smartphone pos-
sono essere associati al massi-
mo tre Tippy.
9. Nella Figura 8 viene mostrata
la schermata iniziale dell’appli-
cazione dopo l’associazione di
due Tippy.
Smart Pad
by
Figura 7. Schermata di associa-
12 Tippyallontana dal Tippy ed il bambino
non è seduto su di esso.
2) “Connesso”: il genitore si
avvicina al Tippy ed il bambino
non è seduto su di esso.
Es. Il genitore si trova in macchi-
na vicino al seggiolino che però
non risulta essere occupato dal
bambino.
3) “Connesso con bambino
Smart Pad
seduto”: il genitore è vicino al
Tippy ed il bambino è seduto su
di esso.
Es. Il genitore si trova in macchi-
by na vicino al seggiolino che risulta
essere occupato dal bambino.
4) “Disconnesso con bambi-
no seduto”: il genitore si trova
lontano dal Tippy e il bambino è
seduto su di esso.
Es. il genitore si è allontanato
dalla macchina lasciando il bam-
Figura 8. Schermata iniziale bino in macchina seduto sul seg-
dopo l’associazione di due Tippy giolino.
associati.
Una volta che il Tippy entra nello
stato “Disconnesso con bambi-
Ogni Tippy può assumere quat- no seduto” viene riprodotto un
tro stati: suono di allarme e parte un con-
to alla rovescia della durata di 1
1) “Disconnesso”: il genitore si minuto. Durante questo lasso di
Italiano 13tempo l’utente ha la possibilità di gono attivi anche quando le ap-
silenziare l’allarme e inibire l’invio plicazioni si trovano in stato di
dell’SMS (Figura 9). background.
3.4. Impostazioni
Cliccare sul simbolo nella
schermata iniziale (Figura 10)
per accedere alle impostazioni
dell’applicazione.
Smart Pad
by
Smart Pad
by
Figura 9. Schermata di allarme.
La generazione del messaggio
di allarme e conseguente invio
dell’SMS di emergenza riman-
14 TippyFigura 10. Schermata delle im- 4. Manutenzione del
postazioni.
prodotto
In questa sezione è possibile:
Il rivestimento esterno è sfo-
- Modificare il suono delle notifi- derabile e lavabile secondo le
che (cliccare su “Notifiche”); istruzioni indicate sull’etichetta
interna.
- Leggere i termini e le condizioni
d’uso (cliccare su “Termini e con- Seguire attentamente le istruzioni
dizioni”); per evitare danneggiamenti:
- Visualizzare una guida interatti- 1. Aprire la zip ed estrarre l’inter-
va all’uso del Tippy (cliccare su no avendo cura di conservarlo,
“Aiuto”). quando privo di rivestimento, in
luogo asciutto e pulito.
- Per uscire definitivamente
dall’applicazione cliccare su 2.Inserire nuovamente l’interno
“Logout”. Nel momento in cui dopo il lavaggio, posizionando
l’utente clicca su “Logout” l’ap- il sensore di peso rivolto verso il
plicazione smetterà di funzionare lato del rivestimento con la scritta
e non sarà possibile rilevare la Tippy.
presenza del bambino sul seg-
giolino. Rientra nell’applicazione 3. Non manomettere né smontare
se vuoi utilizzare correttamente l’interno, non rimuovere il senso-
Tippy. re di peso.
5. Assistenza
Per informazioni ed assistenza
scrivere all’indirizzo:
customerservice@digicom.it
Italiano 15ENGLISH – of children as these can be ha-
zardous;
Instruction for
use 2. Before using the device, make
sure that no products or compo-
nents are damaged. If it is dama-
ged, do not use the product and
1. About the contact a qualified technician or
your dealer;
product
3. To prevent the risk of overhe-
Tippy is a device which supports
ating, keep Tippy away from
parents to control their children
sources of heat, such as heaters,
with age lower than 12 years old
stoves, cookers, etc.
and height lower than 150 cm.
Tippy is placed on the child seat
4. Do not short-circuit the power
and it can detect the presence of
terminals.
the child on it. The parent is infor-
med when the child is leaved in
1.2. Contents of
the child seat thanks to the ap-
packaging
plication available on App Store
and Play Store.
1. Tippy;
Moreover, an alarm message
2. User manual.
containing the GPS position of
the car is sent to a list of telepho-
1.3. Technical
ne numbers.
specifications
Tippy is designed to support but
not to replace the monitoring of
1. Android: compatibility with OS
parents.
5.0 and higher;
1.1. General warnings
2. iOS: compatibility with OS 10.0
and higher.
1. Do not leave any packaging
materials (plastic bags, cardbo-
We recommend checking in ad-
ard boxes, etc.) within the reach
16 Tippyvance the compatibility of your another similar appliance. The
device with the current version user is responsible for taking
of the App. the appliance to a special wa-
ste disposal site at the end of its
3. Communication Technology: life. If the disused appliance is
Bluetooth Low Energy; collected correctly as separate
waste, it can be recycled, trea-
4. Frequency band: 2.4 - 2.485 ted and disposed of ecological-
GHz; ly; this avoids a negative impact
on both the environment and
5. Transmission power: 2.51 mW; health, and contributes towards
the recycling of the product’s
6. Power: non-rechargeable 3V materials.
CR2430 battery; For further information regar-
ding the waste disposal services
7. Operating temperature: -20 °C available, contact your local wa-
+60 °C. ste disposal agency or the shop
where you bought the appliance.
CONFORMITY WITH EU
DIRECTIVE 2006/66/EC AS
THIS PRODUCT AMENDED.
COMPLIES WITH EU
DIRECTIVE 2012/19/EC. The crossed bin symbol on the
battery or its packaging, means
The crossed bin symbol on the that the batteries, at the end of
appliance indicates that the pro- their life, should be disposed of
duct, at the end of its life, must separately from the municipal
be disposed of separately from waste stream via designated
domestic waste, either by taking collection facilities appointed by
it to a separate waste disposal the government or the local au-
site for electric and electronic thorities, or otherwise returned
appliances or by returning it to the dealer when purchasing
to your dealer when you buy new equivalent rechargeable
English 17or non-rechargeable batteries. by directive 2014/53/UE. A copy
Chemical symbols (Hg for mer- of the complete Declaration of
cury, Cd for cadmium, Pb for Compliance can be consulted at:
lead) printed beneath the cros- www.tippyonboard.com.
sed-out wheeled bin symbol In accordance with the
indicate the type of substance European Commission
contained in the battery. Decision N°2000/299/EC dated
The user is responsible for taking 06/04/2000, the frequency band
the batteries to special waste di- used by this product has been
sposal sites at the end of their life harmonized for all EU Countries
to allow for their processing and and therefore this is a Class 1
recycling. 1588 20 The correct product which can be used in all
disposal of your old toy will help European Community Countries.
prevent potential negative con-
sequences for the environment Digicom reserves the right to
and human health and favour change information provided in
the recycling of the materials this manual at any time and wi-
of which the product is made. thout notice.
Improper disposal of the pro- The reproduction, transmission,
duct by the user may harm the transcription or translation into
environment and human health. another language, of any part
For further information regarding and in any form of this manual
the waste disposal services avai- is strictly prohibited without prior
lable, contact your local waste written consent from Digicom.
disposal agency or the shop
where you bought the appliance. 1.5. Warranty
1.4. Declaration of The product is guaranteed
compliance against any conformity defect in
normal conditions of use as pro-
Digicom hereby declares that vided by the instructions for use.
Tippy is in conformity with the The warranty shall not therefore
essential requirements and the apply in the case of damages
related dispositions established caused by improper use, wear or
18 Tippyaccidental events. Picture 1. Correct installation of
For the duration of warranty on Tippy on child seat.
conformity defects please re-
fer to the specific provisions of
national laws applicable in the
country of purchase, where pro-
vided.
2. Installation of
Tippy on child seat
1. 1. Install Tippy on child seat
(as shown in Picture 1) and let
the anchoring of safety belt (red
circle) pass through the horizon-
tal split (green circle in Picture 2). Picture 2. Horizontal split of
Tippy.
Step 1.
English 19Step 2. Step 4.
3. Functions of
mobile application
3.1. Download Android/
iOS application
1. Download the application
“Tippy” using App Store or Play
Store.
3.2. Sign up procedure
2. Sign up clicking on “Sign up”
or signing in using a Facebook or
Step 3. Google account (Picture 3).
20 Tippyoff, the application will require to
turn it on. Click on the symbol
to connect your Tippy to the
smartphone.
Smart Pad
Smart Pad
by
by
Picture 3. Registration procedu-
re.
3.3. Connecting Tippy
to the smartphone Picture 4. Main screen.
3. Once logged in, the applica- 4. The connection screen is
tion will show its main screen shown when the symbol 4. is
(Picture 4). If Bluetooth is turned clicked (Figure 5).
English 21Smart Pad
Picture 6. Central part of Tippy.
by
5. Insert Serial Number by
directly typing it or using the
bar-code and click on the sym-
bol . Remember to press the
central part of your Tippy. You
can find the barcode inside your
Figure 5. Connection screen. Tippy or in the final part of this
manual.
Push on the central part of Tippy 6. After Tippy is correctly con-
(Picture 6) and put to it close the nected to the smartphone, add
phone. the name of your child and the
telephone numbers used to
send SMS in case of emergency
(Picture 7). You must provide a
minimum of one and a maximum
22 Tippyof two emergency telephone
numbers. 8. Each smartphone can support
a maximum of three Tippies.
9. An example of main screen
after connection of Tippy to a
smartphone is shown in Picture
8.
Smart Pad
by
Smart Pad
by
Picture 7. Connection screen
– Addition of profile data and
emergency telephone numbers.
7. Save data clicking on “Save”. Picture 8. Main screen after the
English 23connection of two Tippies. alarm and avoid sending emer-
gency SMS to the provided tele-
phone numbers (Picture 9).
Each Tippy supports four status:
1. “Disconnected”: the parent is
far away from Tippy and the child
is not sitting on it.
2. “Connected”: the parent is
near the Tippy and the child is
not sitting on it.
3) “Connected, Child sitting”:
the parent is near Tippy and the
child is sitting on it.
Example: The parent is inside the Smart Pad
car near the child seat where the
child is sitting.
4) “Disconnected, Child sit-
by
ting”: the parent is far away from
Tippy and the child is sitting on
it.
Example: The parent is moving
away from the car leaving the
child sitting on the child seat.
When Tippy assumes the
“Disconnected, Child sitting” Picture 9. Alarm screen.
status, an alarm sound is repro-
duced and a countdown lasting
one minute starts. During this For both Android and iOS platfor-
minute the user can turn off the ms, the generation of alert SMS
24 Tippyand alarm sound are triggered Figure 10. Settings.
even if the application is in back-
ground state. In this section it is possible to:
- Change the notification sound
3.4. Settings (click on “Notifications”);
Click on the symbol in the - Read the terms and conditions
main screen (Figure 10) to chan- for the use (Click on “Terms and
ge the application settings. Conditions”);
- Follow a tutorial that explains
how to use Tippy (click on
“Help”).
- Click on “Logout” to definitively
exit the application . When the
user click on “Logout”, the appli-
cation doesn’t work and it is not
possible anymore to detect the
presence of the child.
Open again the application to
correctly use Tippy.
Smart Pad
by
English 254. Product maintenance The outer cover is removable and washable according to the instructions on the inner label. Follow the instructions carefully to avoid damages: 1. Open the zip and pull out the inside part, taking care to keep it, when not covered, in a dry and clean place. 2.Reinsert the interior part after washing, positioning the weight sensor facing the side of the liner with the Tippy letter. 3. Do not tamper or dismantle the interior part, do not remove the weight sensor. 5. Customer Service For informations and assistance, contact the address: customerservice@digicom.it
Costruttore - Manufacturer
                      DIGICOM Srl
                 Viale Luigi Cadorna, 95
                20025 Legnano (MI), Italy
     28                   Tippy
750401260001
Puoi anche leggere