A broad selection of canopy solutions. Tested and certified. Molte nuove soluzioni per proteggere il tuo ingresso. Testate e certificate - Inox ...
←
→
Trascrizione del contenuto della pagina
Se il tuo browser non visualizza correttamente la pagina, ti preghiamo di leggere il contenuto della pagina quaggiù

CAN OP IES
                                                                              PEN SIL IN E

                                                                      A broad selection of canopy solutions.
                                                                                       Tested and certified.

                                              Molte nuove soluzioni per proteggere il tuo ingresso.
                                                                              Testate e certificate.

www.iamdesign.com   RIPRODUZIONE VIETATA			         REPRODUCTION PROHIBITED                                    3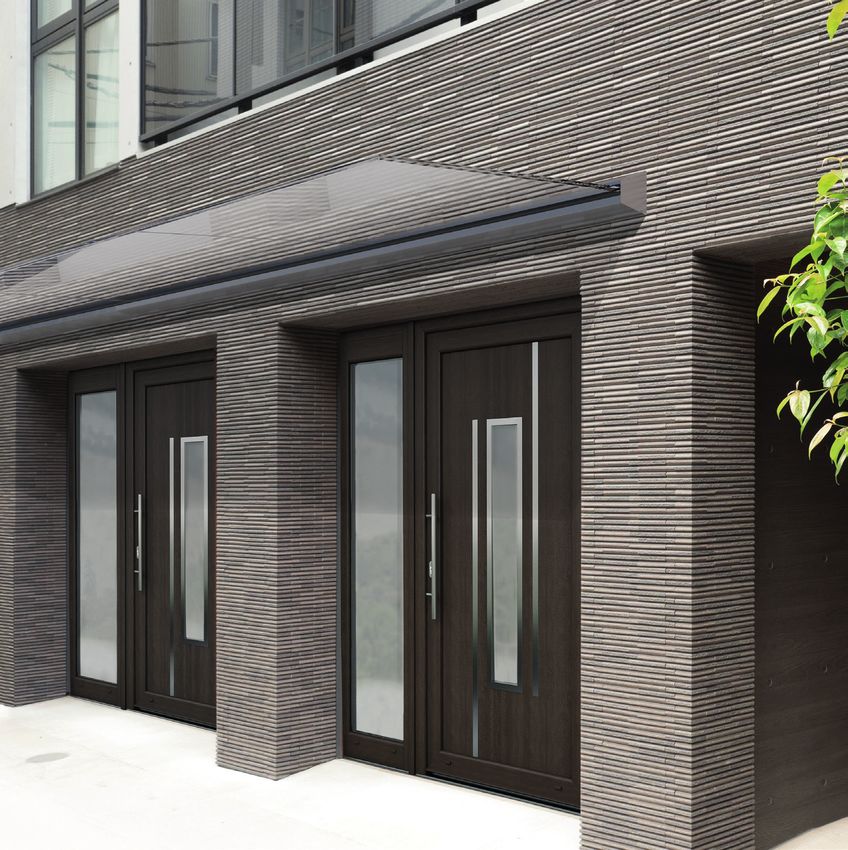
SMARTGLASS
                                                                                                The new SMARTGLASS canopy signed by IAM Design is an
                                                                                                elegant and discreet product, thanks to the invisible fixing to be
                                                                                                carried out in the lower part of the structure through the use of
                                                                                                flat supports and screws.

                                                                                                La nuova pensilina SMARTGLASS di IAM Design è un prodotto
                                                                                                elegante e discreto, grazie al fissaggio invisibile da effettuare
                                                                                                nella parte inferiore del manufatto attraverso l’utilizzo di
                                                                                                supporti piatti e viti.

Compared to the classic canopies, it does           All the fixing operation of this canopy is made                     The Alignment of the SMARTGLASS canopy is
not provide tie rods and for this reason the        only by operating from the lower part, so the                       easy thanks to the alignment brackets that
design is much more minimal and suitable for        use of ladders and scaffolding is very limited                      allows to put everything at the level before
contemporary architecture.                          compared to the canopy systems currently on                         installing the glass support jaws.
                                                    the market.
Rispetto alle pensiline classiche non prevede                                                                           La messa a livella della pensilina SMARTGLASS
tiranti di sostegno e per questo motivo il design   Tutto il fissaggio della pensilina è effettuato                     è facilitata grazie alle staffe di allineamento
è molto più minimale e adatto ad architetture       solo operando dalla parte inferiore, quindi                         che permetto di mettere tutto a livella prima di
contemporanee.                                      l’utilizzo di scale e ponteggi è di molto limitato                  installare le ganasce di sostegno vetro.
                                                    rispetto ai sistemi pensilina attualmente in
                                                    commercio.

                                                                           SAFETY PIN
                                                                           SPINA DI SICUREZZA
                                                                        345 mm

                                                                           SAFETY PIN
                                                                           SPINA DI SICUREZZA

The fixing of the glass not continue with the          The number of holes in the glass is minimally
support jaws, reduces the weight of the product        reduced, in fact only two holes are provided for                          Cutting and painting at will are
and makes it fast to handle.                           each glass to accommodate the safety pin.                                 available on request
                                                                                                                                 Taglio e verniciatura a piacere sono
Il fissaggio del vetro non continuo con le             Il numero dei fori nel vetro è ridotto al minimo,                         disponibili su richiesta
ganasce di sostegno, riduce il peso del                infatti sono previsti solo 2 fori per ogni vetro per
manufatto e lo rende veloce da maneggiare.             far alloggiare la spina di sicurezza.

    4                                               RIPRODUZIONE VIETATA			                        REPRODUCTION PROHIBITED                                     www.iamdesign.com
• SMARTGLASS CANOPY - PENSILINA SMARTGLASS
SMARTGLASS canopies are a complete kit and do not require any additional
component (exept for the wall tiles)
Le pensiline SMARTGLASS sono complete e non necessitano di accessori extra.
COMPONENTS INCLUDED IN THE KIT
• Structural clamps
• Cover profiles for upper and lower closing
• Alignment and levelling profile
• Glass fixing components
• 4 safety pin (E95900) - 6 safety kit (E95910)
• Closing gaskets
Glass not included • 2 end caps
Vetro non incluso NEW
COMPONENTI COMPRESI NEL KIT
Glass thickness Length • Ganasce strutturali
ALUMINIUM Spessore vetro Lunghezza • Profili carter di chiusura superiore ed inferiore
16,76 - 17,52 - 20,76 • Profilo di allineamento e messa in bolla
E95900 2000 mm • Elementi per il fissaggio vetro
21,52 - 24,76 - 25,52 mm
• 4 spine di sicurezza (E95900) - 6 spine di sicurezza (E95910)
16,76 - 17,52 - 20,76
E95910 3000 mm • Guarnizioni di chiusura
21,52 - 24,76 - 25,52 mm
• 2 tappi terminali
LOOSE COMPONENTS - COMPONENTISTICA SFUSA
Ø 45
Ø 14
B
42
L
A
Glass fixing pad Safety pin End cap
NEW NEW NEW
Fissaggio vetro a pressione e regolabile Spina di sicurezza Tappo di chiusura
Glass thick. Length Dimensions
AISI304 Spess. vetro
ALUMINIUM Lunghezza
L ALUMINIUM Dimensioni
AxB
E95820 16,76 - 25,52 mm E95780 56 mm E95750 142 x 160 mm
SMARTGLASS CANOPY INSTALLATION - INSTALLAZIONE PENSILINA SMARTGLASS
1 2 3 4 5 click 6
Drill holes in the wall and secure Mount the upper modules by connecting Fasten the units with the appropriate Secure the upper cover with CLICK sound means a correct insert the gskets on walland glass sides
the lower support brackets. them to the bracket; maximum dowels. one rotation on the indicated pin. installation. of the canopy.
Forare la parete e fissare la staffa horizontal movement allowed. Fissare i moduli con gli appositi tasselli. Fissare il carter superiore mediante Il “click” sonoro indica il fissaggio Inserire le guarnizioni sul lato muro e
inferiore di supporto. Montare i moduli superiori una rotazione sul perno indicato. idoneo. vetro.
agganciandoli alla staffa. Massima
libertà di movimento orizzontale.
7 8 9 10 11 12
SAFETY PIN
Insert the top gasket Insert the gaskets and the safety pins Insert the glass inside the canopy. Adjust the inclination of the glass with Apply the lower cover with the gasket Completed job.
Inserire la guarnizione superiore. (adjustable) in the modules. For each Slide the glass until it touches the the specific gaskets and tighten the along the canopy and then add the Lavoro terminato.
glass it is recommended to use 2 stop. Gasket just inserted. safety pins. After adjusting the glass, closing caps.
safety pins. fix all the gaskets. Applicare il carter inferiore con la
Inserire il vetro all’interno della
Inserire le guarnizioni e le spine di Regolare l’inclinazione del vetro con le guarnizione lungo la pensilina e
pensilina. Far scorrere il vetro fino
sicurezza (regolabili) nei moduli. Per apposite guarnizioni e avvitare le spine quindi aggiungere i tappi di chiusura.
in battuta della guarnizione appena
ogni vetro si consigliano nr 2 spine di di sicurezza. Regolato il vetro, fissare
inserita
sicurezza. tutte le guarnizioni.
www.iamdesign.com RIPRODUZIONE VIETATA REPRODUCTION PROHIBITED 5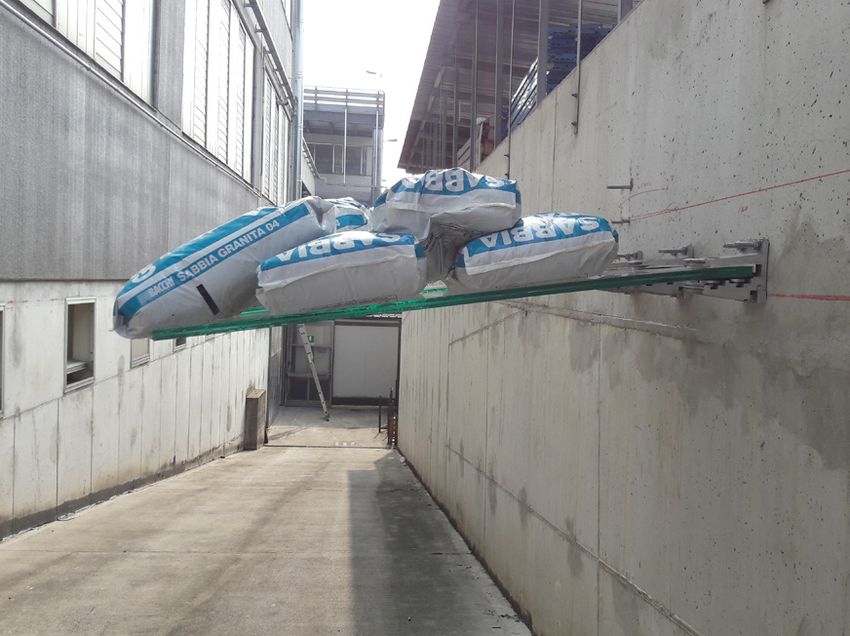
• SMARTGLASS CANOPY - PENSILINA SMARTGLASS
                                                           SMARTGLASS ACCESSORIES - ACCESSORI PER PENSILINA SMARTGLASS
          30 mm                                                  LED SYSTEM COMPONENTS - COMPONENTI LED SYSTEM

• Totally waterproof                    • Totalmente impermeabilizzato                 PVC support for led stripe                              Double sided adhesive tape
• Ultra-bright (over 180 lumens)        • Ultraluminoso (sopra a 180 lumen)            Profilo per sostegno delle strisce led                  Nastro biadesivo

    LED
                           Meter
                                                                                              PVC
                                                                                                                     Length                      BIADHESIVE                           Coil length Dimensions
                           Metro                                                                                     Lunghezza                      TAPE                              L Bobina    Dimensioni
                           Venduti a metro. Lunghezza massima 20 metri
 ELED0020                                                                                  ELED0014                  2000 mm                        E1999892                          33 mt      15 x 1,5 mm
                           Sold by the meter. Maximum length 20 meters

 Input voltage - Input voltaggio                           24 V
 Input current - Input corrente                            154 mA                                                               30 mm                                                            15 mm

 Power - Potenza                                           from/da 3.2 to/a 4 W/m
 Weight - Peso                                             60 g/m
 Life time - Vita                                          35,000h
                                                                                                             10 mm
 Beam angle - Angolo luminosità                            110°
 Luminouse /mt                                             198 lm
 CRI                                                       72                                                                                                       180 mm
 Color temperature - Temperatura del colore                3000°K
 N. Led/18 cm                                              6
                                                                                                              It is possible to cut the LED strip every 18 cm
 Operating T° - T° di esercizio                            -20 C° + 50 C°
                                                                                                              È possibile tagliare la striscia LED ogni 18 cm
 Use - Uso                                                 Indoor/outdoor - Interno/esterno

                                                      APPLICATION OF THE LED STRIP - APPLICAZIONE DELLA STRISCIA LED

                 1                                                             2                                                                   3

             Apply the channel ELED0014 with bi-adhesive                     Seat for LED stripe.                                                Make electrical connections.
             and then insert the LED stripe.                                 Sede per illuminazione LED.                                         Eseguire i collegamenti elettrici.
             Applicare con biadesivo la canaletta
             ELED0014 e successivamente inserire il LED.

    6                                                               RIPRODUZIONE VIETATA			                          REPRODUCTION PROHIBITED                                                   www.iamdesign.com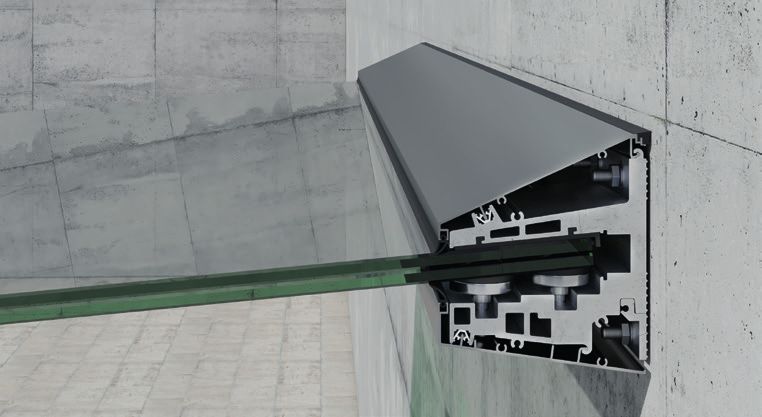
• SMARTGLASS CANOPY - PENSILINA SMARTGLASS
Description
Descrizione
To connect the Led strip to the feeder
ELED0002
Per collegare la striscia Led all’alimentatore
Description
Descrizione
To join two Led strips linearly
ELED0003
Per unire due strisce Led linearmente
Description
Descrizione
To join two Led strips by a 15 cm flexible cable
ELED0004
Per unire due strisce Led con un cavo flessibile di 15 cm
Description
Descrizione
To join two led strips with a 90° elbow
ELED0009
Per unire le strisce led con un angolo fisso a 90°
30 mm 15 mm
Description
Descrizione
To be used at each installation. Protects the end of the strip not connected
ELED0005
Da utilizzare ad ogni installazione. Protegge la fine della striscia non connessa
Feeders
Alimentatori
10 mm
Dimensions POWER
INPUT OUTPUT
Dimensioni POTENZA
100-240VAC 2,2 A +24 V
ELED0100 190 x 52 x 37 mm 100 W < 27 mt
50/60 Hz 4,2 A
100-240VAC 1,2 A +24 V
ELED0110 162,5 x 42,5 x 32 mm 60 W < 16 mt
50/60 Hz 2,5 A
100-240VAC 1,1 A +24 V
ELED0120 148 x 40 x 30 mm 35 W < 9 mt
50/60 Hz 1,5 A
200-240VAC 180
0,3 A mm
+24 V
ELED0130 140 x 30 x 20 mm 18 W < 4 mt
50/60 Hz 0,75 A
Installation Diagram
Utilizzare una pinza per fare pressione Schema di montaggio B
sia dall’alto che nel basso dei connettori C
per unire le strisce di Led A
WELDED
Use a clamp to apply pressure from SALDATO
above and below the connectors to join E
the strips of Leds
ELED0100 - ELED0110
A
ELED0120 - ELED0130 D
B ELED0002
C ELED0004
D ELED0003
E ELED0005 C
www.iamdesign.com RIPRODUZIONE VIETATA REPRODUCTION PROHIBITED 7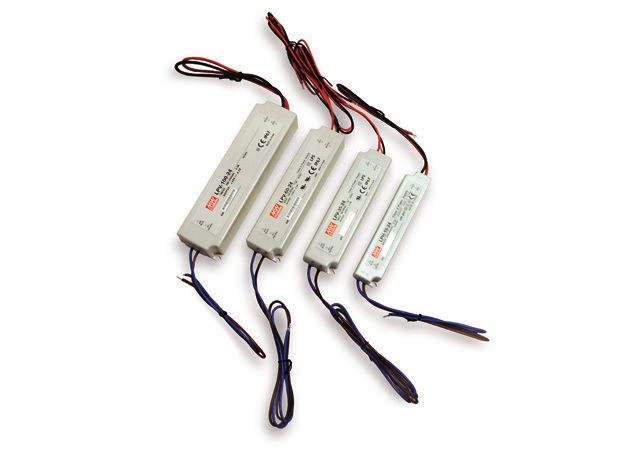
• SMARTGLASS CANOPY - PENSILINA SMARTGLASS

8   RIPRODUZIONE VIETATA			       REPRODUCTION PROHIBITED   www.iamdesign.com

• SMARTGLASS CANOPY - PENSILINA SMARTGLASS
REGULATION AND CERTIFICATIONS - NORMATIVA E CERTIFICAZIONI
The Smartglass canopy has been designed to withstand various static stresses due to
snow load or wind load.
Unlike most canopies on the market, Smartglass also successfully passed the stress tests
resulting from the reversal of the rotating moment due to wind backwash in the area
underneath the glass overhang.
Numerous physical tests have been performed using distributed loads that simulate a
load snow up to 250 kg/sqm and let it work continuously for more than 40 days!
The system has been tested with a load-bearing substructure made of reinforced concrete,
load-bearing masonry or metal beams.
47
In the case of installation on load-bearing masonry, we recommend carrying out pull-out
tests to test the quality of the masonry (service available on request).
CONSECUTIVE TESTING DAYS
GIORNI DI TEST CONSECUTIVI
La pensilina Smartglass è stata progettata per resistere a varie sollecitazioni statiche
dovute al carico neve o al carico vento.
A differenza della maggior parte delle pensiline presenti sul mercato, Smartglass ha
superato con successo anche i test di sollecitazioni derivanti dall’inversione del momento
rotante dovuta dalla risacca del vento nell’area sottostante allo sbalzo in vetro.
Numerosi test fisici sono stati eseguiti utilizzando carichi distribuiti che simulano un
carico neve fino a 250 kg/mq e lasciati agire ininterrottamente per più di 40gg!!
ASK THE TEST CERTIFICATES
Il sistema è stato testato con sottostruttura portante in calcestruzzo armato, muratura CHIEDICI I CERTIFICATI DEI TEST
portante e travi metalliche. RELAZIO
1) OGG
ETTO NE TEC
NICA
La segu
ente relazione
pensiline riguarda
in vetro lo studi
avente o del
Nel caso di installazione su muratura portante, consigliamo di effettuare test di pull-out
profilo
una sporg in allum
enza mass inio da
ima di utilizzare
150 cm. per il
sostegno
SAGO di
MA PRO
FILO
per testare la bontà della muratura (servizio disponibile su richiesta). 15/12/2017
PENSILINA SMART GLASS
Tale profil
o .è in lega
di allum
inio che
ha le
seguenti
caratterist
iche meccanich
e:
Il Tecnico
Ing. Marino Cavallin
_______________________
250
TESTED FOR SNOW LOAD
1
TESTATO PER CARICO NEVE
kg/mq.
TESTED FOR WIND FORCES
COMING FROM BELOW
TESTATO PER CARICO D’ARIA
PROVENIENTE DAL BASSO max 1500
mm
Once installed, the SMARTGLASS canopy resist to the loading stress of 250 kg /sqm with glass up to
1500 mm depth. Verified with glass thickness 10+10+1,52 mm.
Una volta installata, la pensilina SMARTGLASS resiste a 250 Kg/mq con vetri fino a 1500 mm di
profondità. Verificato con vetri di spessore 10+10+1,52 mm.
IN CASE OF ACCIDENTAL RUPTURE OF THE GLASS SHEETS
IN CASO DI ROTTURA ACCIDENTALE DELLE LASTRE DI VETRO
For safety reasons, if the tempered glass panel has a WITH PLASTIC PVB WITH RIGID PLASTIC PVB
standard PVB, it is recommendable to install the canopy at CON PVB STANDARD CON PVB PLASTICO RIGIDO
a height of more than 4 metres.[fig.1] SentryGlas
If instead we use a glass with plastic PVB it is possible to
reduce the height of the shelters up to the desired height
because we have a post resistance even after the breaking
of the glass panel [fig.2]. max 1500 mm
max 1500 mm
> 4000 mm
Per ragioni di sicurezza, se la lastra di vetro temperato ha
un PVB standard è consigliabile installare la pensilina ad
< 4000 mm
un’altezza superiore ai 4 metri. [fig.1]
Se invece si ha in uso un vetro con PVB plastico è possibile
ridurre l’altezza delle pensiline fino alla quota desiderata in
quanto si ottiene una post-resistenza anche dopo la rottura
della lastra di vetro. [fig.2]. [fig.1] [fig.2]
www.iamdesign.com RIPRODUZIONE VIETATA REPRODUCTION PROHIBITED 9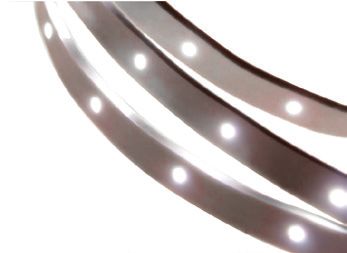
Puoi anche leggere